TrekGuider @trekguider
SF Pride: 6 Route & Party Hacks

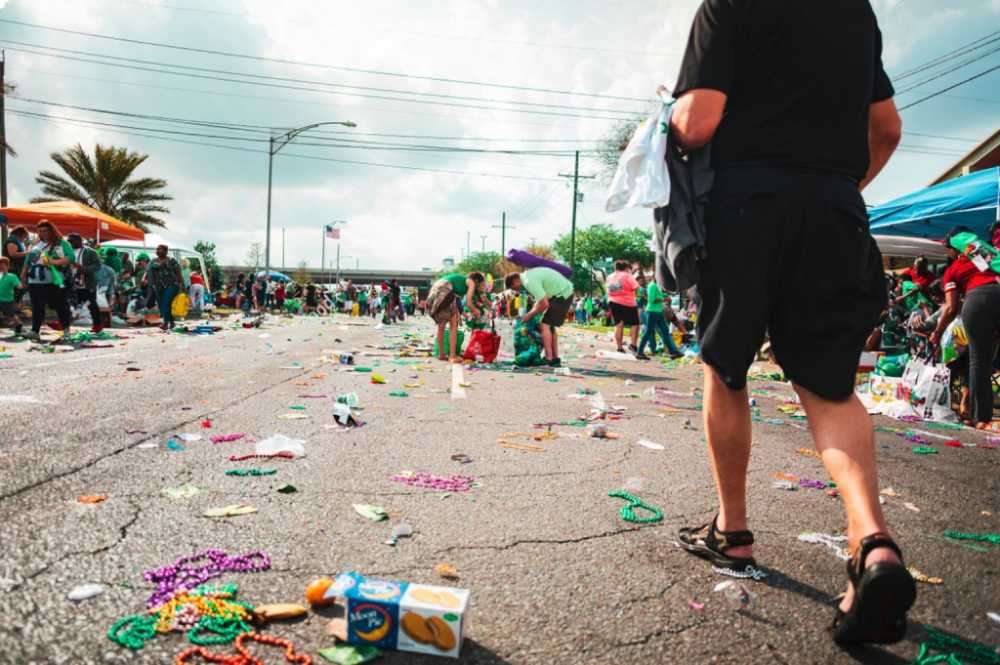
Picture it: a river of rainbow flags, glitter, and pure, unadulterated joy flowing down Market Street. The air thrums with music, cheers, and the collective heartbeat of hundreds of thousands celebrating love, identity, and resilience. This isn't just any parade; this is the legendary San Francisco Pride Parade. But for every person lost in the moment, there's another lost in the crowd, wrestling with a dead phone, a terrible view, and no idea where their friends have vanished. The sheer scale of SF Pride can be overwhelming, threatening to turn a day of pure celebration into a stressful logistical nightmare.
You’ve imagined yourself at the heart of the action, capturing the perfect photo, feeling that powerful sense of community. The reality, however, could be getting stuck behind a seven-foot-tall person, unable to see a single float, with your phone battery blinking at 3% and no cell service to find your crew. The difference between an unforgettable experience and a frustrating ordeal isn't luck—it's preparation. You deserve to experience every ounce of joy this iconic event has to offer, without the chaos and confusion that can so easily derail the day.
This is your definitive guide to conquering the celebration. We’re giving you six battle-tested route and party hacks to navigate the pride parade San Francisco like a seasoned pro. Forget the stress; this playbook ensures you soak in the history, master the logistics, and create memories that will last a lifetime, all while staying safe and comfortable.
Before You Go: Essential Prep for the Pride Parade San Francisco
Before you even think about your rainbow outfit, a little prep work will set the stage for a flawless day. The SF Pride Parade is more than a party; it’s a powerful legacy. Born from the first "gay-in" in 1970 and commemorating the key 1969 Stonewall Uprising, this event has evolved from a protest into a global platform for activism and celebration. In the 1980s, it became a crucial front line for raising AIDS awareness, and today it continues to champion the diverse spectrum of the LGBTQ+ community. Understanding this history enriches the entire experience, transforming it from a spectacle into a meaningful pilgrimage.
The 2026 SF Pride Parade is scheduled for Sunday, the last Sunday of Juneth, with the first contingents stepping off at 10:30 AM. To be ready, your day pack is your most critical asset. Here’s a non-negotiable checklist:
Hydration: Pack a reusable water bottle. There are water stations, but having your own is crucial for staying hydrated in the California sun.
Sun Protection: Sunscreen, a hat, and sunglasses are absolutely essential. There is very little shade along the parade route.
Layered Clothing: San Francisco weather is famously fickle. What starts as a chilly, foggy morning can quickly turn into a warm, sunny afternoon. A light jacket or hoodie you can tie around your waist is the smartest move you can make.
Comfortable Shoes: You will be on your feet for hours, walking and standing. Prioritize comfort over style; your feet will thank you by the end of the day.
Portable Power Bank: Your phone will be working overtime as your camera, map, and communication device. A fully charged power bank is an absolute must-have.
Snacks: While there are food vendors, lines can be long and prices high. Pack some energy bars or other easy-to-eat snacks to keep your energy levels up.
Finally, let's talk safety. SF Pride is known for its strong security measures, including advanced weapon detection technology at key entry points. While organizers work hard to create a secure environment, personal safety matters most in any large crowd. Familiarize yourself with basic protocols, like being aware of your surroundings and keeping your valuables secure. For a comprehensive look at staying safe while traveling, our Solo Female Travel Safety Guide offers invaluable tips that apply to everyone, regardless of gender, in any crowded event scenario.

Hack #1: Master the Market Street Route for the Pride Parade San Francisco
The parade route is deceptively simple: it runs straight down Market Street, starting at Beale Street and culminating at 8th Street, right by the Civic Center Plaza. The challenge isn't knowing the route; it's knowing where on the route to be and when to be there.
The Hack: Arrive by 9 AM and choose your zone strategically. The parade officially starts at 10:30 AM, but the sidewalks begin filling up much earlier. Arriving an hour and a half beforehand allows you to claim a prime spot without having to battle the late-coming masses.
Here’s a breakdown of the route's key zones to help you decide on your ideal viewing experience:
The Starting Zone (Beale to Montgomery Street): This area is often less crowded, especially right at the beginning. You'll see all the contingents when they are fresh, energized, and at their most organized. It’s a fantastic spot for photographers who want clean shots of the floats and performers before the crowds swell. The energy here is one of joyful anticipation.
The Commercial Core (Montgomery to Powell Street): This is the heart of the parade and, consequently, the most packed section. The tall buildings create a canyon-like effect, amplifying the sound and energy. It’s an intense and exhilarating place to be, but not for the faint of heart. If you want to be in the thick of it, this is your spot, but be prepared for a tight squeeze.
The Climax Zone (Powell to 8th Street): As the parade approaches its end at the Civic Center, the energy reaches a fever pitch. This is where the performers give their all, knowing they’re approaching the main celebration. The crowd here is dense but incredibly vibrant. Positioning yourself near 8th Street gives you a head start on moving into the Civic Center Plaza for the post-parade festivities.
Pro-Tip: For a less obstructed view and better photos, try to secure a spot on the south side of Market Street. In the late morning and early afternoon, the sun will be mostly at your back, beautifully illuminating the parade without forcing you to squint. This side is often just slightly less congested than the north side.
Hack #2: The Transportation Game Plan - Ditch the Car, Embrace Public Transit
Let’s be perfectly clear: driving to the SF Pride Parade is a recipe for disaster. Street closures are extensive, parking is virtually non-existent and astronomically expensive, and navigating the gridlock will drain your celebratory spirit before you even arrive.
The Hack: Make BART (Bay Area Rapid Transit) and Muni your best friends for the day. San Francisco’s public transit system is designed to handle massive events like this, and it is by far the most efficient way to get to and from the parade.
Here’s your transit strategy:
BART: The underground trains are the fastest way to get downtown from the East Bay, the Peninsula, or other parts of the city. The key is choosing the right station to exit.
Embarcadero Station: Puts you right near the start of the parade. A great option if you plan to arrive early and watch from the beginning.
Montgomery Station: A perfect middle-ground, placing you in the energetic core of the route. It’s one of the busiest stations, so be prepared for crowds.
Powell Station: Another central option, close to the cable car turnaround and a major shopping area. Like Montgomery, expect it to be very busy.
Civic Center Station: This is your stop if you want to head directly to the post-parade celebration or watch the parade's final leg.
Muni: The city’s network of buses and light rail (Muni Metro) is another excellent choice. The F-Market & Wharves historic streetcar will be rerouted, but the Muni Metro lines run directly under Market Street, using the same stations as BART. Many bus lines will have detours, so be sure to check the SFMTA website or your favorite transit app for real-time updates on the day of the event.
Rideshare services like Uber and Lyft will be operating, but expect heavy surge pricing and designated drop-off/pick-up zones that may be several blocks away from Market Street to avoid the worst of the congestion. Public transit remains the most reliable and cost-effective option.

Hack #3: The Civic Center Celebration - Your Post-Parade HQ
The last float crossing 8th Street doesn't mark the end of the day—it marks the beginning of the next phase. The parade flows directly into the massive Pride Celebration at Civic Center Plaza, a sprawling festival with multiple stages of live music, DJs, inspiring speakers, hundreds of community booths, art installations, and food vendors.
The Hack: Have a concrete plan for navigating the festival, especially for meeting your group. Cell service in and around Civic Center Plaza can become extremely unreliable due to the sheer number of people. A "we'll find each other" approach will likely fail.
Follow these steps for a seamless transition from parade to party:
Establish a Hyper-Specific Meeting Point: Before you separate, agree on a meeting spot that is impossible to mistake. "By the main stage" is too vague. Instead, choose something like, "At the base of the statue of James Lick, on the side facing the library," or "Directly in front of the main entrance to the Asian Art Museum." Set specific times to meet there (e.g., 2 PM and 4 PM).
Pace Yourself and Hydrate: The celebration runs for hours after the parade. It's a marathon, not a sprint. Continue to drink water, find moments of shade, and don't forget to eat.
Explore with Purpose: Don't just wander aimlessly. The community booths are the soul of the celebration. You can connect with dozens of non-profits, activist groups, and local organizations. It’s an incredible opportunity to learn, connect, and find your community.
Know Your Exits: Take a moment upon arrival to orient yourself and identify the main exit points from the plaza. Knowing how to get out quickly in case of an emergency or if you simply feel overwhelmed is a smart move.

Hack #4: Beyond Market Street - Unofficial Parties & Neighborhood Vibes
The official parade and Civic Center festival are the main events, but the spirit of Pride permeates the entire city, becoming a vibrant key element of the city’s festive calendar—a calendar we explore in our broader guide to San Francisco Holidays: Bay Area Buzz.
The Hack: Dip out of the main event for a few hours to experience a different, more intimate side of Pride.
The Castro District: As the historic heart of San Francisco's LGBTQ+ community, the Castro is ground zero for Pride weekend. The streets become a massive, vibrant block party. While it will be just as crowded as the parade, the atmosphere is different—more neighborhood-focused and less structured. Grab a drink at a historic bar, watch the impromptu dance parties, and soak in the history.
Dolores Park: On Pride Sunday, the park's famous "Gay Beach" area expands to cover nearly the entire lawn. It transforms into a massive, sun-drenched picnic party. The vibe is more relaxed and bohemian than the official festival. Pack a blanket, bring some snacks, and enjoy people-watching in one of the city's most beautiful settings.
SoMa (South of Market): This neighborhood is home to many of the city's most famous clubs and venues. Throughout Pride weekend, these spaces host a huge variety of official and unofficial after-parties, from daytime DJ sets to late-night dance events. Check event listings in advance, as many of the most popular parties sell out.

Hack #5: Tech & Safety - Your Digital Toolkit for a Seamless Day
In a modern festival environment, your smartphone is your most powerful tool—if you use it wisely.
The Hack: Prep your phone and apps to be your digital command center for the day.
The Power Bank is Non-Negotiable: We mentioned it before, but it bears repeating. A dead phone means no photos, no map, and no way to contact your friends. A fully charged portable power bank is the single most important piece of tech you can bring.
Master Your Communication Apps: Standard text messages can be delayed when cell networks are overloaded. Use a data-based messaging app like WhatsApp or Signal for your group chat. Their delivery is often more reliable in dense crowds. Use the "Share Live Location" feature for a set period (e.g., 15 minutes) if you get separated and need to find your way back to your group.
Download Offline Maps: Before you leave home, download an offline map of the downtown San Francisco area in your map app of choice. Even if you lose all cell service, your phone's GPS will still work, allowing you to see your location on the map and navigate.
Embrace Official Resources: Check the official SF Pride website in the days leading up to the event. If they release an official app, download it. It will likely have the most accurate schedules, maps, and emergency alerts.
Pro-Tip: Take a screenshot of your planned meeting spots, the parade route map, and the contact info for everyone in your group. Create a dedicated photo album for these screenshots so you can access them instantly, even if your apps won't load due to poor connectivity.

Hack #6: The Exit Strategy - How to Leave Without the Headache
Just as important as your arrival plan is your exit strategy. When hundreds of thousands of people try to leave the same area at the same time, the public transit stations and rideshare zones become incredibly congested.
The Hack: Avoid leaving during the peak rush right as the festival winds down.
You have two primary strategies for a stress-free departure:
The Early Exit: If you've had your fill of the crowds and the main celebration, start making your way out before the final headliners take the stage at Civic Center. By leaving an hour before the official end time, you can beat the massive wave of people heading for the BART and Muni stations.
The Patient Wait: This is often the better option. Instead of rushing out with everyone else, wait it out. Find a restaurant or cafe a few blocks away from Civic Center, grab a bite to eat, and relax for an hour or so. Let the crowds on the transit platforms thin out. By the time you're done, your journey home will be far more pleasant.
If you're using a rideshare service, walk at least four or five blocks away from Market Street and Civic Center before you even attempt to request a ride. This will get you out of the most congested, no-pickup zones and will likely save you from the highest surge pricing.
Your Guide to an Unforgettable Pride
You are now armed with the knowledge to do more than just attend the pride parade San Francisco —you are ready to experience it with confidence, joy, and a sense of empowered preparedness. From mastering the Market Street route and navigating the Civic Center celebration to knowing the smartest ways to get there and back, you have the tools to craft a perfect day. This isn't just about avoiding stress; it's about creating space for the powerful moments of connection, celebration, and solidarity that define SF Pride. Go forth, celebrate loudly, and have an incredible time.
For a complete blueprint to planning your ultimate trip to the Bay Area, including deep dives into its other iconic holidays and hidden gems, be sure to explore our comprehensive Travel Guide.
Meta Data Suggestions:
SEO Meta Title: SF Pride: 6 Essential Hacks for the Parade Route & Parties
URL Slug: sf-pride-parade-route-party-hacks
SEO Meta Description: Master the SF Pride Parade! Get 6 expert hacks on navigating the Market Street route, finding the best parties, and staying safe in the crowds.
Travel News


Comments 0
No comments yet
Be the first to share your experience!
You May Also Like

San Francisco Cherry Blossoms: A Local's Guide to the Blooms

Halloween SF: Haunts Without Horrors

SF Festivals: 7 Must-See Lineups

Christmas SF: Lights & Wharf Wonders

Chinese New Year SF: Parade Essentials

San Francisco Holidays: Bay Area Buzz
TrekGuider @trekguider
St. Patrick's NOLA: Irish Parade Hacks

You’ve heard the stories. St. Patrick’s Day in New Orleans isn’t just another parade awash in green beer and flimsy shamrocks; it’s a legendary, full-contact cultural spectacle. But the idea of diving into that joyous chaos unprepared feels… daunting. You’re worried you’ll miss the real experience, get swallowed by the crowds, and fail to grasp the wonderfully weird traditions that make this celebration one of the most unique in the country. You have a vision of what a parade should be, but you’re quickly realizing New Orleans wrote its own rulebook.
Now, picture it: you’re standing on the curb, shoulder-to-shoulder with thousands, feeling completely overwhelmed. You’re stuck behind a wall of people, unable to see the floats. Suddenly, a cabbage soars over your head, followed by a potato, and you’re left utterly baffled while seasoned locals expertly snag the flying produce. The day feels more like a bizarre grocery giveaway than the festive celebration you imagined. You’re not just a spectator; you’re an outsider, missing the inside jokes and the best throws, completely disconnected from the vibrant energy pulsing through the vibrant energy pulsing through the Irish Channel.
This is your insider’s playbook for unlocking that magic. We’re not just giving you tips; we’re turning you into a parade pro. Together, we’ll deconstruct every wonderfully weird tradition, from the real story behind the flying cabbages to the strategic sweet spots along the route that locals covet. This is your definitive guide to mastering the best St Patrick's day USA celebration, NOLA-style—a key part of the city's festive calendar, which is just one of the incredible events we detail in our master guide to New Orleans Holidays: Cultural Feasts.
The Emerald Isle Meets the Big Easy: Why NOLA's Parade is an Unforgettable Experience
While cities across America celebrate St. Patrick’s Day, New Orleans infuses the holiday with its own unmistakable Creole and Cajun soul. The tradition here is deep-rooted, with parades marching through the city’s streets since 1809, a historical institution honoring the significant Irish heritage that began with waves of immigrants who arrived in the 1800s to dig the city's vital canals.
What truly sets the New Orleans experience apart is how it blends reverence with the city’s signature laissez les bons temps rouler (let the good times roll) philosophy. It’s less about solemnity and more about a joyous, community-wide block party that sprawls across multiple days.
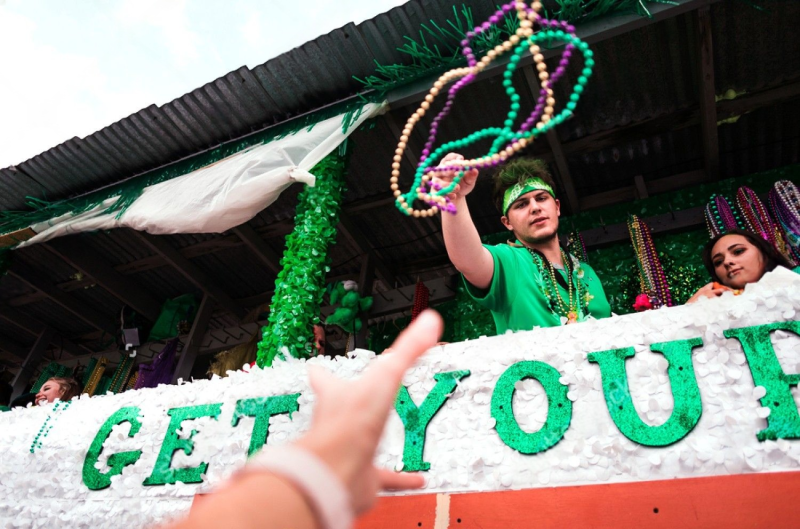
But the single most defining feature—the one that transforms spectators into active participants—is the throws. While Mardi Gras is famous for beads and doubloons, St. Patrick’s Day parades are legendary for their produce. Float riders don’t just toss trinkets; they hurl the ingredients for a traditional Irish stew. Cabbages, carrots, potatoes, onions, and even lemons fly through the air, turning the parade route into the world’s most chaotic and exciting open-air market. This tradition elevates the event from a simple procession to an interactive, and slightly absurd, cultural ritual you won’t find anywhere else.
A Tale of Two Cities: NOLA Throws vs. Chicago's Green River
To truly appreciate the uniqueness of New Orleans, it helps to compare it to another iconic St Patrick's day USA celebration: Chicago. Chicago is world-famous for dyeing its river a brilliant emerald green, a tradition since 1962 where plumbers unions dump 40-60 pounds of a secret vegetable-based powder into the water. It’s a stunning visual spectacle, a passive and beautiful city-wide display.
New Orleans, by contrast, is all about active participation. There’s no passive viewing here. You are part of the show, tasked with catching your dinner. It’s a grassroots, tangible, and slightly wild experience that reflects the city’s hands-on approach to celebration. One is a beautiful painting; the other is an interactive sport.
The Main Event: Hacking the Irish Channel St. Patrick's Day Parade
The crown jewel of the city's celebrations is the Irish Channel St. Patrick's Day Parade. This is the big one, a sprawling, vibrant procession that winds through the historic neighborhood settled by Irish immigrants. To conquer it, you need a game plan.
Mark Your Calendar: Date and Time Essentials
First things first: the parade rarely falls on the actual holiday. To maximize attendance and party potential, organizers schedule it for the Saturday before St. Patrick's Day.
2026 Parade Date: Saturday, the Saturday before St. Patrick's Day
Start Time: 1:00 PM
While the parade officially kicks off at 1 PM, the neighborhood festivities begin much earlier. The Irish Channel transforms into a massive block party by mid-morning, with residents setting up elaborate camps, cooking, and celebrating on the streets. Arriving early isn't just a recommendation; it's essential to soaking in the full, authentic atmosphere.
The Route Decoded: Where to Plant Your Feet for Prime Loot
The parade traditionally begins at the corner of Felicity and Magazine Street, weaving its way through the heart of the Irish Channel. Choosing your viewing spot is the most critical decision you'll make. Your choice will dictate your experience, from crowd density to your chances of catching a prized cabbage.
The Starting Blocks (Near Magazine and Jackson):
Pros: The energy here is absolutely electric. The floats are fully stocked, and the riders are fresh and eager to throw. You'll get the first crack at the best loot.
Cons: This is the domain of the hardcore parade-goer and often the most crowded section. You'll need to arrive exceptionally early (think 9:00 AM) to claim a prime spot. It can be intense and less suitable for families with small children.
The Middle Ground (Along Magazine Street, between Washington and Louisiana):
Pros: The crowds tend to thin out slightly as you move down the route. It offers a fantastic balance of high energy and slightly more breathing room. This is the strategic sweet spot for actively trying to catch throws without the extreme competition of the starting line.
Cons: By this point, some of the most unique throws may have already been tossed. You'll still need to be assertive to get the attention of the float riders.
The Final Stretch (Approaching Jackson Avenue on the return):
Pros: This area is typically the most family-friendly and least congested. It's a more relaxed atmosphere, perfect for those who want to enjoy the spectacle without being in the thick of it. Float riders often unload the last of their throws here, leading to a final, glorious frenzy of produce.
Cons: The parade has been going for a while, and the energy might be slightly lower. The selection of throws will be whatever is left over.
The Art of the Catch: Mastering the Vegetable Throws
Catching a cabbage is a New Orleans rite of passage. It requires more than just luck; it demands technique, awareness, and a bit of shameless enthusiasm.
Gear Up: Forget flimsy plastic bags. Bring a sturdy, reusable tote bag or even a small backpack. A flying cabbage has some heft, and you don't want your bag to break mid-parade.
Make Eye Contact: Float riders are scanning the crowd for enthusiastic targets. Don't just stand there passively. Wave your hands, shout, and make direct eye contact with a rider. Point to yourself or your bag. The more engaged you are, the more likely you are to be rewarded.
Create a Target: Hold your bag open and high. Make it an easy and inviting target. Some locals even create small, decorated nets on poles to extend their reach and stand out from the crowd.
Mind Your Surroundings: This is a full-contact sport. Be aware of the people around you. A cabbage flying into a dense crowd can cause a pile-up. Give your neighbors space and be prepared to move. Never, ever dive onto the ground for a rolling potato—it's not worth the risk.
The "Thank You" Rule: If a rider tosses something directly to you, give them a thumbs-up or a wave of thanks. It’s part of the friendly spirit of the day.

Your St. Patrick's Day USA Survival Kit: Pro-Level Parade Hacks
Showing up is one thing; showing up prepared is another. A little planning transforms a potentially stressful day into a seamless and memorable adventure. Treat it like a mission, and pack accordingly.
Arrive Early, Win the Day
We can't stress this enough. For a 1:00 PM parade, you should aim to be in the Irish Channel and finding your spot no later than 10:00 AM. The streets close to traffic early, and the neighborhood fills up fast. Arriving early allows you to claim a good piece of curb, set up your "base camp" with chairs and a cooler, and enjoy the building atmosphere of the block party before the main event even begins.
The Parking Predicament: Getting There and Back
Driving directly to the parade route is a rookie mistake that will lead to nothing but frustration. Parking is virtually non-existent, and street closures create a labyrinth of dead ends.
Rideshare Smartly: Use a rideshare service like Uber or Lyft, but set your drop-off point several blocks away from Magazine Street. This will help you avoid surge pricing and getting stuck in gridlock.
Take the Streetcar: The St. Charles Streetcar is a scenic and practical option. It runs parallel to the parade route, just a few blocks away. Get off around Jackson Avenue or Washington Avenue and walk toward the river.
Park and Walk: If you must drive, park in the Central Business District (CBD) or the Lower Garden District and enjoy a 15-20 minute walk into the Irish Channel. Reserving a spot in a garage ahead of time using a parking app is a wise investment.
Dress the Part (and for Comfort)
Your attire is both festive and functional. While wearing green is practically mandatory, your comfort should be the top priority.
Footwear is Everything: You will be on your feet for hours, standing, walking, and dodging flying vegetables. Wear your most comfortable, broken-in sneakers or boots. This is not the day for new shoes or anything with a heel.
Layer Up: New Orleans weather in March can be unpredictable. It might be cool and breezy in the morning but warm and sunny by the afternoon. Wear layers—a t-shirt, a long-sleeved shirt, and maybe a light jacket—that you can easily shed as the day warms up.
Sun Protection: Even on a cloudy day, the sun can be strong. Bring sunscreen, a hat, and sunglasses to avoid a post-parade sunburn.
Essential Gear for Your Parade Pack
A well-stocked bag is the mark of a parade veteran. Here’s a checklist of must-have items:
Sturdy Reusable Bag: For all the throws you’re going to catch.
Water and Snacks: Stay hydrated and energized. While vendors are around, having your own supply saves time and money.
Sunscreen & Sunglasses: Protect yourself from the elements.
Portable Phone Charger: Your phone battery will drain quickly from taking photos and trying to find friends in spotty service areas.
Hand Sanitizer and Wipes: Essential for quick clean-ups before you eat.
Cash: Many local food and drink vendors may be cash-only.
A Festive Attitude: The most important item. Embrace the chaos and have fun!
Pro-Tip: Establish a clear, non-movable meeting point with your group before you arrive. Cell service can be spotty in large crowds. Pick a specific storefront or street corner a block or two away from the main route, like "the corner of Constance and First Street," as your emergency regroup spot.
Beyond the Parade: Extending the Celebration
The parade is the main course, but the celebration is an all-day feast. Don't just leave when the last float passes. The block party in the Irish Channel rages on for hours afterward, with music, food, and dancing in the streets.
Many of the neighborhood's iconic pubs, like Tracey's or Parasol's, become ground zero for the festivities, serving up green beer and classic New Orleans fare. Be prepared for long lines, but the vibrant atmosphere is worth the wait. Exploring the side streets off Magazine can also lead you to smaller, less-crowded neighborhood bars where you can catch your breath and celebrate with locals.
Planning a family trip for the parade can be a lot to juggle. If you're flying in with little ones, the logistics can feel overwhelming. Our Stress-Free Flying with Kids Guide provides a complete checklist to make your journey as smooth as the parade is fun.
Pro-Tip: The "throws" aren't just for show. Locals actually use the cabbages, potatoes, and onions to cook their St. Patrick's Day meal of corned beef and cabbage. Catching your ingredients is the ultimate NOLA experience!

Safety First: Navigating the Crowds Like a Pro
With any large-scale event, safety matters most. The St. Patrick's Day parade is overwhelmingly safe and friendly, but it's wise to be prepared.
Use the Buddy System: Never wander off alone. Stick with your group and keep track of each other, especially in the densest parts of the crowd.
Stay Hydrated: It's easy to get dehydrated, even on a cooler day. Alternate alcoholic beverages with plenty of water throughout the day.
Respect the Floats: The most important rule of any New Orleans parade is to never run into the street or chase after a float. The floats are massive, and their operators have limited visibility. Let the throws come to you.
Supervise Children: If you have children with you, keep a close eye on them at all times. Using a ladder can provide a safer, elevated viewing spot, but ensure it's placed a safe distance back from the curb.
Mastering a single event is one thing, but truly understanding the soul of American celebrations requires a deeper dive. For comprehensive strategies on navigating everything from Mardi Gras to the Macy's Thanksgiving Day Parade, our master Travel Guide is the ultimate resource for any serious traveler.
Your Green Light to an Unforgettable Day
You are now armed with the knowledge to do more than just attend the St. Patrick's Day parade in New Orleans—you are ready to conquer it. You know that the real prize isn't just a plastic cup or a string of beads, but a cabbage caught mid-air. You understand that arriving early, choosing your spot wisely, and packing smart are the keys to a perfect day. You are no longer a tourist destined to be confused on the sidelines; you are an informed participant, ready to dive headfirst into one of the most unique and exhilarating St Patrick's day USA celebrations.
Now you have the hacks. Go out there, wear your green with pride, make eye contact with a float rider, and prepare to catch your dinner. The Big Easy is waiting to show you how it’s done.
Travel News
Comments 0
No comments yet
Be the first to share your experience!
You May Also Like
San Francisco Cherry Blossoms: A Local's Guide to the Blooms
Halloween SF: Haunts Without Horrors
SF Festivals: 7 Must-See Lineups
Christmas SF: Lights & Wharf Wonders
Chinese New Year SF: Parade Essentials
San Francisco Holidays: Bay Area Buzz
TrekGuider @trekguider
11 Best Family Travel Blogs for Real Advice

Planning a family vacation feels like it should be an act of joy, but let's be honest—it often descends into a frantic, late-night scroll for answers. You’re drowning in a sea of generic travel advice that simply doesn’t grasp the logistical chaos of navigating an airport with a Tasmanian-devil toddler or the complex psychological warfare of convincing a teenager that a family hike is, in fact, “cool.” You waste hours sifting through posts, a knot of anxiety tightening in your stomach that you’re about to invest your hard-earned money and precious vacation time into a trip that leads to meltdowns for everyone involved. The stress of planning is actively poisoning the very joy you’re trying to create.
What if you could bypass the noise? Imagine tapping directly into a brain trust of seasoned parents who have already navigated these minefields and documented the solutions. Picture finding field-tested, practical advice tailored specifically to your kids’ ages and your family’s unique travel style. This curated list of the best family travel blogs is your direct line to that expertise. While our comprehensive guide to The Best Travel Blogs to Follow in 2026 provides a 30,000-foot view of the entire industry, this article is your specialized ground-level playbook. These are the voices of experience that will help you transform travel chaos into cherished, lifelong memories.
Why Age-Specific Advice is the Key to Family Travel Harmony
Let’s start with a hard truth: the single biggest strategic blunder parents make is assuming "family travel" is a monolith. The reality is that the challenges of traveling with a three-year-old are worlds apart from those of traveling with a fifteen-year-old. As extensive travel industry analysis shows, their needs are fundamentally, diametrically opposed.
Traveling with Toddlers (Ages 1-4): This stage is a masterclass in logistics. The challenges are overwhelmingly physical. Success is measured by your ability to manage rigid nap schedules that are easily derailed, your patience while providing constant supervision for a mobile being with zero sense of danger, and your sheer strength hauling the mountain of required gear—strollers, car seats, diapers, and specialized snacks.
Traveling with Teenagers (Ages 13-18): In stark contrast, the hurdles with teens are primarily psychological and social. This is a game of diplomacy. Victory lies in respecting their craving for independence, granting them downtime away from the family unit, and accepting that their need for reliable WiFi is a non-negotiable part of their travel hierarchy, right alongside food and shelter.
The best family travel blogs don’t just understand this distinction; they build their entire content strategy around it. They provide targeted, actionable solutions to these distinct, age-related pain points, making them an indispensable resource for any parent.

Best Family Travel Blogs for the Toddler & Little Kid Years
This is the age of pure logistics, where the right advice can be the difference between a smooth, joyful trip and a full-blown, public tantrum. These blogs are the undisputed masters of the practical, offering the checklists, packing guides, and sanity-saving strategies you desperately need.
1. Ytravelblog
Run by Australian veterans Caz and Craig Makepeace, Ytravelblog is an institution built on over a decade of trust and real-world experience. They’ve been traveling with their two daughters since they were toddlers, and their content has an incredibly reassuring "we've-been-there" quality that instantly puts parents at ease.
Why They Made Our List:
Honest & Relatable: They excel at addressing the tough, unspoken questions, as evidenced by their iconic post, "
Long-Term Perspective: They offer a rare look at how travel evolves as kids grow, providing wisdom that applies far beyond a single trip.
Balanced Content: They seamlessly cover everything from epic road trips to relaxing resort stays, making them a perfect resource for families who enjoy a variety of travel styles.
2. The Jetsetting Family
Rod, a full-time traveling dad, offers a refreshingly hands-on perspective on family adventure. The Jetsetting Family has become a go-to for parents of toddlers, with unbelievably detailed guides on the nitty-gritty of air travel and packing.
Why They Made Our List:
Logistical Mastery: Their content on managing flights, from booking the right seats to surviving security, is a masterclass in preparation.
Dad's Perspective: Rod’s voice provides a different and valuable viewpoint in a niche often dominated by moms.
High-Quality Visuals: Their video content is especially helpful, showing you exactly how they pack and navigate airports.

3. Marcie in Mommyland
Specializing in travel with babies, toddlers, and preschoolers, Marcie offers some of the most comprehensive and visually appealing content online. Her blog is a goldmine for parents in the demanding early stages of family travel.
Why They Made Our List:
Niche Expertise: Her laser focus on the 0-5 age range means every piece of advice is hyper-relevant and practical.
Product Recommendations: She provides genuinely helpful reviews of travel gear for little ones, saving parents time and money.
Destination Guides for Little Kids: She expertly breaks down popular destinations like Paris and London from the perspective of a parent with a stroller and a diaper bag.
4. Wandering Wagars
Kevin and Christina Wagar are living proof that having kids doesn’t mean the end of adventure. Their blog is a shot of inspiration for parents who want to introduce their young children to diverse, culturally rich experiences from an early age.
Why They Made Our List:
Confidence Building: Their post, "" is packed with actionable advice that empowers hesitant new parents to take that first big trip.
Adventure Focus: They show you how to do more adventurous activities, like caving or hiking, safely with young kids.
Cultural Immersion: They prioritize connecting with local cultures, setting a fantastic example for raising global citizens.
Ready to Conquer the Skies?
For most parents of young children, the flight is the single most daunting part of the entire trip. The thought of keeping a toddler entertained in a confined space for hours, dealing with ear pressure, and avoiding meltdowns at 30,000 feet can be overwhelming. But it doesn't have to be. We’ve compiled the ultimate playbook from experts who have it down to a science.
Download our FREE guide: Stress-Free Flying with Kids Guide and get field-tested tips on booking, packing, and in-flight strategies to ensure a smooth journey for the whole family.
Best Family Travel Blogs for Navigating the Teen Years
Once you enter the teen years, vacation success becomes less about physical logistics and more about masterful diplomacy. It’s a delicate dance of balancing family time with a teenager’s deep-seated need for a teenager’s deep-seated need for independence. These blogs get it.

5. Kids Are A Trip
Created by Kirsten, this blog is an exceptional resource for parents who are past the stroller phase and firmly in the eye-rolling years. She has a real talent for finding activities that genuinely engage the notoriously hard-to-please teenage demographic.
Why They Made Our List:
Teen-Approved Activities: Her content, like "," goes far beyond the obvious tourist traps to find experiences teens will actually enjoy and remember.
Multi-Generational Focus: She provides great ideas for trips that will satisfy everyone from a 14-year-old to a 70-year-old grandparent.
Practical Itineraries: Her sample itineraries are realistic, well-paced, and leave room for the downtime teens desperately need.
6. Ciao Bambino
For families seeking expertly planned, immersive, and often luxurious trips, Ciao Bambino operates in a class of its own. While they cover all ages, their true strength lies in crafting complex itineraries that appeal to multi-generational groups with teens.
Why They Made Our List:
Deep Destination Expertise: Their " " showcases an incredible ability to blend history, food, and culture in a way that captivates every member of the family.
Vetted Recommendations: They have a team of advisors who vet every hotel and activity, providing a level of trust you can count on. It’s this level of curated expertise that inspires the hyper-detailed itineraries you can find from creators on the TrekGuider Platform.
Problem Solving: They excel at solving complex travel puzzles, like planning a trip for a large family with diverse interests and age ranges.
7. Earth Trekkers
The family behind Earth Trekkers—Julie, Tim, and their now-teenage kids Tyler and Kara—have documented their global travels for years. Because their audience has watched their children grow up, their blog serves as a fascinating and incredibly useful roadmap for how family travel evolves over time.
Why They Made Our List:
Real-Time Evolution: They offer an authentic, long-term perspective on transitioning from travel with little kids to travel with independent teens and young adults.
Adventure & Education: They masterfully blend adventure (like hiking in U.S. National Parks) with world schooling and historical context.
Exceptional Photography & Itineraries: Their content is not only inspiring but also carefully detailed, providing a clear path for readers to follow in their footsteps.
Pro-Tip: The #1 piece of advice from blogs that successfully travel with teenagers is to give them ownership. Involve them in the planning process. Let them choose the destination for one day, research the restaurants, or be the official navigator. This simple act of giving them control drastically reduces apathy and disinterest.
How to Vet a Family Travel Blog for Yourself
While our list is a great starting point, knowing how to spot a truly high-quality resource is a skill that will serve you well. Here’s a quick framework based on how our experts evaluate blogs:
Look for Niche Specificity: Does the blogger claim to be an expert on everything, or do they have a clear focus? The best advice often comes from someone who has gone deep on a specific topic, whether that’s RV travel with kids or navigating Disney World with a child who has sensory issues.
Check for Real Community Engagement: Don't just look at follower counts. Read the comments. Does the blogger respond thoughtfully to reader questions? A thriving comment section is a strong signal that the creator has built a genuine, trusting community.
Is the Advice Actionable? Inspirational photos are nice, but the best family travel blogs provide advice you can actually use. Look for detailed budget breakdowns, specific packing lists, and step-by-step instructions. If you finish an article feeling empowered to take action, you’ve found a great resource.

Frequently Asked Questions About Family Travel Blogs
How do family travel blogs make money?
Professional family travel blogs typically use a mix of monetization methods. The most common are affiliate marketing (earning a commission when you buy a product they recommend, like a hotel or travel gear), display advertising (the ads you see on the page), sponsored posts (where a brand pays them to feature a destination or product), and selling their own digital products, like detailed itineraries or travel planning guides.
Is it really safe to take young kids to "adventurous" destinations?
Absolutely, with the right planning and precautions. Blogs like Wandering Wagars and Earth Trekkers are fantastic resources for this. They demonstrate how to approach adventure travel responsibly by choosing age-appropriate activities, prioritizing safety, and managing risk. Their content shows that adventure is scalable and can be an incredible way to build resilience and confidence in kids.
What's the best way to budget for a family trip?
The most effective strategy, echoed by many top travel bloggers, is the "Pay Yourself First" model. This involves setting up a dedicated high-yield savings account for travel and scheduling automatic monthly transfers. You treat your travel fund as a non-negotiable expense, just like a mortgage or car payment. This ensures you’re consistently saving rather than just hoping there’s money left over at the end of the month.
Pro-Tip: When reading any blog, always look for authenticity. The best creators share the highs and the lows. A blogger who admits to a travel mishap or a day when the kids were just not having it is often more trustworthy than one who presents a picture-perfect, flawless feed.
Your Adventure Awaits
The overwhelming task of planning a family trip becomes infinitely more manageable—and even joyful—when you have the right guides. The creators behind these exceptional family travel blogs offer more than just glossy photos and destination ideas; they provide a real-world roadmap for navigating the beautiful, chaotic, and profoundly rewarding journey of exploring the world with your children. They’ve done the trial and error so you don’t have to. By arming yourself with their expert advice, tailored to your family's specific stage and style, you're not just planning a vacation—you're setting the stage for a lifetime of shared adventures.

Meta Data Suggestions:
SEO Meta Title (58 chars): 11 Best Family Travel Blogs for Real Advice (2026 Guide)
URL Slug: best-family-travel-blogs
SEO Meta Description (154 chars): Ditch generic tips. Discover the top 11 family travel blogs with real, field-tested advice for toddlers, teens, and every travel style in between.
Travel News
Comments 0
No comments yet
Be the first to share your experience!
You May Also Like

FTC Affiliate Disclosure: Stay Compliant as a Travel Creator

Essential Affiliate Tools: From Tracking to Full Optimization

Avoid These 5 Affiliate Landing Page Mistakes for Better Conversions

Affiliate Keyword Research Mastery for Travel Blogs

Booking.com Affiliate Review: Pros, Cons & Earnings

Decoding Affiliate Commission Rates: Benchmarks for Travel Creators
TrekGuider @trekguider
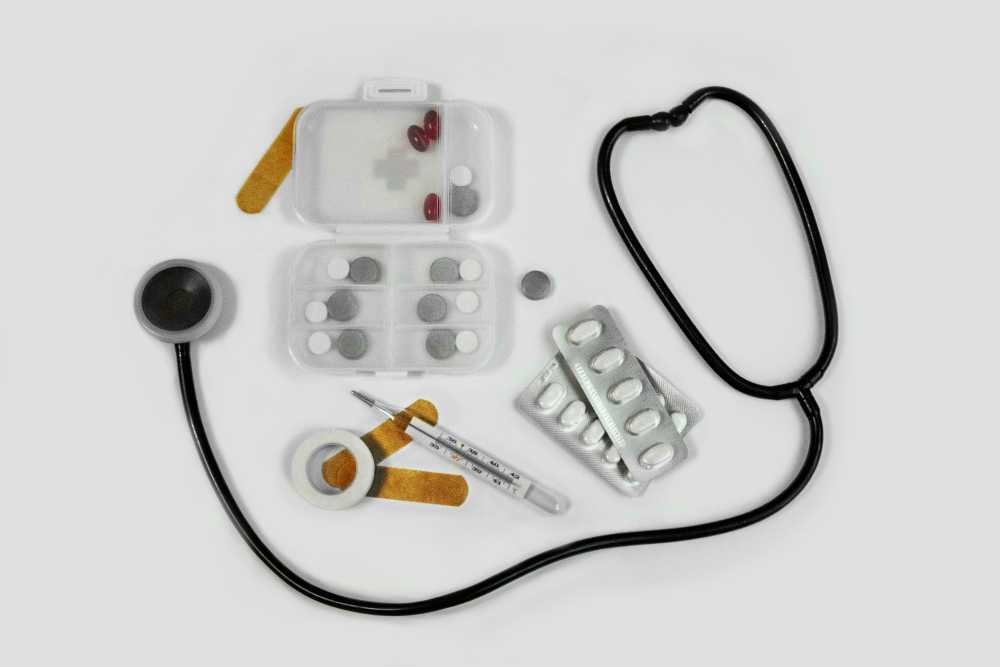
The Ultimate Travel First Aid Kit Checklist (2026)
But it doesn’t have to be that way. The single most powerful tool for ensuring a healthy, stress-free journey is one you create before you even leave home: a comprehensive travel first aid kit. This isn’t just a box of bandages; it’s a personalized arsenal of preparedness that empowers you to handle common health issues with confidence and ease. Building your own kit is at the heart of the proactive mindset we cover in our comprehensive The Ultimate Guide to Travel Safety: A 2026 Playbook. Think of this guide less as a simple shopping list and more as a masterclass in preparedness, backed by pharmacist-approved advice to help you build the ultimate defense against travel’s minor medical curveballs.
DIY vs. Pre-Made: Which Travel First Aid Kit is Right for You?
Before we dive into the specific items, it’s worth considering whether to build your kit from scratch or buy a pre-made one.
Pre-Made Kits: These offer undeniable convenience. They come in a compact case and provide a decent baseline of supplies. However, they are often filled with low-quantity, generic items and may lack the specific medications you need for your trip.
DIY Kits: Building your own kit requires a bit more effort upfront but is superior in every other way. It allows you to choose high-quality brands, pack sufficient quantities, and tailor the contents specifically to your destination, your planned activities, and your personal health needs.
Our recommendation? Start with a high-quality pre-made kit as your base and then use this checklist to supercharge it, swapping out generic items and adding the crucial medications and tools it’s missing. This hybrid approach gives you the best of both worlds.
The Core Components of Your Ultimate Travel First Aid Kit
A truly effective travel first aid kit is organized like a mobile clinic, with specific supplies to treat the most common categories of travel-related ailments. Here is the definitive breakdown of what you need.
Wound & Burn Care: For Life's Little Scrapes
From a papercut to a scraped knee on a cobblestone street, any break in the skin is an open invitation for infection, especially in new environments. Here’s how you shut that door, fast.
Antiseptic Wipes (BZK or alcohol-based): For cleaning wounds, scrapes, and your hands before providing treatment. Individual packets are perfect for travel.
Antibiotic Ointment (e.g., bacitracin): A crucial step to prevent infection in minor cuts, scrapes, and burns after cleaning.
Assorted Adhesive Bandages: Pack a variety of sizes. Fabric bandages are generally more durable and flexible than plastic ones.
Butterfly Bandages / Wound-Closure Strips: Essential for taping the edges of a minor cut together to help it heal cleanly.
Sterile Gauze Pads and a Roll of Gauze: For dressing larger wounds or as a compress to control bleeding. Pack a few different sizes.
Medical Adhesive Tape: To secure gauze and bandages in place.
Moleskin or Blister Treatment Pads: An absolute lifesaver for any trip involving significant walking or hiking. Apply it as soon as you feel a "hot spot" to prevent a blister from forming.
Aloe Vera Gel: Provides soothing relief for minor sunburns.
Pain, Fever & Sprains: Managing Aches and Injuries
Long days of sightseeing, sleeping in unfamiliar beds, and carrying luggage can lead to aches and pains. Be prepared to manage them effectively so they don't slow you down.
Pain Relievers/Fever Reducers: Pack both an ibuprofen-based and an acetaminophen-based option. Pharmacists consistently recommend trusted brands like Advil/Motrin (Ibuprofen) for inflammation and pain, and Tylenol (Acetaminophen) for general pain and fever.
Aspirin: While not for general pain relief for everyone, a dose of aspirin can be life-saving for an adult experiencing symptoms of a heart attack.
Elastic Wrap Bandage: Invaluable for providing support and compression to a sprained ankle, wrist, or knee.
Instant Cold Packs: These single-use packs are activated by squeezing them and are excellent for reducing swelling from sprains, strains, and other minor injuries in the first 24-48 hours.
Pro-Tip: Decant pills into small, clearly labeled travel containers to save space, but take a photo of the original packaging first. This helps you remember dosages and provides information for pharmacists or doctors abroad if needed.

Digestive Issues: Your Defense Against Traveler's Diarrhea
Let’s be direct: traveler’s diarrhea is the single most common illness to strike travelers, affecting up to 80% of visitors in some destinations. Having a dedicated section in your kit to manage digestive distress is absolutely critical.
Anti-diarrhea Medication: To manage symptoms when you need to travel or get through a planned activity. The top pharmacist-recommended brand is Imodium (Loperamide).
Antacids: For relief from indigestion, heartburn, and general upset stomach. Pepto-Bismol is another pharmacist-favorite that can also help with mild diarrhea.
Oral Rehydration Salts: This is arguably the most important item in this section. Dehydration is the primary risk of diarrhea and vomiting. These pre-measured packets mix with safe, bottled water to replenish the essential fluids and electrolytes your body has lost.
Anti-nausea or Motion Sickness Medication: Essential if you’re prone to motion sickness on planes, boats, or winding bus rides.
Allergies, Bites & Skin: Soothing Irritations
New environments mean new pollens, unfamiliar insects, and different plants. Be ready to tackle itches, rashes, and allergic reactions before they become a major annoyance.
Antihistamine (e.g., diphenhydramine): For treating allergic reactions, hives, and severe itching. Note that some antihistamines can cause drowsiness.
Hydrocortisone Cream (1%): A topical steroid cream that provides fast relief from the irritation and itching of rashes and insect bites.
Insect Repellent: In any region with mosquito-borne illnesses like Dengue or Malaria, this is as important as your passport. Choose a repellent with an effective active ingredient like DEET or Picaridin.
Epinephrine Auto-Injector (e.g., EpiPen): This requires a prescription and is absolutely essential for travelers with a history of severe allergic reactions (anaphylaxis).
Ready to Pack Like a Pro?
Your travel first aid kit is a critical piece of your travel puzzle, but it's not the only one. To ensure you don't overlook a single essential item—from documents and finances to clothing and gear—you need a master list. Our comprehensive, free checklist has you covered.
Download Your Free International Travel Checklist Now!
Essential Tools & Personal Medications
The final layer of your kit includes the tools to use your supplies effectively and your own personal health necessities.
Fine-Point Tweezers: For removing splinters, ticks, or other foreign objects from the skin.
Small, Rounded-Tip Scissors: For cutting medical tape, gauze, or moleskin. (Ensure they meet TSA guidelines if packing in a carry-on).
Disposable Non-Latex Gloves: To protect your hands and prevent infection when treating a wound on yourself or someone else.
Digital Thermometer: For accurately checking for fever.
Personal Medications: This is the most critical category. Pack a sufficient supply for your entire trip, plus at least a few extra days' worth in case of delays. Always keep your personal medications in your carry-on luggage in their original, labeled containers.
Pro-Tip: Before you leave, ask your doctor for a letter describing your condition and the medications you take, including their generic names. Keep a digital copy of this and your prescriptions on your phone. This can be invaluable if your medication is lost or you need to see a doctor abroad.

Beyond the Basics: Customizing Your Kit
The ultimate travel first aid kit is not one-size-fits-all. Once you have the core components, elevate your preparedness by customizing it for your specific journey.
By Destination:
Tropical/Developing Countries: Add anti-fungal cream, more insect repellent, and potentially a prescription for a standby antibiotic for severe traveler's diarrhea (consult your doctor).
High-Altitude Destinations: Speak with your doctor about medication to prevent altitude sickness.
By Activity:
Hiking/Trekking: Double down on blister care (moleskin, gel pads), pack an elastic wrap for sprains, and add pain-relieving gel.
Beach Vacation: Add extra aloe vera gel, sting-relief spray, and waterproof bandages.
By Traveler:
With Children: Include children’s formulations and dosages of pain/fever reducers, kid-friendly bandages, and any specific allergy medications they need.
Travel First Aid Kit FAQs
A great kit anticipates problems. Here are answers to common questions that take your preparedness to the next level.
1. What’s the first thing I should do if I get traveler’s diarrhea?
According to the CDC and travel medicine doctors, the first and most important step is oral rehydration. Dehydration is the biggest risk. Start sipping an Oral Rehydration Solution (ORS), sports drinks, or clear broths immediately. For mild to moderate cases that don't have a high fever or blood, an antimotility drug like Loperamide (Imodium) can help manage the symptoms. If symptoms are severe, incapacitating, or include a high fever or blood, it's time to consider a prescribed standby antibiotic and seek medical advice.
2. Should I pack a standby antibiotic in my kit?
This is a question for your doctor or a travel medicine clinic. For travelers heading to high-risk destinations where severe traveler's diarrhea is common, many doctors will provide a prescription for a standby antibiotic like Azithromycin. It’s not for mild cases but can significantly shorten the duration of a severe bout of illness. Discuss your itinerary with your doctor to see if this is right for you.
3. Is it okay to pack medications outside their original bottles to save space?
While it's tempting, it's safest to keep prescription medications in their original, clearly labeled containers. This avoids any confusion or legal issues with customs officials. For over-the-counter pills, you have more flexibility. If you use a travel pill organizer, consider taking a photo of the original packaging so you have the dosage information and ingredients handy.

Pack Confidence for Every Journey
A carefully assembled travel first aid kit does more than just prepare you for minor medical issues; it provides profound peace of mind. It transforms you from a worried passenger into a self-sufficient, empowered traveler, ready to handle the small bumps in the road so you can stay focused on the incredible experiences ahead. By following this checklist, you’re not just packing supplies—you’re packing the confidence to explore the world freely and fully.
Now that your health and safety are covered, you can focus on the other details that make a trip unforgettable. For a complete, deep-dive into every facet of trip planning, from health and safety to budgeting and logistics, our comprehensive Travel Guide is the only resource you'll ever need.
Meta Data Suggestions:
SEO Meta Title (55 characters): The Ultimate Travel First Aid Kit Checklist (2026)
URL Slug: travel-first-aid-kit-checklist
SEO Meta Description (154 characters): Build the perfect travel first aid kit. Our 2026 checklist, with pharmacist-approved tips, covers everything from wound care to stomach issues. Be prepared.
Travel News
Comments 0
No comments yet
Be the first to share your experience!
You May Also Like

Ultimate USA Holidays Guide: Top Picks
FTC Affiliate Disclosure: Stay Compliant as a Travel Creator
Essential Affiliate Tools: From Tracking to Full Optimization
Booking.com Affiliate Review: Pros, Cons & Earnings
Decoding Affiliate Commission Rates: Benchmarks for Travel Creators
