SF Pride: 6 Route & Party Hacks
TrekGuider @trekguider
Picture it: a river of rainbow flags, glitter, and pure, unadulterated joy flowing down Market Street. The air thrums with music, cheers, and the collective heartbeat of hundreds of thousands celebrating love, identity, and resilience. This isn't just any parade; this is the legendary San Francisco Pride Parade. But for every person lost in the moment, there's another lost in the crowd, wrestling with a dead phone, a terrible view, and no idea where their friends have vanished. The sheer scale of SF Pride can be overwhelming, threatening to turn a day of pure celebration into a stressful logistical nightmare.
You’ve imagined yourself at the heart of the action, capturing the perfect photo, feeling that powerful sense of community. The reality, however, could be getting stuck behind a seven-foot-tall person, unable to see a single float, with your phone battery blinking at 3% and no cell service to find your crew. The difference between an unforgettable experience and a frustrating ordeal isn't luck—it's preparation. You deserve to experience every ounce of joy this iconic event has to offer, without the chaos and confusion that can so easily derail the day.
This is your definitive guide to conquering the celebration. We’re giving you six battle-tested route and party hacks to navigate the pride parade San Francisco like a seasoned pro. Forget the stress; this playbook ensures you soak in the history, master the logistics, and create memories that will last a lifetime, all while staying safe and comfortable.

Before You Go: Essential Prep for the Pride Parade San Francisco
Before you even think about your rainbow outfit, a little prep work will set the stage for a flawless day. The SF Pride Parade is more than a party; it’s a powerful legacy. Born from the first "gay-in" in 1970 and commemorating the key 1969 Stonewall Uprising, this event has evolved from a protest into a global platform for activism and celebration. In the 1980s, it became a crucial front line for raising AIDS awareness, and today it continues to champion the diverse spectrum of the LGBTQ+ community. Understanding this history enriches the entire experience, transforming it from a spectacle into a meaningful pilgrimage.
The 2026 SF Pride Parade is scheduled for Sunday, the last Sunday of Juneth, with the first contingents stepping off at 10:30 AM. To be ready, your day pack is your most critical asset. Here’s a non-negotiable checklist:
Hydration: Pack a reusable water bottle. There are water stations, but having your own is crucial for staying hydrated in the California sun.
Sun Protection: Sunscreen, a hat, and sunglasses are absolutely essential. There is very little shade along the parade route.
Layered Clothing: San Francisco weather is famously fickle. What starts as a chilly, foggy morning can quickly turn into a warm, sunny afternoon. A light jacket or hoodie you can tie around your waist is the smartest move you can make.
Comfortable Shoes: You will be on your feet for hours, walking and standing. Prioritize comfort over style; your feet will thank you by the end of the day.
Portable Power Bank: Your phone will be working overtime as your camera, map, and communication device. A fully charged power bank is an absolute must-have.
Snacks: While there are food vendors, lines can be long and prices high. Pack some energy bars or other easy-to-eat snacks to keep your energy levels up.
Finally, let's talk safety. SF Pride is known for its strong security measures, including advanced weapon detection technology at key entry points. While organizers work hard to create a secure environment, personal safety matters most in any large crowd. Familiarize yourself with basic protocols, like being aware of your surroundings and keeping your valuables secure. For a comprehensive look at staying safe while traveling, our Solo Female Travel Safety Guide offers invaluable tips that apply to everyone, regardless of gender, in any crowded event scenario.

Hack #1: Master the Market Street Route for the Pride Parade San Francisco
The parade route is deceptively simple: it runs straight down Market Street, starting at Beale Street and culminating at 8th Street, right by the Civic Center Plaza. The challenge isn't knowing the route; it's knowing where on the route to be and when to be there.
The Hack: Arrive by 9 AM and choose your zone strategically. The parade officially starts at 10:30 AM, but the sidewalks begin filling up much earlier. Arriving an hour and a half beforehand allows you to claim a prime spot without having to battle the late-coming masses.
Here’s a breakdown of the route's key zones to help you decide on your ideal viewing experience:
The Starting Zone (Beale to Montgomery Street): This area is often less crowded, especially right at the beginning. You'll see all the contingents when they are fresh, energized, and at their most organized. It’s a fantastic spot for photographers who want clean shots of the floats and performers before the crowds swell. The energy here is one of joyful anticipation.
The Commercial Core (Montgomery to Powell Street): This is the heart of the parade and, consequently, the most packed section. The tall buildings create a canyon-like effect, amplifying the sound and energy. It’s an intense and exhilarating place to be, but not for the faint of heart. If you want to be in the thick of it, this is your spot, but be prepared for a tight squeeze.
The Climax Zone (Powell to 8th Street): As the parade approaches its end at the Civic Center, the energy reaches a fever pitch. This is where the performers give their all, knowing they’re approaching the main celebration. The crowd here is dense but incredibly vibrant. Positioning yourself near 8th Street gives you a head start on moving into the Civic Center Plaza for the post-parade festivities.
Pro-Tip: For a less obstructed view and better photos, try to secure a spot on the south side of Market Street. In the late morning and early afternoon, the sun will be mostly at your back, beautifully illuminating the parade without forcing you to squint. This side is often just slightly less congested than the north side.
Hack #2: The Transportation Game Plan - Ditch the Car, Embrace Public Transit
Let’s be perfectly clear: driving to the SF Pride Parade is a recipe for disaster. Street closures are extensive, parking is virtually non-existent and astronomically expensive, and navigating the gridlock will drain your celebratory spirit before you even arrive.
The Hack: Make BART (Bay Area Rapid Transit) and Muni your best friends for the day. San Francisco’s public transit system is designed to handle massive events like this, and it is by far the most efficient way to get to and from the parade.
Here’s your transit strategy:
BART: The underground trains are the fastest way to get downtown from the East Bay, the Peninsula, or other parts of the city. The key is choosing the right station to exit.
Embarcadero Station: Puts you right near the start of the parade. A great option if you plan to arrive early and watch from the beginning.
Montgomery Station: A perfect middle-ground, placing you in the energetic core of the route. It’s one of the busiest stations, so be prepared for crowds.
Powell Station: Another central option, close to the cable car turnaround and a major shopping area. Like Montgomery, expect it to be very busy.
Civic Center Station: This is your stop if you want to head directly to the post-parade celebration or watch the parade's final leg.
Muni: The city’s network of buses and light rail (Muni Metro) is another excellent choice. The F-Market & Wharves historic streetcar will be rerouted, but the Muni Metro lines run directly under Market Street, using the same stations as BART. Many bus lines will have detours, so be sure to check the SFMTA website or your favorite transit app for real-time updates on the day of the event.
Rideshare services like Uber and Lyft will be operating, but expect heavy surge pricing and designated drop-off/pick-up zones that may be several blocks away from Market Street to avoid the worst of the congestion. Public transit remains the most reliable and cost-effective option.

Hack #3: The Civic Center Celebration - Your Post-Parade HQ
The last float crossing 8th Street doesn't mark the end of the day—it marks the beginning of the next phase. The parade flows directly into the massive Pride Celebration at Civic Center Plaza, a sprawling festival with multiple stages of live music, DJs, inspiring speakers, hundreds of community booths, art installations, and food vendors.
The Hack: Have a concrete plan for navigating the festival, especially for meeting your group. Cell service in and around Civic Center Plaza can become extremely unreliable due to the sheer number of people. A "we'll find each other" approach will likely fail.
Follow these steps for a seamless transition from parade to party:
Establish a Hyper-Specific Meeting Point: Before you separate, agree on a meeting spot that is impossible to mistake. "By the main stage" is too vague. Instead, choose something like, "At the base of the statue of James Lick, on the side facing the library," or "Directly in front of the main entrance to the Asian Art Museum." Set specific times to meet there (e.g., 2 PM and 4 PM).
Pace Yourself and Hydrate: The celebration runs for hours after the parade. It's a marathon, not a sprint. Continue to drink water, find moments of shade, and don't forget to eat.
Explore with Purpose: Don't just wander aimlessly. The community booths are the soul of the celebration. You can connect with dozens of non-profits, activist groups, and local organizations. It’s an incredible opportunity to learn, connect, and find your community.
Know Your Exits: Take a moment upon arrival to orient yourself and identify the main exit points from the plaza. Knowing how to get out quickly in case of an emergency or if you simply feel overwhelmed is a smart move.

Hack #4: Beyond Market Street - Unofficial Parties & Neighborhood Vibes
The official parade and Civic Center festival are the main events, but the spirit of Pride permeates the entire city, becoming a vibrant key element of the city’s festive calendar—a calendar we explore in our broader guide to San Francisco Holidays: Bay Area Buzz.
The Hack: Dip out of the main event for a few hours to experience a different, more intimate side of Pride.
The Castro District: As the historic heart of San Francisco's LGBTQ+ community, the Castro is ground zero for Pride weekend. The streets become a massive, vibrant block party. While it will be just as crowded as the parade, the atmosphere is different—more neighborhood-focused and less structured. Grab a drink at a historic bar, watch the impromptu dance parties, and soak in the history.
Dolores Park: On Pride Sunday, the park's famous "Gay Beach" area expands to cover nearly the entire lawn. It transforms into a massive, sun-drenched picnic party. The vibe is more relaxed and bohemian than the official festival. Pack a blanket, bring some snacks, and enjoy people-watching in one of the city's most beautiful settings.
SoMa (South of Market): This neighborhood is home to many of the city's most famous clubs and venues. Throughout Pride weekend, these spaces host a huge variety of official and unofficial after-parties, from daytime DJ sets to late-night dance events. Check event listings in advance, as many of the most popular parties sell out.

Hack #5: Tech & Safety - Your Digital Toolkit for a Seamless Day
In a modern festival environment, your smartphone is your most powerful tool—if you use it wisely.
The Hack: Prep your phone and apps to be your digital command center for the day.
The Power Bank is Non-Negotiable: We mentioned it before, but it bears repeating. A dead phone means no photos, no map, and no way to contact your friends. A fully charged portable power bank is the single most important piece of tech you can bring.
Master Your Communication Apps: Standard text messages can be delayed when cell networks are overloaded. Use a data-based messaging app like WhatsApp or Signal for your group chat. Their delivery is often more reliable in dense crowds. Use the "Share Live Location" feature for a set period (e.g., 15 minutes) if you get separated and need to find your way back to your group.
Download Offline Maps: Before you leave home, download an offline map of the downtown San Francisco area in your map app of choice. Even if you lose all cell service, your phone's GPS will still work, allowing you to see your location on the map and navigate.
Embrace Official Resources: Check the official SF Pride website in the days leading up to the event. If they release an official app, download it. It will likely have the most accurate schedules, maps, and emergency alerts.
Pro-Tip: Take a screenshot of your planned meeting spots, the parade route map, and the contact info for everyone in your group. Create a dedicated photo album for these screenshots so you can access them instantly, even if your apps won't load due to poor connectivity.

Hack #6: The Exit Strategy - How to Leave Without the Headache
Just as important as your arrival plan is your exit strategy. When hundreds of thousands of people try to leave the same area at the same time, the public transit stations and rideshare zones become incredibly congested.
The Hack: Avoid leaving during the peak rush right as the festival winds down.
You have two primary strategies for a stress-free departure:
The Early Exit: If you've had your fill of the crowds and the main celebration, start making your way out before the final headliners take the stage at Civic Center. By leaving an hour before the official end time, you can beat the massive wave of people heading for the BART and Muni stations.
The Patient Wait: This is often the better option. Instead of rushing out with everyone else, wait it out. Find a restaurant or cafe a few blocks away from Civic Center, grab a bite to eat, and relax for an hour or so. Let the crowds on the transit platforms thin out. By the time you're done, your journey home will be far more pleasant.
If you're using a rideshare service, walk at least four or five blocks away from Market Street and Civic Center before you even attempt to request a ride. This will get you out of the most congested, no-pickup zones and will likely save you from the highest surge pricing.
Your Guide to an Unforgettable Pride
You are now armed with the knowledge to do more than just attend the pride parade San Francisco —you are ready to experience it with confidence, joy, and a sense of empowered preparedness. From mastering the Market Street route and navigating the Civic Center celebration to knowing the smartest ways to get there and back, you have the tools to craft a perfect day. This isn't just about avoiding stress; it's about creating space for the powerful moments of connection, celebration, and solidarity that define SF Pride. Go forth, celebrate loudly, and have an incredible time.
For a complete blueprint to planning your ultimate trip to the Bay Area, including deep dives into its other iconic holidays and hidden gems, be sure to explore our comprehensive Travel Guide.
Meta Data Suggestions:
SEO Meta Title: SF Pride: 6 Essential Hacks for the Parade Route & Parties
URL Slug: sf-pride-parade-route-party-hacks
SEO Meta Description: Master the SF Pride Parade! Get 6 expert hacks on navigating the Market Street route, finding the best parties, and staying safe in the crowds.
Don't Miss Out! Subscribe for Exclusive Content
Subscribe


Comments 0
No comments yet
Be the first to share your experience!
Dont Miss Out! Subscribe for Exclusive Content

San Francisco Cherry Blossoms: A Local's Guide to the Blooms

Halloween SF: Haunts Without Horrors

SF Festivals: 7 Must-See Lineups

Christmas SF: Lights & Wharf Wonders

Chinese New Year SF: Parade Essentials

San Francisco Holidays: Bay Area Buzz
Lollapalooza: 7 Stage-Hopping Tips
TrekGuider @trekguider
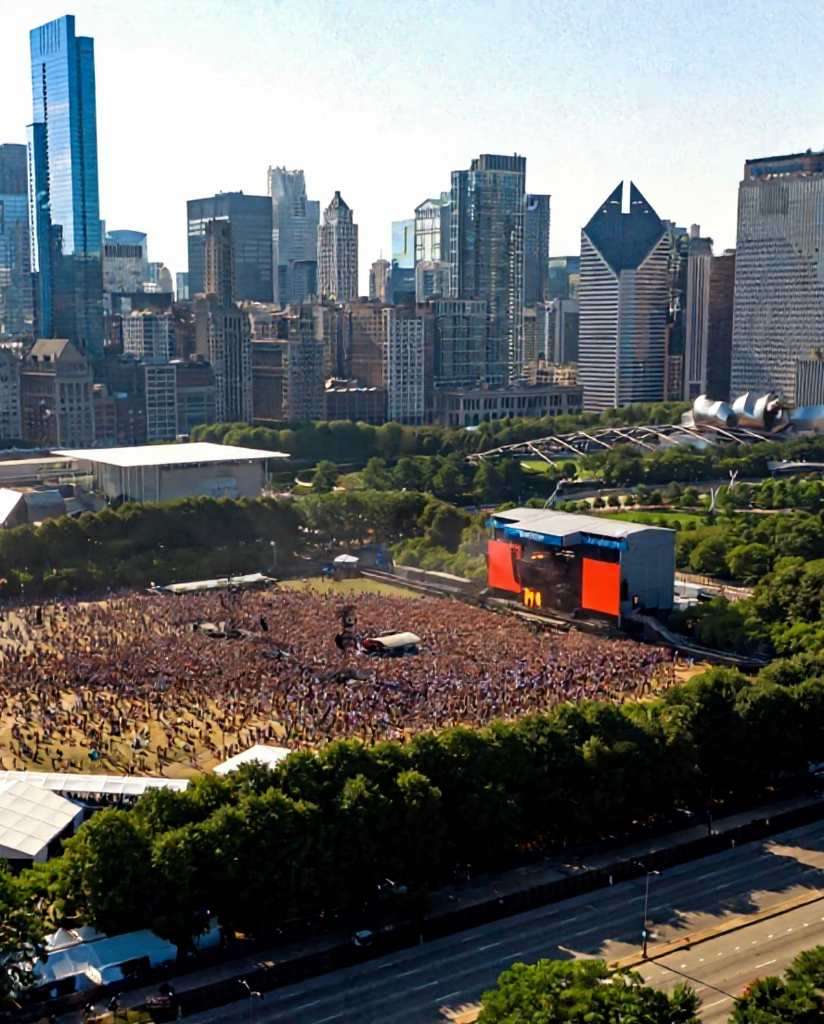
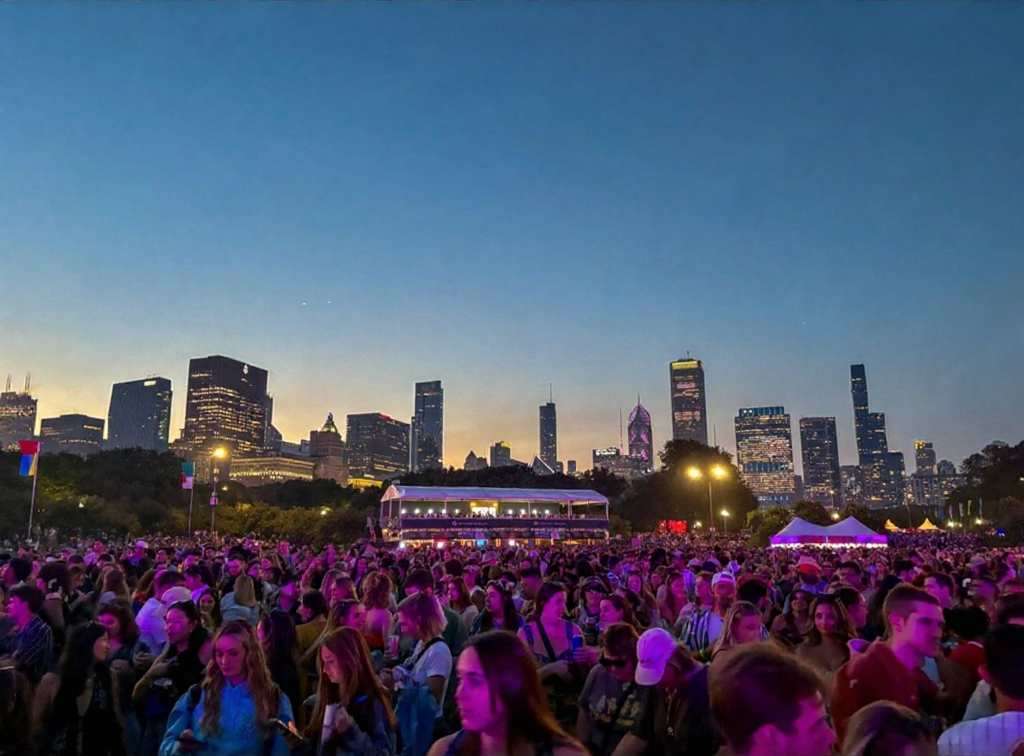
You’ve done it. You scored the golden ticket to Lollapalooza, the four-day musical marathon that transforms Chicago’s Grant Park into the center of the universe. But now, staring at a schedule that looks more like a complex circuit board than a concert lineup, the reality sets in. Dozens of artists you’re dying to see are scattered across a dozen stages, their set times overlapping in a cruel twist of fate. The sheer scale of the festival, with its massive crowds and sprawling grounds, suddenly feels less like a dream and more like a daunting logistical nightmare.
The anxiety begins to bubble. You picture yourself spending half the day trudging from the T-Mobile stage at the south end to the Bud Light stage at the north, only to arrive sweaty, exhausted, and just in time to hear the final chords of your favorite song. The fear of missing out becomes a palpable threat, turning the promise of unforgettable musical moments into a frantic race against the clock. Without a rock-solid plan, your festival experience could be defined by endless walks, missed opportunities, and the nagging feeling of being perpetually in the wrong place. This isn't just about seeing bands; it's about conquering one of the keystone events in a city known for its epic celebrations, a true highlight among the many experiences we cover in our definitive guide to Chicago Holidays: Windy City Thrills.
Forget the stress. This guide is your strategic playbook for navigating the glorious chaos of Lollapalooza Chicago. We’re breaking down the art of stage-hopping into seven actionable, pro-level tips that will transform you from a frantic fan into a festival veteran. From mastering the map before you even step foot in Grant Park to planning a seamless exit, these strategies will ensure you maximize your time, conserve your energy, and catch every single performance on your must-see list.
1. Become a Pre-Festival Master of the Map & Schedule
The biggest mistake a Lollapalooza rookie can make is showing up and trying to figure it all out on the fly. Grant Park is a massive urban oasis, and when it’s filled with stages, vendors, and hundreds of thousands of people, it becomes a complex, pulsating labyrinth. Your success begins long before you scan your wristband.
Download the Official App Immediately
Long before you even think about packing, your first move is to download the official Lollapalooza app. Consider it your digital command center for the entire weekend, running from July 31 to the final day of the festival. The app provides the most up-to-date schedule, a detailed festival map, and, most importantly, real-time push notifications. If a set time changes, a stage is delayed, or a surprise guest appears, the app will be the first to tell you. It also sends out crucial emergency alerts, making it an indispensable tool for staying safe and informed.
Create Your Artist Tiers
Once the full schedule drops, it’s time for strategy. Open the lineup—featuring titans like Olivia Rodrigo, Tyler the Creator, Sabrina Carpenter, and A$AP Rocky for the 2026 festival—and categorize every artist into two simple lists:
Tier 1 (Must-See): These are your non-negotiables. The artists you bought the ticket for. You will be at their set, no matter what.
Tier 2 (Nice-to-See): These are the artists you’d love to catch if the timing and location work out. They are your flexible options, the happy bonuses.
This simple act of prioritization is the bedrock of your stage-hopping plan. It allows you to build your day around your top-tier artists and fill the gaps with others, preventing the decision paralysis that comes from having too many choices.
Internalize the Grant Park Layout
Study the festival map like you’re planning a heist. The two main stages are typically located at the far north and south ends of Grant Park, a walk that can easily take 20-30 minutes through a thick crowd. Identify the locations of your Tier 1 artists and mentally map the routes between them. Note the locations of smaller stages, food courts (Chow Town), and, critically, the free water stations. Understanding the physical distances involved will help you make realistic calls about which back-to-back sets are doable and which are pure fantasy.

2. Master the "Perimeter Path" to Navigate Crowds
The center of any festival crowd is a slow-moving, densely packed sea of humanity. Trying to cut directly through the middle to get from one stage to another is a rookie move that wastes time and energy. The secret to swift movement is to think like a river, flowing where the resistance is lowest.
Stick to the Arteries
The most effective way to navigate Lollapalooza Chicago is by using the perimeter paths. Instead of plunging into the heart of the crowd, stick to the designated walkways along the sides. These paths, often lining the edges of the park or separating vendor areas, are the festival's arteries. While they may look like the longer route on a map, they are almost always faster than trying to push through a stationary audience. Make a mental note of these pathways when you first arrive.
Live by the 15-Minute Rule
If your next Tier 1 artist is on a stage across the park, you need to be ruthless with your timing. Implement the 15-Minute Rule: leave the current set 15 minutes before it ends. This gives you a critical head start, allowing you to exit the immediate crowd before the mass exodus begins when the music stops. It might sting to walk away from the end of a great performance, but that small sacrifice ensures you’re in a good position for the next one, rather than hearing it faintly from a quarter-mile away.
3. Hydrate and Fuel Like a Seasoned Athlete
Stage-hopping is a sport. You’ll be on your feet for 10 hours a day, walking several miles under the summer sun. You’re not just attending a concert; you’re entering a temporary city that generates a staggering economic impact—estimated at over $440 million. That scale demands respect and a bit of preparation.
Make Water Your First Priority
Lollapalooza provides free water refill stations throughout the grounds. When you first enter Grant Park, make it your mission to locate the station nearest the entrance and the stages you’ll be frequenting. Dehydration is the number one enemy of the festival-goer; it saps your energy, causes headaches, and can ruin your entire weekend. Make it a personal rule to refill your water bottle every single time you pass a station.
Pro-Tip: Bring a collapsible water bottle or an empty hydration pack. It's light, complies with security rules, and allows you to carry more water than a standard bottle. This means fewer trips to the refill station and more time enjoying the music.
4. Dress for a Four-Day Marathon, Not a Fashion Sprint
While Lollapalooza is a prime spot for people-watching and showing off your style, practicality should be your guiding principle. Your fashion choices can make or break your physical ability to enjoy the festival.
Your Shoes Are Your Most Important Gear
You will be walking and standing on concrete, grass, and uneven ground for hours on end. This is not the time for brand-new boots that need breaking in, flimsy sandals, or anything with a heel. Your number one priority should be comfortable, supportive, and already broken-in sneakers or walking shoes. Your feet are your foundation for the entire weekend; treat them well.
Prepare for All Four Chicago Seasons in One Day
Chicago weather is famously unpredictable. A day that starts hot and sunny can quickly turn cool and rainy. The key is to dress in layers. Start with a lightweight, breathable base layer and bring a flannel, hoodie, or light jacket that you can tie around your waist during the day and put on after the sun goes down. Most importantly, pack a poncho. It’s small, light, and will be an absolute lifesaver if a sudden downpour occurs.
5. Establish a "Home Base" for Your Crew
Navigating Lollapalooza Chicago with friends is a core part of the experience, but it’s incredibly easy to get separated. Cell service is notoriously unreliable when tens of thousands of people are trying to use it at once, so you can’t count on a text message or call to find your group.
Why a Meeting Point is Non-Negotiable
Before you even think about splitting up to see different artists, establish a clear, specific, and easy-to-find meeting point. This is your group’s "home base." If anyone gets lost, their phone dies, or you just need to regroup, everyone knows exactly where to go.
How to Choose a Good Spot
Don’t pick a generic spot like "the fountain" or "the food court." Choose a unique and unmistakable landmark. A good meeting point is something like, "the giant silver sculpture near the Buckingham Fountain" or "the corner of the 'Deep Dish' pizza stand in Chow Town." Pick a spot that is slightly away from the main walkways to avoid being constantly jostled. Check in at your home base at pre-determined times to ensure everyone is safe and accounted for.

6. Embrace the Journey Between the Stages
Stage-hopping isn’t just a commute; it’s an opportunity. The journey from one performance to another is part of the festival experience itself. Instead of seeing it as a chore, reframe it as a chance for discovery and inspiration.
Discover Your Next Favorite Band
As you walk the perimeter paths, you’ll pass smaller stages where artists you’ve never heard of are playing. Pause for a few minutes and listen. This is how you stumble upon incredible new music. Some of the most memorable Lollapalooza moments happen not at the massive headliner stages, but in the intimate settings of the BMI or Grove stages. Let your ears guide you.
Explore the Full Festival Experience
Lollapalooza is more than just a concert. It’s a massive cultural event filled with creativity. On your way from one stage to the next, take a detour through the art installations, check out the merch tents, or see what activations the sponsors have set up. This spirit of creative discovery is what fuels the best entrepreneurs. If you're feeling inspired by the artistry around you, channel that energy into your own project with our free Digital Product Ideas Guide. By exploring, you break up the monotony of walking and get a richer, more complete festival experience.

7. Plan Your Grand Escape in Advance
How you leave the festival is just as important as how you navigate it. At 10 PM, when the final headliner finishes, a massive wave of people will pour out of the Grant Park exits, creating a human traffic jam that can be overwhelming and slow.
Beat the Final Rush
Just as with the 15-Minute Rule for stage-hopping, consider leaving a few minutes before the absolute end of the night. Slipping out during the last song or just before the encore can save you up to an hour of being stuck in a slow-moving crowd. You’ll get to public transit or your rideshare pickup spot ahead of the main surge, which is a priceless advantage after a long day.
Know Your Public Transit Route Cold
The best way to get to and from Lollapalooza Chicago is by using the CTA rail system. Multiple downtown street closures make driving or using rideshares near the park a nightmare. Before the festival, identify the closest CTA station to your accommodation and memorize the route to and from the park exits. Having this plan locked in will prevent you from wandering aimlessly with a dead phone at the end of a long day.
Pro-Tip: If you must use a rideshare, set your pickup location several blocks away from the Grant Park exits. Walk away from the chaos and toward your pin. You'll escape the immediate surge pricing, and your driver will be able to find you much more easily than in the gridlock traffic near the festival grounds.
Your Blueprint for Lollapalooza Domination
The overwhelming scale of Lollapalooza can intimidate even the most enthusiastic music fan, but it doesn’t have to. With a strategic approach, the festival transforms from a logistical puzzle into the ultimate musical playground. By preparing in advance, navigating smartly, and taking care of your body, you shift from being a passive attendee to the master of your own experience. With these stage-hopping tips, you're now fully equipped with the knowledge of a seasoned pro, ready to conquer Lollapalooza Chicago and create a weekend of flawless, unforgettable memories.

Your Lollapalooza adventure is just one part of an incredible trip. To make the most of your time in the Windy City and beyond, check out our comprehensive Travel Guide. It’s packed with insider tips for exploring the best destinations across the USA.
Don't Miss Out! Subscribe for Exclusive Content
SubscribeComments 0
No comments yet
Be the first to share your experience!
Dont Miss Out! Subscribe for Exclusive Content
San Francisco Cherry Blossoms: A Local's Guide to the Blooms
Halloween SF: Haunts Without Horrors
SF Festivals: 7 Must-See Lineups
Christmas SF: Lights & Wharf Wonders

SF Pride: 6 Route & Party Hacks
Chinese New Year SF: Parade Essentials
The Ultimate Solo Travel Packing List: A Modular Checklist
TrekGuider @trekguider
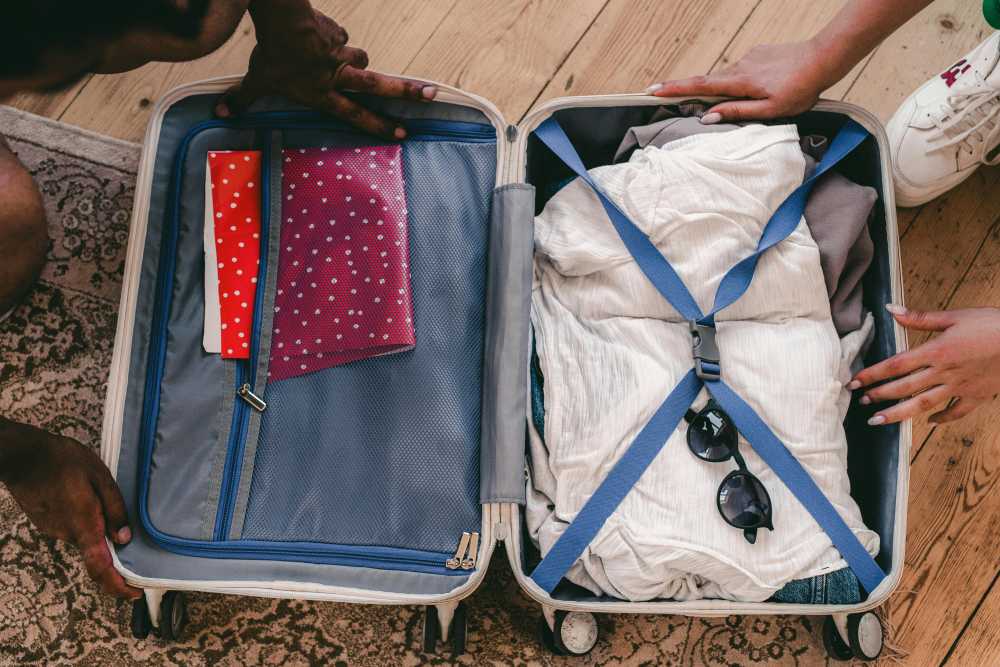
Staring at an empty suitcase can be overwhelming. This is not another generic article; this is your definitive, actionable solo travel packing list. It’s a methodical system designed to transform packing from a chore into an act of empowerment. We’ve built this checklist on a "Core + Modules" framework: a non-negotiable foundation of essentials, plus optional modules you can add for specific types of travel.
This tactical checklist is your "what." Before you dive into the specific items, we highly recommend reading our guide to to understand the minimalist systems and philosophy that make this list so powerful. Understanding the "why" will make packing the "what" intuitive and stress-free.
Your Core Essentials
Every trip, regardless of destination or duration, starts here. These are the non-negotiable items that form the base of any smart solo travel plan. Do not leave home without them.
Your Access to Everything
Your ability to move, transact, and prove your identity matters most. Build redundancy into your document strategy.
Passport/Visa: Check that your passport has at least six months of validity from your planned return date.
Digital & Physical Copies: Store a physical photocopy of your passport and driver's license in a separate bag from the originals. Keep high-quality photos of them in a secure cloud service (Google Drive, Dropbox) and in your email.
Travel Insurance Details: Carry a printed copy of your policy and save a PDF to your phone for offline access.
Multiple Bank Cards: Pack at least two different credit cards and one debit card. Store them in separate locations (e.g., one in your wallet, one in your daypack).
Emergency Cash: Hide $100-$200 USD deep within your main bag as a final safety net.
Bank Travel Notifications: Log into your banking apps and set a travel notice for your specific destinations and dates. This five-minute task prevents your accounts from being frozen for suspected fraud.
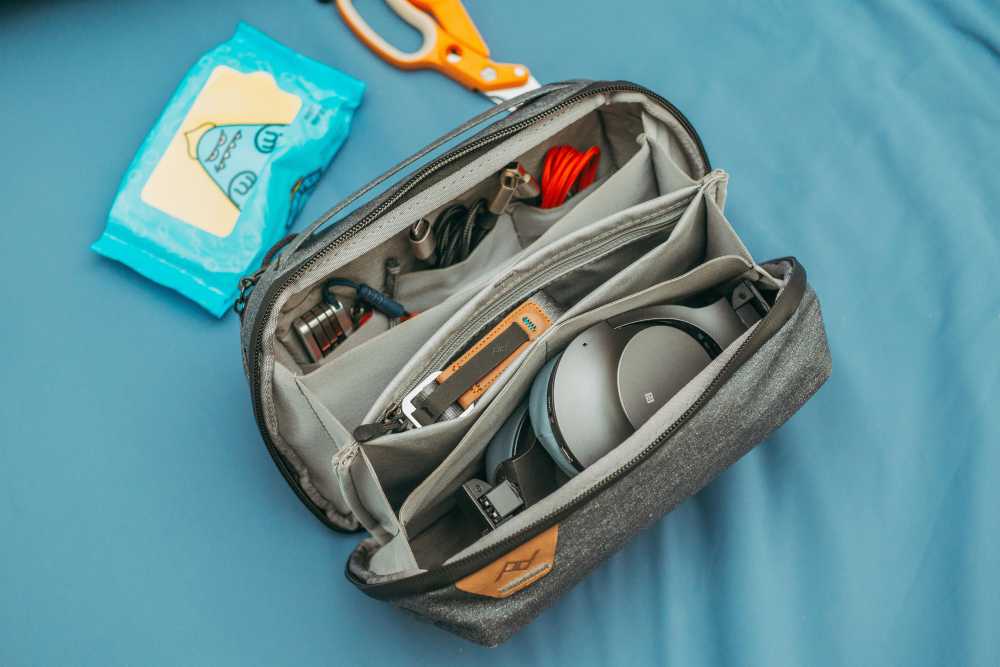
Your On-the-Go Wellness Kit
Stay healthy and comfortable on the road. The goal is a compact, leak-proof, and comprehensive kit.
Prescription Medications: Pack enough for your entire trip in their original, labeled containers. Bring a copy of the prescription itself.
Mini First-Aid Kit:
Pain relievers (Ibuprofen/Acetaminophen)
Assorted adhesive bandages
Antiseptic wipes
Blister treatment (e.g., Compeed)
Anti-diarrhea medication (e.g., Imodium)
Solid Toiletries: The ultimate packing hack. Eliminates liquid restrictions, prevents leaks, and lasts longer.
Solid shampoo bar
Solid conditioner bar
Solid soap bar
The Basics:
Toothbrush
Solid toothpaste tablets
Deodorant
Your Digital Lifeline
Your smartphone is your navigator, translator, and connection to the world. Keeping it powered is mission-critical.
Smartphone: Your all-in-one command center. Download offline maps for your destination.
Portable Power Bank: A non-negotiable safety item. Choose a 10,000mAh+ model from a reliable brand like Anker to guarantee 2-3 full phone charges. Keep it charged.
Universal Power Adapter: Invest in one high-quality universal adapter with multiple USB ports. This allows you to charge all your devices from a single outlet.
Noise-Canceling Headphones: Essential for focus and peace on loud flights, trains, or in shared hostel rooms.

Essential Solo Travel Safety Gear
This module proactively addresses the "what-if" scenarios, allowing you to explore with confidence and sleep soundly. The gear here is your first line of defense, but true confidence comes from preparation. For a complete guide to situational awareness and navigating new environments securely, our comprehensive article, Anxious to Adventurous: Solo Travel Tips for Confidence, is required reading.
For Your Accommodation
Portable Door Lock (e.g., Addalock): A small, lightweight device that braces your door from the inside, making it impossible to open even with a key.
Door Stop Alarm: A wedge that slides under your door. If opened, it physically blocks the door while emitting a piercingly loud alarm.
For When You're Out & About
Anti-Theft Daypack (e.g., Pacsafe, Travelon): Choose a crossbody bag or backpack with slash-proof straps, lockable zippers, and RFID-blocking pockets.
Personal Safety Alarm: A keychain device that emits an ear-splitting siren and flashing strobe light to attract attention and disorient an attacker.
RFID-Blocking Wallet: Protects your passport and credit cards from electronic "skimming."
The 5-4-3-2-1 Formula
Pack less and wear more with a strategic, versatile wardrobe built on mix-and-match essentials. Choose a neutral color palette (black, gray, navy) for core items.
The 5-4-3-2-1 Formula (1-Week Framework)
5 Tops: Focus on wrinkle-resistant, odor-resistant fabrics. At least one should be merino wool—the ultimate travel fabric for temperature regulation and multi-day wear.
4 Bottoms: A typical mix includes one pair of comfortable travel pants, one pair of jeans or chinos, and one skirt or pair of shorts.
3 Accessories: A lightweight scarf or sarong is incredibly versatile (fashion, beach cover-up, towel, head covering).
2 Pairs of Shoes:
Pair 1: Supremely comfortable, broken-in walking shoes.
Pair 2: A versatile, slightly dressier option (flats, loafers, clean leather sneakers).
1 Jacket: A waterproof, windproof outer shell. Layer with a fleece or sweater for warmth as needed.
Climate Sub-Modules (Choose One)
Cold Climate Add-ons: One set of thermal base layers (top and bottom), a warm hat, gloves, and wool socks.
Tropical Climate Add-ons: A swimsuit, a quick-dry microfiber towel, a wide-brimmed sun hat, and sunglasses.
Digital Nomad's Checklist
This module is for anyone working on the road. It focuses on creating an efficient, ergonomic, and connected remote workstation.

Lightweight Laptop: An ultrabook (e.g., MacBook Air) offers the best balance of power and portability.
Portable Laptop Stand (e.g., Roost, Nexstand): The single best way to prevent neck and back pain.
Ergonomic Peripherals: A slim, portable keyboard (e.g., Logitech K380) and a portable mouse (e.g., Logitech MX Anywhere).
High-Quality Headphones with Mic: Essential for calls and focus in noisy environments.
eSIM: Use an app like Airalo to purchase and install a digital SIM card before you leave. Get connected the moment you land.
High-Capacity "PD" Power Bank: Ensure your power bank is "Power Delivery" rated and has enough capacity to charge your laptop, not just your phone.
What NOT to Pack
Knowing what to leave behind is as important as knowing what to bring.

Expensive or Sentimental Jewelry: Don't bring anything you would be devastated to lose.
Full-Sized Towel: Most accommodations provide them. If needed, a quick-dry travel towel is a superior option.
Multiple "Good" Outfits: Stick to versatile pieces that can be dressed up or down.
Physical Books: An e-reader provides an entire library at a fraction of the weight.
"Just in Case" Items: Unless you're traveling to a very remote location, you can buy most basic items at your destination.
Your Questions Answered
What should a solo female traveler add? Many add a versatile sarong (for modesty at religious sites), a silicone doorstop for extra security, and some opt for a fake wedding ring to deter unwanted attention.
How do I pack for a long-term trip in a carry-on? Commit to doing laundry. Pack one week's worth of clothing using the capsule method and plan to do laundry every 7-10 days.
What are the best shoes for solo travel? The ones you can walk in comfortably for 8+ hours. Never bring new, unbroken-in shoes on a trip.
By starting with the Core Essentials and adding modules tailored to your journey, you have now built the perfect solo travel packing list. This system eliminates guesswork, ensures you are prepared for your adventure, and empowers you to travel with the confidence of a pro.
Read the full guide: Anxious to Adventurous: The Ultimate Guide to Solo Travel Confidence
Don't Miss Out! Subscribe for Exclusive Content
SubscribeComments 0
No comments yet
Be the first to share your experience!
Dont Miss Out! Subscribe for Exclusive Content

Ultimate USA Holidays Guide: Top Picks

FTC Affiliate Disclosure Essentials: Stay Compliant as a Travel Creator

Essential Affiliate Tools: From Tracking to Full Optimization

Booking.com Affiliate Program Review: Pros, Cons, and Earnings Potential

Decoding Affiliate Commission Rates: Benchmarks for Travel Creators

Amazon Associates for Travel: Strategies to Maximize Commissions
High-Paying Affiliate Opportunities for Individual Travel Affiliates
TrekGuider @trekguider
High-Paying Affiliate Opportunities for Individual Travel Affiliates
You’re a talented travel creator, but your affiliate dashboard tells a frustrating story. You spend hours crafting the perfect packing list, linking to dozens of small-ticket items, only to see a few dollars trickle in. It feels like you’re running on a hamster wheel, putting in immense effort for pennies on the dollar—a far cry from the sustainable business you dream of building.
This isn't just a feeling; it's a strategic dead end. You see the industry reports and know the potential is there. You're operating at the intersection of two economic juggernauts: a creator economy forecasted to exceed $1.3 trillion by 2033 and a global affiliate market projected to hit $93 billion. The money is there, but it doesn't flow to those who work the hardest; it flows to those who work the smartest. The reported average of $13,847 a month for travel affiliates isn't a myth, but it’s inaccessible to those stuck in the volume game.

This isn't another sprawling listicle of 50 programs. This is a strategic playbook. We're going to deconstruct the three pillars of a high-income affiliate strategy perfectly suited for the solo creator: high-ticket products, recurring revenue, and the game-changing power of referral affiliate models. This is how you stop thinking like a hobbyist and start getting paid like the professional you are. It’s a critical piece of the puzzle we cover from every angle in our definitive pillar guide, Travel Affiliate Programs: The 2026 Ultimate Guide—your command center for the entire ecosystem.
The Mindset Shift: From Chasing Volume to Creating Value
But before we dive into the specific opportunities, we need to address the single most important factor: your mindset. Most new creators are obsessed with traffic and commission percentages, believing the path to wealth is paved with millions of pageviews. This leads them directly into the low-margin trap.
Professional affiliates, however, focus on a much more powerful metric: Earnings Per Click (EPC). This number tells you the average amount of money you make every single time someone clicks one of your links. It’s the ultimate measure of your influence.
Consider the simple math:
Scenario A (The Volume Trap): You promote a $50 travel gadget with a 4% commission. You earn $2 per sale. To make $200, you need to drive 100 sales.
Scenario B (The Value Strategy): You promote a $3,000 adventure tour with a 6% commission. You earn $180 per sale. To make more than $200, you only need to drive two sales.
Which business would you rather run? By focusing on value over volume, you can build a more profitable and sustainable business with the same—or even less—traffic.

The High-Ticket Strategy—Earn More from a Single Click
The most direct path to a higher income is to promote products and services with a high price tag. A single conversion can generate a commission that would otherwise take hundreds of smaller sales to match. This is the core of a strategy focused on high paying affiliates.
Adventure Tour Operators
Selling a multi-thousand-dollar tour is one of the most effective ways to generate a substantial commission. You aren't just selling a trip; you're selling a life-changing experience.
Prime Example: G Adventures: This adventure travel company specializes in small-group tours that often cost thousands of dollars. With a 6% commission, a single booking for a $4,000 trip to Antarctica nets you a $240 commission. Crucially, they offer a generous 90-day cookie duration, which is perfectly suited for a high-consideration purchase that requires weeks of planning.
Luxury Travel & Premium Accommodations
For creators in the luxury niche, the earning potential is immense. Promoting five-star hotels, premium villas, or business-class flight deals can yield significant returns. While a program like Booking.com has its flaws, partnering directly with luxury hotel groups or high-end booking platforms can be incredibly lucrative.

Premium Travel Gear
While Amazon is the default for many, it's often the least profitable option for expensive gear. Specialty retailers offer higher commission rates on the premium products your audience is looking for.
Prime Example: REI: For creators in the outdoor and adventure space, REI is a premier partner. They offer a 5-8% commission on high-quality gear. Selling a $700 tent or a $400 backpack through REI will yield a much higher commission than the 3-4% offered by Amazon, and you're connecting your audience with a trusted, specialist brand.
Pro-Tip: When promoting high-ticket items, your content must match the price tag. A brief mention won't cut it. You need to create in-depth, comprehensive reviews, case studies, and guides that give your audience the confidence to make a major purchase decision.
The Recurring Revenue Model—Get Paid Month After Month
What’s better than a big commission? A commission that pays you every single month. Recurring revenue is the holy grail for creators seeking stable, predictable income. With this model, you make a sale once, and you continue to earn a commission for as long as that customer remains subscribed.

Travel Insurance Subscriptions
This is the most powerful recurring revenue stream for travel creators. Every long-term traveler and digital nomad needs insurance, and many use subscription-based services.
Prime Example: SafetyWing: A favorite among digital nomads, SafetyWing offers travel medical insurance on a monthly subscription. Their affiliate program is one of the best in the industry, offering a 10% recurring commission for up to 364 days. A single referral can turn into a year-long passive income stream that builds on itself with every new sign-up.
Travel-Tech & Software
Think about the digital tools your audience uses to plan and execute their travels. Many of these are subscription-based and have fantastic affiliate programs. This could include:
VPN Services: Essential for digital nomads and security-conscious travelers.
Photo Editing Software: Like Adobe Lightroom or preset subscriptions.
Booking & Planning Apps: Niche apps that help travelers organize their trips.
Pro-Tip: The key to succeeding with recurring models is to promote products that become an indispensable part of your audience's travel lifestyle. When the product is essential, the customer rarely cancels, and your passive income stream remains stable and grows over time.
The Ultimate High-Paying Opportunity: The Referral Affiliate Model
We've saved the most powerful model for last. This is the strategy that the world's top creators use to build diversified, high-margin businesses. It represents a big change from being a simple affiliate to becoming a true platform partner.
What’s the difference?
Traditional Affiliates earn a one-time commission for selling someone else's product.
Referral Affiliates build a network and earn a long-term, passive income stream from that network's success.
This model is about empowerment. Instead of just selling a product to your audience, you introduce them to a platform or tool that helps them achieve their own goals. It creates a powerful win-win scenario that feels more like a collaboration than a transaction.

The Ultimate Evolution: The TrekGuider Referral Model
This is precisely the model we’ve built to empower creators at TrekGuider. We believe the most valuable product you can ever promote is your own. The TrekGuider Platform is designed for travel creators to sell their own digital products—like itineraries, guides, maps, and presets.
Our referral program is the ultimate high-paying affiliate opportunity because it transforms you into a business builder. When you introduce fellow creators to the platform using your unique referral link, you unlock a powerful, ongoing revenue share.
Here’s how it works:
You Empower Your Peers: You share a platform that can help your fellow creators build their own sustainable businesses and monetize their expertise.
You Earn Passively: When a new seller joins through your link, you receive an ongoing revenue share from the platform's earnings on their sales—a powerful 25% for their first 30 days, and 12.5% for the next 11 months.
You Build a Compounding Asset: This isn't a one-time payment. It's a long-term passive income stream that grows as the creators you refer become more successful. You are building a network and earning from its collective success.
This is the pinnacle of value-based marketing. You succeed by helping others succeed, creating a powerful and ethical engine for high-margin, passive income.
Build Your Own High-Margin Product
The most successful creators know that affiliate income is just one piece of the puzzle. The ultimate strategy for diversifying your income and taking full control of your earnings is to sell your own digital products. But where do you start?
Our free Digital Product Ideas Guide is packed with dozens of proven, profitable ideas specifically for travel creators. Download it today to find the perfect product for your audience and start building your content empire.
Frequently Asked Questions (FAQ)
1. Are high-ticket programs harder to convert? Yes, they can be. A customer will spend more time researching a $3,000 tour than a $30 gadget. This is why your content must be exceptionally thorough and trustworthy. It's a trade-off: more effort per piece of content for a much higher reward per conversion.
2. Is this too complicated for a solo creator to manage? Not at all. The beauty of this strategy is its focus. Instead of managing links for a hundred cheap products, you're focusing on building deep, valuable content around a handful of high-performing partners. It's about working smarter, not harder.
3. How do I find these types of high-paying affiliate opportunities? Start by looking at the premium products and services you already use and love. Visit their websites and look for an "Affiliates" or "Partners" link, usually in the footer. You can also explore major affiliate networks like CJ Affiliate or ShareASale and filter for partners with high average order values or recurring commission structures.
Your Path to a Professional Income
The world of high paying affiliates is not a secret club reserved for the elite. It is accessible to any individual creator who is willing to be strategic. By shifting your focus from volume to value, you can fundamentally transform your earning potential.
Stop chasing pennies. Start building a professional, resilient business by incorporating these three pillars into your strategy:
Promote High-Ticket Products to earn substantial commissions from a single sale.
Leverage Recurring Revenue Models to build a stable, predictable passive income stream.
Embrace Referral Programs like the TrekGuider Platform to become a true partner and build a business asset that pays you for years to come.
As an individual travel affiliate, your expertise and the trust you've built with your audience are your most valuable assets. By aligning your monetization strategy with high-value opportunities, you can ensure you are finally compensated for the immense value you provide.

Meta Data Suggestions:
SEO Meta Title: 5 High-Paying Affiliate Opportunities for Travel Creators
URL Slug: /high-paying-affiliate-opportunities
SEO Meta Description: Stop earning pennies. Discover 5 high-paying affiliate opportunities for travel creators, focusing on high-ticket sales, recurring revenue, and referral programs.
Read the full guide: The Travel Blogger's Playbook to Affiliate Marketing Mastery
Don't Miss Out! Subscribe for Exclusive Content
SubscribeComments 0
No comments yet
Be the first to share your experience!
Dont Miss Out! Subscribe for Exclusive Content
FTC Affiliate Disclosure Essentials: Stay Compliant as a Travel Creator
Essential Affiliate Tools: From Tracking to Full Optimization

Avoid These 5 Affiliate Landing Page Mistakes for Better Conversions

Affiliate Keyword Research Mastery for Travel Blogs
Booking.com Affiliate Program Review: Pros, Cons, and Earnings Potential