SF Pride: 6 Route & Party Hacks
TrekGuider @trekguider
Picture it: a river of rainbow flags, glitter, and pure, unadulterated joy flowing down Market Street. The air thrums with music, cheers, and the collective heartbeat of hundreds of thousands celebrating love, identity, and resilience. This isn't just any parade; this is the legendary San Francisco Pride Parade. But for every person lost in the moment, there's another lost in the crowd, wrestling with a dead phone, a terrible view, and no idea where their friends have vanished. The sheer scale of SF Pride can be overwhelming, threatening to turn a day of pure celebration into a stressful logistical nightmare.
You’ve imagined yourself at the heart of the action, capturing the perfect photo, feeling that powerful sense of community. The reality, however, could be getting stuck behind a seven-foot-tall person, unable to see a single float, with your phone battery blinking at 3% and no cell service to find your crew. The difference between an unforgettable experience and a frustrating ordeal isn't luck—it's preparation. You deserve to experience every ounce of joy this iconic event has to offer, without the chaos and confusion that can so easily derail the day.
This is your definitive guide to conquering the celebration. We’re giving you six battle-tested route and party hacks to navigate the pride parade San Francisco like a seasoned pro. Forget the stress; this playbook ensures you soak in the history, master the logistics, and create memories that will last a lifetime, all while staying safe and comfortable.

Before You Go: Essential Prep for the Pride Parade San Francisco
Before you even think about your rainbow outfit, a little prep work will set the stage for a flawless day. The SF Pride Parade is more than a party; it’s a powerful legacy. Born from the first "gay-in" in 1970 and commemorating the key 1969 Stonewall Uprising, this event has evolved from a protest into a global platform for activism and celebration. In the 1980s, it became a crucial front line for raising AIDS awareness, and today it continues to champion the diverse spectrum of the LGBTQ+ community. Understanding this history enriches the entire experience, transforming it from a spectacle into a meaningful pilgrimage.
The 2026 SF Pride Parade is scheduled for Sunday, the last Sunday of Juneth, with the first contingents stepping off at 10:30 AM. To be ready, your day pack is your most critical asset. Here’s a non-negotiable checklist:
Hydration: Pack a reusable water bottle. There are water stations, but having your own is crucial for staying hydrated in the California sun.
Sun Protection: Sunscreen, a hat, and sunglasses are absolutely essential. There is very little shade along the parade route.
Layered Clothing: San Francisco weather is famously fickle. What starts as a chilly, foggy morning can quickly turn into a warm, sunny afternoon. A light jacket or hoodie you can tie around your waist is the smartest move you can make.
Comfortable Shoes: You will be on your feet for hours, walking and standing. Prioritize comfort over style; your feet will thank you by the end of the day.
Portable Power Bank: Your phone will be working overtime as your camera, map, and communication device. A fully charged power bank is an absolute must-have.
Snacks: While there are food vendors, lines can be long and prices high. Pack some energy bars or other easy-to-eat snacks to keep your energy levels up.
Finally, let's talk safety. SF Pride is known for its strong security measures, including advanced weapon detection technology at key entry points. While organizers work hard to create a secure environment, personal safety matters most in any large crowd. Familiarize yourself with basic protocols, like being aware of your surroundings and keeping your valuables secure. For a comprehensive look at staying safe while traveling, our Solo Female Travel Safety Guide offers invaluable tips that apply to everyone, regardless of gender, in any crowded event scenario.

Hack #1: Master the Market Street Route for the Pride Parade San Francisco
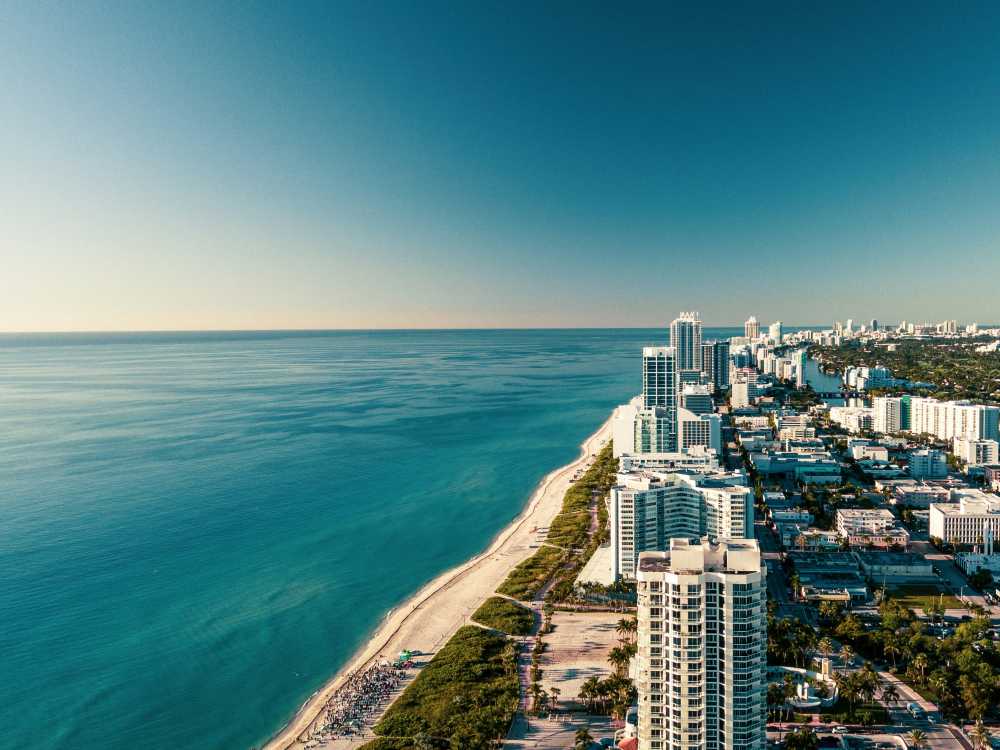
The parade route is deceptively simple: it runs straight down Market Street, starting at Beale Street and culminating at 8th Street, right by the Civic Center Plaza. The challenge isn't knowing the route; it's knowing where on the route to be and when to be there.
The Hack: Arrive by 9 AM and choose your zone strategically. The parade officially starts at 10:30 AM, but the sidewalks begin filling up much earlier. Arriving an hour and a half beforehand allows you to claim a prime spot without having to battle the late-coming masses.
Here’s a breakdown of the route's key zones to help you decide on your ideal viewing experience:
The Starting Zone (Beale to Montgomery Street): This area is often less crowded, especially right at the beginning. You'll see all the contingents when they are fresh, energized, and at their most organized. It’s a fantastic spot for photographers who want clean shots of the floats and performers before the crowds swell. The energy here is one of joyful anticipation.
The Commercial Core (Montgomery to Powell Street): This is the heart of the parade and, consequently, the most packed section. The tall buildings create a canyon-like effect, amplifying the sound and energy. It’s an intense and exhilarating place to be, but not for the faint of heart. If you want to be in the thick of it, this is your spot, but be prepared for a tight squeeze.
The Climax Zone (Powell to 8th Street): As the parade approaches its end at the Civic Center, the energy reaches a fever pitch. This is where the performers give their all, knowing they’re approaching the main celebration. The crowd here is dense but incredibly vibrant. Positioning yourself near 8th Street gives you a head start on moving into the Civic Center Plaza for the post-parade festivities.
Pro-Tip: For a less obstructed view and better photos, try to secure a spot on the south side of Market Street. In the late morning and early afternoon, the sun will be mostly at your back, beautifully illuminating the parade without forcing you to squint. This side is often just slightly less congested than the north side.
Hack #2: The Transportation Game Plan - Ditch the Car, Embrace Public Transit
Let’s be perfectly clear: driving to the SF Pride Parade is a recipe for disaster. Street closures are extensive, parking is virtually non-existent and astronomically expensive, and navigating the gridlock will drain your celebratory spirit before you even arrive.
The Hack: Make BART (Bay Area Rapid Transit) and Muni your best friends for the day. San Francisco’s public transit system is designed to handle massive events like this, and it is by far the most efficient way to get to and from the parade.
Here’s your transit strategy:
BART: The underground trains are the fastest way to get downtown from the East Bay, the Peninsula, or other parts of the city. The key is choosing the right station to exit.
Embarcadero Station: Puts you right near the start of the parade. A great option if you plan to arrive early and watch from the beginning.
Montgomery Station: A perfect middle-ground, placing you in the energetic core of the route. It’s one of the busiest stations, so be prepared for crowds.
Powell Station: Another central option, close to the cable car turnaround and a major shopping area. Like Montgomery, expect it to be very busy.
Civic Center Station: This is your stop if you want to head directly to the post-parade celebration or watch the parade's final leg.
Muni: The city’s network of buses and light rail (Muni Metro) is another excellent choice. The F-Market & Wharves historic streetcar will be rerouted, but the Muni Metro lines run directly under Market Street, using the same stations as BART. Many bus lines will have detours, so be sure to check the SFMTA website or your favorite transit app for real-time updates on the day of the event.
Rideshare services like Uber and Lyft will be operating, but expect heavy surge pricing and designated drop-off/pick-up zones that may be several blocks away from Market Street to avoid the worst of the congestion. Public transit remains the most reliable and cost-effective option.

Hack #3: The Civic Center Celebration - Your Post-Parade HQ
The last float crossing 8th Street doesn't mark the end of the day—it marks the beginning of the next phase. The parade flows directly into the massive Pride Celebration at Civic Center Plaza, a sprawling festival with multiple stages of live music, DJs, inspiring speakers, hundreds of community booths, art installations, and food vendors.
The Hack: Have a concrete plan for navigating the festival, especially for meeting your group. Cell service in and around Civic Center Plaza can become extremely unreliable due to the sheer number of people. A "we'll find each other" approach will likely fail.
Follow these steps for a seamless transition from parade to party:
Establish a Hyper-Specific Meeting Point: Before you separate, agree on a meeting spot that is impossible to mistake. "By the main stage" is too vague. Instead, choose something like, "At the base of the statue of James Lick, on the side facing the library," or "Directly in front of the main entrance to the Asian Art Museum." Set specific times to meet there (e.g., 2 PM and 4 PM).
Pace Yourself and Hydrate: The celebration runs for hours after the parade. It's a marathon, not a sprint. Continue to drink water, find moments of shade, and don't forget to eat.
Explore with Purpose: Don't just wander aimlessly. The community booths are the soul of the celebration. You can connect with dozens of non-profits, activist groups, and local organizations. It’s an incredible opportunity to learn, connect, and find your community.
Know Your Exits: Take a moment upon arrival to orient yourself and identify the main exit points from the plaza. Knowing how to get out quickly in case of an emergency or if you simply feel overwhelmed is a smart move.

Hack #4: Beyond Market Street - Unofficial Parties & Neighborhood Vibes
The official parade and Civic Center festival are the main events, but the spirit of Pride permeates the entire city, becoming a vibrant key element of the city’s festive calendar—a calendar we explore in our broader guide to San Francisco Holidays: Bay Area Buzz.
The Hack: Dip out of the main event for a few hours to experience a different, more intimate side of Pride.
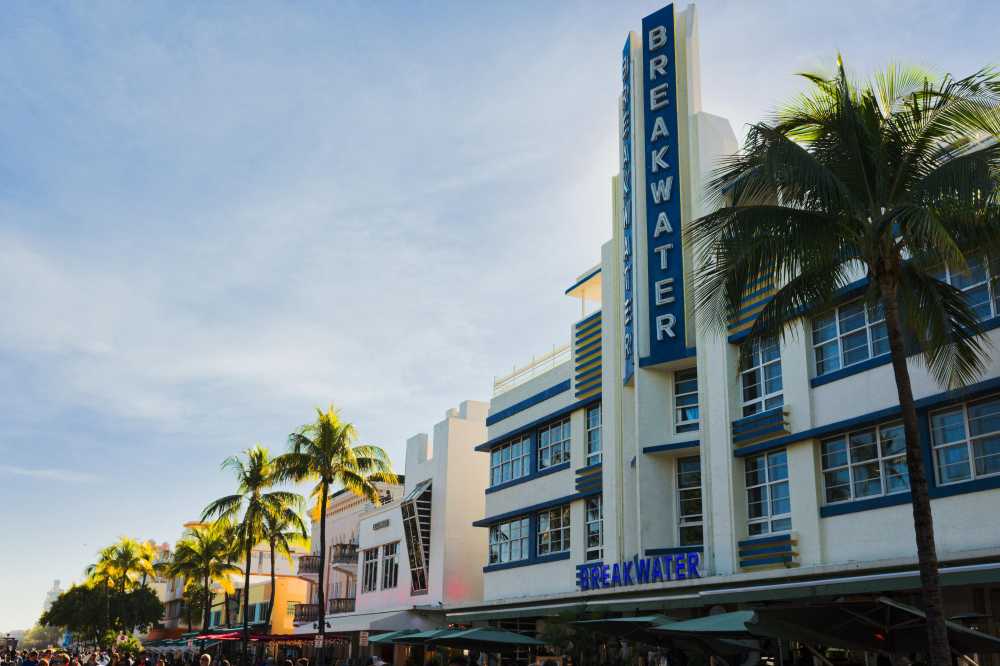
The Castro District: As the historic heart of San Francisco's LGBTQ+ community, the Castro is ground zero for Pride weekend. The streets become a massive, vibrant block party. While it will be just as crowded as the parade, the atmosphere is different—more neighborhood-focused and less structured. Grab a drink at a historic bar, watch the impromptu dance parties, and soak in the history.
Dolores Park: On Pride Sunday, the park's famous "Gay Beach" area expands to cover nearly the entire lawn. It transforms into a massive, sun-drenched picnic party. The vibe is more relaxed and bohemian than the official festival. Pack a blanket, bring some snacks, and enjoy people-watching in one of the city's most beautiful settings.
SoMa (South of Market): This neighborhood is home to many of the city's most famous clubs and venues. Throughout Pride weekend, these spaces host a huge variety of official and unofficial after-parties, from daytime DJ sets to late-night dance events. Check event listings in advance, as many of the most popular parties sell out.

Hack #5: Tech & Safety - Your Digital Toolkit for a Seamless Day
In a modern festival environment, your smartphone is your most powerful tool—if you use it wisely.
The Hack: Prep your phone and apps to be your digital command center for the day.
The Power Bank is Non-Negotiable: We mentioned it before, but it bears repeating. A dead phone means no photos, no map, and no way to contact your friends. A fully charged portable power bank is the single most important piece of tech you can bring.
Master Your Communication Apps: Standard text messages can be delayed when cell networks are overloaded. Use a data-based messaging app like WhatsApp or Signal for your group chat. Their delivery is often more reliable in dense crowds. Use the "Share Live Location" feature for a set period (e.g., 15 minutes) if you get separated and need to find your way back to your group.
Download Offline Maps: Before you leave home, download an offline map of the downtown San Francisco area in your map app of choice. Even if you lose all cell service, your phone's GPS will still work, allowing you to see your location on the map and navigate.
Embrace Official Resources: Check the official SF Pride website in the days leading up to the event. If they release an official app, download it. It will likely have the most accurate schedules, maps, and emergency alerts.
Pro-Tip: Take a screenshot of your planned meeting spots, the parade route map, and the contact info for everyone in your group. Create a dedicated photo album for these screenshots so you can access them instantly, even if your apps won't load due to poor connectivity.

Hack #6: The Exit Strategy - How to Leave Without the Headache
Just as important as your arrival plan is your exit strategy. When hundreds of thousands of people try to leave the same area at the same time, the public transit stations and rideshare zones become incredibly congested.
The Hack: Avoid leaving during the peak rush right as the festival winds down.
You have two primary strategies for a stress-free departure:
The Early Exit: If you've had your fill of the crowds and the main celebration, start making your way out before the final headliners take the stage at Civic Center. By leaving an hour before the official end time, you can beat the massive wave of people heading for the BART and Muni stations.
The Patient Wait: This is often the better option. Instead of rushing out with everyone else, wait it out. Find a restaurant or cafe a few blocks away from Civic Center, grab a bite to eat, and relax for an hour or so. Let the crowds on the transit platforms thin out. By the time you're done, your journey home will be far more pleasant.
If you're using a rideshare service, walk at least four or five blocks away from Market Street and Civic Center before you even attempt to request a ride. This will get you out of the most congested, no-pickup zones and will likely save you from the highest surge pricing.
Your Guide to an Unforgettable Pride
You are now armed with the knowledge to do more than just attend the pride parade San Francisco —you are ready to experience it with confidence, joy, and a sense of empowered preparedness. From mastering the Market Street route and navigating the Civic Center celebration to knowing the smartest ways to get there and back, you have the tools to craft a perfect day. This isn't just about avoiding stress; it's about creating space for the powerful moments of connection, celebration, and solidarity that define SF Pride. Go forth, celebrate loudly, and have an incredible time.
For a complete blueprint to planning your ultimate trip to the Bay Area, including deep dives into its other iconic holidays and hidden gems, be sure to explore our comprehensive Travel Guide.
Meta Data Suggestions:
SEO Meta Title: SF Pride: 6 Essential Hacks for the Parade Route & Parties
URL Slug: sf-pride-parade-route-party-hacks
SEO Meta Description: Master the SF Pride Parade! Get 6 expert hacks on navigating the Market Street route, finding the best parties, and staying safe in the crowds.
Don't Miss Out! Subscribe for Exclusive Content
Subscribe


Comments 0
No comments yet
Be the first to share your experience!
Dont Miss Out! Subscribe for Exclusive Content

San Francisco Cherry Blossoms: A Local's Guide to the Blooms

Halloween SF: Haunts Without Horrors

SF Festivals: 7 Must-See Lineups

Christmas SF: Lights & Wharf Wonders

Chinese New Year SF: Parade Essentials

San Francisco Holidays: Bay Area Buzz
The Complete Guide to Solo Road Trips: Planning, Safety & Vehicle Prep
TrekGuider @trekguider
You see the pictures, you hear the stories—the ultimate solo road trip, a journey of pure freedom on the open road. But when you actually start to think about it, a wave of very real questions hits hard: What if I get a flat tire in the middle of nowhere? How do I stay safe alone at a motel? Can I really handle all the planning, driving, and navigating by myself?
That initial thrill can quickly turn to anxiety, paralyzing you before you even check your tire pressure. Without a rock-solid plan, a dream trip can easily become a stressful, expensive, or even dangerous ordeal. The difference between a life-changing experience and a cautionary tale lies in preparation. While the logistics of solo travel are unique, the core principles of smart preparation are universal—a foundation just as crucial when mapping out Family Travel Ideas: The 2026 Guide to Unforgettable Trips as it is for hitting the road alone.
This guide is your solution. It is the definitive roadmap designed to systematically dismantle every fear and answer every question. We will replace uncertainty with a comprehensive, step-by-step framework covering everything from strategic planning and budgeting to critical safety protocols and vehicle preparation. After reading this, you will not only feel capable but completely empowered to pack your bags, turn the key, and confidently hit the road for one of the great solo road trips you've always imagined.

Why a Solo Trip is a Powerful Investment in Yourself
Before we dive into logistics, let's anchor ourselves in the why. A solo road trip is more than a change of scenery; it’s an active opportunity to disconnect from the demands of daily life and reconnect with the one person you can sometimes lose track of: yourself.
Absolute Freedom: You decide when to start, where to stop, and how long to linger. There are no compromises on the itinerary, the music, or the choice between a greasy-spoon diner and a scenic picnic. Every decision is yours alone.
Radical Self-Reliance: Successfully navigating hundreds of miles on your own is a profound confidence builder. You’ll learn to solve problems on the fly, trust your judgment, and discover a deep well of resilience you never knew you had.
The Luxury of Headspace: The long stretches of highway provide the mental space for deep thought and reflection. It’s a chance to process, dream, and learn what truly energizes you without the noise of external influence.
The Blueprint: Strategic Planning for the Open Road
While the soul of a road trip lives in its moments of spontaneity, its backbone is forged in smart preparation. This isn't about creating a rigid, fun-killing schedule; it's about building the strong framework that enables true freedom and removes decision fatigue when it matters most.

Define Your Mission: Destination & Purpose
First things first: What kind of journey are you craving? Your answer will be the compass for your entire plan. Are you seeking:
Rejuvenation? Picture a scenic drive along Oregon's coast, with stops in quiet towns and fog-laced forests.
High Adventure? A route looping through Utah's "Mighty 5" national parks, filled with challenging hikes and epic vistas. Planning a park-centric journey is a classic for a reason, and our National Park Road Trip Checklist can be an invaluable tool.
Cultural Discovery? A trip winding through the historic backroads of New England or the music-rich towns of the Mississippi Delta.
Your "why" dictates your route. The iconic Pacific Coast Highway delivers on coastal drama, while a journey along Route 66 is a nostalgic dive into Americana. Use tools like Google Maps, Roadtrippers, and travel blogs to map a general path, but also search for terms like "scenic byways in California" (or whichever state you're exploring) to uncover less-traveled gems.
The Art of the Flexible Itinerary
A rigid, minute-by-minute schedule is the enemy of a great road trip. The goal is to create a structured yet pliable plan.
Respect Your Driving Limits: This is the golden rule. Aim for no more than 4-6 hours of actual driving per day. This prevents burnout, gives you ample time to explore your stops, and, crucially, ensures you can arrive at your lodging before dark.
Anchor Your Journey: Always pre-book your accommodation for the first night and the last night of your trip. This brackets your journey, removing the stress of finding a place to stay when you’re either buzzing with first-day energy or exhausted from the final leg.
Identify Key "Pillars": Pinpoint the 2-3 must-see sights, cities, or parks on your route. These are your pillars. Plan your overnight stays around them, giving yourself enough time to explore them properly.
Embrace the In-Between: For the days between your pillars, keep your plans loose. This is where the magic happens. It allows you to follow a sign for a quirky roadside museum, spend an extra two hours at a breathtaking viewpoint, or explore a town that just feels right.
Budgeting: Your Financial Freedom Fund
A clear budget isn't a leash; it’s the tool that frees you from financial stress on the road.
Fuel: Use an app like GasBuddy to estimate total fuel costs based on your car's MPG and planned mileage. Be conservative and round up.
Lodging: Research average costs for hotels, motels, or campgrounds in your target areas. Prices can fluctuate wildly by season and local events.
Food & Drink: Set a daily food budget. Packing a cooler with drinks, snacks, and breakfast items is a pro move that drastically cuts costs.
Activities: Account for national park passes (an "America the Beautiful" annual pass is often a great value), museum tickets, and tours.
The "Uh-Oh" Fund: This is non-negotiable. Set aside 15-20% of your total budget as a contingency. This fund is for the flat tire, the surprise concert ticket, or the necessary hotel upgrade after a rough day.
Pro-Tip: Before you go, call your bank and credit card companies to notify them of your travel plans. This prevents them from freezing your account due to "unusual activity" when you're buying gas 500 miles from home.
Mastering Solo Road Trips with Confidence
Your personal safety matters most. A proactive, systematic approach doesn't create fear; it builds the confidence you need to explore freely.

Personal Safety
Think of your awareness as your most critical travel companion—the one piece of gear that should never be packed away. It's your built-in radar for navigating the world with confidence.
Share Your Battle Plan: Leave a detailed copy of your itinerary with at least two trusted friends or family members. Include hotel names, addresses, and phone numbers.
The Daily Check-In: Establish a simple system. A quick "Made it to Flagstaff! All good." text each evening provides peace of mind for everyone.
Daylight is Your Ally: Plan your driving to end well before sunset. Navigating unfamiliar roads and finding your hotel is infinitely easier and safer in the light.
Trust Your Gut Instinct: Your intuition is a highly evolved threat-detection system. If a gas station, rest stop, or situation feels wrong, it is wrong for you. Leave immediately. Don't second-guess it.
Walk with Purpose: Project confidence. Be aware of your surroundings. Avoid looking lost or glued to your phone. If you need to check a map, step inside a coffee shop or store.
Social Media Lag Time: Share your amazing photos after you've left a location. Posting your real-time whereabouts can broadcast your solo status to the wrong people.
A DEEPER DIVE ON SAFETY
For many independent travelers, safety is the number one concern. We've compiled a comprehensive resource filled with actionable strategies and expert advice specifically for navigating the world on your own.
Download our free Solo Female Travel Safety Guide to build unshakeable confidence for your next adventure.
The Solo Mindset: From Loneliness to Solitude
Let’s address the elephant in the room: loneliness. It's a valid concern, but it's crucial to differentiate it from solitude. Loneliness is a lack; solitude is a presence—the presence of yourself.
Embrace Dinners for One: Bring a book or a journal. Use the time to people-watch and savor your meal without distraction.
Strike Up Casual Conversations: Chat with the barista, the park ranger, or the shopkeeper. These small interactions can provide a welcome dose of human connection without any obligation.
Schedule Calls Home: Plan a few calls with friends or family during your trip. Hearing a familiar voice can be a great reset if you're feeling isolated.
Your Co-Pilot Check
On a solo trip, your car isn't just transportation; it's your partner. Ensuring it's in peak condition is the single most important thing you can do before you leave.

The Pre-Flight Mechanical Inspection
At least one week before you depart, have your vehicle inspected by a trusted mechanic, or do it yourself if you're knowledgeable.
Tires (The Four You See and The One You Don't): Check the pressure on all four tires plus the spare. Inspect the tread depth using the "penny test." If the tread doesn't cover Lincoln's head, you need new tires.
Fluids: Check your oil, coolant, brake fluid, and windshield washer fluid. Get an oil change if you're within 1,000 miles of your next service interval.
Brakes: Listen for squealing. Feel for any vibration when braking. Don't compromise here; get them checked if there's any doubt.
Battery: Look for corrosion (a white, powdery substance) on the terminals. If your battery is over three years old, have it load-tested at an auto parts store (it's often free).
Lights & Wipers: Test all lights. Replace wiper blades if they're cracked or leave streaks. A sudden downpour is a terrible time to discover they're useless.
Building the Ultimate Roadside Emergency Kit
A well-stocked kit can turn a trip-ending crisis into a manageable inconvenience. Having a comprehensive checklist is key. A great starting point for any major is our International Travel Checklist, which you can adapt for a domestic journey.
Jumper cables and a portable jump starter
Tire pressure gauge and a portable 12V air compressor
A complete first-aid kit
A powerful LED flashlight or headlamp (with extra batteries)
Basic toolkit (multi-tool, adjustable wrench, screwdrivers, gloves)
Duct tape and zip ties
Reflective warning triangles
A warm blanket, emergency rain poncho
High-energy, non-perishable snacks (protein bars, nuts)
At least one gallon of water
Pro-Tip: A portable jump starter (a small lithium-ion battery pack) is the best safety device a solo traveler can buy. It allows you to jump-start your own car without the need for another vehicle or the risk of asking a stranger for help.
Frequently Asked Questions
How much should I budget for a solo road trip?
Your main costs will be fuel, lodging, and food. A good starting point for a domestic US trip is to budget $150-$250 per day. This can be much lower if you're camping and cooking your own meals, or higher if you prefer nicer hotels and restaurants. Always add a 15-20% contingency fund for unexpected costs.
What's the best way to stay safe at rest stops or gas stations?
Choose busy, well-lit locations whenever possible. Before you get out of the car, take a moment to observe your surroundings. Stay off your phone, be aware of who is around you, and trust your gut instinct. If a place feels unsafe, leave and find the next one.
Is it better to book all my accommodations in advance for a solo trip?
We recommend a hybrid approach. Book your first and last nights in advance to reduce stress. For the nights in between, having flexibility is great, but it's wise to book your next night's stay at least 24 hours in advance, especially in popular areas, so you're not left scrambling at dusk.
Turn the Key: Your Adventure Begins Now
The journey of a thousand miles begins not with a single step, but with a decision—the decision to prepare. By now, the idea of a solo adventure should feel less like a daunting challenge and more like an exciting, achievable reality. You have the framework for careful planning, the knowledge to build a strong safety net, and the checklist to ensure your vehicle is a reliable partner.
You are equipped to handle the road with confidence and embrace the unparalleled freedom that only solo road trips can offer. The open road is not just a path to a new destination; it’s a path to a more capable and self-aware version of yourself. The planning is part of the adventure. The preparation is part of the empowerment. Now, it's time to put it all into action. Go create a story that is entirely your own.

Don't Miss Out! Subscribe for Exclusive Content
SubscribeComments 0
No comments yet
Be the first to share your experience!
Dont Miss Out! Subscribe for Exclusive Content
San Francisco Cherry Blossoms: A Local's Guide to the Blooms
Halloween SF: Haunts Without Horrors
SF Festivals: 7 Must-See Lineups
Christmas SF: Lights & Wharf Wonders

SF Pride: 6 Route & Party Hacks
Chinese New Year SF: Parade Essentials
Miami Holidays: 8 Beach Fest Vibes
TrekGuider @trekguider
Forget the winter coat and the hot cocoa. In Miami, the holiday season arrives on a salt-laced breeze, trading snow-dusted rooftops for palm trees wrapped in glittering lights. Here, New Year’s Eve is scored by world-class DJs, not carolers, and the most unforgettable celebrations unfold right on the water. Planning for holidays in Miami means embracing a vibrant, sun-drenched reality where the festive spirit is measured in beats per minute and degrees Fahrenheit.
This is a city that doesn’t just observe holidays; it transforms them into spectacular, larger-than-life events. From the global art world descending for a week of dazzling creativity in December to patriotic fireworks bursting over the turquoise waters of Biscayne Bay, Miami’s calendar is a year-round proof of its energetic soul.

Whether you’re an art connoisseur ready to navigate the world’s most prestigious fair, a music devotee chasing the electric thrill of a legendary festival, or simply someone dreaming of a Christmas where the only ice you’ll see is floating in your mojito, this guide is your starting point. Get ready to discover a holiday season where the vibes are as warm as the weather.
For a broader look at how different American cities celebrate the nation's biggest moments, from New York's iconic parades to New Orleans' cultural feasts, our Ultimate USA Holidays Guide: Top Picks is your essential national planner.
1. Art Basel: The Global Art World’s Winter Playground
Each December, Miami sheds its beach-town persona to become the undisputed epicenter of the international art world. Art Basel Miami Beach is far more than an art fair; it’s a city-wide cultural takeover that, according to industry reports, injects over $500 million into the local economy—an impact that rivals a Super Bowl. The main event at the Miami Beach Convention Center is the prestigious core, where blue-chip galleries present museum-quality works to collectors and enthusiasts. But the real energy of the week spills out into every neighborhood.
For first-timers, the scale can be overwhelming. Start your journey at the main fair by exploring the Meridians sector for monumental installations or the Nova sector for works fresh from artists' studios. Then, venture out. The true magic lies in the dozens of satellite fairs, like the acclaimed Untitled Art on the sands of Ocean Drive or the edgy NADA Miami, each with its own distinct personality. For a dose of vibrant, accessible creativity, a stroll through the iconic Wynwood Walls district is non-negotiable. This is your chance to immerse yourself in creativity, attend exclusive parties, and witness the absolute cutting edge of the contemporary art scene.
To navigate the main fair, satellite events, and transportation like a seasoned collector, our complete playbook is essential: Art Basel Miami: 7 Insider Hacks.

2. Ultra Music Festival: An Electronic Music Pilgrimage
As winter thaws into spring, a different kind of energy electrifies Miami. The deep, thumping bass of the Ultra Music Festival reverberates through downtown, transforming the sprawling Bayfront Park into a neon-drenched paradise for electronic music fans. This is a global pilgrimage, drawing the biggest names in the industry—from legends like Tiësto and Armin van Buuren to modern titans like Skrillex and John Summit—to its iconic, pyrotechnic-heavy stages. For three days, from afternoon until midnight, the city’s heart pulses with euphoric beats, dazzling light shows, and an unparalleled party atmosphere that attracts attendees from over 100 countries.
Surviving Ultra is a marathon, not a sprint. The event is famously "rain or shine," so your attire needs to be strategic: think lightweight, breathable fabrics and your most comfortable sneakers. A hydration pack is not just a recommendation; it's a critical piece of gear, and cooling towels will feel like a godsend under the Florida sun. For enhanced safety, organizers have partnered with the SaferWatch app for real-time, anonymous reporting. Remember, there’s no designated festival parking, so plan on using rideshare or the Metromover to dive into the heart of the action.
To master the festival from lineup planning to staying cool in the crowd, don't miss our essential survival guide: Ultra Festival: Beat the Heat Guide.
3. Christmas in Miami: A Tropical Holiday Dream
Who needs a white Christmas when you can have a turquoise one? In Miami, the holiday season is a uniquely tropical affair where festive cheer is all about sun, sand, and spectacle. Instead of snow-covered pines, you’ll find majestic palm trees elegantly wrapped in thousands of twinkling lights, their fronds rustling in the warm evening breeze. The quintessential Miami experience is the holiday boat parade, a dazzling procession of vessels—from humble fishing boats to luxurious yachts—cruising down Biscayne Bay, all decked out in elaborate, illuminated displays that shimmer across the water.
It’s a season that proves you don’t need cold weather to feel the magic. Families flock to experiences like the Christmas Wonderland at Tropical Park for classic holiday fun with a warm-weather twist, complete with carnival rides, festive treats, and immersive light shows. The blend of beach culture and yuletide cheer creates a relaxed yet celebratory atmosphere that’s impossible to find anywhere else. It’s the perfect escape for anyone looking to trade their snow boots for sandals and redefine their holiday traditions.
Discover the best spots for waterfront light shows and find the most festive events with our dedicated guide: Christmas Miami: Tropical Lights Tour.

4. New Year's Eve: A High-Energy Countdown to Midnight
Miami was practically built for New Year's Eve. The city’s natural glamour and penchant for a world-class party lead to a night of explosive celebration, with an option for every style and budget. The epicenter of the public festivities is Bayfront Park, where thousands gather for a free concert and a massive fireworks display over the water. The city’s iconic “Big Orange,” a neon icon, slowly ascends the side of the InterContinental Hotel, reaching the top at midnight to welcome the new year.
For those seeking a more exclusive experience, South Beach is the destination. World-famous clubs like LIV and Fontainebleau host legendary parties with celebrity DJs and A-list crowds, where tickets often start at $200 and climb. For a more laid-back but still vibrant scene, the chic bars in Coconut Grove or Brickell offer a lower-cost entry point, often around $50. But for a truly unforgettable view, consider a boat cruise on Biscayne Bay. These ticketed events often include dinner, drinks, and a DJ, giving you front-row seats to the fireworks, far from the crowds on land.
To find the perfect celebration to ring in your new year, explore our curated list of the city’s hottest parties and viewing spots: NYE Miami: 5 Epic Party Spots.

5. Miami Beach Holidays: The Ultimate Festive Escape
At its core, a trip to Miami is about the beach, and the holidays are no exception. The city masterfully blends the deep relaxation of a seaside getaway with the electric excitement of its seasonal festivities. Imagine spending Christmas morning with a refreshing swim in the Atlantic, or watching the New Year's Eve fireworks with your toes buried in the cool sand. This is the essence of holidays in miami—a perfect fusion of leisure and celebration that feels both indulgent and invigorating.
During the day, the iconic stretch of South Beach is your playground. You can soak up the sun, try your hand at paddleboarding, or simply admire the pastel hues of the historic Art Deco architecture along Ocean Drive. As evening approaches, the area comes alive with a different energy. Oceanfront hotels host elegant holiday brunches, and rooftop bars offer festive cocktails with panoramic views of the city and sea. It’s a vacation that offers the best of both worlds, ensuring you return home feeling both rested from the sun and energized by the celebrations.
Learn how to perfectly balance oceanside relaxation with festive revelry using our complete guide: Miami Beach Holidays: Festive Escapes.

6. Independence Day: A Patriotic Bayfront Spectacle
On the Fourth of July, Miami’s patriotic spirit shines as brightly as its world-famous sunshine. The city’s stunning waterfront provides a dramatic backdrop for one of the most cherished holidays in the USA. The main event is the massive, choreographed fireworks display launched over Biscayne Bay, with Bayfront Park serving as the primary viewing location for the public. Throughout the afternoon, the park buzzes with live music, food vendors, and a family-friendly atmosphere as thousands gather with picnics and blankets, creating a lively community vibe as they await nightfall.
For a truly unique Miami experience, savvy locals and visitors alike choose to watch the spectacle from the water. Renting a private boat or joining a chartered cruise offers an unparalleled, unobstructed view of the fireworks, far from the packed crowds on land. As the colorful explosions light up the night sky, their reflections dancing on the bay with the glittering city skyline in the background, you’ll understand why celebrating America’s birthday here is an unforgettable experience.
For the best viewing spots on land and sea, plus tips for a spectacular Fourth of July, see our guide: Independence Day Miami: Fireworks Fun.
7. The Savvy Traveler's Wardrobe: What to Pack for Miami
One of the greatest luxuries of a Miami holiday is the weather. While much of the country is layering up, Miami basks in sunshine and balmy warmth, making it the ultimate winter escape. This blissful climate, however, demands a specific packing strategy. Leave the heavy coats and wool at home; your suitcase should be a curated collection of lightweight, stylish, and practical pieces ready for sun, sophistication, and the occasional surprise rain shower.
Your essential Miami packing list should include:
Elevated Swimwear & Cover-Ups: You’ll live in these. Pack at least two swimsuits and a few stylish cover-ups (a linen shirt, a sarong, a chic sundress) that can easily transition from the pool deck at the Delano to a casual lunch spot.
High-Performance Sun Protection: The Florida sun is no joke. A high-SPF, sweatproof sunscreen is non-negotiable. Pair it with a wide-brimmed hat and high-quality, polarized sunglasses to protect yourself in style.
Versatile Footwear: You'll be doing a lot of walking, from gallery-hopping in the Design District to dancing at a festival. A pair of comfortable yet fashionable sneakers is essential. Also pack flat sandals for daytime and a pair of dressier wedges or heels for evenings out.
Day-to-Night Outfits: Think in terms of breathable, humidity-friendly fabrics like cotton, linen, and rayon. Pack versatile pieces: tailored shorts, flowy midi skirts, and lightweight tops that can be dressed up or down. For evenings in South Beach or Brickell, a sophisticated cocktail dress or a sharp blazer-and-trousers combo is a must.
A Light Layer: While days are hot, aggressive air conditioning and evening sea breezes can create a chill. A light jacket, a cashmere wrap, or a stylish cardigan is a smart addition for evenings.
Essential Tech: A portable power bank is a lifesaver during long festival days or while you’re out exploring. And to make your photos pop with that iconic, sun-kissed Miami glow, download our Free Travel Lightroom Presets before you go.
8. Your Strategic Game Plan for the Holidays in Miami
A successful trip during the holidays in Miami hinges on smart, advance planning. The city’s magnetic appeal during peak seasons means that the best hotels, top dinner reservations, and event tickets sell out months in advance. To avoid disappointment and premium pricing, book your flights and accommodations at least three to six months out, especially if your trip coincides with Art Basel, Ultra, or New Year's Eve.

Choosing Your Home Base:
South Beach: Stay here if you crave being in the heart of the action, with direct beach access, world-class nightlife, and the iconic Art Deco backdrop. It's glamorous, energetic, and always awake.
Downtown/Brickell: This is your command center for events at Bayfront Park like Ultra and the July 4th fireworks. It offers a sleek, urban feel with stunning rooftop bars, financial-district polish, and excellent public transit via the Metromover.
Wynwood/Design District: The perfect choice for art lovers and trendsetters. This area is a visual feast of street art, cutting-edge galleries, and chic boutiques, offering a more creative, bohemian vibe.
Coconut Grove: For a more laid-back, village-like atmosphere, head to the Grove. It’s known for its lush parks, charming sidewalk cafes, and beautiful marinas.
Navigating the City: Parking in Miami, particularly in Miami Beach, is notoriously difficult and expensive. Save yourself the stress and embrace the city's other options. Rideshare services are abundant, but be prepared for surge pricing during major events. The free, elevated Metromover is a fantastic way to navigate the Downtown and Brickell areas. For any trip, it's wise to book parking in advance using an app like SpotHero if you must drive.
These expert-written articles are just the beginning. The TrekGuider Marketplace is your portal to an entire library of digital resources created by vetted, on-the-ground experts. Find detailed neighborhood guides, self-guided walking tours, and curated lists of hidden gems—all available for instant download. Think of it as having a local expert’s brain in your pocket. For a truly comprehensive plan, our all-in-one Travel Guide is the ultimate resource for crafting your perfect U.S. adventure.
Are you a Miami insider with secrets to share? TrekGuider isn’t just for travelers—it’s a platform for creators like you. If you have specialized local knowledge, you can use our tools to build a business around your passion. Set up your free creator page, publish articles to build your authority, and sell your own digital guides to a global audience.
Your Unforgettable Miami Holiday Awaits
From the avant-garde masterpieces of Art Basel to the sun-drenched revelry of Christmas on the beach, Miami offers a holiday experience that is vibrant, exhilarating, and utterly unique. It’s a city that invites you to trade quiet tradition for thrilling adventure and to create new memories under the warm Florida sun. By planning ahead and embracing the city's infectious energy, you can craft the perfect getaway. Whether you're here for the art, the music, or simply the beach, the holidays in Miami promise a spectacular escape you won’t soon forget.
Don't Miss Out! Subscribe for Exclusive Content
SubscribeComments 0
No comments yet
Be the first to share your experience!
Dont Miss Out! Subscribe for Exclusive Content
San Francisco Cherry Blossoms: A Local's Guide to the Blooms
Halloween SF: Haunts Without Horrors
SF Festivals: 7 Must-See Lineups
Christmas SF: Lights & Wharf Wonders
SF Pride: 6 Route & Party Hacks
Chinese New Year SF: Parade Essentials
Solo Travel Blog Monetization: Turning Stories into Income
TrekGuider @trekguider
You've seen the Instagram posts tagged '#digitalnomad' and wondered if it's actually real. Can a solo travel blog—your solo travel blog—truly become a source of income, or is it just a path to burnout? The truth is, most new bloggers fail because they follow a random list of 'monetization ideas.' They're missing the most critical element: a strategic, time-based plan. This is not a list of ideas. This is your 24-month roadmap, grounded in real data from six-figure bloggers, showing you exactly what to do, when to do it, and the income you can realistically expect at each stage. This is your guide to successful solo travel blog monetization.

Moving from Hobbyist to Business Owner
The first and most critical shift you must make is mental. Your blog is no longer just a personal travel diary; it is the central asset of a new business. Every decision, from the topics you cover to the way you structure your articles, must be made with a clear purpose: to provide immense value to a specific audience. Before you can monetize effectively, you must provide that value, which starts with mastering the fundamentals. For a complete playbook on creating world-class content and navigating your journey, review our comprehensive .
This business-oriented mindset means prioritizing the single most important driver of revenue: Search Engine Optimization (SEO). While social media can provide fleeting traffic spikes, SEO delivers a consistent, sustainable stream of readers who are actively searching for the solutions you provide. These are the people who will click your links, book tours, and buy your products. From this day forward, think of yourself not as a blogger, but as the CEO of a media company whose primary asset is high-ranking, helpful content.
What to Expect and When
Forget the overnight success stories. Building a profitable blog is a marathon, not a sprint. Having a realistic timeline prevents discouragement and keeps you focused on the right tasks at the right time.

Year 1 Expectations: Building Traffic and Earning Your First ~$2,000
Recommended: The Solo Female Travel Safety Guide
Recommended: How to Pack Light: The Carry-On Guide
The first year is all about laying the foundation. Your primary goal is not to make a full-time income, but to publish a critical mass of high-quality, SEO-optimized content and establish topical authority in your niche. You'll spend the first few months writing and publishing consistently without seeing much traffic, and that's completely normal.
Data from established bloggers shows that you can expect to make your first affiliate sale around month four or five. By the end of the first year, a dedicated blogger can realistically earn between $1,000 and $5,000. This income will come almost exclusively from strategic affiliate marketing.
Year 2 Expectations: Scaling to a Viable Income ($20,000 - $40,000)
Year two is the scaling phase. The content you published in your first year begins to mature and rank higher in Google search results, leading to a significant increase in traffic. This is the year you'll likely cross the critical threshold needed to qualify for premium ad networks. This combination of escalating affiliate commissions and new, high-earning display ad revenue is what transforms your blog from a side hustle into a viable business. It's not uncommon for bloggers who were earning $200/month at the end of year one to be earning $2,000-$4,000/month by the end of year two.
(Months 1-6): Laying the Foundation for Your Solo Travel Blog Monetization
Welcome to the grind. In this foundational phase, you are building the powerful engine of your business long before you see significant fuel (i.e., traffic). Success here isn't measured in dollars; it's measured in discipline and consistent output.
Your Primary Focus: Publishing High-Quality, SEO-Optimized Content
Think of high-quality content as the real estate upon which you'll build your entire business. It's the non-negotiable asset that makes all future income possible. In these first six months, your goal should be to publish 25-40 thoroughly researched, long-form articles that target specific keywords your audience is searching for. Every article should aim to be the single best resource on the internet for its given topic. This early library of content is what Google will eventually reward with traffic.
Method 1: Strategic Affiliate Marketing (The Best First Step)
Affiliate marketing is the practice of earning a commission by promoting another company's products or services. It is the perfect first monetization method because most programs have no minimum traffic requirements. You can, and should, include affiliate links from day one.
The key is to recommend products you genuinely use and trust. Your recommendations must be woven naturally into helpful content. Don't just list products; explain why a certain backpack is perfect for a carry-on-only trip or how a specific travel insurance policy saved you during an emergency. A crucial element of this is transparency. Always include a clear affiliate disclosure at the top of your posts. This isn't just an FTC requirement; it's a critical component of building long-term trust with your audience.
Choosing the Right Affiliate Platforms: A Data-Driven Comparison
Start with a mix of affiliate aggregators and direct programs to maximize your opportunities.
Travelpayouts: An excellent starting point. It's an aggregator that gives you access to dozens of travel brands like Booking.com, GetYourGuide, and Hostelworld through a single platform, making it easy to manage your links and payments.
Stay22: A powerful, map-based tool specifically for accommodations. It often has a higher conversion rate than other hotel affiliate links because it shows users a variety of options on a map, which is incredibly helpful in the travel planning process.
Direct Programs: Many essential travel brands have their own programs. Be sure to sign up for:
Amazon Associates: For all the physical gear you recommend, from packing cubes to portable chargers.
Booking.com / Agoda: The top platforms for hotel bookings worldwide.
GetYourGuide / Viator: The leaders in tours, activities, and attraction tickets.
Pro-Tip: Don't go back and add affiliate links later. Research and include relevant links in every article as you write it. This saves an immense amount of time and ensures your monetization efforts start from the moment you hit "publish."
(Months 7-18): Scaling Traffic and Unlocking Serious Income
With a solid foundation of content beginning to rank, you now shift your focus from pure production to growing the one metric that unlocks the next level of income: monthly sessions.
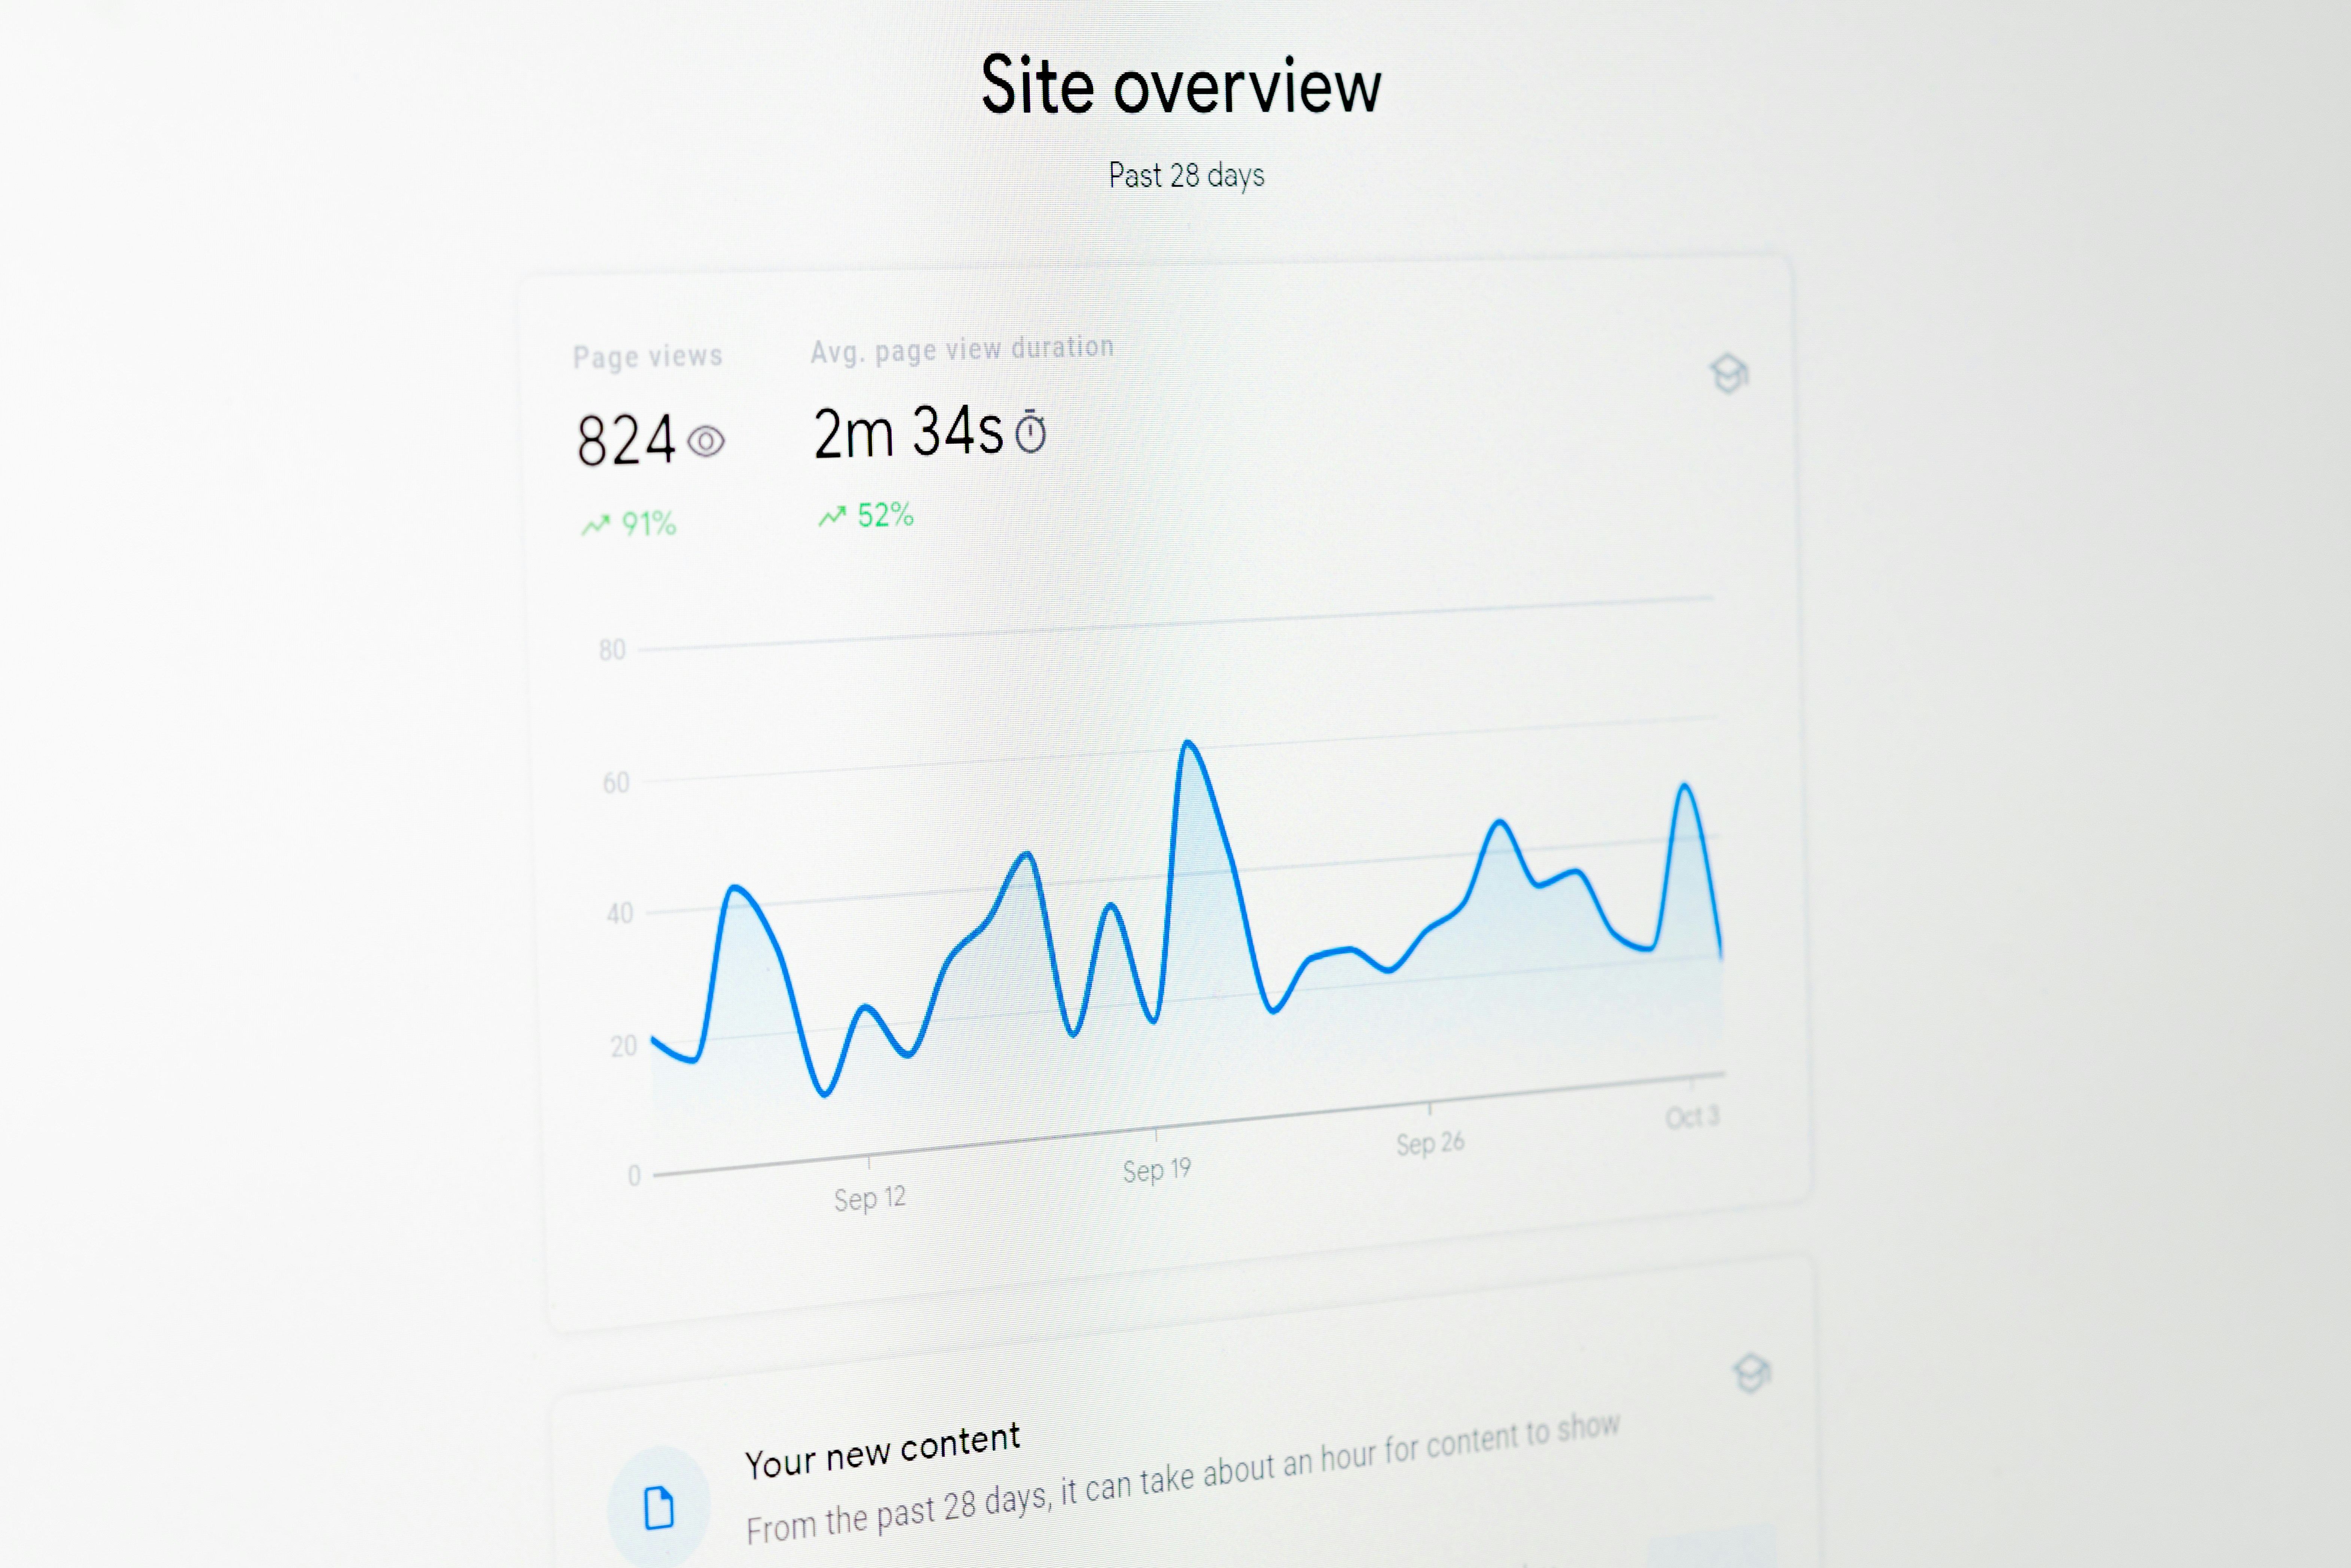
Your Primary Focus: Reaching 50,000+ Monthly Sessions
This is the magic number. Crossing the threshold of 50,000 monthly sessions (the number of visits to your site, as measured by Google Analytics) is the key inflection point where your income potential grows exponentially. It signals to premium ad networks that you have a substantial and engaged audience, making you a valuable partner. Reaching this level requires continued content production and a focus on building high-quality backlinks to your articles.

Method 2: Display Advertising (Unlocking Passive Income)
Display ads are the advertisements you see placed within the content of a website. When you have significant traffic, this becomes a powerful and almost entirely passive income stream. The key is to work with the right network.
The Ad Network Ladder: From Beginner to Premium
Not all ad networks are created equal. Your goal is to climb the ladder to a premium network as quickly as possible.
Avoid Google AdSense: Many new bloggers start here, which is a major mistake. AdSense pays extremely low rates, often resulting in an RPM (Revenue Per Mille, or earnings per 1,000 pageviews) of just $1-$3. It clutters your site for pennies.
Starter Networks (The Stepping Stone): Networks like Journey by Mediavine (requires 10,000 monthly sessions) or Ezoic offer a significant step up from AdSense. They are a great intermediate goal.
Premium Networks (The Goal): This is where serious income begins.
Mediavine: The gold standard for many bloggers. They require a minimum of 50,000 monthly sessions. Mediavine is known for its incredible support and high RPMs, often in the $20 - $40+ range. They command higher rates from advertisers because of their high-quality publisher network and direct sales teams.
Raptive (formerly AdThrive): The top tier. Raptive requires 100,000 monthly sessions and is known for having some of the highest RPMs in the industry for the same reasons.
Getting accepted into Mediavine is a major milestone. For a blog with 50,000 sessions, a $25 RPM translates to $1,250 in passive income per month. This is in addition to your growing affiliate revenue.
(Months 19+): The CEO Phase—Building a Diversified Travel Brand
Once you have stable traffic and income from ads and affiliates, you can move into the final phase: maximizing profitability by leveraging your most valuable asset—your audience's trust.
Building Brand Authority and Audience Trust
At this stage, your readers see you as a trusted expert. They've followed your advice, booked hotels you recommended, and bought gear you reviewed. This trust is the asset you will now monetize directly, leading to the highest profit margins possible.
Method 3: Selling Your Own Digital Products (The Highest Profit Margin)
Creating and selling your own products is the holy grail of solo travel blog monetization. You control the price, the product, and you keep nearly 100% of the revenue. This requires a loyal audience that trusts your expertise, which is why it's an advanced strategy.

Examples of high-value digital products for a solo travel audience include:
Comprehensive E-books: A deep dive into a specific topic, like "The Ultimate Guide to Solo Female Travel in Southeast Asia."
Printable Destination Itineraries: Detailed day-by-day plans for cities like Rome, Tokyo, or Lisbon that your readers can purchase and download.
Trip Planning Templates: Customizable spreadsheets or Notion templates that help your readers organize their own trips.
Digital Packing Lists: Niche-specific checklists for different types of travel (e.g., carry-on only, winter travel, hiking).
Pro-Tip: Validate your product idea before you build it. Send a survey to your email list or poll your audience on social media, asking what they struggle with most. If dozens of people say "planning my Italy itinerary is overwhelming," you have a winning product idea.
Method 4: Sponsored Content and Brand Partnerships
Sponsored content, where a brand pays you for a dedicated article or mention, represents a shift from passive to active income. While it can be lucrative, with sponsored posts often fetching $1,000 or more, you shouldn't just wait for opportunities to land in your inbox. As your brand authority grows, you can proactively pitch partnerships. Create a professional media kit—a one-page PDF outlining your website traffic, audience demographics, and core values—and reach out to brands you already use and love with a specific collaboration idea.
Frequently Asked Questions (FAQ Section)
How much money can you make from a travel blog?
In your first year, aim for $1,000-$5,000. By the end of year two, $20,000-$40,000 is a realistic target for dedicated bloggers. Established, six-figure travel bloggers who have diversified into ads, affiliates, and digital products can earn well over $100,000 per year.
How long does it take to make $1000 a month blogging?
For most travel bloggers who consistently publish high-quality, SEO-optimized content, it takes between 12 and 18 months to consistently earn $1,000 per month. This milestone typically occurs after being accepted into a premium ad network like Mediavine.
Do I need a large social media following to make money?
No. This is a common and damaging myth. The most profitable travel blogs focus on SEO. You can make a full-time income from a travel blog with fewer than 1,000 Instagram followers if your website traffic from Google is high and consistent.
What are the initial costs of starting a profitable travel blog?
The essential startup costs are minimal. You'll need a domain name (around $15/year) and web hosting (around $5-$15/month). Investing in a premium WordPress theme ($60 one-time) and an SEO tool like Keysearch ($17/month) are highly recommended but not strictly necessary on day one.
Turning your passion for solo travel into a profitable business is not a dream; it's a project. It requires a strategic plan, immense dedication, and an unwavering focus on providing real value. This roadmap has shown you the what and the when. By following this phased approach to solo travel blog monetization, you move beyond wishful thinking and begin the methodical work of building a business that can fund your travels and your life. The journey is long, but the destination—a life of freedom and financial independence—is worth every step.
Read the full guide: Anxious to Adventurous: The Ultimate Guide to Solo Travel Confidence
Don't Miss Out! Subscribe for Exclusive Content
SubscribeComments 0
No comments yet
Be the first to share your experience!
Dont Miss Out! Subscribe for Exclusive Content

FTC Affiliate Disclosure: Stay Compliant as a Travel Creator

Essential Affiliate Tools: From Tracking to Full Optimization

Avoid These 5 Affiliate Landing Page Mistakes for Better Conversions

Affiliate Keyword Research Mastery for Travel Blogs

Booking.com Affiliate Review: Pros, Cons & Earnings
