SF Pride: 6 Route & Party Hacks
TrekGuider @trekguider
Picture it: a river of rainbow flags, glitter, and pure, unadulterated joy flowing down Market Street. The air thrums with music, cheers, and the collective heartbeat of hundreds of thousands celebrating love, identity, and resilience. This isn't just any parade; this is the legendary San Francisco Pride Parade. But for every person lost in the moment, there's another lost in the crowd, wrestling with a dead phone, a terrible view, and no idea where their friends have vanished. The sheer scale of SF Pride can be overwhelming, threatening to turn a day of pure celebration into a stressful logistical nightmare.
You’ve imagined yourself at the heart of the action, capturing the perfect photo, feeling that powerful sense of community. The reality, however, could be getting stuck behind a seven-foot-tall person, unable to see a single float, with your phone battery blinking at 3% and no cell service to find your crew. The difference between an unforgettable experience and a frustrating ordeal isn't luck—it's preparation. You deserve to experience every ounce of joy this iconic event has to offer, without the chaos and confusion that can so easily derail the day.
This is your definitive guide to conquering the celebration. We’re giving you six battle-tested route and party hacks to navigate the pride parade San Francisco like a seasoned pro. Forget the stress; this playbook ensures you soak in the history, master the logistics, and create memories that will last a lifetime, all while staying safe and comfortable.

Before You Go: Essential Prep for the Pride Parade San Francisco
Before you even think about your rainbow outfit, a little prep work will set the stage for a flawless day. The SF Pride Parade is more than a party; it’s a powerful legacy. Born from the first "gay-in" in 1970 and commemorating the key 1969 Stonewall Uprising, this event has evolved from a protest into a global platform for activism and celebration. In the 1980s, it became a crucial front line for raising AIDS awareness, and today it continues to champion the diverse spectrum of the LGBTQ+ community. Understanding this history enriches the entire experience, transforming it from a spectacle into a meaningful pilgrimage.
The 2026 SF Pride Parade is scheduled for Sunday, the last Sunday of Juneth, with the first contingents stepping off at 10:30 AM. To be ready, your day pack is your most critical asset. Here’s a non-negotiable checklist:
Hydration: Pack a reusable water bottle. There are water stations, but having your own is crucial for staying hydrated in the California sun.
Sun Protection: Sunscreen, a hat, and sunglasses are absolutely essential. There is very little shade along the parade route.
Layered Clothing: San Francisco weather is famously fickle. What starts as a chilly, foggy morning can quickly turn into a warm, sunny afternoon. A light jacket or hoodie you can tie around your waist is the smartest move you can make.
Comfortable Shoes: You will be on your feet for hours, walking and standing. Prioritize comfort over style; your feet will thank you by the end of the day.
Portable Power Bank: Your phone will be working overtime as your camera, map, and communication device. A fully charged power bank is an absolute must-have.
Snacks: While there are food vendors, lines can be long and prices high. Pack some energy bars or other easy-to-eat snacks to keep your energy levels up.
Finally, let's talk safety. SF Pride is known for its strong security measures, including advanced weapon detection technology at key entry points. While organizers work hard to create a secure environment, personal safety matters most in any large crowd. Familiarize yourself with basic protocols, like being aware of your surroundings and keeping your valuables secure. For a comprehensive look at staying safe while traveling, our Solo Female Travel Safety Guide offers invaluable tips that apply to everyone, regardless of gender, in any crowded event scenario.

Hack #1: Master the Market Street Route for the Pride Parade San Francisco
The parade route is deceptively simple: it runs straight down Market Street, starting at Beale Street and culminating at 8th Street, right by the Civic Center Plaza. The challenge isn't knowing the route; it's knowing where on the route to be and when to be there.
The Hack: Arrive by 9 AM and choose your zone strategically. The parade officially starts at 10:30 AM, but the sidewalks begin filling up much earlier. Arriving an hour and a half beforehand allows you to claim a prime spot without having to battle the late-coming masses.
Here’s a breakdown of the route's key zones to help you decide on your ideal viewing experience:
The Starting Zone (Beale to Montgomery Street): This area is often less crowded, especially right at the beginning. You'll see all the contingents when they are fresh, energized, and at their most organized. It’s a fantastic spot for photographers who want clean shots of the floats and performers before the crowds swell. The energy here is one of joyful anticipation.
The Commercial Core (Montgomery to Powell Street): This is the heart of the parade and, consequently, the most packed section. The tall buildings create a canyon-like effect, amplifying the sound and energy. It’s an intense and exhilarating place to be, but not for the faint of heart. If you want to be in the thick of it, this is your spot, but be prepared for a tight squeeze.
The Climax Zone (Powell to 8th Street): As the parade approaches its end at the Civic Center, the energy reaches a fever pitch. This is where the performers give their all, knowing they’re approaching the main celebration. The crowd here is dense but incredibly vibrant. Positioning yourself near 8th Street gives you a head start on moving into the Civic Center Plaza for the post-parade festivities.
Pro-Tip: For a less obstructed view and better photos, try to secure a spot on the south side of Market Street. In the late morning and early afternoon, the sun will be mostly at your back, beautifully illuminating the parade without forcing you to squint. This side is often just slightly less congested than the north side.
Hack #2: The Transportation Game Plan - Ditch the Car, Embrace Public Transit
Let’s be perfectly clear: driving to the SF Pride Parade is a recipe for disaster. Street closures are extensive, parking is virtually non-existent and astronomically expensive, and navigating the gridlock will drain your celebratory spirit before you even arrive.
The Hack: Make BART (Bay Area Rapid Transit) and Muni your best friends for the day. San Francisco’s public transit system is designed to handle massive events like this, and it is by far the most efficient way to get to and from the parade.
Here’s your transit strategy:
BART: The underground trains are the fastest way to get downtown from the East Bay, the Peninsula, or other parts of the city. The key is choosing the right station to exit.
Embarcadero Station: Puts you right near the start of the parade. A great option if you plan to arrive early and watch from the beginning.
Montgomery Station: A perfect middle-ground, placing you in the energetic core of the route. It’s one of the busiest stations, so be prepared for crowds.
Powell Station: Another central option, close to the cable car turnaround and a major shopping area. Like Montgomery, expect it to be very busy.
Civic Center Station: This is your stop if you want to head directly to the post-parade celebration or watch the parade's final leg.
Muni: The city’s network of buses and light rail (Muni Metro) is another excellent choice. The F-Market & Wharves historic streetcar will be rerouted, but the Muni Metro lines run directly under Market Street, using the same stations as BART. Many bus lines will have detours, so be sure to check the SFMTA website or your favorite transit app for real-time updates on the day of the event.
Rideshare services like Uber and Lyft will be operating, but expect heavy surge pricing and designated drop-off/pick-up zones that may be several blocks away from Market Street to avoid the worst of the congestion. Public transit remains the most reliable and cost-effective option.

Hack #3: The Civic Center Celebration - Your Post-Parade HQ
The last float crossing 8th Street doesn't mark the end of the day—it marks the beginning of the next phase. The parade flows directly into the massive Pride Celebration at Civic Center Plaza, a sprawling festival with multiple stages of live music, DJs, inspiring speakers, hundreds of community booths, art installations, and food vendors.
The Hack: Have a concrete plan for navigating the festival, especially for meeting your group. Cell service in and around Civic Center Plaza can become extremely unreliable due to the sheer number of people. A "we'll find each other" approach will likely fail.
Follow these steps for a seamless transition from parade to party:
Establish a Hyper-Specific Meeting Point: Before you separate, agree on a meeting spot that is impossible to mistake. "By the main stage" is too vague. Instead, choose something like, "At the base of the statue of James Lick, on the side facing the library," or "Directly in front of the main entrance to the Asian Art Museum." Set specific times to meet there (e.g., 2 PM and 4 PM).
Pace Yourself and Hydrate: The celebration runs for hours after the parade. It's a marathon, not a sprint. Continue to drink water, find moments of shade, and don't forget to eat.
Explore with Purpose: Don't just wander aimlessly. The community booths are the soul of the celebration. You can connect with dozens of non-profits, activist groups, and local organizations. It’s an incredible opportunity to learn, connect, and find your community.
Know Your Exits: Take a moment upon arrival to orient yourself and identify the main exit points from the plaza. Knowing how to get out quickly in case of an emergency or if you simply feel overwhelmed is a smart move.

Hack #4: Beyond Market Street - Unofficial Parties & Neighborhood Vibes
The official parade and Civic Center festival are the main events, but the spirit of Pride permeates the entire city, becoming a vibrant key element of the city’s festive calendar—a calendar we explore in our broader guide to San Francisco Holidays: Bay Area Buzz.
The Hack: Dip out of the main event for a few hours to experience a different, more intimate side of Pride.
The Castro District: As the historic heart of San Francisco's LGBTQ+ community, the Castro is ground zero for Pride weekend. The streets become a massive, vibrant block party. While it will be just as crowded as the parade, the atmosphere is different—more neighborhood-focused and less structured. Grab a drink at a historic bar, watch the impromptu dance parties, and soak in the history.
Dolores Park: On Pride Sunday, the park's famous "Gay Beach" area expands to cover nearly the entire lawn. It transforms into a massive, sun-drenched picnic party. The vibe is more relaxed and bohemian than the official festival. Pack a blanket, bring some snacks, and enjoy people-watching in one of the city's most beautiful settings.
SoMa (South of Market): This neighborhood is home to many of the city's most famous clubs and venues. Throughout Pride weekend, these spaces host a huge variety of official and unofficial after-parties, from daytime DJ sets to late-night dance events. Check event listings in advance, as many of the most popular parties sell out.

Hack #5: Tech & Safety - Your Digital Toolkit for a Seamless Day
In a modern festival environment, your smartphone is your most powerful tool—if you use it wisely.
The Hack: Prep your phone and apps to be your digital command center for the day.
The Power Bank is Non-Negotiable: We mentioned it before, but it bears repeating. A dead phone means no photos, no map, and no way to contact your friends. A fully charged portable power bank is the single most important piece of tech you can bring.
Master Your Communication Apps: Standard text messages can be delayed when cell networks are overloaded. Use a data-based messaging app like WhatsApp or Signal for your group chat. Their delivery is often more reliable in dense crowds. Use the "Share Live Location" feature for a set period (e.g., 15 minutes) if you get separated and need to find your way back to your group.
Download Offline Maps: Before you leave home, download an offline map of the downtown San Francisco area in your map app of choice. Even if you lose all cell service, your phone's GPS will still work, allowing you to see your location on the map and navigate.
Embrace Official Resources: Check the official SF Pride website in the days leading up to the event. If they release an official app, download it. It will likely have the most accurate schedules, maps, and emergency alerts.
Pro-Tip: Take a screenshot of your planned meeting spots, the parade route map, and the contact info for everyone in your group. Create a dedicated photo album for these screenshots so you can access them instantly, even if your apps won't load due to poor connectivity.

Hack #6: The Exit Strategy - How to Leave Without the Headache
Just as important as your arrival plan is your exit strategy. When hundreds of thousands of people try to leave the same area at the same time, the public transit stations and rideshare zones become incredibly congested.
The Hack: Avoid leaving during the peak rush right as the festival winds down.
You have two primary strategies for a stress-free departure:
The Early Exit: If you've had your fill of the crowds and the main celebration, start making your way out before the final headliners take the stage at Civic Center. By leaving an hour before the official end time, you can beat the massive wave of people heading for the BART and Muni stations.
The Patient Wait: This is often the better option. Instead of rushing out with everyone else, wait it out. Find a restaurant or cafe a few blocks away from Civic Center, grab a bite to eat, and relax for an hour or so. Let the crowds on the transit platforms thin out. By the time you're done, your journey home will be far more pleasant.
If you're using a rideshare service, walk at least four or five blocks away from Market Street and Civic Center before you even attempt to request a ride. This will get you out of the most congested, no-pickup zones and will likely save you from the highest surge pricing.
Your Guide to an Unforgettable Pride
You are now armed with the knowledge to do more than just attend the pride parade San Francisco —you are ready to experience it with confidence, joy, and a sense of empowered preparedness. From mastering the Market Street route and navigating the Civic Center celebration to knowing the smartest ways to get there and back, you have the tools to craft a perfect day. This isn't just about avoiding stress; it's about creating space for the powerful moments of connection, celebration, and solidarity that define SF Pride. Go forth, celebrate loudly, and have an incredible time.
For a complete blueprint to planning your ultimate trip to the Bay Area, including deep dives into its other iconic holidays and hidden gems, be sure to explore our comprehensive Travel Guide.
Meta Data Suggestions:
SEO Meta Title: SF Pride: 6 Essential Hacks for the Parade Route & Parties
URL Slug: sf-pride-parade-route-party-hacks
SEO Meta Description: Master the SF Pride Parade! Get 6 expert hacks on navigating the Market Street route, finding the best parties, and staying safe in the crowds.
Don't Miss Out! Subscribe for Exclusive Content
Subscribe


Comments 0
No comments yet
Be the first to share your experience!
Dont Miss Out! Subscribe for Exclusive Content

San Francisco Cherry Blossoms: A Local's Guide to the Blooms

Halloween SF: Haunts Without Horrors

SF Festivals: 7 Must-See Lineups

Christmas SF: Lights & Wharf Wonders

Chinese New Year SF: Parade Essentials

San Francisco Holidays: Bay Area Buzz
Halloween NOLA: Voodoo Haunts Guide
TrekGuider @trekguider
Are you tired of the same predictable Halloween? The plastic skeletons, the generic haunted houses, and the soulless loop of monster-themed pop songs. You’re searching for an experience that’s genuinely unsettling, one steeped in real history and a palpable sense of the supernatural. You want a Halloween that feels less like a costume party and more like stepping through a veil into another world, and you've heard that New Orleans hosts some of the most legendary Halloween events USA has to offer.
The Crescent City promises exactly that, but navigating its intoxicating chaos can be a nightmare in itself. The French Quarter throngs with tourists, every corner has a barker selling a ghost tour, and the line between authentic tradition and cheap theatrics is dangerously blurred. How do you find the real Voodoo priestess and not a costumed actor? How do you walk the city’s most haunted streets safely? How do you experience the true, spine-chilling spirit of a New Orleans Halloween without getting lost in the tourist traps?
Consider this your sacred map. This guide cuts through the Bourbon Street noise to lead you directly to the soul of Halloween in New Orleans. We will explore the authentic Voodoo traditions that permeate the holiday, guide you through the macabre elegance of the city’s official parade, and reveal the best ways to encounter the spirits that never left. This isn’t just a trip; it’s an initiation into the most unique Halloween celebration in America.

Why a New Orleans Halloween is Unlike Any Other
Forget everything you know about Halloween. In New Orleans, the holiday isn’t just a single night of spooky fun; it’s a city-wide season where the veil between the living and the dead feels impossibly thin. The city's unique cultural gumbo—a rich mix of French, Spanish, African, and Creole heritage—has created a celebration that is deeply intertwined with its own ghost tales and Voodoo traditions. This isn't a manufactured haunt; the city's very foundations are built on a history of plagues, fires, and mysterious legends, providing a genuinely eerie backdrop that you can feel in the humid, heavy air.
This deep, almost sacred connection to its own folklore is what makes the city’s celebrations so profound, setting it apart from anywhere else in the country. It’s a key part of what we explore in our definitive guide to New Orleans Holidays: Cultural Feasts. While Mardi Gras has its world-famous pageantry, a New Orleans Halloween offers something more intimate, more mysterious. The holiday here incorporates authentic Vodou practices, with locals holding ceremonies to honor their ancestors and connect with the spirit world. It’s a time when the city’s folklore feels intensely alive, and every shadowy, gaslit courtyard seems to hold a story whispered on the breeze.
The Krewe of Boo: A Macabre March Through the Quarter
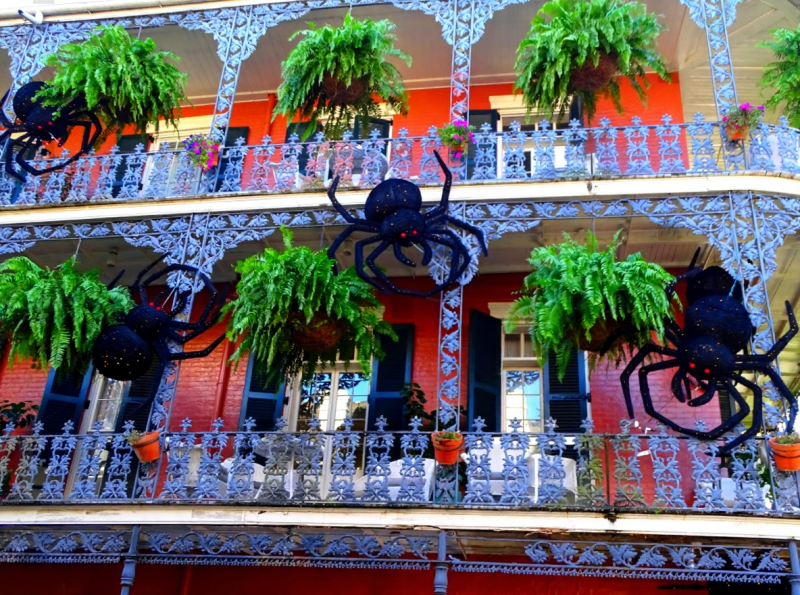
Forget your hometown’s charming little costume march. New Orleans doesn’t do 'quaint' for Halloween. Instead, it unleashes the Krewe of Boo, the city’s official, full-scale Mardi Gras-style parade dedicated entirely to the ghoulish, the ghostly, and the gloriously grotesque. Expect towering, professionally crafted floats depicting zombies, vampires, and monsters from Louisiana folklore, all rolling through the historic French Quarter under the watchful eyes of its centuries-old buildings.

Mark your calendar: the parade is scheduled to roll on the evening of Saturday, the last weekend of October. The route typically begins in the Marigny, travels through the French Quarter, and ends in the Warehouse District. Krewes on the floats don’t just wave; they throw unique Halloween-themed items to the screaming crowds below. Forget beads—you’re more likely to catch spooky-themed doubloons, pralines, or even ghoulish rubber chickens.
To make the most of the Krewe of Boo, follow these essential tips:
Arrive Early: The French Quarter becomes incredibly crowded. Find a spot along the route at least two hours before the parade starts, especially if you want a front-row view. The sections along Decatur Street or Canal Street are often prime locations.
Dress the Part: Costumes are not just encouraged; they are practically mandatory for the full experience. The more creative and elaborate, the better. You’re not just a spectator; you’re part of the city-wide spectacle.
Mind Your Throws: The items thrown from floats can be surprisingly heavy. Keep your head up and be aware of your surroundings to avoid getting bonked by a flying skeleton toy.
Plan Your Exit: Know how you’re getting back to your accommodations before the parade ends. Streets will be closed, and rideshares will be in high demand with significant surge pricing.
Pro-Tip: For a slightly less chaotic viewing experience, find a spot near the beginning of the route in the Marigny. The crowds are often thinner, and the krewes are just starting their procession, full of energy and with plenty of throws left to give.
Diving into the Voodoo Veil: Authentic Spiritual Experiences
The true magic of a New Orleans Halloween lies in its deep, misunderstood connection to Voodoo. This is not the sensationalized "voodoo doll" caricature you see in movies. Louisiana Voodoo, or Vodou, is a legitimate spiritual practice with West African roots, and Halloween aligns with a sacred time for honoring the dead and communicating with ancestors.

For a truly authentic experience, visitors should approach the city’s Voodoo culture with reverence and respect. Many of the most powerful moments happen away from the main tourist drags.
Visit St. Louis Cemetery No. 1: This is the final resting place of the legendary Voodoo Queen, Marie Laveau. During the Halloween season, ceremonies are often held near her grave, and it’s common to find offerings of flowers, candles, and other tokens left in her honor. Access is now restricted to licensed tour guides, but a guided visit provides invaluable historical context. Remember, this is a sacred site, not a theme park attraction. Behave with the utmost respect.
Explore Authentic Voodoo Shops: Skip the kitschy souvenir stores and seek out genuine Voodoo apothecaries and cultural centers. Shops like Voodoo Authentica or Island of Salvation Botanica are run by actual practitioners (Mambos and Houngans) who can provide insight into the religion’s true nature. Here, you can purchase handmade gris-gris bags, candles, and oils, and sometimes even arrange for a spiritual consultation or reading.
Attend a Public Ceremony (with permission): Some Voodoo communities hold public or semi-public ceremonies around Halloween to honor the spirits. These are deeply spiritual events, not performances. If you are fortunate enough to find an opportunity to attend one, do so quietly and respectfully. Do not take photos unless explicitly permitted, and consider leaving a small donation.
Haunted New Orleans: Top Tours for True Ghost Hunters
New Orleans is widely considered one of America’s most haunted cities, and there is no better time to connect with its resident spirits than Halloween. The city offers a dizzying array of ghost tours, but they are not all created equal. Here’s how to find a tour that delivers genuine chills instead of cheap jump-scares.
French Quarter Phantom Tours: These walking tours are the classic choice. The best ones are led by charismatic storytellers who are also passionate history buffs. They’ll guide you through the gaslit streets of the Vieux Carré, stopping at infamous locations like the LaLaurie Mansion (known for its horrific history of torture) and the Gardette-LePretre Mansion, site of a mysterious and bloody mass murder.
Cemetery "Cities of the Dead" Tours: Because New Orleans is built on a swampy delta with a high water table, its deceased are interred in elaborate, above-ground tombs, creating these hauntingly beautiful necropolises. A daytime tour of St. Louis Cemetery No. 1 or Lafayette Cemetery No. 1 is a must. You’ll learn about the city’s unique burial traditions and the famous (and infamous) figures buried within.
Vampire Legends Tours: New Orleans has a curious connection to vampire folklore, most famously through author Anne Rice. These tours dig into the city’s darker, bloodier legends, separating fact from fiction and exploring the real-life stories that may have inspired the myths of the undead.
Navigating these spooky streets after dark requires awareness, especially if you are traveling alone. It’s about being smart and prepared so you can fully immerse yourself in the experience without worry. That’s why our Solo Female Travel Safety Guide is an essential download for anyone exploring the city's haunts, offering practical tips for staying safe while seeking out the supernatural.
Beyond the Haunts: Legendary Parties & Top Halloween Events USA Style
When the sun goes down, New Orleans transforms into one giant, city-wide costume party. The energy is electric, and the people-watching is second to none, solidifying its reputation for hosting some of the best Halloween events USA has to offer.
The epicenter of the chaos is Bourbon Street, which becomes a pedestrian-only sea of costumed revelers. The street is lined with bars offering potent drinks in souvenir cups, and the historic wrought-iron balconies are packed with people throwing beads to the crowds below. While it’s an experience every visitor should have, it can be intense. The key to surviving and enjoying Bourbon Street is to stay in a group and remain aware of your surroundings at all times.
For a more curated experience, look for one of the many large-scale Halloween parties and balls held across the city. Events like the Endless Night Vampire Ball offer a more gothic, formal affair with a strict dress code, while numerous hotels and music venues host massive costume contests with significant cash prizes.
Pro-Tip: The best parties sell out weeks, if not months, in advance. As soon as you book your trip, start researching major events and purchase your tickets online. This will save you from waiting in long lines or, worse, being turned away at the door.
A Practical Guide to a Spooky & Safe New Orleans Halloween
To ensure your supernatural sojourn is memorable for all the right reasons, keep these practical tips in mind:
Book Everything in Advance: Halloween is one of the busiest times of the year in New Orleans. Flights, hotels, and popular tours should be booked months ahead to avoid surge pricing and lack of availability.
Comfort is Key: You will be doing a lot of walking. While your costume is important, make sure your footwear is comfortable enough to handle miles of cobblestone streets and uneven sidewalks. The weather in late October can also be unpredictable; it might be warm and humid or surprisingly cool, so pack layers.
Stay Hydrated and Fed: It’s easy to get caught up in the excitement (and the cocktails), but remember to drink plenty of water. Also, take advantage of the city’s incredible culinary scene. A hearty meal of gumbo or jambalaya will give you the energy you need for a long night of haunting.
Use Rideshares Wisely: While the French Quarter is walkable, you may need transportation to other neighborhoods. Use reputable rideshare apps, but be prepared for surge pricing during peak hours. Always confirm the license plate and driver before getting into a vehicle.
Planning a trip of this magnitude involves many moving parts. For a complete plan covering the best neighborhoods for accommodations, can't-miss restaurants, and a full itinerary for all the city's attractions, our comprehensive Travel Guide is the ultimate resource for your New Orleans adventure.
Embrace the Spirits of the Crescent City
A New Orleans Halloween is more than just a party; it's an immersion into a world of history, mystery, and vibrant tradition that you cannot find anywhere else. It’s a chance to walk in a city where the past is always present, where every corner holds a story, and where the spirits of centuries past feel like they’re just a whisper away. You now have the insider knowledge to bypass the tourist traps and experience the authentic, supernatural soul of one of the most captivating Halloween events USA has to offer.
You are ready to dance with ghosts in Jackson Square, to catch throws from a monster-themed float, and to feel the powerful spiritual energy that makes this celebration so unique.
Ready to plan the ultimate spooky getaway? Download our Solo Female Travel Safety Guide for peace of mind and grab your copy of the Travel Guide to make your trip seamless and unforgettable. The spirits of New Orleans are waiting for you.
Don't Miss Out! Subscribe for Exclusive Content
SubscribeComments 0
No comments yet
Be the first to share your experience!
Dont Miss Out! Subscribe for Exclusive Content
San Francisco Cherry Blossoms: A Local's Guide to the Blooms
Halloween SF: Haunts Without Horrors
SF Festivals: 7 Must-See Lineups
Christmas SF: Lights & Wharf Wonders

SF Pride: 6 Route & Party Hacks
Chinese New Year SF: Parade Essentials
San Francisco Cherry Blossoms: A Local's Guide to the Blooms
TrekGuider @trekguider
The cherry blossom experience in San Francisco is not a grand, sweeping spectacle. It’s something more intimate, more soulful. It’s about turning a corner in a vibrant, historic neighborhood and finding yourself under a delicate canopy of blossoms, the scent of ramen broth mixing with the faint fragrance of spring. It’s a celebration rooted not in diplomacy, but in the fierce resilience of a community.
This is a concentrated jewel box of culture. But that intimacy comes with its own challenges. The Northern California Cherry Blossom Festival, the largest on the West Coast, packs over 220,000 people into the tight-knit blocks of Japantown. A poorly planned visit can quickly devolve into a frustrating battle with crowds, leaving you with more stress than serenity.
This isn’t just another guide. This is your strategic playbook for experiencing San Francisco’s cherry blossoms like a local. We’ll deconstruct the bloom’s tricky timing, reveal the best viewing spots both in and out of the festival’s epicenter, and provide the transportation hacks you need to navigate the city like a pro. By the end of this, you’ll have a plan to witness one of America’s most meaningful cultural celebrations in all its glory.

A Story of Resilience: The Soul of the Festival
To truly appreciate the blossoms here, you have to understand their story. San Francisco’s are proof of a community’s will to survive. Japantown, or Nihonmachi, is one of only three remaining in the United States, a neighborhood that has weathered unimaginable challenges.
After the forced internment of Japanese Americans during WWII, the community returned to find their homes and businesses lost. In the 1960s, city redevelopment projects displaced thousands more. The Northern California Cherry Blossom Festival was born from this turmoil. First held in 1968, it was a defiant celebration of culture and a powerful statement that the community was here to stay.
So when you stand in the Peace Plaza, you’re standing on historic ground. That iconic, five-tiered structure is the Peace Pagoda, a gift from San Francisco’s sister city of Osaka, designed by the renowned Japanese architect Yoshiro Taniguchi. It’s not just a landmark; it’s the spiritual anchor of the entire festival. Every blossom that blooms here feels more meaningful because of the history it represents.
Decoding the Bloom: Festival Dates vs. Nature’s Whim
The first mistake visitors make is confusing the festival schedule with the flowers’ schedule. They are two separate things.
For your planning purposes, here are the official festival dates, which traditionally span two weekends in April:
2026 Northern California Cherry Blossom Festival: April 12-13 & April 19-20, 2026
But here’s the critical distinction every visitor must understand: the festival dates are not the bloom dates. The festival is a fixed celebration of culture, while the blossoms themselves are a fleeting, unpredictable miracle of nature. Your goal is to find the magic window where the two overlap.

The Nuance of "Peak Bloom" in the Bay Area
In San Francisco, "peak bloom" is a rolling event, not a single moment. It depends on the tree variety and the city’s famously fickle microclimates.
The First Wave (Yoshino): The delicate, pale pink Yoshino cherry trees are typically the first to bloom, usually from late March into early April. These are the classic, ethereal blossoms you see in the Japanese Tea Garden.
The Second Wave (Kwanzan): Following the Yoshino are the Kwanzan cherry trees, which produce much fuller, fluffier, and deeper pink blossoms. These are hardier and their bloom often coincides perfectly with the festival’s second weekend and the Grand Parade, making for a spectacular show in Japantown.
Predicting the bloom is an art, not a science. A warm, dry winter can sometimes delay the bloom, as the trees need a certain number of "chill hours" to properly set their buds. Your best bet is to monitor social media. The official festival website and the Instagram accounts for the Japanese Tea Garden and SF Botanical Garden are invaluable resources for real-time updates.
Your Strategic Viewing Guide
You can experience the blossoms in three distinct ways: embracing the festival’s vibrant chaos, seeking tranquil beauty in a world-class garden, or discovering a hidden gem beloved by locals.
1. The Epicenter: Japantown & The Peace Plaza
During the festival weekends, the blocks around the Peace Plaza transform into a bustling hub of Japanese culture. You’ll find everything from traditional music and martial arts demonstrations to mouth-watering street food.
In Japantown, timing isn’t just important—it’s everything. It’s the difference between a serene morning stroll among the blossoms and being swept up in a shoulder-to-shoulder river of festival-goers.
Pro-Tip for Foodies: The food booths, known as yatai, are a massive draw. Don't miss the Takoyaki (octopus balls) from Kagura or the sweet, red-bean-filled Imagawayaki. To beat the lines, arrive right at 11 AM when the festival opens and eat first. The lines can be an hour long by 1 PM.
Pro-Tip for Photographers: The best shot of the Peace Pagoda framed by blossoms is from the Webster Street Bridge overlooking the plaza. For street scenes, a weekday morning before the festival begins offers beautiful, soft light and empty streets.
Go Deeper: For those who want to go even deeper, this is the perfect opportunity to connect with a local expert. The history of Japantown is complex and deeply moving, and a guided walk can reveal stories you’d never find on your own.
2. The Oasis: Golden Gate Park
If you need a break from the festival energy, a short bus ride will take you to the serene landscapes of Golden Gate Park, home to two premier blossom-viewing locations.
The Japanese Tea Garden: This is the oldest public Japanese garden in the United States, and it is an absolute masterpiece. The cherry trees here are artfully placed around the Drum Bridge, pagodas, and koi ponds. It’s a photographer’s dream. There is an entrance fee, but it’s worth every penny. To avoid crowds, purchase your ticket online in advance and go on a weekday morning.
The San Francisco Botanical Garden: Just a short walk from the Tea Garden, the SFBG offers a more sprawling, less crowded experience. Head to the Temperate Asia collection to find their grove of cherry trees. It’s a perfect spot for a quiet picnic under the petals.
3. The Secret Spot: The Palace of Fine Arts
For a truly local experience, head to the Marina district. Tucked away behind the iconic rotunda of the Palace of Fine Arts is a small, enchanting grove of cherry trees. The blossoms here often peak a bit later, sometimes into early May. The sight of the delicate pink flowers against the Greco-Roman architecture is breathtaking and feels like a hidden secret. It’s the perfect place to escape the crowds and enjoy a quiet moment.
Logistics Masterclass: Getting Around
Rule number one: Do not drive to Japantown during the festival. You will spend your entire day circling for non-existent parking. Here’s how to do it right:
Public Transit (Muni): This is your best friend. The 38-Geary and 38R-Geary Rapid buses run constantly along a major corridor and stop one block from the festival. The 2-Clement and 22-Fillmore are also excellent options. Use a Clipper card or the MuniMobile app to make things seamless.
Parking (If You Absolutely Must): The only sane option is the Japan Center Main Garage. The entrance is on Geary Blvd. On festival weekends, you must arrive before 10 AM, or you will find it full.
Ride-Sharing: A good option, but set your drop-off and pick-up points at least three blocks away from the festival’s core (e.g., at Geary & Laguna or Post & Franklin) to avoid getting stuck in gridlock.
Don't-Miss Festival Highlights
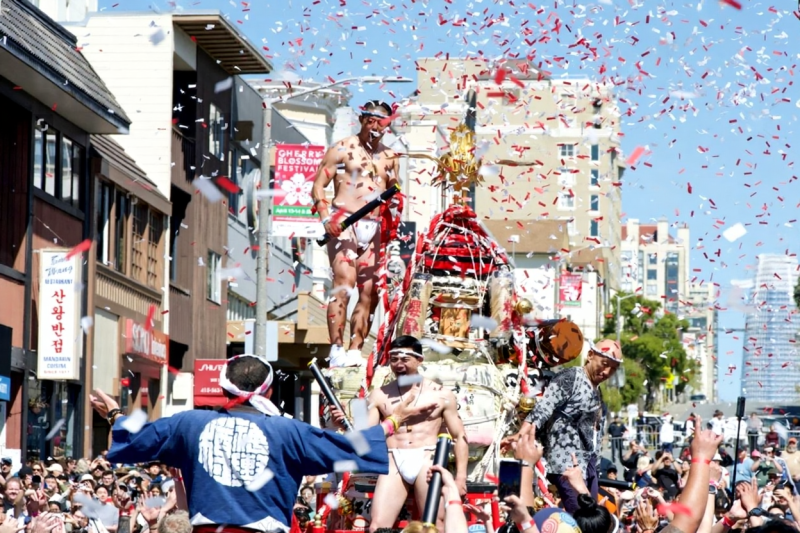
The festival’s crown jewel is the Grand Parade, which closes out the final Sunday of the event. This is a spectacular procession that starts near City Hall and travels up Post Street into the heart of Japantown. You’ll see everything from taiko drummers and dancers to the newly crowned Cherry Blossom Queen and her court—a leadership program for young Japanese American women.
The parade’s incredible finale is the Taru Mikoshi. This is a massive, ornate portable shrine weighing over 1,000 pounds, carried on the shoulders of over 100 chanting participants. It’s a powerful, energetic display of community spirit and a must-see spectacle.
Your Pre-Trip Checklist
A little preparation goes a long way in San Francisco.
Dress in Layers: This is the golden rule of SF. A chilly, foggy morning can become a sunny, breezy afternoon in an instant. A fleece or mid-layer under a windbreaker is the standard local uniform for a reason.
Comfortable Shoes: You will be walking. A lot. The hills are no joke. This is not the time to break in new shoes.
Portable Power Bank: Between navigating, taking photos, and using transit apps, your phone battery won’t stand a chance. A power bank is essential.
Cash: While most vendors take cards, the lines for ATMs are long and the smaller food stalls are often cash-only.
The Cherry Blossom Festival is one of the city's signature spring events. For a complete look at what's happening year-round, our complete guide to San Francisco Holidays: Bay Area Buzz is the essential next read for planning a trip around the city's top seasonal events.
An Unforgettable Bloom
San Francisco’s cherry blossom celebration offers something truly special: a world-class cultural event with the heart of a neighborhood block party. It’s a chance to not only witness the stunning beauty of spring but to feel the powerful spirit of a community that has refused to be erased.
By timing your visit strategically, knowing where to find your own quiet corner, and embracing the city’s public transit, you can bypass the stress and create a truly unforgettable memory. You’re no longer just a tourist; you’re an insider, ready to experience this beautiful and meaningful spectacle to its fullest.
Capture the Perfect Bloom
You’re going to take hundreds of photos of the cherry blossoms—don’t let them get lost on your camera roll. Our free collection of Travel Lightroom Presets is designed to make your photos pop with just one click. Transform your shots of the delicate pink petals and vibrant festival scenes into professional-quality images you’ll be proud to share.
Frequently Asked Questions (FAQ)
When is the absolute best time to see the cherry blossoms in San Francisco? While the festival is in mid-to-late April, the "best" time depends on what you want to see. For the most ethereal, classic blossoms in a garden setting, aim for the first week of April at the Japanese Tea Garden. For the full, vibrant festival experience with the fluffy Kwanzan blossoms, the second weekend of the festival is your best bet.
Is the Northern California Cherry Blossom Festival free? Yes, attending the festival in Japantown, including all the stage performances and watching the parade, is completely free. You will need to pay for food, drinks, and any items from craft vendors. Note that visiting the Japanese Tea Garden in Golden Gate Park requires a separate admission fee.
How much time should I budget for the festival? If you plan to eat, watch a few performances, and browse the stalls, give yourself at least 3-4 hours in Japantown. If you want to see the parade, plan for that to take an additional 2 hours of your day.
Is the festival kid-friendly? Absolutely. Kids love the energy, the food, and the parade. There are also often hands-on cultural activities like origami folding. However, the crowds can be overwhelming for small children, so a weekday visit or arriving right at the opening on a weekend is recommended.
Can I see cherry blossoms in San Francisco outside of Japantown and Golden Gate Park? Yes! Besides our "secret spot" at the Palace of Fine Arts, you can often find beautiful blooming trees scattered in residential neighborhoods like the Richmond and Sunset districts. Keep your eyes peeled in late March and April—you’ll be surprised where they pop up.
Don't Miss Out! Subscribe for Exclusive Content
SubscribeComments 0
No comments yet
Be the first to share your experience!
Dont Miss Out! Subscribe for Exclusive Content
Halloween SF: Haunts Without Horrors
SF Festivals: 7 Must-See Lineups
Christmas SF: Lights & Wharf Wonders
SF Pride: 6 Route & Party Hacks
Chinese New Year SF: Parade Essentials
San Francisco Holidays: Bay Area Buzz
7 Travel Insurance Red Flags to Spot Before You Buy
TrekGuider @trekguider
You’ve done it. You’ve booked the flights, reserved the hotel with the incredible view, and started daydreaming about the adventures that await. But amidst the excitement, a nagging thought creeps in: What if something goes wrong? A sudden illness, a cancelled flight, a lost bag—these are the travel gremlins that can turn a dream trip into a logistical and financial nightmare. You know you need travel insurance, but as you stare at policies, your eyes glaze over. It’s a dense jungle of jargon, fine print, and confusing clauses, and you’re terrified of making a costly mistake.
The truth is, not all travel insurance is created equal. A cheap policy can be worse than no policy at all, luring you in with a low price only to deny your claim with a hidden exclusion you never saw coming. This is more than just an inconvenience; a denied medical claim abroad can lead to financially crippling bills. But it doesn’t have to be this way. Consider this guide your consumer advocate, your secret decoder ring for the complex world of travel insurance. We’re here to provide the critical travel insurance tips you need to buy with confidence, ensuring your policy is a true safety net, not a tangled mess of loopholes. This is a vital piece of the puzzle we cover in our comprehensive guide to The Ultimate Guide to Travel Safety: A 2026 Playbook. Let’s pull back the curtain and expose the seven most critical red flags you must spot before you buy.

Red Flag #1: The Vague "Pre-Existing Medical Conditions" Clause
This is, without a doubt, the single most common landmine in any policy and the reason countless claims are denied. A "pre-existing condition" is generally any injury or illness for which you've had symptoms or received treatment before your policy's start date. The problem is that the definition and the "look-back" period can vary wildly.
A major red flag is an overly broad or unclear definition. Many basic policies will flat-out refuse to cover any claim that arises, directly or indirectly, from a pre-existing condition. This could be something as common as asthma, a managed heart condition, or even a recent knee injury. Furthermore, many travelers are shocked to discover that mental health conditions like anxiety or depression are frequently excluded under this clause.
What to look for:
A Clear "Look-Back Period": A good policy will specify the exact time frame it examines for pre-existing conditions (e.g., 60, 90, or 180 days before you bought the policy).
Waiver of Exclusion: Many comprehensive policies offer a "waiver for pre-existing medical conditions" if you purchase the plan within a short window (typically 14-21 days) of your initial trip deposit. This is an incredibly valuable benefit.
Coverage for "Stable" Conditions: Some policies will cover conditions that have been stable (no change in medication, no new symptoms) for the duration of the look-back period.
Pro-Tip: Honesty is the only policy. When getting a quote, you must declare all medical conditions. Failure to disclose a condition can give the insurer grounds to void your entire policy and deny any claim, even one completely unrelated to your non-disclosure.
Red Flag #2: The "Adventure & High-Risk Activities" Exclusion
That thrilling scuba dive in the Red Sea, the exhilarating ski trip down a black diamond run, or even a "tame" activity like hot-air ballooning might not be covered by a standard policy. Insurers create a list of activities they deem "high-risk," and if you get injured while participating, you're on your own. For any traveler whose itinerary is more ambitious than a stroll from the hotel to the pool, this is a five-alarm fire.
The list of excluded activities can be surprisingly long and sometimes illogical. It can include everything from bungee jumping and skydiving to motorcycle riding and even certain types of high-altitude trekking. If you're booking an excursion, the first thing you should do is check if that specific activity is covered. Never assume it is.
What to look for:
A Clearly Defined List: Scrutinize the policy document for a specific section on "Excluded Activities." If you can't find a clear list, that's a red flag in itself.
Optional "Adventure Sports" Rider: Reputable insurance providers will offer an optional add-on or a specific, higher-tiered plan that provides coverage for a wide range of adventure sports. It will cost more, but it’s non-negotiable if you plan to partake.
Check Specifics: Don't just see "scuba diving" is covered. Check the details. Does it cover you to a certain depth? Does it require a specific certification? The details are everything.
Red Flag #3: The "Government Travel Advisory" Loophole
In an unstable world, government travel advisories are a key tool for assessing risk. They can also become a loophole for insurers to deny claims. Most policies contain a clause that voids your coverage if you travel to a country or region for which your home government has issued a "Do Not Travel" or equivalent high-level warning before your departure.
Where this gets tricky is when an advisory is issued after you've booked your trip. While some policies will cover trip cancellation in this scenario, many will not provide any medical or evacuation coverage if you choose to go against the official advice. This red flag effectively shifts the entire financial risk of traveling to a potentially volatile destination onto your shoulders.
What to look for:
Specific Wording on Advisories: Look for the exact language the policy uses. Does it only exclude travel to destinations with a warning in place at the time of purchase, or does it also apply if a warning is issued later?
"Cancel for Any Reason" Upgrade: This is one of the best ways to protect yourself against last-minute travel advisory changes. More on this below.

Red Flag #4: The Blanket "Pandemic & Epidemic" Exclusion
In the wake of the COVID-19 pandemic, nearly every provider updated its policies to address communicable diseases. A major red flag is a policy with a broad, all-encompassing exclusion for any losses "due to, arising from, or in connection with any pandemic or epidemic."
This sweeping language could mean you have no coverage for a wide range of scenarios. It could mean you can't cancel if a new lockdown is imposed, if you're afraid to travel due to an outbreak, or even if you contract the illness yourself just before or during your trip.
What to look for:
Named Perils Coverage: Look for policies that, at a minimum, treat a specific disease (e.g., COVID-19) like any other illness. This means if you are medically diagnosed and can't travel, your trip cancellation should be covered. Likewise, your emergency medical expenses should be covered if you get sick on your trip.
Clarity on Quarantine Costs: The best policies today will explicitly state whether they cover the costs of a mandatory quarantine (e.g., extra hotel nights, food) if you test positive while abroad.
Red Flag #5: The "Named Perils Only" Cancellation Clause
Many travelers believe "trip cancellation coverage" means they can cancel for any reason and get their money back. This is a dangerous and costly misconception. Standard policies operate on a "named perils" basis, meaning they will only reimburse you for non-refundable costs if you cancel for one of the very specific, listed reasons in the policy document.
A red flag is a policy with a short and restrictive list. Common covered reasons include the unforeseen illness or death of the traveler or a close family member, a house fire, or being called for jury duty. Common reasons that are often not covered include changing your mind, a relationship breakup, or work conflicts. This means if you have to cancel because your pet-sitter backs out or your boss denies your vacation time at the last minute, you get nothing.
Red Flag #6: The Restrictive "Pregnancy & Childbirth" Limitation
Traveling while pregnant requires an extra layer of precaution, and your insurance policy needs to reflect that. A significant red flag is a policy that either completely excludes pregnancy or has highly restrictive limitations.
Many standard policies will not cover costs related to a normal, routine pregnancy. This means if you go into labor while on your trip, the costs of a routine childbirth and care for a healthy newborn will likely not be covered. Coverage for unforeseen complications is often only provided up to a certain stage of the pregnancy (e.g., 23 to 32 weeks), and many policies will not cover pregnancies that resulted from IVF.
What to look for:
A Clear Definition of "Complication": The policy should specify what it considers an unforeseen complication of pregnancy.
Stated Gestational Week Limit: Look for the exact week up to which coverage for complications is provided.
Coverage for Newborn Care: Check if the policy provides any coverage for the care of a newborn if they are born prematurely on the trip.

Your Pre-Trip Master Plan
Navigating insurance is just one piece of the pre-travel puzzle. To ensure you've covered every base—from passports and visas to packing and finances—a master checklist is your most powerful tool. Download our free, comprehensive checklist to make your preparation seamless.
Download Your Free International Travel Checklist Now!
Red Flag #7: The "Mental Health Conditions" Blind Spot
This is a frequently overlooked but critically important exclusion. Many travel insurance policies contain a specific clause that excludes any claims arising from "mental or nervous health disorders." This can include conditions like anxiety disorders, depression, dementia, and other psychiatric conditions.
This means if you have a panic attack and need to be hospitalized, or if you need to cancel your trip due to a severe depressive episode, your policy may offer no coverage. For the millions of people who manage mental health conditions, this is a glaring and dangerous gap in coverage.
What to look for:
Review the Exclusions List: Carefully read the general exclusions section for any mention of "mental," "nervous," or "psychological" disorders.
Specialized Policies: Some providers are beginning to offer more inclusive plans. You may need to seek out a specialty provider or a higher-end comprehensive plan that explicitly states it provides coverage for acute episodes of a pre-existing mental health condition.
Pro-Tip: Cancel For Any Reason (CFAR) is an optional upgrade that acts as your ultimate safety net against uncovered cancellation reasons. It typically reimburses 50-80% of your non-refundable costs. But be aware: you must purchase a CFAR add-on within a short window, usually 14-21 days, of your initial trip payment. Don't wait!
Travel Insurance FAQs
Spotting red flags is easier when you speak the language. Here are answers to common questions, providing some essential travel insurance tips for understanding policy jargon.
1. What's the real difference between primary and secondary medical coverage?
This determines the order of payment and how much work you have to do. A primary policy pays first. You file your claim directly with the travel insurer, which means less paperwork and faster reimbursement. Secondary coverage only pays after your other insurance (like your regular health plan) has paid its share. It requires you to file twice and is generally less convenient. For international travel, primary coverage is strongly recommended.
2. Is travel insurance worth it for a domestic trip?
Often, yes. While your regular health insurance will likely work in another state, it won't cover trip cancellation, interruption, or lost baggage. If you've prepaid for expensive flights and non-refundable hotels for a trip to a national park, for instance, trip insurance can protect that investment if you have to cancel for a covered reason.
3. When is the best time to buy travel insurance?
You should buy your policy as soon as you make your first non-refundable trip payment (like booking flights or a tour). This ensures you are covered for the longest possible period. More importantly, it's the only way to be eligible for time-sensitive benefits like the "pre-existing condition waiver" and the "Cancel for Any Reason" upgrade, which often must be purchased within 14-21 days of your initial deposit.

Travel with True Peace of Mind
Buying travel insurance isn’t just about ticking a box on your pre-trip to-do list. It’s about making an informed decision to purchase a strong financial safety net. By using these travel insurance tips to read a policy like a pro, you can confidently spot the red flags, avoid the worthless plans, and choose a policy that delivers on its promise. An investment in the right coverage—and in a comprehensive resource like our all-encompassing Travel Guide—is an investment in your own peace of mind. Now you can focus on the adventure ahead, knowing you’re protected no matter what the journey throws your way.
Meta Data Suggestions:
SEO Meta Title (59 characters): 7 Travel Insurance Red Flags to Spot Before You Buy
URL Slug: travel-insurance-red-flags
SEO Meta Description (154 characters): Don't get burned by bad travel insurance. Learn the 7 critical red flags to spot in any policy with these essential travel insurance tips before you buy.
Don't Miss Out! Subscribe for Exclusive Content
SubscribeComments 0
No comments yet
Be the first to share your experience!
Dont Miss Out! Subscribe for Exclusive Content

Ultimate USA Holidays Guide: Top Picks

FTC Affiliate Disclosure Essentials: Stay Compliant as a Travel Creator

Essential Affiliate Tools: From Tracking to Full Optimization

Booking.com Affiliate Program Review: Pros, Cons, and Earnings Potential

Decoding Affiliate Commission Rates: Benchmarks for Travel Creators
