SF Festivals: 7 Must-See Lineups
TrekGuider @trekguider
San Francisco’s cultural calendar is a dizzying, year-round whirlwind of activity, making it almost impossible to know where to begin. You want to dive into the authentic heart of the city, but you’re faced with an overwhelming number of options. How do you choose the events that are truly iconic, the ones that define the Bay Area’s unique spirit, without wasting your precious time on something that doesn’t live up to the hype?
The fear of missing out is real. You could easily find yourself stuck in a generic tourist trap, completely missing the vibrant, community-driven celebrations happening just a few blocks away. You risk leaving the city without ever experiencing the dazzling traditions of the Chinese New Year Parade or the electrifying energy of the Pride Parade on Market Street. Don’t let your trip be defined by indecision; let it be defined by unforgettable moments.
This guide is your definitive solution. We’ve hand-picked the 7 must-see lineups that represent the very best festivals in San Francisco. Think of this as your insider’s ticket to the city's biggest moments, but it's just one piece of the puzzle. For a complete, year-round look at the city's seasonal rhythm, be sure to explore our comprehensive guide to San Francisco Holidays: Bay Area Buzz.

1. Chinese New Year Parade: One of the Oldest Festivals in San Francisco
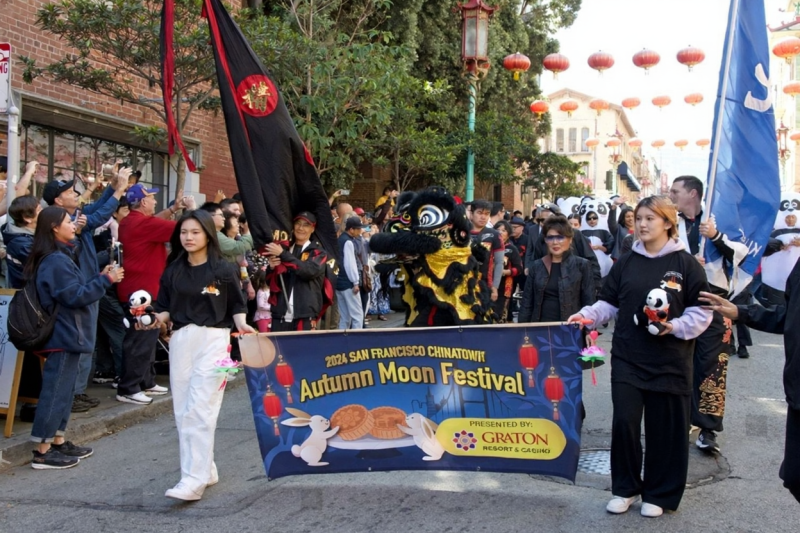
Forget what you think you know about parades. San Francisco’s Chinese New Year Parade isn’t just an event; it’s a full-blown sensory spectacle and a powerful link to the city’s soul. As one of the most cherished festivals in San Francisco, this celebration transforms the streets into a living river of light, sound, and ancient tradition.
The Cultural Significance: A Tradition Since 1851
San Francisco is home to the oldest and largest Chinese New Year celebration outside of Asia, a tradition that has been a key part of the city's cultural identity since 1851. The festival marks the beginning of the new year on the traditional lunisolar Chinese calendar and is a time for families to honor ancestors, share symbolic foods like noodles for longevity, and welcome a year of good fortune. While the celebration includes a vibrant Flower Fair and a bustling Street Fair, the main event is the spectacular night parade.
Key Dates and Times for 2026
Mark your calendars for the Year of the Snake. The main parade is scheduled for Saturday, around mid-February (dates shift each year), starting at 5:15 PM. As one of the few night-illuminated parades in North America, it offers a uniquely magical experience. Expect to see:
Elaborate Floats: Beautifully designed floats glowing under the city lights.
Traditional Lion Dancers: Energetic performers in stunning costumes, believed to bring good luck.
The Golden Dragon: The parade’s grand finale features the famous 268-foot Golden Dragon, a breathtaking sight that requires a team of over 100 people to carry through the streets.
Modern Drone Light Show: A stunning high-tech addition that blends ancient tradition with Bay Area innovation.
Pro-Tips for the Best Viewing Experience
To make the most of this incredible event, a little planning goes a long way.
Arrive Early: The parade route gets crowded hours before the start time. Secure a spot along the route by mid-afternoon for the best views.
Use Public Transit: Street closures make driving and parking nearly impossible. Use BART or Muni to get downtown and walk to the parade route.
Dress in Layers: San Francisco weather is famously unpredictable. Even if the day is warm, the evening will get chilly, so bring a jacket, hat, and gloves.
Consider Bleacher Seats: If you want to guarantee a comfortable spot with a clear view, you can purchase tickets for the bleacher seating located along the route.
Pro-Tip: Don't leave before the grand finale! The parade now incorporates a modern drone light show, a stunning high-tech contrast to the traditional 268-foot Golden Dragon that you won't want to miss.

2. SF Pride Parade: One of the Most Iconic Festivals in San Francisco
The San Francisco Pride Parade is more than just a festival; it’s a powerful, vibrant, and deeply meaningful declaration of love, equality, and resilience. Every June, hundreds of thousands of people from all over the world gather to celebrate the LGBTQ+ community in one of the largest and most famous Pride events globally.
From Protest to Celebration: The History of SF Pride
The roots of SF Pride run deep. The event commemorates the 1969 Stonewall Uprising in New York City, a key moment that ignited the modern fight for LGBTQ+ rights. San Francisco’s first "gay-in" was held in 1970, evolving from a political protest into the massive celebration of identity and activism it is today. Through the 1980s, the parade became a crucial platform for raising AIDS awareness, and it continues to be a powerful stage for advocating for the rights and visibility of the entire LGBTQ+ spectrum.
2026 Parade Route and Schedule
The 2026 SF Pride Parade is scheduled for Sunday, the last Sunday of June, starting at 10:30 AM. The route runs along Market Street, beginning at Beale Street and concluding at 8th Street, leading into the heart of the Civic Center Plaza celebration. The parade is a joyous spectacle featuring colorful floats, dynamic marching contingents from community organizations and corporate allies, and an infectious energy of pure celebration.
Navigating the Crowds and Staying Safe
With massive crowds, it’s essential to plan ahead for a smooth and safe experience.
Find a Good Spot: The sidewalks along Market Street fill up quickly. For a slightly less crowded experience, try finding a spot closer to the beginning of the route near the Embarcadero.
Stay Hydrated and Protected: The June sun can be strong. Bring water, sunscreen, and a hat.
Use Technology: The event is known for its strong security measures, which have included advanced weapon detection technology, allowing attendees to focus on the celebration. Look for official festival apps that provide maps, schedules, and emergency alerts.
Pro-Tip: Major events like SF Pride are leveraging technology for safety. Look for official festival apps or partnerships with services like SaferWatch for real-time, anonymous safety reporting and emergency alerts, ensuring you can focus on the celebration.
If you're inspired to document the incredible energy of events like Pride, our The Travel Creator's Toolkit provides essential tips and resources for capturing stunning photos and videos on the go.

3. St. Patrick's Day Parade: A Sea of Green on Market Street
San Francisco’s St. Patrick's Day Parade is a cherished tradition that brings a touch of Irish luck and culture to the West Coast. Held annually since 1852, it’s one of the city’s longest-running events, drawing families, locals, and visitors alike for a day of festive fun.
Honoring Irish Heritage in the Bay Area
While the holiday observes the anniversary of the death of Saint Patrick, the parade in San Francisco has evolved into a broad celebration of Irish and Irish-American culture. It’s a day to honor the significant contributions of the Irish community to the city’s history and development. The event is a vibrant display of heritage, filled with the sounds of bagpipes, the sight of traditional Irish dancers, and a sea of green attire.
Parade Details and What to Expect
The parade typically takes place on the Saturday closest to St. Patrick's Day (March 17). It proceeds down Market Street, culminating in a festival at Civic Center Plaza. You can expect to see a lively procession featuring:
Local Irish community groups and families.
Traditional Irish musicians and dance troupes.
Colorful floats and marching bands.
Local dignitaries and community leaders.
The post-parade festival continues the celebration with live music, Irish food and drink, and cultural exhibits, making it a full day of family-friendly entertainment.

4. Cinco de Mayo Festival: A Vibrant Celebration of Mexican-American Culture
While often mistaken for Mexican Independence Day, Cinco de Mayo commemorates the Mexican Army's unlikely victory over the French at the Battle of Puebla in 1862. In San Francisco, this day has a particularly deep historical significance, with parades held since 1863, evolving into a proud celebration of Mexican-American heritage and resistance.
The True Meaning of Cinco de Mayo
For Mexican-Americans in the 19th century, the victory at Puebla was a powerful symbol of resistance against European imperialism. Over the decades, particularly during the Chicano Movement, the holiday was embraced as a day to celebrate cultural pride. Today, the San Francisco festival continues this legacy, often featuring speakers and music that connect the historical victory to contemporary issues of democracy and social justice.
Where to Find the Festivities
The celebration is typically centered in the Mission District, the historic heart of the city’s Latino community. The festival transforms the neighborhood with a low-rider car show, live music stages featuring everything from mariachi to salsa, and booths offering delicious, authentic Mexican cuisine. It’s a family-friendly event that offers a rich, immersive cultural experience far beyond the commercialized versions of the holiday.

5. Fourth of July Fireworks: A Patriotic Explosion Over the Bay
There are few better places to celebrate American Independence Day than along the stunning San Francisco waterfront. The city’s annual Fourth of July celebration is a massive event, drawing huge crowds for a day of festivities capped off by a spectacular fireworks display over the bay.
The Best Viewing Spots for the Fireworks Display
The main event is the fireworks show, which is typically launched from barges located near Pier 39 and Aquatic Park. To get a prime viewing spot, you have several options:
Fisherman's Wharf & Pier 39: This is the epicenter of the celebration, offering close-up views but also the largest crowds. Arrive early in the afternoon to claim your space.
Aquatic Park and Ghirardelli Square: These spots offer fantastic, direct views of the fireworks.
Angel Island or Alcatraz: For a truly unique perspective, consider a ticketed boat tour that takes you out onto the bay for an unobstructed view away from the waterfront crowds.
Coit Tower: The hills around Coit Tower provide an elevated vantage point, though it’s a popular spot that also fills up quickly.
Planning Your Day: What to Bring and When to Arrive
This is one of the busiest days of the year on the waterfront. Plan to arrive by early afternoon at the latest. Bring blankets or low-backed chairs, snacks, and plenty of water. Most importantly, pack warm layers. As soon as the sun goes down, the famous San Francisco fog can roll in, bringing a significant temperature drop. Public transportation is strongly recommended, as parking will be extremely limited and expensive.
6. Halloween in the Castro: A Uniquely San Francisco Haunt
While many cities celebrate Halloween, San Francisco puts its own unique and fabulous spin on the holiday, with the Castro District historically serving as the vibrant, beating heart of the festivities. Although the massive official street party of years past has been discontinued, the spirit of Halloween is alive and well.
The Castro's Legendary Halloween Spirit
The Castro’s legacy as a Halloween destination is legendary. The neighborhood comes alive with incredible, elaborate costumes, and the atmosphere is one of pure, unadulterated fun. While there is no longer a formal, city-sponsored event, the evening still draws crowds who come to see and be seen in their Halloween best. The celebration now takes the form of numerous pub crawls, costume contests, and private parties hosted by the area's many bars and clubs.
Safety and Transportation Tips for a Spooky Night
If you plan to celebrate in the Castro, safety and logistics are key.
Use Rideshares or Public Transit: Parking is virtually nonexistent, and you’ll want a safe ride home. The Castro Muni station is centrally located.
Stay with Your Group: The streets can get crowded. Use a buddy system and keep your phone charged.
Be Respectful: Remember that the Castro is a residential neighborhood. Be respectful of residents and local businesses while you celebrate.
For those seeking a more traditional haunted experience, the famous Winchester Mystery House in nearby San Jose offers special candlelit tours during the Halloween season.

7. Christmas in Union Square: The Heart of SF's Holiday Magic
When the holiday season arrives, Union Square transforms into a magical winter wonderland, serving as the festive centerpiece for the entire city. If you’re looking for classic Christmas cheer, this is the place to be.
The Iconic Tree and Ice Rink
The two main attractions in Union Square are the massive, beautifully decorated Christmas tree and the seasonal outdoor ice rink. Skating under the twinkling lights with the iconic square as your backdrop is a quintessential San Francisco holiday experience. The entire area is decked out in festive lights and decorations, creating a joyful and picturesque atmosphere that’s perfect for families, couples, and anyone looking to get into the holiday spirit.
Finding the Best Views and Photo Ops
For a stunning bird’s-eye view of the tree, the ice rink, and all the festive chaos, head to the upper floors of the Macy's department store that borders the square. The windows of the Cheesecake Factory at the top offer one of the most sought-after views in the city during the holidays. The square itself offers countless photo opportunities, from the giant ornaments to the festive storefronts of the surrounding luxury retailers. This is the perfect place to capture that classic holiday memory.
Your Guide to the Best of the Bay
You are now equipped with the insider knowledge to experience the very best festivals in San Francisco. From the ancient traditions of the Lunar New Year to the modern celebrations of Pride and the festive magic of Christmas in Union Square, you have a clear path to immersing yourself in the events that truly define this incredible city. You no longer have to guess which events are worthwhile; you can now plan your trip with confidence, ready to create memories that will last a lifetime.
To take your planning to the next level and build a complete itinerary around these incredible events, explore our comprehensive Travel Guide. It’s packed with expert advice on everything from lodging and dining to transportation, ensuring your entire San Francisco adventure is as seamless as it is unforgettable.
Don't Miss Out! Subscribe for Exclusive Content
Subscribe


Comments 0
No comments yet
Be the first to share your experience!
Dont Miss Out! Subscribe for Exclusive Content

San Francisco Cherry Blossoms: A Local's Guide to the Blooms

Halloween SF: Haunts Without Horrors

Christmas SF: Lights & Wharf Wonders

SF Pride: 6 Route & Party Hacks

Chinese New Year SF: Parade Essentials

San Francisco Holidays: Bay Area Buzz
Transportation Safety: Staying Safe on Planes & Trains
TrekGuider @trekguider
There's a certain magic to being in transit—that liminal space where you're neither here nor there, just a passenger watching the world blur past your window. It’s the very heart of travel, but it’s also a moment of profound vulnerability. The problem is, amidst the controlled chaos of an airport, the anonymous bustle of a train station, or the quiet confines of a taxi, our focus can drift.
This constant motion agitates a core travel anxiety: the fear that one moment of distraction could lead to a lost passport, a stolen wallet, or a compromised sense of security that sours an entire trip. But it doesn't have to be this way. The solution is to trade that anxiety for a set of simple, repeatable habits—a tactical playbook for navigating every mode of transport with unshakable confidence. This guide delivers the essential transportation safety tips you need, broken down by the unique challenges of air, rail, and ground travel. Mastering these routines is a critical part of any smart travel strategy, a foundation we explore in our comprehensive guide to The Ultimate Guide to Travel Safety: A 2026 Playbook.
Think of your journey in stages, with each mode of transport presenting its own unique playbook. We’ll start where most international trips begin: the controlled chaos of the airport.

Mastering the Airport: Your Guide to Air Travel Security
An airport is a marvel of modern logistics, but for a traveler, it’s a gauntlet of queues, checkpoints, and crowds. Its process-driven environment creates unique security challenges, but a few smart transportation safety tips can make all the difference from the moment you pack your bags to the second you reclaim them.
Before You Leave: Smart Packing & Luggage Security
Your airport safety strategy begins at home. How you pack and secure your luggage is your first and most important line of defense.
Never Pack Valuables in Checked Luggage: This is the cardinal rule of air travel. If it’s valuable or irreplaceable, it belongs with you in the cabin. Your carry-on is the only secure place for:
Passport, IDs, and all travel documents
Cash, credit cards, and debit cards
Electronics (laptops, tablets, cameras, power banks)
Essential medications (plus extra for delays)
Jewelry and any other items of sentimental or high monetary value
Use Globally Recognized Locks: The TSA needs to be able to inspect checked bags. If you use a non-approved lock, they will cut it off. To avoid this, use locks recognized by the TSA. According to their official guidelines, these can be opened by security officers using universal master keys. Look for the Travel Sentry (red diamond) or Safe Skies logo when buying a lock. This isn't just a U.S. system; it's a global standard used by security agencies in Canada, the UK, Germany, Japan, and dozens of other countries.
Make Your Bag Stand Out: In a sea of black roller bags, a little personality is a security feature. Use a colorful luggage strap, a unique tag, or a bright ribbon to make your bag instantly identifiable. This dramatically reduces the chance of an accidental bag swap at the carousel.
Photograph Your Evidence: Before you hand over your bag, take a quick photo of your packed suitcase (both open and closed). If your bag is lost, delayed, or damaged, this provides an indisputable visual record for your airline and insurance claims.

Pack Smarter, Not Harder
A lighter bag is a safer bag. It’s easier to manage, less likely to be checked, and keeps your essentials within arm's reach. Our definitive guide shows you how to fit everything you need into a single carry-on, saving you time, money, and the stress of lost luggage.
Download the Free How to Pack Light Guide
Navigating the Security Checkpoint
The security line is a notorious chokepoint where travelers are distracted, rushed, and temporarily separated from their belongings. This is a time for heightened focus.
Guard Your Bins: As your items slide onto the conveyor belt, keep your eyes on them. Wait to walk through the metal detector until you see your bins beginning to enter the X-ray machine. This minimizes the time your valuables are sitting unattended on the other side.
Consolidate Before the Line: Don't wait until you're at the bins to fumble with loose items. Before you even join the queue, place your phone, wallet, passport, and boarding pass inside a zipped pocket of your jacket or deep within your carry-on.
Beware of Coordinated Distractions: Professional thieves sometimes work in teams at security. One person might create a delay in front of you (e.g., setting off the metal detector repeatedly) while an accomplice on the other side of the scanner quickly grabs your emerging laptop or wallet. Be patient, but stay vigilant and focused on your belongings.
On the Rails: A Playbook for Safe Train Travel
Train travel offers a romantic and scenic way to see the world, but the open nature of stations and the shared spaces on board require a specific approach to security.
General Security on Daytime Trains
During the day, the primary risk is opportunistic theft in crowded stations or on busy carriages.
Maintain Physical Contact: In a chaotic station, your luggage should be in direct physical contact with you at all times. Loop a strap around your foot or keep a hand on the handle. When waiting on a platform, stand with your back to a wall and your bags in front of you.
Position Luggage Strategically: On the train, store your main suitcase on an overhead rack that is across the aisle from you, not directly above. This keeps it constantly within your line of sight. If you must use the large luggage racks at the end of a carriage, use a lightweight cable lock to secure your bag to the rack itself.
Never Let Your Daypack Go: Your small bag containing your valuables should be treated as an extension of your body. Keep it on your lap, on the seat next to you, or in a crossbody position. When you get up to use the restroom or walk to the dining car, it goes with you. No exceptions.

Overnight on the Rails: Your Security Checklist
Sleeping on a train is an unforgettable experience, but it’s also when you are most vulnerable. Follow these three protocols to ensure a safe and restful journey.
Physically Secure Your Main Luggage: A thief can silently walk through a dark train car and lift a bag from an unlocked compartment. Make your bag an inconvenient, noisy target. Use a small cable lock or even your bag’s own strap to attach it to a fixed object like:
The luggage rack frame
The ladder to the top bunk
The metal frame under your seat
Keep Essential Valuables on Your Person: Your most critical items—passport, phone, cash, cards—should never be in your main luggage while you sleep. The only secure place is on your body.
Use a money belt worn under your clothes.
Sleep with your small daypack physically on your bunk. Use it as a pillow or loop a strap around your arm or leg. This ensures your essentials remain safe even if your main bag is compromised.
Secure Your Compartment Door: The door is your primary barrier. As soon as everyone is settled for the night, lock it from the inside. Private sleeper cabins have strong locks. In a shared couchette, have a polite conversation with your cabin mates and agree to keep the door locked. Train staff or border officials will knock loudly enough to wake you if they need entry.
Pro-Tip: When booking a bunk in a shared couchette, the top bunk is often the most secure choice. It is harder for anyone to access your belongings without waking you and keeps you out of the general foot traffic in the compartment.
On the Ground: Staying Safe in Taxis & Ride-Shares
Your journey isn’t over until you’ve reached your hotel. Ground transportation is the final leg, and it’s a critical moment to apply your safety knowledge.

Your Ride-Share Safety Checklist
Ride-sharing apps have built-in safety features, but they only work if you use them. Before you get into any vehicle, run through this non-negotiable verification checklist.
Verify the Vehicle:
Match the License Plate: This is the most important step. The license plate number in the app must match the plate on the car. If it doesn’t, do not get in. Cancel the ride and report the mismatch.
Match the Car Details: Confirm the make, model, and color of the car also match the information in the app.
Verify the Driver:
Check the Driver's Photo: Glance at the driver and ensure they match the photo in the app.
Confirm Your Name: Ask the driver, "Who are you here for?" or "What's my name?" They must be able to say your name. Never volunteer it by asking, "Are you here for Jane?" This gives a fraudulent driver the information they need.
Use PIN Verification: Many apps now offer a PIN verification feature. Enable it. The trip cannot start until you provide the correct PIN to your driver, guaranteeing you are in the right car.
Share Your Trip Details:
As soon as the trip starts, use the app’s built-in "Share Trip Status" function. This sends a live map of your journey, including the car's route and your ETA, to a trusted contact.
Sit in the Back Seat:
Especially when traveling alone, sitting in the back provides personal space and allows you to exit from either side of the vehicle if you feel uncomfortable.
Trust Your Instincts:
If anything feels off—the driver, the vehicle, the situation—do not get in. Cancel the ride, report your concerns, and order another car. Your safety is worth more than a cancellation fee.
Navigating Taxis and Tuk-Tuks Safely
When using traditional taxis, you are more reliant on your own judgment and vigilance.
Insist on the Meter: The "broken meter" is one of the oldest travel scams in the book, designed to lock you into a wildly inflated flat fare. Before getting in, point to the meter and say, "Meter, please." If the driver refuses, simply find another taxi.
Follow Your Route: Have your destination pulled up on a map app on your phone. This helps you ensure the driver is taking a logical route and not an inefficient "scenic" one designed to drive up the fare.
Use Official Taxi Ranks: At airports and train stations, always use the designated, official taxi queue. Avoid the freelance drivers who approach you in the arrivals hall, as they are often unlicensed and operating illegally.
Pro-Tip: Ask your hotel or restaurant to call a taxi for you. They almost always have a relationship with a reputable, trusted local company. Before you get in, take a quick, discreet photo of the taxi's license plate and driver ID card (usually displayed on the dash).

Frequently Asked Questions (FAQ)
Q: What's the safest way to carry my passport and money while in transit? A: The best method is to use multiple locations. Keep your passport, one credit card, and the bulk of your cash in a secure money belt or neck wallet worn under your clothing. Keep a small amount of daily cash and a second credit card in a more accessible wallet in a front pocket or a secure crossbody bag.
Q: Are airport charging stations safe to use? A: Avoid using the public USB ports. Hackers can modify these stations for "juice jacking," which can install malware or steal data from your phone. Always use your own AC power adapter and plug it into a standard electrical outlet, or carry a portable power bank.
Q: Should I use my phone's data plan abroad or rely on public WiFi? A: Using your own cellular data plan (either an international plan or a local SIM card) is always more secure than public WiFi. If you must use public WiFi, you absolutely need to use a VPN (Virtual Private Network) to encrypt your connection and protect your data from hackers.
Travel with Confidence
Transportation is the thread that connects the incredible moments of your journey. By mastering these transportation safety tips, you transform these in-between moments from periods of uncertainty into a seamless and secure part of your adventure. Whether you’re locking your bag before a flight, securing your cabin on an overnight train, or verifying your ride-share before hopping in, these proactive habits build a powerful foundation of security.
This allows you to move through the world not with fear, but with the calm confidence of a prepared and savvy traveler. For a more comprehensive look at planning your entire journey, our all-encompassing Travel Guide is the perfect resource. And for expert advice on navigating the specific transit systems of your next destination—from the Tokyo Metro to the Swiss rail network—be sure to explore the detailed guides from our expert creators on the TrekGuider. You're now equipped to handle the journey, so you can focus on the destination.
Don't Miss Out! Subscribe for Exclusive Content
SubscribeComments 0
No comments yet
Be the first to share your experience!
Dont Miss Out! Subscribe for Exclusive Content

Ultimate USA Holidays Guide: Top Picks

FTC Affiliate Disclosure Essentials: Stay Compliant as a Travel Creator

Essential Affiliate Tools: From Tracking to Full Optimization

Booking.com Affiliate Program Review: Pros, Cons, and Earnings Potential

Decoding Affiliate Commission Rates: Benchmarks for Travel Creators

Amazon Associates for Travel: Strategies to Maximize Commissions
Is Solo Travel Safe? A Data-Driven Look at the Real Risks & How to Mitigate Them
TrekGuider @trekguider
You've pictured it a thousand times: a journey planned entirely for you, by you. The pure, unadulterated freedom of the open road. But then the doubt creeps in, fueled by worried questions and sensational headlines. Is it actually safe to venture out alone? That single question can be paralyzing, trapping you between a deep desire for adventure and a genuine concern for your well-being.
This constant drumbeat of fear can be deafening, causing you to second-guess your ambitions and question whether your dream of independent exploration is just a reckless fantasy.
This guide is your way through that noise. We believe that safe solo travel is not only possible but is one of the most profoundly empowering experiences a person can have. While we offer deep resources on all kinds of journeys, from group adventures detailed in our Family Travel Ideas: The 2026 Guide to Unforgettable Trips to individual quests, this article is dedicated to you, the solo explorer. It’s about replacing vague fears with a clear, data-driven assessment of the real risks and arming yourself with practical, proven strategies to manage them.

The Statistical Truth: Is Solo Travel Safe from a Data Perspective?
First, let's ground ourselves in reality, not headlines. The perception of danger, often amplified by a 24-hour news cycle, is frequently magnified far beyond the statistical truth. While any travel carries inherent risks, data shows that the world is not the uniformly dangerous place it's often made out to be.
Violent crime rates, for instance, have been on a global decline for decades. According to the United Nations Office on Drugs and Crime (UNODC), the global homicide rate has been steadily decreasing. Furthermore, areas popular with tourists are often more heavily policed and protected, simply because tourism is a vital economic engine for many countries.
The most common crimes affecting travelers are not violent assaults, but rather crimes of opportunity—preventable incidents that prey on distraction. These fall into three main categories:
Petty Theft: This is the undisputed champion of tourist troubles. It includes pickpocketing in crowded squares, snatching a phone left on a cafe table, and swiping an unattended bag. Data from cities like Barcelona and Rome consistently shows that this is, by a huge margin, the most reported crime against visitors.
Scams: From the aggressive "friendship bracelet" weavers in Paris to the notoriously creative taxi drivers in Bangkok, scams are designed to trick you out of your money through clever, non-violent deception.
Credit Card Fraud: Sophisticated skimming devices at ATMs or dishonest vendors can capture your card information, leading to fraudulent charges days or weeks later.

Understanding this allows for a critical mindset shift. The goal is not to build a fortress around yourself. It’s to develop smart, consistent habits that make you a "hard target" for these common, low-level threats. The answer to "is solo travel safe?" is overwhelmingly yes, provided you are prepared, aware, and informed.
Building Your Safety Foundation Before You Go
True travel safety isn't something you find; it's something you build. The foundation for a secure and confident solo trip is laid long before you ever start packing a bag. This pre-trip protocol is your blueprint for mitigating risk from the comfort of your own home.
1. Master Your Destination Before You Arrive

Every location has its own unique rhythm and set of unwritten rules. Conducting a deep analysis of your destination with safety as the primary lens is the first and most crucial step.
Consult Official Channels: Start with the U.S. Department of State's travel advisories. They provide detailed, country-specific information on everything from political unrest and health concerns to targeted advice for female or LGBTQ+ travelers. Pay attention to the overall country level, but also look for specific regional warnings.
Dig for Local Nuances: Go beyond official reports. Use travel blogs and forums to understand neighborhood dynamics. Instead of a generic search, use specific, targeted queries like "(City Name) solo female safety" or "scams to watch for in (Country)" on Reddit (r/solotravel) or Facebook groups. This uncovers the subtle, on-the-ground intelligence that guidebooks often miss.
Understand the Cultural Context: Research local customs, dress codes, and social norms. In some countries, what's considered a friendly gesture at home might be interpreted differently. Understanding and respecting the local culture not only enriches your experience but is also a powerful tool for blending in and avoiding unwanted attention.
2. Fortify Your Finances and Documents
The goal here is redundancy. You want to ensure that the loss of a single item—like your wallet or phone—is merely an inconvenience, not a trip-ending catastrophe.
Build a Digital Vault: Scan your passport, driver's license, visa, and the front and back of your credit cards. Save these as encrypted files in a secure cloud service (like Google Drive or Dropbox) and email a copy to yourself and a trusted contact. To ensure you don't miss any critical documents, our International Travel Checklist is an indispensable tool.
Distribute Your Itinerary: Leave a detailed copy of your itinerary—including flight numbers, accommodation names and addresses, and a general daily plan—with a family member or friend back home.
Diversify Your Money: Never depend on a single source of funds. Travel with at least two different credit cards and one debit card, and store them in separate locations. Keep one card in your wallet, one in a hidden pocket of your daypack, and perhaps a third in the safe back at your hotel.
Alert Your Banks: A simple but critical step. Inform your bank and credit card companies of your travel dates and destinations. This prevents their fraud detection systems from freezing your accounts when they see a transaction from a foreign country.
3. Travel Insurance
Think of travel insurance as your ultimate safety net. For a solo traveler, it's not a luxury; it's an absolute necessity. A comprehensive policy is your financial backstop for the unexpected. Look for coverage that includes:
Emergency medical and dental expenses
Emergency medical evacuation (this is critical and can cost tens of thousands of dollars without insurance)
Trip cancellation, delay, or interruption
Lost or stolen luggage and personal effects
A 24/7 emergency assistance hotline
Your On-the-Ground Toolkit for Staying Safe Solo
Once you arrive, your most powerful safety tool is situational awareness. This isn't about being paranoid; it's about being present, perceptive, and engaged with your surroundings.
Mastering the Art of Situational Awareness

This is the skill of observing your environment and making smart, proactive decisions based on what you see.
Walk with Purpose and Confidence: Even when you’re utterly lost, walk like you know exactly where you're going. Keep your head up, your shoulders back, and your pace steady. A confident posture is a natural deterrent.
Minimize Distractions, Maximize Perception: Avoid walking while staring down at your phone or wearing headphones in both ears. These actions scream "distracted tourist" and make you a prime target for pickpockets. Keep your phone in your pocket and one earbud out so you can hear your surroundings.
Blend In, Don't Stand Out: The goal is to look like a savvy local, not a bewildered tourist. Dress in a way that aligns with local styles—if locals don't wear shorts, maybe you shouldn't either. Avoid flashing expensive jewelry, wads of cash, or a high-end camera slung around your neck.
Trust Your Gut Instinct: Your intuition is a highly advanced, subconscious pattern-recognition machine. If a person, a dark alley, or a situation feels "off," it probably is. Don't hesitate or worry about being polite—remove yourself from the situation immediately.
Pro-Tip: Carry a "decoy" wallet. Get a cheap, old wallet and stock it with a small amount of local currency and some expired credit cards or old loyalty cards. Keep this in your pocket or an easily accessible part of your bag. In the unlikely event of a robbery, you can hand this over without losing your primary financial resources.
How to Guarantee Your Accommodation Is Safe for Solo Travel
Your hotel, hostel, or rental is your sanctuary. A few simple checks can ensure it stays that way.
Vet the Location: Before booking, use Google Street View to take a virtual walk around the block. Is it a deserted industrial area or a lively street with open cafes? Read recent reviews, specifically searching for keywords like "safe," "location," and "solo."
Secure Your Room: The moment you check in, test the locks on the door and windows. Always use the deadbolt and security chain when you're inside. For an incredibly effective and cheap extra layer of security, pack a simple rubber doorstop and wedge it under your door at night.
Use the Safe (That's What It's For): Don't leave your passport, extra cash, or spare credit cards lying around. Use the in-room safe. If you're in a hostel, choose one that offers secure individual lockers and bring your own padlock.
Digital Defense: Ensuring Your Solo Travel is Safe Online
In the 21st century, physical safety is only half the battle. Public Wi-Fi networks are notoriously insecure, making them prime hunting grounds for data thieves.
A VPN is Non-Negotiable: A Virtual Private Network (VPN) is an essential tool for any traveler. It encrypts your internet connection, creating a secure, private tunnel for your data that is unreadable to anyone snooping on the network.
Embrace Two-Factor Authentication (2FA): Activate 2FA on all your important accounts (email, banking, social media). This means that even if a thief manages to get your password, they can't access your accounts without a second, time-sensitive code sent to your device.
Be Wary of Public Computers: Avoid logging into sensitive accounts on public computers, like those in an internet cafe or hotel business center. If you absolutely must, use a private/incognito browsing window and be certain to log out of all accounts and clear the browser history before you leave.
Pro-Tip: Adapt the "Morning Photo" protocol for solo use. Each morning, send a quick photo of yourself (showing your outfit) and a brief text outlining your general plans for the day to a trusted contact back home. This creates a simple, timestamped visual record of your appearance and intended whereabouts.
A Crucial Guide for Solo Female Travelers
While the vast majority of safety advice is universal, it's a reality that women traveling alone can face a unique set of concerns and scrutiny. Adhering to the core principles of solo travel safety is therefore doubly important.
Confidence is Your Cloak: Your body language is your first line of defense. Walk tall, be assertive in your interactions, and don't be afraid to be firm or even loud if someone is making you uncomfortable. A simple, sharp "No" is a complete sentence in every language.
Be Mindful of Local Gender Dynamics: Research how men and women typically interact in your destination. In some conservative cultures, direct eye contact or an unsolicited smile from a woman can be misinterpreted as an invitation. Adapting your behavior isn't about submission; it's a sign of cultural respect and a smart safety tactic.
Strategically Handle Unwanted Attention: If you feel you are being followed or persistently harassed, walk directly into a busy shop, restaurant, or hotel lobby. Approach a staff member (especially another woman) and calmly explain the situation. A simple "that person is bothering me" is universally understood.
Use the "Ring" Trick: Many experienced solo female travelers wear a simple, plain band on their left ring finger, regardless of their actual marital status. It can be a simple, non-confrontational way to deter unwanted advances or questions about why you're alone.
Your Essential Toolkit for Confident Exploration
The advice in this section is just the beginning. For a deeper dive into female-specific safety strategies, real-world scenarios, and expert-level preparation, download our free Solo Female Travel Safety Guide. It's the definitive resource for every woman who's ready to see the world on her own terms.
Frequently Asked Questions
What is the most common crime against solo travelers?
The most common risks are crimes of opportunity, not violence. Petty theft, like pickpocketing and bag snatching in crowded tourist areas, is by far the most frequent issue. Being aware and keeping your valuables secure are your best defenses.
Is it safe for a woman to travel alone for the first time?
Absolutely. Thousands of women travel solo safely every day. The key is thorough preparation: choose a destination with a good safety record for solo women, research local customs, and follow the universal safety protocols outlined in this guide.
Should I carry my passport with me while I'm out exploring?
In most cases, it's safer to leave your passport secured in your hotel safe. Carry a photocopy or a digital image on your phone for identification purposes. Some countries legally require you to carry the original, so always verify the local law for your destination.
What is the single most important safety tip for a solo traveler?
Trust your intuition. More than any single gadget or tactic, your gut feeling is your best defense. If a situation or person feels wrong, remove yourself from it immediately without hesitation or apology.
Safety Is the Freedom to Explore
So, after all this, is solo travel safe? The answer is a resounding, confident yes. True safety on the road is not a matter of luck; it is the direct and empowering result of thoughtful preparation, heightened awareness, and a proactive mindset.

By shifting your perspective from a fear of the unknown to a healthy respect for the variables, you transform yourself from a potential target into a capable, worldly explorer. The strategies outlined here are not meant to make you fearful, but to make you free—free from the anxiety that holds you back, and free to embrace the incredible growth, perspective, and pure joy that only solo travel can provide. Armed with this knowledge and a commitment to smart travel practices, you can ensure your journey is not just memorable, but also profoundly safe.
Read the full guide: Family Travel Ideas: The 2026 Guide to Unforgettable Trips
Don't Miss Out! Subscribe for Exclusive Content
SubscribeComments 0
No comments yet
Be the first to share your experience!
Dont Miss Out! Subscribe for Exclusive Content
Ultimate USA Holidays Guide: Top Picks
FTC Affiliate Disclosure Essentials: Stay Compliant as a Travel Creator
Essential Affiliate Tools: From Tracking to Full Optimization
Booking.com Affiliate Program Review: Pros, Cons, and Earnings Potential
Decoding Affiliate Commission Rates: Benchmarks for Travel Creators
Amazon Associates for Travel: Strategies to Maximize Commissions
Email Marketing for Bloggers: A Step-by-Step Playbook
TrekGuider @trekguider
Every creator knows the feeling. You pour a week into a single, well-researched article, hit publish, and watch the initial traffic spike... only for it to fade into the digital silence. Your audience is a ghost, arriving from the ether of a search result only to vanish just as quickly, leaving your business at the mercy of unpredictable algorithms.

This is the fundamental vulnerability of the modern creator. You’re building your brand on “rented land.” A single Google update can obliterate your traffic overnight. A shift in a social media algorithm can make your account virtually invisible. This constant instability is exhausting, and it makes building a sustainable business feel impossible. You’re shouting into the void, hoping someone hears you, instead of having a direct conversation with a community that wants to listen.
This ends today. This is your definitive playbook for building your single most valuable business asset: your email list. We are going to provide a clear, step-by-step system to turn casual website visitors into a loyal, engaged community you own. This is the core engine that powers a modern creator business, a critical strategy we explore in our ultimate guide on How to Make Money Online: A Creator's Guide for 2026. Welcome to your masterclass on email marketing for blogging.
Why Your Email List is Your Most Valuable Business Asset
Before we dive into the "how," you must internalize the "why." In a creator economy projected to swell to nearly $500 billion by 2027, the opportunity is immense. But the data reveals a harsh reality: success is highly stratified, with only about 4% of creators earning over $100,000 a year. The difference is strategy. The top earners operate as "Creator CEOs," and they understand that their email list isn't just another marketing channel; it is the core asset of their entire digital enterprise.
It’s the one audience you truly own.
Think of it as the "Hub-and-Spoke" model of a modern business. Your blog is the hub—the central asset you control. Social media platforms and search engines are the spokes—powerful, but ultimately rented, channels for discovery. The strategic goal of every spoke is to drive traffic back to the hub, where you can convert a fleeting visitor into a permanent member of your community by capturing their email address.

An email list gives you:
Direct, Unfiltered Access: When you send an email, you are not fighting an algorithm for reach. You land directly in your subscriber's inbox, creating a personal and reliable line of communication.
A Loyal Community: Email is an intimate medium. It allows you to build a deep, trust-based relationship with your readers over time, transforming them from passive consumers into true fans.
A Powerful Sales Channel: When it comes time to launch a product or promote an affiliate offer, your email list will be, by far, your highest-converting channel. These are the people who have raised their hands to say they want to hear from you.
In a digital world defined by volatility, your email list is your insurance policy. It is the stable, appreciating asset upon which a durable and profitable business is built.
The Blogger's Email Marketing Funnel: A Step-by-Step Process
Internalizing why this asset is non-negotiable is the first step. Now, let’s build the engine that creates it. An email marketing funnel is simply a system designed to attract subscribers and automatically build a relationship with them. This three-step process is the engine that will power your audience growth.

Step 1: Create an Irresistible Lead Magnet
A lead magnet is a free, high-value resource you offer to visitors in exchange for their email address. It must solve a specific, urgent problem for your target audience. The key is to provide a "quick win" that is so valuable, trading an email for it feels like a bargain.
For a travel blog, effective lead magnets include:
A printable packing checklist for a specific destination (e.g., "The Ultimate Southeast Asia Backpacking Checklist").
A short, beautifully designed PDF guide (e.g., "5 Hidden Gems in Paris Most Tourists Miss").
A 3-day itinerary for a popular city.
A plug-and-play template for planning a travel budget.

Pro-Tip: Don't guess what your audience wants. The best lead magnet ideas come directly from your readers. Look at your blog comments, social media DMs, and most popular posts. What questions are people asking over and over? Create a resource that answers that one question perfectly.
The goal is to create something your ideal reader needs right now. It doesn’t have to be long, but it must be incredibly useful.
Your Audience-Building Starter Kit
Creating high-value assets is the core of a modern creator business. To accelerate your journey, we've bundled together some of our most powerful resources. The Travel Creator's Toolkit is a free collection of checklists, templates, and guides designed to help you streamline your workflow and build your business faster.
Step 2: Implement High-Converting Opt-in Forms
Once you have your lead magnet, you need a way to offer it to your website visitors. An opt-in form is the mechanism for capturing their email addresses. Strategic placement is crucial for maximizing your sign-up rate.
Effective placements include:
Embedded Within Relevant Blog Posts: Place a form directly within an article where it makes the most contextual sense. For example, offer your Paris guide in the middle of a post about "What to Do in Paris."
As an Exit-Intent Pop-up: This form appears when a user is about to leave your site, giving you one last chance to offer them your valuable lead magnet.
In Your Blog's Header or Footer: A permanent, site-wide placement ensures every visitor has an opportunity to subscribe.
On a Dedicated Landing Page: Create a simple page whose sole purpose is to promote your lead magnet. This is the page you will link to from social media or other external sources.
Step 3: Master the 3-Part Automated Welcome Sequence
This is the most critical part of your funnel. Once someone subscribes, they should immediately be entered into an automated series of emails. This "welcome sequence" is your opportunity to make a great first impression and begin building a real relationship.
Here is a simple, proven 3-part sequence:
Email 1: Deliver the Goods & Welcome
Objective: Fulfill your promise instantly and set expectations.
Content: The email should have a clear subject line like "Here's your free guide!" and immediately provide the link to download the lead magnet. Welcome the subscriber to your community, briefly re-introduce yourself and your blog's mission, and tell them what to expect from future emails (e.g., "Every Tuesday, I'll send you my best travel tips and stories.").
Email 2: Provide Pure Value & Build Authority
Objective: Establish your expertise and prove that subscribing was a smart decision.
Content: A day or two later, send an email that is purely helpful. Share a personal story or your single best piece of advice related to the lead magnet's topic. Link to 2-3 of your most popular and relevant blog posts. There should be no sales pitch here; this email is all about giving.
Email 3: Engage & Segment
Objective: Encourage interaction and learn more about your new subscriber.
Content: On the final day, send an email that asks a simple, direct question to encourage a reply. For example: "What's the #1 destination on your bucket list? Just hit reply and let me know—I read every response!" This interaction boosts your email deliverability and gives you priceless insight into your audience's desires. This is the relationship that eventually allows you to confidently launch a course or sell your own Travel Guide on a specialized marketplace like TrekGuider.
This automated sequence ensures every new subscriber has a consistent, positive first experience with your brand, turning them from a name on a list into an engaged member of your community.
Choosing Your Platform: A Guide to Email Service Providers
To manage your email list and automations, you'll need an Email Service Provider (ESP). These platforms are the command center for your entire email marketing operation. For beginners, the choice can be overwhelming, but a few stand out for their features and user-friendliness.

MailerLite:
Best For: Beginners on a tight budget.
Pros: MailerLite offers an excellent free plan (up to 500 subscribers) that includes automation and landing pages. Its drag-and-drop editor is one of the most intuitive and beginner-friendly on the market.
Cons: The automation capabilities are less powerful than more advanced platforms, and the account approval process can sometimes be slow.
ConvertKit:
Best For: Serious creators who are ready to invest in their business.
Pros: ConvertKit is built specifically for creators. Its flexible tag-based system allows for powerful audience segmentation, and its visual automation builder is both intuitive and robust. It's the industry standard for professional bloggers for a reason.
Cons: It comes with a higher price point. The free plan is limited, and paid plans are more expensive than competitors as your list grows.
Selzy:
Best For: Beginners who prioritize customer support.
Pros: Selzy offers a user-friendly interface at a competitive price. Its standout feature is 24/7 chat and email support, even for users on the free plan—a huge advantage for beginners who may need help with setup.
Cons: As a newer player, it has fewer native integrations with other software compared to the more established platforms.
Staying Compliant: A Blogger’s Guide to Email Privacy Laws
Effective email marketing for blogging isn't just about strategy; it's about trust and legal compliance. Any blogger collecting email addresses must adhere to data privacy regulations. Failure to do so can result in massive fines and destroy your audience's trust. The two most important laws to understand are CAN-spam (U.S.) and GDPR (E.U.).

Understanding CAN-SPAM (The U.S. Rules)
The CAN-SPAM Act governs all commercial email messages in the United States. Its core requirements are:
Don't use false or misleading header information.
Don't use deceptive subject lines.
Identify the message as an advertisement.
Tell recipients where you're located by including a valid physical postal address.
Provide a clear and conspicuous way to opt out of future emails.
Honor opt-out requests promptly (within 10 business days).
Navigating GDPR (The E.U. Rules)
The General Data Protection Regulation (GDPR) is much stricter and applies to you if you process the personal data of any E.U. citizen, regardless of where your blog is based. Its key principles include:
Explicit Consent: You must have unambiguous, affirmative consent to email someone. This means using unchecked boxes on your sign-up forms. Pre-checked boxes are not compliant.
Right to Access: Subscribers can request a copy of all the personal data you hold on them.
Right to be Forgotten: Subscribers can request that you erase all of their personal data.
Pro-Tip: The easiest way to ensure compliance is to adopt the strictest standard (GDPR) for all subscribers and use a reputable ESP like ConvertKit or MailerLite. These platforms have built-in tools that make compliance, such as adding an unsubscribe link and your physical address, automatic.
Frequently Asked Questions About Email Marketing for Bloggers
1. How often should I email my list?
Consistency is more important than frequency. For most bloggers, a weekly email is a great starting point. It's frequent enough to stay top-of-mind but not so frequent that it becomes overwhelming. The key is to choose a schedule you can stick to and deliver value every single time.
2. What should I write about in my emails?
Your emails should be a mix of personal stories, exclusive tips that aren't on the blog, links to your latest content, and occasional promotions. Use the 80/20 rule: 80% of your content should be purely valuable and relationship-building, while 20% can be promotional. Always ask yourself, "Is this genuinely helpful for my reader?"
3. How long does it take to see results from email marketing?
You will see results immediately in the form of building a valuable asset. However, turning that asset into a significant source of income takes time. The key is to focus on consistently growing your list and nurturing the relationship. When you do that, the monetization will follow naturally as you build trust.
Your Journey to an Owned Audience Starts Now
In the creator economy, your email list is the engine of your business. It is the foundation upon which all other monetization strategies are built. It’s how you build a real community, establish lasting trust, and create a predictable, profitable enterprise that isn't dependent on the whims of an algorithm.
You now have the complete playbook for successful email marketing for blogging. You understand why it’s critical, and you have the step-by-step process to implement your own funnel—from creating a compelling lead magnet to welcoming new subscribers and staying compliant with the law. The path is clear. Take the first step today and start building your most valuable asset.
Read the full guide: The Travel Blog Business Plan: How to Make Real Money in 2026
Don't Miss Out! Subscribe for Exclusive Content
SubscribeComments 0
No comments yet
Be the first to share your experience!
Dont Miss Out! Subscribe for Exclusive Content
FTC Affiliate Disclosure Essentials: Stay Compliant as a Travel Creator
Essential Affiliate Tools: From Tracking to Full Optimization

Avoid These 5 Affiliate Landing Page Mistakes for Better Conversions

Affiliate Keyword Research Mastery for Travel Blogs
Booking.com Affiliate Program Review: Pros, Cons, and Earnings Potential