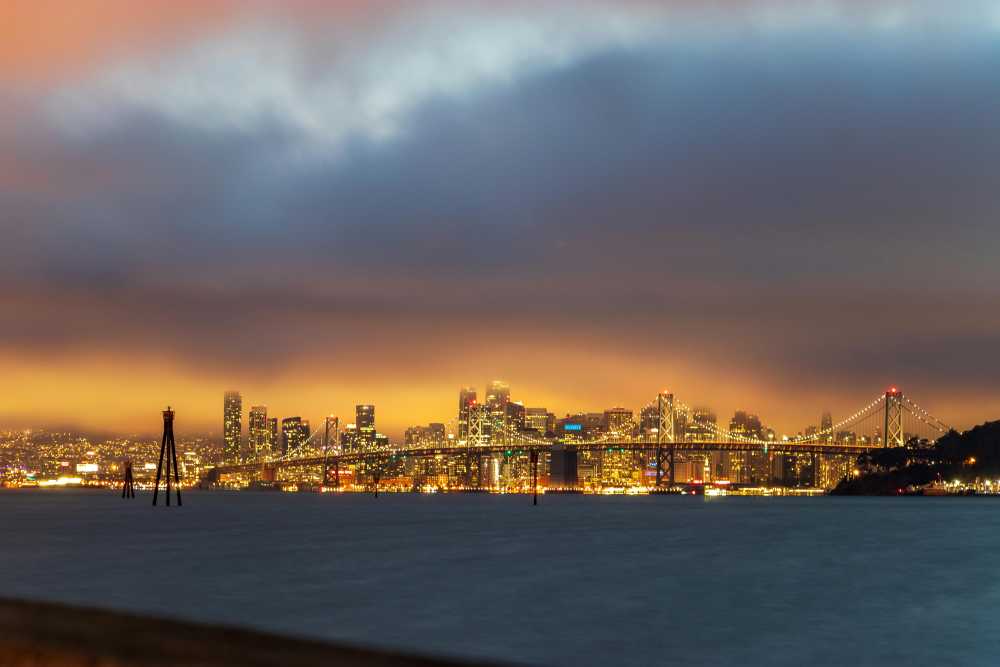
SF Festivals: 7 Must-See Lineups
TrekGuider @trekguider
San Francisco’s cultural calendar is a dizzying, year-round whirlwind of activity, making it almost impossible to know where to begin. You want to dive into the authentic heart of the city, but you’re faced with an overwhelming number of options. How do you choose the events that are truly iconic, the ones that define the Bay Area’s unique spirit, without wasting your precious time on something that doesn’t live up to the hype?
The fear of missing out is real. You could easily find yourself stuck in a generic tourist trap, completely missing the vibrant, community-driven celebrations happening just a few blocks away. You risk leaving the city without ever experiencing the dazzling traditions of the Chinese New Year Parade or the electrifying energy of the Pride Parade on Market Street. Don’t let your trip be defined by indecision; let it be defined by unforgettable moments.
This guide is your definitive solution. We’ve hand-picked the 7 must-see lineups that represent the very best festivals in San Francisco. Think of this as your insider’s ticket to the city's biggest moments, but it's just one piece of the puzzle. For a complete, year-round look at the city's seasonal rhythm, be sure to explore our comprehensive guide to San Francisco Holidays: Bay Area Buzz.

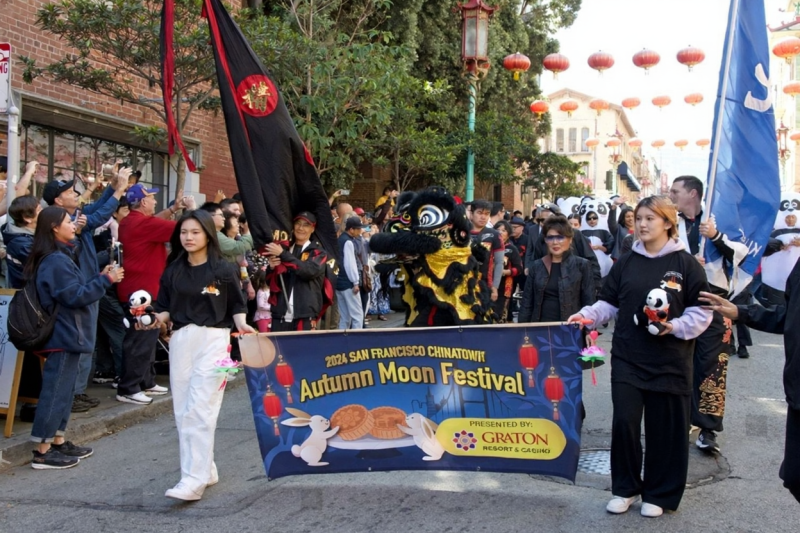
1. Chinese New Year Parade: One of the Oldest Festivals in San Francisco
Forget what you think you know about parades. San Francisco’s Chinese New Year Parade isn’t just an event; it’s a full-blown sensory spectacle and a powerful link to the city’s soul. As one of the most cherished festivals in San Francisco, this celebration transforms the streets into a living river of light, sound, and ancient tradition.
The Cultural Significance: A Tradition Since 1851
San Francisco is home to the oldest and largest Chinese New Year celebration outside of Asia, a tradition that has been a key part of the city's cultural identity since 1851. The festival marks the beginning of the new year on the traditional lunisolar Chinese calendar and is a time for families to honor ancestors, share symbolic foods like noodles for longevity, and welcome a year of good fortune. While the celebration includes a vibrant Flower Fair and a bustling Street Fair, the main event is the spectacular night parade.
Key Dates and Times for 2026
Mark your calendars for the Year of the Snake. The main parade is scheduled for Saturday, around mid-February (dates shift each year), starting at 5:15 PM. As one of the few night-illuminated parades in North America, it offers a uniquely magical experience. Expect to see:
Elaborate Floats: Beautifully designed floats glowing under the city lights.
Traditional Lion Dancers: Energetic performers in stunning costumes, believed to bring good luck.
The Golden Dragon: The parade’s grand finale features the famous 268-foot Golden Dragon, a breathtaking sight that requires a team of over 100 people to carry through the streets.
Modern Drone Light Show: A stunning high-tech addition that blends ancient tradition with Bay Area innovation.
Pro-Tips for the Best Viewing Experience
To make the most of this incredible event, a little planning goes a long way.
Arrive Early: The parade route gets crowded hours before the start time. Secure a spot along the route by mid-afternoon for the best views.
Use Public Transit: Street closures make driving and parking nearly impossible. Use BART or Muni to get downtown and walk to the parade route.
Dress in Layers: San Francisco weather is famously unpredictable. Even if the day is warm, the evening will get chilly, so bring a jacket, hat, and gloves.
Consider Bleacher Seats: If you want to guarantee a comfortable spot with a clear view, you can purchase tickets for the bleacher seating located along the route.
Pro-Tip: Don't leave before the grand finale! The parade now incorporates a modern drone light show, a stunning high-tech contrast to the traditional 268-foot Golden Dragon that you won't want to miss.

2. SF Pride Parade: One of the Most Iconic Festivals in San Francisco
The San Francisco Pride Parade is more than just a festival; it’s a powerful, vibrant, and deeply meaningful declaration of love, equality, and resilience. Every June, hundreds of thousands of people from all over the world gather to celebrate the LGBTQ+ community in one of the largest and most famous Pride events globally.
From Protest to Celebration: The History of SF Pride
The roots of SF Pride run deep. The event commemorates the 1969 Stonewall Uprising in New York City, a key moment that ignited the modern fight for LGBTQ+ rights. San Francisco’s first "gay-in" was held in 1970, evolving from a political protest into the massive celebration of identity and activism it is today. Through the 1980s, the parade became a crucial platform for raising AIDS awareness, and it continues to be a powerful stage for advocating for the rights and visibility of the entire LGBTQ+ spectrum.
2026 Parade Route and Schedule
The 2026 SF Pride Parade is scheduled for Sunday, the last Sunday of June, starting at 10:30 AM. The route runs along Market Street, beginning at Beale Street and concluding at 8th Street, leading into the heart of the Civic Center Plaza celebration. The parade is a joyous spectacle featuring colorful floats, dynamic marching contingents from community organizations and corporate allies, and an infectious energy of pure celebration.
Navigating the Crowds and Staying Safe
With massive crowds, it’s essential to plan ahead for a smooth and safe experience.
Find a Good Spot: The sidewalks along Market Street fill up quickly. For a slightly less crowded experience, try finding a spot closer to the beginning of the route near the Embarcadero.
Stay Hydrated and Protected: The June sun can be strong. Bring water, sunscreen, and a hat.
Use Technology: The event is known for its strong security measures, which have included advanced weapon detection technology, allowing attendees to focus on the celebration. Look for official festival apps that provide maps, schedules, and emergency alerts.
Pro-Tip: Major events like SF Pride are leveraging technology for safety. Look for official festival apps or partnerships with services like SaferWatch for real-time, anonymous safety reporting and emergency alerts, ensuring you can focus on the celebration.
If you're inspired to document the incredible energy of events like Pride, our The Travel Creator's Toolkit provides essential tips and resources for capturing stunning photos and videos on the go.

3. St. Patrick's Day Parade: A Sea of Green on Market Street
San Francisco’s St. Patrick's Day Parade is a cherished tradition that brings a touch of Irish luck and culture to the West Coast. Held annually since 1852, it’s one of the city’s longest-running events, drawing families, locals, and visitors alike for a day of festive fun.
Honoring Irish Heritage in the Bay Area
While the holiday observes the anniversary of the death of Saint Patrick, the parade in San Francisco has evolved into a broad celebration of Irish and Irish-American culture. It’s a day to honor the significant contributions of the Irish community to the city’s history and development. The event is a vibrant display of heritage, filled with the sounds of bagpipes, the sight of traditional Irish dancers, and a sea of green attire.
Parade Details and What to Expect
The parade typically takes place on the Saturday closest to St. Patrick's Day (March 17). It proceeds down Market Street, culminating in a festival at Civic Center Plaza. You can expect to see a lively procession featuring:
Local Irish community groups and families.
Traditional Irish musicians and dance troupes.
Colorful floats and marching bands.
Local dignitaries and community leaders.
The post-parade festival continues the celebration with live music, Irish food and drink, and cultural exhibits, making it a full day of family-friendly entertainment.

4. Cinco de Mayo Festival: A Vibrant Celebration of Mexican-American Culture
While often mistaken for Mexican Independence Day, Cinco de Mayo commemorates the Mexican Army's unlikely victory over the French at the Battle of Puebla in 1862. In San Francisco, this day has a particularly deep historical significance, with parades held since 1863, evolving into a proud celebration of Mexican-American heritage and resistance.
The True Meaning of Cinco de Mayo
For Mexican-Americans in the 19th century, the victory at Puebla was a powerful symbol of resistance against European imperialism. Over the decades, particularly during the Chicano Movement, the holiday was embraced as a day to celebrate cultural pride. Today, the San Francisco festival continues this legacy, often featuring speakers and music that connect the historical victory to contemporary issues of democracy and social justice.
Where to Find the Festivities
The celebration is typically centered in the Mission District, the historic heart of the city’s Latino community. The festival transforms the neighborhood with a low-rider car show, live music stages featuring everything from mariachi to salsa, and booths offering delicious, authentic Mexican cuisine. It’s a family-friendly event that offers a rich, immersive cultural experience far beyond the commercialized versions of the holiday.
5. Fourth of July Fireworks: A Patriotic Explosion Over the Bay
There are few better places to celebrate American Independence Day than along the stunning San Francisco waterfront. The city’s annual Fourth of July celebration is a massive event, drawing huge crowds for a day of festivities capped off by a spectacular fireworks display over the bay.
The Best Viewing Spots for the Fireworks Display
The main event is the fireworks show, which is typically launched from barges located near Pier 39 and Aquatic Park. To get a prime viewing spot, you have several options:
Fisherman's Wharf & Pier 39: This is the epicenter of the celebration, offering close-up views but also the largest crowds. Arrive early in the afternoon to claim your space.
Aquatic Park and Ghirardelli Square: These spots offer fantastic, direct views of the fireworks.
Angel Island or Alcatraz: For a truly unique perspective, consider a ticketed boat tour that takes you out onto the bay for an unobstructed view away from the waterfront crowds.
Coit Tower: The hills around Coit Tower provide an elevated vantage point, though it’s a popular spot that also fills up quickly.
Planning Your Day: What to Bring and When to Arrive
This is one of the busiest days of the year on the waterfront. Plan to arrive by early afternoon at the latest. Bring blankets or low-backed chairs, snacks, and plenty of water. Most importantly, pack warm layers. As soon as the sun goes down, the famous San Francisco fog can roll in, bringing a significant temperature drop. Public transportation is strongly recommended, as parking will be extremely limited and expensive.
6. Halloween in the Castro: A Uniquely San Francisco Haunt
While many cities celebrate Halloween, San Francisco puts its own unique and fabulous spin on the holiday, with the Castro District historically serving as the vibrant, beating heart of the festivities. Although the massive official street party of years past has been discontinued, the spirit of Halloween is alive and well.
The Castro's Legendary Halloween Spirit
The Castro’s legacy as a Halloween destination is legendary. The neighborhood comes alive with incredible, elaborate costumes, and the atmosphere is one of pure, unadulterated fun. While there is no longer a formal, city-sponsored event, the evening still draws crowds who come to see and be seen in their Halloween best. The celebration now takes the form of numerous pub crawls, costume contests, and private parties hosted by the area's many bars and clubs.
Safety and Transportation Tips for a Spooky Night
If you plan to celebrate in the Castro, safety and logistics are key.
Use Rideshares or Public Transit: Parking is virtually nonexistent, and you’ll want a safe ride home. The Castro Muni station is centrally located.
Stay with Your Group: The streets can get crowded. Use a buddy system and keep your phone charged.
Be Respectful: Remember that the Castro is a residential neighborhood. Be respectful of residents and local businesses while you celebrate.
For those seeking a more traditional haunted experience, the famous Winchester Mystery House in nearby San Jose offers special candlelit tours during the Halloween season.

7. Christmas in Union Square: The Heart of SF's Holiday Magic
When the holiday season arrives, Union Square transforms into a magical winter wonderland, serving as the festive centerpiece for the entire city. If you’re looking for classic Christmas cheer, this is the place to be.
The Iconic Tree and Ice Rink
The two main attractions in Union Square are the massive, beautifully decorated Christmas tree and the seasonal outdoor ice rink. Skating under the twinkling lights with the iconic square as your backdrop is a quintessential San Francisco holiday experience. The entire area is decked out in festive lights and decorations, creating a joyful and picturesque atmosphere that’s perfect for families, couples, and anyone looking to get into the holiday spirit.
Finding the Best Views and Photo Ops
For a stunning bird’s-eye view of the tree, the ice rink, and all the festive chaos, head to the upper floors of the Macy's department store that borders the square. The windows of the Cheesecake Factory at the top offer one of the most sought-after views in the city during the holidays. The square itself offers countless photo opportunities, from the giant ornaments to the festive storefronts of the surrounding luxury retailers. This is the perfect place to capture that classic holiday memory.
Your Guide to the Best of the Bay
You are now equipped with the insider knowledge to experience the very best festivals in San Francisco. From the ancient traditions of the Lunar New Year to the modern celebrations of Pride and the festive magic of Christmas in Union Square, you have a clear path to immersing yourself in the events that truly define this incredible city. You no longer have to guess which events are worthwhile; you can now plan your trip with confidence, ready to create memories that will last a lifetime.
To take your planning to the next level and build a complete itinerary around these incredible events, explore our comprehensive Travel Guide. It’s packed with expert advice on everything from lodging and dining to transportation, ensuring your entire San Francisco adventure is as seamless as it is unforgettable.
Don't Miss Out! Subscribe for Exclusive Content
Subscribe


Comments 0
No comments yet
Be the first to share your experience!
Dont Miss Out! Subscribe for Exclusive Content

San Francisco Cherry Blossoms: A Local's Guide to the Blooms

Halloween SF: Haunts Without Horrors

Christmas SF: Lights & Wharf Wonders

SF Pride: 6 Route & Party Hacks

Chinese New Year SF: Parade Essentials

San Francisco Holidays: Bay Area Buzz
The 7 Solo Female Travel Safety Rules You Can't Ignore
TrekGuider @trekguider
You feel the magnetic pull of the world, a deep-seated desire to explore ancient cities, wander through breathtaking landscapes, and discover it all on your own terms. The dream of solo travel is vibrant and powerful. But for so many women, that dream is shadowed by a persistent and paralyzing question: "But will I be safe?"
This isn't just a fleeting thought; it's a formidable barrier. It’s a shared, valid concern that echoes across the travel community. A staggering 66% of women who travel solo report worrying about their personal safety, and for the 59% of women who have yet to start their first independent journey, these concerns are the second-largest obstacle holding them back. The fear is real, and it is robbing you of what could be the most transformative experience of your life. But what if you could systematically dismantle that fear, replacing it with an unshakable foundation of competence?
This guide is your tactical blueprint to do exactly that. We are moving beyond vague reassurances and diving into the essential, non-negotiable rules of solo female travel safety. This isn't about seeing the world through a lens of paranoia; it's about equipping yourself with the knowledge to navigate it intelligently. For a complete overview of the journey, start with our comprehensive pillar guide, The Ultimate Guide to Solo Female Travel (15 Essential Tips). These seven rules, however, are the bedrock—the field-tested strategies that will transform you from a worrier into a prepared and confident global explorer.
Rule 1: Build a "Lifeline Home" Before You Leave
The single most important phase of your safety strategy happens before you ever pack a bag. Creating a strong communication and information bridge between you and a trusted emergency contact back home is non-negotiable. This "mission control" is your ultimate safety net, ensuring that if you are ever unreachable, someone you trust has every critical detail needed to help.
Your "lifeline" packet should be a comprehensive dossier containing both physical and digital copies of the following, based on recommendations from the U.S. Department of State:
A Complete Itinerary: Detail your trip on a day-by-day basis, including flight numbers, train schedules, and the names, addresses, and phone numbers of all booked accommodations.
Copies of All Important Documents: Include the photo page of your passport, any necessary visas, your driver's license, and a full copy of your travel insurance policy, complete with the policy number and the 24/7 emergency assistance phone number.
Financial Information: Provide photocopies of the front and back of every credit and debit card you are carrying. The international toll-free numbers on the back are essential for canceling them if they are lost or stolen.
A Pre-Arranged Communication Plan: Establish a clear plan for when you will check in (e.g., a quick text upon arrival in a new city). Crucially, agree on a protocol for what your contact should do if you miss a check-in (e.g., wait 12 hours, then contact your hotel, then contact the nearest embassy).

Pro-Tip: The single most effective safety action you can take in under five minutes is to enroll your trip with the U.S. Department of State’s free Smart Traveler Enrollment Program (STEP). This provides the nearest U.S. Embassy or Consulate with your itinerary, creating a three-way digital bridge connecting you, your emergency contact, and the State Department for a coordinated response in a worst-case scenario.
Rule 2: Master Your Sanctuary with an Unbreakable Arrival Protocol
Think of your accommodation as more than just a place to sleep. It’s your secure base of operations, your private sanctuary to rest and recharge. Ensuring its integrity from the moment you arrive is a critical habit that provides profound peace of mind. Adopt this methodical security check and perform it automatically every single time you enter a new room.
Prop the Door Open. Before you fully enter, use your main piece of luggage to prop the door open. This simple action prevents the door from closing and locking behind you, guaranteeing an immediate escape route should the room not be empty.
Conduct a Full Room Sweep. With the door still open, perform a quick but thorough physical search. Check under the bed, behind all curtains, inside closets, and in the bathroom, including behind the shower curtain.
Verify All Locks. Once the room is confirmed to be empty, close the door and immediately test all locking mechanisms. Engage the deadbolt, chain lock, or security latch. Go to every window and any balcony doors to ensure they lock securely.
Deploy Your Personal Security. Your own devices provide a layer of protection entirely within your control. Immediately place a rubber wedge doorstop alarm under the main door or install a portable door lock like an Addalock. These inexpensive, lightweight devices are highly effective at preventing unauthorized entry, even from someone with a key card.
Locate and Map Emergency Exits. Find the fire exit map on the back of the door. Identify the two nearest exits, then physically walk the route to each one, counting the doors you pass. This mental map is invaluable for navigating in darkness or smoke.
Perform a Hidden Camera Scan. In an age of miniaturized electronics, a quick scan for hidden cameras is a prudent measure. Use your phone's flashlight to look for the tell-tale glint of a tiny lens in unexpected places like smoke detectors, alarm clocks, and USB wall chargers. In the dark, use your phone's front-facing camera (which is more sensitive to infrared light) to scan the space. Look for the small, often blinking, IR lights used by night-vision cameras that are invisible to the naked eye.
Adopt a "Verify, Then Open" Door Policy. Make it your strict policy to never open your door to an unsolicited knock. If someone claims to be from housekeeping, call the front desk using the room phone to verify they sent a staff member to your room.

YOUR ULTIMATE SAFETY TOOLKIT
Mastering your environment is the first step to confident travel. True preparedness means having the right tools for every situation. Our free, downloadable Solo Female Travel Safety Guide is the perfect companion to these rules. It's a comprehensive checklist and resource guide covering everything from what to pack to what to do in an emergency.
Rule 3: Take Absolute Control of Your Ground Transportation
Moving through an unfamiliar city can be a point of high vulnerability. Whether you’re using a ride-sharing app or a local taxi, you must shift from being a passive passenger to an active participant in your own safety. Adhere to this strict set of protocols for every single ride.
The "Match, Name, Share" Protocol for Ride-Shares
Match: Before you get in, carefully match the vehicle's make, model, and license plate number with the information in the app. Check that the driver's appearance matches their profile photo. If anything is off, do not get in the car.
Name: This is a critical verification step. Do not approach a vehicle and ask, "Are you here for Jane?" This gives a potential imposter the information they need. Instead, from a safe position on the curb, ask the driver, "Who are you here for?" A legitimate driver will be able to state your name correctly.
Share: Before your ride begins, use the app's built-in "Share Trip Status" feature. This sends a live map of your journey to a trusted contact, allowing them to track your progress in real-time.
Universal Rules for Every Ride
The Backseat Protocol: As a solo traveler, always sit in the back seat on the side opposite the driver. This creates crucial physical distance and gives you access to two separate exits.
The Route Protocol: Keep your own mapping application, like Google Maps, open on your phone throughout the journey. If the driver takes a significant, unexplained detour, you are empowered to question it. If the response makes you uncomfortable, end the ride in a safe, well-lit public area.

Rule 4: Create Layers of Personal and Digital Security
Your solo female travel safety strategy should be built on layers and redundancy. This means pairing smart practices with an effective toolkit of personal security devices and ensuring your digital lifelines are always active.
Your Personal Security Toolkit
Personal Safety Alarm: This is arguably the most valuable device for a solo traveler. An alarm like the She's Birdie emits an extremely loud siren (130+ decibels) and a flashing strobe light to startle an attacker and attract immediate attention. They are small, legal everywhere, and attach to a keychain for instant access.
Anti-Theft Bag: Invest in a bag with features like RFID-blocking pockets (to protect from electronic skimming), slash-proof fabric, and lockable zippers. A crossbody style worn in front of your body offers the most security.
Portable Door Lock / Alarm: As mentioned in Rule 2, carrying your own lock gives you absolute control over the security of your room, ensuring your sanctuary remains impenetrable.

Your Digital Security Layer
Your phone is your map, translator, and lifeline. A solar-powered power bank adds a critical layer of resilience to a standard one, ensuring you can maintain a charge even during power outages or on multi-day treks.
Rule 5: Project Confidence and Practice Proactive Situational Awareness
How you carry yourself has a profound impact on how you are perceived. Projecting confidence—even when you're feeling uncertain—is a powerful deterrent. Walk with purpose, keep your head up, and make brief eye contact. This signals that you are aware of your surroundings, not an easy target.
This confidence is fueled by situational awareness. It's not about being paranoid; it's about being present.
Understand the Local Landscape: Before arriving, research common tourist scams. A 2024 report noted that 29% of solo female travelers had experienced a theft or attempted scam. Knowing the playbook for ploys like the "friendship bracelet" or "spilled drink" allows you to disengage before you become a victim.
Trust Your Intuition: Your intuition is your most finely tuned security equipment. If a person, place, or situation feels "off," it probably is. You do not need a logical reason. Honor it. Cross the street, leave the bar, get in a different train car. Acting on your intuition is not rude; it is intelligent.
Manage Your Inputs: Be mindful of your alcohol consumption. Your awareness is your primary defense, and anything that dulls it increases your vulnerability.

Rule 6: Embrace That Safety Anxiety Decreases with Experience
It's crucial to understand the psychology of solo travel fear. The data reveals a powerful truth: the act of traveling solo is the most effective antidote to the fear of it.
Among women who have taken fewer than six solo trips, 77% report worrying about safety. That number drops dramatically to just 55% for those who have traveled solo more than ten times. This establishes a direct, negative correlation between experience and anxiety.

Every time you successfully navigate a new city and overcome a challenge, you are collecting real-world evidence of your own competence. This direct experience systematically replaces abstract, media-fueled fear with managed, situational awareness. You learn that while vigilance is essential, you are far more capable than you imagined. The goal of your first trip is to break this cycle of fear and begin the empowering loop of experience.
Rule 7: Never Outsource Your Safety to Chance—The Travel Insurance Mandate
For a solo traveler, travel insurance isn't an optional add-on; it is a foundational pillar of your financial security. A cheap policy is not a good deal if it doesn't have the right coverage. When evaluating policies, ensure the plan includes strong coverage in these key areas:
Emergency Medical Coverage: A policy should offer a minimum of $250,000 in benefits.
Emergency Medical Evacuation: This covers the potentially astronomical cost of transporting you to a hospital with adequate facilities or back home.
Emergency Medical Reunion (Companion Coverage): This is vital for solo travelers. If you are hospitalized, this coverage pays for a family member's transportation and accommodation to be at your bedside, providing invaluable logistical and emotional support.
Trip Interruption and Cancellation: This reimburses your non-refundable trip costs if you have to cancel or cut your trip short for a covered reason.
Frequently Asked Questions About Solo Female Travel Safety
What's the single most important safety device I should buy?
A personal safety alarm. While a doorstop and anti-theft bag are excellent, a loud, attention-grabbing alarm is the most versatile tool for deterring a potential threat in any public situation, day or night.
I'm nervous about nightlife. Should I just avoid going out after dark?
Not at all! The key is to be strategic. Have your transportation planned in advance—know exactly how you're getting home. Nurse your drink and never leave it unattended. Stick to well-lit, reputable areas and consider starting with a structured activity, like a group tour or a show, rather than just wandering.
How do I handle street harassment without escalating the situation?
The most effective strategy is confident disengagement. Do not respond or make prolonged eye contact. Project purpose and keep walking. In many cases, a reaction is what the harasser is seeking. If you feel you are being followed, walk into a busy, open shop or restaurant immediately.
Are group tours a good option for a safety-conscious first-timer?
Absolutely. An estimated 75% of women who have never traveled alone would be more likely to do so on a group tour. They provide a "scaffolded" entry into the world of solo travel. You can find tours vetted and reviewed by other solo female travelers on platforms like TrekGuider, which is a great way to build foundational confidence.
Your Journey to Confident Exploration Starts Now
The narrative around solo female travel safety is too often dominated by fear. But the data tells a different, more empowering story of capability and resilience. These seven rules are your framework—a practical system for managing risk and moving through the world with intelligent confidence. By internalizing these strategies, you build a foundation of competence from which you can freely and bravely explore.
Now that you have the safety blueprint, the truly exciting part can begin. Explore our collection of expert-written Travel Guide resources to find your perfect destination, and remember to download the essential Solo Female Travel Safety Guide. The world is waiting for you to discover it—and yourself.
Meta Data Suggestions:
SEO Meta Title (59 characters): The 7 Essential Solo Female Travel Safety Rules for 2026
URL Slug: solo-female-travel-safety-rules
SEO Meta Description (154 characters): From accommodation security to transport protocols, these 7 non-negotiable solo female travel safety rules will empower you to explore the world with confidence.
Don't Miss Out! Subscribe for Exclusive Content
SubscribeComments 0
No comments yet
Be the first to share your experience!
Dont Miss Out! Subscribe for Exclusive Content

How to Avoid Travel Scams: A Global Guide

Is Public WiFi Safe? How to Protect Your Data Abroad

A Woman's Guide to Safe Travel: 10 Critical Tips

7 Hotel Safety & Security Tips for Peace of Mind

9 Beach Safety Tips That Could Save Your Life

How to Stay Safe While Hiking: A Hiker's Safety Guide
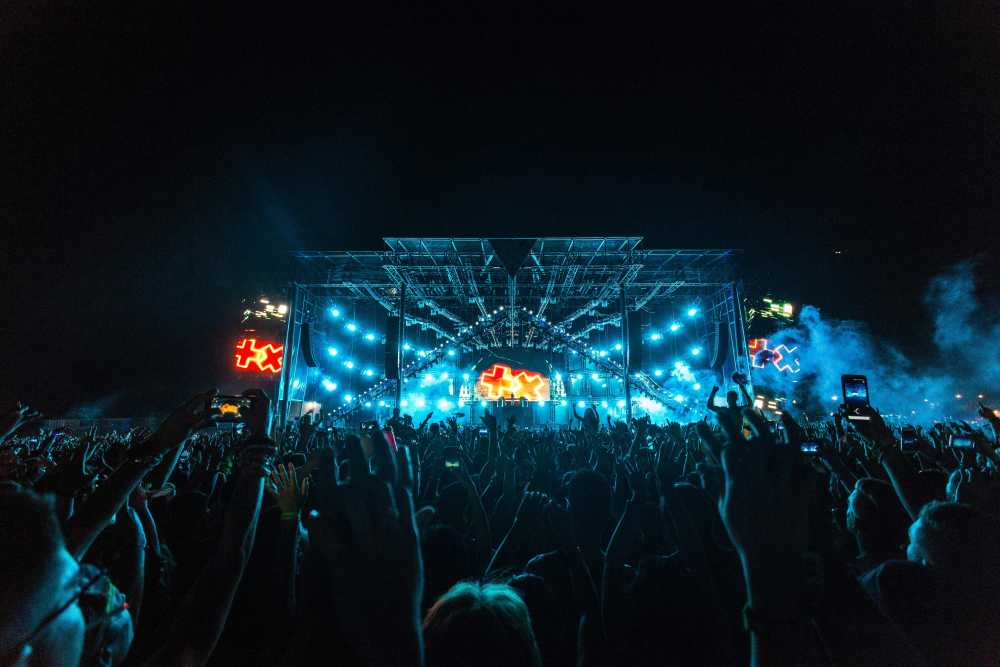
Ultra Festival: Beat the Heat Guide
TrekGuider @trekguider
You’ve done it. You scored the golden ticket to Ultra Music Festival, a three-day sonic pilgrimage in the heart of Miami where the world’s greatest DJs command colossal stages and the energy is nothing short of electric. But as the bass drops, so does the relentless Florida sun. The real problem isn't just the heat; it's the brutal combination of scorching temperatures, suffocating humidity, and tens of thousands of dancing bodies that can quickly turn your dream festival into a dehydrated, sun-stroked nightmare.
Imagine the agony of missing Skrillex’s closing set because you’re dizzy and nauseous, huddled in a medical tent. Picture the sheer frustration of tapping out before sunset on day one, your energy completely drained, while your friends rave on into the night. This isn't a scare tactic; it's a common reality for unprepared attendees who fatally underestimate the physical toll of partying under the Miami sun for three straight days. The line between an unforgettable weekend and a miserable, potentially dangerous one is drawn by a single thing: a bulletproof strategy.
This is that strategy. Forget the generic "drink water" advice you’ve heard a thousand times. This is your new bible for not just surviving, but truly conquering the heat at Ultra. We’re providing a pro-level, comprehensive blueprint covering everything from tactical gear selection and advanced hydration science to strategic stage navigation and leveraging festival tech for your safety. Follow these steps, and you won't just beat the heat—you'll own the entire experience, from the opening beat on Friday to the final fireworks on Sunday.

Understanding the Ultra Music Festival Environment: Sun, Crowds, and Sound
Before you can build a plan, you must understand the battlefield. Ultra Music Festival unfolds in late March at Bayfront Park, a beautiful but notoriously exposed venue. For 2026, the festival runs from March 28-30 (and for you long-term planners, March 27-29 in 2026), a time when Miami’s weather is deceptively intense. While the festival is at the heart of the city's vibrant event calendar—a scene we detail in our complete guide to Miami Holidays: 8 Beach Fest Vibes—its unique environment presents a specific set of challenges you must be prepared for.
The festival operates on a strict "rain or shine" policy, meaning you need to be ready for anything. The schedule itself is a marathon, not a sprint:
Friday, March 28: 4:00 PM – 12:00 AM
Saturday, March 29: 12:00 PM – 12:00 AM
Sunday, March 30: 12:00 PM – 10:00 PM
Notice that Saturday and Sunday demand ten to twelve hours of exposure. The primary obstacles you will face are:
Intense Solar Radiation: The Florida sun is powerful. Without adequate shade, direct exposure can lead to severe sunburn and rapidly increase your core body temperature.
Oppressive Humidity: Miami's humidity cripples your body's natural cooling system. It prevents sweat from evaporating effectively, making 85°F feel like a suffocating 95°F.
Massive Crowds: Dense crowds trap body heat, creating microclimates that are significantly hotter than the ambient air. Navigating these human seas requires immense physical energy.
Constant Movement: You’ll be walking, standing, and dancing for hours on end, burning calories and losing fluids at a dangerously accelerated rate.
The first and most critical mindset shift is to treat Ultra like an athletic event. Your preparation starts long before you ever step foot in Bayfront Park.

Pre-Festival Prep: Your Foundation for Success
Victory is won in the preparation. What you do in the days leading up to the festival and what you pack in your bag will absolutely dictate your endurance and enjoyment.
The Ultimate Packing List: Beyond the Basics
Your packing list is your first line of defense. Every single item should serve a purpose, primarily focused on cooling, hydration, and comfort.
Clothing (The Three B’s: Breathable, Bright, and Barely-There):
Fabrics: Choose lightweight, moisture-wicking materials like polyester, nylon, or bamboo blends. These technical fabrics pull sweat away from your skin, allowing it to evaporate and cool you down. Avoid cotton at all costs; it absorbs moisture, becoming a heavy, suffocating trap for heat.
Colors: Opt for light-colored clothing. White, beige, and pastels reflect sunlight rather than absorbing it like dark colors do.
Fit: Loose-fitting garments are your best friend. They allow for crucial airflow against your skin, preventing heat from getting trapped.
Footwear (Your Most Important Gear): You will be on your feet for 30+ hours over the weekend. Comfortable, well-worn sneakers are non-negotiable. Do not, under any circumstances, wear brand-new shoes, flimsy sandals, or heavy boots. Running or athletic shoes with proven arch support are ideal.
Hydration Hardware:
Hydration Pack: This is the single most important piece of gear you can bring. A CamelBak or a similar backpack with a water bladder allows you to carry 2-3 liters of water and sip continuously without fumbling with a bottle. Ensure it complies with the latest festival size and pocket regulations before you go.
Electrolyte Packets: Pack single-serving powders or tablets (like Liquid I.V., Nuun, or Pedialyte packets). They are small, light, and absolutely essential for true hydration.
Sun & Heat Protection Arsenal:
Sweatproof Sunscreen: A broad-spectrum, water-resistant sunscreen with an SPF of 50 or higher is mandatory. Apply it generously 30 minutes before you enter and reapply every two hours, no exceptions.
Wide-Brimmed Hat: A bucket hat or other wide-brimmed hat provides a portable oasis of shade for your face, neck, and ears, significantly reducing your perceived temperature.
UV-Protective Sunglasses: Protect your eyes from the relentless glare and long-term sun damage.
Cooling Towel: These hyper-evaporative towels, when soaked in water, provide incredible cooling relief when worn around your neck.
Handheld Fan/Mister: A small, battery-operated fan can be a godsend in a stagnant, dense crowd, creating a personal breeze when you need it most.
Physical Conditioning: Don't Underestimate the Marathon
You wouldn't run a 10k without training, and you shouldn't tackle Ultra without some physical prep.
Pre-Hydrate Aggressively: Begin increasing your water intake 2-3 days before the festival. Your goal is to start Day 1 with your body in a state of optimal hydration, not playing a desperate game of catch-up.
Build Endurance: In the weeks leading up, incorporate some light cardio into your routine. Even 30 minutes of brisk walking or jogging a few times a week will dramatically improve your stamina.
Prioritize Sleep: Get a full 8 hours of sleep each night in the week before the festival. A sleep deficit severely impairs your body's ability to regulate temperature and recover.
Just as detailed planning is key for a scenic road trip, like the one we map out in our Big Sur Map & Itinerary, careful preparation is essential for a massive festival. Don't leave your experience to chance.
Mastering Hydration: The Core of Your Ultra Music Festival Strategy
This is the most critical section of this guide. Proper hydration at Ultra is a science. Simply drinking water when you feel thirsty is a recipe for disaster; by the time you feel thirst, you are already significantly dehydrated.

Water Isn't Enough: The Critical Role of Electrolytes
When you sweat, you don't just lose water; you lose vital minerals called electrolytes—primarily sodium, potassium, and magnesium. These minerals are the spark plugs of your body, responsible for regulating nerve and muscle function, hydrating your cells, and balancing blood pressure. Replenishing them is just as important as replenishing water.
Why It Matters: Drinking excessive amounts of plain water without replacing electrolytes can lead to a dangerous condition called hyponatremia, where the sodium levels in your blood become dangerously diluted. Symptoms can mimic dehydration (nausea, headache, confusion) but can be far more severe.
Your Game Plan: For every two refills of your hydration pack with plain water, make the third refill an electrolyte mix. This simple rule ensures you are constantly replenishing what you're sweating out. Avoid relying on sugary energy drinks or sodas for hydration; they can often make dehydration worse.
Your Hydration Schedule: A Sip-by-Sip Plan
Discipline is everything. You need a proactive hydration schedule, not a reactive one.
The Morning Load-Up: Drink at least 16-20 ounces (about half a liter) of water with an electrolyte packet before you even leave for the festival.
The Immediate Refill: The very first thing you do upon entering Bayfront Park is locate a water station and fill your hydration pack to its maximum capacity.
The 15-Minute Rule: Take a few big sips of water from your pack every 15 minutes. Set a recurring alarm on your phone or watch if you have to. Do not wait until you feel thirsty.
The Proactive Refill: Never wait until your pack is empty to refill it. When it's about one-third full, make your way to a water station. The lines are shortest during non-peak times (e.g., during a headliner's set when everyone is at one stage, or early in the day).
The End-of-Night Recovery: Drink another 16-20 ounces of electrolyte-infused water before you go to sleep. This will supercharge your body's recovery overnight and prepare you for the next day.
Pro-Tip: As soon as you get inside, open the festival map on the official app and screenshot the locations of all free water refill stations. The stations located near smaller stages or along the perimeter of the park often have significantly shorter lines than the ones near the main stage.
Strategic Navigation and Lineup Planning
How you move through the festival and plan your day is just as important as what you pack. Wasting energy is a luxury you simply cannot afford.

Decoding the Festival Map for Heat Evasion
The festival grounds are a maze of stages, vendors, and people. Use the map to your real advantage.
Identify Cool Zones: Before you even start thinking about artists, scan the map for any designated shade structures, indoor stages (like the iconic Megastructure), or air-conditioned brand activations. These are your recovery oases.
Plan Efficient Routes: When moving from the Main Stage to the Resistance stage, don't just try to cut through the thickest part of the crowd. Use the perimeter walkways. It might be a slightly longer distance, but it will be faster and require far less energy than pushing through a human traffic jam.
Building a Smart Schedule: Pacing is Everything
With a 2026 lineup featuring titans like John Summit & Dom Dolla, Armin van Buuren, Tiësto, Chase & Status, and Deadmau5, the temptation is to sprint from stage to stage. This is a rookie mistake that will burn you out by 9 PM on Friday.
Prioritize Ruthlessly: Accept that you cannot see every artist. Pick your top 3-4 "can't-miss" sets for each day and build your schedule around them as anchors.
Schedule Deliberate Downtime: The hottest part of the day is typically between 2 PM and 5 PM. This is the perfect time to schedule a tactical break. Find a shady spot, sit down, focus on hydrating, and eat a proper meal. This planned rest will give you the energy you need for the headlining acts at night.
Embrace Discovery: Use the time between your must-see sets to explore smaller stages. They are often less crowded, providing more space to dance, breathe, and discover your new favorite artist.
Pro-Tip: When moving through a dense crowd to get closer to a stage, conserve energy by following directly behind a larger, determined person or group. Let them carve a path for you. It's a simple "drafting" trick that saves a surprising amount of physical effort.
Leveraging Technology and Safety Resources at Ultra Music Festival
In the modern festival era, your phone is an essential survival tool. Ultra has integrated technology to enhance attendee safety, and you should take full advantage of every resource.
Your Phone is Your Lifeline
The Official Ultra App: Download it well in advance. It contains the most up-to-date festival map, set times, and, most importantly, will send push notifications for any emergency alerts or important announcements.
The SaferWatch App: Ultra has partnered with the SaferWatch app, which allows you to report any safety or security concerns (medical emergencies, suspicious activity) directly and anonymously to festival staff in real-time. Have it downloaded and set up before you arrive.
Portable Charger: Your phone is useless with a dead battery. A fully charged portable power bank is not optional; it's mandatory.
Knowing Where to Go for Help
Even with perfect preparation, things can go wrong. Knowing how to recognize a problem and where to get help is crucial.
Locate Medical Tents: Just like the water stations, the first thing you should do is identify the location of all medical tents on your map. They are staffed with professionals who are there to help you, no questions asked. There is no shame in seeking help.
Recognize the Signs of Heat Exhaustion: Be aware of these symptoms in yourself and your friends:
Heavy sweating
Dizziness or lightheadedness
Nausea or vomiting
A throbbing headache
Cool, pale, clammy skin
If you or a friend experience these, get to a medical tent immediately. Do not try to "tough it out."
Be a Good Raver: The Ultra community is known for looking out for one another. If you see someone who looks unwell or is in distress, ask if they need help and guide them toward a medical tent or alert festival staff.

You're Ready to Conquer Ultra
The roar of the crowd, the earth-shaking bass, the Miami skyline lit up against the night sky—these are the moments that define the Ultra Music Festival experience. By approaching the weekend with the mindset of an endurance athlete, you are no longer at the mercy of the elements. You are in control. Preparation is your armor, hydration is your fuel, and a smart strategy is your map to victory. You now have the expert knowledge to stay cool, energized, and safe from the first set to the final encore.
You are now equipped to handle the heat, navigate the crowds, and fully immerse yourself in the magic of one of the world's greatest music festivals. This level of detailed planning is what transforms a good trip into an unforgettable one. For comprehensive strategies on navigating destinations and events worldwide, our master Travel Guide is the ultimate resource for the serious traveler. Now go, stay hydrated, and have the time of your life.
Don't Miss Out! Subscribe for Exclusive Content
SubscribeComments 0
No comments yet
Be the first to share your experience!
Dont Miss Out! Subscribe for Exclusive Content
San Francisco Cherry Blossoms: A Local's Guide to the Blooms
Halloween SF: Haunts Without Horrors

SF Festivals: 7 Must-See Lineups
Christmas SF: Lights & Wharf Wonders
SF Pride: 6 Route & Party Hacks
Chinese New Year SF: Parade Essentials
How to Avoid Travel Scams: A Global Guide
TrekGuider @trekguider
There’s a unique sickness that can ruin a perfect trip, and it has nothing to do with food poisoning. It’s the bitter sting of being scammed—the feeling of being played for a fool that can sour the memory of an entire vacation. You plan for months, dreaming of ancient ruins and bustling markets, only to have that excitement hijacked by a single moment of deception. The financial loss is frustrating, but the emotional toll is worse. It can leave you feeling cynical, embarrassed, and distrustful, robbing you of the open-hearted curiosity that makes travel so transformative.
This is the universal problem every traveler faces, an invisible tax on our sense of adventure. In a world of unfamiliar customs and currencies, we are at an inherent disadvantage—and scammers don't just know this; they bank on it. They are masters of psychological manipulation, running sophisticated plays that exploit your politeness, your confusion, and your inherent trust in others. They don’t just target the naive; they target the kind. But you don’t have to be a victim. This guide is your shield. By understanding their tactics, you can spot the con from a mile away and disengage with unshakeable confidence. This is your "know your enemy" playbook for the world's most common travel scams, a critical component of the holistic preparedness we cover in our definitive The Ultimate Guide to Travel Safety: A 2026 Playbook. Let's dismantle their script, so you can stick to writing your own.

The Psychology of the Scam: Why Their Tricks Work
To truly become scam-proof, you don't just need to know what they do; you need to understand why it works. Scammers aren't just lucky; they are leveraging predictable patterns of human behavior that can trip up even the most seasoned traveler.
The Reciprocity Principle: Many scams begin with a "gift"—a friendship bracelet, a sprig of rosemary, or unsolicited "help." This is a tactic designed to create a subconscious social obligation in you, the victim. Because they have given you something of perceived value, it becomes psychologically much harder for you to refuse their subsequent, and often aggressive, demand for payment.
Exploiting Greed: Some scams, like the infamous "found ring" ploy, don't rely on your kindness but on your own potential greed. By offering you something that appears incredibly valuable for a low price, the scammer tempts you into thinking you're the one getting the better end of the deal. The reality is, if an offer seems too good to be true, it is, and your desire for a windfall is the bait.
Manufactured Urgency and Confusion: Scammers thrive in chaos. They will often create a high-pressure situation—a supposed "spill" on your jacket, a crowded petition board, or a complex currency exchange—to distract and confuse you. In that moment of disorientation, your brain's threat-assessment capabilities are overloaded, your guard is down, and their accomplice strikes.
By recognizing these underlying tactics, you can spot the setup long before the punchline.
The Top 10 Travel Scams and How to Disengage
Your best defense is knowing their playbook. Here is a breakdown of the ten most common travel scams you'll encounter globally, complete with a description of the con and a direct, scripted response you can use to shut it down instantly.
1. The Transportation Scam ('Broken Meter' / 'Hotel is Closed')
This is often the first scam you'll encounter, right outside the airport. The taxi or tuk-tuk driver will claim their meter is broken to negotiate a wildly inflated flat fee. A more insidious version involves the driver insisting your chosen hotel or attraction is "closed for a holiday" to divert you to a friend's guesthouse or shop where they get a hefty commission.
How to Disengage: Your defense starts before you even get in the vehicle.
Your Script: Point directly to the meter and say clearly, "Meter, please?" If the driver refuses or claims it's broken, simply say, "No, thank you," and find another taxi. If they insist your destination is closed, be a broken record: "Please take me to the address. I have a reservation." Do not engage in a debate.
2. The Distraction Theft ('The Spiller' / 'The Petitioner')
This classic scam relies on teamwork and manufactured chaos. One person will create a diversion to occupy your attention while an accomplice pickpockets you or snags your bag. Common tactics include someone "accidentally" spilling a drink or condiment on you and offering to help clean it up, or a group of people swarming you with a clipboard asking you to sign a petition. While you're flustered or focused on the petition, your valuables disappear.
How to Disengage: The moment the diversion happens, your only priority is to secure your belongings.
Your Script: Immediately clutch your bag, moving it to the front of your body, and put a hand on your wallet and phone. Create physical distance from the person and say loudly and clearly, "No, thank you. I'm fine." Do not accept their "help." Keep moving and walk away.
3. The 'Free' Gift Scam ('Friendship Bracelet' / 'Rosemary Sprig')
This scam preys on the reciprocity principle. A friendly person will approach you and place an item on your person—tying a "friendship" bracelet on your wrist or putting a sprig of rosemary in your hand for "good luck." They'll call it a gift. The moment it's on you, their demeanor changes, and they begin to aggressively demand payment, often causing a public scene to embarrass you into paying.
How to Disengage: The key is to prevent physical contact from the start.
Your Script: As they approach, hold up a hand in a clear "stop" gesture and say a firm, "No, thank you," while walking away without breaking your stride. If they manage to place an item on you, immediately take it off, place it on the ground, and walk away without looking back. Do not hand it back to them, as this re-engages the interaction.
4. The 'Found Ring' Scam
This play targets your potential greed. A scammer will pretend to find a valuable-looking gold ring on the ground near you and ask if you dropped it. When you say no, they will inspect it, claim it must be real gold, and offer to sell it to you for a "good price" because they need the cash. The ring is, of course, a worthless brass fake.
How to Disengage: Your reaction should be one of complete disinterest.
Your Script: Without stopping or even slowing down, simply say, "It's not mine," and continue walking. Any hesitation, curiosity, or engagement signals that you are a potential mark.

5. The Overpriced Service Invitation ('Tea Ceremony' / 'Local Bar')
A friendly and often attractive local strikes up a conversation, building rapport before inviting you to a "special" cultural experience, like a traditional tea ceremony or a local bar that tourists don't know about. After you've accepted the service, you are presented with a massively inflated bill, and intimidating staff may block the exit until you pay up.
How to Disengage: The rule is simple: never follow a stranger to a second, private location.
Your Script: Decline the invitation politely but firmly: "Thank you for the kind invitation, but I have other plans." Repeat it as necessary and do not offer any further explanation.
Pro-Tip: Your smartphone is a powerful anti-scam tool. If a taxi driver is taking you on a suspicious route, open a mapping app with the volume up. The audible turn-by-turn directions signal that you are tracking the route and know where you are going.
6. The Damaged Rental Scam
This scam is most common with motorbike or jet ski rentals in tourist hotspots. You are often required to leave your passport as collateral. When you return the vehicle, the owner points out pre-existing damage—scratches and dents you didn't cause—and accuses you of causing it. They then demand an exorbitant fee for repairs, holding your passport hostage until you pay.
How to Disengage: This scam is defeated with preventative action.
Your Script (Preventative): Before taking the vehicle, pull out your phone in front of the owner and say, "I'm just going to take a quick video of the vehicle's condition." Slowly and clearly film every part of the vehicle, zooming in on any existing scratches and dents while narrating what you see. This creates undeniable proof. If they demand your passport, respond, "I cannot leave my passport, but I can provide a cash deposit or a credit card authorization."
7. The Wrong Change / Note Switch Scam
This simple but effective scam relies on your unfamiliarity with the local currency. A cashier, vendor, or taxi driver will give you the incorrect change, hoping you won't notice. A common variation is the "note switch." You pay with a large bill, and the cashier deftly swaps it for a smaller one while you're not looking, then insists you didn't pay enough.
How to Disengage: Be present and deliberate during every cash transaction.
Your Script: As you hand over a large bill, state its value clearly out loud: "Paying with a 50." Count your change slowly and carefully at the counter before you walk away. If it is incorrect, state calmly, "Excuse me, I believe there's a mistake with the change."
8. The Fake Police Scam
Scammers impersonating plainclothes police officers will approach you and accuse you of a minor, often fabricated, offense (like dropping a cigarette butt or not having a specific permit). They will then demand you pay an immediate "fine" in cash to avoid being taken to the station. They may also ask to inspect your wallet for "counterfeit money," stealing some of it during the inspection.
How to Disengage: Real police do not demand on-the-spot cash fines. Call their bluff.
Your Script: Remain calm and polite, but firm. Never hand over your wallet or passport. Say, "I understand. I am happy to go with you to the official police station to handle this." This will almost always cause them to vanish.

Your Ultimate Solo Travel Playbook
Navigating the world alone requires an extra layer of awareness. Scammers often target solo travelers, but with the right strategies, you can project unshakable confidence. Our specialized guide is the ultimate resource for any woman dreaming of exploring the world on her own terms.
Download your free Solo Female Travel Safety Guide now!
9. The ATM / Card Skimming Scam
This is a high-tech scam with two common variations. Criminals may install a "skimming" device over the card slot of an ATM to copy your card's magnetic stripe data, while a tiny hidden camera records you entering your PIN. Alternatively, a "helpful" local might approach you at an ATM, offering to help you avoid foreign transaction fees, but is actually using a handheld skimmer to steal your card information.
How to Disengage: Be protective of your physical card and your PIN.
Your Script: If a stranger approaches you at an ATM offering help, immediately cover the keypad with your other hand, take your card, and say, "No, thank you, I'm fine." Cancel the transaction and leave. It is always safer to use ATMs located inside a bank during business hours. Before inserting your card, physically jiggle the card reader and keypad. If anything feels loose, it may have been tampered with.
10. The Fake Ticket / Accommodation Scam
Scammers set up professional-looking but fake websites or post fraudulent ads on legitimate booking sites offering heavily discounted airline tickets, event passes, or holiday rentals. You pay in advance, often via a non-refundable bank transfer, only to discover upon arrival that your ticket is fake or the beautiful apartment you booked doesn't exist.
How to Disengage: This scam is prevented by diligent booking practices.
Your Script (Preventative): If an offer seems too good to be true, it is. A safe response when dealing with any third-party seller is, "I only book through official websites or with a credit card." Credit card payments offer a layer of fraud protection that bank transfers do not. One of the best ways to check out independent guides is to use a reliable platform. For example, on TrekGuider Marketplace, you can find products from verified travel creators, which will add an extra level of security and accountability to your plans.
Travel Scams FAQ: Your Questions Answered
A prepared mind anticipates the next question. Here are expert answers to common concerns about navigating travel scams.
1. What should I do if I realize I've been scammed?
First, don't blame yourself. These are professionals. Your immediate priorities are to mitigate the damage and ensure your safety. If credit cards were stolen or compromised, call your bank immediately to cancel them. If your passport was taken, contact your country's nearest embassy or consulate. File a report with the local tourist police; while recovery is unlikely, the report can be essential for travel insurance claims. Most importantly, try not to let it ruin your trip. View it as a hard-earned lesson in travel wisdom.
2. Are some destinations worse for scams than others?
While scams can happen anywhere, they are more prevalent in major global tourist hubs where large crowds, language barriers, and a general sense of disorientation create the perfect hunting ground. Cities like Paris, Rome, Barcelona, and Bangkok are famous for their attractions, but also for specific, localized scams. The key isn't to avoid these incredible places, but to go into them with heightened awareness of the specific cons you are most likely to encounter there.
3. What's the most sophisticated scam I should be aware of?
A frighteningly sophisticated evolution of the classic "family-in-need" scam involves the use of Artificial Intelligence. Scammers can use AI to create "deepfakes"—convincingly altered audio recordings that perfectly mimic a traveler's voice. They can use this to call a family member back home with a fabricated emergency, making a desperate plea for money sound terrifyingly real. The best defense is to pre-arrange a "duress code" or a secret question with your family that only you would know the answer to, which can instantly verify your identity in a real emergency.

Travel With Confidence, Not Fear
The world is not the scary, dangerous place that these scams make it seem. The vast majority of people you meet on your travels will be kind, honest, and welcoming. The goal of this guide is not to make you paranoid but to make you prepared. Knowledge is your armor. By understanding the psychology and the mechanics of these common travel scams, you take away their power. You are no longer an easy mark; you are an informed, savvy traveler who can navigate the world with an open heart, backed by a prepared mind.
Now that you're equipped to handle the cons, you can focus on the bigger picture of planning a flawless trip. For a complete master guide covering everything from health and digital security to packing and logistics, our all-encompassing Travel Guide is the only resource you'll ever need.

SEO Meta Title (Under 60 characters):
How to Avoid the Top 10 Travel Scams (A Global Guide)
URL Slug:
how-to-avoid-travel-scams
SEO Meta Description (Under 155 characters):
Worried about travel scams? Our global guide reveals the top 10 tourist cons and gives you the exact scripts to disengage safely and travel with confidence.
Don't Miss Out! Subscribe for Exclusive Content
SubscribeComments 0
No comments yet
Be the first to share your experience!
Dont Miss Out! Subscribe for Exclusive Content

Ultimate USA Holidays Guide: Top Picks

FTC Affiliate Disclosure Essentials: Stay Compliant as a Travel Creator

Essential Affiliate Tools: From Tracking to Full Optimization

Booking.com Affiliate Program Review: Pros, Cons, and Earnings Potential

Decoding Affiliate Commission Rates: Benchmarks for Travel Creators
