SF Festivals: 7 Must-See Lineups
TrekGuider @trekguider
San Francisco’s cultural calendar is a dizzying, year-round whirlwind of activity, making it almost impossible to know where to begin. You want to dive into the authentic heart of the city, but you’re faced with an overwhelming number of options. How do you choose the events that are truly iconic, the ones that define the Bay Area’s unique spirit, without wasting your precious time on something that doesn’t live up to the hype?
The fear of missing out is real. You could easily find yourself stuck in a generic tourist trap, completely missing the vibrant, community-driven celebrations happening just a few blocks away. You risk leaving the city without ever experiencing the dazzling traditions of the Chinese New Year Parade or the electrifying energy of the Pride Parade on Market Street. Don’t let your trip be defined by indecision; let it be defined by unforgettable moments.
This guide is your definitive solution. We’ve hand-picked the 7 must-see lineups that represent the very best festivals in San Francisco. Think of this as your insider’s ticket to the city's biggest moments, but it's just one piece of the puzzle. For a complete, year-round look at the city's seasonal rhythm, be sure to explore our comprehensive guide to San Francisco Holidays: Bay Area Buzz.

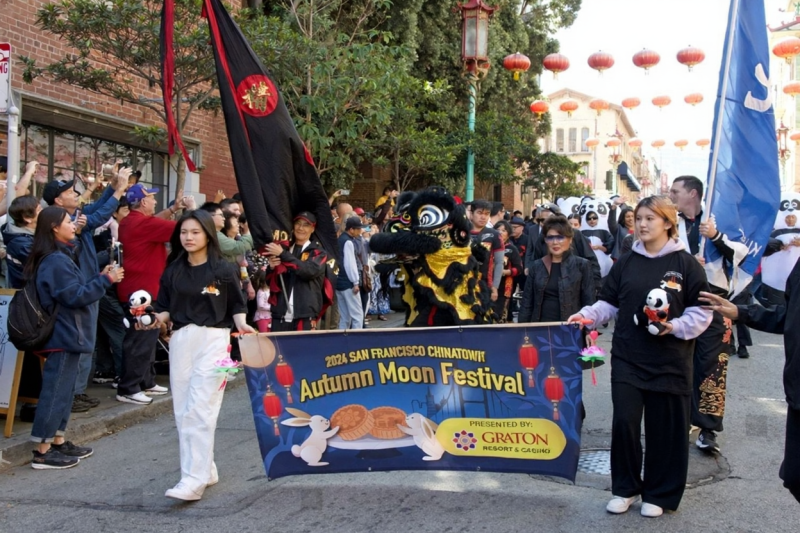
1. Chinese New Year Parade: One of the Oldest Festivals in San Francisco
Forget what you think you know about parades. San Francisco’s Chinese New Year Parade isn’t just an event; it’s a full-blown sensory spectacle and a powerful link to the city’s soul. As one of the most cherished festivals in San Francisco, this celebration transforms the streets into a living river of light, sound, and ancient tradition.
The Cultural Significance: A Tradition Since 1851
San Francisco is home to the oldest and largest Chinese New Year celebration outside of Asia, a tradition that has been a key part of the city's cultural identity since 1851. The festival marks the beginning of the new year on the traditional lunisolar Chinese calendar and is a time for families to honor ancestors, share symbolic foods like noodles for longevity, and welcome a year of good fortune. While the celebration includes a vibrant Flower Fair and a bustling Street Fair, the main event is the spectacular night parade.
Key Dates and Times for 2026
Mark your calendars for the Year of the Snake. The main parade is scheduled for Saturday, around mid-February (dates shift each year), starting at 5:15 PM. As one of the few night-illuminated parades in North America, it offers a uniquely magical experience. Expect to see:
Elaborate Floats: Beautifully designed floats glowing under the city lights.
Traditional Lion Dancers: Energetic performers in stunning costumes, believed to bring good luck.
The Golden Dragon: The parade’s grand finale features the famous 268-foot Golden Dragon, a breathtaking sight that requires a team of over 100 people to carry through the streets.
Modern Drone Light Show: A stunning high-tech addition that blends ancient tradition with Bay Area innovation.
Pro-Tips for the Best Viewing Experience
To make the most of this incredible event, a little planning goes a long way.
Arrive Early: The parade route gets crowded hours before the start time. Secure a spot along the route by mid-afternoon for the best views.
Use Public Transit: Street closures make driving and parking nearly impossible. Use BART or Muni to get downtown and walk to the parade route.
Dress in Layers: San Francisco weather is famously unpredictable. Even if the day is warm, the evening will get chilly, so bring a jacket, hat, and gloves.
Consider Bleacher Seats: If you want to guarantee a comfortable spot with a clear view, you can purchase tickets for the bleacher seating located along the route.
Pro-Tip: Don't leave before the grand finale! The parade now incorporates a modern drone light show, a stunning high-tech contrast to the traditional 268-foot Golden Dragon that you won't want to miss.

2. SF Pride Parade: One of the Most Iconic Festivals in San Francisco
The San Francisco Pride Parade is more than just a festival; it’s a powerful, vibrant, and deeply meaningful declaration of love, equality, and resilience. Every June, hundreds of thousands of people from all over the world gather to celebrate the LGBTQ+ community in one of the largest and most famous Pride events globally.
From Protest to Celebration: The History of SF Pride
The roots of SF Pride run deep. The event commemorates the 1969 Stonewall Uprising in New York City, a key moment that ignited the modern fight for LGBTQ+ rights. San Francisco’s first "gay-in" was held in 1970, evolving from a political protest into the massive celebration of identity and activism it is today. Through the 1980s, the parade became a crucial platform for raising AIDS awareness, and it continues to be a powerful stage for advocating for the rights and visibility of the entire LGBTQ+ spectrum.
2026 Parade Route and Schedule
The 2026 SF Pride Parade is scheduled for Sunday, the last Sunday of June, starting at 10:30 AM. The route runs along Market Street, beginning at Beale Street and concluding at 8th Street, leading into the heart of the Civic Center Plaza celebration. The parade is a joyous spectacle featuring colorful floats, dynamic marching contingents from community organizations and corporate allies, and an infectious energy of pure celebration.
Navigating the Crowds and Staying Safe
With massive crowds, it’s essential to plan ahead for a smooth and safe experience.
Find a Good Spot: The sidewalks along Market Street fill up quickly. For a slightly less crowded experience, try finding a spot closer to the beginning of the route near the Embarcadero.
Stay Hydrated and Protected: The June sun can be strong. Bring water, sunscreen, and a hat.
Use Technology: The event is known for its strong security measures, which have included advanced weapon detection technology, allowing attendees to focus on the celebration. Look for official festival apps that provide maps, schedules, and emergency alerts.
Pro-Tip: Major events like SF Pride are leveraging technology for safety. Look for official festival apps or partnerships with services like SaferWatch for real-time, anonymous safety reporting and emergency alerts, ensuring you can focus on the celebration.
If you're inspired to document the incredible energy of events like Pride, our The Travel Creator's Toolkit provides essential tips and resources for capturing stunning photos and videos on the go.

3. St. Patrick's Day Parade: A Sea of Green on Market Street
San Francisco’s St. Patrick's Day Parade is a cherished tradition that brings a touch of Irish luck and culture to the West Coast. Held annually since 1852, it’s one of the city’s longest-running events, drawing families, locals, and visitors alike for a day of festive fun.
Honoring Irish Heritage in the Bay Area
While the holiday observes the anniversary of the death of Saint Patrick, the parade in San Francisco has evolved into a broad celebration of Irish and Irish-American culture. It’s a day to honor the significant contributions of the Irish community to the city’s history and development. The event is a vibrant display of heritage, filled with the sounds of bagpipes, the sight of traditional Irish dancers, and a sea of green attire.
Parade Details and What to Expect
The parade typically takes place on the Saturday closest to St. Patrick's Day (March 17). It proceeds down Market Street, culminating in a festival at Civic Center Plaza. You can expect to see a lively procession featuring:
Local Irish community groups and families.
Traditional Irish musicians and dance troupes.
Colorful floats and marching bands.
Local dignitaries and community leaders.
The post-parade festival continues the celebration with live music, Irish food and drink, and cultural exhibits, making it a full day of family-friendly entertainment.

4. Cinco de Mayo Festival: A Vibrant Celebration of Mexican-American Culture
While often mistaken for Mexican Independence Day, Cinco de Mayo commemorates the Mexican Army's unlikely victory over the French at the Battle of Puebla in 1862. In San Francisco, this day has a particularly deep historical significance, with parades held since 1863, evolving into a proud celebration of Mexican-American heritage and resistance.
The True Meaning of Cinco de Mayo
For Mexican-Americans in the 19th century, the victory at Puebla was a powerful symbol of resistance against European imperialism. Over the decades, particularly during the Chicano Movement, the holiday was embraced as a day to celebrate cultural pride. Today, the San Francisco festival continues this legacy, often featuring speakers and music that connect the historical victory to contemporary issues of democracy and social justice.
Where to Find the Festivities
The celebration is typically centered in the Mission District, the historic heart of the city’s Latino community. The festival transforms the neighborhood with a low-rider car show, live music stages featuring everything from mariachi to salsa, and booths offering delicious, authentic Mexican cuisine. It’s a family-friendly event that offers a rich, immersive cultural experience far beyond the commercialized versions of the holiday.

5. Fourth of July Fireworks: A Patriotic Explosion Over the Bay
There are few better places to celebrate American Independence Day than along the stunning San Francisco waterfront. The city’s annual Fourth of July celebration is a massive event, drawing huge crowds for a day of festivities capped off by a spectacular fireworks display over the bay.
The Best Viewing Spots for the Fireworks Display
The main event is the fireworks show, which is typically launched from barges located near Pier 39 and Aquatic Park. To get a prime viewing spot, you have several options:
Fisherman's Wharf & Pier 39: This is the epicenter of the celebration, offering close-up views but also the largest crowds. Arrive early in the afternoon to claim your space.
Aquatic Park and Ghirardelli Square: These spots offer fantastic, direct views of the fireworks.
Angel Island or Alcatraz: For a truly unique perspective, consider a ticketed boat tour that takes you out onto the bay for an unobstructed view away from the waterfront crowds.
Coit Tower: The hills around Coit Tower provide an elevated vantage point, though it’s a popular spot that also fills up quickly.
Planning Your Day: What to Bring and When to Arrive
This is one of the busiest days of the year on the waterfront. Plan to arrive by early afternoon at the latest. Bring blankets or low-backed chairs, snacks, and plenty of water. Most importantly, pack warm layers. As soon as the sun goes down, the famous San Francisco fog can roll in, bringing a significant temperature drop. Public transportation is strongly recommended, as parking will be extremely limited and expensive.
6. Halloween in the Castro: A Uniquely San Francisco Haunt
While many cities celebrate Halloween, San Francisco puts its own unique and fabulous spin on the holiday, with the Castro District historically serving as the vibrant, beating heart of the festivities. Although the massive official street party of years past has been discontinued, the spirit of Halloween is alive and well.
The Castro's Legendary Halloween Spirit
The Castro’s legacy as a Halloween destination is legendary. The neighborhood comes alive with incredible, elaborate costumes, and the atmosphere is one of pure, unadulterated fun. While there is no longer a formal, city-sponsored event, the evening still draws crowds who come to see and be seen in their Halloween best. The celebration now takes the form of numerous pub crawls, costume contests, and private parties hosted by the area's many bars and clubs.
Safety and Transportation Tips for a Spooky Night
If you plan to celebrate in the Castro, safety and logistics are key.
Use Rideshares or Public Transit: Parking is virtually nonexistent, and you’ll want a safe ride home. The Castro Muni station is centrally located.
Stay with Your Group: The streets can get crowded. Use a buddy system and keep your phone charged.
Be Respectful: Remember that the Castro is a residential neighborhood. Be respectful of residents and local businesses while you celebrate.
For those seeking a more traditional haunted experience, the famous Winchester Mystery House in nearby San Jose offers special candlelit tours during the Halloween season.

7. Christmas in Union Square: The Heart of SF's Holiday Magic
When the holiday season arrives, Union Square transforms into a magical winter wonderland, serving as the festive centerpiece for the entire city. If you’re looking for classic Christmas cheer, this is the place to be.
The Iconic Tree and Ice Rink
The two main attractions in Union Square are the massive, beautifully decorated Christmas tree and the seasonal outdoor ice rink. Skating under the twinkling lights with the iconic square as your backdrop is a quintessential San Francisco holiday experience. The entire area is decked out in festive lights and decorations, creating a joyful and picturesque atmosphere that’s perfect for families, couples, and anyone looking to get into the holiday spirit.
Finding the Best Views and Photo Ops
For a stunning bird’s-eye view of the tree, the ice rink, and all the festive chaos, head to the upper floors of the Macy's department store that borders the square. The windows of the Cheesecake Factory at the top offer one of the most sought-after views in the city during the holidays. The square itself offers countless photo opportunities, from the giant ornaments to the festive storefronts of the surrounding luxury retailers. This is the perfect place to capture that classic holiday memory.
Your Guide to the Best of the Bay
You are now equipped with the insider knowledge to experience the very best festivals in San Francisco. From the ancient traditions of the Lunar New Year to the modern celebrations of Pride and the festive magic of Christmas in Union Square, you have a clear path to immersing yourself in the events that truly define this incredible city. You no longer have to guess which events are worthwhile; you can now plan your trip with confidence, ready to create memories that will last a lifetime.
To take your planning to the next level and build a complete itinerary around these incredible events, explore our comprehensive Travel Guide. It’s packed with expert advice on everything from lodging and dining to transportation, ensuring your entire San Francisco adventure is as seamless as it is unforgettable.
Don't Miss Out! Subscribe for Exclusive Content
Subscribe


Comments 0
No comments yet
Be the first to share your experience!
Dont Miss Out! Subscribe for Exclusive Content

San Francisco Cherry Blossoms: A Local's Guide to the Blooms

Halloween SF: Haunts Without Horrors

Christmas SF: Lights & Wharf Wonders

SF Pride: 6 Route & Party Hacks

Chinese New Year SF: Parade Essentials

San Francisco Holidays: Bay Area Buzz
50+ Travel Blog Name Ideas (And How to Choose)
TrekGuider @trekguider
You feel it in your bones—the burning desire to turn your travel adventures into something more. You're ready to build a brand, share your stories, and launch the travel blog you've been dreaming of. But you’re stuck. You’re staring at a blank screen, trapped by the single most paralyzing question every creator faces: What do I call it?
The pressure to find the perfect name is immense. Every brilliant idea you have feels either too generic, too cheesy, or, most frustratingly, already taken. You worry about choosing a name you’ll outgrow or one that fails to capture the essence of your vision, and this single decision is holding you back from ever hitting "publish."
Forget the endless, frustrating brainstorming sessions. This guide is your definitive branding workshop. We’re not just going to give you a list of generic travel blog name ideas; we’re going to equip you with a proven, step-by-step framework for brainstorming, vetting, and choosing a powerful, memorable, and—most importantly—available brand name. Consider this the final resource you’ll need to overcome the naming hurdle and finally launch your travel media business.
Why Your Blog’s Name is a Critical Business Decision
In the competitive world of travel content, your blog's name is far more than just a URL; it’s the foundation of your entire brand. It’s the first impression you make on a potential reader, a signal of your niche, and a promise of the value you provide. The right name can convey authority, personality, and trustworthiness in a split second.
As the digital world becomes more crowded, a unique and memorable name is a key differentiator that helps you stand out and build a loyal community. Choosing the right name is the very first step in joining the ranks of The Best Travel Blogs to Follow in 2026, transforming your passion from a simple hobby into a legitimate media brand. It sets the tone for your content, guides your visual identity, and becomes the anchor for the entire business you are about to build.
The 5-Step Framework for Choosing the Perfect Travel Blog Name
Treat this framework as your strategic playbook. By following these five steps systematically, you’ll move from a state of overwhelming uncertainty to one of confident clarity, ensuring you select a name that is not only creative but also commercially viable.

Step 1: The Foundation — Brainstorm Core Keywords
Before you can think of a single name, you must first define what your brand is about. This initial step is all about creating a "word bank" of concepts that are central to your blog. Don’t self-censor here; just write.
Create lists of words associated with these four categories:
Your Niche: Are you focused on luxury, budget, adventure, family, food, or solo travel? List every related term. For example, a family adventure blog might list: family, kids, teens, journey, trek, quest, wild, explore, outdoors.
Your Target Audience: Who are you writing for? Digital nomads, parents, retirees, college students? List words that describe them or resonate with them. For example: nomad, creator, parent, wanderer, seeker, adventurer.
Your Tone & Voice: What feeling do you want to evoke? Is your brand inspiring, funny, practical, sophisticated, or rugged? List adjectives. For example: witty, curious, bold, serene, classic, heirloom, luxe.
Travel & Exploration Verbs/Nouns: List general travel-related words that you like the sound of. For example: atlas, compass, globe, passport, voyage, roam, wander, seek, journey, passage, trail.
At the end of this exercise, you’ll have a rich palette of keywords to work with in the next steps.
Step 2: The Spark — Apply Proven Naming Formulas
Now, take the keywords from your word bank and start combining them using these common, effective naming formulas. This is where the magic happens.
The Alliteration Formula (Same Letter): This technique makes names catchy and memorable.
Examples: Roaming Roads, Compass Chronicles, Summit Stories.
The Portmanteau Formula (Blend Words): Combine two words to create a new, unique one.
Examples: Foodventure (Food + Adventure), Staycationist (Stay + Vacation), Technomad (Tech + Nomad).
The "Your Name" Formula (Personal Brand): Using your own name builds a personal connection and positions you as the expert.
Examples: Adventurous Kate, Nomadic Matt, Travels with Taylor.
The "Adjective + Noun" Formula (Descriptive): This is a classic, straightforward approach.
Examples: The Wandering Wagars, The Broke Backpacker, The Travel Bite.
Experiment by mixing and matching words from your Step 1 list into these formulas. Generate a long list of 20-30 potential names without judgment.
Step 3: The Inspiration — Use Blog Name Generators (Wisely)
Online blog name generators can be helpful, but they should be used for inspiration, not as a final answer. Input your top keywords from Step 1 into a few of these tools. Most of the suggestions will be generic or unusable, but occasionally, a generator can spark a new idea or a creative word combination you hadn't considered. Add any interesting options to your long list.
Pro-Tip: Think five or ten years into the future. Will the name you choose still fit if your travel style evolves? A name like "Backpacking a Twenty-Something" might feel perfect now, but it has a built-in expiration date. Aim for a name that allows your brand to grow with you.

Step 4: The Reality Check — Verify Availability
This is the most critical and often most disheartening step, but it’s non-negotiable. You must thoroughly check if your favorite names are available.
Check the Domain: Your primary goal is to secure a .com domain. Our market analysis consistently shows that a professional, easy-to-navigate website is a direct signal of brand investment. A .com domain is at the heart of that perception, inspiring a level of trust that other extensions simply don't. Use a domain registrar like Namecheap or GoDaddy to see if YourBlogName.com is available. If it’s taken, you should strongly consider moving on to the next name on your list.
Check Social Media Handles: Once you find an available .com, immediately check if the name is available as a consistent handle across your target social media platforms (e.g., Instagram, TikTok, Pinterest, YouTube). Having @YourBlogName everywhere is crucial for brand consistency.
If your top name passes both checks, put it on your shortlist. If not, cross it off and move on. Do not get emotionally attached to a name you can't own outright.
Step 5: The Final Hurdle — Conduct a Conflict Check
Before you purchase the domain, perform one last check to avoid future headaches.
Google It: Do a simple Google search for your chosen name. Is another brand, especially in a related industry, already using it? Even if the .com is available, you don’t want to compete with an established brand for name recognition.
Check Trademarks: For extra diligence, perform a basic search on the U.S. Patent and Trademark Office (USPTO) database. This can help you avoid obvious trademark conflicts down the road.
The name that makes it through all five steps is your winner.
Ready to Build Your Brand?
Choosing a name is the first step. Building a successful travel blog requires a full suite of tools for content creation, SEO, and monetization. Get a head start with our comprehensive, expert-curated toolkit.
The Travel Creator's Toolkit
75+ Travel Blog Name Ideas to Spark Your Creativity
To help you with Step 1 and 2, here is a categorized list of over 75 travel blog name ideas. Use these as a starting point to fuel your own unique combinations.

Puns & Wordplay
In Tents Exploration
The Globe Trotters
Suitcase Stories
Miles and Smiles
Pretty Plane Sailing
Frequent Flier Finds
Life is a Trip
Home is Where the Bag is
Have Luggage, Will Travel
Check-In & Check-Out
Alliteration & Rhyme
Roaming Roads
Compass Chronicles
Voyage Vision
Summit Stories
Passage Planner
Wayward Wanderings
The Travel Tribe
Seeker’s Saga
Trekking Threads
The Global Guide
Niche-Specific Names
Family: The Family Fold, Park Pack, Teen Travel Tribe, Little Luggage Life, The Wandering Weans
Solo: Solo Sphere, One Woman’s World, The Independent Itinerary, Just Me Journeys, The Singular Seeker
Luxury: The Gilded Getaway, First Class Compass, The Curated Journey, Velvet Atlas, Heritage & Hideaways
Budget: The Frugal Flier, Penny-Wise Passage, The Backpacker's Billfold, Thrifty Trails, The Value Voyager
Adventure: Adventure Atlas, Summit & Scale, The Adrenaline Almanac, Off-Grid Odyssey, The Wild Wayfarer
Action-Oriented & Evocative
Chase the Horizon
Seek the Summit
Beyond the Map
Find Your Path
Cross the Meridian
The Saffron Trail
Saltwater Soul
Alpenglow Atlas
Terra Incognita
The Far-Flung
Modern & Simple
The Travel Edit
Wayward Co.
Compass Collective
The Getaway Guide
Trip Theory
Atlas & Anchor
Itinerary & Ink
The Local Lens
Foreign & Familiar
The Departure Desk
Food Travel
Feast Finder
Culinary Compass
The Hungry Horizon
Fork & Globe
Spice Routes
The Traveling Table
Street Food Stories
Plates & Passports
The Foodie Flight
Cravings & Capitals
Photography Travel
The Shutter Sphere
Aperture Abroad
Focus Finder
The Framing Fellow
Light & Landmark
Pixel Passport
The Wandering Lens
ISO Elsewhere
The Photo Trekker
Viewfinder Voyages

Frequently Asked Questions About Naming Your Blog
Should my blog name include my destination niche (e.g., "Awesome Italy")?
It can be a powerful strategy for building authority quickly. It tells readers and search engines exactly what you're about. However, it can be limiting if you decide to travel elsewhere. If you're certain you'll focus on one area for years, go for it. If you think you might expand, a broader name offers more long-term flexibility.
What if the .com for my name is taken, but .net or .co is free?
We strongly advise against it. As mentioned, the .com extension is the gold standard; it conveys professionalism and trust. Other extensions can appear less credible and are harder for people to remember. Your audience will instinctively type .com, and you don’t want to send your hard-earned traffic to another website. It’s better to find a new name with an available .com.
Is it a bad idea to use my own name for my travel blog?
Not at all! Using your own name is an excellent way to build a personal brand, positioning yourself as the face of your business. Industry leaders like Nomadic Matt and Adventurous Kate have done this with massive success. The only downside is a potential lack of privacy, so be sure you're comfortable with putting your name out there publicly.
How important is having a keyword in my blog name for SEO?
It's less important than it used to be. Today, search engines prioritize the quality of your content over having an exact-match keyword in your domain. Focus on choosing a name that is memorable, unique, and brandable. A strong brand name is far more valuable for long-term SEO than a clunky, keyword-stuffed domain.
The Final Step: From Name to Brand
Once you’ve successfully navigated the framework and chosen your perfect name, act immediately. The internet moves fast, and you don’t want someone else to grab your idea.

Pro-Tip: As soon as you decide on a name that is available, purchase the .com domain and claim the social media handles on all relevant platforms. Do this immediately, even before you have a website built. Owning these assets is the first real step in making your brand a reality.
With your name secured, you’re no longer just dreaming; you’re building. The next step is to create a platform where you can share your expertise and begin monetizing your content. While traditional methods like advertising exist, the most profitable and sustainable path is to sell your own unique digital products—like itineraries, guides, or workshops. This is where you transition from being a content creator to a media entrepreneur. The TrekGuider Platform is the ultimate ecosystem designed for creators like you, providing the tools and marketplace to sell your digital products and build a thriving business from day one.
Your Journey Starts Now
Choosing a name for your travel blog can feel like an insurmountable obstacle, but it doesn’t have to be. By shifting your mindset from searching for a "cool name" to executing a strategic branding process, you can move forward with confidence and clarity. You now have a repeatable framework and a wealth of travel blog name ideas to break through the creative block that has been holding you back.
The perfect name is a strategic blend of personal expression and practical verification. You are equipped with the knowledge to find it. You're no longer just a traveler with an idea; you're a founder. Go claim your name, and start building your empire.
Meta Data Suggestions:
SEO Meta Title (58 characters): 75+ Travel Blog Name Ideas & How to Choose the Perfect One
URL Slug: travel-blog-name-ideas
SEO Meta Description (154 characters): Stuck on naming your travel blog? Get unstuck with our 5-step framework and 75+ creative travel blog name ideas to find the perfect brand name for you today.
Don't Miss Out! Subscribe for Exclusive Content
SubscribeComments 0
No comments yet
Be the first to share your experience!
Dont Miss Out! Subscribe for Exclusive Content

Ultimate USA Holidays Guide: Top Picks

FTC Affiliate Disclosure Essentials: Stay Compliant as a Travel Creator

Essential Affiliate Tools: From Tracking to Full Optimization

Avoid These 5 Affiliate Landing Page Mistakes for Better Conversions

Affiliate Keyword Research Mastery for Travel Blogs

Booking.com Affiliate Program Review: Pros, Cons, and Earnings Potential
How to Plan a Stress-Free Hawaii Family Trip
TrekGuider @trekguider
Planning a family trip to Hawaii should feel exciting, but the reality can be overwhelming. You're juggling how to pack for unpredictable weather, what activities will actually entertain everyone from toddlers to teens, and how to manage the logistics without losing your mind. The fear of getting it wrong—forgetting something crucial or planning a day that ends in meltdowns—can quickly overshadow the promise of paradise.

Imagine arriving on Maui only to realize you’ve forgotten the reef-safe sunscreen now required by law, forcing a frantic, expensive search. Picture the meltdowns—from kids and adults alike—when a carefully planned beach day is met with groans of boredom, or the crushing disappointment of discovering the lūʻau you dreamed of has been sold out for weeks. Without a strategic plan, the logistical details can overshadow the magic you’re seeking.
This guide is the antidote to that anxiety. It’s your strategic playbook, crafted from hard-won experience to eliminate the guesswork and transform your planning process into an exciting prelude to your adventure. While this article drills down into Hawaii-specifics, it's part of our complete library of Family Travel Ideas: The 2026 Guide to Unforgettable Trips. Consider this your roadmap to a seamless, stress-free, and truly magical Hawaiian escape.
What to Bring and What to Leave Behind
A successful packing strategy for Hawaii isn't about bringing everything; it's about bringing the right things. The islands’ unique environment—from intense equatorial sun to sudden tropical showers—demands a thoughtful approach. For a deep dive into the core principles, our How to Pack Light Guide is a great resource. This Hawaii-specific blueprint ensures you’re prepared for every possibility without hauling unnecessary weight across the Pacific.
Your In-Flight & First-Day Survival Kit
Think of your carry-on bag as your mission-critical command center. If your checked luggage gets delayed, this bag should contain everything you need to not just survive, but thrive for the first 24 hours.
A Complete Change of Clothes for Everyone: One full, lightweight outfit per person. Don't forget underwear and socks.
Swimsuits: This is non-negotiable. You can change in the lobby restroom and head straight to the pool, starting your vacation immediately.
Essential Medications: All prescription medications, plus a small first-aid kit with children’s pain relievers, allergy medicine, band-aids, and antibacterial ointment.
Documents & Valuables: IDs, credit cards, and digital or printed copies of your key reservations (hotel, rental car, first big tour).
The "Boredom Buster" Kit: Fully charge all electronics and pre-load them with movies and games. For younger kids, pack a small bag with a new coloring book or a few wrapped dollar-store toys to reveal mid-flight.
A Feast of Snacks: Pack more than you think you’ll need to combat travel delays and grumpy tummies.
Empty Reusable Water Bottles: Fill them up post-security to stay hydrated and save money.
Your Flight Plan for Happy Kids
The long flight to Hawaii is often the most dreaded part of the trip. To make it a breeze, download our free, sanity-saving checklist.
Stress-Free Flying with Kids Guide
It's packed with simple, actionable tips to keep kids of all ages happy and occupied from takeoff to landing.
The Checked Luggage
Chaos is the enemy of a relaxing vacation. To combat this, we rely on a modular system built around packing cubes. This simple technique transforms your luggage from a chaotic pit into a structured, mobile dresser where everything has its place.

The Clothing System (Lightweight & Layered): Hawaii’s climate is defined by humidity and trade winds. Pack lightweight, breathable fabrics like cotton and linen. Focus on mix-and-match pieces. For a week, plan on 5-6 tops and 3-4 bottoms per person. Everyone should have a light jacket or cardigan for breezy evenings and a packable rain jacket.
The Beach Gear System (Protect & Play): This is the core of your Hawaii packing.
Reef-Safe Sunscreen: An absolute must. Pack at least one large tube of mineral-based (zinc oxide or titanium dioxide) sunscreen lotion.
Total Sun Protection: Wide-brimmed sun hats, UV-protective sunglasses, and long-sleeved rash guards for every family member.
Minimalist Beach Toys: A collapsible bucket and a few small shovels are all you need.
Goggles: For kids who love to put their face in the water, a good pair of goggles is invaluable.
The Footwear System (The Rule of Three): You only need three pairs of shoes per person.
Water Shoes/Aqua Socks: Essential for exploring rocky tide pools or beaches with sharp lava rock.
Sandals/Flip-Flops: For the beach, pool, and casual strolls.
Closed-Toe Shoes: A comfortable pair of sneakers for travel days, hikes, or activities like ziplining.
What to Leave at Home (And Rent or Buy in Hawaii)
Beach Towels: Every hotel and condo complex will provide these.
Bulky Floaties and Pool Noodles: Buy them there and leave them for another family when you depart.
Full-Sized Snorkel Sets: Renting high-quality, sanitized equipment on the island is far more convenient.
Formal Wear: Hawaii is overwhelmingly casual. A sundress or a collared shirt with nice shorts is as dressed-up as you’ll need to get.
Pro-Tip: Assign each family member a specific color of packing cubes. This simple trick makes it incredibly easy to identify whose clothes are whose.
Crafting Your Perfect Itinerary for Family Beach Vacations in Hawaii
While building sandcastles is a rite of passage, the true magic of Hawaii lies in its diverse experiences. Tailoring activities to your children's developmental stage is the secret to a trip that engages everyone. And to keep it all organized, our Travel Itinerary Template is a game-changer.
For Families with Toddlers & Preschoolers (Ages 0-5)
At this age, the goals are safety, sensory engagement, and maintaining routines. Focus on manageable outings that spark wonder without causing overstimulation.
Master the Art of the Lagoon: The man-made lagoons of Ko Olina on Oahu are a toddler parent’s paradise. The water is virtually waveless, creating a giant, safe saltwater pool. On Kauai, Lydgate Beach Park offers similarly protected swimming.
Meet the Marine Life (Up Close): The Maui Ocean Center is a world-class aquarium with a walk-through tunnel and touch pools. The Waikiki Aquarium on Oahu is smaller but equally captivating.
Discover the Magic of Shave Ice: Don't underestimate the joy of this simple treat. Trying authentic Hawaiian shave ice is a core memory on a hot afternoon.

For School-Aged Kids (Ages 6-12)
This is the golden age of family travel. Kids are old enough for bigger activities and to truly learn from their experiences.
Become a Junior Snorkeler: This is the perfect age to introduce kids to the underwater world. Start at an ultra-calm spot like Kapalua Bay on Maui or Hanauma Bay on Oahu (reservations required!).
Experience a Family Lūʻau: A lūʻau is a quintessential Hawaiian experience. Opt for one known for being family-friendly, like the Smith Family Garden Lūʻau on Kauai.
Become a Volcano Voyager: On the Big Island, a visit to Hawaiʻi Volcanoes National Park is like a real-life science lesson. Pick up a Junior Ranger booklet to transform your kids into active explorers.

For Teenagers (Ages 13-18)
For teenagers, the key is balancing family time with a sense of independence and adventure. Involve them in the planning.
Learn to Surf: Book a group lesson from a reputable surf school in a beginner-friendly area like Waikiki on Oahu or Kihei on Maui.
Conquer an Epic Hike: Challenge your teens with an iconic hike like the summit of Diamond Head on Oahu, which offers panoramic vistas of Waikiki.
Zipline Through Paradise: Soaring through the rainforest canopy on a zipline is a pure adrenaline rush that provides a thrilling adventure for the whole family.

Pro-Tip: The most popular activities in Hawaii—especially lūʻaus, timed-entry parks like Hanauma Bay, and surf lessons—book up weeks, if not months, in advance. Make your reservations the moment you have your travel dates confirmed.
The Aloha Code: Essential Rules for a Safe and Respectful Trip
A little local knowledge goes a long way. These are the non-negotiable rules for any family visiting the islands.
Ocean Safety Comes First
The Pacific Ocean is powerful. The most important rule in Hawaii is "Never turn your back on the ocean." Rogue waves can appear on even the calmest-looking days.
Swim at Lifeguarded Beaches: Whenever possible, choose a beach with a lifeguard on duty.
Understand Shore Break: Many Hawaiian beaches have a powerful shore break, where waves crash directly onto the sand. This can be dangerous for young children.
Respect the Warnings: Pay attention to all posted warning signs regarding strong currents, high surf, or dangerous marine life.
Protecting the 'Āina (Land)
Hawaii's coral reefs are fragile, living ecosystems. Protecting them is not just a suggestion; it's the law.

Use Mineral-Based LOTION Only: By law, you must only use sunscreens with zinc oxide or titanium dioxide. Critically, avoid aerosol sprays. Even "reef-safe" sprays settle on the sand and wash into the ocean, harming the reef.
Apply Early and Often: Apply sunscreen 20 minutes before sun exposure and reapply every two hours, or immediately after swimming.
Respecting the Wildlife
Hawaii is home to the Hawaiian green sea turtle (honu) and the endangered Hawaiian monk seal.

Keep Your Distance—It's the Law: You must maintain a distance of at least 10 feet (3 meters) from sea turtles and 50 feet (15 meters) from monk seals. It is illegal to touch, chase, or harass them.
View Responsibly: Use a zoom lens for photos. If an animal approaches you, calmly and slowly move away.
Frequently Asked Questions
What is the single most important thing to pack for a Hawaii family trip?
The most crucial item is reef-safe, mineral-based sunscreen LOTION. Sunscreens containing oxybenzone and octinoxate are banned in Hawaii to protect the coral reefs, and aerosol sprays are highly discouraged as they pollute the sand and water.
Is Hawaii a safe destination for toddlers and young children?
Absolutely. Many beaches are perfect for little ones, especially the man-made lagoons at Ko Olina on Oahu or the protected rock ponds at Lydgate Beach Park on Kauai, which have calm, waveless water perfect for safe splashing.
Do I really need to book Hawaiian activities in advance?
Yes, it is critical. Popular activities like lūʻaus, boat tours, surf lessons, and timed-entry parks like Hanauma Bay on Oahu often sell out weeks or even months in advance. Booking ahead is essential to avoid disappointment.
What are the essential types of shoes to bring to Hawaii?
You only need three pairs per person: water shoes for rocky beaches and tide pools, comfortable sandals or flip-flops for the beach and pool, and a pair of closed-toe sneakers for travel days and hiking.
Conclusion
The key to crafting the perfect trip isn’t about finding a secret beach; it’s about making a series of smart, informed choices. By implementing a strategic packing system and thoughtfully selecting age-appropriate activities, you transform the stress of planning into the joy of anticipation. You now have the framework to pack with confidence and design an itinerary that weaves together relaxation, adventure, and connection. This is how you create the legendary Hawaiian family vacation that becomes a key part of your family's story. For even more in-depth strategies on planning unforgettable trips anywhere in the world, explore our comprehensive Travel Guide. Aloha.
Read the full guide: Family Travel Ideas: The 2026 Guide to Unforgettable Trips
Don't Miss Out! Subscribe for Exclusive Content
SubscribeComments 0
No comments yet
Be the first to share your experience!
Dont Miss Out! Subscribe for Exclusive Content
Ultimate USA Holidays Guide: Top Picks
FTC Affiliate Disclosure Essentials: Stay Compliant as a Travel Creator
Essential Affiliate Tools: From Tracking to Full Optimization
Booking.com Affiliate Program Review: Pros, Cons, and Earnings Potential

Decoding Affiliate Commission Rates: Benchmarks for Travel Creators

Amazon Associates for Travel: Strategies to Maximize Commissions
Is Public WiFi Safe? How to Protect Your Data Abroad
TrekGuider @trekguider
You’ve just touched down in a new country, a city buzzing with unfamiliar energy. You’re desperate to check the map to your hotel, message family that you’ve arrived safely, or book that last-minute tour. Then you see it, a digital oasis in the chaos of travel: "Free_Airport_WiFi." It feels like a lifesaver. But the moment you connect to that open network, you might as well be shouting your passwords, credit card numbers, and private messages in the middle of a crowded town square.
This isn’t a hypothetical threat; it’s a silent, digital mugging that happens every single day in airports and cafes around the globe. Every unsecured connection is a wide-open door for digital thieves who are masters at exploiting the trust of travelers. They can intercept your data, steal your identity, and drain your bank account before you’ve even claimed your luggage. This menace can cast a shadow of anxiety over your entire trip, turning a tool of convenience into a source of vulnerability.
But it doesn’t have to be this way. This guide is your solution—a simple, non-technical playbook for protecting your digital life abroad. We will demystify the dangers and provide a clear, step-by-step process for using any public network with total confidence. Mastering public wifi safety is a critical skill for the modern traveler and a key part of the masterclass in preparedness we offer in our definitive guide, The Ultimate Guide to Travel Safety: A 2026 Playbook.

The Hidden Danger: What Really Happens on Public WiFi?
The fundamental problem with most public WiFi networks—in cafes, hotels, airports, and libraries—is that they are unencrypted. Think of it like sending a postcard through the mail. Anyone who handles it along the way can read the message written on the back. When you log into your email or check your bank account on an unencrypted network, your data is sent "in the clear," making it trivially easy for a hacker on the same network to intercept and read it.
These hackers don’t need sophisticated government-level equipment. They use readily available software to "sniff" the digital airwaves, plucking your sensitive information out of the stream of data flowing around them. Their primary method for doing this is a shockingly simple and effective strategy known as a "Man-in-the-Middle" attack.
Understanding the "Man-in-the-Middle" Attack
A "Man-in-the-Middle" (MitM) attack is exactly what it sounds like. A hacker secretly positions their computer between your device (your phone or laptop) and the legitimate internet connection point (the WiFi router). You believe you’re communicating directly and securely with the websites you’re visiting, but in reality, the hacker is intercepting, reading, and potentially even altering every piece of information you send and receive.
The most common way they achieve this is through a tactic called a "malicious hotspot" or "evil twin" attack:
The Setup: A hacker sits in a busy airport or coffee shop and sets up a new WiFi network on their laptop. They give it a believable, trustworthy-sounding name, like "Airport_Guest_WiFi" or "Starbucks_Free," often mimicking the name of the legitimate network.
The Connection: Your phone, set to connect to known networks automatically, might connect to this stronger, malicious signal without you even noticing. Or, you might manually select it, assuming it’s the official network.
The Interception: The moment you connect, all of your internet traffic is routed directly through the hacker's computer. They become an invisible eavesdropper on your digital life, capturing your login credentials when you check Facebook, your credit card details when you buy something online, and the contents of your private messages.
To you, the internet works perfectly. You can browse websites and use your apps as usual. You have no idea that a digital thief is silently recording your every move.

Your Digital Bodyguard: The Ultimate Guide to Using a VPN
If an unencrypted network is like sending a postcard, then using a Virtual Private Network (VPN) is like sealing that same message inside a locked, armored briefcase before sending it. A VPN is the single most powerful and essential tool for ensuring your public wifi safety. In simple terms, a VPN is an app for your phone or computer that creates a secure, encrypted tunnel for all your internet traffic, making your data completely unreadable to anyone who tries to intercept it.
When you connect to a VPN, even if you’re on a hacker’s malicious hotspot, all they can see is a stream of indecipherable gibberish. Your passwords, bank details, and messages are completely shielded from prying eyes.
How to Set Up a VPN on Your Smartphone in 4 Simple Steps
You don’t need to be a tech expert to use a VPN. Modern VPN services are designed to be incredibly user-friendly. Here’s a simple, step-by-step guide for any non-technical traveler.
Step 1: Choose and Subscribe to a VPN Service
Before you travel, you need to sign up for a reputable, subscription-based VPN provider. Do some research by reading reviews from trusted tech websites like Wired or The Verge. Crucially, avoid "free" VPN services. These companies have to make money somehow, and they often do it by logging your online activity, selling your data to advertisers, or, in the worst cases, embedding malware in their own software. A paid subscription to a well-known provider is a small investment for ironclad security.
Step 2: Download and Install the VPN App
Once you’ve created an account on the VPN provider’s website, the next step is to get the app on your phone.
On an iPhone: Go to the App Store, search for the name of your chosen VPN (e.g., NordVPN, ExpressVPN, Surfshark), and tap "Get" to download and install it.
On an Android phone: Go to the Google Play Store, search for the name of your VPN provider, and tap "Install."
Step 3: Log In and Grant Permissions
Open the newly installed app. You’ll be prompted to log in using the email and password you created when you subscribed. The very first time you try to connect, the app will ask for permission to add a VPN configuration to your phone's settings. A standard system pop-up from iOS or Android will appear. You must tap "Allow" or "OK." This is a necessary and safe step that allows the app to manage your phone's internet connection.
Step 4: Connect to a VPN Server
This is the easiest part. Most VPN apps are designed for one-tap simplicity.
The app’s main screen will almost always feature a large "Quick Connect" or "Connect" button. Tapping this will automatically connect you to the fastest or nearest server available. For general security on public WiFi, this is all you need to do.
If you want to appear as if you are browsing from a specific country (useful for accessing home-country content), you can tap on the "Locations" or "Servers" list within the app and select a country to connect through.
Once you tap connect, the app will confirm your "Connected" status, and a small VPN icon will appear in your phone’s status bar at the very top of the screen. That’s it. Your internet connection is now fully encrypted and secure.

Pro-Tip: For travelers who work on the road, like digital nomads or content creators, a VPN isn't just a recommendation—it's an essential business tool. Consistent use is key to protecting client data and financial information. This level of professional-grade security is at the heart of the resources we provide in The Travel Creator's Toolkit.
Are You a Travel Creator or Digital Nomad?
Protecting your data is just the beginning. To thrive on the road, you need the right tools for content creation, productivity, and monetization. Our free toolkit has you covered with expert-vetted recommendations for the apps, gear, and platforms that power a successful location-independent career.
Beyond the VPN: 3 Essential Habits for Ironclad Public WiFi Safety
While a VPN is your star player, a few additional habits will complete your digital defense, creating a multi-layered security strategy that protects you from a wider range of threats.
1. Practice Impeccable Device and Password Hygiene
Your first line of defense is the device itself. Before you leave home, make sure your digital house is in order.
Secure Your Devices: Ensure all your devices—laptop, smartphone, tablet—are updated with the latest operating system and security patches. Lock every single device with a strong, complex passphrase or, even better, biometric protection like a fingerprint or facial recognition.
Manage Passwords Securely: Never store passwords in a plain text file on your device. Use a reputable, cloud-based password manager app to generate and store unique, complex passwords for every account.
Perform a Digital "Clean Up": Before you travel, clear your browser's history, cache, and saved passwords. When you return home, make it a habit to change the passwords for any critical accounts you accessed while you were away, especially banking and email.
2. Avoid "Juice Jacking": The Threat of Public USB Ports
Those convenient USB charging stations you see in airports, cafes, and hotel lobbies are a potential security risk. Hackers can modify these public ports in a practice known as "juice jacking," where the USB connection is used not only to charge your device but also to secretly install malware or steal data from it. The data pins on a USB cable can transmit information while the power pins are charging your device.
The solution is simple and non-negotiable: never plug your device directly into a public USB port. Instead, use your own AC power adapter and plug it into a standard electrical outlet, or carry a portable power bank to recharge your devices safely.

3. Beware of Digital Trojan Horses: Untrusted Accessories
This same principle applies to any untrusted digital accessory. If you find a USB drive left behind in a hotel business center or a cafe, do not plug it into your laptop out of curiosity. Criminals sometimes intentionally leave these "bait" drives in public places, loaded with malware that will auto-install the moment it's connected to a computer. Treat any found accessory as a potential threat.
Pro-Tip: Before you leave, do a digital 'pack-up.' Log out of all non-essential apps on your phone and laptop. This reduces your 'attack surface,' meaning that even if your device is compromised, the hacker has access to far less of your personal data.
Public WiFi Safety FAQs
A prepared mind anticipates questions. Here are expert answers to common concerns about staying safe online while traveling.
1. Is WiFi on a plane or in a reputable hotel safer than in a coffee shop?
Not necessarily. While a hotel network may require a password, that doesn't mean the connection itself is encrypted or secure from other guests on the same network. The rule of thumb is to treat any WiFi network you do not personally own and control as untrusted. The same risks of interception and Man-in-the-Middle attacks can apply anywhere, from a budget hostel to a five-star resort. Always use your VPN.
2. Are "Free VPNs" really that bad?
Yes. A reliable VPN service requires significant infrastructure—servers, software development, and security maintenance—which costs money. If a "free" VPN provider isn't charging you a subscription fee, they are making money from you in other ways. Many have been caught logging user activity, selling browsing data to third parties, or even injecting extra ads into your browsing. In the worst cases, the "free VPN" itself is just a front for harvesting your data. A reputable, paid VPN service is a small investment for a massive gain in privacy and security.
3. Can't I just use my phone's cellular data plan instead?
Yes, and you should when possible. Your phone's 4G or 5G cellular data connection is significantly more secure than public WiFi. However, international data roaming charges can be astronomically expensive. Learning to use public WiFi safely is a crucial skill for budget-conscious travelers who need to stay connected without breaking the bank.

Connect with Confidence
Public WiFi is not inherently evil. It is a powerful tool that has become an indispensable part of modern travel. But like any powerful tool, it demands respect and the right safety equipment. The fear and uncertainty surrounding public wifi safety stem from a lack of knowledge, not from an insurmountable threat.
You now possess that knowledge. By understanding the simple risks and adopting the straightforward solutions—led by your essential VPN—you can transform any public hotspot from a potential liability into a trusted resource. You are now equipped to connect with confidence, anywhere in the world, freeing your mind to focus on the adventure in front of you.
This level of digital preparedness is just one part of a truly seamless travel experience. To master every aspect of your journey, from planning and packing to health and logistics, our all-encompassing Travel Guide is the only resource you'll ever need.
Don't Miss Out! Subscribe for Exclusive Content
SubscribeComments 0
No comments yet
Be the first to share your experience!
Dont Miss Out! Subscribe for Exclusive Content

How to Avoid Travel Scams: A Global Guide

A Woman's Guide to Safe Travel: 10 Critical Tips

7 Hotel Safety & Security Tips for Peace of Mind

9 Beach Safety Tips That Could Save Your Life

How to Stay Safe While Hiking: A Hiker's Safety Guide
