Chicago Beer Fests: Top 6 Tastings
TrekGuider @trekguider
Chicago. The Windy City. A metropolis of staggering architecture, legendary deep-dish pizza, and a cultural pulse that's impossible to ignore. But for the discerning traveler, another current runs deep through its streets: a world-class, boundary-pushing craft beer scene. The problem? If you're searching for the best beer festivals Chicago has to offer, you're likely drowning in a generic sea of event listings and outdated guides. It’s a frustrating quest that can leave you wondering where the truly exceptional tasting experiences are hiding.
The agitation is real. You don't want to waste your precious travel time or money on a crowded, soulless festival with endless lines and a tap list dominated by macro-brews. You're hunting for something more—an authentic experience that pairs the city's vibrant energy with the innovative spirit of its local brewers. You risk missing out on that perfect pint, that unique seasonal ale enjoyed in a memorable setting, the very reason you sought out Chicago's beer culture. You want a curated path to the city's best pours, not just another tent in a park.
So, let's cut through the noise. I've personally vetted the city's event calendar to bring you a curated guide to the six most exceptional beer tasting experiences—moments that are woven directly into the fabric of Chicago's most iconic celebrations. This isn't just a list; it's your strategic plan for exploring the sudsy side of the city. We'll show you how to find craft beer havens at massive music festivals, what to sip while a river runs green, and where to find festive German lagers in the heart of downtown. These are the can't-miss moments that elevate a simple drink into a core Chicago memory, and they represent just one facet of the year-round excitement we detail in our complete guide to Chicago Holidays: Windy City Thrills.

1. Lollapalooza: An Unlikely Star Among Beer Festivals in Chicago
When you picture Lollapalooza, you see massive stages, roaring crowds, and a lineup of global music superstars. But tucked within this four-day musical marathon is one of the most unique settings for a craft beer experience in the city. Lollapalooza, taking over Grant Park from July 31 - the final day of the festival, is a city within a city, and its beverage program has evolved to satisfy the sophisticated palates of modern festival-goers.
Forget the days of limited options. The festival now boasts a dedicated "Craft Beer Oasis," a shaded haven where you can escape the pulsating crowds and explore a curated selection of Chicago's finest local breweries. Here, you can find everything from crisp, refreshing pilsners perfect for a sunny afternoon watching artists like Olivia Rodrigo or Sabrina Carpenter, to bold, hoppy IPAs that provide the perfect fuel for a night with headliners like Tyler the Creator, A$AP Rocky, and Korn.
Your Tasting Strategy:
Plan Your Pours: With gates open from 11 AM to 10 PM daily, pacing is key. Start your day with a lighter option, like a session ale or a kolsch, to stay hydrated. As the sun sets and the energy builds, transition to something with more character—perhaps a hazy IPA from a local favorite or a rich porter to savor during the final set.
Navigate Like a Pro: Before you even arrive, download the official Lollapalooza app. It’s your key to locating the craft beer tents, viewing digital menus, and identifying which vendors have the shortest lines. This simple step can save you precious time that is better spent enjoying the music.
Pairing is Everything: Think of your beer choice as part of the sensory experience. The bright, citrusy notes of a pale ale can perfectly complement the upbeat energy of a pop performance by an artist like TWICE, while the complex, dark notes of a stout might be the ideal companion for an intense rock set.
Pro-Tip: Lollapalooza is a "rain or shine" event. Pack a poncho. A sudden downpour can send crowds running for cover, creating the perfect five-minute window for you to walk right up to a beer tent with no line and discover your new favorite Chicago brew.

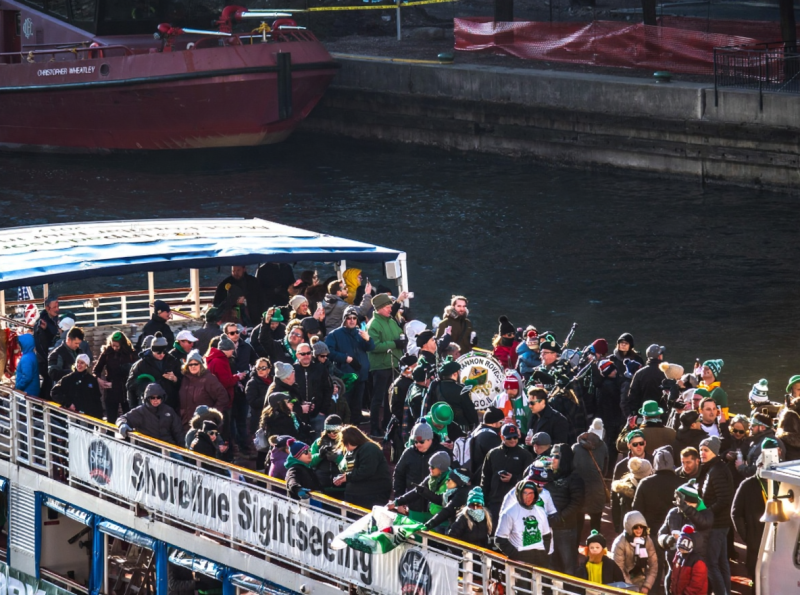
2. The St. Patrick's Day Green River Pour: A Uniquely Chicago Tradition
On Saturday, the Saturday before St. Patrick's Day, Chicago performs a miracle of civic engineering and festive spirit: it dyes its river a brilliant, shimmering emerald green. This spectacle, a tradition dating back to 1962, is the centerpiece of the city's St. Patrick's Day celebration and creates an unparalleled backdrop for a truly unique beer experience. While not a formal festival, the entire riverfront transforms into a massive, open-air party where the beer flows as freely as the green water.
The day kicks off as crews release 40 to 60 pounds of a secret, vegetable-based powder into the water, turning it a vibrant green for about five to six hours. This is followed by the grand parade—a tradition since 1843—which starts at 12:15 PM and marches down Columbus Drive. For a beer lover, the mission is clear: secure a spot with a view and a pint in hand.
Your Tasting Strategy:
Embrace the Theme: This is the one day of the year when ordering a green-dyed light lager is not just acceptable, but practically mandatory. It’s a novelty, a photo op, and a rite of passage for anyone celebrating in the city.
Seek Out Authenticity: Beyond the green beer, riverfront pubs and pop-up vendors will be pouring classic Irish styles. Look for a rich, creamy nitrogen-poured stout or a malty Irish red ale. These traditional brews offer a delicious, authentic contrast to the playful absurdity of the green river.
Location, Location, Location: The best views are from the bridges crossing the river or along the Riverwalk. Arrive early (by 9 AM) to claim your territory. Many local bars and restaurants with river views offer ticketed events that include drinks, providing a more comfortable (and less crowded) way to enjoy the spectacle.
This celebration is a photographer's dream. To make your photos of the emerald river and city skyline truly pop, consider using our collection of Free Travel Lightroom Presets, designed to enhance travel shots and make your memories look as vivid as the day itself.
3. The Christkindlmarket Chalice: German Biers and Festive Cheer
As winter descends upon Chicago, Daley Plaza transforms into a magical, twinkling European village. This is the Christkindlmarket, a traditional German-style Christmas market that is at the heart of the city's holiday season. While families flock here for handcrafted ornaments and festive snacks, beer aficionados know it as the premier destination for authentic German winter brews.
The experience is famously centered around "Glühwein" (hot spiced wine), but the beer selection is equally impressive and essential to the market's charm. You won't find a sprawling list of experimental IPAs here. Instead, the focus is on classic, impeccably crafted German styles that are perfect for sipping in the chilly air.
Your Tasting Strategy:
Drink from the Boot: The most iconic part of the experience is drinking from the commemorative ceramic boot-shaped mug, or "Stiefel." Each year features a new design, making it a collectible souvenir. It’s the perfect vessel for a crisp German pilsner, a malty Märzen, or a dark, roasty Dunkel.
Explore Winter Styles: Look for seasonal specialties like a Doppelbock or a Winter Warmer. These beers are typically higher in alcohol and feature rich, malty flavors of caramel, toffee, and dark fruit, making them the perfect antidote to a cold Chicago evening.
Pair with German Fare: The beer is only half the story. Enhance your tasting by pairing your brew with traditional market food. A crisp pilsner cuts through the richness of a bratwurst, while the sweet maltiness of a bock beer beautifully complements a warm, soft pretzel or a bag of candied nuts.
Pro-Tip: The Christkindlmarket can get extremely crowded, especially on weekends. For a more relaxed tasting experience, visit on a weekday afternoon. You'll have more space to wander, shorter lines for beer and food, and a better chance to chat with the vendors about their offerings.

4. The July 4th Fireworks Flight: Patriotic Pints at Navy Pier
Independence Day in Chicago is a spectacular affair, culminating in a massive fireworks display over Lake Michigan, launched from the iconic Navy Pier. While thousands crowd the pier itself, the savvy beer lover knows the best experience is found away from the main throng, combining the stunning visuals with a curated taste of American craft brewing. This is your chance to create your own micro beer tasting against a patriotic backdrop.
The strategy is to find a rooftop bar or a comfortable perch with a clear view of the fireworks. Many establishments in the Streeterville and River North neighborhoods offer exactly this. The goal is to arrive by 7 PM, settle in, and order a "flight" of local craft beers to enjoy as the sky lights up.
Your Tasting Strategy:
Curate an All-American Flight: Work with your server to build a tasting flight that celebrates American brewing history and innovation. A perfect flight might include:
A Classic American Lager: A clean, crisp, and refreshing starting point.
An American Pale Ale (APA): The style that arguably launched the craft beer revolution, known for its balance of malt and citrusy hops.
A West Coast IPA: A bold, hop-forward brew that showcases the piney, bitter notes characteristic of the style.
A Midwest Stout: A rich, dark beer from a local Chicago or regional brewery, perhaps with notes of coffee or chocolate.
The Rooftop Advantage: Choosing a rooftop bar not only gives you a superior, less crowded view of the fireworks but also provides access to a full menu, comfortable seating, and proper glassware—all elements that elevate the beer tasting experience.
Timing is Key: Order your flight about 30-45 minutes before the fireworks are scheduled to begin. This gives you ample time to savor and compare each beer as the anticipation builds, culminating in the grand finale both in the sky and in your glass.
5. Neighborhood Street Fairs: The True Heart of Beer Festivals in Chicago
While the major events offer fantastic beer experiences, the heart and soul of the city's craft scene is found at its countless neighborhood street festivals. These weekend events, which pop up across Chicago's diverse communities from late spring to early fall, are the authentic gatherings that locals cherish. This is where you move beyond the big names and discover the hyper-local, experimental breweries that are pushing the boundaries of craft beer.
Exploring these festivals requires a spirit of adventure. One weekend you might be at a food-focused fest in the West Loop, the next at an art fair in Lincoln Park. The key is that nearly every one of them features a strong showing from local breweries, often pouring special, festival-only releases.
Your Tasting Strategy:
Follow the Breweries: Instead of searching for festivals, follow your favorite Chicago breweries on social media. They will always announce which neighborhood events they'll be pouring at, leading you directly to the best and most interesting beer selections.
Talk to the Brewers: At these smaller events, you often have the chance to speak directly with the brewers or brewery staff. Ask them what's new, what they're excited about, and what you should try. This insider access is invaluable for any true beer fan.
Go Beyond the Loop: Don't be afraid to hop on the 'L' train and explore festivals in neighborhoods like Logan Square, Pilsen, or Andersonville. This is where you'll find the city's most exciting and innovative breweries, far from the downtown crowds.
Discovering these hidden gems is the ultimate reward for any traveler. To plan your journey through the city's neighborhoods and uncover these and other off-the-beaten-path experiences, our comprehensive Travel Guide is the essential resource, packed with local insights and detailed maps.

6. The Cinco de Mayo Cerveza Celebration: Pints and Parades
On May 5th, Chicago's vibrant Mexican-American communities, particularly in the Little Village neighborhood, burst into celebration for Cinco de Mayo. The holiday, which commemorates the Mexican Army's 1862 victory at the Battle of Puebla, is marked by lively parades, incredible food, and, of course, fantastic beer. This is a cultural immersion that offers a unique and flavorful tasting experience far removed from a standard beer fest.
The centerpiece is the parade, a colorful procession of floats, dancers, and musicians. The surrounding streets become a festival in their own right, with vendors selling authentic Mexican cuisine and local bars and restaurants pouring a variety of Mexican and Mexican-inspired beers.
Your Tasting Strategy:
Start with the Classics: Begin with a classic Mexican-style lager. It’s light, crisp, and incredibly refreshing—the perfect beer for sipping in the sun while you watch the parade. Ask for it with a lime wedge for the full, traditional experience.
Explore Craft Interpretations: Many Chicago craft breweries create special releases for Cinco de Mayo. Look for creative interpretations like a lime-infused gose, a spicy habanero-laced stout, or a refreshing pale ale brewed with agave nectar.
The Ultimate Food Pairing: The real magic happens when you pair your beer with the food. The crispness of a lager perfectly cuts through the richness of tacos al pastor, while the subtle sweetness of an amber ale beautifully complements the smoky flavor of elotes (grilled street corn).
Your Ultimate Chicago Beer Adventure Awaits
Chicago's beer scene is as dynamic and diverse as the city itself. It isn't confined to traditional taprooms or designated festival grounds; it's woven into the very fabric of the city's greatest celebrations. By looking beyond the obvious, you can craft a tasting journey that is unique, memorable, and deeply connected to the local culture. From sipping German lagers at a Christmas market to enjoying an All-American flight during the July 4th fireworks, you now have the ultimate insider's guide to the best beer festivals Chicago has to offer—even the ones you didn't know existed. So go forth, raise a glass, and toast to the incredible spirit of the Windy City.
Don't Miss Out! Subscribe for Exclusive Content
Subscribe


Comments 0
No comments yet
Be the first to share your experience!
Dont Miss Out! Subscribe for Exclusive Content

San Francisco Cherry Blossoms: A Local's Guide to the Blooms

Halloween SF: Haunts Without Horrors

SF Festivals: 7 Must-See Lineups

Christmas SF: Lights & Wharf Wonders

SF Pride: 6 Route & Party Hacks

Chinese New Year SF: Parade Essentials
Amazon Associates for Travel: Strategies to Maximize Commissions
TrekGuider @trekguider
Let’s be blunt: the Amazon Associates program feels like a paradox. On one hand, it’s the undisputed titan of e-commerce, a platform your audience uses weekly, if not daily. On the other, its core metrics—a paltry 3-4% commission for most travel gear and a 24-hour cookie—seem purpose-built to underwhelm.
This isn't just a feeling; it's a business problem that breeds frustration. You see the industry reports—the affiliate marketing market soaring past $93 billion, with travel creators hitting a reported average of $13,847 a month—and it feels like your Amazon efforts are a high-effort, low-reward distraction. You’re stuck in a cycle of creating content for a platform that seems designed to underpay you, leaving a fortune on the table.
This guide is your way out of that cycle. This is a hyper-focused masterclass on transforming Amazon Associates from a minor annoyance into a consistent and significant revenue stream. We’re moving beyond the basics to deliver advanced, actionable strategies tailored specifically for amazon associates for travel bloggers. You will learn to master high-conversion gear lists, use the SiteStripe tool for maximum efficiency, and navigate the treacherous waters of Amazon’s Terms of Service to build a bulletproof and profitable system, a topic we deconstruct from every angle in our definitive command center for the entire affiliate ecosystem: Travel Affiliate Programs: The 2026 Ultimate Guide.

The Amazon Paradox: Why a Low-Commission Program is a Top Earner
At first glance, the program’s core metrics are discouraging. So why is Amazon Associates an essential, non-negotiable tool for virtually every top-earning travel creator?
The answer lies in two powerful forces: universal trust and the strategic magic of the 24-hour universal cookie.
First, you don’t have to sell your audience on the legitimacy of Amazon. They already have an account, their credit card is saved, and they trust the platform implicitly. This pre-existing brand equity dramatically reduces friction and leads to higher conversion rates than almost any other retailer.
Second, and most importantly, is the secret weapon: the 24-hour universal cookie. When a reader clicks your affiliate link for a travel adapter, a tracking cookie is placed on their browser. For the next 24 hours, you earn a commission on everything they add to their cart and purchase, not just the travel adapter.
Here’s how this plays out in the real world:
A reader clicks your link for a $15 travel adapter.
While on Amazon, they remember they also need a new $400 camera for their trip, a $150 suitcase, and $50 worth of toiletries.
They add it all to their cart and check out.
You don’t earn a commission on just the $15 adapter. You earn a commission on the entire $615 cart. This is the hidden engine that turns tiny clicks into substantial payouts. Your job isn’t just to sell a single product; it’s to open the 24-hour window.
Strategy 1: Master High-Conversion Content
Because the cookie window is so short, your content must be engineered to capture a user who is in the final stages of planning and ready to buy. Generic travelogues won’t cut it. Your focus must be on creating hyper-specific, product-focused content that solves an immediate purchasing need.
The Power of the Hyper-Specific Gear List
This is your bread and butter. But you must move beyond the generic "My Ultimate Packing List." The key to success is targeting long-tail keywords that attract a user with a very specific problem. Instead of competing with a million other packing lists, you become the definitive resource for a targeted niche.
Instead of: "My Packing List"
Target: "What to Pack for a Two-Week Safari in Tanzania"
Instead of: "Best Travel Cameras"
Target: "Best Vlogging Cameras and Mics for YouTube Travel Channels"
Instead of: "What to Wear in Europe"
Target: "What to Wear in Italy in October (That Isn't Jeans)"
These posts attract highly motivated buyers and are far less competitive to rank for in Google.
The "What's In My Bag?" Post
This is a classic for a reason: it works. This format allows you to showcase your gear in an authentic, personal context. The key is to use your own high-quality photos. Show the gear in use, show it laid out, and explain why each item has earned its place in your bag. This builds immense trust and makes your recommendations feel like they’re coming from a savvy friend, not a salesperson.
The Standalone Product Review
Reserve these for key, high-value, or truly exceptional pieces of gear that are central to your niche. If you are an adventure travel blogger, a deep-dive review of your favorite hiking boots or travel backpack can become an evergreen asset that earns commissions for years. Go into excruciating detail, share your real-world experiences, and include plenty of authentic photos and videos.
Strategy 2: The SiteStripe Workflow for Maximum Efficiency
One of the biggest hurdles to effectively monetizing with Amazon is the time it takes to generate links. Logging into your dashboard, searching for a product, and creating a custom link is a slow, clunky process. This is where mastering the Amazon SiteStripe is a game-changer.
SiteStripe is a free, official toolbar from Amazon that appears at the top of your browser whenever you’re logged into your Associates account and browsing Amazon.com. It allows you to generate a custom affiliate link for any product page with a single click.

Your High-Speed Workflow:
Find the Product: Navigate to the exact product page you want to recommend on Amazon.
Click to Generate: At the top of the page, use the SiteStripe toolbar to instantly get a link. You can choose:
Text: A clean, short amzn.to link.
Image: An image-based link with your tracking ID embedded.
Text + Image: A rich-text box with both the image and a text link.
Copy and Paste: Paste the link or code directly into your blog post.
What used to be a five-minute process now takes five seconds. This efficiency is critical. It allows you to quickly and easily add affiliate links to all relevant content, ensuring you never miss an opportunity to monetize.
Pro-Tip: Use SiteStripe to quickly grab image links. Product images hosted by Amazon are high-quality and load quickly. Using these official image links is often better than uploading your own product photos (for non-personal shots) and can help improve your page load speed.
Strategy 3: Build a Bulletproof System with TOS Mastery
Amazon is notoriously strict, and getting banned from the Associates program is a real risk. An accidental violation of their extensive Terms of Service (TOS) can result in the immediate termination of your account and the forfeiture of all your hard-earned commissions. Protecting your account matters most for any serious amazon associates for travel bloggers.

While you must read the full Associates Program Policies, here are the most common and critical violations that travel creators unwittingly commit:
Never Use Links in Emails: This is a cardinal sin. Amazon strictly forbids the use of affiliate links in any offline manner, including emails, newsletters, PDFs, or e-books. Always link from your email to a page on your blog, and place the Amazon links there.
Don't Cloak Your Links: While link cloaking is a best practice for most affiliate programs, Amazon has specific rules against it. They must be able to clearly identify that the link is coming from your site. Using a standard amzn.to short link generated by SiteStripe is always the safest bet.
Never Mention Specific Prices: Prices on Amazon fluctuate constantly. Stating a price in your article ("This backpack costs $199") is a violation because it can quickly become inaccurate. Instead, use a call-to-action like, "Check the latest price on Amazon."
Disclose, Disclose, Disclose: You must have a clear FTC disclosure on your site. Amazon also requires specific language: "As an Amazon Associate, I earn from qualifying purchases." This should be easily visible on your site.
Comply with Google's Rules: Beyond Amazon's rules, you must also comply with Google's. All paid links, including affiliate links, must use the rel="sponsored" HTML attribute. This signals to search engines that the link is commercial. Thankfully, most modern link management plugins can add this tag automatically, but it is your responsibility to ensure it’s there.
The Professional's Playbook: The Travel Creator's Toolkit
Mastering Amazon is a critical piece of the puzzle, but it's just one piece. To build a truly professional and profitable content business, you need a complete system. Our ultimate resource bundle, The Travel Creator's Toolkit, is packed with the checklists, content templates, and guides you need to build a resilient and diversified affiliate income stream.
Strategy 4: The Pro-Level Play - Combine Amazon with High-Margin Digital Products
The ultimate strategy for top-earning creators is to use Amazon as a foundational layer in a more sophisticated, diversified income strategy. Amazon is perfect for recommending physical products, but its commissions will never match the profit margins of selling your own digital products.
This is where you combine the high-volume nature of Amazon with the high-margin nature of your own expertise. This is the evolution from affiliate to owner.

The Funnel in Action:
The Blog Post: You write your hyper-specific gear list, "The Ultimate Packing List for a 7-Day Trek in Patagonia."
The Amazon Links: You populate the post with your affiliate links for the perfect hiking boots, waterproof jacket, wool socks, and trekking poles available on Amazon. You solve your reader's immediate gear problem.
The High-Margin Upsell: At the end of the post, you offer the perfect next step. You add a call-to-action that says: "Now that you have the gear, get the complete plan. My premium 'Patagonia Self-Guided Trekking Itinerary' is a downloadable guide with detailed maps, daily schedules, and booking links for all the campsites. Get it now on the TrekGuider Platform."
This is the master strategy. You use Amazon to earn commissions on the "what" (the gear) and then sell your own high-margin product that provides the "how" (the plan). This allows you to fully monetize your expertise and build a business that you control completely.
Frequently Asked Questions (FAQ)
1. Can I use Amazon affiliate links on social media like Instagram or Pinterest? Yes, but with extreme caution. You must use the special links generated through the Amazon mobile app's "Mobile GetLink" feature or SiteStripe. You also must clearly identify yourself as an Amazon Associate on the social media profile where the links are shared. Most importantly, the link cannot be on a page that is "behind a gate" (like a private Facebook group).
2. What happens if a product I link to is out of stock? The link will still work and the 24-hour cookie will still be set. If the customer buys something else on Amazon during that window, you will still earn a commission. However, it creates a poor user experience. It's good practice to periodically check your top-performing links to ensure the products are still available.
3. How do I handle international traffic? My readers are from all over the world? This is a critical issue for travel creators. By default, a link to Amazon.com will only earn you a commission if the purchase is made on the US store. To monetize your global audience, you must use a link localization service. Amazon has its own called "OneLink," which can automatically redirect your international visitors to their local Amazon storefront. Third-party services like Geniuslink (Geni.us) offer more advanced features and are very popular with professional affiliates.
Your Blueprint for Amazon Mastery
Stop thinking of Amazon Associates as a low-paying chore. Start seeing it for what it is: a high-volume conversion machine that, when used strategically, can become a powerful and reliable pillar of your income. The key is not to focus on the low commission rate but to obsess over leveraging the 24-hour universal cookie.
By mastering the strategies for amazon associates for travel bloggers—creating hyper-specific content, working efficiently with SiteStripe, staying relentlessly compliant with the TOS, and layering it with your own high-margin products—you transform the program from a source of frustration into a predictable engine for revenue. This is a foundational skill for any serious travel creator looking to build a diversified and resilient business that can fund their adventures for years to come.
Read the full guide: The Travel Blogger's Playbook to Affiliate Marketing Mastery
Don't Miss Out! Subscribe for Exclusive Content
SubscribeComments 0
No comments yet
Be the first to share your experience!
Dont Miss Out! Subscribe for Exclusive Content

Ultimate USA Holidays Guide: Top Picks

FTC Affiliate Disclosure: Stay Compliant as a Travel Creator

Essential Affiliate Tools: From Tracking to Full Optimization

Avoid These 5 Affiliate Landing Page Mistakes for Better Conversions

Affiliate Keyword Research Mastery for Travel Blogs

Booking.com Affiliate Review: Pros, Cons & Earnings
Solo Travel Blog Monetization: Turning Stories into Income
TrekGuider @trekguider
You've seen the Instagram posts tagged '#digitalnomad' and wondered if it's actually real. Can a solo travel blog—your solo travel blog—truly become a source of income, or is it just a path to burnout? The truth is, most new bloggers fail because they follow a random list of 'monetization ideas.' They're missing the most critical element: a strategic, time-based plan. This is not a list of ideas. This is your 24-month roadmap, grounded in real data from six-figure bloggers, showing you exactly what to do, when to do it, and the income you can realistically expect at each stage. This is your guide to successful solo travel blog monetization.

Moving from Hobbyist to Business Owner
The first and most critical shift you must make is mental. Your blog is no longer just a personal travel diary; it is the central asset of a new business. Every decision, from the topics you cover to the way you structure your articles, must be made with a clear purpose: to provide immense value to a specific audience. Before you can monetize effectively, you must provide that value, which starts with mastering the fundamentals. For a complete playbook on creating world-class content and navigating your journey, review our comprehensive .
This business-oriented mindset means prioritizing the single most important driver of revenue: Search Engine Optimization (SEO). While social media can provide fleeting traffic spikes, SEO delivers a consistent, sustainable stream of readers who are actively searching for the solutions you provide. These are the people who will click your links, book tours, and buy your products. From this day forward, think of yourself not as a blogger, but as the CEO of a media company whose primary asset is high-ranking, helpful content.
What to Expect and When
Forget the overnight success stories. Building a profitable blog is a marathon, not a sprint. Having a realistic timeline prevents discouragement and keeps you focused on the right tasks at the right time.

Year 1 Expectations: Building Traffic and Earning Your First ~$2,000
Recommended: The Solo Female Travel Safety Guide
Recommended: How to Pack Light: The Carry-On Guide
The first year is all about laying the foundation. Your primary goal is not to make a full-time income, but to publish a critical mass of high-quality, SEO-optimized content and establish topical authority in your niche. You'll spend the first few months writing and publishing consistently without seeing much traffic, and that's completely normal.
Data from established bloggers shows that you can expect to make your first affiliate sale around month four or five. By the end of the first year, a dedicated blogger can realistically earn between $1,000 and $5,000. This income will come almost exclusively from strategic affiliate marketing.
Year 2 Expectations: Scaling to a Viable Income ($20,000 - $40,000)
Year two is the scaling phase. The content you published in your first year begins to mature and rank higher in Google search results, leading to a significant increase in traffic. This is the year you'll likely cross the critical threshold needed to qualify for premium ad networks. This combination of escalating affiliate commissions and new, high-earning display ad revenue is what transforms your blog from a side hustle into a viable business. It's not uncommon for bloggers who were earning $200/month at the end of year one to be earning $2,000-$4,000/month by the end of year two.
(Months 1-6): Laying the Foundation for Your Solo Travel Blog Monetization
Welcome to the grind. In this foundational phase, you are building the powerful engine of your business long before you see significant fuel (i.e., traffic). Success here isn't measured in dollars; it's measured in discipline and consistent output.
Your Primary Focus: Publishing High-Quality, SEO-Optimized Content
Think of high-quality content as the real estate upon which you'll build your entire business. It's the non-negotiable asset that makes all future income possible. In these first six months, your goal should be to publish 25-40 thoroughly researched, long-form articles that target specific keywords your audience is searching for. Every article should aim to be the single best resource on the internet for its given topic. This early library of content is what Google will eventually reward with traffic.
Method 1: Strategic Affiliate Marketing (The Best First Step)
Affiliate marketing is the practice of earning a commission by promoting another company's products or services. It is the perfect first monetization method because most programs have no minimum traffic requirements. You can, and should, include affiliate links from day one.
The key is to recommend products you genuinely use and trust. Your recommendations must be woven naturally into helpful content. Don't just list products; explain why a certain backpack is perfect for a carry-on-only trip or how a specific travel insurance policy saved you during an emergency. A crucial element of this is transparency. Always include a clear affiliate disclosure at the top of your posts. This isn't just an FTC requirement; it's a critical component of building long-term trust with your audience.
Choosing the Right Affiliate Platforms: A Data-Driven Comparison
Start with a mix of affiliate aggregators and direct programs to maximize your opportunities.
Travelpayouts: An excellent starting point. It's an aggregator that gives you access to dozens of travel brands like Booking.com, GetYourGuide, and Hostelworld through a single platform, making it easy to manage your links and payments.
Stay22: A powerful, map-based tool specifically for accommodations. It often has a higher conversion rate than other hotel affiliate links because it shows users a variety of options on a map, which is incredibly helpful in the travel planning process.
Direct Programs: Many essential travel brands have their own programs. Be sure to sign up for:
Amazon Associates: For all the physical gear you recommend, from packing cubes to portable chargers.
Booking.com / Agoda: The top platforms for hotel bookings worldwide.
GetYourGuide / Viator: The leaders in tours, activities, and attraction tickets.
Pro-Tip: Don't go back and add affiliate links later. Research and include relevant links in every article as you write it. This saves an immense amount of time and ensures your monetization efforts start from the moment you hit "publish."
(Months 7-18): Scaling Traffic and Unlocking Serious Income
With a solid foundation of content beginning to rank, you now shift your focus from pure production to growing the one metric that unlocks the next level of income: monthly sessions.
Your Primary Focus: Reaching 50,000+ Monthly Sessions
This is the magic number. Crossing the threshold of 50,000 monthly sessions (the number of visits to your site, as measured by Google Analytics) is the key inflection point where your income potential grows exponentially. It signals to premium ad networks that you have a substantial and engaged audience, making you a valuable partner. Reaching this level requires continued content production and a focus on building high-quality backlinks to your articles.

Method 2: Display Advertising (Unlocking Passive Income)
Display ads are the advertisements you see placed within the content of a website. When you have significant traffic, this becomes a powerful and almost entirely passive income stream. The key is to work with the right network.
The Ad Network Ladder: From Beginner to Premium
Not all ad networks are created equal. Your goal is to climb the ladder to a premium network as quickly as possible.
Avoid Google AdSense: Many new bloggers start here, which is a major mistake. AdSense pays extremely low rates, often resulting in an RPM (Revenue Per Mille, or earnings per 1,000 pageviews) of just $1-$3. It clutters your site for pennies.
Starter Networks (The Stepping Stone): Networks like Journey by Mediavine (requires 10,000 monthly sessions) or Ezoic offer a significant step up from AdSense. They are a great intermediate goal.
Premium Networks (The Goal): This is where serious income begins.
Mediavine: The gold standard for many bloggers. They require a minimum of 50,000 monthly sessions. Mediavine is known for its incredible support and high RPMs, often in the $20 - $40+ range. They command higher rates from advertisers because of their high-quality publisher network and direct sales teams.
Raptive (formerly AdThrive): The top tier. Raptive requires 100,000 monthly sessions and is known for having some of the highest RPMs in the industry for the same reasons.
Getting accepted into Mediavine is a major milestone. For a blog with 50,000 sessions, a $25 RPM translates to $1,250 in passive income per month. This is in addition to your growing affiliate revenue.
(Months 19+): The CEO Phase—Building a Diversified Travel Brand
Once you have stable traffic and income from ads and affiliates, you can move into the final phase: maximizing profitability by leveraging your most valuable asset—your audience's trust.
Building Brand Authority and Audience Trust
At this stage, your readers see you as a trusted expert. They've followed your advice, booked hotels you recommended, and bought gear you reviewed. This trust is the asset you will now monetize directly, leading to the highest profit margins possible.
Method 3: Selling Your Own Digital Products (The Highest Profit Margin)
Creating and selling your own products is the holy grail of solo travel blog monetization. You control the price, the product, and you keep nearly 100% of the revenue. This requires a loyal audience that trusts your expertise, which is why it's an advanced strategy.

Examples of high-value digital products for a solo travel audience include:
Comprehensive E-books: A deep dive into a specific topic, like "The Ultimate Guide to Solo Female Travel in Southeast Asia."
Printable Destination Itineraries: Detailed day-by-day plans for cities like Rome, Tokyo, or Lisbon that your readers can purchase and download.
Trip Planning Templates: Customizable spreadsheets or Notion templates that help your readers organize their own trips.
Digital Packing Lists: Niche-specific checklists for different types of travel (e.g., carry-on only, winter travel, hiking).
Pro-Tip: Validate your product idea before you build it. Send a survey to your email list or poll your audience on social media, asking what they struggle with most. If dozens of people say "planning my Italy itinerary is overwhelming," you have a winning product idea.
Method 4: Sponsored Content and Brand Partnerships
Sponsored content, where a brand pays you for a dedicated article or mention, represents a shift from passive to active income. While it can be lucrative, with sponsored posts often fetching $1,000 or more, you shouldn't just wait for opportunities to land in your inbox. As your brand authority grows, you can proactively pitch partnerships. Create a professional media kit—a one-page PDF outlining your website traffic, audience demographics, and core values—and reach out to brands you already use and love with a specific collaboration idea.
Frequently Asked Questions (FAQ Section)
How much money can you make from a travel blog?
In your first year, aim for $1,000-$5,000. By the end of year two, $20,000-$40,000 is a realistic target for dedicated bloggers. Established, six-figure travel bloggers who have diversified into ads, affiliates, and digital products can earn well over $100,000 per year.
How long does it take to make $1000 a month blogging?
For most travel bloggers who consistently publish high-quality, SEO-optimized content, it takes between 12 and 18 months to consistently earn $1,000 per month. This milestone typically occurs after being accepted into a premium ad network like Mediavine.
Do I need a large social media following to make money?
No. This is a common and damaging myth. The most profitable travel blogs focus on SEO. You can make a full-time income from a travel blog with fewer than 1,000 Instagram followers if your website traffic from Google is high and consistent.
What are the initial costs of starting a profitable travel blog?
The essential startup costs are minimal. You'll need a domain name (around $15/year) and web hosting (around $5-$15/month). Investing in a premium WordPress theme ($60 one-time) and an SEO tool like Keysearch ($17/month) are highly recommended but not strictly necessary on day one.
Turning your passion for solo travel into a profitable business is not a dream; it's a project. It requires a strategic plan, immense dedication, and an unwavering focus on providing real value. This roadmap has shown you the what and the when. By following this phased approach to solo travel blog monetization, you move beyond wishful thinking and begin the methodical work of building a business that can fund your travels and your life. The journey is long, but the destination—a life of freedom and financial independence—is worth every step.
Read the full guide: Anxious to Adventurous: The Ultimate Guide to Solo Travel Confidence
Don't Miss Out! Subscribe for Exclusive Content
SubscribeComments 0
No comments yet
Be the first to share your experience!
Dont Miss Out! Subscribe for Exclusive Content
FTC Affiliate Disclosure: Stay Compliant as a Travel Creator
Essential Affiliate Tools: From Tracking to Full Optimization
Avoid These 5 Affiliate Landing Page Mistakes for Better Conversions
Affiliate Keyword Research Mastery for Travel Blogs
Booking.com Affiliate Review: Pros, Cons & Earnings
