10 Best International Destinations for Digital Nomads
TrekGuider @trekguider
The dream of working from anywhere is powerful, but the reality of choosing where to plant your laptop is a daunting, high-stakes decision. You’ve seen the polished photos, but behind that image lies a complex web of visa regulations, tax laws, and the non-negotiable need for blazing-fast internet. The web is flooded with generic listicles that tout beautiful scenery but gloss over the critical details that can make or break your experience. Choosing wrong means legal headaches, financial strain, and a level of frustration that will have you booking a ticket straight back home.
Forget the superficial listicles. This is your definitive, data-driven playbook for the 10 best international destinations for digital nomads in 2026, built for the savvy American remote worker who demands more than just pretty pictures. We cut through the noise to focus on the pillars that truly matter, empowering you to make a strategic, confident decision about your next chapter. After all, succeeding as a nomad isn't just about picking a spot on the map; it requires a foundation of confidence, and our guide on essential is the perfect place to start building it.

The Four Pillars of a Perfect Nomad Base
Before we jet off, let's establish the framework. A world-class nomad destination is a careful balance of four key factors.
Cost of Living: This isn't about surviving; it's about thriving. We analyze the monthly budget for a comfortable lifestyle, including a modern apartment, a mix of dining out and cooking, and co-working space access.
Digital Infrastructure: High-speed, reliable internet is your lifeline. We look at average broadband speeds and the general stability of the connection in key cities.
Visa Accessibility: This is often the biggest hurdle. We assess the ease of securing legal long-term residency through official digital nomad visas, weighing income requirements against long-term benefits.
Quality of Life: This is the magic ingredient. It’s a measure of community, safety, culture, and the overall vibe that makes a place feel like home.
The Gold Standard: 5 Destinations That Get Everything Right
These locations represent the top tier, offering a world-class balance of all four pillars. They boast mature infrastructure, welcoming communities, and clear legal pathways for American remote workers.
1. Lisbon, Portugal: Europe’s Magnetic West Coast Hub

Lisbon has cemented its status as the quintessential European hub for digital nomads. It's a magical blend of old-world charm, with its rattling trams and historic Alfama district, and a buzzing modern tech scene. Its coastal location, incredible food, and established international community make it an almost perfect entry point for living and working in Europe.
The Data Breakdown:
Cost of Living: Expect a monthly budget of $2,500 - $3,900 for a comfortable lifestyle. While it’s one of the more affordable Western European capitals, its popularity has driven up prices.
Internet Speed: Excellent. With widespread fiber-optic coverage, you can expect reliable average speeds of 150 Mbps.
Visa Situation: Portugal offers the D8 Digital Nomad Visa, requiring a monthly income of around $3,480. Critically, this visa provides a clear pathway to permanent residency after five years—a massive long-term benefit.
Quality of Life: Superb. Lisbon is safe, walkable, and packed with world-class restaurants and cafes. The large, active nomad community means you’ll never struggle to find your tribe.
On-the-Ground Intel: Popular neighborhoods include the historic Alfama and the trendy, central Chiado. Co-working spaces like Second Home and LACS are central hubs for networking and deep work.
2. Mexico City, Mexico: The North American Nearshore Favorite
For Americans, Mexico City is an unbeatable combination of affordability, cultural richness, and logistical ease. Its position in a North American time zone is a massive advantage for collaborating with US-based teams. It's a sprawling, dynamic metropolis with a world-class culinary scene and a cost of living that feels like a dream.
The Data Breakdown:
Cost of Living: A fantastic value. A comfortable monthly budget falls between $1,500 - $2,100.
Internet Speed: Good, but diligence is required. Average speeds are around 60 Mbps, which is sufficient for most work, but can be inconsistent. Always confirm the internet speed with your Airbnb host or landlord before committing.
Visa Situation: This is evolving. The reliable, long-term solution is the Temporary Residence Visa, which requires proving financial solvency and should be obtained from a Mexican consulate before you go.
Quality of Life: Exceptional. The energy of CDMX is infectious. The neighborhoods of Condesa and Roma are nomad epicenters, filled with beautiful parks, Art Deco architecture, and some of the best cafes on the planet.
On-the-Ground Intel: Base yourself in Condesa or Roma for the quintessential nomad experience. Public transportation is extensive, and Uber is cheap and reliable for getting around this massive city.
3. Chiang Mai, Thailand: The Original Budget-Friendly Haven

Chiang Mai is the legendary cradle of the digital nomad movement. It continues to offer an almost impossibly low cost of living without sacrificing quality of life. Surrounded by lush mountains, filled with ancient temples, and home to an incredible food culture, it provides a relaxed base with one of the most established nomad communities on the planet.
The Data Breakdown:
Cost of Living: Astonishingly low. You can live a very comfortable life for $1,000 - $1,300 per month.
Internet Speed: Surprisingly fast. Fiber-optic is common, delivering average speeds of 100 Mbps.
Visa Situation: Thailand has recently introduced the Destination Thailand Visa (DTV), a 5-year visa for remote workers that is a game-changer, replacing the old, precarious system of "visa runs."
Quality of Life: Excellent. The pace of life is slower, the people are famously friendly, and the food alone is worth the trip.
On-the-Ground Intel: The Nimman neighborhood is the modern heart of the nomad scene, packed with trendy cafes and co-working spaces like Punspace. Renting a scooter is the most common and enjoyable way to get around.
Pro-Tip: When looking for monthly accommodation, book a hotel or Airbnb for your first 1-2 weeks. Use that time to explore neighborhoods in person and connect with local Facebook groups for digital nomads. The best and most affordable deals are almost always found on the ground, not online.
4. Tbilisi, Georgia: The Undiscovered Gem with an Unbeatable Visa
For those seeking an off-the-beaten-path destination with a stunningly simple visa policy, Tbilisi is a revelation. The capital of Georgia is a city of dramatic contrasts, where ancient churches sit next to futuristic architecture. It's incredibly affordable, with a unique culture and cuisine that will captivate adventurous nomads.
The Data Breakdown:
Cost of Living: Very affordable, ranging from $1,000 - $2,200 a month.
Internet Speed: The main drawback. Speeds average a slower 15 Mbps. It's workable, but not ideal for data-heavy professions.
Visa Situation: Unbeatable. Georgia offers a 1-year visa-free policy for Americans on arrival, making it the easiest place in the world to set up a long-term base with zero bureaucracy.
Quality of Life: High for the price. Tbilisi is a city with deep history, a burgeoning wine scene, and a dramatic landscape. The community is smaller but growing and tight-knit.
On-the-Ground Intel: The Vake and Vera neighborhoods are popular with expats for their green spaces and modern amenities. The city is compact and walkable, and Georgian hospitality is legendary.
5. Budapest, Hungary: Old-World Grandeur, New-World Speeds
Budapest offers the quintessential grand European capital experience at a fraction of the price. Straddling the Danube River, the "Pearl of the Danube" is famous for its stunning architecture, historic thermal baths, and eclectic ruin bars. For nomads, its biggest selling point is world-class internet in a beautiful, central European setting.
The Data Breakdown:
Cost of Living: Very reasonable for a major European city, at $1,100 - $1,300 per month.
Internet Speed: Blazing fast. With average speeds of 220 Mbps, it's one of the most reliable cities on this list.
Visa Situation: Hungary offers a digital nomad visa (called the "White Card") with an income requirement of around €2,000 per month.
Quality of Life: Fantastic. It's a city with endless things to do, from exploring castles to relaxing in centuries-old spas. It’s a great base for exploring the rest of Central Europe.
On-the-Ground Intel: Most nomads live on the bustling Pest side, particularly in the lively Jewish Quarter (District VII), which is the heart of the city's nightlife and creative scene.
5 More World-Class Contenders for Your Shortlist
These locations are fantastic options that excel in specific areas, making them perfect for nomads with particular priorities.
Medellín, Colombia: Known as the "City of Eternal Spring" for its perfect climate, Medellín has become a thriving, innovative hub for nomads.
Bali, Indonesia: The ultimate destination for wellness, surfing, and spirituality. The town of Canggu is the epicenter of a massive and vibrant community.
Buenos Aires, Argentina: Crave a European feel with a Latin American passion? This city of grand boulevards, tango, and incredible steak is for you, though economic instability can be a challenge.
Valencia, Spain: A fantastic quality of life with beautiful beaches, a stunning park, and a more relaxed vibe than Madrid or Barcelona. Its new digital nomad visa is very popular.
Kuala Lumpur, Malaysia: A modern, multicultural Asian metropolis that serves as a fantastic and affordable hub for exploring Southeast Asia with top-notch infrastructure.
The Visa Game: Your Guide to Staying Legal Long-Term

Understanding the legal landscape matters most. The world is shifting away from the gray area of tourist visas towards official international destinations for digital nomads visas.
Tourist Visas: The "old way" involved "visa runs" (leaving and re-entering to reset the clock). This strategy is risky, increasingly unreliable, and provides no legal right to work.
Digital Nomad Visas (DNVs): These are official residency permits designed for remote workers. They provide a legal, long-term basis to live and work in a country, but come with bureaucracy and high minimum income requirements (typically $2,500-$3,500+ per month).
Pro-Tip: Taxes are the most complex part of nomad life. As a US citizen, you are taxed on worldwide income regardless of where you live. Rules like the Foreign Earned Income Exclusion can help, but this is not a DIY situation. Always consult a tax professional specializing in US expat taxes before you leave.
The Nomad Reality Check: Answering Your Toughest Questions

How do you build community and avoid loneliness?
Be proactive. Choose a destination with an established community. Join co-working spaces. Use apps like Meetup.com. Prioritize "slow travel"—staying in one place for 3-6 months to build deeper connections.
What are the essential items to pack?
Less than you think. Aim for carry-on only. Pack versatile clothing (merino wool is king), a solid power bank, a universal travel adapter, and noise-canceling headphones. Almost anything you forget can be bought abroad.
Is the digital nomad lifestyle a permanent vacation?
Absolutely not. This is a common and dangerous myth. A sustainable nomad lifestyle is about living your normal life—with work deadlines, budgets, and chores—in a different location. It requires immense self-discipline.
Choosing from the many amazing international destinations for digital nomads is a deeply personal decision. The "best" place isn't a rank on a list; it's the location where the delicate balance of cost, connectivity, community, and culture aligns perfectly with your personal and professional needs. This guide has given you the data-driven framework and on-the-ground intelligence to make that strategic choice. You have the tools to move beyond the dream and build a real, sustainable life of freedom and adventure abroad. The world is waiting.
Read the full guide: Anxious to Adventurous: The Ultimate Guide to Solo Travel Confidence
Don't Miss Out! Subscribe for Exclusive Content
Subscribe


Comments 0
No comments yet
Be the first to share your experience!
Dont Miss Out! Subscribe for Exclusive Content

Is Public WiFi Safe? How to Protect Your Data Abroad

A Woman's Guide to Safe Travel: 10 Critical Tips

7 Hotel Safety & Security Tips for Peace of Mind

11 Essential Solo Travel Safety Tips You Need to Know

The Ultimate Guide to Travel Safety: A 2026 Playbook

How to Meet People While Traveling Solo (Without Being Awkward)
How to Plan a Stress-Free Hawaii Family Trip
TrekGuider @trekguider
Planning a family trip to Hawaii should feel exciting, but the reality can be overwhelming. You're juggling how to pack for unpredictable weather, what activities will actually entertain everyone from toddlers to teens, and how to manage the logistics without losing your mind. The fear of getting it wrong—forgetting something crucial or planning a day that ends in meltdowns—can quickly overshadow the promise of paradise.

Imagine arriving on Maui only to realize you’ve forgotten the reef-safe sunscreen now required by law, forcing a frantic, expensive search. Picture the meltdowns—from kids and adults alike—when a carefully planned beach day is met with groans of boredom, or the crushing disappointment of discovering the lūʻau you dreamed of has been sold out for weeks. Without a strategic plan, the logistical details can overshadow the magic you’re seeking.
This guide is the antidote to that anxiety. It’s your strategic playbook, crafted from hard-won experience to eliminate the guesswork and transform your planning process into an exciting prelude to your adventure. While this article drills down into Hawaii-specifics, it's part of our complete library of Family Travel Ideas: The 2026 Guide to Unforgettable Trips. Consider this your roadmap to a seamless, stress-free, and truly magical Hawaiian escape.
What to Bring and What to Leave Behind
A successful packing strategy for Hawaii isn't about bringing everything; it's about bringing the right things. The islands’ unique environment—from intense equatorial sun to sudden tropical showers—demands a thoughtful approach. For a deep dive into the core principles, our How to Pack Light Guide is a great resource. This Hawaii-specific blueprint ensures you’re prepared for every possibility without hauling unnecessary weight across the Pacific.
Your In-Flight & First-Day Survival Kit
Think of your carry-on bag as your mission-critical command center. If your checked luggage gets delayed, this bag should contain everything you need to not just survive, but thrive for the first 24 hours.
A Complete Change of Clothes for Everyone: One full, lightweight outfit per person. Don't forget underwear and socks.
Swimsuits: This is non-negotiable. You can change in the lobby restroom and head straight to the pool, starting your vacation immediately.
Essential Medications: All prescription medications, plus a small first-aid kit with children’s pain relievers, allergy medicine, band-aids, and antibacterial ointment.
Documents & Valuables: IDs, credit cards, and digital or printed copies of your key reservations (hotel, rental car, first big tour).
The "Boredom Buster" Kit: Fully charge all electronics and pre-load them with movies and games. For younger kids, pack a small bag with a new coloring book or a few wrapped dollar-store toys to reveal mid-flight.
A Feast of Snacks: Pack more than you think you’ll need to combat travel delays and grumpy tummies.
Empty Reusable Water Bottles: Fill them up post-security to stay hydrated and save money.
Your Flight Plan for Happy Kids
The long flight to Hawaii is often the most dreaded part of the trip. To make it a breeze, download our free, sanity-saving checklist.
Stress-Free Flying with Kids Guide
It's packed with simple, actionable tips to keep kids of all ages happy and occupied from takeoff to landing.
The Checked Luggage
Chaos is the enemy of a relaxing vacation. To combat this, we rely on a modular system built around packing cubes. This simple technique transforms your luggage from a chaotic pit into a structured, mobile dresser where everything has its place.

The Clothing System (Lightweight & Layered): Hawaii’s climate is defined by humidity and trade winds. Pack lightweight, breathable fabrics like cotton and linen. Focus on mix-and-match pieces. For a week, plan on 5-6 tops and 3-4 bottoms per person. Everyone should have a light jacket or cardigan for breezy evenings and a packable rain jacket.
The Beach Gear System (Protect & Play): This is the core of your Hawaii packing.
Reef-Safe Sunscreen: An absolute must. Pack at least one large tube of mineral-based (zinc oxide or titanium dioxide) sunscreen lotion.
Total Sun Protection: Wide-brimmed sun hats, UV-protective sunglasses, and long-sleeved rash guards for every family member.
Minimalist Beach Toys: A collapsible bucket and a few small shovels are all you need.
Goggles: For kids who love to put their face in the water, a good pair of goggles is invaluable.
The Footwear System (The Rule of Three): You only need three pairs of shoes per person.
Water Shoes/Aqua Socks: Essential for exploring rocky tide pools or beaches with sharp lava rock.
Sandals/Flip-Flops: For the beach, pool, and casual strolls.
Closed-Toe Shoes: A comfortable pair of sneakers for travel days, hikes, or activities like ziplining.
What to Leave at Home (And Rent or Buy in Hawaii)
Beach Towels: Every hotel and condo complex will provide these.
Bulky Floaties and Pool Noodles: Buy them there and leave them for another family when you depart.
Full-Sized Snorkel Sets: Renting high-quality, sanitized equipment on the island is far more convenient.
Formal Wear: Hawaii is overwhelmingly casual. A sundress or a collared shirt with nice shorts is as dressed-up as you’ll need to get.
Pro-Tip: Assign each family member a specific color of packing cubes. This simple trick makes it incredibly easy to identify whose clothes are whose.
Crafting Your Perfect Itinerary for Family Beach Vacations in Hawaii
While building sandcastles is a rite of passage, the true magic of Hawaii lies in its diverse experiences. Tailoring activities to your children's developmental stage is the secret to a trip that engages everyone. And to keep it all organized, our Travel Itinerary Template is a game-changer.
For Families with Toddlers & Preschoolers (Ages 0-5)
At this age, the goals are safety, sensory engagement, and maintaining routines. Focus on manageable outings that spark wonder without causing overstimulation.
Master the Art of the Lagoon: The man-made lagoons of Ko Olina on Oahu are a toddler parent’s paradise. The water is virtually waveless, creating a giant, safe saltwater pool. On Kauai, Lydgate Beach Park offers similarly protected swimming.
Meet the Marine Life (Up Close): The Maui Ocean Center is a world-class aquarium with a walk-through tunnel and touch pools. The Waikiki Aquarium on Oahu is smaller but equally captivating.
Discover the Magic of Shave Ice: Don't underestimate the joy of this simple treat. Trying authentic Hawaiian shave ice is a core memory on a hot afternoon.

For School-Aged Kids (Ages 6-12)
This is the golden age of family travel. Kids are old enough for bigger activities and to truly learn from their experiences.
Become a Junior Snorkeler: This is the perfect age to introduce kids to the underwater world. Start at an ultra-calm spot like Kapalua Bay on Maui or Hanauma Bay on Oahu (reservations required!).
Experience a Family Lūʻau: A lūʻau is a quintessential Hawaiian experience. Opt for one known for being family-friendly, like the Smith Family Garden Lūʻau on Kauai.
Become a Volcano Voyager: On the Big Island, a visit to Hawaiʻi Volcanoes National Park is like a real-life science lesson. Pick up a Junior Ranger booklet to transform your kids into active explorers.
For Teenagers (Ages 13-18)
For teenagers, the key is balancing family time with a sense of independence and adventure. Involve them in the planning.
Learn to Surf: Book a group lesson from a reputable surf school in a beginner-friendly area like Waikiki on Oahu or Kihei on Maui.
Conquer an Epic Hike: Challenge your teens with an iconic hike like the summit of Diamond Head on Oahu, which offers panoramic vistas of Waikiki.
Zipline Through Paradise: Soaring through the rainforest canopy on a zipline is a pure adrenaline rush that provides a thrilling adventure for the whole family.
Pro-Tip: The most popular activities in Hawaii—especially lūʻaus, timed-entry parks like Hanauma Bay, and surf lessons—book up weeks, if not months, in advance. Make your reservations the moment you have your travel dates confirmed.
The Aloha Code: Essential Rules for a Safe and Respectful Trip
A little local knowledge goes a long way. These are the non-negotiable rules for any family visiting the islands.
Ocean Safety Comes First
The Pacific Ocean is powerful. The most important rule in Hawaii is "Never turn your back on the ocean." Rogue waves can appear on even the calmest-looking days.
Swim at Lifeguarded Beaches: Whenever possible, choose a beach with a lifeguard on duty.
Understand Shore Break: Many Hawaiian beaches have a powerful shore break, where waves crash directly onto the sand. This can be dangerous for young children.
Respect the Warnings: Pay attention to all posted warning signs regarding strong currents, high surf, or dangerous marine life.
Protecting the 'Āina (Land)
Hawaii's coral reefs are fragile, living ecosystems. Protecting them is not just a suggestion; it's the law.

Use Mineral-Based LOTION Only: By law, you must only use sunscreens with zinc oxide or titanium dioxide. Critically, avoid aerosol sprays. Even "reef-safe" sprays settle on the sand and wash into the ocean, harming the reef.
Apply Early and Often: Apply sunscreen 20 minutes before sun exposure and reapply every two hours, or immediately after swimming.
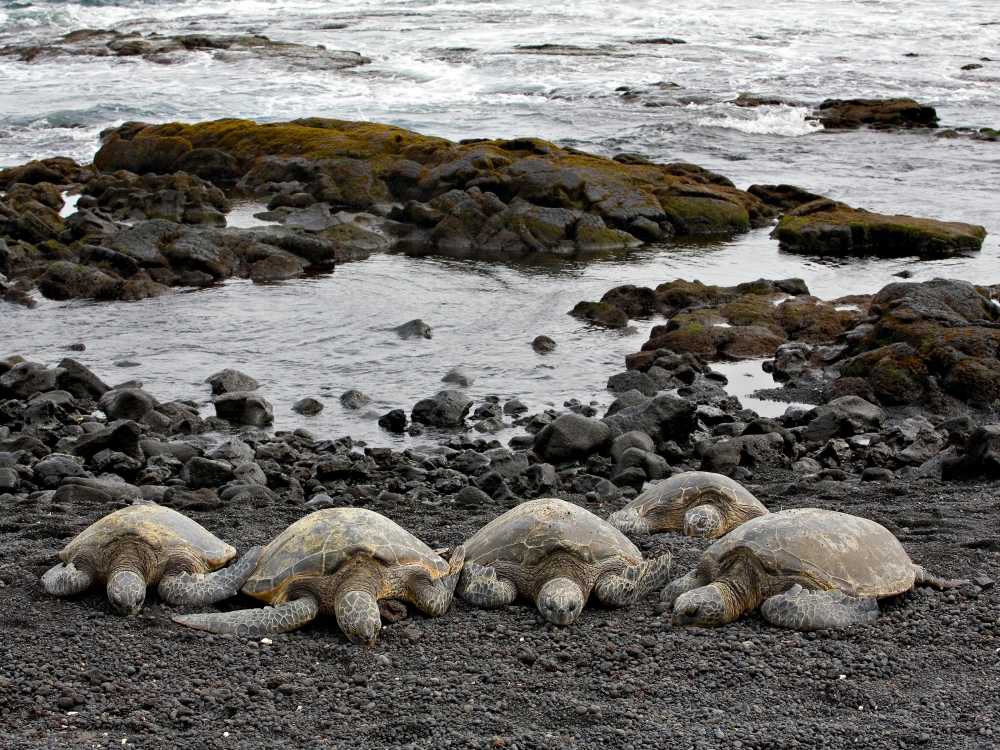
Respecting the Wildlife
Hawaii is home to the Hawaiian green sea turtle (honu) and the endangered Hawaiian monk seal.

Keep Your Distance—It's the Law: You must maintain a distance of at least 10 feet (3 meters) from sea turtles and 50 feet (15 meters) from monk seals. It is illegal to touch, chase, or harass them.
View Responsibly: Use a zoom lens for photos. If an animal approaches you, calmly and slowly move away.
Frequently Asked Questions
What is the single most important thing to pack for a Hawaii family trip?
The most crucial item is reef-safe, mineral-based sunscreen LOTION. Sunscreens containing oxybenzone and octinoxate are banned in Hawaii to protect the coral reefs, and aerosol sprays are highly discouraged as they pollute the sand and water.
Is Hawaii a safe destination for toddlers and young children?
Absolutely. Many beaches are perfect for little ones, especially the man-made lagoons at Ko Olina on Oahu or the protected rock ponds at Lydgate Beach Park on Kauai, which have calm, waveless water perfect for safe splashing.
Do I really need to book Hawaiian activities in advance?
Yes, it is critical. Popular activities like lūʻaus, boat tours, surf lessons, and timed-entry parks like Hanauma Bay on Oahu often sell out weeks or even months in advance. Booking ahead is essential to avoid disappointment.
What are the essential types of shoes to bring to Hawaii?
You only need three pairs per person: water shoes for rocky beaches and tide pools, comfortable sandals or flip-flops for the beach and pool, and a pair of closed-toe sneakers for travel days and hiking.
Conclusion
The key to crafting the perfect trip isn’t about finding a secret beach; it’s about making a series of smart, informed choices. By implementing a strategic packing system and thoughtfully selecting age-appropriate activities, you transform the stress of planning into the joy of anticipation. You now have the framework to pack with confidence and design an itinerary that weaves together relaxation, adventure, and connection. This is how you create the legendary Hawaiian family vacation that becomes a key part of your family's story. For even more in-depth strategies on planning unforgettable trips anywhere in the world, explore our comprehensive Travel Guide. Aloha.
Read the full guide: Family Travel Ideas: The 2026 Guide to Unforgettable Trips
Don't Miss Out! Subscribe for Exclusive Content
SubscribeComments 0
No comments yet
Be the first to share your experience!
Dont Miss Out! Subscribe for Exclusive Content

Ultimate USA Holidays Guide: Top Picks

FTC Affiliate Disclosure Essentials: Stay Compliant as a Travel Creator

Essential Affiliate Tools: From Tracking to Full Optimization

Booking.com Affiliate Program Review: Pros, Cons, and Earnings Potential

Decoding Affiliate Commission Rates: Benchmarks for Travel Creators

Amazon Associates for Travel: Strategies to Maximize Commissions
The Travel Blog Business Plan: How to Make Real Money in 2026
TrekGuider @trekguider
Stop collecting tactics. Start building a business. The internet is flooded with articles listing a dozen ways of how to make money travel blogging—affiliate links, display ads, sponsored posts—but they all miss the most critical question: in what order? Without a strategic plan, those tactics are just lottery tickets, a recipe for confusion and burnout.

This isn't another list. This is your comprehensive, step-by-step business plan, designed to take you from zero traffic and zero income to a profitable, scalable travel content business. We’re going to show you exactly what to focus on in your first 12 months (hint: it has nothing to do with making money) and provide the exact framework the top 1% of bloggers use to build seven-figure brands.
Forget the random tips and the vague "follow your passion" advice. It’s time to get serious. It's time to build a real asset.
Phase 1: Building Your Unfair Advantage (Months 1-12)
Welcome to the trenches. This is the most important—and by far the least glamorous—phase of your travel blogging career. The first 6 to 12 months are not about earning an income, chasing sponsored trips, or designing a beautiful logo. Let me be crystal clear: your goal in year one is not to make money.
Your goal is to build an asset.
Think of yourself as a real estate developer in a prime location. You wouldn't try to rent out a skyscraper while you're still pouring the concrete foundation. In the world of digital content, your asset is a high-quality website that attracts a dedicated audience through search engines. Your currency isn't dollars; it's traffic. Your foundation isn't concrete; it's trust.

During this foundational phase, every ounce of your energy—every late night and every weekend—will be dedicated to constructing a blog that is so genuinely helpful and authoritative that monetization becomes the natural, inevitable next step, not a desperate scramble. This is where you do the unsexy work that separates you from the 99% of travel blogs that are abandoned by month six. This is where you build your unfair advantage.
Step 1: Choose a Profitable Niche (Go Deep, Not Wide)
The single most fatal mistake a new travel blogger can make is trying to be everything to everyone. A blog about "my travels around the world" is a personal journal destined for an audience of three: you, your mom, and your most supportive friend.
A blog about "solo female travel in Southeast Asia on a budget" is a business. For those interested in this path, starting with can provide immense value to your future audience.
The fear of market saturation is valid, but the solution isn't to give up. The solution is to get laser-focused. Choosing a profitable niche is the most critical strategic decision you will make. It's not about limiting yourself; it's about making yourself the only logical choice for a specific person. A narrow focus is your primary weapon against a crowded market.

Here’s why this works:
It Builds Crushing Topical Authority for SEO: Google's algorithm is a machine built to find experts. When you write 30 in-depth articles exclusively about hiking in the Pacific Northwest, you are screaming to Google that you are the authority on that topic. This makes it exponentially easier to rank for valuable keywords than it is for a generalist who writes about Oregon one week and Paris the next. You're not just a voice in the crowd; you're the leading expert in a specific field.
It Attracts a High-Value Audience: A focused niche attracts a specific, passionate audience with a predictable set of problems, desires, and budgets. This clarity makes it far easier to create content that feels like it’s reading their mind, which in turn makes it easier to eventually sell products they are desperate to buy.
It Skyrockets Conversion Rates: Whether it's an affiliate link for a specific child-friendly hiking carrier or a brand deal with an Oregon-based tour company, a targeted audience converts at an astronomically higher rate. A general audience is just window shopping; a niche audience has their wallet out, ready to act on your expert recommendations.
Don't be afraid to get granular. Use this simple formula: [Who] does [What] in [Where].
From: "European travel" -> To: "Train travel for seniors in Western Europe."
From: "Family travel" -> To: "Accessible travel in Tuscany for multi-generational families."
From: "Adventure travel" -> To: "Scuba diving certification trips in the Caribbean for beginners."
A niche isn't a prison; it's your real advantage. It allows you to become a big fish in a small, profitable pond. For more ideas, explore our in-depth guide to 15 Profitable Travel Blog Niche Ideas for 2026.
Step 2: The Minimum Viable Setup (Spend Less Than $100)
Your perfectionism is your enemy here. The "Aspiring Travelpreneur" often falls into the trap of "pre-crastination"—spending months and thousands of dollars on custom design, expensive plugins, and countless online courses before they've even published a single, helpful article.
Resist this urge with every fiber of your being. In the beginning, your money is infinitely better spent on the experiences you can write about than on a fancy website.
Forget the custom logo and bespoke WordPress theme for now. In the beginning, your website needs to be a Toyota Corolla, not a Ferrari: utterly reliable, brutally efficient, and cheap to run. The goal isn't to win design awards; it's to build a platform that won't buckle when the traffic finally arrives.

Here are the absolute essentials:
A Domain Name: Choose a .com that is brandable, memorable, and hints at your niche. Don't overthink it. (Approx. $15/year)
Reliable Hosting: This is your one non-negotiable technical investment. Do not use free platforms like Wix or Blogger—you don't own your content, and your monetization options will be crippled. Shared hosting from a reputable provider like SiteGround, Bluehost, or Lyrical Host is the industry standard for your first year. (Approx. $5-$10/month)
A Clean WordPress Theme: Install the free, self-hosted version from WordPress.org (never .com). Then, choose a lightweight, fast-loading theme. A premium theme like Kadence or GeneratePress offers a free version that is more than powerful enough to get you started. In 2026, website speed is a critical ranking factor for SEO and essential for user experience. A slow site is a dead site.
Alternatively, for creators who want to bypass the technical setup of hosting and WordPress entirely, a marketplace platform like TrekGuider offers a powerful head start. By registering as a creator on TrekGuider, you can not only sell digital products but also publish your own blog directly on the platform. This approach allows you to focus 100% on creating great content while leveraging built-in tools to view statistics on your posts, directly track your audience engagement, and grow your business within an established travel ecosystem.
That's it. Your total initial investment can and should be under $100. Every dollar you save here is a dollar you can put toward the travel that will fuel your content—and your business—for the next year.
Step 3: Master "Helpful Content" SEO to Reach 50,000 Sessions
Traffic is the lifeblood of a profitable blog. It is the raw material from which all revenue is refined. Without a steady, predictable stream of readers, you have no one to show ads to, no one to click your affiliate links, and zero influence to leverage with brands. In this foundational phase, your single most important Key Performance Indicator (KPI) is monthly sessions.
And your singular, obsessive goal is to reach 50,000 monthly sessions.
Why that exact number? Because it's the golden ticket. It is the minimum traffic requirement to get accepted into premium advertising networks like Mediavine and Raptive (formerly AdThrive). The income difference isn't just big; it's staggering.
Google AdSense might earn you a paltry $1-$3 per 1,000 visitors (a metric called "RPM," or Revenue Per Mille).
A premium network like Mediavine can earn you $20, $30, or even $40+ RPM for the exact same traffic.
Hitting this threshold is the inflection point where your blog transforms from an expensive hobby into a legitimate source of income. It's the first taste of real profit.
The only sustainable, long-term way to get there is through Search Engine Optimization (SEO). This means creating content that methodically answers the specific questions your niche audience is typing into Google. Forget writing diary entries about your feelings. Your job now is to become a problem-solver. Your mantra is "helpful content."
This "nuts and bolts" content is the bedrock of every successful travel blog. Think about the practical, unglamorous questions a traveler actually needs answered:
"How much does a 3-day trip to Lisbon cost for a couple?" (Our is built on answering questions just like this.)
"Is it safe to drink tap water in Costa Rica in 2026?"
"What is the best travel insurance that covers trekking in Nepal?"
"A detailed, day-by-day itinerary for one week in Japan without a car." (This is the exact kind of detail you'll find in our .)
By focusing relentlessly on answering these practical questions with first-hand experience and exhaustive detail, you build immense trust with your audience and demonstrate your expertise to Google. This is a slow, methodical process of laying brick after brick. To learn the fundamentals, your first read should be our A Beginner's Guide to SEO for Travel Blogs.
Phase 2: The Monetization Ladder (Months 12-24)
You survived the gauntlet of year one. You've published 50+ articles of deeply helpful, SEO-optimized content. Your traffic is climbing steadily, and you're approaching or have just surpassed the magical 50,000 session mark. Now, and only now, is it time to flip the monetization switch. It's time to talk about how to make money travel blogging.

We call this phase the "Monetization Ladder" because it’s a sequential process. Trying to do everything at once—ads, affiliates, brand deals, products—is the fastest way to get overwhelmed and do everything poorly. Instead, you'll climb the ladder one rung at a time, introducing income streams in a logical order that aligns with your blog's growth and authority.
Rung 1: Affiliate Marketing
Affiliate marketing is the perfect first rung on the ladder for two simple, powerful reasons: it has zero traffic requirements, and it integrates perfectly with the helpful content you are already creating. Our guide on .
The concept is beautifully simple: you recommend products or services you genuinely use and love (hotels, tours, gear, travel insurance), and when a reader makes a purchase through your unique tracking link, you earn a commission at no extra cost to them.
This is the most reader-centric form of monetization possible. You're not just slapping a jarring banner ad on your site; you're providing a curated, value-added recommendation that solves a specific problem for your reader. For example, in an article about "The Best Carry-On Backpacks for a Two-Week Trip to Europe," you link to the specific Osprey backpack you've personally torture-tested for the past three years. It's a natural, helpful, and profitable service.

Your Action Plan:
Begin with Aggregators: In your early days, it's most efficient to join large affiliate networks that give you access to thousands of brands under one roof. For travel, your first stops should be platforms like TravelPayouts (for flights, hotels, tours), Stay22 (for embedding beautiful, interactive accommodation maps), and of course, Amazon Associates for all travel gear.
Perform a Content Audit: Go back through your top 10-15 highest-traffic articles. Where have you mentioned a hotel, a piece of gear, a tour, or a booking site? Add your affiliate links to these existing, proven posts first. This is the lowest-hanging fruit.
Prioritize Unshakeable Trust: This is the cardinal rule. Only recommend things you have used personally or would confidently recommend to your best friend. Your long-term credibility is worth infinitely more than a few quick commissions. The moment your readers suspect you're recommending something just for the money, you've lost.
Rung 2: Premium Display Advertising
This is your reward for a year of relentless, thankless work. The moment your Google Analytics shows you've crossed the 50,000-session threshold in the last 30 days, you should stop everything you're doing and apply to Mediavine.
Getting accepted is a rite of passage. It's the moment your traffic asset begins producing significant, life-changing passive income.
As we covered, the income potential is transformative. A blog earning a disappointing $50/month from AdSense could suddenly be earning $1,000-$2,000/month from Mediavine with the exact same audience. This provides a stable, predictable income floor. It's the money that pays your rent, allows you to reinvest in your business, and finally eases the financial pressure of this entrepreneurial journey.
The beauty of premium ads is their passive nature. Once you're approved, Mediavine's expert team works with you to install the ad code. They handle all the optimization, management, and advertiser relationships. Your only job is to keep doing what got you here: creating excellent content that attracts readers. This predictable income stream frees up your mental energy to focus on the more lucrative, and more complex, rungs of the ladder.
Rung 3: Sponsored Content & Brand Partnerships
Once you have established traffic, a clear niche, and a professional-looking website, brands will start to notice. You'll begin to get emails in your inbox with subject lines like "Collaboration Opportunity." This can be a very lucrative income stream, but it is a minefield if not approached with extreme strategic caution, as we outline in our guide to .

Many bloggers, desperate for validation and cash, fall into the trap of accepting any and every offer that comes their way. They turn their carefully crafted blog into a chaotic billboard of random, low-value sponsored posts for mattress companies and mobile games. This erodes reader trust and can be, in the words of veteran blogger Nomadic Matt, utterly "soul-sucking."
Position sponsored content as an opportunistic, supplementary income stream, not your primary goal.
You Are the Prize: Remember this always. You have done the hard work of building the asset—the targeted audience. Brands need access to your audience far more than you need their one-off payment. Do not accept free products in exchange for "exposure." Your rates should be based on the value you provide, and you should be comfortable starting at $500-$1,000 for a single sponsored post and rising quickly from there.
Create a Professional Media Kit: When you're ready to proactively pitch brands or respond to inquiries, you need a professional media kit. This is a 2-3 page PDF that acts as your blog's resume. Our free resource, , includes essential apps and resources that can help you showcase your traffic statistics, audience demographics, and past work, making the difference between being ignored and landing a four-figure deal.
Chase Partnerships, Not Posts: The most successful bloggers don't do one-off posts. They build long-term, multi-faceted partnerships. Instead of just pitching a single article, pitch a package that includes a dedicated blog post, a series of Instagram stories, a YouTube video, and inclusion in your email newsletter. This provides immense value to the brand and commands a price tag 5-10x higher than a single post.
Phase 3: Scaling to a Six-Figure Business (Year 2+)
If you've diligently climbed the monetization ladder, you'll have a profitable travel blog. You'll be earning a consistent, respectable income from ads, affiliates, and a few select brand deals. Congratulations—you've built yourself a great job.
But Phase 3 is about transcending that. It's about making the leap from content creator to business owner.

The objective here is to decouple your income from your time. It's about building systems and assets that generate revenue while you sleep, travel, or work on your next big project. This is where becomes a reality. You achieve this by creating and owning your own proprietary products.
The Ultimate Goal: Creating and Selling Your Own Digital Products
This is the endgame. This is the key to true financial independence and uncapped scaling. When you sell your own products, you control everything: the price, the profit margin (which is often 95% or higher), and the customer relationship. This is how the most successful bloggers build seven-figure brands, and we've compiled some top .
The best digital products are not born from a flash of genius. They are born directly from the problems you have been methodically solving for your audience all along. What questions do they ask you over and over again in your comments and DMs? What is their single biggest pain point?
Package the solution.

Examples of highly profitable digital products for travel bloggers include:
Hyper-Detailed Itineraries or Guides: Not a blog post, but a beautifully designed, downloadable PDF itinerary for a specific trip, complete with daily schedules, Google Map integrations, booking links, and insider tips they can't find anywhere else.
Niche E-books: A comprehensive guide to a topic you are an undisputed expert in, like "The Digital Nomad's Handbook to Visas and Taxes" or "The Complete Guide to Planning a Honeymoon in Greece," which you could model after our professional .
High-Value Templates: Notion or Google Sheets templates that help your readers organize their trip research, manage their budget, or track their credit card points. People will gladly pay a premium to save time and get organized.
Specialized Online Courses: High-ticket items ($200-$2,000+) that teach a specific, valuable skill, such as "Travel Photography for Beginners," "How to Land Your First Tourism Board Partnership," or "SEO for Travel Bloggers."
Once you've created your product, the next question is where to sell it. While you can set up your own storefront on your blog, a dedicated marketplace is often the fastest path to your first sale. By listing your products on the TrekGuider marketplace, you tap into a pre-existing audience of passionate travelers actively looking for resources. Our platform provides you with the tools to not only sell your digital guides and itineraries but also to publish your own blog content, view detailed statistics on views and engagement, and directly influence your sales through an integrated ecosystem designed for travelpreneurs.
Creating high-value products like detailed travel itineraries is a proven, winning model. To streamline this process, you can start with , which allows you to create professional, shareable plans your audience will love.
The potential here is limitless, and it is where you will build real, lasting, life-changing wealth.
Building an Email List: Your Most Valuable Asset
If your blog is your public storefront, your email list is your private VIP lounge. It is the single most valuable, durable, and critical asset in your entire business, for one simple reason: you own it. For a deep dive, explore our guide on .
Your Google rankings can fluctuate overnight. Instagram could shut down tomorrow. Facebook's algorithm is a black box. But your email list is a direct, unfiltered line of communication to your most loyal fans, and it is immune to the whims of algorithms.
It is the primary sales channel for launching your digital products and the ultimate tool for building a durable, long-term business.

Start building your list from day one—long before you have something to sell. Don't just put a "subscribe here" box in your footer. Offer a simple, valuable, and irresistible "lead magnet"—a freebie in exchange for an email address. This could be a one-page packing checklist like our , a 5-page PDF guide to the "Top 10 Mistakes to Avoid," or a simple spreadsheet template.
Nurture that list by sending regular, value-packed newsletters. Then, when it comes time to launch your e-book or course, you will have a warm, engaged audience of true fans who are ready and eager to buy from you. If you need help getting started, read our guide on How to Choose the Best Email Marketing Platform.
This three-phase plan is the exact blueprint for building a real business. But what does that business actually look like on a bank statement? Let’s pull back the curtain and talk about the numbers.
Financial Realities: A Data-Backed Look at Income & Timelines
It is absolutely crucial to have realistic expectations. Travel blogging is a marathon, not a sprint. The internet is littered with the ghosts of blogs started by people who expected to be earning thousands within a few months and quit when reality hit.
Profitability is a slow, steady climb built on relentless consistency. The numbers below are aggregated from dozens of public travel blog income reports to give you a realistic, no-fluff picture of what the journey often looks like when you follow this business plan.

These figures are not guarantees. They are a reflection of what is possible with a strategic, patient, and business-minded approach. Many bloggers never reach these numbers because they quit too soon, focus on the wrong things (like Instagram likes), or treat their blog like a diary instead of an asset. By following this plan, you put yourself on the path to joining the successful minority.
Frequently Asked Questions (FAQ Section)

How much do top travel bloggers make?
The most successful travel bloggers operate as full-blown media companies and can earn anywhere from $20,000 to over $100,000 per month. These figures are the result of 5-10+ years of work. Their income is highly diversified, coming from premium ads, a complex web of affiliate partnerships, a suite of their own digital products and courses, high-level brand ambassador deals, and sometimes even their own curated group tours. They have successfully transitioned from being "bloggers" to being brand CEOs.
Can you start a travel blog with no money?
While you can technically start on a free platform, it is a strategic dead end if your goal is to make serious money. As outlined in Phase 1, the minimum viable setup (domain and hosting) costs less than $100 for the entire first year. The question of how to become a travel blogger with no money is better framed as a lean startup. The most significant investment by far is your "sweat equity"—the hundreds of hours you will pour into creating exceptional content. If the initial $100 is a barrier, your first business goal should be to save that amount.
Is travel blogging dead or too saturated in 2026?
No, but the bar for entry is much higher. The era of the generalist "look at my cool life" travel diary is definitively over. The market is saturated with mediocrity, but there is more opportunity than ever for true experts who serve a specific niche. Readers and Google alike are rewarding authentic, deep, experience-based content over generic, AI-generated listicles. So, is travel blogging profitable in 2026? The answer is a resounding yes—for those who treat it like a business and commit to becoming the most helpful resource for a specific audience.
You have the business plan. Now it's time to get the tools to execute it.
The TrekGuider marketplace is built for this journey. Here, you can not only sell your digital products but also publish your own blog, track your stats, and grow your audience. To get started, download , a curated collection of 34 essential apps and resources designed to help you build your travel blog faster and smarter. For a complete A-to-Z resource on smarter travel, which will fuel your content for years, check out our .
Related Guides
- How to Make Money Blogging (From $0 to $10k/mo)
- How to Create a Digital Travel Guide People Will Buy
- 7 Digital Products That Sell Themselves for Travelers
- How to Make Money Online: A Creator's Guide for 2026
- Top 10 Travel Affiliate Programs for 2026
- 6 Proven Models to Make Money Online Blogging
- 5 Passive Income Ideas for Your Travel Blog
- Email Marketing for Bloggers: A Step-by-Step Playbook
- How to Start a Travel Blog (And Get Noticed)
- 15 Travel Blog Niche Ideas with Low Competition
Don't Miss Out! Subscribe for Exclusive Content
SubscribeComments 0
No comments yet
Be the first to share your experience!
Dont Miss Out! Subscribe for Exclusive Content
FTC Affiliate Disclosure Essentials: Stay Compliant as a Travel Creator
Essential Affiliate Tools: From Tracking to Full Optimization

Avoid These 5 Affiliate Landing Page Mistakes for Better Conversions

Affiliate Keyword Research Mastery for Travel Blogs
Booking.com Affiliate Program Review: Pros, Cons, and Earnings Potential