Halloween SF: Haunts Without Horrors
TrekGuider @trekguider
Let’s be honest: the hunt for the perfect Halloween vibe is a nightmare of its own. You’re craving that electric, creative buzz, but your search is clogged with two extremes: haunted houses that promise sleepless nights or tame pumpkin patches that feel like a grade-school field trip. You want the magic, not the mundane or the macabre. The search for memorable Halloween activities often leads to a dead end of generic parties and overcrowded attractions that prioritize jump scares over genuine atmosphere.
You dream of diving into the spirit of a San Francisco Halloween, a city legendary for its theatrical flair and vibrant culture. Yet, you worry you’ll miss the truly unique experiences—the ones that capture the city’s soul. When you search for the best Halloween events USA has to offer, the results are often dominated by theme park horror nights, leaving you wondering where the quirky, enchanting, and spirited celebrations are hiding. You deserve a Halloween that’s more about spectacle and spirit than stress and scares.
This guide is your key to unlocking that spectacle. We’re pulling back the velvet curtain on the city’s most captivating celebrations, where creativity is king and the atmosphere is pure magic. From the dazzling, unofficial street festivities in the world-famous Castro District to the architectural mysteries of a legendary mansion, you’ll discover how to experience all the haunts without the horrors. It’s a key part of the city's vibrant seasonal calendar, which we explore in full in our comprehensive guide to San Francisco Holidays: Bay Area Buzz. Get ready to craft a Halloween adventure that is uniquely, unforgettably San Francisco.

Why San Francisco Is a Top Destination for Unique Halloween Events USA-Wide
San Francisco doesn't just celebrate Halloween; it performs it. In a city defined by its pioneering spirit and artistic soul, the holiday transforms into a city-wide stage for radical self-expression. Unlike destinations that lean heavily on fear, SF’s Halloween is built on a foundation of community, spectacle, and participation. The city’s iconic Victorian architecture, often shrouded in the cool bay mist, provides a naturally dramatic backdrop for festivities that feel both historic and thrillingly modern.
Here, the holiday is less about manufactured scares and more about organic, grassroots celebrations that reflect the distinct personality of its neighborhoods. It’s a place where tech-infused artistry meets old-world charm, creating a Halloween experience that stands apart. It’s about being part of the show, not just watching it from the sidelines. With Halloween falling on a Friday in 2026 and a Saturday in 2026, San Francisco is primed for full-weekend celebrations, making it the perfect destination for a multi-day festive getaway.

The Castro: Ground Zero for Creative Spectacle
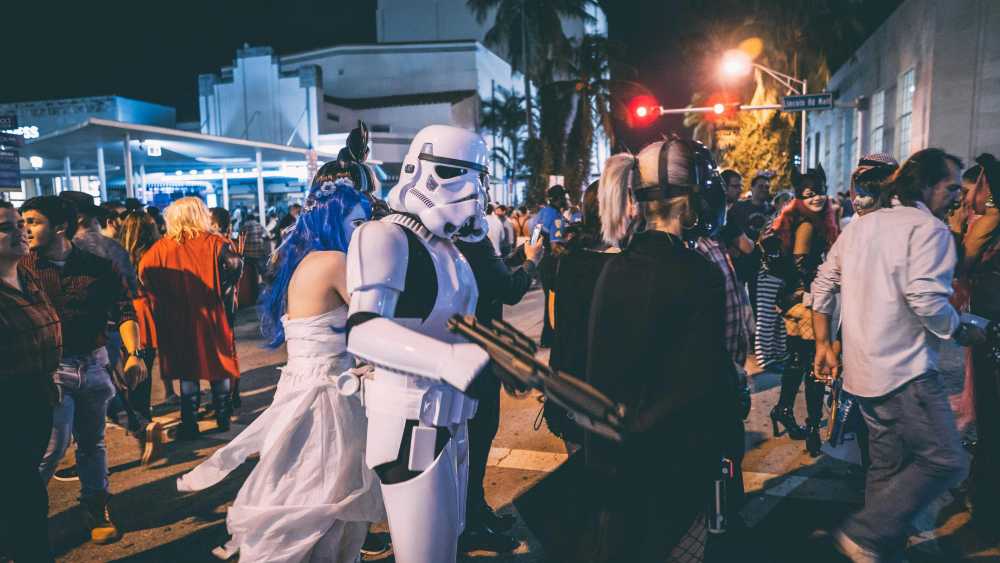
When the sun sets on October 31st, the heart of San Francisco's Halloween celebration beats strongest in the Castro District. For decades, this historic neighborhood has been the unofficial epicenter of a massive, informal street party. While the official, city-sanctioned event has been discontinued, the spirit of flamboyant celebration is inextinguishable, making it a must-see spectacle for those seeking atmosphere over anxiety.
A Legacy of Theatrical Celebration
The Castro's reputation as a hub for celebration is deeply woven into its identity as a global icon for the LGBTQ+ community. This legacy of pride, resilience, and theatricality naturally extends to Halloween, which has long been an occasion for lavish costumes and uninhibited self-expression. The neighborhood’s streets transform into a runway of pure imagination, where locals and visitors alike come together to see and be seen. It’s this powerful sense of community and freedom that makes Halloween in the Castro an experience rooted in joy and connection.
What to Expect: A Masterclass in Costume Art
A night in the Castro on Halloween is a feast for the senses. The focus here is squarely on the costumes—and they are legendary. Expect to see everything from breathtakingly elaborate, hand-crafted creations that look like they belong on a movie set to hilarious, pop-culture-inspired group ensembles.
Unrivaled People-Watching: Find a spot along Castro Street and simply take in the parade of creativity. The energy is infectious, fueled by music, laughter, and the collective awe of the incredible artistry on display.
A Festive, Open-Air Vibe: While the area gets crowded, the atmosphere is generally light and celebratory. It’s less of a chaotic party and more of a vibrant, open-air gallery of costume art.
Focus on Fun, Not Fear: This is the essence of "Haunts Without Horrors." The thrill comes from the dazzling creativity and the electric atmosphere, not from things that jump out of the dark.
How to Navigate the Castro Pub Crawls Like a Pro
The neighborhood's many bars and pubs are a central part of the evening, with many participating in informal pub crawls. If you choose to partake, a little planning goes a long way in ensuring a smooth and safe night.
Assemble Your Krewe: The buddy system is non-negotiable. Stick with your friends, establish a clear meeting point (like a specific intersection or storefront) in case you get separated, and use a location-sharing app on your phones.
Strategize Your Stops: Have a few destinations in mind rather than wandering aimlessly. Check social media in the days leading up to see if any bars are advertising special events, themes, or cover charges.
Pace for the Long Haul: The night is a marathon, not a sprint. Stay hydrated with water between drinks and know your limits. The goal is to remember the amazing costumes, not to forget the entire night.
Master Your Exit Plan: As the Master Brief confirms, using rideshares is the smartest and safest way to get home. Book your ride a few blocks away from the most congested intersections on Castro or Market Street to make pickup faster and easier for your driver.
Pro-Tip: To experience the best of the Castro's atmosphere without the most intense crowds, aim to arrive in the early evening (around 7-8 PM). You'll get to see the incredible costumes and soak in the festive energy before the streets reach their peak capacity later in the night.
The Winchester Mystery House: A Haunt of a Different Kind
For a different kind of chill—one steeped in history, mystery, and architectural absurdity—a trip to the Winchester Mystery House is an essential part of the Bay Area Halloween experience. Located a short drive from San Francisco, this sprawling mansion is famous not for ghosts, but for its baffling and bizarre construction. It’s the perfect "haunt without horror" because the unease comes from its unsettling, real-life story, not from manufactured scares.
More Architectural Anomaly Than Haunted House
The legend of the Winchester Mystery House is as captivating as its design. It is said that Sarah Winchester, heiress to the Winchester rifle fortune, was instructed by a medium to continuously build onto her home 24/7 for 38 years to appease the spirits of those killed by her family's famous rifles. The result is a sprawling 160-room mansion filled with architectural oddities designed to confuse any spirits that might be lurking.
Staircases to Nowhere: Discover stairways that ascend directly into the ceiling.
Doors Opening to Nothing: Find doors that serve no purpose, opening onto solid walls or, more alarmingly, two-story drops.
A Labyrinthine Layout: The house was intentionally designed to be a maze, with winding hallways, secret passages, and a dizzying number of rooms.
Exploring the mansion is an exercise in psychological curiosity. The unsettling feeling comes from trying to comprehend the obsessive, labyrinthine logic behind its construction. It’s a historical puzzle box that you can walk through, making it a fascinating and slightly spooky destination that engages the mind rather than just the adrenaline glands.
Planning Your Visit: An Insider's Itinerary
A visit to the Winchester Mystery House requires a bit of planning to make the most of the experience, especially during the popular Halloween season.
Book Tickets in Advance: This is non-negotiable. Halloween season is peak time. Secure your tour tickets online well in advance to avoid a sold-out disappointment.
Choose Your Tour Wisely: The mansion typically offers several types of tours, from a general estate tour to more specialized, seasonally themed explorations. Review the options to find the one that best fits your interest in history, architecture, or paranormal lore.
Give Yourself Time: Don't rush it. Besides the house tour itself, the estate has beautiful gardens and historical exhibits to explore. Plan for at least half a day for the entire experience, including travel time from San Francisco.
Packing for a day trip that combines city exploration with a visit to a historic estate can be a challenge. You need to be prepared for changing temperatures and long periods of walking. Our How to Pack Light Guide provides essential tips for creating a versatile daypack with everything you need, ensuring you stay comfortable without being weighed down.

A Practical Guide to the Best Halloween Events USA Offers in SF
Mastering Halloween in San Francisco is about more than just knowing where to go; it’s about navigating the city like a local. From transportation tricks to costume considerations, these practical tips will ensure your night is all treat and no trick.
Transportation Triumphs: Getting Around the City
On Halloween night, the city's streets can be congested, especially in popular neighborhoods.
Embrace Public Transit: Muni and BART are your best friends. They are cost-effective and eliminate the stress of finding (and paying for) parking. Plan your route ahead of time and check for any holiday schedule changes.
Rideshares Require Strategy: While convenient, surge pricing will be in effect. If you use a rideshare app, walk a few blocks away from the main crowds to a less chaotic side street. This makes your pickup location easier for your driver to find and can sometimes lower the fare.
Walk with Purpose: San Francisco is a fantastic walking city, but be prepared for its famous hills. Wear comfortable shoes, even if they clash with your costume. Your feet will thank you at 2 AM.
Costume Craft: Dressing for SF's Fickle Climate
San Francisco's weather is a character in itself. A sunny afternoon can quickly give way to a cold, foggy evening, a phenomenon locals lovingly call "Karl the Fog."
Layers Are Your Superpower: The golden rule of dressing in SF applies even on Halloween. Design your costume with layers in mind. A stylish jacket, a dramatic cape, or thermal undergarments can be a lifesaver when the temperature drops.
Comfort Is King (or Queen): You'll likely be doing a lot of walking or standing. Prioritize comfortable footwear above all else. Nothing ruins a fun night faster than painful blisters.
Pro-Tip: Weave safety directly into your costume design. Use reflective fabrics, glow-in-the-dark paint, or battery-powered LED lights. Not only will you be more visible crossing the city's busy streets, but you'll also add a cool, tech-forward element to your look that feels perfectly at home in San Francisco.
Beyond the Main Events: Finding SF's Hidden Halloween Charm
San Francisco’s Halloween magic isn’t confined to just one or two locations. The city’s innovative and nature-loving spirit means you can find festive touches in the most unexpected places.
Atmospheric Lights in Golden Gate Park
Drawing inspiration from the city’s love of blending tech and nature, keep an eye out for special light installations or themed events in Golden Gate Park. As dusk falls, the park’s misty groves and winding paths take on a naturally spooky ambiance. It’s the perfect setting for a low-key, atmospheric evening walk before heading to more lively celebrations.
Artisan Markets with a Spooky Twist
San Francisco is home to countless local artisan markets. During October, many of these markets embrace the season, offering Halloween-themed crafts, gourmet treats, and local art. It’s a fantastic way to find a unique souvenir and experience the city’s creative community on a more intimate level, often with stunning bay views as a backdrop.
The Ultimate Resource for Your Entire Trip
A single holiday is just a snapshot of what this incredible city has to offer. To truly unlock the best of the Bay Area, from its iconic landmarks to its hidden neighborhood gems, a comprehensive resource is essential. To discover even more seasonal secrets and plan the perfect trip any time of year, our comprehensive Travel Guide is the ultimate resource for exploring San Francisco and beyond.

Conclusion: Embrace the Unforgettable Spirit of a San Francisco Halloween
San Francisco offers a Halloween experience that is as unique as the city itself—one that champions creativity, community, and atmosphere over cheap thrills and jump scares. It’s a place where you can marvel at the incredible costume artistry in the Castro, ponder the architectural riddles of a mysterious mansion, and soak in the festive energy of a city that truly knows how to celebrate. From the Castro's vibrant streets to mysterious mansions, the city provides some of the most memorable Halloween events USA has to offer by focusing on what truly matters: community, creativity, and unforgettable fun.
You now have the insider knowledge to craft a Halloween adventure that's perfectly spirited and uniquely San Francisco. You can confidently navigate the city's biggest celebrations and discover its hidden charms, creating memories that will last a lifetime.
What are you most excited to experience? Share your San Francisco Halloween plans in the comments below
Don't Miss Out! Subscribe for Exclusive Content
Subscribe


Comments 0
No comments yet
Be the first to share your experience!
Dont Miss Out! Subscribe for Exclusive Content

San Francisco Cherry Blossoms: A Local's Guide to the Blooms

SF Festivals: 7 Must-See Lineups

Christmas SF: Lights & Wharf Wonders

SF Pride: 6 Route & Party Hacks

Chinese New Year SF: Parade Essentials

San Francisco Holidays: Bay Area Buzz
Ultra Festival: Beat the Heat Guide
TrekGuider @trekguider
You’ve done it. You scored the golden ticket to Ultra Music Festival, a three-day sonic pilgrimage in the heart of Miami where the world’s greatest DJs command colossal stages and the energy is nothing short of electric. But as the bass drops, so does the relentless Florida sun. The real problem isn't just the heat; it's the brutal combination of scorching temperatures, suffocating humidity, and tens of thousands of dancing bodies that can quickly turn your dream festival into a dehydrated, sun-stroked nightmare.
Imagine the agony of missing Skrillex’s closing set because you’re dizzy and nauseous, huddled in a medical tent. Picture the sheer frustration of tapping out before sunset on day one, your energy completely drained, while your friends rave on into the night. This isn't a scare tactic; it's a common reality for unprepared attendees who fatally underestimate the physical toll of partying under the Miami sun for three straight days. The line between an unforgettable weekend and a miserable, potentially dangerous one is drawn by a single thing: a bulletproof strategy.
This is that strategy. Forget the generic "drink water" advice you’ve heard a thousand times. This is your new bible for not just surviving, but truly conquering the heat at Ultra. We’re providing a pro-level, comprehensive blueprint covering everything from tactical gear selection and advanced hydration science to strategic stage navigation and leveraging festival tech for your safety. Follow these steps, and you won't just beat the heat—you'll own the entire experience, from the opening beat on Friday to the final fireworks on Sunday.

Understanding the Ultra Music Festival Environment: Sun, Crowds, and Sound
Before you can build a plan, you must understand the battlefield. Ultra Music Festival unfolds in late March at Bayfront Park, a beautiful but notoriously exposed venue. For 2026, the festival runs from March 28-30 (and for you long-term planners, March 27-29 in 2026), a time when Miami’s weather is deceptively intense. While the festival is at the heart of the city's vibrant event calendar—a scene we detail in our complete guide to Miami Holidays: 8 Beach Fest Vibes—its unique environment presents a specific set of challenges you must be prepared for.
The festival operates on a strict "rain or shine" policy, meaning you need to be ready for anything. The schedule itself is a marathon, not a sprint:
Friday, March 28: 4:00 PM – 12:00 AM
Saturday, March 29: 12:00 PM – 12:00 AM
Sunday, March 30: 12:00 PM – 10:00 PM
Notice that Saturday and Sunday demand ten to twelve hours of exposure. The primary obstacles you will face are:
Intense Solar Radiation: The Florida sun is powerful. Without adequate shade, direct exposure can lead to severe sunburn and rapidly increase your core body temperature.
Oppressive Humidity: Miami's humidity cripples your body's natural cooling system. It prevents sweat from evaporating effectively, making 85°F feel like a suffocating 95°F.
Massive Crowds: Dense crowds trap body heat, creating microclimates that are significantly hotter than the ambient air. Navigating these human seas requires immense physical energy.
Constant Movement: You’ll be walking, standing, and dancing for hours on end, burning calories and losing fluids at a dangerously accelerated rate.
The first and most critical mindset shift is to treat Ultra like an athletic event. Your preparation starts long before you ever step foot in Bayfront Park.

Pre-Festival Prep: Your Foundation for Success
Victory is won in the preparation. What you do in the days leading up to the festival and what you pack in your bag will absolutely dictate your endurance and enjoyment.
The Ultimate Packing List: Beyond the Basics
Your packing list is your first line of defense. Every single item should serve a purpose, primarily focused on cooling, hydration, and comfort.
Clothing (The Three B’s: Breathable, Bright, and Barely-There):
Fabrics: Choose lightweight, moisture-wicking materials like polyester, nylon, or bamboo blends. These technical fabrics pull sweat away from your skin, allowing it to evaporate and cool you down. Avoid cotton at all costs; it absorbs moisture, becoming a heavy, suffocating trap for heat.
Colors: Opt for light-colored clothing. White, beige, and pastels reflect sunlight rather than absorbing it like dark colors do.
Fit: Loose-fitting garments are your best friend. They allow for crucial airflow against your skin, preventing heat from getting trapped.
Footwear (Your Most Important Gear): You will be on your feet for 30+ hours over the weekend. Comfortable, well-worn sneakers are non-negotiable. Do not, under any circumstances, wear brand-new shoes, flimsy sandals, or heavy boots. Running or athletic shoes with proven arch support are ideal.
Hydration Hardware:
Hydration Pack: This is the single most important piece of gear you can bring. A CamelBak or a similar backpack with a water bladder allows you to carry 2-3 liters of water and sip continuously without fumbling with a bottle. Ensure it complies with the latest festival size and pocket regulations before you go.
Electrolyte Packets: Pack single-serving powders or tablets (like Liquid I.V., Nuun, or Pedialyte packets). They are small, light, and absolutely essential for true hydration.

Sun & Heat Protection Arsenal:
Sweatproof Sunscreen: A broad-spectrum, water-resistant sunscreen with an SPF of 50 or higher is mandatory. Apply it generously 30 minutes before you enter and reapply every two hours, no exceptions.
Wide-Brimmed Hat: A bucket hat or other wide-brimmed hat provides a portable oasis of shade for your face, neck, and ears, significantly reducing your perceived temperature.
UV-Protective Sunglasses: Protect your eyes from the relentless glare and long-term sun damage.
Cooling Towel: These hyper-evaporative towels, when soaked in water, provide incredible cooling relief when worn around your neck.
Handheld Fan/Mister: A small, battery-operated fan can be a godsend in a stagnant, dense crowd, creating a personal breeze when you need it most.
Physical Conditioning: Don't Underestimate the Marathon
You wouldn't run a 10k without training, and you shouldn't tackle Ultra without some physical prep.
Pre-Hydrate Aggressively: Begin increasing your water intake 2-3 days before the festival. Your goal is to start Day 1 with your body in a state of optimal hydration, not playing a desperate game of catch-up.
Build Endurance: In the weeks leading up, incorporate some light cardio into your routine. Even 30 minutes of brisk walking or jogging a few times a week will dramatically improve your stamina.
Prioritize Sleep: Get a full 8 hours of sleep each night in the week before the festival. A sleep deficit severely impairs your body's ability to regulate temperature and recover.
Just as detailed planning is key for a scenic road trip, like the one we map out in our Big Sur Map & Itinerary, careful preparation is essential for a massive festival. Don't leave your experience to chance.
Mastering Hydration: The Core of Your Ultra Music Festival Strategy
This is the most critical section of this guide. Proper hydration at Ultra is a science. Simply drinking water when you feel thirsty is a recipe for disaster; by the time you feel thirst, you are already significantly dehydrated.

Water Isn't Enough: The Critical Role of Electrolytes
When you sweat, you don't just lose water; you lose vital minerals called electrolytes—primarily sodium, potassium, and magnesium. These minerals are the spark plugs of your body, responsible for regulating nerve and muscle function, hydrating your cells, and balancing blood pressure. Replenishing them is just as important as replenishing water.
Why It Matters: Drinking excessive amounts of plain water without replacing electrolytes can lead to a dangerous condition called hyponatremia, where the sodium levels in your blood become dangerously diluted. Symptoms can mimic dehydration (nausea, headache, confusion) but can be far more severe.
Your Game Plan: For every two refills of your hydration pack with plain water, make the third refill an electrolyte mix. This simple rule ensures you are constantly replenishing what you're sweating out. Avoid relying on sugary energy drinks or sodas for hydration; they can often make dehydration worse.
Your Hydration Schedule: A Sip-by-Sip Plan
Discipline is everything. You need a proactive hydration schedule, not a reactive one.
The Morning Load-Up: Drink at least 16-20 ounces (about half a liter) of water with an electrolyte packet before you even leave for the festival.
The Immediate Refill: The very first thing you do upon entering Bayfront Park is locate a water station and fill your hydration pack to its maximum capacity.
The 15-Minute Rule: Take a few big sips of water from your pack every 15 minutes. Set a recurring alarm on your phone or watch if you have to. Do not wait until you feel thirsty.
The Proactive Refill: Never wait until your pack is empty to refill it. When it's about one-third full, make your way to a water station. The lines are shortest during non-peak times (e.g., during a headliner's set when everyone is at one stage, or early in the day).
The End-of-Night Recovery: Drink another 16-20 ounces of electrolyte-infused water before you go to sleep. This will supercharge your body's recovery overnight and prepare you for the next day.
Pro-Tip: As soon as you get inside, open the festival map on the official app and screenshot the locations of all free water refill stations. The stations located near smaller stages or along the perimeter of the park often have significantly shorter lines than the ones near the main stage.
Strategic Navigation and Lineup Planning
How you move through the festival and plan your day is just as important as what you pack. Wasting energy is a luxury you simply cannot afford.

Decoding the Festival Map for Heat Evasion
The festival grounds are a maze of stages, vendors, and people. Use the map to your real advantage.
Identify Cool Zones: Before you even start thinking about artists, scan the map for any designated shade structures, indoor stages (like the iconic Megastructure), or air-conditioned brand activations. These are your recovery oases.
Plan Efficient Routes: When moving from the Main Stage to the Resistance stage, don't just try to cut through the thickest part of the crowd. Use the perimeter walkways. It might be a slightly longer distance, but it will be faster and require far less energy than pushing through a human traffic jam.
Building a Smart Schedule: Pacing is Everything
With a 2026 lineup featuring titans like John Summit & Dom Dolla, Armin van Buuren, Tiësto, Chase & Status, and Deadmau5, the temptation is to sprint from stage to stage. This is a rookie mistake that will burn you out by 9 PM on Friday.
Prioritize Ruthlessly: Accept that you cannot see every artist. Pick your top 3-4 "can't-miss" sets for each day and build your schedule around them as anchors.
Schedule Deliberate Downtime: The hottest part of the day is typically between 2 PM and 5 PM. This is the perfect time to schedule a tactical break. Find a shady spot, sit down, focus on hydrating, and eat a proper meal. This planned rest will give you the energy you need for the headlining acts at night.
Embrace Discovery: Use the time between your must-see sets to explore smaller stages. They are often less crowded, providing more space to dance, breathe, and discover your new favorite artist.
Pro-Tip: When moving through a dense crowd to get closer to a stage, conserve energy by following directly behind a larger, determined person or group. Let them carve a path for you. It's a simple "drafting" trick that saves a surprising amount of physical effort.
Leveraging Technology and Safety Resources at Ultra Music Festival
In the modern festival era, your phone is an essential survival tool. Ultra has integrated technology to enhance attendee safety, and you should take full advantage of every resource.
Your Phone is Your Lifeline
The Official Ultra App: Download it well in advance. It contains the most up-to-date festival map, set times, and, most importantly, will send push notifications for any emergency alerts or important announcements.
The SaferWatch App: Ultra has partnered with the SaferWatch app, which allows you to report any safety or security concerns (medical emergencies, suspicious activity) directly and anonymously to festival staff in real-time. Have it downloaded and set up before you arrive.
Portable Charger: Your phone is useless with a dead battery. A fully charged portable power bank is not optional; it's mandatory.
Knowing Where to Go for Help
Even with perfect preparation, things can go wrong. Knowing how to recognize a problem and where to get help is crucial.
Locate Medical Tents: Just like the water stations, the first thing you should do is identify the location of all medical tents on your map. They are staffed with professionals who are there to help you, no questions asked. There is no shame in seeking help.
Recognize the Signs of Heat Exhaustion: Be aware of these symptoms in yourself and your friends:
Heavy sweating
Dizziness or lightheadedness
Nausea or vomiting
A throbbing headache
Cool, pale, clammy skin
If you or a friend experience these, get to a medical tent immediately. Do not try to "tough it out."
Be a Good Raver: The Ultra community is known for looking out for one another. If you see someone who looks unwell or is in distress, ask if they need help and guide them toward a medical tent or alert festival staff.

You're Ready to Conquer Ultra
The roar of the crowd, the earth-shaking bass, the Miami skyline lit up against the night sky—these are the moments that define the Ultra Music Festival experience. By approaching the weekend with the mindset of an endurance athlete, you are no longer at the mercy of the elements. You are in control. Preparation is your armor, hydration is your fuel, and a smart strategy is your map to victory. You now have the expert knowledge to stay cool, energized, and safe from the first set to the final encore.
You are now equipped to handle the heat, navigate the crowds, and fully immerse yourself in the magic of one of the world's greatest music festivals. This level of detailed planning is what transforms a good trip into an unforgettable one. For comprehensive strategies on navigating destinations and events worldwide, our master Travel Guide is the ultimate resource for the serious traveler. Now go, stay hydrated, and have the time of your life.
Don't Miss Out! Subscribe for Exclusive Content
SubscribeComments 0
No comments yet
Be the first to share your experience!
Dont Miss Out! Subscribe for Exclusive Content
San Francisco Cherry Blossoms: A Local's Guide to the Blooms

Halloween SF: Haunts Without Horrors
SF Festivals: 7 Must-See Lineups
Christmas SF: Lights & Wharf Wonders
SF Pride: 6 Route & Party Hacks
Chinese New Year SF: Parade Essentials
The Ultimate Travel First Aid Kit Checklist (2026)
TrekGuider @trekguider
But it doesn’t have to be that way. The single most powerful tool for ensuring a healthy, stress-free journey is one you create before you even leave home: a comprehensive travel first aid kit. This isn’t just a box of bandages; it’s a personalized arsenal of preparedness that empowers you to handle common health issues with confidence and ease. Building your own kit is at the heart of the proactive mindset we cover in our comprehensive The Ultimate Guide to Travel Safety: A 2026 Playbook. Think of this guide less as a simple shopping list and more as a masterclass in preparedness, backed by pharmacist-approved advice to help you build the ultimate defense against travel’s minor medical curveballs.
DIY vs. Pre-Made: Which Travel First Aid Kit is Right for You?
Before we dive into the specific items, it’s worth considering whether to build your kit from scratch or buy a pre-made one.
Pre-Made Kits: These offer undeniable convenience. They come in a compact case and provide a decent baseline of supplies. However, they are often filled with low-quantity, generic items and may lack the specific medications you need for your trip.
DIY Kits: Building your own kit requires a bit more effort upfront but is superior in every other way. It allows you to choose high-quality brands, pack sufficient quantities, and tailor the contents specifically to your destination, your planned activities, and your personal health needs.
Our recommendation? Start with a high-quality pre-made kit as your base and then use this checklist to supercharge it, swapping out generic items and adding the crucial medications and tools it’s missing. This hybrid approach gives you the best of both worlds.
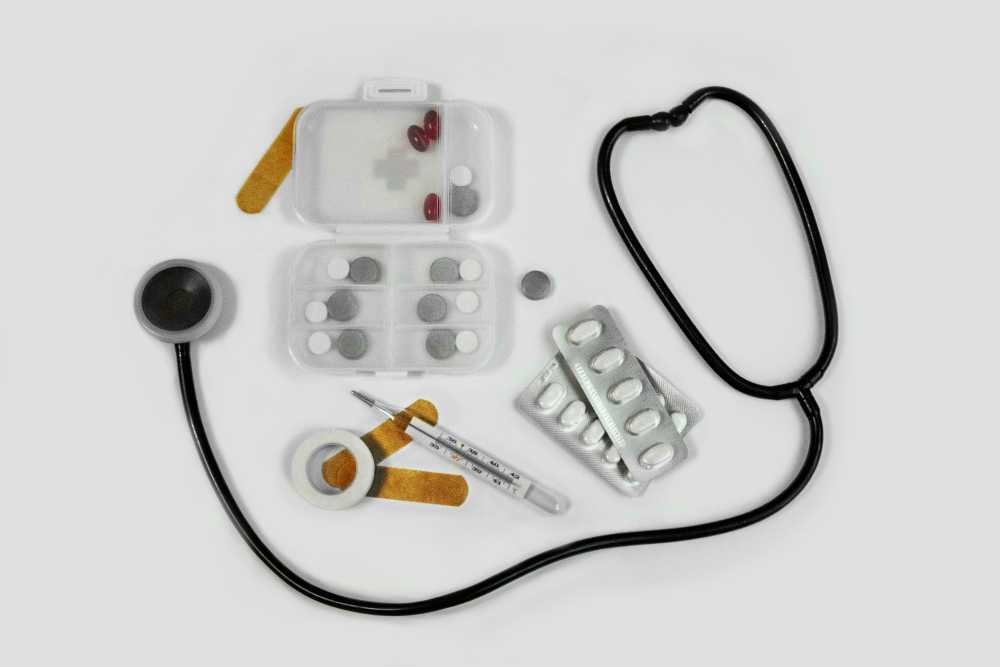
The Core Components of Your Ultimate Travel First Aid Kit
A truly effective travel first aid kit is organized like a mobile clinic, with specific supplies to treat the most common categories of travel-related ailments. Here is the definitive breakdown of what you need.
Wound & Burn Care: For Life's Little Scrapes
From a papercut to a scraped knee on a cobblestone street, any break in the skin is an open invitation for infection, especially in new environments. Here’s how you shut that door, fast.
Antiseptic Wipes (BZK or alcohol-based): For cleaning wounds, scrapes, and your hands before providing treatment. Individual packets are perfect for travel.
Antibiotic Ointment (e.g., bacitracin): A crucial step to prevent infection in minor cuts, scrapes, and burns after cleaning.
Assorted Adhesive Bandages: Pack a variety of sizes. Fabric bandages are generally more durable and flexible than plastic ones.
Butterfly Bandages / Wound-Closure Strips: Essential for taping the edges of a minor cut together to help it heal cleanly.
Sterile Gauze Pads and a Roll of Gauze: For dressing larger wounds or as a compress to control bleeding. Pack a few different sizes.
Medical Adhesive Tape: To secure gauze and bandages in place.
Moleskin or Blister Treatment Pads: An absolute lifesaver for any trip involving significant walking or hiking. Apply it as soon as you feel a "hot spot" to prevent a blister from forming.
Aloe Vera Gel: Provides soothing relief for minor sunburns.
Pain, Fever & Sprains: Managing Aches and Injuries
Long days of sightseeing, sleeping in unfamiliar beds, and carrying luggage can lead to aches and pains. Be prepared to manage them effectively so they don't slow you down.
Pain Relievers/Fever Reducers: Pack both an ibuprofen-based and an acetaminophen-based option. Pharmacists consistently recommend trusted brands like Advil/Motrin (Ibuprofen) for inflammation and pain, and Tylenol (Acetaminophen) for general pain and fever.
Aspirin: While not for general pain relief for everyone, a dose of aspirin can be life-saving for an adult experiencing symptoms of a heart attack.
Elastic Wrap Bandage: Invaluable for providing support and compression to a sprained ankle, wrist, or knee.
Instant Cold Packs: These single-use packs are activated by squeezing them and are excellent for reducing swelling from sprains, strains, and other minor injuries in the first 24-48 hours.
Pro-Tip: Decant pills into small, clearly labeled travel containers to save space, but take a photo of the original packaging first. This helps you remember dosages and provides information for pharmacists or doctors abroad if needed.

Digestive Issues: Your Defense Against Traveler's Diarrhea
Let’s be direct: traveler’s diarrhea is the single most common illness to strike travelers, affecting up to 80% of visitors in some destinations. Having a dedicated section in your kit to manage digestive distress is absolutely critical.
Anti-diarrhea Medication: To manage symptoms when you need to travel or get through a planned activity. The top pharmacist-recommended brand is Imodium (Loperamide).
Antacids: For relief from indigestion, heartburn, and general upset stomach. Pepto-Bismol is another pharmacist-favorite that can also help with mild diarrhea.
Oral Rehydration Salts: This is arguably the most important item in this section. Dehydration is the primary risk of diarrhea and vomiting. These pre-measured packets mix with safe, bottled water to replenish the essential fluids and electrolytes your body has lost.
Anti-nausea or Motion Sickness Medication: Essential if you’re prone to motion sickness on planes, boats, or winding bus rides.
Allergies, Bites & Skin: Soothing Irritations
New environments mean new pollens, unfamiliar insects, and different plants. Be ready to tackle itches, rashes, and allergic reactions before they become a major annoyance.
Antihistamine (e.g., diphenhydramine): For treating allergic reactions, hives, and severe itching. Note that some antihistamines can cause drowsiness.
Hydrocortisone Cream (1%): A topical steroid cream that provides fast relief from the irritation and itching of rashes and insect bites.
Insect Repellent: In any region with mosquito-borne illnesses like Dengue or Malaria, this is as important as your passport. Choose a repellent with an effective active ingredient like DEET or Picaridin.
Epinephrine Auto-Injector (e.g., EpiPen): This requires a prescription and is absolutely essential for travelers with a history of severe allergic reactions (anaphylaxis).
Ready to Pack Like a Pro?
Your travel first aid kit is a critical piece of your travel puzzle, but it's not the only one. To ensure you don't overlook a single essential item—from documents and finances to clothing and gear—you need a master list. Our comprehensive, free checklist has you covered.
Download Your Free International Travel Checklist Now!
Essential Tools & Personal Medications
The final layer of your kit includes the tools to use your supplies effectively and your own personal health necessities.
Fine-Point Tweezers: For removing splinters, ticks, or other foreign objects from the skin.
Small, Rounded-Tip Scissors: For cutting medical tape, gauze, or moleskin. (Ensure they meet TSA guidelines if packing in a carry-on).
Disposable Non-Latex Gloves: To protect your hands and prevent infection when treating a wound on yourself or someone else.
Digital Thermometer: For accurately checking for fever.
Personal Medications: This is the most critical category. Pack a sufficient supply for your entire trip, plus at least a few extra days' worth in case of delays. Always keep your personal medications in your carry-on luggage in their original, labeled containers.
Pro-Tip: Before you leave, ask your doctor for a letter describing your condition and the medications you take, including their generic names. Keep a digital copy of this and your prescriptions on your phone. This can be invaluable if your medication is lost or you need to see a doctor abroad.

Beyond the Basics: Customizing Your Kit
The ultimate travel first aid kit is not one-size-fits-all. Once you have the core components, elevate your preparedness by customizing it for your specific journey.
By Destination:
Tropical/Developing Countries: Add anti-fungal cream, more insect repellent, and potentially a prescription for a standby antibiotic for severe traveler's diarrhea (consult your doctor).
High-Altitude Destinations: Speak with your doctor about medication to prevent altitude sickness.
By Activity:
Hiking/Trekking: Double down on blister care (moleskin, gel pads), pack an elastic wrap for sprains, and add pain-relieving gel.
Beach Vacation: Add extra aloe vera gel, sting-relief spray, and waterproof bandages.
By Traveler:
With Children: Include children’s formulations and dosages of pain/fever reducers, kid-friendly bandages, and any specific allergy medications they need.
Travel First Aid Kit FAQs
A great kit anticipates problems. Here are answers to common questions that take your preparedness to the next level.
1. What’s the first thing I should do if I get traveler’s diarrhea?
According to the CDC and travel medicine doctors, the first and most important step is oral rehydration. Dehydration is the biggest risk. Start sipping an Oral Rehydration Solution (ORS), sports drinks, or clear broths immediately. For mild to moderate cases that don't have a high fever or blood, an antimotility drug like Loperamide (Imodium) can help manage the symptoms. If symptoms are severe, incapacitating, or include a high fever or blood, it's time to consider a prescribed standby antibiotic and seek medical advice.
2. Should I pack a standby antibiotic in my kit?
This is a question for your doctor or a travel medicine clinic. For travelers heading to high-risk destinations where severe traveler's diarrhea is common, many doctors will provide a prescription for a standby antibiotic like Azithromycin. It’s not for mild cases but can significantly shorten the duration of a severe bout of illness. Discuss your itinerary with your doctor to see if this is right for you.
3. Is it okay to pack medications outside their original bottles to save space?
While it's tempting, it's safest to keep prescription medications in their original, clearly labeled containers. This avoids any confusion or legal issues with customs officials. For over-the-counter pills, you have more flexibility. If you use a travel pill organizer, consider taking a photo of the original packaging so you have the dosage information and ingredients handy.

Pack Confidence for Every Journey
A carefully assembled travel first aid kit does more than just prepare you for minor medical issues; it provides profound peace of mind. It transforms you from a worried passenger into a self-sufficient, empowered traveler, ready to handle the small bumps in the road so you can stay focused on the incredible experiences ahead. By following this checklist, you’re not just packing supplies—you’re packing the confidence to explore the world freely and fully.
Now that your health and safety are covered, you can focus on the other details that make a trip unforgettable. For a complete, deep-dive into every facet of trip planning, from health and safety to budgeting and logistics, our comprehensive Travel Guide is the only resource you'll ever need.
Meta Data Suggestions:
SEO Meta Title (55 characters): The Ultimate Travel First Aid Kit Checklist (2026)
URL Slug: travel-first-aid-kit-checklist
SEO Meta Description (154 characters): Build the perfect travel first aid kit. Our 2026 checklist, with pharmacist-approved tips, covers everything from wound care to stomach issues. Be prepared.
Don't Miss Out! Subscribe for Exclusive Content
SubscribeComments 0
No comments yet
Be the first to share your experience!
Dont Miss Out! Subscribe for Exclusive Content

Ultimate USA Holidays Guide: Top Picks

FTC Affiliate Disclosure Essentials: Stay Compliant as a Travel Creator

Essential Affiliate Tools: From Tracking to Full Optimization

Booking.com Affiliate Program Review: Pros, Cons, and Earnings Potential

Decoding Affiliate Commission Rates: Benchmarks for Travel Creators

Amazon Associates for Travel: Strategies to Maximize Commissions
FTC Affiliate Disclosure Essentials: Stay Compliant as a Travel Creator
TrekGuider @trekguider
Let’s talk about the single most valuable asset in your travel content business: trust. It’s the bedrock of your brand, the reason your audience listens, and the currency that turns recommendations into revenue. Yet, there’s a legal landmine many creators unwittingly step on that can shatter that trust in an instant: the Federal Trade Commission (FTC).

In a creator economy where the affiliate marketing industry is a $93 billion juggernaut, operating with professional integrity isn't just good ethics—it's a brilliant business strategy. The creators hitting the reported average of $13,847 a month aren't just getting lucky; they're building resilient businesses on a foundation of transparency. But the rules around disclosure can feel like a confusing maze of legalese, leading many to either ignore them or implement them incorrectly. This isn't just a minor slip-up; it's a mistake that can get you kicked out of affiliate programs, alienate your audience, and attract unwanted legal attention.
This guide is your definitive, jargon-free map through that maze. We're breaking down the exact rules, providing copy-and-paste templates for every platform, and giving you the confidence to monetize ethically and legally. Mastering compliance is at the heart of a successful business, a topic we explore from every angle in our comprehensive pillar page on Travel Affiliate Programs: The 2026 Ultimate Guide.
What Exactly Is an FTC Affiliate Disclosure?
At its heart, an FTC affiliate disclosure is a simple, honest statement. It informs your audience that you have a "material connection" to a product or service you're recommending. In plain English, if you stand to earn a commission, get a free product, or receive any compensation when someone uses your link, you are legally required to tell them.
This isn't just red tape. It serves two purposes that are vital to your business:
It’s the Law: The FTC is America's consumer protection agency. Its job is to prevent deceptive advertising, and hiding a paid endorsement is considered deceptive. Compliance is non-negotiable.
It Forges Unbreakable Trust: In the creator world, transparency is a superpower. When you're upfront about your affiliate relationships, you prove you have nothing to hide. This makes your audience more likely to trust your recommendations, not less, because they see you as an honest broker.
Pro-Tip: Stop thinking of your FTC affiliate disclosure as a legal chore. Start seeing it as a badge of honor that signals your commitment to professionalism and respect for your audience.

The "Clear and Conspicuous" Standard: Your Four-Point Compliance Checklist
The FTC’s mandate boils down to two words: "clear and conspicuous." This isn’t just vague legalese; it’s an actionable standard built on four pillars. If your disclosure fails on even one, it’s not compliant.
1. Prominence: It Must Be Impossible to Miss
Your disclosure can't be an afterthought. It needs to be presented in a font, color, and location that a typical user can't help but see. That means no tiny, light-gray text hidden in a crowded footer.
2. Presentation: It Must Be in Plain English
Ditch the corporate jargon. Your disclosure needs to be written in simple, straightforward language that anyone can understand instantly.
Excellent: "This post contains affiliate links. If you buy something through one of these links, I may earn a commission at no extra cost to you."
Poor: "This site is a participant in affiliate advertising programs designed to provide a means for sites to earn advertising fees."
3. Placement: It Must Appear Before Any Links
This is the rule creators break most often. The disclosure must be placed where your audience will see it before they scroll to your first affiliate link. Placing it at the bottom of your post is a clear violation.
4. Proximity: It Must Be Close to the Action
The disclosure should be as close to your recommendations as possible. For a blog post, a single, clear statement at the very top of the article is the gold standard and covers all the links that follow.

Your Platform-by-Platform Disclosure Playbook (with Templates)
The four pillars apply everywhere, but how you build them changes with the platform. Here’s your definitive guide.
For Your Travel Blog or Website
This is your home base, and the rules are clearest here. Your disclosure must be at the top of the article, before the main content begins.
Compliant Placement: At the very beginning of the post.
Non-Compliant Placement: In the sidebar, in the footer, or on a separate "Disclosures" page.
Template You Can Use:
(Heads up! This post contains affiliate links. If you book or buy something through one of my links, I may earn a small commission at no extra cost to you. This helps me keep the adventures coming. Thanks for your support!)
For Instagram (Posts, Stories, and Reels)
On social media, disclosures must be instantly visible without a user having to click "see more."
Compliant Placement: Within the first three lines of the caption.
Non-Compliant Placement: Buried in a long block of hashtags at the end.
Pro-Tip: For maximum clarity, the FTC recommends using simple, unambiguous terms.
Templates You Can Use:
For Captions: Start your caption with Ad: or Sponsored:.
Hashtags: Use clear, upfront hashtags like #ad or #sponsored. While #affiliate is used, it's less clear to the average consumer.
For Stories/Reels: The best method is using Instagram's built-in "Paid Partnership" label. If that's not an option, superimpose clear text like "Ad" or "Sponsored" on the screen and mention it verbally.

For YouTube Videos
A compliant YouTube video requires a two-pronged disclosure: one verbal, one written.
Compliant Placement: Stated verbally near the beginning of the video AND written in the description box above the "show more" fold.
Non-Compliant Placement: Only written in the description box where a user has to click to see it.
Templates You Can Use:
Verbal Script: "Just a quick heads-up before we get started—this video contains affiliate links. So if you decide to book that incredible tour I'm about to show you, I might earn a small commission, which is a huge help in supporting this channel!"
Description Box Text: DISCLOSURE: This video and description may contain affiliate links, which means that if you click on one of the product links, I’ll receive a small commission at no additional cost to you.
Don't Forget Referral Links
The rules for an FTC affiliate disclosure extend beyond traditional product sales. They cover any "material connection," and that absolutely includes referral programs. If you share a link that gives a friend a discount and earns you a credit or bonus, that relationship must be disclosed.
This is particularly relevant for modern creator platforms. For example, when you invite fellow creators to join the TrekGuider Seller Platform using your unique referral link, you must be transparent about the fact that you stand to benefit. The best disclosures frame this as a win-win.
Templates for Referral Links:
Simple & Direct: "This is my referral link. If you sign up, I may receive a bonus from TrekGuider."
Benefit-Focused: "Use my link to join the TrekGuider Seller Platform! You'll get mention the benefit, e.g., a 15% discount on your first purchase, and I'll get a small commission to help support my work."
The Travel Creator's Toolkit
Mastering compliance is a key part of building a professional content business. To help you organize your entire strategy—from legal checklists to content templates—we've created the ultimate resource bundle. It’s designed to help you operate like a pro from day one.
Download Your Free Bundle: The Travel Creator's Toolkit Today!
Frequently Asked Questions (FAQ)
1. Is it enough to have a "Disclosure Policy" page on my website? No. While having a dedicated policy page is a good practice, it does not satisfy the FTC's requirement for a disclosure that is proximate to the recommendation. The disclosure must be on the same page as the affiliate links themselves.
2. Do I need to disclose if I received a product for free, even if I'm not getting paid? Yes. Receiving a product or service for free (like a complimentary hotel stay or a free piece of luggage) is considered a "material connection" and must be disclosed just as you would a monetary commission.
3. Can I just use #affiliate in my social media posts? While it's better than nothing, the FTC has indicated that it prefers clearer, more universally understood terms like #ad or #sponsored. The term "affiliate" may not be clear to everyone in your audience.
Your Commitment to Transparency
The world of FTC affiliate disclosure is not designed to be a trap. It’s a framework for honest communication. By embracing these rules, you’re not just protecting yourself legally; you’re making a powerful statement to your audience that you value their trust above all else.
You now have the knowledge and the templates to implement compliant disclosures with confidence across every platform. See this not as a chore, but as a professional standard that elevates your brand. In the creator economy, transparency isn't just good policy—it's the ultimate currency.
Read the full guide: The Travel Blogger's Playbook to Affiliate Marketing Mastery
Don't Miss Out! Subscribe for Exclusive Content
SubscribeComments 0
No comments yet
Be the first to share your experience!
Dont Miss Out! Subscribe for Exclusive Content
Ultimate USA Holidays Guide: Top Picks
Essential Affiliate Tools: From Tracking to Full Optimization

Avoid These 5 Affiliate Landing Page Mistakes for Better Conversions

Affiliate Keyword Research Mastery for Travel Blogs
Booking.com Affiliate Program Review: Pros, Cons, and Earnings Potential