Essential Affiliate Tools: From Tracking to Full Optimization
TrekGuider @trekguider
You’re a creator, not an administrator. Yet, you find yourself drowning in a sea of administrative tasks. You’re manually copying and pasting ugly, mile-long affiliate links, toggling between a dozen different program dashboards to check your stats, and spending more time wrestling with spreadsheets than you do creating the travel content you love. Your affiliate "business" feels less like a streamlined operation and more like a chaotic, time-sucking hobby that isn't paying the bills.
This inefficiency is more than just frustrating—it's a silent killer of your income. Every hour you spend on manual, repetitive tasks is an hour you’re not creating the next piece of content that could generate revenue for years to come. You're flying blind, guessing which strategies are working, unable to see which links are converting, and which pages are actually profitable. The reported average income of $13,847 a month for travel affiliates feels like a distant fantasy when you’re stuck in this administrative quicksand.

This guide is your way out. It is your curated, creator-friendly tech stack—a definitive list of the essential affiliate marketing tools that will automate the tedious, provide crystal-clear data, and free you up to focus on growth. We’ll cover the entire workflow, from foundational link management and tracking to the advanced tools needed for full-scale optimization. This is how you transform your passion project into a professional, efficient, and profitable business. For a complete command of the entire affiliate landscape, our definitive pillar page, Travel Affiliate Programs: The 2026 Ultimate Guide, is your essential command center for mastering the entire ecosystem.
The Foundational Layer: Your Operational Command Center
Before you can optimize, you must organize. This first set of tools forms the non-negotiable foundation of any serious affiliate marketing business. They are your central nervous system for managing links, ensuring compliance, and tracking performance from a single source of truth.
Link Management Plugins (The Digital Quartermaster)
If you run your travel blog on WordPress, a link management plugin is the single most important tool you will install. These plugins take the long, ugly, and intimidating affiliate links provided by programs and "cloak" them into short, clean, branded URLs that are far more trustworthy to your audience.
Think of it as your command center. Instead of embarking on a digital scavenger hunt through year-old posts to update a single expired link, you change it once in a central dashboard, and the plugin deploys that change site-wide instantly. This functionality alone will save you hundreds of hours over the life of your business. Furthermore, a link like yourblog.com/recommends/osprey-backpack is infinitely more professional and trustworthy to a reader than a long URL filled with random tracking parameters, directly impacting your click-through rates.

Top Tools in This Category:
Recommended: Travel Creator Toolkit: 34 Essential Apps and Resources
Recommended: Digital Product Ideas: How to Make Money From Your Next Trip
ThirstyAffiliates: A powerhouse plugin built specifically for affiliate marketers. It offers advanced features like autolinking (automatically turning specific keywords into affiliate links), proactive link checking to find broken links, and detailed click analytics.
Pretty Links: A slightly simpler but highly effective alternative. It excels at link cloaking, redirection, and providing basic click-tracking reports right from your WordPress dashboard.
Pro-Tip: The best link management plugins, like ThirstyAffiliates, can automatically add the required rel="sponsored" tag to all of your affiliate links. This is a critical feature that ensures you stay compliant with Google's guidelines for paid links, protecting your site from potential SEO penalties without you having to think about it.
Affiliate Tracking Tools (Your Source of Truth)
"What gets measured gets managed." To grow your affiliate income, you need a crystal-clear understanding of what’s working. While many creators start by manually checking each affiliate network’s dashboard, a dedicated approach to tracking provides a more holistic, actionable view.
For most creators, your affiliate tracking tools will be a combination of your link management plugin’s analytics and the dashboards provided by your affiliate networks (like CJ Affiliate or Travelpayouts). These platforms show you crucial metrics like clicks, conversions, and commission earnings.
However, as your business matures, you'll want to track performance across different income models. For example, the TrekGuider Seller Platform includes a dedicated referral dashboard. This is a specialized tracking tool that shows you not just one-time sales, but the ongoing, passive income you’re earning from the new sellers you’ve brought to the platform. It’s a perfect example of how a modern platform provides the built-in affiliate tracking tools you need to monitor more sophisticated, high-margin income streams like revenue sharing.
The Growth Engine: Traffic & SEO Tools
With your operational house in order, the focus must pivot from organization to acquisition. A perfectly managed link is useless without a steady stream of the right people clicking on it. This is where your growth engine comes in—the tools designed to attract your ideal audience with precision.
SEO & Keyword Research Platforms
The most profitable affiliate content is created with intention. It targets keywords that signal a user is actively researching a purchase (e.g., "best carry-on luggage review"). SEO platforms are your treasure map for finding these "money" keywords and building a content strategy that attracts buyers, not just browsers.

These platforms are indispensable for:
Finding Profitable Keywords: Uncover what your audience is searching for, how many people are searching for it, and how difficult it will be to rank on Google.
Analyze the Competition: See exactly which keywords your competitors are ranking for and which pages are bringing them the most traffic.
Track Your Performance: Monitor your rankings for your target keywords over time to see what’s working and where you need to improve.
Top Tools in This Category:
Ahrefs: A comprehensive, professional-grade SEO toolkit. Its "Keywords Explorer" is second to none for finding high-value commercial investigation keywords, and its "Site Explorer" provides deep insights into any competitor's strategy.
SEMrush: Another all-in-one industry leader that offers a powerful suite of tools for keyword research, rank tracking, and competitive analysis.
Pro-Tip: Don't confine your keyword strategy to your blog. With video projected to account for a staggering 55% of all affiliate traffic by 2026, the same commercial-intent keywords you find for your articles are the exact titles you should be using for your YouTube videos and TikToks.
Analytics Platforms
While SEO tools help you get traffic, a web analytics platform tells you what that traffic does once it arrives. It’s essential for understanding your audience, diagnosing problems, and optimizing their journey from reader to buyer.
The Must-Have Tool:
Google Analytics: The free, industry-standard tool for website analytics. It's an incredibly powerful platform that provides all the data you need to understand user behavior, track conversions, and identify your top traffic sources, allowing you to double down on what works.
The Conversion Toolkit: Optimization & Social Media Tools
Attracting traffic is only half the battle. The final, crucial step is converting that traffic into clicks and commissions. This set of tools is designed to streamline your workflow and optimize your content for maximum impact.
"Link in Bio" Tools (For Social Dominance)
Platforms like Instagram and TikTok are powerful for audience building, but they famously limit your ability to use clickable links. A "link in bio" tool solves this by creating a simple, mobile-friendly landing page that can house all of your most important affiliate links, blog posts, and offers.

Top Tools in This Category:
Linktree: The most well-known tool in this space, offering a simple and effective way to create a micro-landing page for your social media bio.
Later: While primarily a social media scheduling tool, Later’s "Link in Bio" feature is excellent, allowing you to create a clickable grid of your Instagram posts, driving traffic directly to relevant blog posts and affiliate offers.
The Amazon Workflow Accelerator
For nearly every travel creator, Amazon Associates is a core part of their affiliate strategy. However, creating links for individual products can be a slow, manual process.
The Must-Have Tool:
Amazon SiteStripe: This is a free, official toolbar from Amazon that appears at the top of your browser whenever you’re on Amazon.com. It allows you to generate a custom affiliate link (text, image, or both) for any product page with a single click, dramatically speeding up your content creation workflow.
Your Strategy Blueprint: The Travel Creator's Toolkit
Feeling overwhelmed by the options? A powerful tech stack is only as good as the strategy behind it. To help you organize your entire affiliate marketing plan—from keyword research to content creation and promotion—we've created the ultimate resource bundle. It’s packed with the checklists, templates, and guides you need to build a professional and profitable system.
Download Your Free Bundle: The Travel Creator's Toolkit Today!
Frequently Asked Questions (FAQ)
1. Do I really need all these tools when I'm just starting out? When you're starting, focus on the foundation. A WordPress site with a link management plugin (like Pretty Links) and Google Analytics is your essential starting stack. This is a low-cost setup that allows you to organize your links and track your traffic from day one. You can invest in a premium SEO tool like Ahrefs once your site is generating enough revenue to justify the cost.
2. Are there any good free affiliate marketing tools? Absolutely. Google Analytics is free and non-negotiable. Amazon SiteStripe is also free. For keyword research, you can start with free tools like Google Keyword Planner or the free versions of various SEO tools, though they are more limited. The free versions of "link in bio" tools like Linktree are also perfectly sufficient for most creators.
3. How do these tools help with tracking beyond just clicks? Advanced tracking involves connecting data points. For instance, by using UTM parameters (which you can add manually or with some plugins), you can see in Google Analytics not just that someone came from your blog, but that they came from the specific button in your review of the Osprey backpack. This level of detail is what allows you to A/B test different calls-to-action and truly optimize your pages for conversion.
Conclusion: From Hobbyist to CEO
The difference between a creator earning a few dollars a month and one earning a full-time income often comes down to their systems. Top earners don't waste time on manual, low-value tasks. They leverage technology to work smarter, not harder. They treat their content not as a hobby, but as a business.

You now have a curated list of the best affiliate marketing tools to build your own professional tech stack. Start with the foundation: a link management plugin to organize and track your links. Then, layer in SEO and analytics tools to build a predictable stream of traffic. Finally, use optimization and workflow tools to convert that traffic with maximum efficiency.
These affiliate tracking tools and optimization platforms are not an expense; they are an investment in your own efficiency, professionalism, and profitability. By implementing this toolkit, you take a definitive step away from being a hobbyist and become the CEO of your own thriving travel content business.
Meta Data Suggestions:
SEO Meta Title (58 characters): 9 Essential Affiliate Marketing Tools for Travel Creators
URL Slug: essential-affiliate-marketing-tools
SEO Meta Description (154 characters): Discover the top affiliate marketing tools for travel creators. From link tracking to SEO, this guide covers the essential tech stack to automate and grow your income.
Read the full guide: The Travel Blogger's Playbook to Affiliate Marketing Mastery
Don't Miss Out! Subscribe for Exclusive Content
Subscribe


Comments 0
No comments yet
Be the first to share your experience!
Dont Miss Out! Subscribe for Exclusive Content

Ultimate USA Holidays Guide: Top Picks

FTC Affiliate Disclosure: Stay Compliant as a Travel Creator

Avoid These 5 Affiliate Landing Page Mistakes for Better Conversions

Affiliate Keyword Research Mastery for Travel Blogs

Booking.com Affiliate Review: Pros, Cons & Earnings

Decoding Affiliate Commission Rates: Benchmarks for Travel Creators
The Ultimate Guide to Solo Female Travel (15 Essential Tips)
TrekGuider @trekguider
The world of travel is being redrawn by its most powerful new explorers: women journeying on their own. This isn't just a trend; it's a seismic cultural shift. With the global solo travel market projected to surge past $1.5 trillion by 2033, and women making up a staggering 84% of that market, one thing is clear: the solo female traveler is here to stay. This movement is powered by a desire for something more than a vacation. According to recent reports, it's about pursuing profound personal growth (68%) and the unparalleled freedom that only comes from navigating the world on your own terms.

If you're reading this, you likely feel that same pull. And while the ambition is thrilling, it's often shadowed by valid questions about safety, logistics, and loneliness. This guide is here to replace that apprehension with confident, decisive action. These are the essential solo female travel tips—a comprehensive roadmap designed to take you from daydream to departure with clarity and courage.
The Foundation - Safety & Mindset
Before you book a flight or pack a bag, the most important part of your journey begins. It's the internal work of building a resilient mindset, understanding the emotional landscape of solo travel, and grounding yourself in smart, practical safety strategies.
Tip 1: Master Situational Awareness to Travel Confidently
The single biggest concern for women traveling solo is safety. A recent study found that 66% of solo female travelers worry about their personal safety, and it's a valid, intelligent concern. But here is the empowering reality: the same study revealed that while 25% have felt they were in a dangerous situation, a mere 1% were ultimately the victim of a crime. This tells us that women are overwhelmingly capable and successful at navigating the world safely.
The key is trading abstract fear for concrete skills, and situational awareness is your most powerful tool. It’s not about paranoia; it’s about presence. It means understanding how to recognize and avoid common tourist scams, from the "friendship bracelet" ploy near the Sacré-Cœur to the broken taxi meter at a foreign airport. It’s knowing how to carry yourself with purpose and confidence, even when you’re lost, and making conscious, clear-headed decisions about where you go, especially after dark.
Most powerfully, the data reveals a direct correlation between experience and anxiety. While a significant 77% of women who have taken fewer than six solo trips worry about safety, that number drops to just 55% for those with over ten trips under their belt. The act of traveling solo is, in itself, the most potent antidote to the fear of it. Each challenge overcome recalibrates your personal risk assessment, replacing media-fueled fear with managed awareness built on real-world evidence of your own competence.

For a complete tactical breakdown, get your free Solo Female Travel Safety Guide and read our in-depth article, The 7 Solo Female Travel Safety Rules You Can't Ignore.
Tip 2: Embrace the Journey of Personal Growth
Why do you really want to travel alone? For the vast majority of women, the answer goes far beyond seeing new sights. It’s an investment in the self. Solo travel is a real-world masterclass in capability, forcing you to become your own navigator, problem-solver, and chief decision-maker. Every challenge overcome—from successfully navigating a foreign subway system to ordering a meal in a new language—builds a powerful and tangible sense of radical self-reliance.
This journey strips away the familiar roles you play at home—employee, partner, daughter, friend—and allows you to connect with your authentic self, free from the expectations of others. You'll develop a profound resilience, learning to view setbacks not as crises but as puzzles to be solved. As Alice Teacake of Teacake Travels puts it, "it's through leaving our comfort zone and facing challenges that we become far more adaptable, quick-thinking, stronger and wiser." This isn’t just about feeling good; it's about fundamental personal development. The confidence you build on the road doesn’t stay in your suitcase; it comes home with you, permanently altering how you see yourself and your capabilities in the world.
To explore the transformative "why" behind the journey, read our inspirational guide: The 5 Unexpected Benefits of Traveling by Yourself.
Tip 3: Learn the Art of Confidently Dining Alone
For many aspiring solo travelers, one of the most daunting thoughts isn't about navigating a new city, but about a simple, seemingly trivial act: eating a meal alone in a restaurant. This social anxiety is incredibly common, but it's an obstacle that can be transformed from a dreaded necessity into one of the most pleasant and empowering rituals of your trip. The key is to be strategic.
Start by choosing your venue wisely. Actively avoid establishments that are overtly formal or marketed towards romantic couples. Instead, opt for casual bistros, lively cafes with outdoor seating perfect for people-watching, or restaurants known for their counter seating. Sitting at the bar is the universally accepted and most comfortable spot for a solo diner. It eliminates the feeling of occupying an empty table and often places you in a more dynamic, social environment where you can chat with the bartender or simply observe the action in comfortable anonymity.

Bringing a "prop"—a travel journal to record your day's adventures, a good book, or a map to plan the next day—gives you a purposeful focus during any lulls. It signals to yourself and others that you are content and engaged in your own company. Dining during off-peak hours can also significantly reduce anxiety, as the restaurant will be less chaotic. With a little practice, you'll find that a table for one is a front-row seat to the world.
For a full menu of confidence-building tactics, see our guide: 5 Ways to Confidently Eat Alone While Traveling.
Tip 4: Build Your Tribe on the Road (Safely)
Traveling solo doesn’t have to mean traveling lonely. One of the most enriching parts of the experience is connecting with other people, both locals and fellow travelers, on your own terms. The secret is to create opportunities for interaction in safe, structured, and natural ways.
Your choice of accommodation is the easiest place to start. Modern hostels are designed as social hubs, with common areas, kitchens, and organized events like group dinners or walking tours. Even if you book a private room for security and comfort, simply spending time in the common lounge is a low-pressure way to strike up a conversation. Joining group activities is another guaranteed method. A free walking tour on your first day in a new city is a classic and highly effective strategy to get your bearings while chatting with other travelers. Consider a local cooking class, a surf lesson, or a day trip to a nearby attraction; the shared experience makes conversation feel natural and easy.
Technology can also be a powerful tool for safe connection. Vetted, women-focused Facebook groups like "Solo Female Travelers" or apps like BumbleBFF can help you meet up for a coffee or a meal. The goal isn't to fill every moment with social interaction, but to know how to find it when you want it, enriching your journey with shared experiences and new perspectives.
Learn how to create meaningful connections without compromising your safety in our guide: How to Meet People While Traveling Solo (Without Being Awkward).
Tip 5: Find Inspiration from Those Who've Gone Before
The path to your first solo trip is paved with the stories and advice of the millions of women who have gone before you. Tapping into this vast well of experience is one of the best ways to build confidence and gather practical, real-world advice. Solo female travel blogs are an invaluable resource, offering everything from packing lists for specific climates to warnings about local scams. Following a few trusted voices can make you feel like you have a savvy friend in your pocket.
For the Safety-Conscious Traveler: Kate McCulley of Adventurous Kate has built her platform on the mission to "teach women how to travel the world safely!" After being shipwrecked in Indonesia, she became a leading advocate for preparedness and risk management. Her blog is a go-to resource for practical, no-nonsense safety advice that empowers rather than scares.
For the Aspiring Digital Nomad: Kristin Addis of Be My Travel Muse specializes in off-the-beaten-path and adventure travel. She focuses on authentic experiences that foster personal growth and encourages women to find a travel style that is uniquely meaningful to them, making her a fantastic resource for anyone dreaming of a long-term travel lifestyle.
For the Part-Time Traveler: Amanda Williams of A Dangerous Business champions the idea that you don't have to quit your job to see the world. Her blog is perfect for those who want to integrate more travel into their existing life, offering realistic itineraries and practical tips for maximizing vacation time and traveling smarter, not just longer.
Discover your next favorite travel mentor in our curated list: Top 11 Solo Female Travel Blogs to Follow in 2026.
The Logistics - Planning Your Perfect Trip

With a confident mindset established, it’s time to dive into the exciting logistics of where you'll go and how you'll get there. This is where your dream trip starts to take tangible shape.
Tip 6: Choose Your First Destination Wisely
The choice of where to take that first solo trip is a monumental one; it sets the tone for every adventure to come. The ideal country for a first-timer combines a high of safety, a well-developed tourist infrastructure, and a culture that is welcoming to independent travelers. Using data from sources like the Global Peace Index (GPI) provides a solid, fact-based starting point for your research.
Iceland: Consistently ranked the most peaceful country in the world by the GPI, Iceland is an outstanding choice. It boasts an exceptionally low crime rate, a high degree of gender equality, and English is widely spoken. Its strong tourism infrastructure, with countless tours and easy-to-navigate routes like the Ring Road, makes it highly accessible for independent travelers seeking otherworldly landscapes.

Portugal: A consistent top-ten performer on the GPI, Portugal offers the safety and charm of Western Europe at a more affordable price point. Its cities are considered very safe, the locals are welcoming, and it has become a major hub for solo travelers and digital nomads, ensuring a vibrant community of like-minded people. Ready to explore its charming cities and stunning coastlines? Our Portugal Guide has everything you need to get started.

Japan: Renowned for its astonishingly low crime rates and a culture of deep respect for public order, Japan is one of the safest-feeling countries on earth. The efficiency of its public transport is legendary, and features like women-only subway cars during rush hour provide an added layer of comfort for solo female travelers seeking a unique and profound cultural immersion. Check out our detailed guide to Japan.
For a full list of beginner-friendly and secure destinations, check out our guide: The 10 Best Countries for a First Solo Trip in 2026.
Tip 7: Craft a Realistic Budget You'll Actually Stick To
Financial planning is the bedrock of a stress-free solo journey. As the sole bearer of all costs, a strategic approach to budgeting isn't just advisable—it's essential. The process transforms a vague dream into an achievable financial goal. Start by researching the three largest costs: pre-trip essentials (visas, gear), long-haul transportation (flights), and a realistic average daily on-the-ground cost for your chosen destination. A daily budget in Prague, for example, can be less than half of what you'd spend in Paris, primarily due to lodging and food costs.
Create a detailed spreadsheet breaking down all expenses into specific categories: Pre-Trip Costs, International Transport, Daily Lodging, Daily Food, Daily Activities, and Local Transport. This gives you a clear picture of where your money is going and identifies areas where you can save. Once you have a total, work backward to set a monthly savings target and automate the transfer to a dedicated, high-yield savings account.
The most critical step? Incorporate a contingency fund. No budget is perfect, and travel is full of unexpected opportunities and challenges. Add a buffer of 15-20% to your total estimated cost. This fund is your safety net for emergencies, unexpected fees, or the freedom to say "yes" to a spontaneous, can't-miss experience without financial guilt.

For a step-by-step walkthrough and downloadable templates, see our complete guide: How to Make a Solo Travel Budget (That You'll Actually Keep).
Tip 8: Pack Light, Travel Free
For a solo traveler, mastering the art of minimalist packing is a superpower. Traveling with only a carry-on-sized bag enhances mobility, saves you money on baggage fees, and increases security by keeping your belongings with you at all times. It’s the ultimate form of travel freedom, allowing you to navigate crowded train stations and cobblestone streets with ease. The philosophy is simple: pack for one week and plan to do laundry once.
The key to a minimalist wardrobe is versatility. A merino wool t-shirt is a traveler's miracle fabric; it regulates temperature, wicks moisture, and is naturally antimicrobial, meaning you can wear it multiple times between washes. A large, high-quality scarf or sarong is the ultimate multi-tool, functioning as an accessory, a wrap for a chilly plane, a head covering for religious sites, or a picnic blanket. Solid toiletries—like shampoo bars and conditioner bars—are a game-changer, eliminating the worry of liquid spills and airport security rules. By choosing every item with intention and focusing on multi-use pieces, you can easily fit everything you need for a 10-day trip into a single, liberating bag.

Get the complete checklist and strategy in our ultimate guide: The Minimalist Solo Travel Packing List: A Complete Guide.
Tip 9: Explore Europe Like a Pro
Europe is a classic and incredibly rewarding destination for solo female travelers, thanks to its breathtaking diversity, high levels of safety, and excellent transportation networks. Choosing how to get from country to country is a key part of planning your adventure, with each option offering a different balance of cost, speed, and experience.
By Train: The quintessential European experience. Traveling by rail pass offers scenic views and the unparalleled convenience of arriving directly in the city center. It’s best for travelers who value flexibility and spontaneity, though high-speed routes in countries like Spain and Italy often require advance seat reservations, which come with an extra fee. Our Spain Guide can help you navigate the system.
By Budget Airline: Unbeatable for covering long distances quickly and cheaply. A flight from Lisbon to Berlin is far more time-efficient than any land-based option. However, the low headline price often hides hefty fees for luggage, and airports are typically located far outside the city, adding significant time and transit costs to your journey. It's efficient, but often a stressful means to an end.
By Coach Bus: Almost always the cheapest way to travel between cities, especially in Central and Eastern Europe where the bus network is extensive. Modern coaches are often comfortable, with Wi-Fi and power outlets, but journeys are significantly longer than by train or plane and are susceptible to traffic delays. This is the best option for the budget-conscious traveler for whom time is not the primary concern.
For a detailed comparison and continent-specific advice, see our first-timer's manual: How to Travel Europe Alone: A 2026 First-Timer's Guide.
Tip 10: Discover the Best of the USA on a Solo Road Trip
The United States offers a lifetime of solo travel possibilities, and the great American road trip is an iconic journey of freedom and discovery. The key to a successful solo trip is to focus on a specific region or theme rather than trying to cover too much ground. These itineraries offer a perfect blend of adventure, culture, and stunning scenery.

Pacific Coast Highway (California): A quintessential American drive. This 5-7 day itinerary from San Francisco to Los Angeles is all about the dramatic coastal scenery of Highway 1, with essential stops in the charming arts town of Carmel-by-the-Sea and the iconic, redwood-lined cliffs of Big Sur.
Southwest National Parks Loop (Utah/Arizona): An epic 7-10 day road trip for the avid hiker. Fly into Las Vegas and create a loop to visit the majestic canyons of Zion National Park, the otherworldly hoodoos of Bryce Canyon National Park, and the awe-inspiring Grand Canyon. The proximity of these parks makes for a manageable and visually stunning journey.
Southern Culinary & Music Trail (TN/LA): A journey through the heart of American music. Start in Nashville for country music and hot chicken, drive to Memphis to experience the blues on Beale Street and visit Graceland, and end in New Orleans for the vibrant sounds of jazz in the French Quarter. This trip is a feast for the ears and the taste buds.
Find your perfect American adventure in our list of itineraries: Solo Travel in the USA: 10 Incredible Itinerary Ideas.
Advanced Tactics - The Savvy Traveler's Toolkit
You’ve got the mindset and the plan. Now, let’s sharpen your skills with advanced, practical solo female travel tips that separate the novice from the savvy, seasoned traveler.
Tip 11: Choose Your Accommodation Like a Security Pro
Your accommodation is your sanctuary, a private space to rest and recharge. Ensuring its security is a non-negotiable first step upon arrival. Executing a consistent, methodical check immediately upon entering a hotel room or Airbnb can provide critical peace of mind. This protocol should become an automatic habit. First, prop the door open with your luggage before fully entering the room; this prevents the door from locking behind you and ensures an immediate escape route should you discover the room is not empty.
Next, conduct a quick but thorough physical search of the entire space: under the bed, behind all curtains, inside closets, and in the bathroom. Once you've confirmed the room is empty, close the door and immediately test all locking mechanisms, including the deadbolt and any chain locks. Go to every window and balcony door to ensure they are secure. Your personal security devices provide a layer of protection that is entirely within your control. Immediately place a rubber wedge doorstop alarm under the main door or install a portable door lock. Finally, locate the fire exit map, identify the two nearest exits, and physically walk the route to each. This mental map is invaluable for navigating in darkness or smoke.

Tip 12: Master Ground Transportation Safety
Ground transportation in an unfamiliar country can be a point of vulnerability. Adhering to a strict set of safety protocols for every ride is essential. When using a ride-share app, always follow the "Match, Name, Share" protocol. First, carefully Match the vehicle's make, model, and license plate number with the information provided in the app. Second, from a safe position on the curb, ask the driver, "Who are you here for?" to make them say your Name. Never ask, "Are you here for Jane?" A legitimate driver will know your name without prompting.
Finally, before your ride begins, use the app's built-in feature to Share your trip status with a trusted friend or family member, allowing them to track your journey in real-time. As a solo traveler, always sit in the back seat on the side opposite the driver. This creates physical distance and gives you access to two separate exits. Keep your own mapping application open on your phone throughout the journey to follow the route. If the driver takes a significant and unexplained detour, you are empowered to question it and, if necessary, end the ride in a safe, well-lit public area.
Tip 13: Never Leave Home Without Travel Insurance
For a solo traveler, travel insurance is not an optional luxury; it is an absolute necessity. It functions as a financial and logistical safety net in the event of a medical emergency, trip disruption, or theft far from home. When evaluating policies, a solo traveler should ensure the plan includes strong coverage in several key areas.
The most critical component is Emergency Medical Coverage; medical care abroad can be extraordinarily expensive, so a policy should offer a minimum of $250,000 in benefits. Emergency Medical Evacuation is also essential, as it covers the potentially astronomical cost of transporting you to a hospital with adequate facilities or back to your home country.
Critically for solo travelers, look for a policy that includes Emergency Medical Reunion (Companion Coverage). If you are hospitalized for an extended period, this coverage will pay for a family member's transportation and accommodation to be at your bedside. This logistical and emotional support is invaluable when you are alone and ill in a foreign country. Finally, ensure the policy covers Trip Interruption and has adequate reimbursement for lost or stolen baggage.
Tip 14: Assemble a Digital and Physical "Lifeline" Packet
Before departing on any international trip, a solo traveler should establish a "mission control" back home by providing a designated emergency contact with a comprehensive packet of information. This ensures that if you are unreachable, someone you trust has all the necessary details to assist you. This packet should include both physical and digital copies of your passport photo page, any necessary visas, your driver's license, your travel insurance policy (with the 24/7 assistance number), and the front and back of every credit and debit card you're carrying.
Also include a complete day-by-day itinerary with flight numbers, train schedules, and the names, addresses, and phone numbers of all booked accommodations. The final, crucial step is to enroll your trip with the U.S. Department of State’s free Smart Traveler Enrollment Program (STEP). Enrolling your trip online provides the nearest U.S. Embassy or Consulate with your itinerary and contact information. It creates a three-way digital bridge connecting you, your emergency contact, and the State Department, ensuring a coordinated response in a worst-case scenario.
Tip 15: Use the Right Financial Tools to Avoid Hidden Fees
Using the right financial tools abroad is crucial for avoiding costly and unnecessary fees that can silently drain your travel budget. The two most important products for a solo traveler are a credit card with no foreign transaction fees and a debit card that reimburses ATM fees worldwide.
Many credit cards charge a foreign transaction fee, typically 3% of every purchase made abroad. This fee can quickly add up and negate any rewards you might be earning. It is essential to travel with a credit card that explicitly has no such fees; leading options include the Chase Sapphire Preferred® Card and the Capital One Venture Rewards Credit Card.
Similarly, withdrawing local currency from an ATM almost always involves two fees: one from your home bank and one from the local ATM operator. To circumvent this, open an account with a bank that offers worldwide ATM fee reimbursements. A premier example in the United States is the Charles Schwab Bank High Yield Investor Checking Account, which refunds all ATM fees incurred anywhere in the world at the end of each month. Using these two products in tandem can save you hundreds of dollars over the course of a long trip.

Your Journey Awaits
The rise of the solo female traveler is proof of a collective desire for growth, freedom, and self-discovery. The journey requires preparation, awareness, and courage, but it is more accessible and safer today than ever before. These solo female travel tips are designed to be your foundation, a toolkit to dismantle fear and build competence. By embracing smart strategies, you can confidently navigate the challenges and unlock the profound rewards of exploring the world on your own terms. It's one of the most powerful investments you can ever make in yourself.
The world is waiting. Start planning with our comprehensive Travel Guide and ensure your safety with our free Solo Female Travel Safety Guide.
Your Story is the Next Chapter
As you start your own solo adventures, you’ll collect stories, insights, and expertise that are uniquely yours. You’ll discover the best gelateria in Rome, the quietest hiking trail in Zion, the most efficient way to navigate the Tokyo metro. That knowledge is valuable. At TrekGuider, we’ve built a platform for travelers like you to become creators—to share your wisdom, publish your own guides, and inspire the next wave of explorers. When you're ready, your journey can become the guide.
Don't Miss Out! Subscribe for Exclusive Content
SubscribeComments 0
No comments yet
Be the first to share your experience!
Dont Miss Out! Subscribe for Exclusive Content
Ultimate USA Holidays Guide: Top Picks
FTC Affiliate Disclosure: Stay Compliant as a Travel Creator

Essential Affiliate Tools: From Tracking to Full Optimization
Booking.com Affiliate Review: Pros, Cons & Earnings
Decoding Affiliate Commission Rates: Benchmarks for Travel Creators

Amazon Associates for Travel: Strategies to Maximize Commissions
How to Stay Safe While Hiking: A Hiker's Safety Guide
TrekGuider @trekguider
The call of the trail is a powerful one. It promises sweeping vistas, the quiet solitude of the forest, and the profound satisfaction of reaching a summit under your own power. But for all its beauty, the wilderness is impartial and unforgiving. The same trail that offers bliss on a sunny morning can present serious danger when the weather turns, a wrong turn is made, or an ankle is twisted. This is the problem every hiker faces: the gap between the adventure we dream of and the preparation it demands.
That gap is often filled with anxiety. A flicker of doubt about reading the map, a worry about the approaching clouds, or a sudden fear of what that noise was in the undergrowth can rob an incredible experience of its joy. Too often, hikers—both novice and experienced—find themselves in serious trouble simply by underestimating the trail and overestimating their preparedness. According to Search and Rescue (SAR) teams, most emergencies are the result of small, preventable mistakes. This guide is your definitive playbook for closing that gap for good. We’re providing the essential, expert-backed hiking safety tips you need to move through the backcountry with unwavering confidence. This isn't about fear; it's about empowerment. By mastering these skills, you’re ensuring every hike is a safe one, a core pillar of the responsible adventurer’s mindset we explore in our definitive The Ultimate Guide to Travel Safety: A 2026 Playbook. Let’s gear up, get smart, and get you ready to hit the trail.

This journey from novice to self-sufficient hiker begins not on the trail itself, but with a simple, powerful philosophy of preparedness that has been tested and refined by generations of mountaineers and wilderness experts. It all starts with your pack.
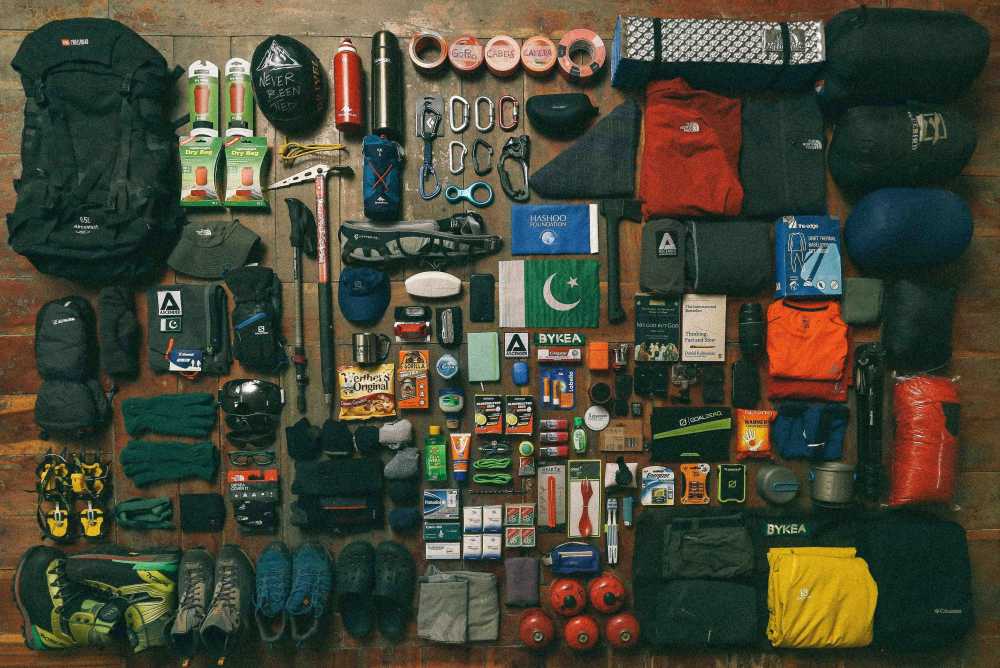
The Foundation of Safety: The 10 Essentials System
Long before your boots touch the dirt, your safety on the trail has already been decided by one thing: what’s inside your pack. Endorsed by the National Park Service and outdoor organizations like REI, the "10 Essentials" is not just a packing list; it's a systematic approach to preparedness. It ensures you have the tools to handle common problems and survive an unexpected night outdoors. Think of these not as ten individual items, but as ten crucial systems.
Navigation: Your primary system for knowing where you are and where you’re going. This must include a physical topographic map of the area and a compass. A GPS device or a smartphone with downloaded offline maps is a great tool, but electronics can fail. A map and compass are your foolproof backup.
Illumination: You need to be able to see in the dark, period. Carry a headlamp or flashlight with a full charge, and always pack extra batteries. A headlamp is superior as it keeps your hands free for other tasks.
Sun Protection: Sunburn and sunstroke can be serious dangers on the trail. This system includes sunglasses, broad-spectrum sunscreen (SPF 30+), and a wide-brimmed hat. Sun-protective clothing can also be a game-changer.
First-Aid Supplies: You must have the ability to treat common trail injuries. Your kit should be equipped to handle blisters, cuts, scrapes, and sprains. A basic kit is good; a custom-built one is better.
Repair Kit and Tools: Gear can break. A multi-tool or knife is invaluable, and a small roll of duct tape can repair everything from a torn jacket to a broken tent pole.
Fire: In an emergency, fire provides warmth, a way to purify water, and a powerful psychological boost. Carry waterproof matches, a reliable lighter, and a dedicated fire starter like dryer lint or a commercial fire-starting block.
Insulation: Weather can change in an instant, especially at elevation. You must carry an extra layer of clothing beyond what you start the hike in, regardless of the forecast. This should be a moisture-wicking layer, like a fleece jacket or thermal top—never cotton, which loses all insulating properties when wet.
Nutrition: Always pack more food than you think you’ll need. An extra day’s worth of non-perishable, high-energy food is the standard. Items like protein bars, nuts, and dried fruit are perfect.
Hydration: Carry more water than you expect to need and have a way to purify more. This means carrying a water filter or purification tablets to safely treat water from streams or lakes in an emergency.
Emergency Shelter: If you’re forced to spend an unplanned night out, protection from the elements is critical to preventing hypothermia. This doesn't mean a tent. A lightweight, packable emergency space blanket or bivy sack is all you need.

For expert-vetted gear lists and detailed trail guides from seasoned creators, the TrekGuider Marketplace is an invaluable resource for taking your preparation to the next level.
"Never Get Lost Again": Mastering Trail Navigation
Of all the potential hiking dangers, getting lost is one of the most common and terrifying. A recent study of SAR missions revealed that "error in judgment" was a leading cause of hikers needing rescue, and a huge part of that is poor navigation. Relying solely on your phone’s GPS is one of the biggest hiking safety tips to ignore—service is unreliable in the backcountry, and batteries die. True navigational confidence comes from time-tested skills.
How to Use a Map and Compass
This fundamental skill is easier than you think and is your most reliable tool.
Place the Compass on the Map: Lay your map flat. Identify your current location and your destination. Place your compass so the long edge of its baseplate creates a line connecting the two points, with the "Direction of Travel" arrow on the compass pointing toward your destination.
Set the Compass Bezel: Keeping the baseplate still, rotate the round bezel (the dial) until the orienting lines inside it are parallel with the map's north-south grid lines. Make sure the "N" on the bezel is pointing to North on the map. The number on the bezel aligned with the Direction of Travel arrow is now your bearing.
Follow the Bearing: Lift the compass off the map and hold it level in front of you. Turn your body until the red magnetic needle is "in the shed"—that is, perfectly inside the red orienting arrow on the bezel. The Direction of Travel arrow now points precisely to your destination. Pick a landmark in that direction, walk to it, and repeat the process.
Pro-Tip: The difference between "true north" (on your map) and "magnetic north" (where your compass points) is called declination. For precise navigation, you must adjust your compass for the local declination, which will be printed on your map.

Wildlife on the Trail: A Guide to Safe Encounters
Seeing wildlife is a thrilling part of hiking, but it’s crucial to remember that you are a visitor in their home. The core principles of every encounter are to maintain a safe distance, never feed wildlife, and know how to react to avoid escalating a situation.
Bear Encounters (Black vs. Grizzly)
Making noise while you hike (talking, clapping) is the best way to avoid surprising a bear. If you do encounter one, your reaction depends on the species.
If a Black Bear Approaches: Never run. Make yourself look as large as possible by raising your arms and opening your jacket. Yell, clap, and make loud noises. If it attacks, fight back aggressively. Target the bear's face and nose with anything you have—rocks, trekking poles, your fists. Do not play dead.
If a Grizzly Bear Approaches/Charges: Do not run and do not make direct eye contact. Speak in a calm, low voice to show you are not a threat. If it charges, stand your ground and use bear spray when it is within 30 feet. If it makes contact, play dead. Lie flat on your stomach, protect the back of your neck with your hands, and use your pack as a shield.
Mountain Lion (Cougar) Encounters
These predators are ambush hunters, so an encounter is rare. If you see one, it has likely been watching you.
Protocol: Do not run, as this triggers their chase instinct. Make direct eye contact. Make yourself appear larger by raising your arms and opening your jacket. Speak in a loud, firm voice. Slowly back away, giving the cat an escape route.
If Attacked: Fight back with everything you've got. Use rocks, sticks, or your hands to target the animal's eyes and face.
Venomous Snake Encounters
Snakes have no interest in humans and will only strike if they feel threatened.
Protocol: If you see a snake, freeze. Do not make any sudden movements. Once you've located the snake, slowly back away and give it a wide berth to move on. Be careful where you step and place your hands, especially when scrambling over rocks or logs.
If Bitten: The priority is to stay calm to slow the spread of venom. Limit physical activity and get to a hospital as quickly and safely as possible for evaluation and potential antivenom treatment.
Handling Trail Emergencies: What to Do When Things Go Wrong
Even with perfect preparation, accidents can happen. A twisted ankle, a sudden illness, or getting turned around can escalate quickly. Your ability to stay calm and make rational decisions is your most valuable asset. If you find yourself in trouble, remember the acronym S.T.O.P.
Stop: The moment you realize you are in trouble, stop moving. Sit down.
Think: Assess your situation calmly. What went wrong? What resources do you have?
Observe: Look around you. Where is the sun? Can you see any landmarks? Is there a source of water or shelter nearby?
Plan: Formulate a simple, logical plan. Don't make panicked decisions.
First Aid on the Trail
Your first-aid kit from the 10 Essentials is your go-to tool for injuries. Here's how to handle the most common trail ailments:
Blisters: The moment you feel a "hot spot" on your foot, stop and address it. Clean the area and apply moleskin or a blister-specific pad. Don't wait for it to become a full-blown blister.
Sprains: For a twisted ankle or knee, use an elastic wrap bandage from your kit to provide compression and support. Loosen it if you feel any numbness or tingling. Elevate the joint when you rest, and use a trekking pole or sturdy branch as a crutch if needed.
Cuts and Scrapes: Control any bleeding with direct pressure using a sterile gauze pad. Once it stops, clean the wound thoroughly with an antiseptic wipe and apply antibiotic ointment before covering it with a bandage.
A well-stocked daypack is crucial, but so is a plan for the whole trip. Before you head out to explore our incredible national parks, make sure your vehicle and supplies are just as prepared as your hiking gear.
Your Ultimate Adventure Blueprint
Ready to hit the road? Don't leave home without our expert-vetted National Park Road Trip Checklist. This free guide covers everything from vehicle prep and essential gear to can't-miss stops, ensuring your adventure is seamless from start to finish. Download it for free now!
Hiking Safety FAQs
A prepared mind anticipates questions. Here are expert answers to common concerns.
1. What's the right way to signal for help?
If you determine you cannot get yourself out of a situation safely, you need to signal for help. The universal distress signal is three of anything: three whistle blasts, three flashes of a headlamp, or three piles of rocks. A whistle is a must-have item that uses far less energy and carries further than shouting. For serious backcountry travel, consider investing in a personal locator beacon (PLB) or satellite messenger, which can send an SOS signal with your exact location to emergency services.
2. Is it safe to hike alone?
Solo hiking can be an incredibly rewarding experience, but it requires a higher level of preparation and self-sufficiency. All the rules in this guide become even more critical. It is absolutely essential that you leave a detailed itinerary with a trusted friend or family member. Include your planned route, your start and end times, and a "panic time"—the specific time they should call for help if they haven't heard from you.
3. What do I do if the weather turns bad unexpectedly?
Your first priority is to get below the treeline if you're in an exposed area to reduce the risk of lightning strikes. Put on your extra insulating layer and your rain gear before you get wet and cold. Assess your map and your situation. It is often safer to turn back, even if you're close to your destination, than to push on into deteriorating conditions.
Pro-Tip: Always tell someone your plan. Before every hike, leave a detailed itinerary with a trusted friend or family member. This is the single most important safety net you have.

Your Adventure, Empowered by Preparation
The goal of these hiking safety tips is not to fill you with fear, but to arm you with confidence. Every piece of gear you pack and every skill you learn is a key that unlocks a new level of freedom on the trail. Preparation allows you to push your boundaries, explore wilder places, and immerse yourself in the beauty of nature without the nagging whisper of anxiety. By respecting the wilderness and committing to self-sufficiency, you transform from a simple visitor into a capable, confident adventurer.
Now that you have the skills for a safe hike, you can integrate that adventure into a larger, perfectly planned journey. For a complete master plan covering everything from budgeting and logistics to finding the best trails and tours, our all-encompassing Travel Guide is the only resource you'll ever need.
Don't Miss Out! Subscribe for Exclusive Content
SubscribeComments 0
No comments yet
Be the first to share your experience!
Dont Miss Out! Subscribe for Exclusive Content

How to Avoid Travel Scams: A Global Guide

Is Public WiFi Safe? How to Protect Your Data Abroad

A Woman's Guide to Safe Travel: 10 Critical Tips

7 Hotel Safety & Security Tips for Peace of Mind

9 Beach Safety Tips That Could Save Your Life

7 Travel Insurance Red Flags to Spot Before You Buy
Travel Insurance Guide: Avoid Mistakes & Travel Worry-Free
TrekGuider @trekguider
You’ve spent weeks, maybe even months, planning the perfect getaway. You’ve booked the flights, reserved the hotel, and your itinerary is a masterpiece of exploration and relaxation. But there’s one final task that feels more like a chore than an exciting step: buying travel insurance. The whole process is a minefield of confusing jargon, endless fine print, and the nagging fear that you’re either overpaying for coverage you don’t need or, worse, buying a worthless policy that will abandon you when you need it most. This is where our guide to choosing travel insurance comes in.

This isn't just a minor administrative headache; it's a high-stakes decision. A sudden illness in a foreign country can lead to six-figure medical bills that your domestic health plan won't cover. A last-minute trip cancellation could mean losing thousands of dollars in non-refundable deposits. Relying on the "free" insurance from your credit card often leaves critical gaps in coverage, especially for medical emergencies. The anxiety is real because the horror stories of denied claims are everywhere, leaving travelers financially and emotionally stranded. For any traveler, this financial safety net is non-negotiable, forming a core part of the playbook we lay out in our ultimate .
It’s time to trade that anxiety for absolute confidence. This guide will demystify the entire process. We will translate the arcane language of insurance into simple, actionable advice. We’ll provide you with a powerful, step-by-step framework to help you analyze your needs, compare policies like a pro, and identify the red flags that most people miss. By the end of this article, you won't just buy a travel insurance policy; you will strategically select the perfect coverage that empowers you to travel with true, unshakeable peace of mind.
Why Travel Insurance is Your Trip's Most Important Investment
Let's reframe the conversation. Travel insurance isn't an annoying expense; it is the foundational investment that protects the value of every other dollar you've spent on your trip. This isn't a niche product anymore; American travelers spent a staggering $5.56 billion on travel protection in 2024, a 46% increase from pre-pandemic levels, signaling a major shift in how we prepare for travel.
The cost of a strong policy typically falls between 5% and 10% of your total non-refundable trip costs. So, for a $4,000 vacation, you might pay between $200 and $400 for a policy.
Now, weigh that against the potential for catastrophic financial loss:
Medical Emergencies Abroad: An unexpected hospital stay in many countries can easily exceed $50,000. One uninsured traveler faced a $130,000 bill for a coronary bypass in the U.S.
Medical Evacuation: If you're injured in a remote location and need to be transported to a modern hospital or flown back home, the bill for an air ambulance can soar past $100,000.

Here's a hard truth every American traveler must understand: your domestic health insurance, including Medicare, becomes virtually useless the moment you cross the border. This makes dedicated travel medical insurance an absolute necessity for international journeys. Viewing your premium as the "price of certainty" is the first step. The next is understanding exactly what that certainty buys you.
The 6 Core Types of Coverage You Need to Understand
A comprehensive policy is a bundle of different coverages. Understanding what each piece does is the first step in choosing the right plan. Here’s a breakdown of the essential components.
1. Trip Cancellation
Recommended: Stress-Free Flying with Kids: Airport, TSA, and In-Flight Guide
Recommended: Travel Guide: Trip Planning, Flights, and Avoiding Tourist Traps
This is your primary defense against losing your prepaid, non-refundable deposits. It reimburses you if you have to cancel your trip before you leave for a covered reason, like a sudden illness, a family emergency, or severe weather making your destination inaccessible.
Recommended Minimum: 100% of all your prepaid, non-refundable trip costs.
Who Needs It Most: Any traveler with significant upfront financial commitments, such as those who have booked organized tours, cruises, or non-refundable flights and accommodations.
2. Trip Interruption
This coverage kicks in after your trip has already started. If you have to cut your trip short and return home early due to a covered reason, it reimburses you for the unused portion of your trip and can cover the often-exorbitant cost of a last-minute flight home.
Recommended Minimum: 125% to 150% of your trip cost. The extra percentage is crucial for covering those expensive last-minute travel arrangements.
Who Needs It Most: Individuals on long, multi-stop, or particularly expensive journeys where ending the trip early would mean a massive financial loss.
3. Emergency Medical Expense
This is the most critical component for international travel. It covers your bills for medical treatment, hospital stays, and doctor’s services for an illness or injury that occurs during your trip.
Recommended Minimum: At least $50,000 for general international travel. Increase this to $100,000 for cruises or travel to remote destinations.
Who Needs It Most: All international travelers. This is non-negotiable.
4. Emergency Medical Evacuation & Repatriation
This covers the immense cost of transporting you to the nearest adequate medical facility or, if deemed medically necessary, all the way back to your home country. This is a separate benefit from your Emergency Medical coverage and is absolutely vital.
Recommended Minimum: At least $250,000. An air ambulance is incredibly expensive, and being underinsured here could be financially devastating.
Who Needs It Most: Travelers visiting remote or undeveloped areas, participating in adventure sports, or going on cruises where they may be far from high-quality medical facilities.
5. Baggage & Personal Effects / Baggage Delay
This provides two distinct benefits. Baggage & Personal Effects coverage reimburses you if your luggage is lost, stolen, or damaged. Baggage Delay coverage gives you a stipend to buy essential items like clothes and toiletries if your checked bags are delayed by the airline for a certain period (e.g., 6-12 hours).
Recommended Minimum: Check the per-item sub-limits. Coverage for expensive electronics or jewelry is often capped at a low amount like $250-$500.
Who Needs It Most: Travelers with multiple flight connections or those carrying essential or expensive equipment.
6. "Cancel For Any Reason" (CFAR) Upgrade
CFAR is the ultimate flexibility upgrade. It’s an optional add-on that lets you cancel your trip for any reason whatsoever—even reasons not covered by a standard policy, like a work conflict or simply changing your mind—and get a significant portion of your non-refundable costs back, typically 50% to 75%.
Who Needs It Most: Travelers with very expensive or complex trips, those with unpredictable personal situations, or anyone who desires the maximum possible protection against losing their travel investment.

Pro-Tip: "Cancel For Any Reason" coverage is extremely time-sensitive. You must purchase this add-on within a short window, usually 7 to 21 days, of making your very first trip payment or deposit. If you miss this window, the option is gone.
Your 5-Step Playbook for Choosing the Perfect Policy

Don't just pick the cheapest plan. Follow this strategic process to ensure the policy you buy is perfectly aligned with your trip and your needs.
Calculate Your Total Financial Risk.
Before you do anything else, open a spreadsheet and tally up every single prepaid, non-refundable expense for your trip. This includes flights, cruise payments, tour deposits, non-refundable hotel stays, and event tickets. The final number is your total trip cost, and it dictates the minimum amount of Trip Cancellation coverage you need.
Assess Your Personal Risk Profile.
Next, look beyond the numbers and evaluate your unique circumstances.
Health: Do you, a traveling companion, or a close family member at home have a pre-existing health condition that could flare up?
Destination: Are you traveling to a remote area with limited medical infrastructure where an evacuation might be necessary?
Activities: Will you be skiing, scuba diving, or mountain climbing? These often require special coverage.
Use Comparison Sites to Shortlist, Not to Buy.
Online aggregator sites like Squaremouth and InsureMyTrip are fantastic tools for the initial research phase. You can enter your trip details and get dozens of quotes from different providers in a side-by-side format. Use these sites to identify a shortlist of two or three well-priced plans from reputable companies that appear to meet your top-level needs (e.g., $100,000 in medical coverage).
Scrutinize the Actual Policy Document.
This is the most important step. For each policy on your shortlist, download the full "Certificate of Insurance" or "Policy Wording." This is the legal contract. Ignore the marketing brochures and summary pages. You are on a mission to find the definitions, limitations, and, most importantly, the exclusions. This is where you’ll discover if that "adventure activity" you've planned is actually covered.
Call the Provider Before You Buy.
The final step is to get on the phone with a licensed agent from the insurance company. Your goal is to get verbal confirmation on your most critical questions.
"My itinerary includes skiing in the Alps. Can you confirm that this policy provides full medical and evacuation coverage for injuries sustained while skiing?"
"Can you explain the 'look-back period' for pre-existing conditions and the exact requirements to get the waiver?"
"If I have a medical emergency, what is the exact procedure? Do I need to call you for pre-authorization before I go to a hospital?"
Red Flags and Fine Print: A Savvy Traveler's Guide to Choosing Travel Insurance

A policy is defined as much by what it excludes as what it covers. Be on the lookout for these common traps that lead to denied claims.
Pre-Existing Medical Conditions
This is a leading cause of claim denials. A pre-existing condition is any ailment you received treatment or medical advice for during a "look-back period" (usually 60-180 days) before buying your policy. To cover these conditions, you need a "pre-existing medical condition exclusion waiver." As mentioned, this is time-sensitive and typically requires you to buy your policy within a week or two of your initial trip deposit.
Adventure Sports & High-Risk Activities
Standard policies often exclude activities they deem "hazardous." This can include everything from bungee jumping to scuba diving. If you plan on doing anything more adventurous than swimming, you must either find a policy that specifically covers it or purchase an adventure sports add-on.
U.S. State Department Advisories
This is a critical, often-overlooked exclusion. Insurance companies monitor official government travel advisories.
WARNING: Most policies will provide ZERO coverage if you travel to a country that is under a "Level 4: Do Not Travel" advisory from the U.S. State Department. Your entire policy could be voided. Always check the official State Department website before booking and before departing.
Mental Health, Pandemics, and "Fear of Travel"
Standard trip cancellation does not cover changing your mind. Canceling a trip due to anxiety, fear of a pandemic, or other mental health concerns is generally not a covered reason. This is a scenario where only a "Cancel For Any Reason" (CFAR) policy would provide reimbursement.
Pro-Tip: When dealing with a claim, especially for a delay, get everything in writing. If a flight is canceled, don't just accept a verbal reason. Go to the airline desk and get a printed statement detailing the official cause of the cancellation. This piece of paper can be the difference between a paid claim and a denial.
Is Your Credit Card's "Free" Travel Insurance Good Enough?
Many premium travel credit cards, like the Chase Sapphire Reserve or The Platinum Card from American Express, advertise travel insurance as a key benefit. But this "free" coverage has significant gaps and should be seen as a supplement, not a substitute for a real policy.
The Pros: Credit card coverage is often decent for things like trip delays, baggage delays, and rental car damage waivers.
The Critical Gaps:
Emergency Medical Coverage: This is the biggest weakness. Most cards offer little to no emergency medical coverage.
Emergency Evacuation: This is almost never included, leaving you exposed to a massive financial risk.
Low Cancellation Limits: The trip cancellation benefit is often capped at a level (e.g., $10,000 per trip) that may be insufficient for more expensive journeys.
Secondary vs. Primary Coverage: Much of the coverage is "secondary," meaning you have to file with any other insurance you have first, creating a complicated and lengthy claims process. A standalone policy provides "primary" coverage that pays first.
The Verdict: For any international trip, or any domestic trip with significant non-refundable costs, a dedicated, comprehensive policy with high primary medical and evacuation limits is the only prudent choice.
Choosing travel insurance is not a gamble; it is a strategic act of preparation that transforms hope into confidence. In today's world, a proactive approach to risk management is the key to true peace of mind. You are now armed with the knowledge to decode policy language, identify critical exclusions, and follow a proven framework for selecting the right coverage. By using this guide to choosing travel insurance, you can move forward with your planning, fully empowered and secure in the knowledge that you have a strong financial safety net in place. Your investment, your health, and your adventure are protected.
Read the full guide: Anxious to Adventurous: The Ultimate Guide to Solo Travel Confidence
Don't Miss Out! Subscribe for Exclusive Content
SubscribeComments 0
No comments yet
Be the first to share your experience!
Dont Miss Out! Subscribe for Exclusive Content
Ultimate USA Holidays Guide: Top Picks
FTC Affiliate Disclosure: Stay Compliant as a Travel Creator
Essential Affiliate Tools: From Tracking to Full Optimization
Booking.com Affiliate Review: Pros, Cons & Earnings
Decoding Affiliate Commission Rates: Benchmarks for Travel Creators