7 Proven Affiliate Marketing Tips to Skyrocket Travel Income
TrekGuider @trekguider
You know the feeling. You pour your heart into creating stunning, genuinely helpful travel content. You’ve built an audience that trusts you, joined the right programs, and carefully placed your affiliate links. Yet, when you check your income reports, the numbers are stubbornly, frustratingly flat. There’s a chasm between the immense effort you’re putting in and the revenue trickling out, leaving you wondering how other creators are funding their global adventures while you’re struggling to cover your hosting costs.
That gap isn’t about luck or a bigger audience—it’s about strategy. The affiliate marketing industry is a $93 billion juggernaut, and with the travel vertical accounting for a hefty 16% of that pie, the opportunity is monumental. The creators hitting the reported average of $13,847 a month aren’t just content publishers; they are strategic business operators. They understand that a few critical optimizations are the difference between earning pennies and earning a living.

This guide delivers those optimizations. We’re moving beyond the basics and diving deep into the proven, actionable affiliate marketing tips that will fundamentally transform your results. These are the tactical shifts that turn passive link-placers into high-earning entrepreneurs. Put these strategies into play, and you'll build a more resilient and profitable business. For a complete command of the entire ecosystem, our definitive pillar page, [Travel Affiliate Programs: The 2026 Ultimate Guide], is your essential command center.
1. Target “Commercial Investigation” Keywords First
Let’s start by correcting the single biggest mistake in the affiliate playbook. Most creators produce content first, then try to shoehorn links in later. The elite strategy? Reverse-engineer the entire process. Start by targeting keywords that signal a user is already in a buying mindset. SEO professionals call this "commercial investigation intent."
Attracting a reader searching for "what to do in Rome" is fine. Attracting a reader searching for "Viator vs GetYourGuide Rome tours" is pure gold. The second user has their wallet out; your job is simply to guide their final decision.

Build your content calendar around these high-conversion keyword patterns:
"Best Of" Keywords: "best carry-on luggage for international travel," "best travel insurance for digital nomads."
Comparison Keywords: "SafetyWing vs World Nomads," "Booking.com vs Expedia."
Review Keywords: "G Adventures Peru tour review," "Osprey Farpoint 40 review."
Alternative Keywords: "GetYourGuide alternatives," "Marriott Bonvoy alternatives."
When you build content around these phrases, you’re meeting an audience that doesn’t need to be convinced to buy—they just need an expert to help them decide what to buy.
2. Obsess Over Cookie Duration, Not Just Commission Rates
A high commission rate is seductive, but it’s often a vanity metric. The real powerhouse behind the scenes is the cookie duration—the window of time after a click where you still get credit for the sale. Travel is a high-consideration purchase, often involving days or even weeks of research. A short cookie window is a guaranteed way to lose income you rightfully earned.
Consider this all-too-common scenario:
Program A (e.g., Booking.com): Touts a high commission but uses a "session-based" cookie. If your reader clicks, browses, and closes the tab to think it over, your cookie evaporates. When they return the next day to book, you earn nothing.
Program B (e.g., Expedia Group): Offers a solid commission with a 7-day cookie. Your reader can click today, do more research, and book five days later—and you still get paid for the referral.

For high-ticket items like adventure tours, this is even more critical. G Adventures offers a 90-day cookie because they know a $3,000 trip isn't an impulse buy. Always prioritize the longer cookie duration; it respects the customer's journey and ensures you are properly compensated for your influence.
3. Engineer Trust Through Radical Transparency
In the creator economy, trust is your most valuable currency. Without it, no amount of traffic or clever tactics will ever lead to meaningful conversions. The fastest way to build and fortify that trust is through radical transparency.
This begins with your FTC disclosure. Don't bury it in your footer. Place a clear, simple disclosure at the very top of every article containing affiliate links. But don't stop at the legal minimum. Weave transparency into the very fabric of your content:
Share the "Why": Don't just link to a product. Explain why you’re recommending it from personal experience. "I've carried this Peak Design travel backpack across three continents; here's how it held up in the chaos of Tokyo's subways and the jungles of Costa Rica."
Acknowledge the Flaws: No product is perfect. Mentioning a minor drawback or clarifying who a product is not for makes your recommendation exponentially more believable and useful.
Leverage Social Proof: Include screenshots of positive reviews, user-generated content, or testimonials to validate your recommendation and show that others have had a great experience.
When your audience knows you prioritize their best interests above all else, they will trust your recommendations implicitly and convert without hesitation.
4. Become a Conversion Rate Scientist: One of the Most Crucial Affiliate Marketing Tips
Getting the click is only half the battle. Converting that click into a commission is where the science of optimization comes in. Your mission is to make the path from your content to the merchant's checkout as seamless and compelling as possible.
Fight Analysis Paralysis: Presenting 20 options for the "best hotel in Paris" will overwhelm your reader into inaction. Curate your list to a top 3-5 and declare a clear "Top Pick" for a specific type of traveler (e.g., "Best for Budget," "Best for Luxury"). This expert guidance simplifies their decision and boosts their confidence to click.
Optimize Your Calls-to-Action (CTAs): Banish "Click Here" from your vocabulary. Your CTAs must be specific, benefit-driven, and visually distinct. Use eye-catching buttons with contrasting colors and compelling text like:
"Check Prices & Availability on Viator"
"See the Latest Reviews on Tripadvisor"
"Get a Free Quote from SafetyWing"
Crush Your Page Load Speed: Every second counts. Industry data shows that a mere one-second delay in page load speed can slash conversions by a staggering 7%. Compress your images, use a lightweight theme, and invest in quality hosting. A fast website is a profitable website.

Pro-Tip: Use comparison tables to visually organize information for head-to-head reviews. Tables make it incredibly easy for readers to scan key features, pros, and cons, which is a highly effective method for driving clicks on high-intent pages.
5. Diversify Your Portfolio to Build a Resilient Business
Relying on a single affiliate program—especially a giant like Amazon Associates—is one of the most common and dangerous affiliate marketing mistakes. Terms can change overnight, commissions can be slashed, and programs can shut down with little warning.
A resilient affiliate business is built on a diversified portfolio. Aim to partner with 3-5 core programs that are a perfect fit for your niche. A healthy, strong mix for a travel creator might include:
Accommodations: Expedia Group or Agoda
Tours & Activities: Viator or GetYourGuide
Insurance: SafetyWing or World Nomads
Gear: Amazon Associates and a specialty retailer like REI
This diversification insulates you from risk and creates multiple, independent income streams, ensuring that a negative change in one program doesn't cripple your entire business.
6. Go Beyond Links: Diversify with a Referral Model
One of the most powerful affiliate marketing tips for creators ready to level up is to look beyond traditional commission-per-sale models. A referral program creates a win-win scenario that can be even more lucrative while building deeper community ties.
Unlike a standard affiliate link, a referral link often gives a direct benefit to the person who clicks it, like a discount on their first purchase. This instantly reframes your recommendation from a sales pitch to a valuable insider deal.

This is precisely the model we’ve built into the [TrekGuider Seller Platform]. It’s designed to be a high-margin addition to your monetization strategy. When you refer fellow creators to sell their digital products on our marketplace, you unlock a powerful new income stream:
Your Audience Wins: New users who sign up with your link get a 15% discount on their first purchase, giving them an immediate, tangible benefit.
You Win: You earn an ongoing revenue share from the platform's earnings when you bring new sellers aboard. This creates a long-term, passive income stream that grows as your network succeeds.
Integrating a referral model like this adds a powerful layer of diversification and transforms you from a simple affiliate into a true platform partner.
7. Create Your Own High-Margin Product
The final, and most profitable, tip is to realize that the highest commission you can ever earn is 100%. The world’s top-earning creators all understand this: the most valuable product you can ever promote is your own.
Affiliate marketing is the perfect training ground. You learn what your audience needs, what they are willing to pay for, and how to sell it to them. The next logical step is to package your own expertise into a premium digital product.
A detailed, 7-day downloadable itinerary for a city you know inside and out.
A comprehensive guide to "Van Life for Beginners."
A set of your signature Lightroom presets for travel photography.

Selling your own products gives you complete control over your income, brand, and customer relationships. It is the ultimate strategy for diversifying your revenue and building a true content empire.
Ready to Build Your First Digital Product?
The most successful creators know that affiliate income is just one piece of the puzzle. Creating and selling your own digital products offers unparalleled profit margins and authority. But where do you start?
Our free [Digital Product Ideas Guide] is packed with dozens of proven, profitable ideas specifically for travel creators. Download it today to find the perfect product for your audience and start building your own content empire.
Frequently Asked Questions (FAQ)
1. How many affiliate programs should I join when starting out? Start with a focused portfolio of 3-5 core programs that are a perfect fit for your niche. It's far more effective to deeply integrate a few high-performing programs than to sprinkle links from dozens of them. You can always expand as your business grows.
2. Do I really need a link management plugin? Yes, it's essential for any serious affiliate marketer. Tools like ThirstyAffiliates or Pretty Links "cloak" long, ugly affiliate links into clean, branded URLs. More importantly, they allow you to manage all your links from a central dashboard, which is a massive time-saver and helps ensure compliance with Google's rel="sponsored" tag requirement.
3. How do I properly disclose affiliate links to stay FTC compliant? The FTC requires a "clear and conspicuous" disclosure. This means it must be placed at the top of your blog post, before any affiliate links appear. It should be in plain, easy-to-understand language. Hiding it in the footer or on a separate page is not compliant.
Your Blueprint for Exponential Growth
Becoming a top-earning affiliate marketer isn't about finding a single secret hack. It is about the consistent application of proven strategies. By implementing these seven affiliate marketing tips, you will evolve from a content creator into a strategic business owner.
You will attract higher-quality traffic, build deeper trust with your audience, convert more clicks into commissions, and build a diversified, resilient business that can fund your travels for years to come. The roadmap is clear. The opportunity is waiting. It’s time to start optimizing.
Don't Miss Out! Subscribe for Exclusive Content
Subscribe


Comments 0
No comments yet
Be the first to share your experience!
Dont Miss Out! Subscribe for Exclusive Content

FTC Affiliate Disclosure Essentials: Stay Compliant as a Travel Creator

Essential Affiliate Tools: From Tracking to Full Optimization

Avoid These 5 Affiliate Landing Page Mistakes for Better Conversions

Affiliate Keyword Research Mastery for Travel Blogs

Booking.com Affiliate Program Review: Pros, Cons, and Earnings Potential

Decoding Affiliate Commission Rates: Benchmarks for Travel Creators
San Francisco Cherry Blossoms: A Local's Guide to the Blooms
TrekGuider @trekguider
The cherry blossom experience in San Francisco is not a grand, sweeping spectacle. It’s something more intimate, more soulful. It’s about turning a corner in a vibrant, historic neighborhood and finding yourself under a delicate canopy of blossoms, the scent of ramen broth mixing with the faint fragrance of spring. It’s a celebration rooted not in diplomacy, but in the fierce resilience of a community.
This is a concentrated jewel box of culture. But that intimacy comes with its own challenges. The Northern California Cherry Blossom Festival, the largest on the West Coast, packs over 220,000 people into the tight-knit blocks of Japantown. A poorly planned visit can quickly devolve into a frustrating battle with crowds, leaving you with more stress than serenity.
This isn’t just another guide. This is your strategic playbook for experiencing San Francisco’s cherry blossoms like a local. We’ll deconstruct the bloom’s tricky timing, reveal the best viewing spots both in and out of the festival’s epicenter, and provide the transportation hacks you need to navigate the city like a pro. By the end of this, you’ll have a plan to witness one of America’s most meaningful cultural celebrations in all its glory.

A Story of Resilience: The Soul of the Festival
To truly appreciate the blossoms here, you have to understand their story. San Francisco’s are proof of a community’s will to survive. Japantown, or Nihonmachi, is one of only three remaining in the United States, a neighborhood that has weathered unimaginable challenges.
After the forced internment of Japanese Americans during WWII, the community returned to find their homes and businesses lost. In the 1960s, city redevelopment projects displaced thousands more. The Northern California Cherry Blossom Festival was born from this turmoil. First held in 1968, it was a defiant celebration of culture and a powerful statement that the community was here to stay.
So when you stand in the Peace Plaza, you’re standing on historic ground. That iconic, five-tiered structure is the Peace Pagoda, a gift from San Francisco’s sister city of Osaka, designed by the renowned Japanese architect Yoshiro Taniguchi. It’s not just a landmark; it’s the spiritual anchor of the entire festival. Every blossom that blooms here feels more meaningful because of the history it represents.
Decoding the Bloom: Festival Dates vs. Nature’s Whim
The first mistake visitors make is confusing the festival schedule with the flowers’ schedule. They are two separate things.
For your planning purposes, here are the official festival dates, which traditionally span two weekends in April:
2026 Northern California Cherry Blossom Festival: April 12-13 & April 19-20, 2026
But here’s the critical distinction every visitor must understand: the festival dates are not the bloom dates. The festival is a fixed celebration of culture, while the blossoms themselves are a fleeting, unpredictable miracle of nature. Your goal is to find the magic window where the two overlap.

The Nuance of "Peak Bloom" in the Bay Area
In San Francisco, "peak bloom" is a rolling event, not a single moment. It depends on the tree variety and the city’s famously fickle microclimates.
The First Wave (Yoshino): The delicate, pale pink Yoshino cherry trees are typically the first to bloom, usually from late March into early April. These are the classic, ethereal blossoms you see in the Japanese Tea Garden.
The Second Wave (Kwanzan): Following the Yoshino are the Kwanzan cherry trees, which produce much fuller, fluffier, and deeper pink blossoms. These are hardier and their bloom often coincides perfectly with the festival’s second weekend and the Grand Parade, making for a spectacular show in Japantown.
Predicting the bloom is an art, not a science. A warm, dry winter can sometimes delay the bloom, as the trees need a certain number of "chill hours" to properly set their buds. Your best bet is to monitor social media. The official festival website and the Instagram accounts for the Japanese Tea Garden and SF Botanical Garden are invaluable resources for real-time updates.
Your Strategic Viewing Guide
You can experience the blossoms in three distinct ways: embracing the festival’s vibrant chaos, seeking tranquil beauty in a world-class garden, or discovering a hidden gem beloved by locals.
1. The Epicenter: Japantown & The Peace Plaza
During the festival weekends, the blocks around the Peace Plaza transform into a bustling hub of Japanese culture. You’ll find everything from traditional music and martial arts demonstrations to mouth-watering street food.
In Japantown, timing isn’t just important—it’s everything. It’s the difference between a serene morning stroll among the blossoms and being swept up in a shoulder-to-shoulder river of festival-goers.
Pro-Tip for Foodies: The food booths, known as yatai, are a massive draw. Don't miss the Takoyaki (octopus balls) from Kagura or the sweet, red-bean-filled Imagawayaki. To beat the lines, arrive right at 11 AM when the festival opens and eat first. The lines can be an hour long by 1 PM.
Pro-Tip for Photographers: The best shot of the Peace Pagoda framed by blossoms is from the Webster Street Bridge overlooking the plaza. For street scenes, a weekday morning before the festival begins offers beautiful, soft light and empty streets.
Go Deeper: For those who want to go even deeper, this is the perfect opportunity to connect with a local expert. The history of Japantown is complex and deeply moving, and a guided walk can reveal stories you’d never find on your own.
2. The Oasis: Golden Gate Park
If you need a break from the festival energy, a short bus ride will take you to the serene landscapes of Golden Gate Park, home to two premier blossom-viewing locations.
The Japanese Tea Garden: This is the oldest public Japanese garden in the United States, and it is an absolute masterpiece. The cherry trees here are artfully placed around the Drum Bridge, pagodas, and koi ponds. It’s a photographer’s dream. There is an entrance fee, but it’s worth every penny. To avoid crowds, purchase your ticket online in advance and go on a weekday morning.
The San Francisco Botanical Garden: Just a short walk from the Tea Garden, the SFBG offers a more sprawling, less crowded experience. Head to the Temperate Asia collection to find their grove of cherry trees. It’s a perfect spot for a quiet picnic under the petals.
3. The Secret Spot: The Palace of Fine Arts
For a truly local experience, head to the Marina district. Tucked away behind the iconic rotunda of the Palace of Fine Arts is a small, enchanting grove of cherry trees. The blossoms here often peak a bit later, sometimes into early May. The sight of the delicate pink flowers against the Greco-Roman architecture is breathtaking and feels like a hidden secret. It’s the perfect place to escape the crowds and enjoy a quiet moment.
Logistics Masterclass: Getting Around
Rule number one: Do not drive to Japantown during the festival. You will spend your entire day circling for non-existent parking. Here’s how to do it right:
Public Transit (Muni): This is your best friend. The 38-Geary and 38R-Geary Rapid buses run constantly along a major corridor and stop one block from the festival. The 2-Clement and 22-Fillmore are also excellent options. Use a Clipper card or the MuniMobile app to make things seamless.
Parking (If You Absolutely Must): The only sane option is the Japan Center Main Garage. The entrance is on Geary Blvd. On festival weekends, you must arrive before 10 AM, or you will find it full.
Ride-Sharing: A good option, but set your drop-off and pick-up points at least three blocks away from the festival’s core (e.g., at Geary & Laguna or Post & Franklin) to avoid getting stuck in gridlock.
Don't-Miss Festival Highlights
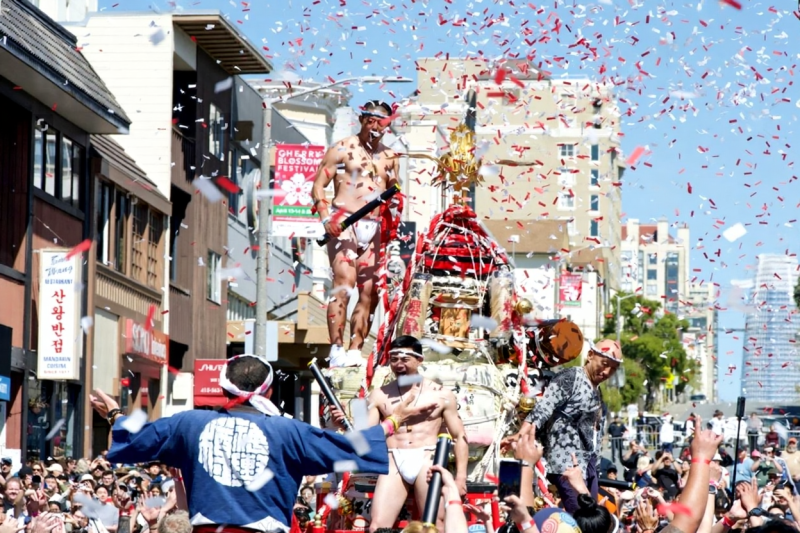
The festival’s crown jewel is the Grand Parade, which closes out the final Sunday of the event. This is a spectacular procession that starts near City Hall and travels up Post Street into the heart of Japantown. You’ll see everything from taiko drummers and dancers to the newly crowned Cherry Blossom Queen and her court—a leadership program for young Japanese American women.
The parade’s incredible finale is the Taru Mikoshi. This is a massive, ornate portable shrine weighing over 1,000 pounds, carried on the shoulders of over 100 chanting participants. It’s a powerful, energetic display of community spirit and a must-see spectacle.
Your Pre-Trip Checklist
A little preparation goes a long way in San Francisco.
Dress in Layers: This is the golden rule of SF. A chilly, foggy morning can become a sunny, breezy afternoon in an instant. A fleece or mid-layer under a windbreaker is the standard local uniform for a reason.
Comfortable Shoes: You will be walking. A lot. The hills are no joke. This is not the time to break in new shoes.
Portable Power Bank: Between navigating, taking photos, and using transit apps, your phone battery won’t stand a chance. A power bank is essential.
Cash: While most vendors take cards, the lines for ATMs are long and the smaller food stalls are often cash-only.
The Cherry Blossom Festival is one of the city's signature spring events. For a complete look at what's happening year-round, our complete guide to [San Francisco Holidays: Bay Area Buzz] is the essential next read for planning a trip around the city's top seasonal events.
An Unforgettable Bloom
San Francisco’s cherry blossom celebration offers something truly special: a world-class cultural event with the heart of a neighborhood block party. It’s a chance to not only witness the stunning beauty of spring but to feel the powerful spirit of a community that has refused to be erased.
By timing your visit strategically, knowing where to find your own quiet corner, and embracing the city’s public transit, you can bypass the stress and create a truly unforgettable memory. You’re no longer just a tourist; you’re an insider, ready to experience this beautiful and meaningful spectacle to its fullest.
Capture the Perfect Bloom
You’re going to take hundreds of photos of the cherry blossoms—don’t let them get lost on your camera roll. Our free collection of Travel Lightroom Presets is designed to make your photos pop with just one click. Transform your shots of the delicate pink petals and vibrant festival scenes into professional-quality images you’ll be proud to share.
Frequently Asked Questions (FAQ)
When is the absolute best time to see the cherry blossoms in San Francisco? While the festival is in mid-to-late April, the "best" time depends on what you want to see. For the most ethereal, classic blossoms in a garden setting, aim for the first week of April at the Japanese Tea Garden. For the full, vibrant festival experience with the fluffy Kwanzan blossoms, the second weekend of the festival is your best bet.
Is the Northern California Cherry Blossom Festival free? Yes, attending the festival in Japantown, including all the stage performances and watching the parade, is completely free. You will need to pay for food, drinks, and any items from craft vendors. Note that visiting the Japanese Tea Garden in Golden Gate Park requires a separate admission fee.
How much time should I budget for the festival? If you plan to eat, watch a few performances, and browse the stalls, give yourself at least 3-4 hours in Japantown. If you want to see the parade, plan for that to take an additional 2 hours of your day.
Is the festival kid-friendly? Absolutely. Kids love the energy, the food, and the parade. There are also often hands-on cultural activities like origami folding. However, the crowds can be overwhelming for small children, so a weekday visit or arriving right at the opening on a weekend is recommended.
Can I see cherry blossoms in San Francisco outside of Japantown and Golden Gate Park? Yes! Besides our "secret spot" at the Palace of Fine Arts, you can often find beautiful blooming trees scattered in residential neighborhoods like the Richmond and Sunset districts. Keep your eyes peeled in late March and April—you’ll be surprised where they pop up.
Don't Miss Out! Subscribe for Exclusive Content
SubscribeComments 0
No comments yet
Be the first to share your experience!
Dont Miss Out! Subscribe for Exclusive Content

Halloween SF: Haunts Without Horrors

SF Festivals: 7 Must-See Lineups

Christmas SF: Lights & Wharf Wonders

SF Pride: 6 Route & Party Hacks

Chinese New Year SF: Parade Essentials

San Francisco Holidays: Bay Area Buzz
Transportation Safety: Staying Safe on Planes & Trains
TrekGuider @trekguider
There's a certain magic to being in transit—that liminal space where you're neither here nor there, just a passenger watching the world blur past your window. It’s the very heart of travel, but it’s also a moment of profound vulnerability. The problem is, amidst the controlled chaos of an airport, the anonymous bustle of a train station, or the quiet confines of a taxi, our focus can drift.
This constant motion agitates a core travel anxiety: the fear that one moment of distraction could lead to a lost passport, a stolen wallet, or a compromised sense of security that sours an entire trip. But it doesn't have to be this way. The solution is to trade that anxiety for a set of simple, repeatable habits—a tactical playbook for navigating every mode of transport with unshakable confidence. This guide delivers the essential transportation safety tips you need, broken down by the unique challenges of air, rail, and ground travel. Mastering these routines is a critical part of any smart travel strategy, a foundation we explore in our comprehensive guide to [The Ultimate Guide to Travel Safety: A 2026 Playbook].
Think of your journey in stages, with each mode of transport presenting its own unique playbook. We’ll start where most international trips begin: the controlled chaos of the airport.

Mastering the Airport: Your Guide to Air Travel Security
An airport is a marvel of modern logistics, but for a traveler, it’s a gauntlet of queues, checkpoints, and crowds. Its process-driven environment creates unique security challenges, but a few smart transportation safety tips can make all the difference from the moment you pack your bags to the second you reclaim them.
Before You Leave: Smart Packing & Luggage Security
Your airport safety strategy begins at home. How you pack and secure your luggage is your first and most important line of defense.
Never Pack Valuables in Checked Luggage: This is the cardinal rule of air travel. If it’s valuable or irreplaceable, it belongs with you in the cabin. Your carry-on is the only secure place for:
Passport, IDs, and all travel documents
Cash, credit cards, and debit cards
Electronics (laptops, tablets, cameras, power banks)
Essential medications (plus extra for delays)
Jewelry and any other items of sentimental or high monetary value
Use Globally Recognized Locks: The TSA needs to be able to inspect checked bags. If you use a non-approved lock, they will cut it off. To avoid this, use locks recognized by the TSA. According to their official guidelines, these can be opened by security officers using universal master keys. Look for the Travel Sentry (red diamond) or Safe Skies logo when buying a lock. This isn't just a U.S. system; it's a global standard used by security agencies in Canada, the UK, Germany, Japan, and dozens of other countries.
Make Your Bag Stand Out: In a sea of black roller bags, a little personality is a security feature. Use a colorful luggage strap, a unique tag, or a bright ribbon to make your bag instantly identifiable. This dramatically reduces the chance of an accidental bag swap at the carousel.
Photograph Your Evidence: Before you hand over your bag, take a quick photo of your packed suitcase (both open and closed). If your bag is lost, delayed, or damaged, this provides an indisputable visual record for your airline and insurance claims.

Pack Smarter, Not Harder
A lighter bag is a safer bag. It’s easier to manage, less likely to be checked, and keeps your essentials within arm's reach. Our definitive guide shows you how to fit everything you need into a single carry-on, saving you time, money, and the stress of lost luggage.
[Download the Free How to Pack Light Guide]
Navigating the Security Checkpoint
The security line is a notorious chokepoint where travelers are distracted, rushed, and temporarily separated from their belongings. This is a time for heightened focus.
Guard Your Bins: As your items slide onto the conveyor belt, keep your eyes on them. Wait to walk through the metal detector until you see your bins beginning to enter the X-ray machine. This minimizes the time your valuables are sitting unattended on the other side.
Consolidate Before the Line: Don't wait until you're at the bins to fumble with loose items. Before you even join the queue, place your phone, wallet, passport, and boarding pass inside a zipped pocket of your jacket or deep within your carry-on.
Beware of Coordinated Distractions: Professional thieves sometimes work in teams at security. One person might create a delay in front of you (e.g., setting off the metal detector repeatedly) while an accomplice on the other side of the scanner quickly grabs your emerging laptop or wallet. Be patient, but stay vigilant and focused on your belongings.
On the Rails: A Playbook for Safe Train Travel
Train travel offers a romantic and scenic way to see the world, but the open nature of stations and the shared spaces on board require a specific approach to security.
General Security on Daytime Trains
During the day, the primary risk is opportunistic theft in crowded stations or on busy carriages.
Maintain Physical Contact: In a chaotic station, your luggage should be in direct physical contact with you at all times. Loop a strap around your foot or keep a hand on the handle. When waiting on a platform, stand with your back to a wall and your bags in front of you.
Position Luggage Strategically: On the train, store your main suitcase on an overhead rack that is across the aisle from you, not directly above. This keeps it constantly within your line of sight. If you must use the large luggage racks at the end of a carriage, use a lightweight cable lock to secure your bag to the rack itself.
Never Let Your Daypack Go: Your small bag containing your valuables should be treated as an extension of your body. Keep it on your lap, on the seat next to you, or in a crossbody position. When you get up to use the restroom or walk to the dining car, it goes with you. No exceptions.

Overnight on the Rails: Your Security Checklist
Sleeping on a train is an unforgettable experience, but it’s also when you are most vulnerable. Follow these three protocols to ensure a safe and restful journey.
Physically Secure Your Main Luggage: A thief can silently walk through a dark train car and lift a bag from an unlocked compartment. Make your bag an inconvenient, noisy target. Use a small cable lock or even your bag’s own strap to attach it to a fixed object like:
The luggage rack frame
The ladder to the top bunk
The metal frame under your seat
Keep Essential Valuables on Your Person: Your most critical items—passport, phone, cash, cards—should never be in your main luggage while you sleep. The only secure place is on your body.
Use a money belt worn under your clothes.
Sleep with your small daypack physically on your bunk. Use it as a pillow or loop a strap around your arm or leg. This ensures your essentials remain safe even if your main bag is compromised.
Secure Your Compartment Door: The door is your primary barrier. As soon as everyone is settled for the night, lock it from the inside. Private sleeper cabins have strong locks. In a shared couchette, have a polite conversation with your cabin mates and agree to keep the door locked. Train staff or border officials will knock loudly enough to wake you if they need entry.
Pro-Tip: When booking a bunk in a shared couchette, the top bunk is often the most secure choice. It is harder for anyone to access your belongings without waking you and keeps you out of the general foot traffic in the compartment.
On the Ground: Staying Safe in Taxis & Ride-Shares
Your journey isn’t over until you’ve reached your hotel. Ground transportation is the final leg, and it’s a critical moment to apply your safety knowledge.

Your Ride-Share Safety Checklist
Ride-sharing apps have built-in safety features, but they only work if you use them. Before you get into any vehicle, run through this non-negotiable verification checklist.
Verify the Vehicle:
Match the License Plate: This is the most important step. The license plate number in the app must match the plate on the car. If it doesn’t, do not get in. Cancel the ride and report the mismatch.
Match the Car Details: Confirm the make, model, and color of the car also match the information in the app.
Verify the Driver:
Check the Driver's Photo: Glance at the driver and ensure they match the photo in the app.
Confirm Your Name: Ask the driver, "Who are you here for?" or "What's my name?" They must be able to say your name. Never volunteer it by asking, "Are you here for Jane?" This gives a fraudulent driver the information they need.
Use PIN Verification: Many apps now offer a PIN verification feature. Enable it. The trip cannot start until you provide the correct PIN to your driver, guaranteeing you are in the right car.
Share Your Trip Details:
As soon as the trip starts, use the app’s built-in "Share Trip Status" function. This sends a live map of your journey, including the car's route and your ETA, to a trusted contact.
Sit in the Back Seat:
Especially when traveling alone, sitting in the back provides personal space and allows you to exit from either side of the vehicle if you feel uncomfortable.
Trust Your Instincts:
If anything feels off—the driver, the vehicle, the situation—do not get in. Cancel the ride, report your concerns, and order another car. Your safety is worth more than a cancellation fee.
Navigating Taxis and Tuk-Tuks Safely
When using traditional taxis, you are more reliant on your own judgment and vigilance.
Insist on the Meter: The "broken meter" is one of the oldest travel scams in the book, designed to lock you into a wildly inflated flat fare. Before getting in, point to the meter and say, "Meter, please." If the driver refuses, simply find another taxi.
Follow Your Route: Have your destination pulled up on a map app on your phone. This helps you ensure the driver is taking a logical route and not an inefficient "scenic" one designed to drive up the fare.
Use Official Taxi Ranks: At airports and train stations, always use the designated, official taxi queue. Avoid the freelance drivers who approach you in the arrivals hall, as they are often unlicensed and operating illegally.
Pro-Tip: Ask your hotel or restaurant to call a taxi for you. They almost always have a relationship with a reputable, trusted local company. Before you get in, take a quick, discreet photo of the taxi's license plate and driver ID card (usually displayed on the dash).

Frequently Asked Questions (FAQ)
Q: What's the safest way to carry my passport and money while in transit? A: The best method is to use multiple locations. Keep your passport, one credit card, and the bulk of your cash in a secure money belt or neck wallet worn under your clothing. Keep a small amount of daily cash and a second credit card in a more accessible wallet in a front pocket or a secure crossbody bag.
Q: Are airport charging stations safe to use? A: Avoid using the public USB ports. Hackers can modify these stations for "juice jacking," which can install malware or steal data from your phone. Always use your own AC power adapter and plug it into a standard electrical outlet, or carry a portable power bank.
Q: Should I use my phone's data plan abroad or rely on public WiFi? A: Using your own cellular data plan (either an international plan or a local SIM card) is always more secure than public WiFi. If you must use public WiFi, you absolutely need to use a VPN (Virtual Private Network) to encrypt your connection and protect your data from hackers.
Travel with Confidence
Transportation is the thread that connects the incredible moments of your journey. By mastering these transportation safety tips, you transform these in-between moments from periods of uncertainty into a seamless and secure part of your adventure. Whether you’re locking your bag before a flight, securing your cabin on an overnight train, or verifying your ride-share before hopping in, these proactive habits build a powerful foundation of security.
This allows you to move through the world not with fear, but with the calm confidence of a prepared and savvy traveler. For a more comprehensive look at planning your entire journey, our all-encompassing [Travel Guide] is the perfect resource. And for expert advice on navigating the specific transit systems of your next destination—from the Tokyo Metro to the Swiss rail network—be sure to explore the detailed guides from our expert creators on the TrekGuider. You're now equipped to handle the journey, so you can focus on the destination.
Don't Miss Out! Subscribe for Exclusive Content
SubscribeComments 0
No comments yet
Be the first to share your experience!
Dont Miss Out! Subscribe for Exclusive Content

Ultimate USA Holidays Guide: Top Picks
FTC Affiliate Disclosure Essentials: Stay Compliant as a Travel Creator
Essential Affiliate Tools: From Tracking to Full Optimization
Booking.com Affiliate Program Review: Pros, Cons, and Earnings Potential
Decoding Affiliate Commission Rates: Benchmarks for Travel Creators
