Jazz Fest: Ultimate Lineup Planner
TrekGuider @trekguider
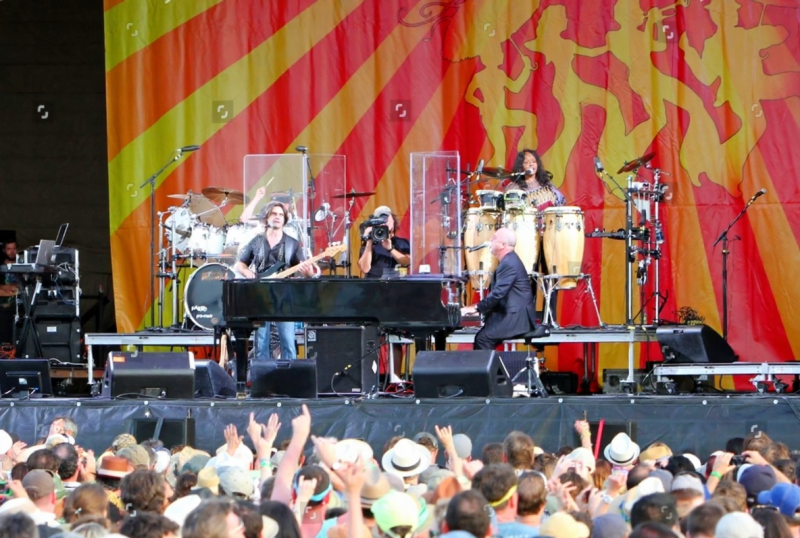
The New Orleans Jazz & Heritage Festival is a titan of American culture, a sprawling, soulful celebration that transforms the Fair Grounds Race Course into the center of the musical universe. But with that iconic status comes an overwhelming challenge: with a dozen stages, hundreds of artists, and a menu of Louisiana’s finest cuisine that could take a lifetime to explore, how do you possibly see and taste it all? You’ve spent months dreaming of this, only to be handed a schedule so dense it feels impossible to crack.
Imagine the sinking feeling of hearing the distant roar of the crowd for a legend’s set while you’re stuck on the opposite side of the infield. You spend your day battling a sea of people, crisscrossing the grounds under a hot sun, only to miss the first three songs of a band you were dying to see. The fear of missing out becomes a tangible stress, turning a dream trip into a frantic race against the clock. Without a rock-solid strategy, you risk experiencing only a fraction of what this incredible event offers, leaving with a nagging regret over the missed bands and uneaten crawfish bread.
Forget the festival FOMO. This is your playbook for conquering the controlled chaos of the Fair Grounds, turning a dizzying schedule into a masterclass of music, food, and soul. We will break down everything you need to build a flawless plan, navigate the grounds like a local, and balance the world-class music with the equally legendary food. This is the ultimate lineup planner for Jazz Fest New Orleans, designed to ensure your time is spent soaking in the magic, not getting stuck in the mud.

Before You Go: Pre-Festival Prep for the Savvy Planner
A masterful Jazz Fest experience begins long before you step through the gates. The sheer scale of the event, which roars to life from April 24 to early May, demands a thoughtful approach. Smart preparation is the secret that separates the overwhelmed amateur from the festival pro who glides effortlessly from stage to stage. This is your foundational work, where you turn the festival’s massive schedule from an intimidating document into a personalized roadmap. As one of the crown jewels we celebrate in our definitive guide to New Orleans Holidays: Cultural Feasts, Jazz Fest is a cultural pilgrimage that richly rewards those who arrive with a plan.
Decoding the "Cubes": Your First Step to Lineup Mastery
In the lexicon of Jazz Fest veterans, the daily performance schedules are simply "the cubes." This grid-style layout is your bible, detailing who is playing where and when. Your first mission is to become fluent in its language.
Download the Official App: Weeks before the festival, the official New Orleans Jazz & Heritage Festival app becomes the most important app on your phone. Download it the moment it’s released. This digital tool contains the full "cubes," an interactive map, vendor lists, and, most critically, the ability to build your own personalized schedule.
Study the Grounds: Before you start picking artists, spend time with the festival map. Get a feel for the locations of the major stages—like the Festival Stage and the Gentilly Stage where headliners hold court—and the more intimate tents, such as the legendary Gospel Tent, the Blues Tent, and the Jazz Tent. Understanding the physical distance between stages is the key to realistic planning.
Star Your Favorites: Go through the lineup day by day and start "starring" or "favoriting" every single act that piques your interest. Don't hold back; this is your master list of possibilities. This year’s lineup already boasts a staggering collection of headliners like Pearl Jam, Dave Matthews Band, Luke Combs, and Lil Wayne & The Roots, so your list of must-sees will fill up fast.
Assembling Your Tiers: From "Must-See" to "Happy Accident"
With your initial list of favorited artists, it's time to get strategic. Set times will inevitably clash. The key is to prioritize ruthlessly.
Tier 1: The Non-Negotiables: Identify the 3-4 artists each day that you absolutely, positively cannot miss. These are your anchors, the pillars around which the rest of your day will be built.
Tier 2: The High-Interest Acts: These are the performers you’d be thrilled to see. If their set times and locations work conveniently around your Tier 1 picks, you’ll make every effort to be there.
Tier 3: The Serendipity List: This is your list for discovery. It’s filled with intriguing local brass bands, up-and-coming songwriters, or genres you’re curious about. These are the acts you’ll check out when you have a gap in your schedule. The true magic of Jazz Fest often lies in stumbling upon an incredible performance you never planned to see.

Essential Gear for a Full Day at the Fair Grounds
The festival is a marathon, not a sprint. It runs from 11 AM to 7 PM daily and proceeds "rain or shine," so you need to be prepared for anything a Louisiana spring day can throw at you.
Sun Protection: A wide-brimmed hat, sweatproof sunscreen, and sunglasses are non-negotiable. Shade is a precious and rare commodity.
Footwear: You will walk miles on uneven terrain that can turn to mud in an instant. Comfortable, broken-in, waterproof boots are your best bet.
Rain Gear: A lightweight poncho is a must. A classic New Orleans downpour can appear out of nowhere, and a simple poncho can save your day.
Hydration: Bring an empty reusable water bottle. Free water stations are located throughout the grounds, and staying hydrated is critical.
A Small Blanket or Chair: A small, foldable festival chair or a compact blanket gives you a home base at a stage and a chance to get off your feet. Always check the official festival website for the latest rules on chair sizes.
Navigating the Stages: A Pro's Guide to the Jazz Fest New Orleans Landscape
Once you’re on the grounds, a new challenge emerges: moving efficiently through a temporary city of music lovers. The space is vast, the crowds are thick, and every minute spent fighting a human traffic jam is a minute of music lost. Mastering the art of movement is what separates the pros from the rookies.
The Art of Stage Hopping: The Perimeter Strategy
The single most effective technique for navigating between stages is to avoid the center. The natural instinct is to cut directly through the middle of the crowd, but this is almost always the slowest and most frustrating path.
Instead, adopt the perimeter strategy. When you need to move, walk to the outer edge of the crowd and use the less-congested pathways along the racetrack, food vendor areas, and craft marketplaces. It may look like a longer route on the map, but you will move significantly faster. This method is your secret weapon for making it from the Gospel Tent to the Gentilly Stage in record time.
Understanding the Vibe of Each Major Stage Area
While the lineup is diverse everywhere, different stages at Jazz Fest New Orleans cultivate their own unique atmospheres. Knowing these vibes helps you plan not just your schedule, but your energy.
The Main Stages (Festival Stage & Gentilly Stage): These are the epicenters for the big-name headliners. Expect massive crowds, high energy, and a classic large-scale concert feel. If you want to be close, you need to camp out hours in advance.
The Tents (Gospel, Blues, Jazz): The tents offer a more intimate and often more intense musical experience. The Gospel Tent is legendary for its powerful, soul-stirring performances. The Blues and Jazz tents are where you’ll find virtuoso musicians in a focused, respectful listening environment. They also provide crucial shade.
The Cultural Stages (Fais Do-Do, Jazz & Heritage): These stages are the heart of the festival's "heritage" mission, showcasing the rich sounds of Louisiana, from Cajun and Zydeco to Mardi Gras Indians. The vibe here is pure, joyful, and deeply authentic.
Pro-Tip: Use the official festival app to set alerts for your must-see artists 15 minutes before their set time. This gives you a travel-time buffer to move from one stage to another using the perimeter strategy without feeling rushed.
More Than Music: Planning Your Culinary and Cultural Itinerary
To treat Jazz Fest as only a music festival is to miss half the point. It is, without exaggeration, one of the greatest food festivals on the planet. Furthermore, the craft areas showcase the incredible artistry of the region. A truly ultimate lineup plan integrates these cultural pillars into your day.

The "Food Fest" Within the Jazz Fest: Don't Miss These Bites
The food booths at Jazz Fest are a headline attraction. Planning your meals is just as important as planning your music.
Eat at Off-Peak Times: The food lines are longest between noon and 2 PM. Plan to eat an early lunch right when the gates open or a later one after 3 PM to minimize your wait.
Divide and Conquer: If you’re with a group, send one person for drinks while others wait in different food lines for Crawfish Monica, Mango Freeze, or Alligator Sausage. Reconvene and share your haul to sample more of the legends.
The vibrant colors of the food, the elaborate costumes, and the soulful expressions of the musicians are all begging to be photographed. To make your festival shots pop, download our Free Travel Lightroom Presets. They are expertly designed to enhance the unique light and color palette of a New Orleans celebration.
Exploring the Heritage Crafts: A Mid-Day Music Break
Jazz Fest features three distinct craft marketplaces: Congo Square African Marketplace, Contemporary Crafts, and the Louisiana Marketplace. When the sun is at its peak or you have a gap between sets, take a leisurely stroll through these areas. It’s a perfect way to rest your ears, cool down, and find a unique, handmade souvenir that truly represents the soul of the festival.
Advanced Strategies for the Ultimate Jazz Fest New Orleans Experience
You’ve prepped, you’ve planned, and you know how to navigate. Now it’s time for the pro-level strategies that will elevate your experience from great to unforgettable.
The "Rain or Shine" Reality: How to Prepare for Louisiana Weather
The festival’s "rain or shine" policy is serious. While stages may temporarily close for lightning, the event continues.
Protect Your Gear: Bring a waterproof bag or Ziploc bags for your phone and wallet. A wet phone can quickly ruin a day.
Embrace the Mud: If it rains, the Fair Grounds will become muddy. This is where your choice of waterproof footwear pays off. Lean into it.
Post-Rain Strategy: After a storm, the covered tents will be packed. This is a great time to head to an outdoor stage, as many people will be slow to leave the shelter, giving you a chance to get a better spot.

The Zero-Waste Warrior: Participating in Festival Sustainability
Jazz Fest is a massive event, and you can play a role in reducing its environmental impact. Look for the festival’s oyster shell recycling program, a fantastic initiative that helps rebuild coastal reefs. Use the designated recycling and compost bins, and always opt for refilling your water bottle over buying single-use plastic.
Pro-Tip: The last set of the day creates a massive exit rush. Consider leaving 15-20 minutes before the final song of the headliner you're watching to beat the crowds heading for the shuttles. That small head start can save you an hour of waiting in line.
Planning a trip to Jazz Fest is often the centerpiece of a larger New Orleans adventure. To make the most of your entire visit, from the French Quarter to the Garden District, our comprehensive Travel Guide provides expert-led itineraries and local secrets to help you build the perfect trip.

Your Blueprint for Jazz Fest Success
You are now armed with a complete strategic blueprint to not just attend the New Orleans Jazz & Heritage Festival, but to truly conquer it. By decoding the cubes, prioritizing your artist list, and mastering the perimeter strategy, you’ve eliminated the guesswork. By integrating the world-class food and crafts into your plan, you’ve ensured a rich experience that captures the true spirit of this cultural institution. You are ready to move with purpose, eat with gusto, and immerse yourself in the unparalleled soundscape of the incredible Jazz Fest New Orleans.
Meta Data Suggestions:
SEO Meta Title: Jazz Fest New Orleans: The Ultimate Lineup & Stage Planner
URL Slug: /jazz-fest-new-orleans-lineup-planner
SEO Meta Description: Conquer Jazz Fest 2026 with our ultimate planner. Get pro tips on navigating stages, scheduling artists like Pearl Jam, and finding the best food.
Don't Miss Out! Subscribe for Exclusive Content
Subscribe


Comments 0
No comments yet
Be the first to share your experience!
Dont Miss Out! Subscribe for Exclusive Content

San Francisco Cherry Blossoms: A Local's Guide to the Blooms

Halloween SF: Haunts Without Horrors

SF Festivals: 7 Must-See Lineups

Christmas SF: Lights & Wharf Wonders

SF Pride: 6 Route & Party Hacks

Chinese New Year SF: Parade Essentials
7 Best Travel Photography Blogs for Tips
TrekGuider @trekguider
You know the feeling. You’re standing before a truly breathtaking scene—a fiery sunset melting into the ocean, a frenetic city street alive with energy, a mountain range so vast it stills your breath. You raise your camera, convinced you can bottle that magic. But when you get home, the photos on your screen are a pale imitation. The colors look washed out, the epic scale feels diminished, and the raw emotion of the moment is gone. It's the most common frustration in photography.
The gap between the photos you take and the professional shots you admire isn't about money or a more expensive camera. It's about knowledge. It's about seeing the world through a trained eye and understanding the techniques that transform a simple snapshot into a powerful story. The secret is learning from those who have already walked the path and mastered the craft. In a world saturated with social media portfolios, however, finding true educators can feel impossible.
That’s why we’ve sifted through the noise for you. We’ve identified the creators who are dedicated to teaching—the ones who provide the actionable advice, in-depth tutorials, and honest gear reviews that will actually make you a better photographer. If you’re ready to finally start creating travel photos that do your memories justice, you’re in the right place. These are the best travel photography blogs for real, practical tips. And for panoramic view of the top creators ac across every niche, our definitive guide to The Best Travel Blogs to Follow in 2026 is your essential starting point.
What Separates a Portfolio from a Powerhouse Educational Blog?
Before we dive in, let’s clarify our criteria. A gallery of beautiful photos is inspiring, but it won’t teach you how to improve. The blogs on this list were handpicked because they are exceptional educational platforms that empower their audience.
According to our 2026-2026 market analysis, the most authoritative blogs share key traits that set them apart. First is niche specificity and expertise; they establish themselves as deep experts in a specific domain, whether it’s adventure photography or post-processing. Second is the quality of writing and originality, allowing them to deconstruct complex topics—like the exposure triangle or advanced composition—into language anyone can understand. They are teachers, not just tastemakers.
The Top 7 Travel Photography Blogs for Actionable Advice
These seven blogs deliver on the promise of education. Each offers a unique perspective and a wealth of knowledge to help you improve your craft, whether you’re starting out or looking to refine your professional skills.

1. Expert Vagabond (Matthew Karsten)
For the photographer who thrives in the wild, there’s no better mentor than Matthew Karsten of Expert Vagabond. With over a decade of professional experience shooting in some of the world's most remote corners, Karsten doesn’t just show you the shot; he shows you the grit behind it. His gear guides are legendary for their depth, explaining not just what he uses, but why a particular piece of equipment is e essential for a specific environment. This is the ultimate resource for learning to create stunning images under rugged, challenging conditions.
2. Along Dusty Roads (Andrew & Emily)
Andrew and Emily are masters of mood. Their work has a distinct, cinematic quality, and their blog is an incredible resource for learning how to evoke emotion through imagery. While they offer detailed guides on photography techniques, their true genius lies in post-processing. Their Lightroom tutorials are models of clarity, focused on teaching you how to use editing to enhance the story of your image, not just apply a generic filter. They prove that the art happens just as much in the digital darkroom as it does in the camera.
3. BucketListly Blog (Pete R.)
If you love the tech behind the art, BucketListly Blog is your paradise. Pete’s gear reviews are exhaustive, moving far beyond spec sheets to deliver careful real-world performance analysis. He covers everything from the latest flagship mirrorless cameras to the best travel drones and action cameras. What makes his blog essential is its dual focus on both photography and videography, making it a one-stop shop for the modern hybrid creator who needs to produce elite content in multiple formats.
4. I Hit The Button (Andy Feliciotti)
The name says it all. This blog is laser-focused on the science and art of photography. Andy Feliciotti dives deep into the technical craft, offering detailed explorations of topics like long exposure, astrophotography, and advanced composition. This is where you go when you’re ready to move beyond beginner tips and truly understand the why behind a great photo. It’s the perfect resource for the photographer who loves to geek out on the details and push their creative boundaries.

5. The Blonde Abroad (Kiersten Rich)
Kiersten Rich is a powerhouse in the travel industry, and her photography is a masterclass in creating a vibrant, aspirational brand. Her blog is an excellent resource for anyone looking to master lifestyle and portrait travel photography. She offers fantastic, practical tips on everything from styling and wardrobe choices to using presets to achieve a cohesive, professional aesthetic. Her content is especially helpful for solo travelers who want to learn how to take incredible photos of themselves.
6. The Planet D (Dave & Deb)
Dave and Deb have been exploring the world for over a decade, and their photography captures the sheer scale and grandeur of our planet's most epic landscapes. Their blog is a fantastic learning tool for anyone looking to improve their landscape and wildlife photography. They provide practical, field-tested advice on what lenses to use for sweeping vistas, how to shoot in harsh weather conditions (like Antarctica!), and how to tell a story of adventure through a series of powerful images.
7. The Lovers Passport (Stephen & Giselle)
Focused on couple’s travel, The Lovers Passport is an invaluable resource for anyone wanting to learn how to weave human elements into their photography. They excel at breaking down how to plan and execute an epic shot, from location scouting with Google Earth to posing subjects to create a compelling narrative. Their guides are packed with practical advice on making a destination feel both grand in scale and deeply intimate at the same time.
Decoding the Masters: Key Lessons from the Pros
Studying the work of these top-tier photographers reveals a set of shared principles. Their incredible images are not the result of magic, but a consistent application of three core pillars: strategic gear selection, timeless composition, and masterful post-processing.

It Starts with the Right Gear (But Not How You Think)
A unanimous philosophy among these pros is that the best camera for travel is the one you’re willing to carry. A bulky, heavy kit is a liability, not an asset. The market trend is toward smaller, lighter, yet incredibly powerful mirrorless systems.
Beyond the camera, your core kit should include a few essentials: a versatile "walk-around" lens (like a 24-70mm), extra batteries, and a solid camera bag.
Pro-Tip: A lightweight carbon fiber tripod is the single best investment for elevating your landscape photography. It allows you to shoot at "golden hour" with a low ISO for clean images and enables creative long exposures that are impossible handheld.
Mastering the Fundamentals of Composition
Gear is just a tool. The real art lies in arranging the elements within your frame. The best photographers use these timeless principles to tell a story.
Rule of Thirds: Mentally divide your frame into a 3x3 grid. By placing your subject along a line or at an intersection, you create a more balanced and visually engaging image than a simple centered shot.
Leading Lines: Use a road, river, or fence to create a line that guides the viewer's eye through the scene toward your main subject. This technique is a powerful way to create a sense of depth.
Shooting at Golden Hour: The hour after sunrise and before sunset offers soft, warm, directional light. This is far more flattering and dramatic than the harsh, flat light of midday.
Framing: Use foreground elements like an archway, a window, or tree branches to create a natural frame around your subject. This adds context and draws the viewer's focus.
Changing Perspective: Don't shoot everything from eye level. Get low to the ground to emphasize a foreground or find a high vantage point for a unique, sweeping overview. This simple shift can make a scene extraordinary.
Ready to Practice Your Composition Skills? Download the free Best NYC Photo Spots Map and start capturing incredible cityscapes today!
The Digital Darkroom: Post-Processing is Half the Battle
Every single professional photo you admire has been post-processed. Editing is not about "fixing" a bad photo; it's about enhancing a good one to fully realize your creative vision. The blogs we've highlighted consistently teach three key areas of editing in software like Adobe Lightroom.
Using Lightroom Presets: Presets are one-click settings that create a consistent aesthetic. They are excellent learning tools for understanding how different settings interact to create a professional look.
Editing Sunset Photos: This is a classic challenge that requires balancing the extreme dynamic range between the bright sky and the dark landscape. Tutorials will teach you how to use tools like graduated filters and the shadow/highlight sliders to balance the exposure and bring out the rich, vibrant colors.
Basic Color Grading: This is the art of adjusting the colors in your image to create a specific mood. Mastering the HSL (Hue, Saturation, Luminance) panel allows you to take full control, making the blues in the ocean deeper, the greens in a forest richer, or giving your entire photo a warm, autumnal feel. Destinations with distinct color palettes, like the neon-lit streets of Tokyo or the serene temples of Kyoto, are perfect places to practice these skills. If you're planning a trip, our Japan Travel Guide can help you find the most visually stunning locations.
Pro-Tip: When starting with post-processing, focus on mastering one tool at a time. The HSL panel in Lightroom is a great place to begin. Learning how to selectively adjust the hue, saturation, and luminance of individual colors can have a bigger impact on your photos than trying to learn every single tool at once.
Your Path to Better Travel Photos
Improving your travel photography is a journey, not a destination. It doesn't happen overnight. But by following the right guides, you can accelerate your progress and avoid common pitfalls. The path is simple: learn from the best travel photography blogs, focus on mastering the fundamental techniques of composition and light, and practice every chance you get. Pick one blog from this list to follow this week. Choose one composition technique to practice on your next outing, even if it's just in your own backyard. The more you shoot with intention, the faster you will begin to create images that truly capture the magic of your travels.
Meta Data Suggestions:
SEO Meta Title (56 characters): 7 Best Travel Photography Blogs for Tips (2026 Update)
URL Slug: best-travel-photography-blogs-tips
SEO Meta Description (154 characters): Want to take better travel photos? Discover the 7 best travel photography blogs that offer actionable tips on gear, composition, and editing from the pros.
Don't Miss Out! Subscribe for Exclusive Content
SubscribeComments 0
No comments yet
Be the first to share your experience!
Dont Miss Out! Subscribe for Exclusive Content

Ultimate USA Holidays Guide: Top Picks

FTC Affiliate Disclosure Essentials: Stay Compliant as a Travel Creator

Essential Affiliate Tools: From Tracking to Full Optimization

Avoid These 5 Affiliate Landing Page Mistakes for Better Conversions

Affiliate Keyword Research Mastery for Travel Blogs

Booking.com Affiliate Program Review: Pros, Cons, and Earnings Potential
How to Start a Travel Blog (And Get Noticed)
TrekGuider @trekguider
You have a passion for travel that borders on obsession. Your camera roll is a treasure map of untold stories, and your notes app is filled with the kind of hard-won wisdom that could save a fellow traveler time, money, and stress. The idea of starting a travel blog feels like the perfect way to share it all—a potential path to a life with more freedom and adventure.
But there’s a problem. The moment you consider the "how," a wave of technical overwhelm washes over you. Domains, hosting, WordPress, plugins, SEO—it’s a foreign language, a dense fog of conflicting advice that makes the entire project feel intimidating and out of reach. You see other creators living the dream, and you're stuck in analysis paralysis, believing you need to be a web developer just to get started. Every day you wait, you feel the immense opportunity of the creator economy—a market projected to swell from $250 billion to nearly $500 billion by 2027—slipping through your fingers.
Forget the confusion. This is the guide that cuts through the noise. The old way of starting a travel blog is dead. You don't need to build a website from scratch. This is your chronological, step-by-step playbook that will show you how to start a travel blog presence on a powerful marketplace, letting you focus on what you do best: creating. We'll walk you through building a professional home for your brand in minutes, not months. This is your A-to-Z blueprint for building the foundational asset of your future business. Once this home base is built, you can begin the journey of transforming it into a real enterprise, a journey we map out in our ultimate guide to How to Make Money Online: A Creator's Guide for 2026.
Why a Marketplace? The Smarter Foundation for Your Creator Empire
Before we dive in, it's critical to understand why starting on a creator marketplace like TrekGuider is a fundamentally better strategy than building a self-hosted blog from scratch. While owning a website was once the only path, today it's a detour filled with technical headaches, maintenance costs, and the slow, grinding challenge of building traffic from zero.
The most resilient and profitable creators still operate on a "Hub-and-Spoke" model, but the "hub" has evolved.
The Old Hub: A self-hosted blog you have to build, manage, and secure yourself.
The New Hub: Your professional creator page on a marketplace like TrekGuider. This is the core business asset you control, supercharged with a built-in audience, e-commerce tools, and the collective SEO power of the entire platform.
The Spokes: Social media platforms remain your powerful distribution channels, used to capture attention and drive traffic back to your new, high-powered hub.
Starting on a marketplace isn't just about creating a profile; it's about plugging into a pre-built ecosystem designed for your success. You get to skip the entire technical setup and focus day-one on content and commerce.

The Strategic Blueprint – Nailing Your Niche
Even on a powerful platform, the single biggest real advantage you can give yourself is specificity. Trying to be a travel expert for "everyone" is a recipe for getting lost in the noise. Choosing a well-defined niche allows you to build authority faster, attract a dedicated audience, and stand out in a catalog of creators.
How to Find a Profitable Niche
A successful niche sits at the intersection of three circles: your genuine passion, your audience's pressing problems, and its potential for profitability. Before you commit, you must validate your idea.
Keyword & Platform Search: Use keyword research tools to check Google search volume, but also search within the marketplace itself. Are other creators successfully selling products in this niche? Is there a healthy amount of interest? This is your data-driven sign of audience demand.
Competitor & Market Analysis: The presence of a few successful creators in your niche is a good thing; it proves a market exists. Analyze their products, articles, and pricing. If others are generating revenue, it validates the niche's commercial potential.
5 Promising Travel Blog Niche Ideas to Spark Inspiration
To get your brainstorming started, here are five less-saturated niches with huge potential for 2026:
Eco-Friendly & Sustainable Travel: Focus on low-impact tourism, conservation-focused experiences, and green-certified brands. This niche attracts a passionate, value-driven audience.
Remote Work & "Workation" Travel: Become the go-to resource for digital nomads by creating guides on finding reliable WiFi, navigating visa requirements, and discovering the best long-term accommodations.
Culinary Tourism (Hyper-Niche): Don't just be a "food travel" blog. Go deeper. Focus on a specific cuisine (e.g., "Exploring the Regional Cuisines of Southern Italy") or a dietary need (e.g., "A Vegan's Guide to Japan").
Accessible Travel: A critically underserved and deeply important niche. Create practical guides and resources for travelers with disabilities, focusing on wheelchair-accessible hotels, attractions, and transportation.
Micro-Destination Blog: Instead of trying to cover the world, become the undisputed expert on a single city, region, or small country (e.g., "The Ultimate Guide to Visiting Malta"). You can dominate local affiliate partnerships and product sales for that area.
How to Start a Travel Blog on a Marketplace – Your 10-Minute Setup
This is where you leapfrog months of technical work. Instead of wrestling with hosting and code, you'll build a professional home for your brand in less time than it takes to drink a cup of coffee.

Step 1: Claim Your Professional Creator Page
Getting started is simple. Navigate to the TrekGuider marketplace and register. The platform is actively creating pages for established bloggers using public data, so your first step is to search the author catalog to see if a page already exists for you.
If you find your page, you can claim it and gain full control.
If not, you can create a new one from scratch in minutes.
Step 2: Customize Your Digital Home Base
Your creator page is your professional landing page. It's designed to be your central hub, consolidating your entire brand in one place. Fill out every section to build trust and showcase your expertise:
Basic Information: Add a high-quality photo and a compelling bio that tells your story and explains who you help.
Social & External Links: Integrate your social media profiles and link out to any other personal websites or online stores you may have.
Monetization Tools: Enable the donation feature to allow your most loyal fans to support you through one-time payments or recurring subscriptions.
Step 3: Build Your Product Showcase
This is your integrated storefront. You don't need to install any clunky e-commerce plugins. Simply start uploading the digital products you want to sell:
Guides and E-books
Custom Maps and Routes
Itinerary Templates
The platform handles secure payment processing (via Stripe) and instant digital delivery, so you can focus on creating, not logistics.
The Foundational Content – Publishing on the Platform
With your digital home base established, it's time to furnish it with value. On a marketplace, you don't need to worry about building a blog from zero. Your mission is to publish 5-10 high-quality, in-depth articles directly to the platform's article section. This is your primary strategy for getting discovered.

Why Publishing on the Marketplace is a Superpower
Instant Audience: You tap into the marketplace's existing audience of passionate travelers who are already there to read articles and buy products.
Shared SEO Authority: You benefit from the domain authority of the entire platform, giving your articles a better chance to rank on Google much faster than a brand-new website.
Direct Traffic to Your Products: Every article you publish is linked back to your creator page, acting as a powerful, built-in funnel that drives readers directly to your product showcase and donation buttons.
Writing Your First Authority-Building Articles
Your first articles should be "key elements"—long, in-depth, evergreen posts that solve a major problem for your niche audience. Examples include:
A definitive guide to your niche destination (e.g., "The Ultimate First-Timer's Guide to Visiting Bali").
An exhaustive packing list (e.g., "What to Pack for a 2-Week Trip to Italy").
A detailed "how-to" post (e.g., "How to Plan a Trip to Japan on a Budget").
Feeling Overwhelmed by Trip Planning?
Creating a detailed itinerary is one of the most time-consuming parts of travel planning. To help you streamline the process for your own adventures—and to give you an example of a high-value resource you can one day create for your own readers—we've built the ultimate tool. Our comprehensive, plug-and-play itinerary template takes the stress out of organizing your next trip.
Download Your Free Plug-and-Play Itinerary Template Now
This type of high-value resource is exactly what your audience is looking for. Once you've created a helpful freebie, the next step is to package your unique expertise into a premium Travel Guide, which you can sell directly on your TrekGuider creator page to a global audience of passionate travelers.
Getting Noticed – The Basics of Promotion
With your page set up and a foundation of great content published, you can finally shift your focus to promotion.

Master Marketplace SEO From Day One
SEO is still your most critical long-term strategy, but now you apply it to the articles you publish on TrekGuider. For every post you write, you should:
Target a Keyword: Choose a specific phrase your ideal reader would search for.
Use the Keyword: Place your keyword naturally in the article's title, the first paragraph, and at least one subheading.
Optimize Images: Use descriptive file names and add "alt text" to every image.
Use Social Media as Your Amplifier
Your social media channels are your "spokes." Their job is to drive traffic back to your TrekGuider "hub." Share your newly published articles and link directly to your creator page or specific products in your social profiles. This creates a powerful feedback loop, funneling your existing audience to the place where they can best support you and buy your products.
Pro-Tip: Your creator page bio is your elevator pitch. It's the first thing a potential customer will read. Use it to tell a compelling story, clearly state who you serve, and explain the unique value you provide. This builds an instant, human connection that turns a casual browser into a loyal follower.
Frequently Asked Questions About Starting a Travel Blog
1. Is it free to start a travel blog on TrekGuider?
Yes. Creating your personal author page, publishing articles, and listing products is free. The platform makes money by taking a small, transparent commission on the products you sell, so we only succeed when you succeed.
2. Do I need my own website to use the marketplace?
No, and that's the biggest advantage. TrekGuider provides you with your own professional landing page, so you can have a credible, feature-rich home for your brand without any of the costs or technical hassles of building and maintaining your own site.
3. How does the platform help me get discovered?
The marketplace helps in two key ways: First, your articles and products are showcased to the platform's entire audience of travelers. Second, by publishing on a high-authority domain, your content has a much better chance of ranking on search engines like Google, attracting new users to the platform and, ultimately, to your page.
Your Journey Starts Now
The path from a vague dream to a published, professional travel blog presence is no longer a fog. It's a clear, actionable checklist. You now have the complete blueprint that details how to start a travel blog the modern, smarter way—by leveraging the power of a creator marketplace.
The most challenging part of any great journey is taking the first step. You have the map to a faster, more direct route. The only thing left to do is to begin your adventure.
SEO Meta Data Suggestions:
SEO Meta Title (58 characters): How to Start a Travel Blog in 2026 (Beginner's Guide)
URL Slug: how-to-start-a-travel-blog
SEO Meta Description (154 characters): A step-by-step guide for beginners on how to start a travel blog. Learn how to choose a niche, set up your creator page, and publish content that gets noticed.
Read the full guide: The Travel Blog Business Plan: How to Make Real Money in 2026
Don't Miss Out! Subscribe for Exclusive Content
SubscribeComments 0
No comments yet
Be the first to share your experience!
Dont Miss Out! Subscribe for Exclusive Content
FTC Affiliate Disclosure Essentials: Stay Compliant as a Travel Creator
Essential Affiliate Tools: From Tracking to Full Optimization
Avoid These 5 Affiliate Landing Page Mistakes for Better Conversions
Affiliate Keyword Research Mastery for Travel Blogs
Booking.com Affiliate Program Review: Pros, Cons, and Earnings Potential
