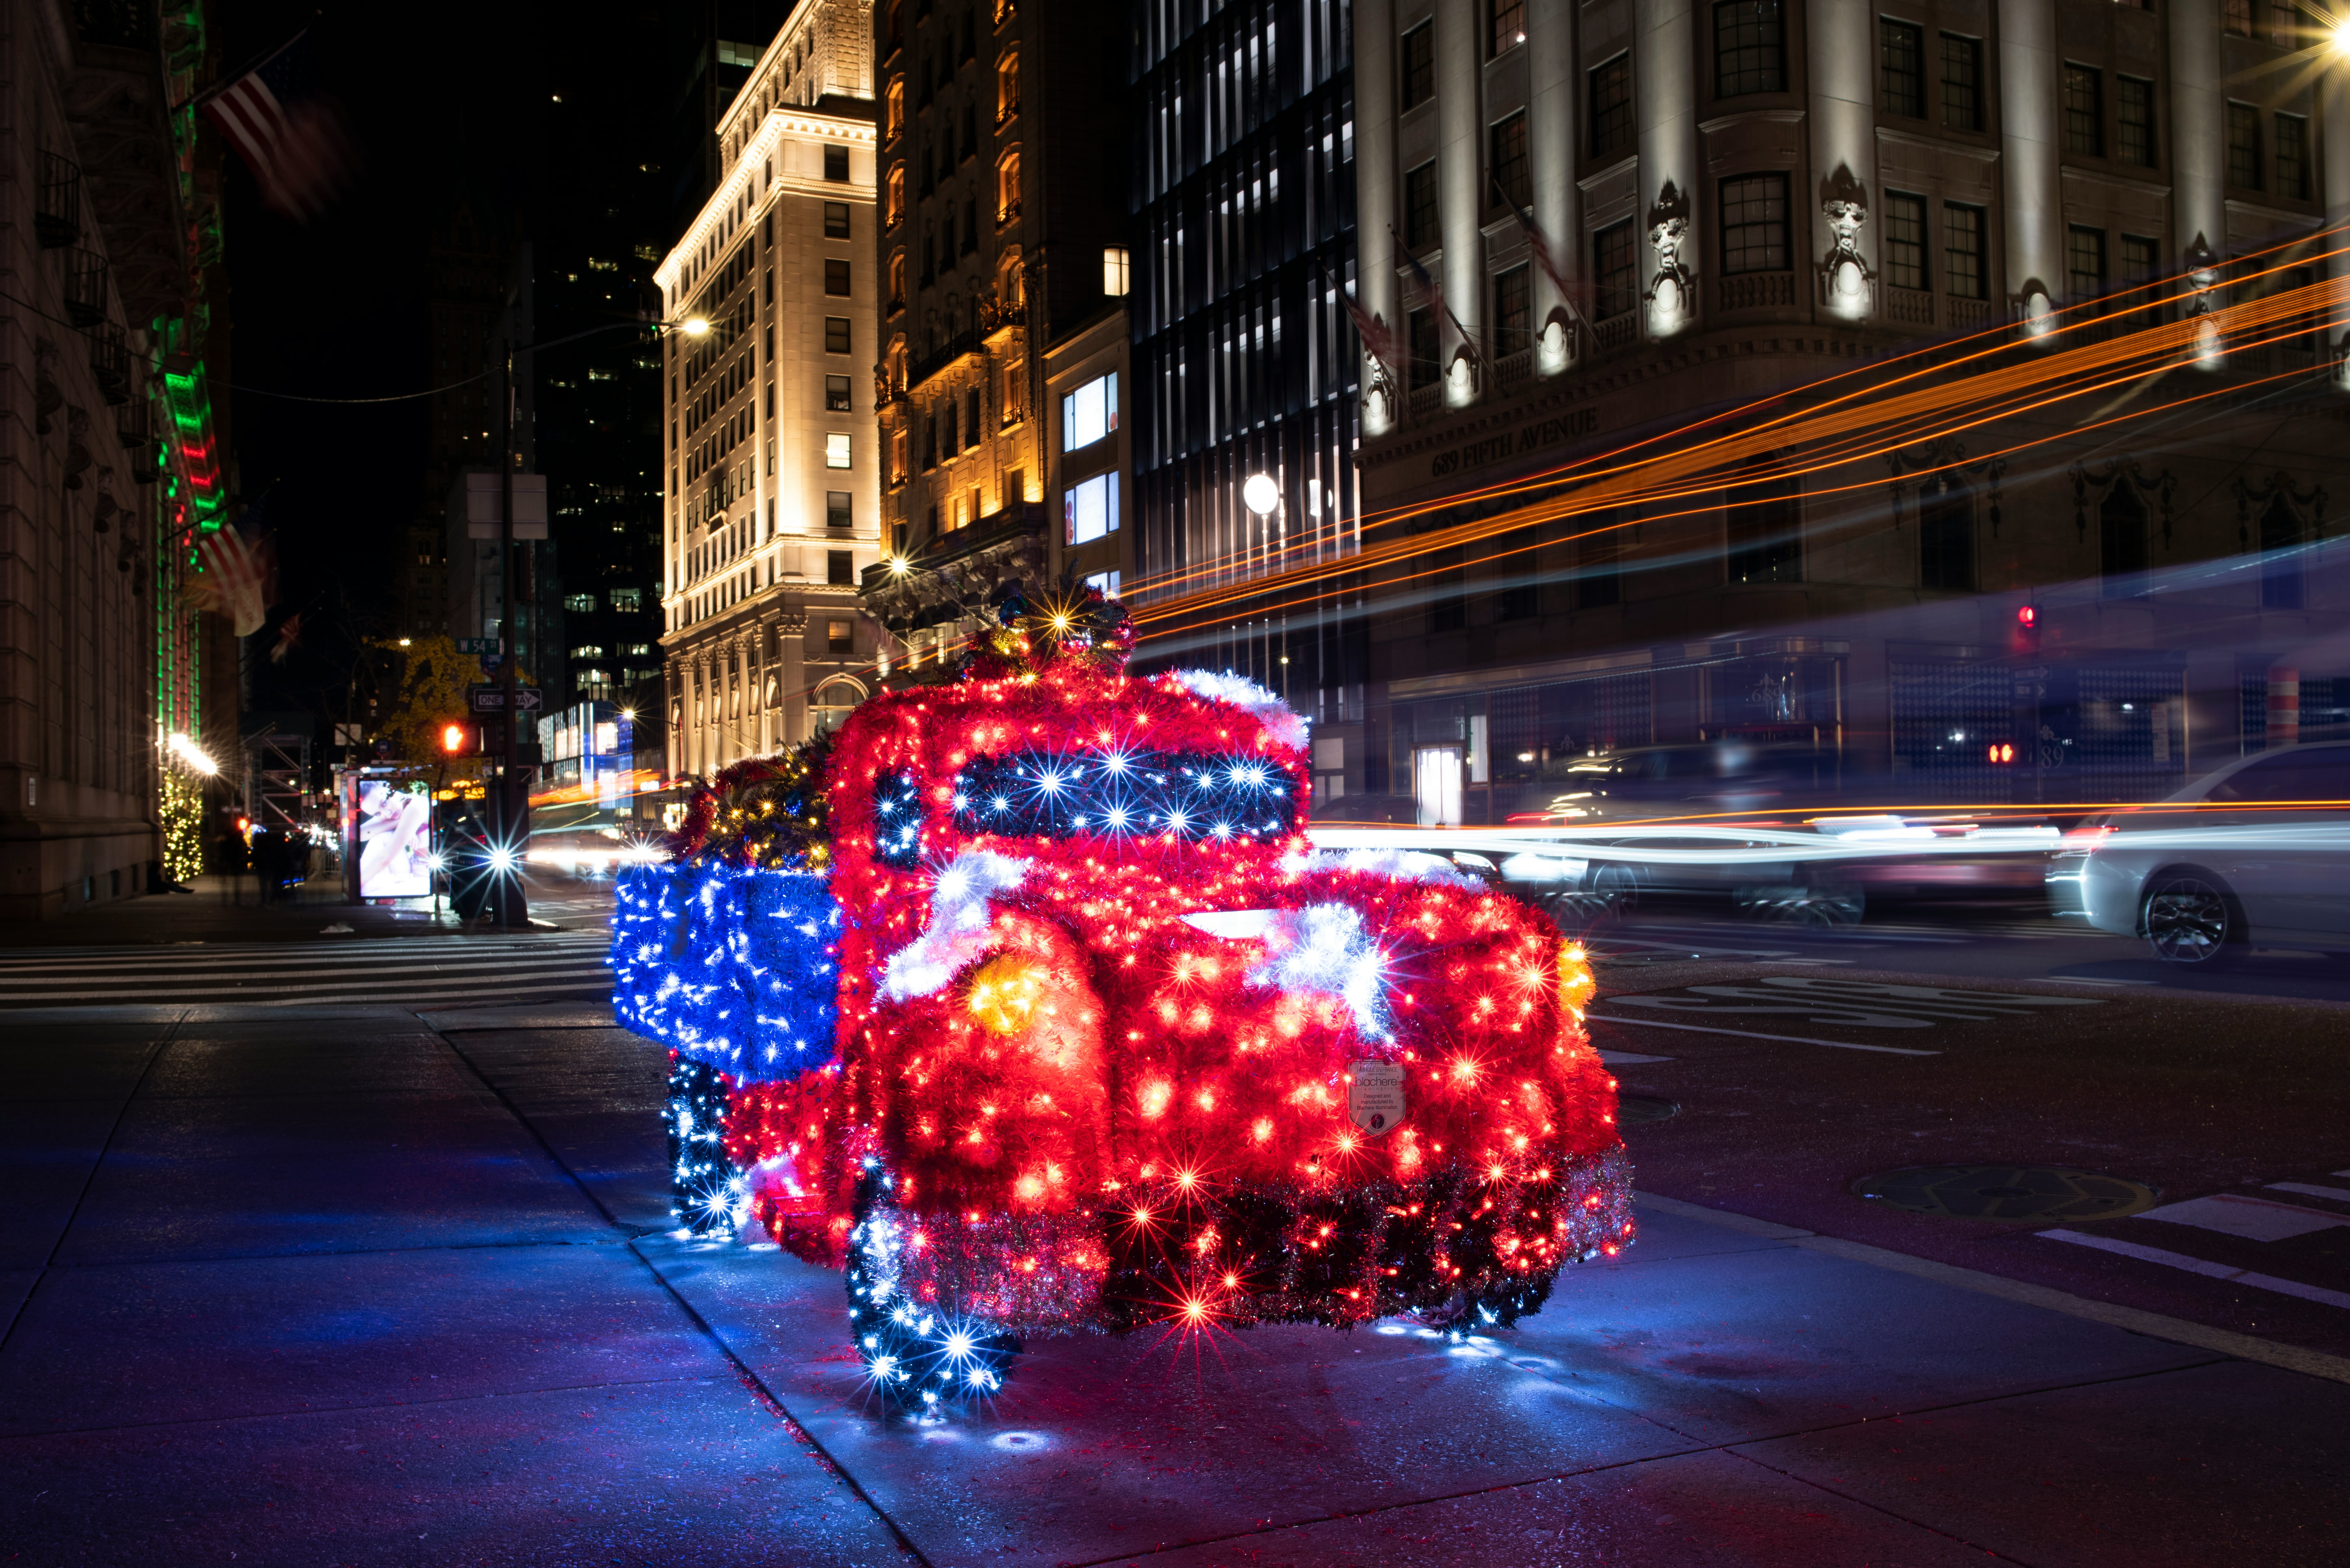
Christmas in NYC: 7 Magical Markets
TrekGuider @trekguider
Planning a trip for Christmas in New York can feel like trying to direct a Broadway show—exciting, but utterly overwhelming. You’ve seen the twinkling lights and festive cheer in countless movies, and you want that magical, snow-globe experience for yourself. You dream of sipping hot cocoa while browsing charming wooden stalls, finding unique gifts, and soaking in an atmosphere so festive it feels like a warm hug.
But the reality can be a chaotic whirlwind of massive crowds, tourist traps, and paralyzing indecision. You risk spending your precious holiday time stuck in the wrong places, missing out on the authentic, cozy markets that truly define the city's holiday spirit. Instead of feeling the magic, you end up feeling stressed, cold, and disappointed, wondering if you’ve missed the real heart of a New York Christmas.
This guide is your definitive map to festive perfection. We’re cutting through the noise to take you on an insider’s tour of the 7 most magical Christmas markets in NYC. We’ll share pro-tips on what to buy, the best times to visit to avoid the crowds, and how to pair each market with the city’s most stunning light displays for the ultimate holiday adventure. These markets are a key part of the city's festive transformation, a spectacle we explore in full in our complete guide to New York Holidays: 10 Must-Do Events. Get ready to experience the holiday season in NYC the way it was meant to be.

Essential Know-Before-You-Go Tips for a Perfect Market Day
A little strategy goes a long way in a city that never sleeps, especially during the holidays. To make your market-hopping experience more magical and less maddening, keep these core principles in mind. They are the key to unlocking a smoother, more enjoyable Christmas in New York.
Embrace the Weekday Morning: The single best piece of advice for any major NYC attraction is to go early on a weekday. The holiday markets are most pleasant right when they open, typically around 11 AM. You’ll have more space to browse, chat with vendors, and truly appreciate the craftsmanship without being jostled by the shoulder-to-shoulder afternoon crowds.
Master Public Transportation: Driving and parking in Manhattan during the holidays is a recipe for extreme frustration and expense. The subway and buses are your best friends. Plan your market route using a transit app, buy a MetroCard for the duration of your stay, and enjoy the freedom of zipping beneath the traffic-clogged streets.
Dress in Smart Layers: New York’s winter weather is notoriously fickle. You might be freezing while walking between markets but quickly overheat once inside a packed indoor venue like Grand Central. Dress in layers—a thermal base, a sweater or fleece, and a warm, waterproof coat—that you can easily add or remove. A comfortable pair of waterproof boots is non-negotiable.
Carry a Mix of Cash and Cards: While the vast majority of vendors now accept credit cards, some smaller artisans or food stalls may be cash-only or have credit card minimums. Having a mix of both ensures you’ll never miss out on that perfect, one-of-a-kind find or a warm pretzel when you need it most.
1. Bank of America Winter Village at Bryant Park: The Iconic Centerpiece
If you could only visit one holiday market in NYC, this would be it. The Winter Village at Bryant Park is the quintessential New York Christmas experience, a dazzling wonderland set against the iconic backdrop of the New York Public Library and soaring midtown skyscrapers. This isn't just a market; it's a full-blown festive destination.
The entire experience is built around the 17,000-square-foot ice rink, which famously offers free admission (you just pay for skate rentals). Surrounding it are over 180 European-inspired, custom-designed "jewel box" kiosks that glow from within, creating a warm and inviting atmosphere as you wander the park's allées.
Here, you’ll find a truly global selection of goods, from complex ornaments and handmade leather goods to unique jewelry and cozy winter apparel from independent designers. The food options are a major draw. You can find everything from savory Belgian waffles and pierogies to rich hot chocolate and artisanal cheese. The Lodge provides an aprés-skate-themed food hall, offering a cozy spot to refuel and watch the skaters.
Pro-Tip: To truly enjoy the ambiance, visit on a weekday morning right when it opens. You can have a leisurely skate on the near-empty rink and browse the shops in peace. By lunchtime, the crowds swell, and the experience becomes far more hectic.

2. Union Square Holiday Market: The Eclectic European-Style Village
If your gift list demands something with more soul than a department store can offer, make a beeline for the Union Square Holiday Market. It’s less a market and more a sprawling, festive village that erupts in the heart of downtown, its iconic red-and-white striped stalls forming a labyrinth of pure creative energy.
The sheer variety and quality of the vendors are what set this market apart. It’s a juried market, meaning every vendor is carefully selected, ensuring a high standard of craftsmanship and originality. The winding aisles encourage exploration, making you feel like you’re discovering a hidden gem around every corner. This is the place to find gifts you simply won't see anywhere else: hand-blown glass ornaments, screen-printed posters from local artists, gourmet pantry items, and organic bath products. Several booths even offer on-the-spot personalization, whether it’s stamping a leather keychain or engraving a piece of jewelry.
The market can feel overwhelming. Our advice? Grab a map at the entrance and do a quick loop of the perimeter first to get your bearings. Then, dive into the inner aisles to hunt for treasures.
3. Columbus Circle Holiday Market: An Upscale Festive Escape
Perfectly situated at the southwest entrance to Central Park, the Columbus Circle Holiday Market offers a slightly more relaxed and upscale shopping experience. It’s the ideal place to find sophisticated gifts for the most discerning people on your list, with the added bonus of a magical Central Park stroll right next door.
The location is simply unbeatable. The glittering lights of the market stalls, with the stone arches of the park entrance and the Time Warner Center as a backdrop, create a picture-perfect holiday scene. It’s smaller and more manageable than Union Square, allowing for a more leisurely browsing experience focused on quality craftsmanship and gourmet treats. Expect to find elegant jewelry, designer winter wear, complex wooden puzzles, and fine art photography. The food vendors are a delight, selling artisanal chocolates, infused olive oils, and spiced gingerbread.
After shopping, complete your classic NYC holiday afternoon by taking a horse-drawn carriage ride through Central Park or going for a skate at the famous Wollman Rink.

4. Grand Central Holiday Fair: The Warmest Indoor Market
When the winter wind is biting, the Grand Central Holiday Fair offers a warm and dazzling respite. Housed in the magnificent, beaux-arts Vanderbilt Hall, this indoor market is a haven of calm and quality, away from the outdoor chill. Shopping under the grand chandeliers is an experience in itself.
The market is hand-picked, focusing exclusively on American-made and handcrafted products from artisans and small businesses across the USA. You’ll find everything from handmade stationery and children’s clothing to beautiful pottery and eco-friendly accessories. The atmosphere is refined and peaceful, a stark contrast to the joyful chaos of the outdoor markets. Its location within Grand Central Terminal makes it an incredibly convenient stop for commuters and travelers. Because it’s indoors, this is the perfect market to save for a particularly cold or snowy day.
5. The Holiday Market at the Oculus: A Modern Marvel
For a Christmas in New York experience that is sleek, modern, and architecturally stunning, head downtown to the Holiday Market at the Oculus. Set inside Santiago Calatrava’s breathtaking transit hub, this market blends high-end shopping with festive pop-ups in a truly unforgettable setting.
The venue is the star. The soaring white ribs of the Oculus create a cathedral-like space that feels both grand and futuristic. During the holidays, the space is filled with elaborate decorations and a cheerful, bustling energy, offering a completely different vibe from the traditional wooden-stall markets. The market is a mix of familiar luxury brands and curated pop-up shops offering everything from gourmet sweets to tech gadgets. It often features live musical performances, adding to the lively atmosphere.
Pair It With: The Oculus is part of the World Trade Center complex, making it easy to combine your shopping with a poignant visit to the 9/11 Memorial & Museum or a trip to the top of One World Observatory for staggering city views.
6. Brooklyn Flea + Smorgasburg Winter Market: The Hipster's Holiday Haul
Escape the Manhattan crowds and discover a treasure trove of unique finds at the Brooklyn Flea + Smorgasburg Winter Market. This is where you’ll find the city’s coolest vintage goods, handmade crafts, and artisanal foods all under one roof, making it the ultimate destination for a one-of-a-kind gift.
The vibe is pure Brooklyn: creative, eclectic, and effortlessly cool. It’s a massive market that combines the best of the Brooklyn Flea (vintage clothing, antique furniture, retro vinyl) with the best of Smorgasburg (dozens of gourmet food vendors). You are guaranteed to find something here that you won’t see anywhere else, shopping directly from Brooklyn-based artists and designers. The Smorgasburg section is a culinary adventure in itself, serving up inventive dishes from around the world.
Pro-Tip: This is the perfect market for finding a truly unique gift that tells a story. To make your trip even smoother, especially if you're visiting from abroad and planning to bring treasures home, download our International Travel Checklist to ensure you have everything you need for a seamless journey.
7. Grand Holiday Bazaar: The Year-Round Market with a Festive Flair
For a shopping experience that feels good and does good, visit the Grand Holiday Bazaar on the Upper West Side. This is the city’s largest curated weekly market, but it pulls out all the stops for the holiday season with special festive themes and vendors.
What makes this market truly magical is its powerful social mission: all profits are donated to four local public schools, benefiting over 2,000 children. Shopping here means you’re directly supporting the local community, making every purchase feel meaningful. The atmosphere is friendly and neighborhood-focused, with a rotating lineup of over 150 independent local artisans, designers, and vintage dealers each week. Be sure to check their website before you go to see the theme for the week.

Beyond the Markets: A Tour of NYC's Legendary Holiday Lights
No trip for Christmas in New York is complete without indulging in the city’s legendary light displays. Many of these are conveniently located near the markets, allowing you to create a perfect festive itinerary.
The Rockefeller Center Christmas Tree: This is the undisputed king of all holiday displays. The single best piece of advice, straight from seasoned locals, is to visit at dawn. The early hour rewards you with a serene, crowd-free view that feels like a private showing.
Saks Fifth Avenue Light Show: Directly across from Rockefeller Center, the entire facade of the Saks Fifth Avenue flagship store is transformed into a dazzling musical light show that runs every ten minutes after dusk. It’s a spectacular and unmissable piece of holiday theater.
Dyker Heights, Brooklyn: For a truly over-the-top display, you must take a trip to this Brooklyn neighborhood. The residents engage in a friendly competition to create the most spectacular, professionally-done Christmas light displays imaginable. It’s an unforgettable experience that feels like stepping onto a movie set.
Your Magical New York Christmas Awaits
You now have the insider’s playbook to the very best of festive New York. Armed with this guide, you can navigate the city not as a stressed tourist, but as a savvy traveler ready to soak in the genuine magic of the season. From the iconic grandeur of Bryant Park to the creative buzz of Brooklyn, you have the keys to unlock a holiday trip filled with unique gifts, delicious food, and unforgettable memories. Your perfect Christmas in New York is no longer just a dream—it’s a plan.
Ready to plan your entire U.S. holiday adventure? Our comprehensive Travel Guide is packed with expert advice, detailed itineraries, and local secrets to unlock unforgettable experiences across the country.
Don't Miss Out! Subscribe for Exclusive Content
Subscribe


Comments 0
No comments yet
Be the first to share your experience!
Dont Miss Out! Subscribe for Exclusive Content

San Francisco Cherry Blossoms: A Local's Guide to the Blooms

Halloween SF: Haunts Without Horrors

SF Festivals: 7 Must-See Lineups

Christmas SF: Lights & Wharf Wonders

SF Pride: 6 Route & Party Hacks

Chinese New Year SF: Parade Essentials
The 7 Solo Female Travel Safety Rules You Can't Ignore
TrekGuider @trekguider
You feel the magnetic pull of the world, a deep-seated desire to explore ancient cities, wander through breathtaking landscapes, and discover it all on your own terms. The dream of solo travel is vibrant and powerful. But for so many women, that dream is shadowed by a persistent and paralyzing question: "But will I be safe?"
This isn't just a fleeting thought; it's a formidable barrier. It’s a shared, valid concern that echoes across the travel community. A staggering 66% of women who travel solo report worrying about their personal safety, and for the 59% of women who have yet to start their first independent journey, these concerns are the second-largest obstacle holding them back. The fear is real, and it is robbing you of what could be the most transformative experience of your life. But what if you could systematically dismantle that fear, replacing it with an unshakable foundation of competence?

This guide is your tactical blueprint to do exactly that. We are moving beyond vague reassurances and diving into the essential, non-negotiable rules of solo female travel safety. This isn't about seeing the world through a lens of paranoia; it's about equipping yourself with the knowledge to navigate it intelligently. For a complete overview of the journey, start with our comprehensive pillar guide, The Ultimate Guide to Solo Female Travel (15 Essential Tips). These seven rules, however, are the bedrock—the field-tested strategies that will transform you from a worrier into a prepared and confident global explorer.
Rule 1: Build a "Lifeline Home" Before You Leave
The single most important phase of your safety strategy happens before you ever pack a bag. Creating a strong communication and information bridge between you and a trusted emergency contact back home is non-negotiable. This "mission control" is your ultimate safety net, ensuring that if you are ever unreachable, someone you trust has every critical detail needed to help.
Your "lifeline" packet should be a comprehensive dossier containing both physical and digital copies of the following, based on recommendations from the U.S. Department of State:
A Complete Itinerary: Detail your trip on a day-by-day basis, including flight numbers, train schedules, and the names, addresses, and phone numbers of all booked accommodations.
Copies of All Important Documents: Include the photo page of your passport, any necessary visas, your driver's license, and a full copy of your travel insurance policy, complete with the policy number and the 24/7 emergency assistance phone number.
Financial Information: Provide photocopies of the front and back of every credit and debit card you are carrying. The international toll-free numbers on the back are essential for canceling them if they are lost or stolen.
A Pre-Arranged Communication Plan: Establish a clear plan for when you will check in (e.g., a quick text upon arrival in a new city). Crucially, agree on a protocol for what your contact should do if you miss a check-in (e.g., wait 12 hours, then contact your hotel, then contact the nearest embassy).

Pro-Tip: The single most effective safety action you can take in under five minutes is to enroll your trip with the U.S. Department of State’s free Smart Traveler Enrollment Program (STEP). This provides the nearest U.S. Embassy or Consulate with your itinerary, creating a three-way digital bridge connecting you, your emergency contact, and the State Department for a coordinated response in a worst-case scenario.
Rule 2: Master Your Sanctuary with an Unbreakable Arrival Protocol
Think of your accommodation as more than just a place to sleep. It’s your secure base of operations, your private sanctuary to rest and recharge. Ensuring its integrity from the moment you arrive is a critical habit that provides profound peace of mind. Adopt this methodical security check and perform it automatically every single time you enter a new room.
Prop the Door Open. Before you fully enter, use your main piece of luggage to prop the door open. This simple action prevents the door from closing and locking behind you, guaranteeing an immediate escape route should the room not be empty.
Conduct a Full Room Sweep. With the door still open, perform a quick but thorough physical search. Check under the bed, behind all curtains, inside closets, and in the bathroom, including behind the shower curtain.
Verify All Locks. Once the room is confirmed to be empty, close the door and immediately test all locking mechanisms. Engage the deadbolt, chain lock, or security latch. Go to every window and any balcony doors to ensure they lock securely.
Deploy Your Personal Security. Your own devices provide a layer of protection entirely within your control. Immediately place a rubber wedge doorstop alarm under the main door or install a portable door lock like an Addalock. These inexpensive, lightweight devices are highly effective at preventing unauthorized entry, even from someone with a key card.
Locate and Map Emergency Exits. Find the fire exit map on the back of the door. Identify the two nearest exits, then physically walk the route to each one, counting the doors you pass. This mental map is invaluable for navigating in darkness or smoke.
Perform a Hidden Camera Scan. In an age of miniaturized electronics, a quick scan for hidden cameras is a prudent measure. Use your phone's flashlight to look for the tell-tale glint of a tiny lens in unexpected places like smoke detectors, alarm clocks, and USB wall chargers. In the dark, use your phone's front-facing camera (which is more sensitive to infrared light) to scan the space. Look for the small, often blinking, IR lights used by night-vision cameras that are invisible to the naked eye.
Adopt a "Verify, Then Open" Door Policy. Make it your strict policy to never open your door to an unsolicited knock. If someone claims to be from housekeeping, call the front desk using the room phone to verify they sent a staff member to your room.

YOUR ULTIMATE SAFETY TOOLKIT
Mastering your environment is the first step to confident travel. True preparedness means having the right tools for every situation. Our free, downloadable Solo Female Travel Safety Guide is the perfect companion to these rules. It's a comprehensive checklist and resource guide covering everything from what to pack to what to do in an emergency.
Rule 3: Take Absolute Control of Your Ground Transportation
Moving through an unfamiliar city can be a point of high vulnerability. Whether you’re using a ride-sharing app or a local taxi, you must shift from being a passive passenger to an active participant in your own safety. Adhere to this strict set of protocols for every single ride.
The "Match, Name, Share" Protocol for Ride-Shares
Match: Before you get in, carefully match the vehicle's make, model, and license plate number with the information in the app. Check that the driver's appearance matches their profile photo. If anything is off, do not get in the car.
Name: This is a critical verification step. Do not approach a vehicle and ask, "Are you here for Jane?" This gives a potential imposter the information they need. Instead, from a safe position on the curb, ask the driver, "Who are you here for?" A legitimate driver will be able to state your name correctly.
Share: Before your ride begins, use the app's built-in "Share Trip Status" feature. This sends a live map of your journey to a trusted contact, allowing them to track your progress in real-time.
Universal Rules for Every Ride
The Backseat Protocol: As a solo traveler, always sit in the back seat on the side opposite the driver. This creates crucial physical distance and gives you access to two separate exits.
The Route Protocol: Keep your own mapping application, like Google Maps, open on your phone throughout the journey. If the driver takes a significant, unexplained detour, you are empowered to question it. If the response makes you uncomfortable, end the ride in a safe, well-lit public area.

Rule 4: Create Layers of Personal and Digital Security
Your solo female travel safety strategy should be built on layers and redundancy. This means pairing smart practices with an effective toolkit of personal security devices and ensuring your digital lifelines are always active.
Your Personal Security Toolkit
Personal Safety Alarm: This is arguably the most valuable device for a solo traveler. An alarm like the She's Birdie emits an extremely loud siren (130+ decibels) and a flashing strobe light to startle an attacker and attract immediate attention. They are small, legal everywhere, and attach to a keychain for instant access.
Anti-Theft Bag: Invest in a bag with features like RFID-blocking pockets (to protect from electronic skimming), slash-proof fabric, and lockable zippers. A crossbody style worn in front of your body offers the most security.
Portable Door Lock / Alarm: As mentioned in Rule 2, carrying your own lock gives you absolute control over the security of your room, ensuring your sanctuary remains impenetrable.

Your Digital Security Layer
Your phone is your map, translator, and lifeline. A solar-powered power bank adds a critical layer of resilience to a standard one, ensuring you can maintain a charge even during power outages or on multi-day treks.
Rule 5: Project Confidence and Practice Proactive Situational Awareness
How you carry yourself has a profound impact on how you are perceived. Projecting confidence—even when you're feeling uncertain—is a powerful deterrent. Walk with purpose, keep your head up, and make brief eye contact. This signals that you are aware of your surroundings, not an easy target.
This confidence is fueled by situational awareness. It's not about being paranoid; it's about being present.
Understand the Local Landscape: Before arriving, research common tourist scams. A 2024 report noted that 29% of solo female travelers had experienced a theft or attempted scam. Knowing the playbook for ploys like the "friendship bracelet" or "spilled drink" allows you to disengage before you become a victim.
Trust Your Intuition: Your intuition is your most finely tuned security equipment. If a person, place, or situation feels "off," it probably is. You do not need a logical reason. Honor it. Cross the street, leave the bar, get in a different train car. Acting on your intuition is not rude; it is intelligent.
Manage Your Inputs: Be mindful of your alcohol consumption. Your awareness is your primary defense, and anything that dulls it increases your vulnerability.

Rule 6: Embrace That Safety Anxiety Decreases with Experience
It's crucial to understand the psychology of solo travel fear. The data reveals a powerful truth: the act of traveling solo is the most effective antidote to the fear of it.
Among women who have taken fewer than six solo trips, 77% report worrying about safety. That number drops dramatically to just 55% for those who have traveled solo more than ten times. This establishes a direct, negative correlation between experience and anxiety.

Every time you successfully navigate a new city and overcome a challenge, you are collecting real-world evidence of your own competence. This direct experience systematically replaces abstract, media-fueled fear with managed, situational awareness. You learn that while vigilance is essential, you are far more capable than you imagined. The goal of your first trip is to break this cycle of fear and begin the empowering loop of experience.
Rule 7: Never Outsource Your Safety to Chance—The Travel Insurance Mandate
For a solo traveler, travel insurance isn't an optional add-on; it is a foundational pillar of your financial security. A cheap policy is not a good deal if it doesn't have the right coverage. When evaluating policies, ensure the plan includes strong coverage in these key areas:
Emergency Medical Coverage: A policy should offer a minimum of $250,000 in benefits.
Emergency Medical Evacuation: This covers the potentially astronomical cost of transporting you to a hospital with adequate facilities or back home.
Emergency Medical Reunion (Companion Coverage): This is vital for solo travelers. If you are hospitalized, this coverage pays for a family member's transportation and accommodation to be at your bedside, providing invaluable logistical and emotional support.
Trip Interruption and Cancellation: This reimburses your non-refundable trip costs if you have to cancel or cut your trip short for a covered reason.
Frequently Asked Questions About Solo Female Travel Safety
What's the single most important safety device I should buy?
A personal safety alarm. While a doorstop and anti-theft bag are excellent, a loud, attention-grabbing alarm is the most versatile tool for deterring a potential threat in any public situation, day or night.
I'm nervous about nightlife. Should I just avoid going out after dark?
Not at all! The key is to be strategic. Have your transportation planned in advance—know exactly how you're getting home. Nurse your drink and never leave it unattended. Stick to well-lit, reputable areas and consider starting with a structured activity, like a group tour or a show, rather than just wandering.
How do I handle street harassment without escalating the situation?
The most effective strategy is confident disengagement. Do not respond or make prolonged eye contact. Project purpose and keep walking. In many cases, a reaction is what the harasser is seeking. If you feel you are being followed, walk into a busy, open shop or restaurant immediately.
Are group tours a good option for a safety-conscious first-timer?
Absolutely. An estimated 75% of women who have never traveled alone would be more likely to do so on a group tour. They provide a "scaffolded" entry into the world of solo travel. You can find tours vetted and reviewed by other solo female travelers on platforms like TrekGuider, which is a great way to build foundational confidence.
Your Journey to Confident Exploration Starts Now
The narrative around solo female travel safety is too often dominated by fear. But the data tells a different, more empowering story of capability and resilience. These seven rules are your framework—a practical system for managing risk and moving through the world with intelligent confidence. By internalizing these strategies, you build a foundation of competence from which you can freely and bravely explore.
Now that you have the safety blueprint, the truly exciting part can begin. Explore our collection of expert-written Travel Guide resources to find your perfect destination, and remember to download the essential Solo Female Travel Safety Guide. The world is waiting for you to discover it—and yourself.
Meta Data Suggestions:
SEO Meta Title (59 characters): The 7 Essential Solo Female Travel Safety Rules for 2026
URL Slug: solo-female-travel-safety-rules
SEO Meta Description (154 characters): From accommodation security to transport protocols, these 7 non-negotiable solo female travel safety rules will empower you to explore the world with confidence.
Don't Miss Out! Subscribe for Exclusive Content
SubscribeComments 0
No comments yet
Be the first to share your experience!
Dont Miss Out! Subscribe for Exclusive Content

How to Avoid Travel Scams: A Global Guide

Is Public WiFi Safe? How to Protect Your Data Abroad

A Woman's Guide to Safe Travel: 10 Critical Tips

7 Hotel Safety & Security Tips for Peace of Mind

9 Beach Safety Tips That Could Save Your Life

How to Stay Safe While Hiking: A Hiker's Safety Guide
7-Day Solo Travel Itinerary: A Perfect First-Trip Template
TrekGuider @trekguider
You're ready for an adventure that's entirely your own. No more compromising on destinations, no more syncing schedules. Just you, the open road, and the profound freedom of solo travel.

But a blank page can be intimidating. The excitement of the idea is quickly replaced by the paralysis of planning. Where do I start? How do I build a solo travel itinerary that's exciting but not overwhelming? How do I stay safe?
The good news is that you don't need to reinvent the wheel. You need a proven framework, a reliable playbook to guide you. This article provides the ultimate solution: a flexible 7-day solo travel itinerary that acts as the perfect template for your first independent adventure. It’s designed to eliminate guesswork, build confidence, and ensure an unforgettable experience.
While planning a trip for one has a very different set of challenges than coordinating group travel, as detailed in our guide to Family Travel Ideas: The 2026 Guide to Unforgettable Trips, the need for a solid plan remains universal. This guide is your key to unlocking that journey, transforming apprehension into pure excitement.
Your Pre-Flight Checklist: Engineering a Stress-Free Start
A smooth trip begins long before you pack your bags. Solid preparation is the antidote to travel anxiety, transforming "what ifs" into "I've got this."

1. Choose a Beginner-Friendly Destination
For your first solo trip, set yourself up for success by picking a location known for its strong tourist infrastructure and safety. You're looking for a "soft landing."
Top Contenders: Think cities like Lisbon (Portugal Travel Guide), Dublin, Kyoto (Japan Travel Guide), or Vancouver. These spots are celebrated for being affordable, walkable, friendly, and supremely safe.
The Litmus Test: Can you get around easily on public transport? Is it known for being safe, particularly for solo travelers? Is Wi-Fi widely available?
2. Select Your Home Base Wisely
Your accommodation is more than a place to sleep; it's your sanctuary and command center.
Boutique Hostels (with Private Rooms): The gold standard for many first-timers. You get the social energy of a common room and organized tours, plus the quiet retreat of your own space. It's the perfect balance of community and privacy.
Boutique Hotels or Guesthouses: A step up in privacy and comfort. Small, locally-owned spots often provide a warmer, more personal touch than soulless chains, and the staff can be a goldmine of local tips.
Centrally Located Airbnbs: Ideal if you crave a "live like a local" vibe and a kitchen. Stick exclusively to hosts with a "Superhost" designation and dozens of positive reviews that specifically mention safety, cleanliness, and an excellent location.
3. A Quick Word on Budgeting for Your First Solo Trip
A clear budget isn't a restriction; it's freedom. It frees you from money-related stress on the road. For a 7-day city trip, a simple framework is:
Fixed Costs: Pre-booked flights and accommodation.
Daily Average: Set a realistic daily budget for food, activities, and transport. Research costs in your chosen city (e.g., a meal in Lisbon is far cheaper than in Zurich). A good starting point for many European or North American cities is $75-$125 per day.
Contingency Fund: Always have an extra 20% of your total budget tucked away in a separate account for unexpected opportunities or emergencies.
4. A Pro's Approach to Solo Safety
Your confidence is directly linked to how safe you feel. Build a fortress of preparation. For a deeper dive, especially for female travelers, our Solo Female Travel Safety Guide is an essential resource.
Digital Security: Download offline maps of your city on Google Maps. Use a VPN on public Wi-Fi. Scan your passport and important documents and save them to a secure cloud service like Dropbox.
Situational Awareness: The "Morning Photo" protocol is a great habit for solo travelers. Snap a quick selfie each morning. In an emergency, it provides an exact, current visual reference.
Contingency Plan: Before you leave, share your detailed itinerary with someone at home. Establish a simple check-in cadence (e.g., a quick "all good" text each night).
Financial Safety: Carry a "decoy" wallet with a small amount of cash and an expired credit card. Keep your primary cards and the bulk of your cash in a secure money belt or a hidden internal pocket. Never keep all your money in one place.
Pro-Tip: Download the Noonlight app. It's a discreet safety button on your phone. If you're feeling uneasy, you can hold your thumb on the button. Release it and don't enter your PIN, and it will automatically alert local authorities with your exact location.
Your Ultimate Pre-Trip Tool
Feeling organized is feeling confident. Before you book a single flight, download our free International Travel Checklist. It’s a comprehensive resource that covers everything from passports and visas to packing and travel insurance, ensuring you don't miss a single crucial step.
The Perfect 7-Day Solo Travel Itinerary Blueprint
This is your playbook. The specific sights will change, but the strategic rhythm of this week is designed to maximize discovery while preventing burnout.

Day 1: Land Softly, Start Slow
Your only goal on day one is to land softly. Forget the pressure to do anything "touristy." The mission is simple: arrive, check-in, and breathe.
Afternoon (Arrival & Settle): Navigate from the airport to your lodging using a pre-vetted option—an official taxi stand, Uber/Lyft, or the city's express train. Avoid unsolicited ride offers. Once you drop your bags, take 30 minutes to actually unpack. This small act of nesting transforms a sterile room into your personal space.
Late Afternoon (The Reconnaissance Walk): Take a short, aimless walk with a purpose: to locate your vitals. Find the nearest ATM, pharmacy, small grocery store, and metro/bus stop. This simple recon mission builds a mental map and makes you feel instantly more capable.
Evening (The Easiest Dinner Ever): Your first meal should be low-stress. Find a casual, well-lit café or bistro within a few blocks of your accommodation. Ask for a table with a view of the street. This isn't just dinner; it's your first immersion.
Day 2: Find Your Anchor, Catch the Vibe
Today is about orientation. You'll anchor yourself with a major landmark and then plug into the city's authentic energy.
Morning (The Iconic Anchor): Head to the city's most famous landmark—the one on all the postcards. Book your ticket online, weeks in advance, to bypass the soul-crushing queues. Seeing this "anchor point" early gives your mental map a center of gravity.
Lunch (A Feast for the Senses): Skip the tourist-trap restaurants and head for a bustling local food market. It's a vibrant, low-pressure way to sample authentic cuisine. Graze from different stalls, trying whatever looks and smells incredible.
Afternoon (The Ultimate Solo Travel Hack): Join a "free" walking tour (they run on tips, so bring cash). A passionate local guide will give you a brilliant crash course in the city's history, secrets, and layout. It's also an effortless way to be around fellow travelers.
Evening (Culture or Comfort): If you're energized, catch a local performance—traditional music, a play, anything that gives you a taste of the culture. If you're tired, there is zero shame in a simple dinner and an early night. Listen to your body.
Day 3: Pursue Your Passion
This is your trip. Today is dedicated entirely to whatever makes you tick.

Morning (The Deep Dive):
Art Lover? Lose yourself in a world-class museum or hunt for street art in a bohemian neighborhood.
History Buff? Explore that niche museum or archaeological site that fascinates you.
Foodie? Take a local cooking class. It's one of the best ways to meet people, learn a skill, and eat an amazing meal.
Nature Enthusiast? Escape to the city's largest park or botanical garden for a few hours of green therapy.
Afternoon (The Art of Getting Lost): Pick a neighborhood that intrigued you and put your phone on airplane mode. Allow yourself to wander without a destination. Follow a charming alleyway, pop into a random shop, sit on a bench. This is where the magic happens.
Evening (A Table for One, with a View): Treat yourself. Find a restaurant or rooftop bar with a spectacular view. Order a great meal, and toast to your adventure. Worried about dining alone? Bring a journal and write about your day—it makes you look like a mysterious travel writer, not a lonely tourist.
Day 4: Gain Perspective with a Day Trip
Escaping the city for a day provides a vital change of scenery and proves your growing travel competence.
Full Day: Choose a destination one or two hours away by train or bus. Think a coastal village, a historic castle, or a national park. The journey itself is part of the adventure.
The Mission: This trip breaks the routine and shows you a completely different facet of the country. It also flexes your navigation skills and builds immense confidence. Successfully planning and executing a day trip on your own is a huge milestone.
Logistics: Research train/bus schedules the night before. Pack a small daypack with a water bottle, snacks, a portable charger, and a light jacket.
Day 5: Live Like You Belong Here
Today, your goal is to blend in. Shed the tourist skin and adopt the rhythms of a local.

Morning (The Café Ritual): Find a small, neighborhood café far from the tourist trail. Order a coffee, grab a pastry, and settle in with a book or journal for an hour. Watch the morning commute, listen to the chatter—just be.
Mid-Day (A Mundane Mission): Do a normal-person errand. Browse a local bookstore, buy fruit at a grocer, or find a post office to mail cards home. These simple tasks ground you in the reality of the place.
Afternoon (Scheduled Downtime): Hit the pause button. You are not a travel machine. Go back to your room for a nap. Read a book on a park bench. Do absolutely nothing. This is a vital part of sustainable travel.
Evening (The Local's Recommendation): Ask a local you've had a pleasant interaction with—your barista, a friendly shopkeeper—"Where's your favorite place to eat around here?" Their recommendation will almost always be more authentic and delicious than anything on a top-ten list.
Day 6: The Open Road and a Fond Farewell
Leave this day largely unplanned. It's a blank page for you to fill with whatever your heart desires.
Morning (Encore or Exploration): Is there a neighborhood you fell in love with? Go back. Did a fellow traveler tell you about a hidden gem you can't stop thinking about? Go find it. This is your flex day to chase your curiosity.
Afternoon (Meaningful Mementos): If you're buying souvenirs, seek out items that tell a story. Skip the generic trinkets and look for local crafts, specialty foods, a vintage poster, or a book from a local author.
Evening (The Last Supper): Make your final dinner a celebration of your journey. Return to a favorite spot or try that one special place you've been saving. As you eat, reflect on the week. Think about what you've learned, the challenges you've overcome, and the person you've become.
Day 7: Depart with Your Head Held High
The last day is for a smooth, grateful exit. No frantic rushing.
Morning: Enjoy one last coffee and pastry at your favorite café. Take a final, mindful walk down a beloved street, soaking in the sights and sounds.
Pack & Go: Head back to your room for a final pack-up. Leave ample time for your journey to the airport. Strolling calmly to your gate is a far better feeling than sprinting.
At the Airport: Once you're through security, pause. Take a deep breath. You did it. You took the dream of solo travel and forged it into reality. Acknowledge the magnitude of that achievement.
Frequently Asked Questions
What is the best way to handle feeling lonely on a solo trip?
It's completely normal to feel a pang of loneliness. The best strategy is to be proactive. Stay in social accommodations like a boutique hostel, join a walking tour or a cooking class on days you crave interaction, and find a cozy café to simply be around the comforting buzz of other people.
Is it awkward to eat at restaurants alone?
Not at all! It's a skill that gets easier with practice. Start with casual cafes, bring a book or journal to feel more comfortable, and try sitting at the bar where you can often chat with the bartender. Soon you'll find it's a peaceful and empowering experience.
How can I stay safe when going out at night by myself?
A: Prioritize well-lit, busy areas and research neighborhoods beforehand. Tell someone where you're going, use ride-sharing apps like Uber instead of walking in unfamiliar areas late at night, and always be mindful of your drink. Trust your intuition—if a place feels off, leave immediately.
What's the most common mistake first-time solo travelers make?
The most common mistake is over-scheduling. New solo travelers often try to fill every single minute to avoid being alone with their thoughts. The real magic happens in the unplanned moments, so be sure to build plenty of downtime and flexibility into your itinerary.
Welcome Home, Traveler: This Is Just the Beginning
Walk through that arrival gate on your way home, and you won't be the same person who left. A solo trip is a declaration—proof that you are more capable, resilient, and fiercely independent than you might have ever allowed yourself to believe.

This solo travel itinerary was never just about seeing a new place; it was about discovering a new version of yourself. Use this template, adapt it, and carry the confidence you've earned into planning your next adventure. When you're ready to go from template to a fully-realized plan, our comprehensive Travel Guide is the perfect next step to turning your dream trip into a reality. Because this isn't the end of one journey; it's the beginning of a lifetime of them.
Read the full guide: Family Travel Ideas: The 2026 Guide to Unforgettable Trips
Don't Miss Out! Subscribe for Exclusive Content
SubscribeComments 0
No comments yet
Be the first to share your experience!
Dont Miss Out! Subscribe for Exclusive Content

Ultimate USA Holidays Guide: Top Picks

FTC Affiliate Disclosure Essentials: Stay Compliant as a Travel Creator

Essential Affiliate Tools: From Tracking to Full Optimization

Booking.com Affiliate Program Review: Pros, Cons, and Earnings Potential

Decoding Affiliate Commission Rates: Benchmarks for Travel Creators
