Budget Solo Travel: A Proven System for Trips Under $1000
TrekGuider @trekguider
Planning a solo trip should be thrilling. But for many, one question hangs in the air, casting a shadow of stress and analysis paralysis over the entire process: "How much will this actually cost?" You’ve scrolled through the endless, generic "tips," but you’re still left without a real plan, haunted by the specter of hidden fees, unexpected expenses, and the daunting idea that a trip under $1000 is pure fantasy.
This is not another list. This is your financial playbook. It’s a proven, three-phase system designed to dismantle uncertainty and empower you to plan an incredible adventure with total confidence. This guide to budget solo travel will give you the framework and the tools to build a realistic budget you can actually trust. A successful trip, however, involves more than just money. For a complete masterclass covering everything from safety to packing and meeting people, be sure to read our ultimate guide to .
The Strategic Foundation—The Decisions That Save the Most
The secret to a truly affordable solo trip isn't about pinching every penny until it screams. It’s about making a few smart, high-impact decisions long before you even think about packing. These foundational choices have the biggest impact on your bottom line and set the stage for a stress-free adventure.
Choose Your Playground Wisely
This is the single most important decision you will make. Your destination dictates the cost of everything else. A week in Zurich will cost exponentially more than a month in Hanoi, no matter how frugal you are. To keep your trip under $1000, you must focus on regions where your home currency has heavyweight buying power.
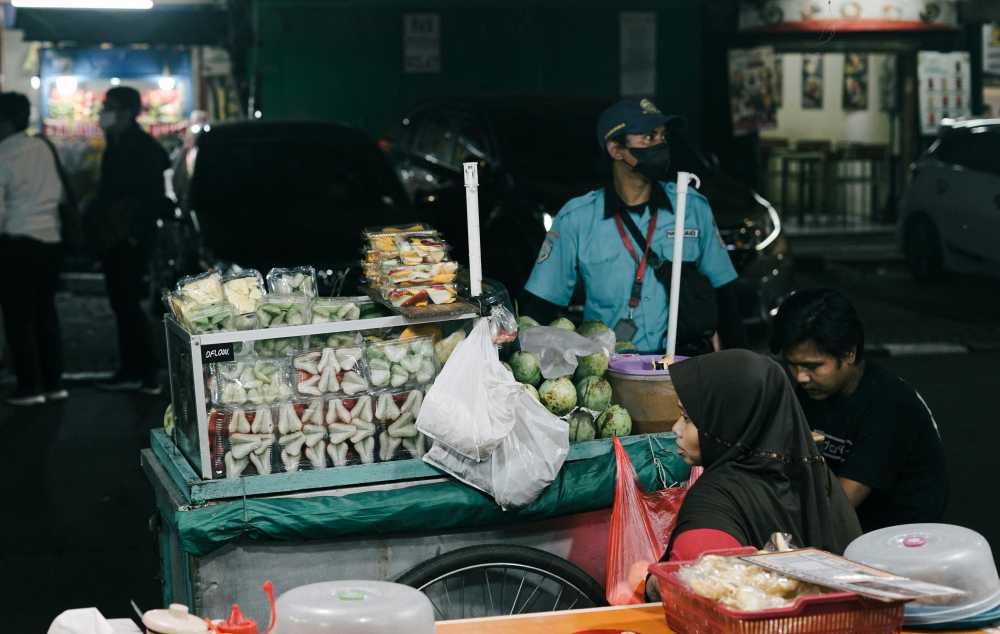
Southeast Asia (The Budget Gold Standard): Countries like Vietnam, Thailand, Cambodia, and Indonesia are legendary for a reason. You can feast on world-class street food for a couple of dollars, secure a clean, private guesthouse room for $20-$30, and witness breathtaking landscapes that cost absolutely nothing to enjoy.
Eastern Europe (Culture Without the Cost): Forget the well-trodden paths of Paris and Rome. Cities like Budapest (Hungary), Prague (Czech Republic), Krakow (Poland), and Lisbon (Portugal) offer centuries of history, stunning architecture, and vibrant culture at a price that feels like a pleasant time warp.
Latin America (Adventure Capital): For raw adventure and rich culture, destinations like Mexico, Colombia, Bolivia, and Guatemala provide unparalleled value. You can explore ancient Mayan ruins, hike active volcanoes, and immerse yourself in dynamic local life, all on a remarkably modest budget.

Master the Calendar
Timing isn't just important; it's everything. Every destination has three travel seasons, and knowing the difference is like having a cheat code.
High Season: Peak tourist time with postcard-perfect weather, but also the biggest crowds and eye-watering prices.
Low Season: The off-season, often with challenging weather, fewer open attractions, and rock-bottom prices.
Shoulder Season: The magic window. Nestled between the high and low seasons (typically April-May and September-October in the northern hemisphere), this is the budget traveler's sweet spot.
Traveling during the shoulder season means you get the best of both worlds: pleasant weather, far fewer tourists cluttering your photos, and dramatic drops in the cost of flights and accommodations. Visiting the Greek Islands in May instead of July, for instance, can easily cut your two biggest expenses by 30-50%.
Build Your Budget Blueprint
Let’s reframe the word "budget." It isn't a restriction; it's a permission slip. A well-crafted budget doesn't tell you what you can't do; it gives you the freedom to do what you want to do, without the guilt or anxiety. Here’s how to build one you can rely on.
Set Your Ceiling: Before anything else, define your absolute maximum trip cost. For this playbook, we're targeting a complete trip under $1000.
Become a Researcher: Open a spreadsheet and start plugging in real numbers. Use sites like Kayak, Booking.com, and detailed travel blogs to estimate average costs for your chosen destination. Be thorough.
Flights/Major Transport: Your biggest single purchase.
Accommodation: Your largest daily expense.
Food & Drink: A realistic mix of meals out, street food, and groceries.
Activities & Tours: Museum entries, day trips, cooking classes.
Local Transport: Subways, buses, and the occasional ride-share.
Travel Insurance: Non-negotiable. Don't even consider leaving home without it.
Build a Financial Safety Net: This is the pro move. Once you have your total estimated cost, add a 15-20% "contingency fund." This isn't for overspending; it’s for the unexpected. It’s the money that lets you say "yes" to a spontaneous adventure or handle a missed train without a panic attack. It’s the key to true peace of mind.

With that blueprint in hand, it’s time to move from strategy to action.
The Booking Engine—Locking in Value on Your Biggest Expenses
This is where the rubber meets the road. With your strategic plan in place, you can now book the core components of your trip with surgical precision, ensuring you get the absolute best value for every dollar spent.
Accommodation Strategy
For a solo traveler, a standard hotel room is almost always the least imaginative and most expensive option. The world of alternative accommodations is where you’ll find incredible value and far more interesting experiences.
Hostels (The Social Hub): The undisputed champion of budget solo travel. They offer dorm beds for incredibly low prices and have a built-in social atmosphere that’s perfect for meeting other travelers. If dorms aren’t your scene, a private room in a quality hostel gives you the perfect blend of privacy and community at a price well below a hotel.
Guesthouses & Local Inns: These smaller, often family-run establishments offer a direct line to the local culture. They're typically much cheaper than large hotel chains and infinitely more charming.
Apartment Rentals (with a Kitchen): For stays of three days or more, sites like Airbnb can be fantastic value. The real secret weapon here is the kitchen. Being able to prepare your own breakfast and the occasional dinner will slash your daily food costs.

How to Slay the Single Supplement Dragon
The "single supplement" is an infuriating fee that tour companies and cruise lines charge solo travelers to cover the perceived loss of a second person in a double-occupancy room. It’s a penalty for your independence, and you should refuse to pay it. Here’s how:
Seek Out Solo-Friendly Companies: Tour operators like Intrepid Travel, G Adventures, and Overseas Adventure Travel are built for travelers like you. They’ll match you with a same-sex roommate to eliminate the fee entirely.
Use the Calendar to Your Advantage: Companies are far more likely to waive the fee during the shoulder season when they have more empty spots to fill.
Become a Last-Minute opportunist: If your schedule is flexible, call companies a week or two before a tour's departure. They may be desperate to fill a final spot and will gladly waive the fee to make a sale.
Don't Be Afraid to Ask: If a solo option isn't listed online, pick up the phone. A friendly, direct request can often work wonders.
Transportation Hacks
Getting from Point A to Point B is a major budget item. A few smart moves here can free up hundreds of dollars for more exciting things.
Pack Light, Win Big: Master the art of carry-on-only travel. Checked baggage fees are a massive profit center for airlines, especially budget carriers. A well-packed carry-on is free, keeps you nimble, and prevents the nightmare of lost luggage.
Make Your Travel Day Your Hotel Night: For longer overland journeys, an overnight train or bus is a brilliant two-for-one hack. It combines your transportation and accommodation costs into a single ticket, saving you a night's expense and a full day of travel time.
Be a Flexible Flier: Use flight aggregators like Google Flights and Skyscanner like a pro. Their "price graph" and "entire month" views are your best friends, instantly showing you the cheapest days to fly. Always search in an incognito browser to prevent price hikes based on your search history.
Pro-Tip: When comparing flight prices, always factor in the "hidden" cost of airport transfers. A flight that looks $50 cheaper might land at a remote airport where a $70 taxi ride is your only option, completely negating your savings.
The Execution Playbook—Living Smart on the Ground
You’ve arrived. Your careful planning has paid off. Now, it's all about execution. Your daily habits and micro-decisions will determine your budget's success. This is where you shift your mindset from "tourist" to "savvy local."
The Food Budget
You don’t have to survive on protein bars to eat affordably. The key is a "High-Low" hybrid approach that lets you experience the best of the local food scene without blowing your budget.
Make Lunch the Main Event: In many cultures, lunch is the biggest meal of the day. Look for a "menu of the day" (or menu del día) where you can get a multi-course, high-quality meal for a fantastic price. Have a lighter, cheaper dinner.
Go on a Supermarket Safari: Your local grocery store is more than just a place for supplies; it’s a cultural institution. It’s perfect for grabbing breakfast items, picnic lunches, and local snacks.
Trust the Streets: In many destinations, especially in Asia and Latin America, the best, most authentic food is found at bustling street food stalls for a dollar or two. It’s a delicious, ultra-affordable way to dive deep into the local cuisine.

Maximize Your Experience, Not Your Spending
The most memorable travel moments are rarely the most expensive. Every city is overflowing with incredible, zero-cost experiences for those who know where to look.
Take a Free Walking Tour (On Day One): This should be your first activity in any new city. It’s a crash course in history, layout, and local culture. You’ll get your bearings and receive priceless insider tips from your guide. Just be sure to tip them what you feel the tour was worth.
Explore Public Parks and Spaces: From the lush gardens of Paris to the sprawling beaches of Rio, a city's public spaces are its soul. They cost nothing to enjoy and are perfect for people-watching.
Hunt for Free Museum Days: Nearly every major museum offers free admission on certain days of the month or evenings of the week. A quick Google search can save you a significant amount on entry fees.
Embrace the Art of Wandering: The single best way to discover a city's hidden courtyards, charming side streets, and authentic local life is to put away the map and simply wander.

Your Blueprint for Affordable Adventure
This isn't just a collection of tips; it's a mindset. You now understand that successful budget solo travel is not a competition to spend the least amount of money possible. It's about the strategic allocation of your resources to maximize experience, discovery, and joy. It's the difference between being cheap and being smart.
Avoid the trap of "false economies"—like booking a hotel far outside the city to save $10, only to spend $15 and two hours on transport each day. But also, know when to embrace the "strategic splurge"—that one incredible meal, cooking class, or guided tour that will become the key element memory of your entire trip. You have the playbook. You have the system. You have the confidence to reject the anxiety of the unknown and step into the incredible freedom of solo travel. The world is not as expensive as you think.
Frequently Asked Questions (FAQ)
How much money do I really need for a trip under $1000?
Excluding your main international flight, a budget of $1000 can comfortably last for 2-4 weeks in high-value regions like Southeast Asia or parts of Eastern Europe. For a one-week trip including flights from the US, you’ll need to target shoulder-season deals to nearby destinations like Mexico and Central America, or watch for flash sales to Europe.
Is it cheaper to stay in a hostel or an Airbnb when solo?
A hostel dorm bed will almost always be your cheapest nightly option. A private room in a hostel is often comparable in price to a basic room in an Airbnb. An entire Airbnb apartment only becomes cost-effective if you stay long enough and use the kitchen religiously to offset the higher upfront cost.
What are the best apps for budget solo travel?
Skyscanner/Google Flights: For finding the cheapest flight dates.
Hostelworld/Booking.com: For finding and booking affordable accommodation.
Rome2rio: For figuring out the cheapest way to get between cities.
Trail Wallet/TravelSpend: For tracking every penny of your expenses in real-time.
How do I handle currency conversion and ATM fees abroad?
First, get a debit card from a bank that charges zero foreign transaction fees and reimburses ATM fees (Charles Schwab Bank is excellent for this). Always decline the "dynamic currency conversion" offered by ATMs and card machines—it's a scam with a terrible exchange rate. Always choose to be charged in the local currency.
Read the full guide: Anxious to Adventurous: The Ultimate Guide to Solo Travel Confidence
Don't Miss Out! Subscribe for Exclusive Content
Subscribe


Comments 0
No comments yet
Be the first to share your experience!
Dont Miss Out! Subscribe for Exclusive Content

Ultimate USA Holidays Guide: Top Picks

FTC Affiliate Disclosure Essentials: Stay Compliant as a Travel Creator

Essential Affiliate Tools: From Tracking to Full Optimization

Booking.com Affiliate Program Review: Pros, Cons, and Earnings Potential

Decoding Affiliate Commission Rates: Benchmarks for Travel Creators

Top 11 High-Paying Affiliate Programs for Travel Bloggers
5 Passive Income Ideas for Your Travel Blog
TrekGuider @trekguider
Let’s be honest: you didn’t launch a travel blog to build yourself a different kind of cubicle. The dream was freedom—an income untethered from a desk, a business that could fund your adventures. Yet the reality for most creators is a hamster wheel of content creation. You’re stuck on a content treadmill, constantly creating, posting, and promoting just to stay afloat. Your blog feels less like a passport to freedom and more like a demanding job that has followed you around the world.
The problem is a strategic one. You’re trapped trading time directly for money through freelance articles or one-off sponsorships, which means if you stop working, the money stops flowing. This constant hustle is the fast track to burnout, leaving your dream of a truly independent lifestyle feeling impossibly out of reach.

It’s time to stop trading hours for dollars and start building assets. The solution is to fundamentally shift your strategy toward building a portfolio of passive income streams—systems and products that work for you 24/7, whether you’re on a plane, exploring a new city, or fast asleep. This guide provides five proven, actionable ideas for passive income blogging. This is your blueprint for creating automated revenue engines that will finally decouple your income from the hours you work. Think of this as a crucial chapter in your business education; for the complete curriculum on building a modern creator enterprise, be sure to read our ultimate guide to How to Make Money Online: A Creator's Guide for 2026.
The Fundamental Shift: Trading Hours for Assets
Before we dive into the tactics, it's critical to internalize the foundational mindset shift required for success. Passive income isn't "money for nothing." As defined in lifestyle business design, it is revenue that, after an initial investment of time and effort, continues to be generated with minimal ongoing labor.
It’s the difference between Active and Passive Income:
Active Income is when you get paid for your direct effort. Think of a freelance article, a sponsored Instagram post, or a one-on-one coaching call. The work is finite, and so is the payment.
Passive Income is when you get paid because you own an asset that creates value. Think of an SEO-optimized blog post that earns affiliate commissions for years, or a digital guide that sells automatically every single day.

You are moving from the role of a service provider to an asset builder. Every idea that follows is a different type of digital asset you can build. Your goal is to create a portfolio of them.
1. Craft Evergreen Affiliate Content That Ranks and Earns for Years
Affiliate marketing is often a blogger's first foray into making money, but not all affiliate content is created equal. The key to making it a source of true passive income is to focus exclusively on creating evergreen content that is optimized for search engines (SEO). A post about a fleeting travel trend might get a burst of traffic, but an in-depth guide to "The 5 Best Carry-On Backpacks for Digital Nomads" can attract a steady stream of visitors from Google—and generate commissions—for years after you hit publish.
This is the very definition of a passive income asset. According to performance marketing industry analysis, a single piece of high-ranking content can generate commissions for years with no additional effort, making it an incredibly scalable model.
Your Action Plan for Passive Affiliate Income:
Identify High-Intent Keywords: Use an SEO tool to find long-tail keywords that signal a user is close to making a purchase. Think "best travel insurance for Europe," "what to pack for Southeast Asia," or "REI vs. Patagonia backpack review."
Go Deeper Than the Competition: Your goal is to create the single best resource on the internet for that specific query. This often means writing long-form articles (2,000+ words) that are well-researched and packed with your genuine, first-hand experience.
Build Strategic Comparison Tables: For product-focused articles, a well-structured comparison table is a conversion powerhouse. These tables organize key features, pros, and cons, allowing the reader to make an informed decision easily. Place your affiliate links within a clear "Check Price & Availability" button to capture the user at their highest point of intent.
Prioritize Trust Above All: The currency of affiliate marketing is trust. Only recommend products and services you have personally used and genuinely believe in. Write balanced, honest reviews that include both the good and the bad. This authenticity is what will ultimately drive conversions.
Pro-Tip: Focus your efforts on promoting "high-ticket" items or recurring subscriptions. Earning a 6% commission on a $2,600 G Adventures tour ($156) is a much higher-leverage use of your time than earning 3% on a $20 travel adapter. Similarly, promoting a service like Dollar Flight Club with a 50% recurring commission builds a predictable, compounding income stream.

2. Monetize Traffic with Premium Display Ads for True Passive Income Blogging
Display advertising is perhaps the purest form of passive income for bloggers. Once your blog achieves a consistent level of traffic, you can join a premium ad network that will automatically place high-quality ads on your site. You get paid based on the number of impressions (views), meaning your entire back catalog of content becomes a revenue-generating asset. An old, popular post about "Things to Do in Paris" can earn money from ads every single day without you ever touching it again.
The key is to understand that this is a volume game. Meaningful income from ads is only possible after you've built a substantial audience.
Your Action Plan for Passive Ad Revenue:
Focus 100% on SEO Traffic: Your single objective to unlock this income stream is to grow your organic traffic from Google. The strategy is simple: consistently publish high-quality, helpful content optimized around keywords your target audience is searching for.
Aim for Premium Network Thresholds: Forget about beginner networks like Google AdSense. The payouts are incredibly low. Your goal should be to qualify for a premium ad network, which will dramatically increase your revenue. The industry benchmarks are:
Mediavine: Requires 50,000 monthly sessions.
Raptive (formerly Adthrive): Requires 100,000 monthly pageviews.
Optimize for User Experience: While it may seem counterintuitive, the best way to maximize ad revenue is to create a great user experience. A fast-loading site with well-structured, easy-to-read content will keep readers on your pages longer, which in turn increases ad impressions and revenue. Ensure your site is mobile-friendly, as the majority of traffic comes from mobile devices.
3. Create a "Sell While You Sleep" Digital Travel Guide
Transitioning from promoting others' products to creating and selling your own is the ultimate step in building a scalable business. Digital products, like eBooks or guides, are the perfect "create once, sell forever" asset. After an initial investment of time to create a comprehensive, high-value digital guide, you can sell it an unlimited number of times, generating revenue automatically with each download.
This model offers exceptionally high profit margins and gives you full control over the product and pricing. It’s how you build a truly independent business in a creator economy projected to nearly double from $250 billion to almost $500 billion by 2027.

Your Action Plan for Creating a Digital Guide:
Validate Your Idea First: The biggest mistake is creating a product nobody wants. Dive into your audience's comments and emails. What destination do they ask about most? What part of trip planning do they find most stressful? Their pain points are your product ideas.
Outline and Write with Intense Value: A great guide is both inspirational and intensely practical. Structure your content logically with a hyperlinked table of contents for easy navigation on mobile. Go beyond generic advice and share your unique, hard-won insider tips that can't be found elsewhere.
Design with a User-Friendly Tool: You don't need to be a graphic designer. A tool like Canva offers professional, easy-to-use templates that allow you to create a beautiful, polished guide. Prioritize a clean layout, large fonts, and your own high-quality photos.
Sell on a Specialized Platform: Once your masterpiece is complete, you need a world-class storefront. A dedicated marketplace like TrekGuider is the ideal place to sell your high-quality Travel Guide. It provides a professional, ready-made platform to connect with a global audience of passionate travelers who are actively searching for expert resources just like yours.
4. Sell Lightroom Presets and Digital Templates
A fantastic and highly popular passive income stream for travel creators with a distinct visual style is selling Lightroom presets. These are pre-packaged photo editing settings that allow your followers to achieve your signature aesthetic in their own photos with a single click. Like a digital guide, presets are created once and can be sold infinitely, providing a highly scalable and passive source of income.
Beyond presets, you can apply this same model to any digital template that saves your audience time and stress. This could include:
Customizable Itinerary Templates: Structured planning documents in Notion or Google Sheets.
Printable Travel Planners: A PDF pack including budget trackers, packing lists, and journal prompts.
Video LUTs: Color grading presets for fellow videographers.
Your Action Plan for Selling Presets & Templates:
Define Your Unique Style: Your visual brand is your product. Analyze your most popular photos. What makes them stand out? Is it a moody, cinematic look or a bright and airy feel? Package this style into a cohesive set of 5-10 presets.
Create a High-Converting Sales Page: Your sales page must visually demonstrate the transformation. Use compelling before-and-after photos to show customers exactly what your presets can do for their images.
Leverage a "Pay What You Want" Freebie: The best way to build an audience for your paid presets is to offer one or two for free as a lead magnet. This gives potential customers a risk-free way to try your product and see the quality for themselves.
CTA Block: Get Your Free Travel Lightroom Presets!
Ready to make your travel photos look stunning with a single click? Download our exclusive Free Travel Lightroom Presets! This starter pack is designed to give your images a professional, polished look and is the perfect introduction to the power of preset editing.
5. License Your Stock Photos and Videos
As a travel blogger, your hard drive is a goldmine. The thousands of high-quality images and video clips you've captured on your journeys are valuable assets. By uploading this content to stock photography platforms, you can license it to businesses, marketers, and other creators around the world, creating a small royalty for each download with no further effort required per sale.
While a single sale might be small, hundreds or thousands of downloads over many years can accumulate into a significant and remarkably passive income stream. You are simply monetizing the byproducts of the work you are already doing.
Your Action Plan for Selling Stock Media:
Sign Up for Major Platforms: Focus your efforts on the largest stock media marketplaces to maximize your potential audience. Top platforms include:
Adobe Stock
Shutterstock
Getty Images
Curate and Keyword Carefully: Don't just upload everything. Select your sharpest, best-lit, and highest-quality images. The key to getting your content discovered is careful keywording. Be descriptive and specific. Instead of "beach," use tags like "tropical beach, white sand, turquoise water, palm trees, sunrise, Thailand."
Remove Branding and Logos: To be commercially viable, your photos must be clean of any recognizable branding, logos, or trademarks.
Pro-Tip: Start shooting with stock in mind. When you're traveling, take a few extra minutes to capture generic, "evergreen" shots. These include landscapes without people, close-ups of food, architectural details, and shots that evoke a mood like "adventure" or "relaxation." These types of images have a much broader commercial appeal.
Your Journey to Financial Freedom Starts Now
Building a profitable blog that provides true freedom is a marathon, not a sprint. The path requires a strategic and deliberate shift in focus from being a content creator who gets paid for their time to a business owner who gets paid for the assets they own. The five ideas outlined above are your blueprint for building those assets.

You now have a clear answer to the question of how to achieve passive income blogging. Don't let yourself be overwhelmed by trying to do everything at once. Choose one idea that excites you the most and aligns with your current strengths. If you're a talented photographer, start with presets. If you have deep expertise in a specific destination, start outlining your digital guide. Take the first step today to build an asset that will pay you back for years to come.
Frequently Asked Questions (FAQ)
1. Is it better to focus on one passive income stream or build several at once?
Focus on one, then stack. The most successful creators follow a "Monetization Ladder." They don't try to do everything at once. Master creating evergreen affiliate content first. Once that system is working, use your authority and cash flow to invest time in building your first digital product. Mastering one stream before moving to the next is the key to sustainable growth.
2. How much traffic do I need to start earning passive income?
This depends entirely on the model. For affiliate marketing or selling your own low-cost digital product, you can start earning with as little as a few thousand pageviews per month if your audience is highly targeted and engaged. For display advertising to be truly worthwhile, you should aim for the 50,000+ monthly session threshold required by premium networks.
3. What's the most common mistake bloggers make when trying to earn passive income?
The biggest mistake is impatience. Passive income streams are assets that take time to build and appreciate. Bloggers often give up on SEO after a few months or launch a digital product to a tiny audience and get discouraged by low sales. True passive income is the reward for long-term, strategic effort.
Meta Data Suggestions:
SEO Meta Title (Under 60 characters):
5 Passive Income Ideas for Your Travel Blog (2026)
URL Slug:
passive-income-ideas-travel-blog
SEO Meta Description (Under 155 characters):
Discover 5 proven passive income ideas for your travel blog. Learn to build assets that make money 24/7, from digital guides to affiliate marketing.
Read the full guide: The Travel Blog Business Plan: How to Make Real Money in 2026
Don't Miss Out! Subscribe for Exclusive Content
SubscribeComments 0
No comments yet
Be the first to share your experience!
Dont Miss Out! Subscribe for Exclusive Content
FTC Affiliate Disclosure Essentials: Stay Compliant as a Travel Creator
Essential Affiliate Tools: From Tracking to Full Optimization

Avoid These 5 Affiliate Landing Page Mistakes for Better Conversions

Affiliate Keyword Research Mastery for Travel Blogs
Booking.com Affiliate Program Review: Pros, Cons, and Earnings Potential
Decoding Affiliate Commission Rates: Benchmarks for Travel Creators
The Ultimate Travel First Aid Kit Checklist (2026)
TrekGuider @trekguider
But it doesn’t have to be that way. The single most powerful tool for ensuring a healthy, stress-free journey is one you create before you even leave home: a comprehensive travel first aid kit. This isn’t just a box of bandages; it’s a personalized arsenal of preparedness that empowers you to handle common health issues with confidence and ease. Building your own kit is at the heart of the proactive mindset we cover in our comprehensive The Ultimate Guide to Travel Safety: A 2026 Playbook. Think of this guide less as a simple shopping list and more as a masterclass in preparedness, backed by pharmacist-approved advice to help you build the ultimate defense against travel’s minor medical curveballs.
DIY vs. Pre-Made: Which Travel First Aid Kit is Right for You?
Before we dive into the specific items, it’s worth considering whether to build your kit from scratch or buy a pre-made one.
Pre-Made Kits: These offer undeniable convenience. They come in a compact case and provide a decent baseline of supplies. However, they are often filled with low-quantity, generic items and may lack the specific medications you need for your trip.
DIY Kits: Building your own kit requires a bit more effort upfront but is superior in every other way. It allows you to choose high-quality brands, pack sufficient quantities, and tailor the contents specifically to your destination, your planned activities, and your personal health needs.
Our recommendation? Start with a high-quality pre-made kit as your base and then use this checklist to supercharge it, swapping out generic items and adding the crucial medications and tools it’s missing. This hybrid approach gives you the best of both worlds.
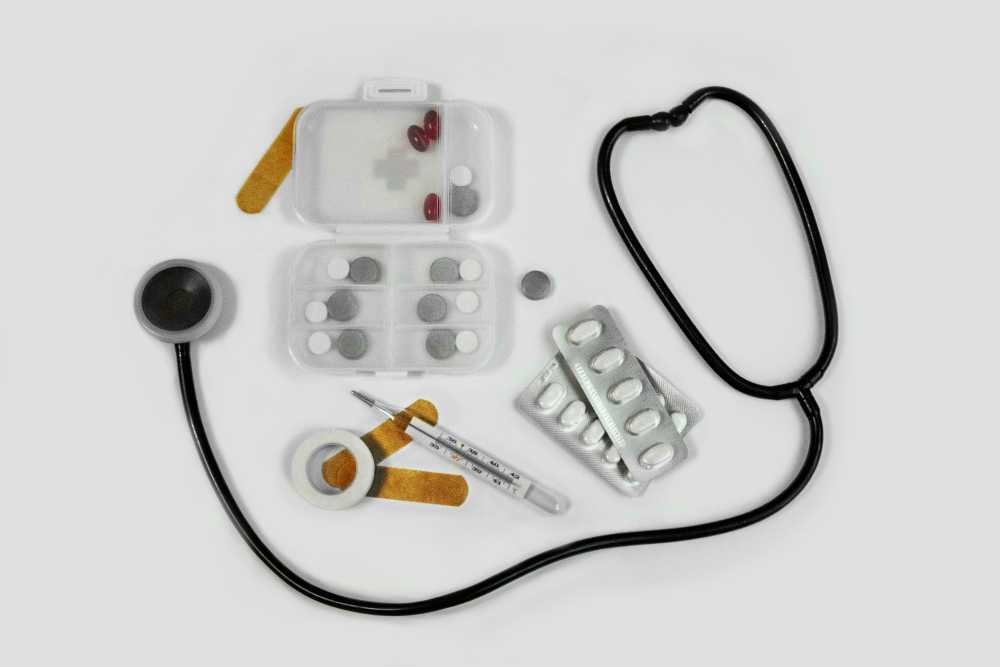
The Core Components of Your Ultimate Travel First Aid Kit
A truly effective travel first aid kit is organized like a mobile clinic, with specific supplies to treat the most common categories of travel-related ailments. Here is the definitive breakdown of what you need.
Wound & Burn Care: For Life's Little Scrapes
From a papercut to a scraped knee on a cobblestone street, any break in the skin is an open invitation for infection, especially in new environments. Here’s how you shut that door, fast.
Antiseptic Wipes (BZK or alcohol-based): For cleaning wounds, scrapes, and your hands before providing treatment. Individual packets are perfect for travel.
Antibiotic Ointment (e.g., bacitracin): A crucial step to prevent infection in minor cuts, scrapes, and burns after cleaning.
Assorted Adhesive Bandages: Pack a variety of sizes. Fabric bandages are generally more durable and flexible than plastic ones.
Butterfly Bandages / Wound-Closure Strips: Essential for taping the edges of a minor cut together to help it heal cleanly.
Sterile Gauze Pads and a Roll of Gauze: For dressing larger wounds or as a compress to control bleeding. Pack a few different sizes.
Medical Adhesive Tape: To secure gauze and bandages in place.
Moleskin or Blister Treatment Pads: An absolute lifesaver for any trip involving significant walking or hiking. Apply it as soon as you feel a "hot spot" to prevent a blister from forming.
Aloe Vera Gel: Provides soothing relief for minor sunburns.
Pain, Fever & Sprains: Managing Aches and Injuries
Long days of sightseeing, sleeping in unfamiliar beds, and carrying luggage can lead to aches and pains. Be prepared to manage them effectively so they don't slow you down.
Pain Relievers/Fever Reducers: Pack both an ibuprofen-based and an acetaminophen-based option. Pharmacists consistently recommend trusted brands like Advil/Motrin (Ibuprofen) for inflammation and pain, and Tylenol (Acetaminophen) for general pain and fever.
Aspirin: While not for general pain relief for everyone, a dose of aspirin can be life-saving for an adult experiencing symptoms of a heart attack.
Elastic Wrap Bandage: Invaluable for providing support and compression to a sprained ankle, wrist, or knee.
Instant Cold Packs: These single-use packs are activated by squeezing them and are excellent for reducing swelling from sprains, strains, and other minor injuries in the first 24-48 hours.
Pro-Tip: Decant pills into small, clearly labeled travel containers to save space, but take a photo of the original packaging first. This helps you remember dosages and provides information for pharmacists or doctors abroad if needed.

Digestive Issues: Your Defense Against Traveler's Diarrhea
Let’s be direct: traveler’s diarrhea is the single most common illness to strike travelers, affecting up to 80% of visitors in some destinations. Having a dedicated section in your kit to manage digestive distress is absolutely critical.
Anti-diarrhea Medication: To manage symptoms when you need to travel or get through a planned activity. The top pharmacist-recommended brand is Imodium (Loperamide).
Antacids: For relief from indigestion, heartburn, and general upset stomach. Pepto-Bismol is another pharmacist-favorite that can also help with mild diarrhea.
Oral Rehydration Salts: This is arguably the most important item in this section. Dehydration is the primary risk of diarrhea and vomiting. These pre-measured packets mix with safe, bottled water to replenish the essential fluids and electrolytes your body has lost.
Anti-nausea or Motion Sickness Medication: Essential if you’re prone to motion sickness on planes, boats, or winding bus rides.
Allergies, Bites & Skin: Soothing Irritations
New environments mean new pollens, unfamiliar insects, and different plants. Be ready to tackle itches, rashes, and allergic reactions before they become a major annoyance.
Antihistamine (e.g., diphenhydramine): For treating allergic reactions, hives, and severe itching. Note that some antihistamines can cause drowsiness.
Hydrocortisone Cream (1%): A topical steroid cream that provides fast relief from the irritation and itching of rashes and insect bites.
Insect Repellent: In any region with mosquito-borne illnesses like Dengue or Malaria, this is as important as your passport. Choose a repellent with an effective active ingredient like DEET or Picaridin.
Epinephrine Auto-Injector (e.g., EpiPen): This requires a prescription and is absolutely essential for travelers with a history of severe allergic reactions (anaphylaxis).
Ready to Pack Like a Pro?
Your travel first aid kit is a critical piece of your travel puzzle, but it's not the only one. To ensure you don't overlook a single essential item—from documents and finances to clothing and gear—you need a master list. Our comprehensive, free checklist has you covered.
Download Your Free International Travel Checklist Now!
Essential Tools & Personal Medications
The final layer of your kit includes the tools to use your supplies effectively and your own personal health necessities.
Fine-Point Tweezers: For removing splinters, ticks, or other foreign objects from the skin.
Small, Rounded-Tip Scissors: For cutting medical tape, gauze, or moleskin. (Ensure they meet TSA guidelines if packing in a carry-on).
Disposable Non-Latex Gloves: To protect your hands and prevent infection when treating a wound on yourself or someone else.
Digital Thermometer: For accurately checking for fever.
Personal Medications: This is the most critical category. Pack a sufficient supply for your entire trip, plus at least a few extra days' worth in case of delays. Always keep your personal medications in your carry-on luggage in their original, labeled containers.
Pro-Tip: Before you leave, ask your doctor for a letter describing your condition and the medications you take, including their generic names. Keep a digital copy of this and your prescriptions on your phone. This can be invaluable if your medication is lost or you need to see a doctor abroad.

Beyond the Basics: Customizing Your Kit
The ultimate travel first aid kit is not one-size-fits-all. Once you have the core components, elevate your preparedness by customizing it for your specific journey.
By Destination:
Tropical/Developing Countries: Add anti-fungal cream, more insect repellent, and potentially a prescription for a standby antibiotic for severe traveler's diarrhea (consult your doctor).
High-Altitude Destinations: Speak with your doctor about medication to prevent altitude sickness.
By Activity:
Hiking/Trekking: Double down on blister care (moleskin, gel pads), pack an elastic wrap for sprains, and add pain-relieving gel.
Beach Vacation: Add extra aloe vera gel, sting-relief spray, and waterproof bandages.
By Traveler:
With Children: Include children’s formulations and dosages of pain/fever reducers, kid-friendly bandages, and any specific allergy medications they need.
Travel First Aid Kit FAQs
A great kit anticipates problems. Here are answers to common questions that take your preparedness to the next level.
1. What’s the first thing I should do if I get traveler’s diarrhea?
According to the CDC and travel medicine doctors, the first and most important step is oral rehydration. Dehydration is the biggest risk. Start sipping an Oral Rehydration Solution (ORS), sports drinks, or clear broths immediately. For mild to moderate cases that don't have a high fever or blood, an antimotility drug like Loperamide (Imodium) can help manage the symptoms. If symptoms are severe, incapacitating, or include a high fever or blood, it's time to consider a prescribed standby antibiotic and seek medical advice.
2. Should I pack a standby antibiotic in my kit?
This is a question for your doctor or a travel medicine clinic. For travelers heading to high-risk destinations where severe traveler's diarrhea is common, many doctors will provide a prescription for a standby antibiotic like Azithromycin. It’s not for mild cases but can significantly shorten the duration of a severe bout of illness. Discuss your itinerary with your doctor to see if this is right for you.
3. Is it okay to pack medications outside their original bottles to save space?
While it's tempting, it's safest to keep prescription medications in their original, clearly labeled containers. This avoids any confusion or legal issues with customs officials. For over-the-counter pills, you have more flexibility. If you use a travel pill organizer, consider taking a photo of the original packaging so you have the dosage information and ingredients handy.

Pack Confidence for Every Journey
A carefully assembled travel first aid kit does more than just prepare you for minor medical issues; it provides profound peace of mind. It transforms you from a worried passenger into a self-sufficient, empowered traveler, ready to handle the small bumps in the road so you can stay focused on the incredible experiences ahead. By following this checklist, you’re not just packing supplies—you’re packing the confidence to explore the world freely and fully.
Now that your health and safety are covered, you can focus on the other details that make a trip unforgettable. For a complete, deep-dive into every facet of trip planning, from health and safety to budgeting and logistics, our comprehensive Travel Guide is the only resource you'll ever need.
Meta Data Suggestions:
SEO Meta Title (55 characters): The Ultimate Travel First Aid Kit Checklist (2026)
URL Slug: travel-first-aid-kit-checklist
SEO Meta Description (154 characters): Build the perfect travel first aid kit. Our 2026 checklist, with pharmacist-approved tips, covers everything from wound care to stomach issues. Be prepared.
Don't Miss Out! Subscribe for Exclusive Content
SubscribeComments 0
No comments yet
Be the first to share your experience!
Dont Miss Out! Subscribe for Exclusive Content
Ultimate USA Holidays Guide: Top Picks
FTC Affiliate Disclosure Essentials: Stay Compliant as a Travel Creator
Essential Affiliate Tools: From Tracking to Full Optimization
Booking.com Affiliate Program Review: Pros, Cons, and Earnings Potential
Decoding Affiliate Commission Rates: Benchmarks for Travel Creators
