Independence Day Miami: Fireworks Fun
TrekGuider @trekguider
You’re picturing it already: a spectacular fireworks display exploding over the water, the warm Atlantic breeze carrying the sounds of celebration, and the electric energy of a city alive with patriotic fervor. That’s the dream of a Miami Fourth of July. But then, the logistical nightmare creeps in. Where are the truly great spots? How do you possibly escape the legendary crowds? Will you spend the best part of your holiday stuck in traffic, only to end up with a view of a palm tree and someone else’s smartphone screen?
The anxiety is palpable. You can almost feel the frustration of a poorly planned evening—circling endlessly for a parking spot that doesn’t exist, fighting through a sea of people for a tiny patch of grass, or arriving at that "secret spot" you read about online only to find it’s the most crowded place in the city. The vision of a perfect, stress-free celebration of American independence starts to fade, replaced by the grim reality of logistical chaos.
This is where your plan changes. Consider this guide your all-access pass to an unforgettable Independence Day Miami experience. We’re not just going to list the best places to watch the fireworks; we’re giving you the insider strategies to outsmart the crowds, navigate the city like a pro, and discover unique viewing alternatives that will elevate your celebration from good to truly epic. It’s time to leave the stress behind and fully embrace the fireworks, the fun, and the unmistakable tropical flair of a Miami Fourth of July.

Why Miami is the Ultimate July 4th Destination
Let's be clear: plenty of cities put on a good fireworks show. But Miami doesn't just celebrate the Fourth of July; it transforms it. Here, patriotic pride is supercharged with a signature blend of cosmopolitan energy and breathtaking coastal beauty. This isn't about a simple barbecue in the park; it's a full-sensory immersion where dazzling pyrotechnics meet the shimmering waters of Biscayne Bay, all set to the city's vibrant, rhythmic soundtrack. It’s this unique fusion of national tradition and tropical paradise that makes Miami a top-tier holiday destination, a theme you'll see woven through the city's calendar in our definitive guide to Miami Holidays: 8 Beach Fest Vibes.
On Friday, July 4, 2026 (and Saturday, July 4, 2026), the city’s atmosphere becomes absolutely electric. While not on the scale of a mega-festival like Art Basel, which can inject over $500 million into the local economy, the city-wide celebration for Independence Day draws massive crowds and represents a significant cultural and economic peak in the summer calendar. Families, friends, and travelers from across the globe converge on the coastline, their faces turned skyward in shared anticipation. The air hangs heavy with the scent of salt and festive street food, while live music drifts from stages set up in waterfront parks. It’s a celebration that honors American history while wholeheartedly embracing the diverse, forward-looking culture that defines modern Miami.
The Main Event: Bayfront Park's Epic Fireworks Display for Independence Day Miami
At the very heart of Miami's Fourth of July celebration is the massive, free festival at Bayfront Park. This iconic urban oasis, nestled on the edge of Biscayne Bay in Downtown Miami, transforms into the city's patriotic epicenter, hosting one of South Florida's largest and most spectacular fireworks displays. The event is a quintessential Miami experience, kicking off with a day-long festival that leads to a breathtaking pyrotechnic show launched from a barge in the bay. The reflection of the cascading colors on the water’s surface doubles the spectacle, creating a mesmerizing, all-encompassing show that lights up the entire downtown skyline.
The atmosphere is vibrant and family-friendly. You'll find a dedicated kids' zone buzzing with activity, dozens of food vendors serving everything from classic American hot dogs to savory Latin-inspired dishes, and live musical performances that keep the energy pulsing throughout the day. As dusk begins to fall, thousands find their spots on the sprawling lawns and along the water's edge, settling in for the grand finale.

Your Bayfront Park Game Plan: A Step-by-Step Guide
To conquer the Bayfront Park experience and sidestep the common frustrations, a smart strategy is non-negotiable. Follow this guide to navigate the day like a seasoned local.
Know the Schedule: Independence Day is Friday, July 4, 2026. The fireworks are the main attraction after dark (usually kicking off around 9 PM), but the park festivities often start in the early afternoon. A week or two before the event, check the official Bayfront Park Management Trust website for the finalized schedule, including concert set times and kids' zone hours.
Arrive Strategically Early: This cannot be overstated. Bayfront Park is ground zero for the celebration, and it fills up incredibly fast. To secure a prime spot with an unobstructed view of the bay, you need to arrive by mid-afternoon at the latest. The best real estate is on the grassy expanses closest to the water. Arriving early lets you claim your territory, relax, and soak in the atmosphere without the frantic, last-minute scramble.
Pack for a Marathon, Not a Sprint: Treat the day like an urban expedition. Your pack list should prioritize comfort and convenience. Bring blankets or low-slung lawn chairs for seating. Pack more water than you think you'll need to combat the Miami heat, along with high-SPF sunscreen, hats, and sunglasses. While the food vendors are tempting, having your own snacks and drinks can save you from long lines and high prices.
Master Public Transportation: Driving and parking in Downtown Miami on July 4th is a recipe for frustration. The smartest, most stress-free way to reach Bayfront Park is via Miami's public transit. The Metromover, a free automated train, has a stop directly at Bayfront Park, making it the undisputed champion of convenience. Alternatively, take the Metrorail to the Government Center station and catch the Metromover's Inner Loop to the park.
Pro-Tip: Event security rules can change year to year. While coolers are generally permitted, always check the official Bayfront Park event page a few days beforehand for the latest restrictions on items like glass bottles, large umbrellas, personal tents, or drones to avoid any issues at the entrance.
Beyond the Park: Unique Ways to Experience the Independence Day Miami Fireworks
While Bayfront Park delivers the classic community celebration, it’s far from your only option. For those looking to dodge the biggest crowds or craft a more exclusive memory, Miami’s unique geography serves up some incredible alternatives.

The Ultimate Miami Hack: Watch from the Water
Hands down, the most spectacular and quintessentially Miami way to see the Fourth of July fireworks is from a boat on Biscayne Bay. This vantage point offers an unparalleled, 360-degree view of the show, far removed from the throngs on land. As the pyrotechnics burst overhead, you’ll be surrounded by their brilliant reflections on the water, creating a truly immersive and unforgettable experience.
Here’s how to make it happen:
Charter a Private Boat: For the ultimate splurge, chartering a private boat with a captain for your group is an incredibly luxurious and intimate way to celebrate. You can curate your own playlist, bring your favorite food and drinks, and design your perfect evening on the water.
Book a Group Fireworks Cruise: A more accessible option is to join one of the special July 4th cruises offered by local tour companies. These often include music, drinks, and appetizers, providing the full on-the-water experience at a fraction of the cost of a private charter. Book well in advance!
Rent a Kayak or Paddleboard: For the adventurous at heart, renting a kayak or paddleboard offers a front-row seat like no other. Launch from a nearby spot like Virginia Key and paddle out into the bay for a serene yet exhilarating viewing experience, feeling the boom of the fireworks reverberate through the water.
Rooftop Bars with a View
Elevate your celebration—literally. The glittering skylines of Downtown and Brickell are home to a growing number of chic rooftop bars that boast stunning panoramic views of Biscayne Bay. Many of these venues host exclusive Fourth of July parties, complete with top-tier DJs, craft cocktails, and gourmet bites. While this option requires a ticket, it guarantees a comfortable, crowd-controlled environment with a sophisticated vibe. Ensure you book tickets weeks in advance, as these events are always a hot commodity.
Finding Your Own Spot: Neighborhood Parks and Beaches
If a more laid-back, local atmosphere is your speed, several other spots around the bay offer excellent (though more distant) views. Consider laying a blanket down at a park on Key Biscayne or finding a spot along the Venetian Causeway. South Pointe Park in Miami Beach is another fantastic option, often providing views of multiple firework displays at once—Miami's, Miami Beach's, and Fisher Island's. These locations are generally less chaotic than Bayfront Park and are perfect for a more relaxed evening.

Planning Your Perfect Patriotic Road Trip
The Fourth of July weekend is the perfect launchpad for a grander Florida adventure. With Miami as your base, you can start an unforgettable road trip. Head south to the iconic Florida Keys for world-class snorkeling and laid-back island life, or venture west into the primeval beauty of Everglades National Park. The holiday provides the perfect excuse to extend your travels and discover more of the Sunshine State.
To ensure your journey is as carefully planned as your fireworks strategy, a solid checklist is essential. We recommend downloading our free National Park Road Trip Checklist. It’s packed with everything you need to remember, from vehicle safety checks and navigation tools to the perfect road-trip snack list.
Essential Tips for a Safe and Stress-Free July 4th in Miami
A fantastic holiday is a safe one. Keep these pro tips in mind to ensure your Independence Day Miami experience is memorable for all the right reasons.

Beating the Miami Heat
July in Miami is no joke. The heat and humidity are intense.
Hydrate Relentlessly: Drink water all day long. By the time you feel thirsty, you're already on your way to being dehydrated.
Sun Protection is Non-Negotiable: Apply a high-SPF, sweatproof sunscreen and reapply it every couple of hours. A wide-brimmed hat and polarized sunglasses are your best friends.
Dress for Success: Opt for lightweight, light-colored, breathable clothing.
Navigating Crowds and Traffic
Logistics are half the battle at any major city event.
Public Transit is King: We can't say it enough. The Metromover and Metrorail are the superior way to get to and from Downtown.
Rideshare Strategically: If you use Uber or Lyft, set your pickup and drop-off points several blocks away from Bayfront Park to avoid surge pricing and gridlock.
Reserve Parking: If you absolutely must drive, use an app like SpotHero to book a parking spot in a garage well in advance. It’s a game-changer.
Family Safety First
In a massive crowd, a safety plan is crucial.
Designate a Meeting Point: The moment you arrive, pick a clear, unmistakable landmark as your group's emergency meeting spot.
Leverage Technology: While cell service can be spotty, major events are increasingly using technology for safety. Be aware of any official event apps that may offer real-time alerts or safety reporting features, similar to what's used at other major Miami festivals.
Supervise Children Closely: In a bustling environment, it’s easy to get separated. Keep a constant eye on your kids. Writing your phone number on a wristband for them is a smart, low-tech backup.
Pro-Tip: Take a photo of your children the morning of the event. If you get separated, having a current picture showing exactly what they are wearing can be invaluable for security personnel.
Elevate Your Entire USA Adventure
Experiencing the magic of a national holiday in an iconic American city can ignite a deep desire to explore more. Understanding the history and local flavor behind events like the Fourth of July transforms you from a mere tourist into a genuine traveler, forging a deeper connection to the places you visit.
If you're inspired to discover more of America's greatest celebrations—from the spooky Voodoo haunts of New Orleans to the dazzling Christmas markets of Chicago—our comprehensive Travel Guide is your essential next step. It’s the ultimate resource for planning unforgettable journeys across the country, packed with the kind of insider knowledge and expert advice that helps you create truly meaningful travel memories.
Your Unforgettable Miami Fourth of July Awaits
You are now officially equipped with the ultimate playbook for a phenomenal Fourth of July in Miami. You know that Bayfront Park is the epicenter, but you also hold the keys to unlocking a more exclusive experience from the water or a glamorous rooftop. You have a concrete plan for navigating the day with confidence, staying safe, and soaking up every last drop of the city's unique patriotic-tropical vibe. With this guide, you are fully prepared for an incredible Independence Day Miami. You're no longer just another visitor hoping for a decent view; you are an expert planner, ready to celebrate America's birthday in unforgettable style.
What are your favorite Fourth of July traditions? Share your tips for celebrating in a big city in the comments below
Don't Miss Out! Subscribe for Exclusive Content
Subscribe


Comments 0
No comments yet
Be the first to share your experience!
Dont Miss Out! Subscribe for Exclusive Content

San Francisco Cherry Blossoms: A Local's Guide to the Blooms

Halloween SF: Haunts Without Horrors

SF Festivals: 7 Must-See Lineups

Christmas SF: Lights & Wharf Wonders

SF Pride: 6 Route & Party Hacks

Chinese New Year SF: Parade Essentials
Email Marketing for Bloggers: A Step-by-Step Playbook
TrekGuider @trekguider
Every creator knows the feeling. You pour a week into a single, well-researched article, hit publish, and watch the initial traffic spike... only for it to fade into the digital silence. Your audience is a ghost, arriving from the ether of a search result only to vanish just as quickly, leaving your business at the mercy of unpredictable algorithms.

This is the fundamental vulnerability of the modern creator. You’re building your brand on “rented land.” A single Google update can obliterate your traffic overnight. A shift in a social media algorithm can make your account virtually invisible. This constant instability is exhausting, and it makes building a sustainable business feel impossible. You’re shouting into the void, hoping someone hears you, instead of having a direct conversation with a community that wants to listen.
This ends today. This is your definitive playbook for building your single most valuable business asset: your email list. We are going to provide a clear, step-by-step system to turn casual website visitors into a loyal, engaged community you own. This is the core engine that powers a modern creator business, a critical strategy we explore in our ultimate guide on How to Make Money Online: A Creator's Guide for 2026. Welcome to your masterclass on email marketing for blogging.
Why Your Email List is Your Most Valuable Business Asset
Before we dive into the "how," you must internalize the "why." In a creator economy projected to swell to nearly $500 billion by 2027, the opportunity is immense. But the data reveals a harsh reality: success is highly stratified, with only about 4% of creators earning over $100,000 a year. The difference is strategy. The top earners operate as "Creator CEOs," and they understand that their email list isn't just another marketing channel; it is the core asset of their entire digital enterprise.
It’s the one audience you truly own.
Think of it as the "Hub-and-Spoke" model of a modern business. Your blog is the hub—the central asset you control. Social media platforms and search engines are the spokes—powerful, but ultimately rented, channels for discovery. The strategic goal of every spoke is to drive traffic back to the hub, where you can convert a fleeting visitor into a permanent member of your community by capturing their email address.

An email list gives you:
Direct, Unfiltered Access: When you send an email, you are not fighting an algorithm for reach. You land directly in your subscriber's inbox, creating a personal and reliable line of communication.
A Loyal Community: Email is an intimate medium. It allows you to build a deep, trust-based relationship with your readers over time, transforming them from passive consumers into true fans.
A Powerful Sales Channel: When it comes time to launch a product or promote an affiliate offer, your email list will be, by far, your highest-converting channel. These are the people who have raised their hands to say they want to hear from you.
In a digital world defined by volatility, your email list is your insurance policy. It is the stable, appreciating asset upon which a durable and profitable business is built.
The Blogger's Email Marketing Funnel: A Step-by-Step Process
Internalizing why this asset is non-negotiable is the first step. Now, let’s build the engine that creates it. An email marketing funnel is simply a system designed to attract subscribers and automatically build a relationship with them. This three-step process is the engine that will power your audience growth.

Step 1: Create an Irresistible Lead Magnet
A lead magnet is a free, high-value resource you offer to visitors in exchange for their email address. It must solve a specific, urgent problem for your target audience. The key is to provide a "quick win" that is so valuable, trading an email for it feels like a bargain.
For a travel blog, effective lead magnets include:
A printable packing checklist for a specific destination (e.g., "The Ultimate Southeast Asia Backpacking Checklist").
A short, beautifully designed PDF guide (e.g., "5 Hidden Gems in Paris Most Tourists Miss").
A 3-day itinerary for a popular city.
A plug-and-play template for planning a travel budget.

Pro-Tip: Don't guess what your audience wants. The best lead magnet ideas come directly from your readers. Look at your blog comments, social media DMs, and most popular posts. What questions are people asking over and over? Create a resource that answers that one question perfectly.
The goal is to create something your ideal reader needs right now. It doesn’t have to be long, but it must be incredibly useful.
Your Audience-Building Starter Kit
Creating high-value assets is the core of a modern creator business. To accelerate your journey, we've bundled together some of our most powerful resources. The Travel Creator's Toolkit is a free collection of checklists, templates, and guides designed to help you streamline your workflow and build your business faster.
Step 2: Implement High-Converting Opt-in Forms
Once you have your lead magnet, you need a way to offer it to your website visitors. An opt-in form is the mechanism for capturing their email addresses. Strategic placement is crucial for maximizing your sign-up rate.
Effective placements include:
Embedded Within Relevant Blog Posts: Place a form directly within an article where it makes the most contextual sense. For example, offer your Paris guide in the middle of a post about "What to Do in Paris."
As an Exit-Intent Pop-up: This form appears when a user is about to leave your site, giving you one last chance to offer them your valuable lead magnet.
In Your Blog's Header or Footer: A permanent, site-wide placement ensures every visitor has an opportunity to subscribe.
On a Dedicated Landing Page: Create a simple page whose sole purpose is to promote your lead magnet. This is the page you will link to from social media or other external sources.
Step 3: Master the 3-Part Automated Welcome Sequence
This is the most critical part of your funnel. Once someone subscribes, they should immediately be entered into an automated series of emails. This "welcome sequence" is your opportunity to make a great first impression and begin building a real relationship.
Here is a simple, proven 3-part sequence:
Email 1: Deliver the Goods & Welcome
Objective: Fulfill your promise instantly and set expectations.
Content: The email should have a clear subject line like "Here's your free guide!" and immediately provide the link to download the lead magnet. Welcome the subscriber to your community, briefly re-introduce yourself and your blog's mission, and tell them what to expect from future emails (e.g., "Every Tuesday, I'll send you my best travel tips and stories.").
Email 2: Provide Pure Value & Build Authority
Objective: Establish your expertise and prove that subscribing was a smart decision.
Content: A day or two later, send an email that is purely helpful. Share a personal story or your single best piece of advice related to the lead magnet's topic. Link to 2-3 of your most popular and relevant blog posts. There should be no sales pitch here; this email is all about giving.
Email 3: Engage & Segment
Objective: Encourage interaction and learn more about your new subscriber.
Content: On the final day, send an email that asks a simple, direct question to encourage a reply. For example: "What's the #1 destination on your bucket list? Just hit reply and let me know—I read every response!" This interaction boosts your email deliverability and gives you priceless insight into your audience's desires. This is the relationship that eventually allows you to confidently launch a course or sell your own Travel Guide on a specialized marketplace like TrekGuider.
This automated sequence ensures every new subscriber has a consistent, positive first experience with your brand, turning them from a name on a list into an engaged member of your community.
Choosing Your Platform: A Guide to Email Service Providers
To manage your email list and automations, you'll need an Email Service Provider (ESP). These platforms are the command center for your entire email marketing operation. For beginners, the choice can be overwhelming, but a few stand out for their features and user-friendliness.

MailerLite:
Best For: Beginners on a tight budget.
Pros: MailerLite offers an excellent free plan (up to 500 subscribers) that includes automation and landing pages. Its drag-and-drop editor is one of the most intuitive and beginner-friendly on the market.
Cons: The automation capabilities are less powerful than more advanced platforms, and the account approval process can sometimes be slow.
ConvertKit:
Best For: Serious creators who are ready to invest in their business.
Pros: ConvertKit is built specifically for creators. Its flexible tag-based system allows for powerful audience segmentation, and its visual automation builder is both intuitive and robust. It's the industry standard for professional bloggers for a reason.
Cons: It comes with a higher price point. The free plan is limited, and paid plans are more expensive than competitors as your list grows.
Selzy:
Best For: Beginners who prioritize customer support.
Pros: Selzy offers a user-friendly interface at a competitive price. Its standout feature is 24/7 chat and email support, even for users on the free plan—a huge advantage for beginners who may need help with setup.
Cons: As a newer player, it has fewer native integrations with other software compared to the more established platforms.
Staying Compliant: A Blogger’s Guide to Email Privacy Laws
Effective email marketing for blogging isn't just about strategy; it's about trust and legal compliance. Any blogger collecting email addresses must adhere to data privacy regulations. Failure to do so can result in massive fines and destroy your audience's trust. The two most important laws to understand are CAN-spam (U.S.) and GDPR (E.U.).

Understanding CAN-SPAM (The U.S. Rules)
The CAN-SPAM Act governs all commercial email messages in the United States. Its core requirements are:
Don't use false or misleading header information.
Don't use deceptive subject lines.
Identify the message as an advertisement.
Tell recipients where you're located by including a valid physical postal address.
Provide a clear and conspicuous way to opt out of future emails.
Honor opt-out requests promptly (within 10 business days).
Navigating GDPR (The E.U. Rules)
The General Data Protection Regulation (GDPR) is much stricter and applies to you if you process the personal data of any E.U. citizen, regardless of where your blog is based. Its key principles include:
Explicit Consent: You must have unambiguous, affirmative consent to email someone. This means using unchecked boxes on your sign-up forms. Pre-checked boxes are not compliant.
Right to Access: Subscribers can request a copy of all the personal data you hold on them.
Right to be Forgotten: Subscribers can request that you erase all of their personal data.
Pro-Tip: The easiest way to ensure compliance is to adopt the strictest standard (GDPR) for all subscribers and use a reputable ESP like ConvertKit or MailerLite. These platforms have built-in tools that make compliance, such as adding an unsubscribe link and your physical address, automatic.
Frequently Asked Questions About Email Marketing for Bloggers
1. How often should I email my list?
Consistency is more important than frequency. For most bloggers, a weekly email is a great starting point. It's frequent enough to stay top-of-mind but not so frequent that it becomes overwhelming. The key is to choose a schedule you can stick to and deliver value every single time.
2. What should I write about in my emails?
Your emails should be a mix of personal stories, exclusive tips that aren't on the blog, links to your latest content, and occasional promotions. Use the 80/20 rule: 80% of your content should be purely valuable and relationship-building, while 20% can be promotional. Always ask yourself, "Is this genuinely helpful for my reader?"
3. How long does it take to see results from email marketing?
You will see results immediately in the form of building a valuable asset. However, turning that asset into a significant source of income takes time. The key is to focus on consistently growing your list and nurturing the relationship. When you do that, the monetization will follow naturally as you build trust.
Your Journey to an Owned Audience Starts Now
In the creator economy, your email list is the engine of your business. It is the foundation upon which all other monetization strategies are built. It’s how you build a real community, establish lasting trust, and create a predictable, profitable enterprise that isn't dependent on the whims of an algorithm.
You now have the complete playbook for successful email marketing for blogging. You understand why it’s critical, and you have the step-by-step process to implement your own funnel—from creating a compelling lead magnet to welcoming new subscribers and staying compliant with the law. The path is clear. Take the first step today and start building your most valuable asset.
Read the full guide: The Travel Blog Business Plan: How to Make Real Money in 2026
Don't Miss Out! Subscribe for Exclusive Content
SubscribeComments 0
No comments yet
Be the first to share your experience!
Dont Miss Out! Subscribe for Exclusive Content

FTC Affiliate Disclosure Essentials: Stay Compliant as a Travel Creator

Essential Affiliate Tools: From Tracking to Full Optimization

Avoid These 5 Affiliate Landing Page Mistakes for Better Conversions

Affiliate Keyword Research Mastery for Travel Blogs

Booking.com Affiliate Program Review: Pros, Cons, and Earnings Potential

Decoding Affiliate Commission Rates: Benchmarks for Travel Creators
The Ultimate Solo Travel Packing List: A Modular Checklist
TrekGuider @trekguider
Staring at an empty suitcase can be overwhelming. This is not another generic article; this is your definitive, actionable solo travel packing list. It’s a methodical system designed to transform packing from a chore into an act of empowerment. We’ve built this checklist on a "Core + Modules" framework: a non-negotiable foundation of essentials, plus optional modules you can add for specific types of travel.
This tactical checklist is your "what." Before you dive into the specific items, we highly recommend reading our guide to to understand the minimalist systems and philosophy that make this list so powerful. Understanding the "why" will make packing the "what" intuitive and stress-free.

Your Core Essentials
Every trip, regardless of destination or duration, starts here. These are the non-negotiable items that form the base of any smart solo travel plan. Do not leave home without them.
Your Access to Everything
Your ability to move, transact, and prove your identity matters most. Build redundancy into your document strategy.
Passport/Visa: Check that your passport has at least six months of validity from your planned return date.
Digital & Physical Copies: Store a physical photocopy of your passport and driver's license in a separate bag from the originals. Keep high-quality photos of them in a secure cloud service (Google Drive, Dropbox) and in your email.
Travel Insurance Details: Carry a printed copy of your policy and save a PDF to your phone for offline access.
Multiple Bank Cards: Pack at least two different credit cards and one debit card. Store them in separate locations (e.g., one in your wallet, one in your daypack).
Emergency Cash: Hide $100-$200 USD deep within your main bag as a final safety net.
Bank Travel Notifications: Log into your banking apps and set a travel notice for your specific destinations and dates. This five-minute task prevents your accounts from being frozen for suspected fraud.
Your On-the-Go Wellness Kit
Stay healthy and comfortable on the road. The goal is a compact, leak-proof, and comprehensive kit.
Prescription Medications: Pack enough for your entire trip in their original, labeled containers. Bring a copy of the prescription itself.
Mini First-Aid Kit:
Pain relievers (Ibuprofen/Acetaminophen)
Assorted adhesive bandages
Antiseptic wipes
Blister treatment (e.g., Compeed)
Anti-diarrhea medication (e.g., Imodium)
Solid Toiletries: The ultimate packing hack. Eliminates liquid restrictions, prevents leaks, and lasts longer.
Solid shampoo bar
Solid conditioner bar
Solid soap bar
The Basics:
Toothbrush
Solid toothpaste tablets
Deodorant
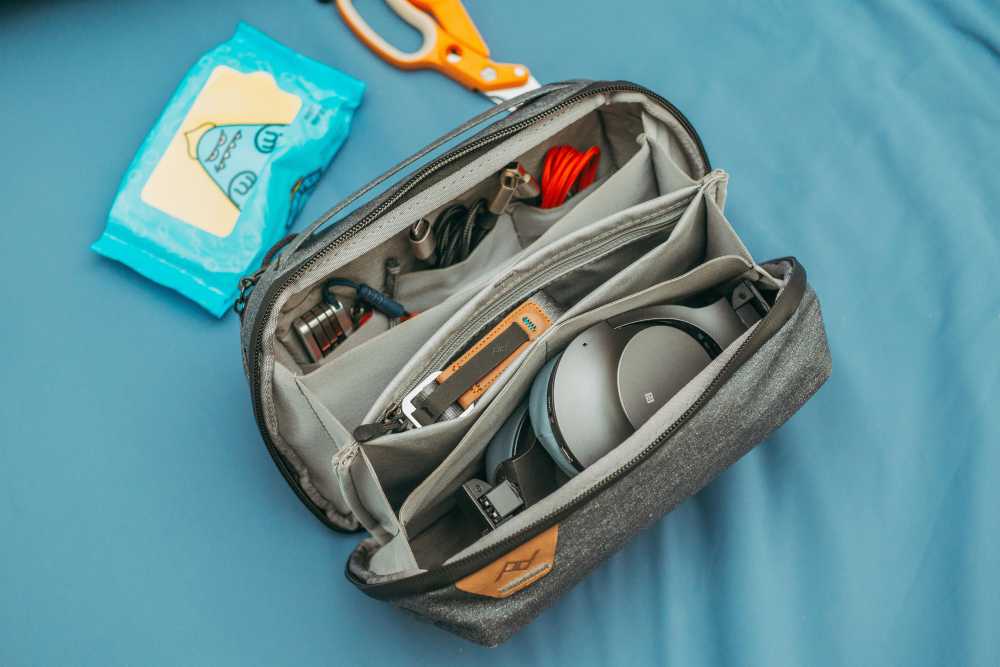
Your Digital Lifeline
Your smartphone is your navigator, translator, and connection to the world. Keeping it powered is mission-critical.
Smartphone: Your all-in-one command center. Download offline maps for your destination.
Portable Power Bank: A non-negotiable safety item. Choose a 10,000mAh+ model from a reliable brand like Anker to guarantee 2-3 full phone charges. Keep it charged.
Universal Power Adapter: Invest in one high-quality universal adapter with multiple USB ports. This allows you to charge all your devices from a single outlet.
Noise-Canceling Headphones: Essential for focus and peace on loud flights, trains, or in shared hostel rooms.

Essential Solo Travel Safety Gear
This module proactively addresses the "what-if" scenarios, allowing you to explore with confidence and sleep soundly. The gear here is your first line of defense, but true confidence comes from preparation. For a complete guide to situational awareness and navigating new environments securely, our comprehensive article, Anxious to Adventurous: Solo Travel Tips for Confidence, is required reading.

For Your Accommodation
Portable Door Lock (e.g., Addalock): A small, lightweight device that braces your door from the inside, making it impossible to open even with a key.
Door Stop Alarm: A wedge that slides under your door. If opened, it physically blocks the door while emitting a piercingly loud alarm.
For When You're Out & About
Anti-Theft Daypack (e.g., Pacsafe, Travelon): Choose a crossbody bag or backpack with slash-proof straps, lockable zippers, and RFID-blocking pockets.
Personal Safety Alarm: A keychain device that emits an ear-splitting siren and flashing strobe light to attract attention and disorient an attacker.
RFID-Blocking Wallet: Protects your passport and credit cards from electronic "skimming."
The 5-4-3-2-1 Formula
Pack less and wear more with a strategic, versatile wardrobe built on mix-and-match essentials. Choose a neutral color palette (black, gray, navy) for core items.
The 5-4-3-2-1 Formula (1-Week Framework)
5 Tops: Focus on wrinkle-resistant, odor-resistant fabrics. At least one should be merino wool—the ultimate travel fabric for temperature regulation and multi-day wear.
4 Bottoms: A typical mix includes one pair of comfortable travel pants, one pair of jeans or chinos, and one skirt or pair of shorts.
3 Accessories: A lightweight scarf or sarong is incredibly versatile (fashion, beach cover-up, towel, head covering).
2 Pairs of Shoes:
Pair 1: Supremely comfortable, broken-in walking shoes.
Pair 2: A versatile, slightly dressier option (flats, loafers, clean leather sneakers).
1 Jacket: A waterproof, windproof outer shell. Layer with a fleece or sweater for warmth as needed.
Climate Sub-Modules (Choose One)
Cold Climate Add-ons: One set of thermal base layers (top and bottom), a warm hat, gloves, and wool socks.
Tropical Climate Add-ons: A swimsuit, a quick-dry microfiber towel, a wide-brimmed sun hat, and sunglasses.
Digital Nomad's Checklist
This module is for anyone working on the road. It focuses on creating an efficient, ergonomic, and connected remote workstation.

Lightweight Laptop: An ultrabook (e.g., MacBook Air) offers the best balance of power and portability.
Portable Laptop Stand (e.g., Roost, Nexstand): The single best way to prevent neck and back pain.
Ergonomic Peripherals: A slim, portable keyboard (e.g., Logitech K380) and a portable mouse (e.g., Logitech MX Anywhere).
High-Quality Headphones with Mic: Essential for calls and focus in noisy environments.
eSIM: Use an app like Airalo to purchase and install a digital SIM card before you leave. Get connected the moment you land.
High-Capacity "PD" Power Bank: Ensure your power bank is "Power Delivery" rated and has enough capacity to charge your laptop, not just your phone.
What NOT to Pack
Knowing what to leave behind is as important as knowing what to bring.

Expensive or Sentimental Jewelry: Don't bring anything you would be devastated to lose.
Full-Sized Towel: Most accommodations provide them. If needed, a quick-dry travel towel is a superior option.
Multiple "Good" Outfits: Stick to versatile pieces that can be dressed up or down.
Physical Books: An e-reader provides an entire library at a fraction of the weight.
"Just in Case" Items: Unless you're traveling to a very remote location, you can buy most basic items at your destination.
Your Questions Answered
What should a solo female traveler add? Many add a versatile sarong (for modesty at religious sites), a silicone doorstop for extra security, and some opt for a fake wedding ring to deter unwanted attention.
How do I pack for a long-term trip in a carry-on? Commit to doing laundry. Pack one week's worth of clothing using the capsule method and plan to do laundry every 7-10 days.
What are the best shoes for solo travel? The ones you can walk in comfortably for 8+ hours. Never bring new, unbroken-in shoes on a trip.

By starting with the Core Essentials and adding modules tailored to your journey, you have now built the perfect solo travel packing list. This system eliminates guesswork, ensures you are prepared for your adventure, and empowers you to travel with the confidence of a pro.
Read the full guide: Anxious to Adventurous: The Ultimate Guide to Solo Travel Confidence
Don't Miss Out! Subscribe for Exclusive Content
SubscribeComments 0
No comments yet
Be the first to share your experience!
Dont Miss Out! Subscribe for Exclusive Content

Ultimate USA Holidays Guide: Top Picks
FTC Affiliate Disclosure Essentials: Stay Compliant as a Travel Creator
Essential Affiliate Tools: From Tracking to Full Optimization
Booking.com Affiliate Program Review: Pros, Cons, and Earnings Potential
Decoding Affiliate Commission Rates: Benchmarks for Travel Creators
