July 4th NYC: Best Fireworks Views
TrekGuider @trekguider
Trying to see the Macy's 4th of July fireworks in New York City can feel like plotting a military campaign. You know it’s one of the most spectacular patriotic displays on the planet, a dazzling barrage of color and sound against the world’s most famous skyline. But the thought of navigating the colossal crowds, deciphering the cryptic official viewing spots, and battling for a sliver of sidewalk with a view of a brick wall is enough to trigger a full-blown anxiety attack.
You’re haunted by visions of being pinned for hours in a human gridlock, craning your neck to see absolutely nothing, with no access to a restroom or a bottle of water. What if you spend all day planning, only to find your chosen spot has been unceremoniously cordoned off by the NYPD? The dream of a magical Independence Day quickly sours into a logistical nightmare, leaving you sweating on a crowded street corner wondering why you didn't just stay home and watch it on TV.
Forget the chaos. This is your definitive battle plan for conquering the crowds and securing a breathtaking view. We’ve distilled the official intel and insider secrets into a foolproof strategy. Whether you want a free patch of grass with a picnic or a more civilized vantage point, this guide will equip you for an unforgettable Fourth of July in New York.

Understanding the Main Event: The Macy's Fireworks Spectacular
Let’s be clear about the sheer scale of this operation. The Macy's 4th of July Fireworks isn't just a show; it's the nation's largest pyrotechnic spectacle, a city-shaking tradition that paints the skyline with thousands of carefully choreographed shells launched from barges on the water. For Friday, July 4, 2026, the show continues its reign on the East River, meaning the most coveted views will be found along the waterfronts of Brooklyn, Queens, and Manhattan.
This isn't a casual affair where you can wander up a few minutes before showtime. It's a massive, city-wide celebration that demands a solid game plan. While the fireworks are an undisputed summer highlight, they're just one piece of the city's vibrant celebratory calendar, which we cover in our definitive guide to New York Holidays: 10 Must-Do Events. Thinking about your trip through this lens—as one epic event among many—is the key to unlocking a truly memorable visit.
The Best Free Viewing Spots for the Fourth of July in New York
Securing a great free spot is the holy grail for most spectators. It requires a healthy dose of patience and impeccable timing, but the reward is a front-row seat to history without spending a dime. The secret is knowing precisely where to go and, just as critically, which tourist traps to avoid.
Brooklyn's Cinematic Waterfront Views
For years, the Brooklyn waterfront has offered the most cinematic views of the fireworks, framing the pyrotechnics against the iconic Manhattan skyline. This is where you go for the postcard shot.
Transmitter Park (Greenpoint): Consistently hailed as a top-tier viewing location, this park offers a direct, jaw-droppingly clear sightline across the East River. Its open, grassy layout is a godsend, providing more room to spread out a blanket than the narrow promenades elsewhere. But its reputation precedes it. To claim a decent piece of turf, you must arrive by 6 PM at the absolute latest.
Domino Park (Williamsburg): With its clever multi-level design, reclaimed factory artifacts, and ample seating, Domino Park is a phenomenal—and popular—option. The elevated walkway provides a unique perspective, and the park's modern amenities (hello, clean restrooms!) make the long wait far more civilized.
East River State Park (Williamsburg): Just a short walk from Domino Park, this location offers a more traditional park experience with a sprawling grassy lawn. It’s a magnet for families and larger groups looking to set up a proper picnic and make a full day of it.
Manhattan's Official Front Lines (and What to Expect)
Manhattan offers official, NYPD-managed viewing points that get you incredibly close to the action. However, this proximity comes at the cost of the highest crowd density and the tightest security.
Official Access Points: The city announces these designated entry points a few days before the event, typically along the FDR Drive in the East Village, Murray Hill, and Midtown East. Check the official Macy's or NYC websites on the day of the event for the exact cross-streets.
The No-Go Zones: Heed the official warnings. The city explicitly advises spectators to avoid FDR Drive in Midtown, Battery Park, and the Brooklyn Heights Promenade. These areas will either be completely closed to the public or offer severely obstructed views. Don't be the tourist who wastes hours trekking to a dead end.
Queens: The Savvy Spectator's Choice
Often overlooked by the masses flocking to Brooklyn, the Queens waterfront in Long Island City provides views that are every bit as stunning, but often with slightly more breathing room.
Gantry Plaza State Park: This park is a true gem, famous for its iconic Pepsi-Cola sign and beautifully restored waterfront gantries. It offers a sweeping panorama of the Midtown skyline, which serves as the ultimate canvas for the fireworks display.
Hunter's Point South Park: Located just south of Gantry Plaza, this park boasts a vast, open green space perfect for laying down a blanket. It’s an excellent alternative for those looking to escape the most intense choke points in Manhattan and Brooklyn.

Pro-Level Strategy: Navigating Security and Human Gridlock
Experiencing the Fourth of July in New York is as much about logistical prowess as it is about patriotic fervor. This is not a casual security checkpoint. The NYPD's presence is comprehensive, involving everything from drones providing aerial surveillance and metal detectors at entry points to NYPD scuba divers patrolling the river itself. This isn't to intimidate, but to ensure a safe event for millions.
Your Arrival and Entry Checklist
Embrace the Early Bird Ethos: We cannot overstate this. For prime real estate like Transmitter Park, a 6 PM arrival is the bare minimum. For the official Manhattan zones, dedicated viewers begin lining up in the early afternoon. The later you arrive, the more likely you are to be watching the back of someone's head.
Pack Like a Pro: You will be on your feet or sitting on the ground for hours. Comfort matters most, but you also need to breeze through security. Large backpacks, coolers, alcohol, and lawn chairs are almost always prohibited. Knowing what to bring—and what to leave behind—is crucial. Our How to Pack Light Guide offers brilliant strategies for carrying just the essentials, a skill that's just as valuable for a day in the city as it is for a week-long trip.
Trust but Verify (Your Sources): On July 4th, follow the NYPD and Macy's on social media or refresh their websites. Viewing points can and do change or close without notice based on crowd capacity. A quick check before you head out can save you from a massive, frustrating detour.
The Buddy System is Non-Negotiable: In crowds of this magnitude, getting separated is incredibly easy. Establish a clear, unambiguous meeting point in advance (e.g., "the corner of X and Y," not "by the hot dog stand"). Keep your phones fully charged, and consider sharing your location with your group via a mapping app.
Pro-Tip: Public transportation is your only sane option. Do not even entertain the idea of driving. Street closures begin in the early afternoon, and parking is a fantasy. The subway is the most efficient way to get close to the action, but expect platforms and train cars to be packed to capacity. Plan your route, buy your MetroCard in advance, and budget at least double the normal travel time.

Beyond the Fireworks: Mastering the All-American Picnic
The fireworks are the grand finale, but Independence Day is an all-day affair. A classic American picnic is the perfect way to spend the afternoon, soaking in the city's festive energy in a more relaxed setting before diving into the waterfront fray.
Prime Picnic Parks (Well Away from the Fireworks Chaos)
Central Park: It’s the quintessential NYC experience for a reason. Head to the vast Sheep Meadow or the Great Lawn, find a spot under a tree, and enjoy the people-watching. You won't see the main fireworks from here, but it’s the perfect stage for your pre-show festivities.
Prospect Park, Brooklyn: Often called Brooklyn's answer to Central Park, the Long Meadow in Prospect Park offers a similarly idyllic and expansive setting. It’s a favorite among locals and provides a more laid-back, community-focused vibe.
Governors Island: A quick and scenic ferry ride away, Governors Island is a true urban oasis. With its sprawling lawns, hammocks, and unparalleled views of the Statue of Liberty, it’s an ideal place to decompress for the day before heading back for the evening's main event.
Your Picnic Pack-Out List
The Spread: Stick to classics that travel well: gourmet sandwiches, cold fried chicken, pasta salads, and fresh fruit. Most importantly, bring more water than you think you'll need. Remember that alcohol is prohibited in public parks.
The Comfort Kit: A large, durable blanket is your foundation. Sunscreen, hats, and sunglasses are absolutely essential for a long day outdoors.
The Clean-Up Crew: Pack a dedicated trash bag and commit to the golden rule of picnicking: leave your spot cleaner than you found it.

Paid Options for a Crowd-Free Fourth of July in New York
If the idea of battling the masses for a patch of grass makes you want to run for the hills, several paid alternatives offer a more comfortable and exclusive experience. These options require booking far in advance and come at a premium, but for many, the guaranteed view and amenities are worth every penny.
Rooftop Bars and Viewing Parties
Many hotels and restaurants with prime real estate in Midtown East, Williamsburg, and Long Island City host ticketed fireworks viewing parties. These events typically include an open bar, food, and live music, all with an elevated, unobstructed view high above the street-level chaos. Expect tickets to start in the low hundreds and sell out weeks, if not months, ahead of time.
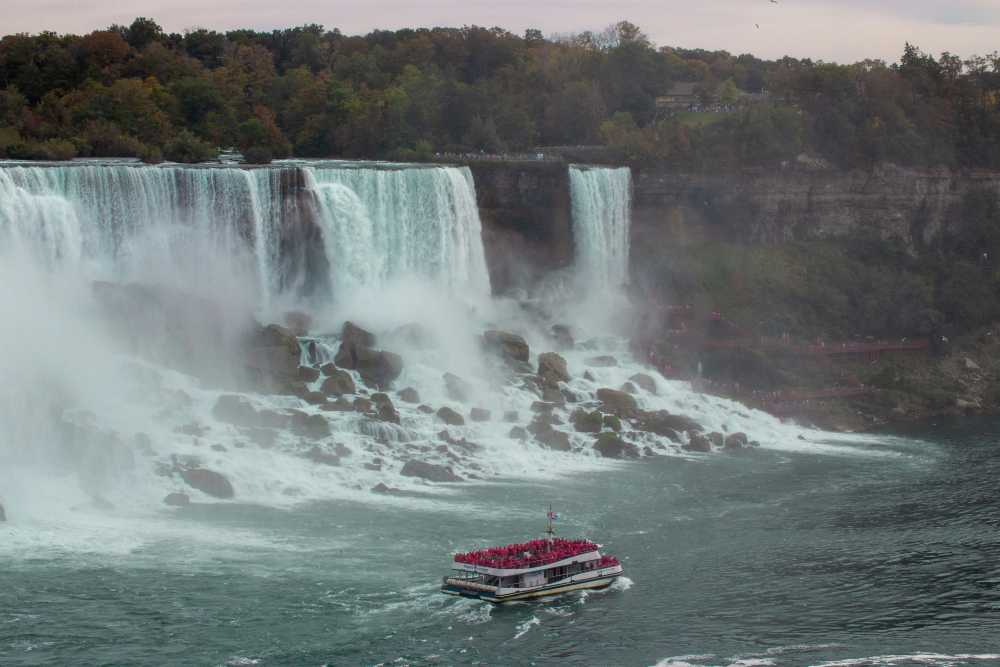
Fireworks Cruises on the East River
For a truly cinematic experience, watch the fireworks from the water itself. Numerous companies offer July 4th dinner cruises that place you directly on the East River, offering an unparalleled, up-close perspective of the show.
The Perks: You get a completely unobstructed view, dinner and drinks are often included, and you have access to clean, private restrooms—a luxury that cannot be overstated.
The Price: This is the most expensive option, with prices frequently ranging from $150 to over $500 per person. They are incredibly popular and must be booked months in advance.
Pro-Tip: When booking any ticketed event, do your due diligence. Scrutinize the venue's location on a map to confirm its viewing position relative to the fireworks barges. Search for reviews and photos from previous years' events to ensure the view is as spectacular as advertised. Not all "river views" are created equal.

Your Mission: An Unforgettable Independence Day
You are now armed with the strategy and insider intelligence to make your Fourth of July in New York a resounding success. The key is to decide on your desired experience—a free-for-all on the grass, a civilized seat at a rooftop bar, or a luxurious view from the water—and plan with precision. Arrive early, pack smart, and stay informed.
This is about more than just watching fireworks; it's about taking part in a quintessential American tradition in the most dynamic city on Earth. You're no longer a tourist hoping for a lucky break; you're an insider with a plan. Go forth, claim your spot, and create some dazzling memories. And when you're ready to plan your next great urban adventure, our comprehensive Travel Guide is packed with the expert resources you need to make every trip a masterpiece.
Don't Miss Out! Subscribe for Exclusive Content
Subscribe


Comments 0
No comments yet
Be the first to share your experience!
Dont Miss Out! Subscribe for Exclusive Content

San Francisco Cherry Blossoms: A Local's Guide to the Blooms

Halloween SF: Haunts Without Horrors

SF Festivals: 7 Must-See Lineups

Christmas SF: Lights & Wharf Wonders

SF Pride: 6 Route & Party Hacks

Chinese New Year SF: Parade Essentials
How to Start a Travel Blog (And Get Noticed)
TrekGuider @trekguider
You have a passion for travel that borders on obsession. Your camera roll is a treasure map of untold stories, and your notes app is filled with the kind of hard-won wisdom that could save a fellow traveler time, money, and stress. The idea of starting a travel blog feels like the perfect way to share it all—a potential path to a life with more freedom and adventure.
But there’s a problem. The moment you consider the "how," a wave of technical overwhelm washes over you. Domains, hosting, WordPress, plugins, SEO—it’s a foreign language, a dense fog of conflicting advice that makes the entire project feel intimidating and out of reach. You see other creators living the dream, and you're stuck in analysis paralysis, believing you need to be a web developer just to get started. Every day you wait, you feel the immense opportunity of the creator economy—a market projected to swell from $250 billion to nearly $500 billion by 2027—slipping through your fingers.
Forget the confusion. This is the guide that cuts through the noise. The old way of starting a travel blog is dead. You don't need to build a website from scratch. This is your chronological, step-by-step playbook that will show you how to start a travel blog presence on a powerful marketplace, letting you focus on what you do best: creating. We'll walk you through building a professional home for your brand in minutes, not months. This is your A-to-Z blueprint for building the foundational asset of your future business. Once this home base is built, you can begin the journey of transforming it into a real enterprise, a journey we map out in our ultimate guide to How to Make Money Online: A Creator's Guide for 2026.

Why a Marketplace? The Smarter Foundation for Your Creator Empire
Before we dive in, it's critical to understand why starting on a creator marketplace like TrekGuider is a fundamentally better strategy than building a self-hosted blog from scratch. While owning a website was once the only path, today it's a detour filled with technical headaches, maintenance costs, and the slow, grinding challenge of building traffic from zero.
The most resilient and profitable creators still operate on a "Hub-and-Spoke" model, but the "hub" has evolved.
The Old Hub: A self-hosted blog you have to build, manage, and secure yourself.
The New Hub: Your professional creator page on a marketplace like TrekGuider. This is the core business asset you control, supercharged with a built-in audience, e-commerce tools, and the collective SEO power of the entire platform.
The Spokes: Social media platforms remain your powerful distribution channels, used to capture attention and drive traffic back to your new, high-powered hub.
Starting on a marketplace isn't just about creating a profile; it's about plugging into a pre-built ecosystem designed for your success. You get to skip the entire technical setup and focus day-one on content and commerce.

The Strategic Blueprint – Nailing Your Niche
Even on a powerful platform, the single biggest real advantage you can give yourself is specificity. Trying to be a travel expert for "everyone" is a recipe for getting lost in the noise. Choosing a well-defined niche allows you to build authority faster, attract a dedicated audience, and stand out in a catalog of creators.
How to Find a Profitable Niche
A successful niche sits at the intersection of three circles: your genuine passion, your audience's pressing problems, and its potential for profitability. Before you commit, you must validate your idea.
Keyword & Platform Search: Use keyword research tools to check Google search volume, but also search within the marketplace itself. Are other creators successfully selling products in this niche? Is there a healthy amount of interest? This is your data-driven sign of audience demand.
Competitor & Market Analysis: The presence of a few successful creators in your niche is a good thing; it proves a market exists. Analyze their products, articles, and pricing. If others are generating revenue, it validates the niche's commercial potential.
5 Promising Travel Blog Niche Ideas to Spark Inspiration
To get your brainstorming started, here are five less-saturated niches with huge potential for 2026:
Eco-Friendly & Sustainable Travel: Focus on low-impact tourism, conservation-focused experiences, and green-certified brands. This niche attracts a passionate, value-driven audience.
Remote Work & "Workation" Travel: Become the go-to resource for digital nomads by creating guides on finding reliable WiFi, navigating visa requirements, and discovering the best long-term accommodations.
Culinary Tourism (Hyper-Niche): Don't just be a "food travel" blog. Go deeper. Focus on a specific cuisine (e.g., "Exploring the Regional Cuisines of Southern Italy") or a dietary need (e.g., "A Vegan's Guide to Japan").
Accessible Travel: A critically underserved and deeply important niche. Create practical guides and resources for travelers with disabilities, focusing on wheelchair-accessible hotels, attractions, and transportation.
Micro-Destination Blog: Instead of trying to cover the world, become the undisputed expert on a single city, region, or small country (e.g., "The Ultimate Guide to Visiting Malta"). You can dominate local affiliate partnerships and product sales for that area.
How to Start a Travel Blog on a Marketplace – Your 10-Minute Setup
This is where you leapfrog months of technical work. Instead of wrestling with hosting and code, you'll build a professional home for your brand in less time than it takes to drink a cup of coffee.

Step 1: Claim Your Professional Creator Page
Getting started is simple. Navigate to the TrekGuider marketplace and register. The platform is actively creating pages for established bloggers using public data, so your first step is to search the author catalog to see if a page already exists for you.
If you find your page, you can claim it and gain full control.
If not, you can create a new one from scratch in minutes.
Step 2: Customize Your Digital Home Base
Your creator page is your professional landing page. It's designed to be your central hub, consolidating your entire brand in one place. Fill out every section to build trust and showcase your expertise:
Basic Information: Add a high-quality photo and a compelling bio that tells your story and explains who you help.
Social & External Links: Integrate your social media profiles and link out to any other personal websites or online stores you may have.
Monetization Tools: Enable the donation feature to allow your most loyal fans to support you through one-time payments or recurring subscriptions.
Step 3: Build Your Product Showcase
This is your integrated storefront. You don't need to install any clunky e-commerce plugins. Simply start uploading the digital products you want to sell:
Guides and E-books
Custom Maps and Routes
Itinerary Templates
The platform handles secure payment processing (via Stripe) and instant digital delivery, so you can focus on creating, not logistics.
The Foundational Content – Publishing on the Platform
With your digital home base established, it's time to furnish it with value. On a marketplace, you don't need to worry about building a blog from zero. Your mission is to publish 5-10 high-quality, in-depth articles directly to the platform's article section. This is your primary strategy for getting discovered.

Why Publishing on the Marketplace is a Superpower
Instant Audience: You tap into the marketplace's existing audience of passionate travelers who are already there to read articles and buy products.
Shared SEO Authority: You benefit from the domain authority of the entire platform, giving your articles a better chance to rank on Google much faster than a brand-new website.
Direct Traffic to Your Products: Every article you publish is linked back to your creator page, acting as a powerful, built-in funnel that drives readers directly to your product showcase and donation buttons.
Writing Your First Authority-Building Articles
Your first articles should be "key elements"—long, in-depth, evergreen posts that solve a major problem for your niche audience. Examples include:
A definitive guide to your niche destination (e.g., "The Ultimate First-Timer's Guide to Visiting Bali").
An exhaustive packing list (e.g., "What to Pack for a 2-Week Trip to Italy").
A detailed "how-to" post (e.g., "How to Plan a Trip to Japan on a Budget").
Feeling Overwhelmed by Trip Planning?
Creating a detailed itinerary is one of the most time-consuming parts of travel planning. To help you streamline the process for your own adventures—and to give you an example of a high-value resource you can one day create for your own readers—we've built the ultimate tool. Our comprehensive, plug-and-play itinerary template takes the stress out of organizing your next trip.
Download Your Free Plug-and-Play Itinerary Template Now
This type of high-value resource is exactly what your audience is looking for. Once you've created a helpful freebie, the next step is to package your unique expertise into a premium Travel Guide, which you can sell directly on your TrekGuider creator page to a global audience of passionate travelers.
Getting Noticed – The Basics of Promotion
With your page set up and a foundation of great content published, you can finally shift your focus to promotion.

Master Marketplace SEO From Day One
SEO is still your most critical long-term strategy, but now you apply it to the articles you publish on TrekGuider. For every post you write, you should:
Target a Keyword: Choose a specific phrase your ideal reader would search for.
Use the Keyword: Place your keyword naturally in the article's title, the first paragraph, and at least one subheading.
Optimize Images: Use descriptive file names and add "alt text" to every image.
Use Social Media as Your Amplifier
Your social media channels are your "spokes." Their job is to drive traffic back to your TrekGuider "hub." Share your newly published articles and link directly to your creator page or specific products in your social profiles. This creates a powerful feedback loop, funneling your existing audience to the place where they can best support you and buy your products.
Pro-Tip: Your creator page bio is your elevator pitch. It's the first thing a potential customer will read. Use it to tell a compelling story, clearly state who you serve, and explain the unique value you provide. This builds an instant, human connection that turns a casual browser into a loyal follower.
Frequently Asked Questions About Starting a Travel Blog
1. Is it free to start a travel blog on TrekGuider?
Yes. Creating your personal author page, publishing articles, and listing products is free. The platform makes money by taking a small, transparent commission on the products you sell, so we only succeed when you succeed.
2. Do I need my own website to use the marketplace?
No, and that's the biggest advantage. TrekGuider provides you with your own professional landing page, so you can have a credible, feature-rich home for your brand without any of the costs or technical hassles of building and maintaining your own site.
3. How does the platform help me get discovered?
The marketplace helps in two key ways: First, your articles and products are showcased to the platform's entire audience of travelers. Second, by publishing on a high-authority domain, your content has a much better chance of ranking on search engines like Google, attracting new users to the platform and, ultimately, to your page.
Your Journey Starts Now
The path from a vague dream to a published, professional travel blog presence is no longer a fog. It's a clear, actionable checklist. You now have the complete blueprint that details how to start a travel blog the modern, smarter way—by leveraging the power of a creator marketplace.
The most challenging part of any great journey is taking the first step. You have the map to a faster, more direct route. The only thing left to do is to begin your adventure.
SEO Meta Data Suggestions:
SEO Meta Title (58 characters): How to Start a Travel Blog in 2026 (Beginner's Guide)
URL Slug: how-to-start-a-travel-blog
SEO Meta Description (154 characters): A step-by-step guide for beginners on how to start a travel blog. Learn how to choose a niche, set up your creator page, and publish content that gets noticed.
Read the full guide: The Travel Blog Business Plan: How to Make Real Money in 2026
Don't Miss Out! Subscribe for Exclusive Content
SubscribeComments 0
No comments yet
Be the first to share your experience!
Dont Miss Out! Subscribe for Exclusive Content

FTC Affiliate Disclosure Essentials: Stay Compliant as a Travel Creator

Essential Affiliate Tools: From Tracking to Full Optimization

Avoid These 5 Affiliate Landing Page Mistakes for Better Conversions

Affiliate Keyword Research Mastery for Travel Blogs

Booking.com Affiliate Program Review: Pros, Cons, and Earnings Potential

Decoding Affiliate Commission Rates: Benchmarks for Travel Creators
50+ Travel Blog Name Ideas (And How to Choose)
TrekGuider @trekguider
You feel it in your bones—the burning desire to turn your travel adventures into something more. You're ready to build a brand, share your stories, and launch the travel blog you've been dreaming of. But you’re stuck. You’re staring at a blank screen, trapped by the single most paralyzing question every creator faces: What do I call it?
The pressure to find the perfect name is immense. Every brilliant idea you have feels either too generic, too cheesy, or, most frustratingly, already taken. You worry about choosing a name you’ll outgrow or one that fails to capture the essence of your vision, and this single decision is holding you back from ever hitting "publish."
Forget the endless, frustrating brainstorming sessions. This guide is your definitive branding workshop. We’re not just going to give you a list of generic travel blog name ideas; we’re going to equip you with a proven, step-by-step framework for brainstorming, vetting, and choosing a powerful, memorable, and—most importantly—available brand name. Consider this the final resource you’ll need to overcome the naming hurdle and finally launch your travel media business.
Why Your Blog’s Name is a Critical Business Decision
In the competitive world of travel content, your blog's name is far more than just a URL; it’s the foundation of your entire brand. It’s the first impression you make on a potential reader, a signal of your niche, and a promise of the value you provide. The right name can convey authority, personality, and trustworthiness in a split second.
As the digital world becomes more crowded, a unique and memorable name is a key differentiator that helps you stand out and build a loyal community. Choosing the right name is the very first step in joining the ranks of The Best Travel Blogs to Follow in 2026, transforming your passion from a simple hobby into a legitimate media brand. It sets the tone for your content, guides your visual identity, and becomes the anchor for the entire business you are about to build.
The 5-Step Framework for Choosing the Perfect Travel Blog Name
Treat this framework as your strategic playbook. By following these five steps systematically, you’ll move from a state of overwhelming uncertainty to one of confident clarity, ensuring you select a name that is not only creative but also commercially viable.

Step 1: The Foundation — Brainstorm Core Keywords
Before you can think of a single name, you must first define what your brand is about. This initial step is all about creating a "word bank" of concepts that are central to your blog. Don’t self-censor here; just write.
Create lists of words associated with these four categories:
Your Niche: Are you focused on luxury, budget, adventure, family, food, or solo travel? List every related term. For example, a family adventure blog might list: family, kids, teens, journey, trek, quest, wild, explore, outdoors.
Your Target Audience: Who are you writing for? Digital nomads, parents, retirees, college students? List words that describe them or resonate with them. For example: nomad, creator, parent, wanderer, seeker, adventurer.
Your Tone & Voice: What feeling do you want to evoke? Is your brand inspiring, funny, practical, sophisticated, or rugged? List adjectives. For example: witty, curious, bold, serene, classic, heirloom, luxe.
Travel & Exploration Verbs/Nouns: List general travel-related words that you like the sound of. For example: atlas, compass, globe, passport, voyage, roam, wander, seek, journey, passage, trail.
At the end of this exercise, you’ll have a rich palette of keywords to work with in the next steps.
Step 2: The Spark — Apply Proven Naming Formulas
Now, take the keywords from your word bank and start combining them using these common, effective naming formulas. This is where the magic happens.
The Alliteration Formula (Same Letter): This technique makes names catchy and memorable.
Examples: Roaming Roads, Compass Chronicles, Summit Stories.
The Portmanteau Formula (Blend Words): Combine two words to create a new, unique one.
Examples: Foodventure (Food + Adventure), Staycationist (Stay + Vacation), Technomad (Tech + Nomad).
The "Your Name" Formula (Personal Brand): Using your own name builds a personal connection and positions you as the expert.
Examples: Adventurous Kate, Nomadic Matt, Travels with Taylor.
The "Adjective + Noun" Formula (Descriptive): This is a classic, straightforward approach.
Examples: The Wandering Wagars, The Broke Backpacker, The Travel Bite.
Experiment by mixing and matching words from your Step 1 list into these formulas. Generate a long list of 20-30 potential names without judgment.
Step 3: The Inspiration — Use Blog Name Generators (Wisely)
Online blog name generators can be helpful, but they should be used for inspiration, not as a final answer. Input your top keywords from Step 1 into a few of these tools. Most of the suggestions will be generic or unusable, but occasionally, a generator can spark a new idea or a creative word combination you hadn't considered. Add any interesting options to your long list.
Pro-Tip: Think five or ten years into the future. Will the name you choose still fit if your travel style evolves? A name like "Backpacking a Twenty-Something" might feel perfect now, but it has a built-in expiration date. Aim for a name that allows your brand to grow with you.

Step 4: The Reality Check — Verify Availability
This is the most critical and often most disheartening step, but it’s non-negotiable. You must thoroughly check if your favorite names are available.
Check the Domain: Your primary goal is to secure a .com domain. Our market analysis consistently shows that a professional, easy-to-navigate website is a direct signal of brand investment. A .com domain is at the heart of that perception, inspiring a level of trust that other extensions simply don't. Use a domain registrar like Namecheap or GoDaddy to see if YourBlogName.com is available. If it’s taken, you should strongly consider moving on to the next name on your list.
Check Social Media Handles: Once you find an available .com, immediately check if the name is available as a consistent handle across your target social media platforms (e.g., Instagram, TikTok, Pinterest, YouTube). Having @YourBlogName everywhere is crucial for brand consistency.
If your top name passes both checks, put it on your shortlist. If not, cross it off and move on. Do not get emotionally attached to a name you can't own outright.
Step 5: The Final Hurdle — Conduct a Conflict Check
Before you purchase the domain, perform one last check to avoid future headaches.
Google It: Do a simple Google search for your chosen name. Is another brand, especially in a related industry, already using it? Even if the .com is available, you don’t want to compete with an established brand for name recognition.
Check Trademarks: For extra diligence, perform a basic search on the U.S. Patent and Trademark Office (USPTO) database. This can help you avoid obvious trademark conflicts down the road.
The name that makes it through all five steps is your winner.
Ready to Build Your Brand?
Choosing a name is the first step. Building a successful travel blog requires a full suite of tools for content creation, SEO, and monetization. Get a head start with our comprehensive, expert-curated toolkit.
The Travel Creator's Toolkit
75+ Travel Blog Name Ideas to Spark Your Creativity
To help you with Step 1 and 2, here is a categorized list of over 75 travel blog name ideas. Use these as a starting point to fuel your own unique combinations.

Puns & Wordplay
In Tents Exploration
The Globe Trotters
Suitcase Stories
Miles and Smiles
Pretty Plane Sailing
Frequent Flier Finds
Life is a Trip
Home is Where the Bag is
Have Luggage, Will Travel
Check-In & Check-Out
Alliteration & Rhyme
Roaming Roads
Compass Chronicles
Voyage Vision
Summit Stories
Passage Planner
Wayward Wanderings
The Travel Tribe
Seeker’s Saga
Trekking Threads
The Global Guide
Niche-Specific Names
Family: The Family Fold, Park Pack, Teen Travel Tribe, Little Luggage Life, The Wandering Weans
Solo: Solo Sphere, One Woman’s World, The Independent Itinerary, Just Me Journeys, The Singular Seeker
Luxury: The Gilded Getaway, First Class Compass, The Curated Journey, Velvet Atlas, Heritage & Hideaways
Budget: The Frugal Flier, Penny-Wise Passage, The Backpacker's Billfold, Thrifty Trails, The Value Voyager
Adventure: Adventure Atlas, Summit & Scale, The Adrenaline Almanac, Off-Grid Odyssey, The Wild Wayfarer
Action-Oriented & Evocative
Chase the Horizon
Seek the Summit
Beyond the Map
Find Your Path
Cross the Meridian
The Saffron Trail
Saltwater Soul
Alpenglow Atlas
Terra Incognita
The Far-Flung
Modern & Simple
The Travel Edit
Wayward Co.
Compass Collective
The Getaway Guide
Trip Theory
Atlas & Anchor
Itinerary & Ink
The Local Lens
Foreign & Familiar
The Departure Desk
Food Travel
Feast Finder
Culinary Compass
The Hungry Horizon
Fork & Globe
Spice Routes
The Traveling Table
Street Food Stories
Plates & Passports
The Foodie Flight
Cravings & Capitals
Photography Travel
The Shutter Sphere
Aperture Abroad
Focus Finder
The Framing Fellow
Light & Landmark
Pixel Passport
The Wandering Lens
ISO Elsewhere
The Photo Trekker
Viewfinder Voyages

Frequently Asked Questions About Naming Your Blog
Should my blog name include my destination niche (e.g., "Awesome Italy")?
It can be a powerful strategy for building authority quickly. It tells readers and search engines exactly what you're about. However, it can be limiting if you decide to travel elsewhere. If you're certain you'll focus on one area for years, go for it. If you think you might expand, a broader name offers more long-term flexibility.
What if the .com for my name is taken, but .net or .co is free?
We strongly advise against it. As mentioned, the .com extension is the gold standard; it conveys professionalism and trust. Other extensions can appear less credible and are harder for people to remember. Your audience will instinctively type .com, and you don’t want to send your hard-earned traffic to another website. It’s better to find a new name with an available .com.
Is it a bad idea to use my own name for my travel blog?
Not at all! Using your own name is an excellent way to build a personal brand, positioning yourself as the face of your business. Industry leaders like Nomadic Matt and Adventurous Kate have done this with massive success. The only downside is a potential lack of privacy, so be sure you're comfortable with putting your name out there publicly.
How important is having a keyword in my blog name for SEO?
It's less important than it used to be. Today, search engines prioritize the quality of your content over having an exact-match keyword in your domain. Focus on choosing a name that is memorable, unique, and brandable. A strong brand name is far more valuable for long-term SEO than a clunky, keyword-stuffed domain.
The Final Step: From Name to Brand
Once you’ve successfully navigated the framework and chosen your perfect name, act immediately. The internet moves fast, and you don’t want someone else to grab your idea.

Pro-Tip: As soon as you decide on a name that is available, purchase the .com domain and claim the social media handles on all relevant platforms. Do this immediately, even before you have a website built. Owning these assets is the first real step in making your brand a reality.
With your name secured, you’re no longer just dreaming; you’re building. The next step is to create a platform where you can share your expertise and begin monetizing your content. While traditional methods like advertising exist, the most profitable and sustainable path is to sell your own unique digital products—like itineraries, guides, or workshops. This is where you transition from being a content creator to a media entrepreneur. The TrekGuider Platform is the ultimate ecosystem designed for creators like you, providing the tools and marketplace to sell your digital products and build a thriving business from day one.
Your Journey Starts Now
Choosing a name for your travel blog can feel like an insurmountable obstacle, but it doesn’t have to be. By shifting your mindset from searching for a "cool name" to executing a strategic branding process, you can move forward with confidence and clarity. You now have a repeatable framework and a wealth of travel blog name ideas to break through the creative block that has been holding you back.
The perfect name is a strategic blend of personal expression and practical verification. You are equipped with the knowledge to find it. You're no longer just a traveler with an idea; you're a founder. Go claim your name, and start building your empire.
Meta Data Suggestions:
SEO Meta Title (58 characters): 75+ Travel Blog Name Ideas & How to Choose the Perfect One
URL Slug: travel-blog-name-ideas
SEO Meta Description (154 characters): Stuck on naming your travel blog? Get unstuck with our 5-step framework and 75+ creative travel blog name ideas to find the perfect brand name for you today.
Don't Miss Out! Subscribe for Exclusive Content
SubscribeComments 0
No comments yet
Be the first to share your experience!
Dont Miss Out! Subscribe for Exclusive Content

Ultimate USA Holidays Guide: Top Picks
FTC Affiliate Disclosure Essentials: Stay Compliant as a Travel Creator
Essential Affiliate Tools: From Tracking to Full Optimization
Avoid These 5 Affiliate Landing Page Mistakes for Better Conversions
Affiliate Keyword Research Mastery for Travel Blogs