The 7 Solo Female Travel Safety Rules You Can't Ignore
TrekGuider @trekguider
You feel the magnetic pull of the world, a deep-seated desire to explore ancient cities, wander through breathtaking landscapes, and discover it all on your own terms. The dream of solo travel is vibrant and powerful. But for so many women, that dream is shadowed by a persistent and paralyzing question: "But will I be safe?"
This isn't just a fleeting thought; it's a formidable barrier. It’s a shared, valid concern that echoes across the travel community. A staggering 66% of women who travel solo report worrying about their personal safety, and for the 59% of women who have yet to start their first independent journey, these concerns are the second-largest obstacle holding them back. The fear is real, and it is robbing you of what could be the most transformative experience of your life. But what if you could systematically dismantle that fear, replacing it with an unshakable foundation of competence?
This guide is your tactical blueprint to do exactly that. We are moving beyond vague reassurances and diving into the essential, non-negotiable rules of solo female travel safety. This isn't about seeing the world through a lens of paranoia; it's about equipping yourself with the knowledge to navigate it intelligently. For a complete overview of the journey, start with our comprehensive pillar guide, [The Ultimate Guide to Solo Female Travel (15 Essential Tips)]. These seven rules, however, are the bedrock—the field-tested strategies that will transform you from a worrier into a prepared and confident global explorer.
Rule 1: Build a "Lifeline Home" Before You Leave
The single most important phase of your safety strategy happens before you ever pack a bag. Creating a strong communication and information bridge between you and a trusted emergency contact back home is non-negotiable. This "mission control" is your ultimate safety net, ensuring that if you are ever unreachable, someone you trust has every critical detail needed to help.
Your "lifeline" packet should be a comprehensive dossier containing both physical and digital copies of the following, based on recommendations from the U.S. Department of State:
A Complete Itinerary: Detail your trip on a day-by-day basis, including flight numbers, train schedules, and the names, addresses, and phone numbers of all booked accommodations.
Copies of All Important Documents: Include the photo page of your passport, any necessary visas, your driver's license, and a full copy of your travel insurance policy, complete with the policy number and the 24/7 emergency assistance phone number.
Financial Information: Provide photocopies of the front and back of every credit and debit card you are carrying. The international toll-free numbers on the back are essential for canceling them if they are lost or stolen.
A Pre-Arranged Communication Plan: Establish a clear plan for when you will check in (e.g., a quick text upon arrival in a new city). Crucially, agree on a protocol for what your contact should do if you miss a check-in (e.g., wait 12 hours, then contact your hotel, then contact the nearest embassy).

Pro-Tip: The single most effective safety action you can take in under five minutes is to enroll your trip with the U.S. Department of State’s free Smart Traveler Enrollment Program (STEP). This provides the nearest U.S. Embassy or Consulate with your itinerary, creating a three-way digital bridge connecting you, your emergency contact, and the State Department for a coordinated response in a worst-case scenario.
Rule 2: Master Your Sanctuary with an Unbreakable Arrival Protocol
Think of your accommodation as more than just a place to sleep. It’s your secure base of operations, your private sanctuary to rest and recharge. Ensuring its integrity from the moment you arrive is a critical habit that provides profound peace of mind. Adopt this methodical security check and perform it automatically every single time you enter a new room.
Prop the Door Open. Before you fully enter, use your main piece of luggage to prop the door open. This simple action prevents the door from closing and locking behind you, guaranteeing an immediate escape route should the room not be empty.
Conduct a Full Room Sweep. With the door still open, perform a quick but thorough physical search. Check under the bed, behind all curtains, inside closets, and in the bathroom, including behind the shower curtain.
Verify All Locks. Once the room is confirmed to be empty, close the door and immediately test all locking mechanisms. Engage the deadbolt, chain lock, or security latch. Go to every window and any balcony doors to ensure they lock securely.
Deploy Your Personal Security. Your own devices provide a layer of protection entirely within your control. Immediately place a rubber wedge doorstop alarm under the main door or install a portable door lock like an Addalock. These inexpensive, lightweight devices are highly effective at preventing unauthorized entry, even from someone with a key card.
Locate and Map Emergency Exits. Find the fire exit map on the back of the door. Identify the two nearest exits, then physically walk the route to each one, counting the doors you pass. This mental map is invaluable for navigating in darkness or smoke.
Perform a Hidden Camera Scan. In an age of miniaturized electronics, a quick scan for hidden cameras is a prudent measure. Use your phone's flashlight to look for the tell-tale glint of a tiny lens in unexpected places like smoke detectors, alarm clocks, and USB wall chargers. In the dark, use your phone's front-facing camera (which is more sensitive to infrared light) to scan the space. Look for the small, often blinking, IR lights used by night-vision cameras that are invisible to the naked eye.
Adopt a "Verify, Then Open" Door Policy. Make it your strict policy to never open your door to an unsolicited knock. If someone claims to be from housekeeping, call the front desk using the room phone to verify they sent a staff member to your room.

YOUR ULTIMATE SAFETY TOOLKIT
Mastering your environment is the first step to confident travel. True preparedness means having the right tools for every situation. Our free, downloadable [Solo Female Travel Safety Guide] is the perfect companion to these rules. It's a comprehensive checklist and resource guide covering everything from what to pack to what to do in an emergency.
Rule 3: Take Absolute Control of Your Ground Transportation
Moving through an unfamiliar city can be a point of high vulnerability. Whether you’re using a ride-sharing app or a local taxi, you must shift from being a passive passenger to an active participant in your own safety. Adhere to this strict set of protocols for every single ride.
The "Match, Name, Share" Protocol for Ride-Shares
Match: Before you get in, carefully match the vehicle's make, model, and license plate number with the information in the app. Check that the driver's appearance matches their profile photo. If anything is off, do not get in the car.
Name: This is a critical verification step. Do not approach a vehicle and ask, "Are you here for Jane?" This gives a potential imposter the information they need. Instead, from a safe position on the curb, ask the driver, "Who are you here for?" A legitimate driver will be able to state your name correctly.
Share: Before your ride begins, use the app's built-in "Share Trip Status" feature. This sends a live map of your journey to a trusted contact, allowing them to track your progress in real-time.
Universal Rules for Every Ride
The Backseat Protocol: As a solo traveler, always sit in the back seat on the side opposite the driver. This creates crucial physical distance and gives you access to two separate exits.
The Route Protocol: Keep your own mapping application, like Google Maps, open on your phone throughout the journey. If the driver takes a significant, unexplained detour, you are empowered to question it. If the response makes you uncomfortable, end the ride in a safe, well-lit public area.

Rule 4: Create Layers of Personal and Digital Security
Your solo female travel safety strategy should be built on layers and redundancy. This means pairing smart practices with an effective toolkit of personal security devices and ensuring your digital lifelines are always active.
Your Personal Security Toolkit
Personal Safety Alarm: This is arguably the most valuable device for a solo traveler. An alarm like the She's Birdie emits an extremely loud siren (130+ decibels) and a flashing strobe light to startle an attacker and attract immediate attention. They are small, legal everywhere, and attach to a keychain for instant access.
Anti-Theft Bag: Invest in a bag with features like RFID-blocking pockets (to protect from electronic skimming), slash-proof fabric, and lockable zippers. A crossbody style worn in front of your body offers the most security.
Portable Door Lock / Alarm: As mentioned in Rule 2, carrying your own lock gives you absolute control over the security of your room, ensuring your sanctuary remains impenetrable.

Your Digital Security Layer
Your phone is your map, translator, and lifeline. A solar-powered power bank adds a critical layer of resilience to a standard one, ensuring you can maintain a charge even during power outages or on multi-day treks.
Rule 5: Project Confidence and Practice Proactive Situational Awareness
How you carry yourself has a profound impact on how you are perceived. Projecting confidence—even when you're feeling uncertain—is a powerful deterrent. Walk with purpose, keep your head up, and make brief eye contact. This signals that you are aware of your surroundings, not an easy target.
This confidence is fueled by situational awareness. It's not about being paranoid; it's about being present.
Understand the Local Landscape: Before arriving, research common tourist scams. A 2024 report noted that 29% of solo female travelers had experienced a theft or attempted scam. Knowing the playbook for ploys like the "friendship bracelet" or "spilled drink" allows you to disengage before you become a victim.
Trust Your Intuition: Your intuition is your most finely tuned security equipment. If a person, place, or situation feels "off," it probably is. You do not need a logical reason. Honor it. Cross the street, leave the bar, get in a different train car. Acting on your intuition is not rude; it is intelligent.
Manage Your Inputs: Be mindful of your alcohol consumption. Your awareness is your primary defense, and anything that dulls it increases your vulnerability.

Rule 6: Embrace That Safety Anxiety Decreases with Experience
It's crucial to understand the psychology of solo travel fear. The data reveals a powerful truth: the act of traveling solo is the most effective antidote to the fear of it.
Among women who have taken fewer than six solo trips, 77% report worrying about safety. That number drops dramatically to just 55% for those who have traveled solo more than ten times. This establishes a direct, negative correlation between experience and anxiety.

Every time you successfully navigate a new city and overcome a challenge, you are collecting real-world evidence of your own competence. This direct experience systematically replaces abstract, media-fueled fear with managed, situational awareness. You learn that while vigilance is essential, you are far more capable than you imagined. The goal of your first trip is to break this cycle of fear and begin the empowering loop of experience.
Rule 7: Never Outsource Your Safety to Chance—The Travel Insurance Mandate
For a solo traveler, travel insurance isn't an optional add-on; it is a foundational pillar of your financial security. A cheap policy is not a good deal if it doesn't have the right coverage. When evaluating policies, ensure the plan includes strong coverage in these key areas:
Emergency Medical Coverage: A policy should offer a minimum of $250,000 in benefits.
Emergency Medical Evacuation: This covers the potentially astronomical cost of transporting you to a hospital with adequate facilities or back home.
Emergency Medical Reunion (Companion Coverage): This is vital for solo travelers. If you are hospitalized, this coverage pays for a family member's transportation and accommodation to be at your bedside, providing invaluable logistical and emotional support.
Trip Interruption and Cancellation: This reimburses your non-refundable trip costs if you have to cancel or cut your trip short for a covered reason.
Frequently Asked Questions About Solo Female Travel Safety
What's the single most important safety device I should buy?
A personal safety alarm. While a doorstop and anti-theft bag are excellent, a loud, attention-grabbing alarm is the most versatile tool for deterring a potential threat in any public situation, day or night.
I'm nervous about nightlife. Should I just avoid going out after dark?
Not at all! The key is to be strategic. Have your transportation planned in advance—know exactly how you're getting home. Nurse your drink and never leave it unattended. Stick to well-lit, reputable areas and consider starting with a structured activity, like a group tour or a show, rather than just wandering.
How do I handle street harassment without escalating the situation?
The most effective strategy is confident disengagement. Do not respond or make prolonged eye contact. Project purpose and keep walking. In many cases, a reaction is what the harasser is seeking. If you feel you are being followed, walk into a busy, open shop or restaurant immediately.
Are group tours a good option for a safety-conscious first-timer?
Absolutely. An estimated 75% of women who have never traveled alone would be more likely to do so on a group tour. They provide a "scaffolded" entry into the world of solo travel. You can find tours vetted and reviewed by other solo female travelers on platforms like [TrekGuider], which is a great way to build foundational confidence.
Your Journey to Confident Exploration Starts Now
The narrative around solo female travel safety is too often dominated by fear. But the data tells a different, more empowering story of capability and resilience. These seven rules are your framework—a practical system for managing risk and moving through the world with intelligent confidence. By internalizing these strategies, you build a foundation of competence from which you can freely and bravely explore.
Now that you have the safety blueprint, the truly exciting part can begin. Explore our collection of expert-written [Travel Guide] resources to find your perfect destination, and remember to download the essential [Solo Female Travel Safety Guide]. The world is waiting for you to discover it—and yourself.
Meta Data Suggestions:
SEO Meta Title (59 characters): The 7 Essential Solo Female Travel Safety Rules for 2026
URL Slug: solo-female-travel-safety-rules
SEO Meta Description (154 characters): From accommodation security to transport protocols, these 7 non-negotiable solo female travel safety rules will empower you to explore the world with confidence.
Don't Miss Out! Subscribe for Exclusive Content
Subscribe


Comments 0
No comments yet
Be the first to share your experience!
Dont Miss Out! Subscribe for Exclusive Content

How to Avoid Travel Scams: A Global Guide

Is Public WiFi Safe? How to Protect Your Data Abroad

A Woman's Guide to Safe Travel: 10 Critical Tips

7 Hotel Safety & Security Tips for Peace of Mind

9 Beach Safety Tips That Could Save Your Life

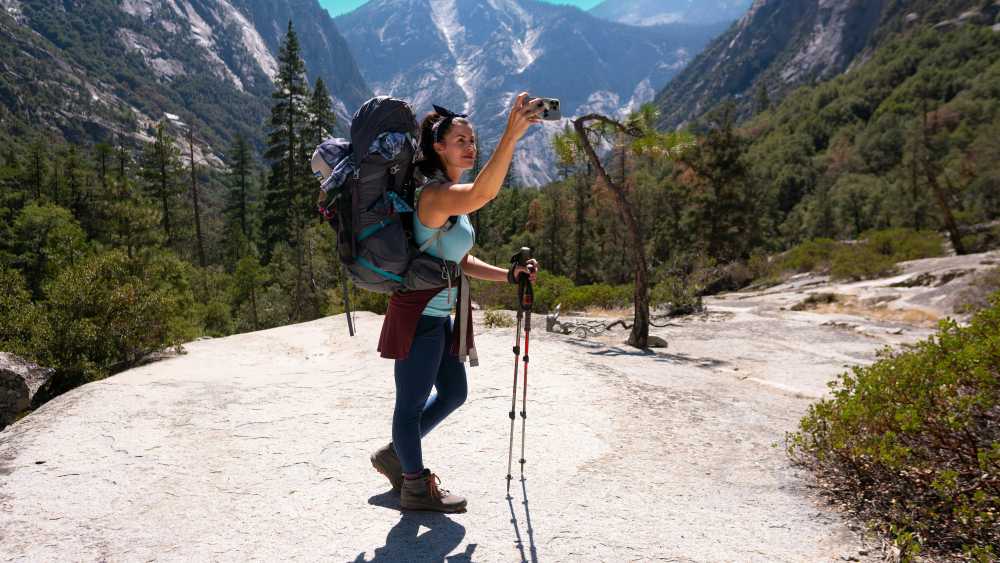
How to Stay Safe While Hiking: A Hiker's Safety Guide
Lollapalooza: 7 Stage-Hopping Tips
TrekGuider @trekguider
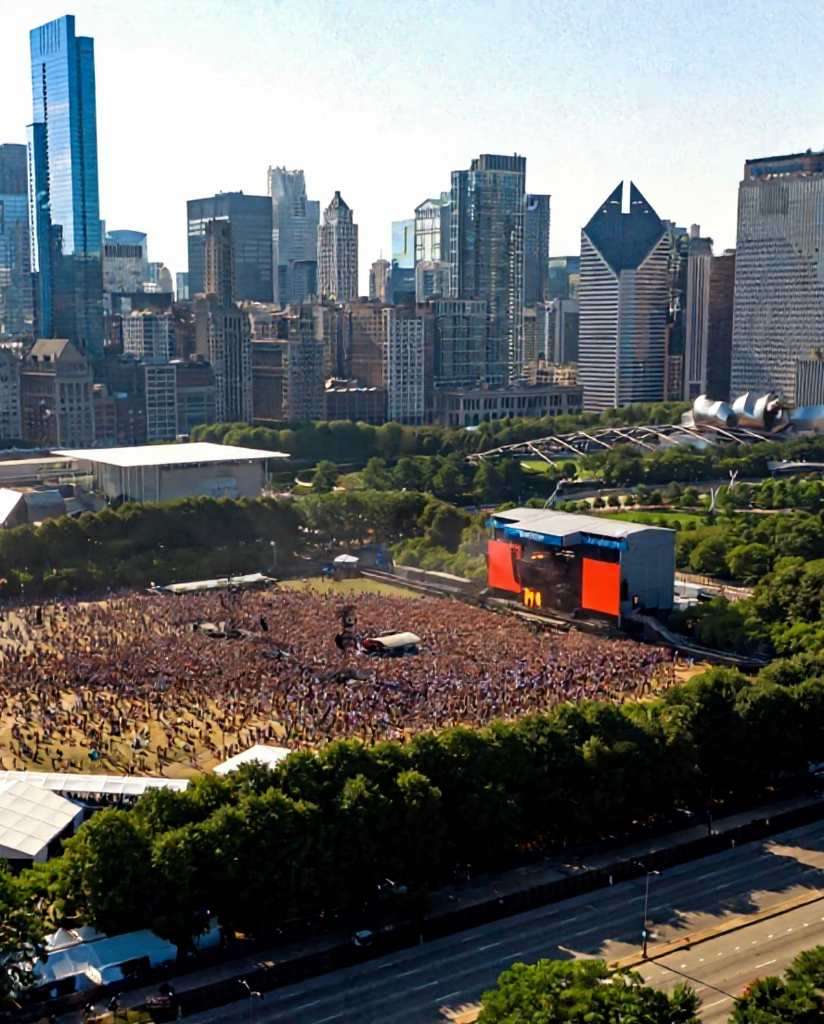
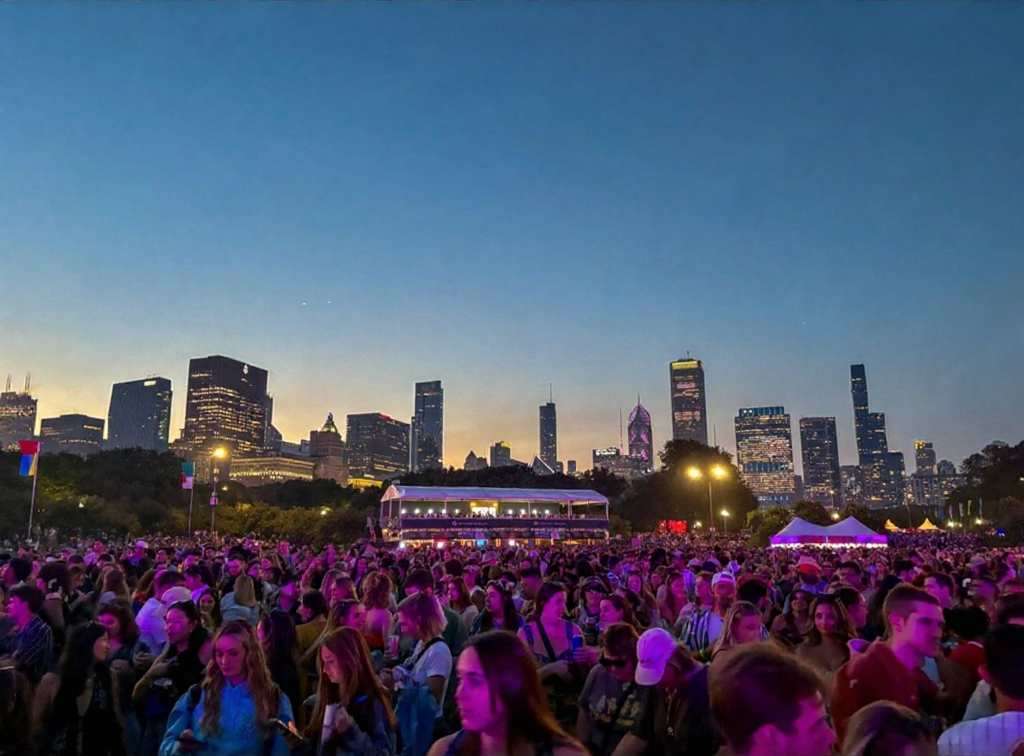
You’ve done it. You scored the golden ticket to Lollapalooza, the four-day musical marathon that transforms Chicago’s Grant Park into the center of the universe. But now, staring at a schedule that looks more like a complex circuit board than a concert lineup, the reality sets in. Dozens of artists you’re dying to see are scattered across a dozen stages, their set times overlapping in a cruel twist of fate. The sheer scale of the festival, with its massive crowds and sprawling grounds, suddenly feels less like a dream and more like a daunting logistical nightmare.
The anxiety begins to bubble. You picture yourself spending half the day trudging from the T-Mobile stage at the south end to the Bud Light stage at the north, only to arrive sweaty, exhausted, and just in time to hear the final chords of your favorite song. The fear of missing out becomes a palpable threat, turning the promise of unforgettable musical moments into a frantic race against the clock. Without a rock-solid plan, your festival experience could be defined by endless walks, missed opportunities, and the nagging feeling of being perpetually in the wrong place. This isn't just about seeing bands; it's about conquering one of the keystone events in a city known for its epic celebrations, a true highlight among the many experiences we cover in our definitive guide to [Chicago Holidays: Windy City Thrills].
Forget the stress. This guide is your strategic playbook for navigating the glorious chaos of Lollapalooza Chicago. We’re breaking down the art of stage-hopping into seven actionable, pro-level tips that will transform you from a frantic fan into a festival veteran. From mastering the map before you even step foot in Grant Park to planning a seamless exit, these strategies will ensure you maximize your time, conserve your energy, and catch every single performance on your must-see list.
1. Become a Pre-Festival Master of the Map & Schedule
The biggest mistake a Lollapalooza rookie can make is showing up and trying to figure it all out on the fly. Grant Park is a massive urban oasis, and when it’s filled with stages, vendors, and hundreds of thousands of people, it becomes a complex, pulsating labyrinth. Your success begins long before you scan your wristband.
Download the Official App Immediately
Long before you even think about packing, your first move is to download the official Lollapalooza app. Consider it your digital command center for the entire weekend, running from July 31 to the final day of the festival. The app provides the most up-to-date schedule, a detailed festival map, and, most importantly, real-time push notifications. If a set time changes, a stage is delayed, or a surprise guest appears, the app will be the first to tell you. It also sends out crucial emergency alerts, making it an indispensable tool for staying safe and informed.
Create Your Artist Tiers
Once the full schedule drops, it’s time for strategy. Open the lineup—featuring titans like Olivia Rodrigo, Tyler the Creator, Sabrina Carpenter, and A$AP Rocky for the 2026 festival—and categorize every artist into two simple lists:
Tier 1 (Must-See): These are your non-negotiables. The artists you bought the ticket for. You will be at their set, no matter what.
Tier 2 (Nice-to-See): These are the artists you’d love to catch if the timing and location work out. They are your flexible options, the happy bonuses.
This simple act of prioritization is the bedrock of your stage-hopping plan. It allows you to build your day around your top-tier artists and fill the gaps with others, preventing the decision paralysis that comes from having too many choices.
Internalize the Grant Park Layout
Study the festival map like you’re planning a heist. The two main stages are typically located at the far north and south ends of Grant Park, a walk that can easily take 20-30 minutes through a thick crowd. Identify the locations of your Tier 1 artists and mentally map the routes between them. Note the locations of smaller stages, food courts (Chow Town), and, critically, the free water stations. Understanding the physical distances involved will help you make realistic calls about which back-to-back sets are doable and which are pure fantasy.

2. Master the "Perimeter Path" to Navigate Crowds
The center of any festival crowd is a slow-moving, densely packed sea of humanity. Trying to cut directly through the middle to get from one stage to another is a rookie move that wastes time and energy. The secret to swift movement is to think like a river, flowing where the resistance is lowest.
Stick to the Arteries
The most effective way to navigate Lollapalooza Chicago is by using the perimeter paths. Instead of plunging into the heart of the crowd, stick to the designated walkways along the sides. These paths, often lining the edges of the park or separating vendor areas, are the festival's arteries. While they may look like the longer route on a map, they are almost always faster than trying to push through a stationary audience. Make a mental note of these pathways when you first arrive.
Live by the 15-Minute Rule
If your next Tier 1 artist is on a stage across the park, you need to be ruthless with your timing. Implement the 15-Minute Rule: leave the current set 15 minutes before it ends. This gives you a critical head start, allowing you to exit the immediate crowd before the mass exodus begins when the music stops. It might sting to walk away from the end of a great performance, but that small sacrifice ensures you’re in a good position for the next one, rather than hearing it faintly from a quarter-mile away.
3. Hydrate and Fuel Like a Seasoned Athlete
Stage-hopping is a sport. You’ll be on your feet for 10 hours a day, walking several miles under the summer sun. You’re not just attending a concert; you’re entering a temporary city that generates a staggering economic impact—estimated at over $440 million. That scale demands respect and a bit of preparation.
Make Water Your First Priority
Lollapalooza provides free water refill stations throughout the grounds. When you first enter Grant Park, make it your mission to locate the station nearest the entrance and the stages you’ll be frequenting. Dehydration is the number one enemy of the festival-goer; it saps your energy, causes headaches, and can ruin your entire weekend. Make it a personal rule to refill your water bottle every single time you pass a station.
Pro-Tip: Bring a collapsible water bottle or an empty hydration pack. It's light, complies with security rules, and allows you to carry more water than a standard bottle. This means fewer trips to the refill station and more time enjoying the music.

4. Dress for a Four-Day Marathon, Not a Fashion Sprint
While Lollapalooza is a prime spot for people-watching and showing off your style, practicality should be your guiding principle. Your fashion choices can make or break your physical ability to enjoy the festival.
Your Shoes Are Your Most Important Gear
You will be walking and standing on concrete, grass, and uneven ground for hours on end. This is not the time for brand-new boots that need breaking in, flimsy sandals, or anything with a heel. Your number one priority should be comfortable, supportive, and already broken-in sneakers or walking shoes. Your feet are your foundation for the entire weekend; treat them well.
Prepare for All Four Chicago Seasons in One Day
Chicago weather is famously unpredictable. A day that starts hot and sunny can quickly turn cool and rainy. The key is to dress in layers. Start with a lightweight, breathable base layer and bring a flannel, hoodie, or light jacket that you can tie around your waist during the day and put on after the sun goes down. Most importantly, pack a poncho. It’s small, light, and will be an absolute lifesaver if a sudden downpour occurs.
5. Establish a "Home Base" for Your Crew
Navigating Lollapalooza Chicago with friends is a core part of the experience, but it’s incredibly easy to get separated. Cell service is notoriously unreliable when tens of thousands of people are trying to use it at once, so you can’t count on a text message or call to find your group.
Why a Meeting Point is Non-Negotiable
Before you even think about splitting up to see different artists, establish a clear, specific, and easy-to-find meeting point. This is your group’s "home base." If anyone gets lost, their phone dies, or you just need to regroup, everyone knows exactly where to go.
How to Choose a Good Spot
Don’t pick a generic spot like "the fountain" or "the food court." Choose a unique and unmistakable landmark. A good meeting point is something like, "the giant silver sculpture near the Buckingham Fountain" or "the corner of the 'Deep Dish' pizza stand in Chow Town." Pick a spot that is slightly away from the main walkways to avoid being constantly jostled. Check in at your home base at pre-determined times to ensure everyone is safe and accounted for.

6. Embrace the Journey Between the Stages
Stage-hopping isn’t just a commute; it’s an opportunity. The journey from one performance to another is part of the festival experience itself. Instead of seeing it as a chore, reframe it as a chance for discovery and inspiration.
Discover Your Next Favorite Band
As you walk the perimeter paths, you’ll pass smaller stages where artists you’ve never heard of are playing. Pause for a few minutes and listen. This is how you stumble upon incredible new music. Some of the most memorable Lollapalooza moments happen not at the massive headliner stages, but in the intimate settings of the BMI or Grove stages. Let your ears guide you.
Explore the Full Festival Experience
Lollapalooza is more than just a concert. It’s a massive cultural event filled with creativity. On your way from one stage to the next, take a detour through the art installations, check out the merch tents, or see what activations the sponsors have set up. This spirit of creative discovery is what fuels the best entrepreneurs. If you're feeling inspired by the artistry around you, channel that energy into your own project with our free [Digital Product Ideas Guide]. By exploring, you break up the monotony of walking and get a richer, more complete festival experience.

7. Plan Your Grand Escape in Advance
How you leave the festival is just as important as how you navigate it. At 10 PM, when the final headliner finishes, a massive wave of people will pour out of the Grant Park exits, creating a human traffic jam that can be overwhelming and slow.
Beat the Final Rush
Just as with the 15-Minute Rule for stage-hopping, consider leaving a few minutes before the absolute end of the night. Slipping out during the last song or just before the encore can save you up to an hour of being stuck in a slow-moving crowd. You’ll get to public transit or your rideshare pickup spot ahead of the main surge, which is a priceless advantage after a long day.
Know Your Public Transit Route Cold
The best way to get to and from Lollapalooza Chicago is by using the CTA rail system. Multiple downtown street closures make driving or using rideshares near the park a nightmare. Before the festival, identify the closest CTA station to your accommodation and memorize the route to and from the park exits. Having this plan locked in will prevent you from wandering aimlessly with a dead phone at the end of a long day.
Pro-Tip: If you must use a rideshare, set your pickup location several blocks away from the Grant Park exits. Walk away from the chaos and toward your pin. You'll escape the immediate surge pricing, and your driver will be able to find you much more easily than in the gridlock traffic near the festival grounds.
Your Blueprint for Lollapalooza Domination
The overwhelming scale of Lollapalooza can intimidate even the most enthusiastic music fan, but it doesn’t have to. With a strategic approach, the festival transforms from a logistical puzzle into the ultimate musical playground. By preparing in advance, navigating smartly, and taking care of your body, you shift from being a passive attendee to the master of your own experience. With these stage-hopping tips, you're now fully equipped with the knowledge of a seasoned pro, ready to conquer Lollapalooza Chicago and create a weekend of flawless, unforgettable memories.

Your Lollapalooza adventure is just one part of an incredible trip. To make the most of your time in the Windy City and beyond, check out our comprehensive [Travel Guide]. It’s packed with insider tips for exploring the best destinations across the USA.
Don't Miss Out! Subscribe for Exclusive Content
SubscribeComments 0
No comments yet
Be the first to share your experience!
Dont Miss Out! Subscribe for Exclusive Content

San Francisco Cherry Blossoms: A Local's Guide to the Blooms

Halloween SF: Haunts Without Horrors

SF Festivals: 7 Must-See Lineups

Christmas SF: Lights & Wharf Wonders

SF Pride: 6 Route & Party Hacks

Chinese New Year SF: Parade Essentials
Budget Solo Travel: A Proven System for Trips Under $1000
TrekGuider @trekguider
Planning a solo trip should be thrilling. But for many, one question hangs in the air, casting a shadow of stress and analysis paralysis over the entire process: "How much will this actually cost?" You’ve scrolled through the endless, generic "tips," but you’re still left without a real plan, haunted by the specter of hidden fees, unexpected expenses, and the daunting idea that a trip under $1000 is pure fantasy.
This is not another list. This is your financial playbook. It’s a proven, three-phase system designed to dismantle uncertainty and empower you to plan an incredible adventure with total confidence. This guide to budget solo travel will give you the framework and the tools to build a realistic budget you can actually trust. A successful trip, however, involves more than just money. For a complete masterclass covering everything from safety to packing and meeting people, be sure to read our ultimate guide to .
The Strategic Foundation—The Decisions That Save the Most
The secret to a truly affordable solo trip isn't about pinching every penny until it screams. It’s about making a few smart, high-impact decisions long before you even think about packing. These foundational choices have the biggest impact on your bottom line and set the stage for a stress-free adventure.
Choose Your Playground Wisely
This is the single most important decision you will make. Your destination dictates the cost of everything else. A week in Zurich will cost exponentially more than a month in Hanoi, no matter how frugal you are. To keep your trip under $1000, you must focus on regions where your home currency has heavyweight buying power.
Southeast Asia (The Budget Gold Standard): Countries like Vietnam, Thailand, Cambodia, and Indonesia are legendary for a reason. You can feast on world-class street food for a couple of dollars, secure a clean, private guesthouse room for $20-$30, and witness breathtaking landscapes that cost absolutely nothing to enjoy.
Eastern Europe (Culture Without the Cost): Forget the well-trodden paths of Paris and Rome. Cities like Budapest (Hungary), Prague (Czech Republic), Krakow (Poland), and Lisbon (Portugal) offer centuries of history, stunning architecture, and vibrant culture at a price that feels like a pleasant time warp.
Latin America (Adventure Capital): For raw adventure and rich culture, destinations like Mexico, Colombia, Bolivia, and Guatemala provide unparalleled value. You can explore ancient Mayan ruins, hike active volcanoes, and immerse yourself in dynamic local life, all on a remarkably modest budget.

Master the Calendar
Timing isn't just important; it's everything. Every destination has three travel seasons, and knowing the difference is like having a cheat code.
High Season: Peak tourist time with postcard-perfect weather, but also the biggest crowds and eye-watering prices.
Low Season: The off-season, often with challenging weather, fewer open attractions, and rock-bottom prices.
Shoulder Season: The magic window. Nestled between the high and low seasons (typically April-May and September-October in the northern hemisphere), this is the budget traveler's sweet spot.
Traveling during the shoulder season means you get the best of both worlds: pleasant weather, far fewer tourists cluttering your photos, and dramatic drops in the cost of flights and accommodations. Visiting the Greek Islands in May instead of July, for instance, can easily cut your two biggest expenses by 30-50%.
Build Your Budget Blueprint
Let’s reframe the word "budget." It isn't a restriction; it's a permission slip. A well-crafted budget doesn't tell you what you can't do; it gives you the freedom to do what you want to do, without the guilt or anxiety. Here’s how to build one you can rely on.
Set Your Ceiling: Before anything else, define your absolute maximum trip cost. For this playbook, we're targeting a complete trip under $1000.
Become a Researcher: Open a spreadsheet and start plugging in real numbers. Use sites like Kayak, Booking.com, and detailed travel blogs to estimate average costs for your chosen destination. Be thorough.
Flights/Major Transport: Your biggest single purchase.
Accommodation: Your largest daily expense.
Food & Drink: A realistic mix of meals out, street food, and groceries.
Activities & Tours: Museum entries, day trips, cooking classes.
Local Transport: Subways, buses, and the occasional ride-share.
Travel Insurance: Non-negotiable. Don't even consider leaving home without it.
Build a Financial Safety Net: This is the pro move. Once you have your total estimated cost, add a 15-20% "contingency fund." This isn't for overspending; it’s for the unexpected. It’s the money that lets you say "yes" to a spontaneous adventure or handle a missed train without a panic attack. It’s the key to true peace of mind.

With that blueprint in hand, it’s time to move from strategy to action.
The Booking Engine—Locking in Value on Your Biggest Expenses
This is where the rubber meets the road. With your strategic plan in place, you can now book the core components of your trip with surgical precision, ensuring you get the absolute best value for every dollar spent.
Accommodation Strategy
For a solo traveler, a standard hotel room is almost always the least imaginative and most expensive option. The world of alternative accommodations is where you’ll find incredible value and far more interesting experiences.
Hostels (The Social Hub): The undisputed champion of budget solo travel. They offer dorm beds for incredibly low prices and have a built-in social atmosphere that’s perfect for meeting other travelers. If dorms aren’t your scene, a private room in a quality hostel gives you the perfect blend of privacy and community at a price well below a hotel.
Guesthouses & Local Inns: These smaller, often family-run establishments offer a direct line to the local culture. They're typically much cheaper than large hotel chains and infinitely more charming.
Apartment Rentals (with a Kitchen): For stays of three days or more, sites like Airbnb can be fantastic value. The real secret weapon here is the kitchen. Being able to prepare your own breakfast and the occasional dinner will slash your daily food costs.

How to Slay the Single Supplement Dragon
The "single supplement" is an infuriating fee that tour companies and cruise lines charge solo travelers to cover the perceived loss of a second person in a double-occupancy room. It’s a penalty for your independence, and you should refuse to pay it. Here’s how:
Seek Out Solo-Friendly Companies: Tour operators like Intrepid Travel, G Adventures, and Overseas Adventure Travel are built for travelers like you. They’ll match you with a same-sex roommate to eliminate the fee entirely.
Use the Calendar to Your Advantage: Companies are far more likely to waive the fee during the shoulder season when they have more empty spots to fill.
Become a Last-Minute opportunist: If your schedule is flexible, call companies a week or two before a tour's departure. They may be desperate to fill a final spot and will gladly waive the fee to make a sale.
Don't Be Afraid to Ask: If a solo option isn't listed online, pick up the phone. A friendly, direct request can often work wonders.
Transportation Hacks
Getting from Point A to Point B is a major budget item. A few smart moves here can free up hundreds of dollars for more exciting things.
Pack Light, Win Big: Master the art of carry-on-only travel. Checked baggage fees are a massive profit center for airlines, especially budget carriers. A well-packed carry-on is free, keeps you nimble, and prevents the nightmare of lost luggage.
Make Your Travel Day Your Hotel Night: For longer overland journeys, an overnight train or bus is a brilliant two-for-one hack. It combines your transportation and accommodation costs into a single ticket, saving you a night's expense and a full day of travel time.
Be a Flexible Flier: Use flight aggregators like Google Flights and Skyscanner like a pro. Their "price graph" and "entire month" views are your best friends, instantly showing you the cheapest days to fly. Always search in an incognito browser to prevent price hikes based on your search history.
Pro-Tip: When comparing flight prices, always factor in the "hidden" cost of airport transfers. A flight that looks $50 cheaper might land at a remote airport where a $70 taxi ride is your only option, completely negating your savings.
The Execution Playbook—Living Smart on the Ground
You’ve arrived. Your careful planning has paid off. Now, it's all about execution. Your daily habits and micro-decisions will determine your budget's success. This is where you shift your mindset from "tourist" to "savvy local."
The Food Budget
You don’t have to survive on protein bars to eat affordably. The key is a "High-Low" hybrid approach that lets you experience the best of the local food scene without blowing your budget.
Make Lunch the Main Event: In many cultures, lunch is the biggest meal of the day. Look for a "menu of the day" (or menu del día) where you can get a multi-course, high-quality meal for a fantastic price. Have a lighter, cheaper dinner.
Go on a Supermarket Safari: Your local grocery store is more than just a place for supplies; it’s a cultural institution. It’s perfect for grabbing breakfast items, picnic lunches, and local snacks.
Trust the Streets: In many destinations, especially in Asia and Latin America, the best, most authentic food is found at bustling street food stalls for a dollar or two. It’s a delicious, ultra-affordable way to dive deep into the local cuisine.
Maximize Your Experience, Not Your Spending
The most memorable travel moments are rarely the most expensive. Every city is overflowing with incredible, zero-cost experiences for those who know where to look.
Take a Free Walking Tour (On Day One): This should be your first activity in any new city. It’s a crash course in history, layout, and local culture. You’ll get your bearings and receive priceless insider tips from your guide. Just be sure to tip them what you feel the tour was worth.
Explore Public Parks and Spaces: From the lush gardens of Paris to the sprawling beaches of Rio, a city's public spaces are its soul. They cost nothing to enjoy and are perfect for people-watching.
Hunt for Free Museum Days: Nearly every major museum offers free admission on certain days of the month or evenings of the week. A quick Google search can save you a significant amount on entry fees.
Embrace the Art of Wandering: The single best way to discover a city's hidden courtyards, charming side streets, and authentic local life is to put away the map and simply wander.

Your Blueprint for Affordable Adventure
This isn't just a collection of tips; it's a mindset. You now understand that successful budget solo travel is not a competition to spend the least amount of money possible. It's about the strategic allocation of your resources to maximize experience, discovery, and joy. It's the difference between being cheap and being smart.
Avoid the trap of "false economies"—like booking a hotel far outside the city to save $10, only to spend $15 and two hours on transport each day. But also, know when to embrace the "strategic splurge"—that one incredible meal, cooking class, or guided tour that will become the key element memory of your entire trip. You have the playbook. You have the system. You have the confidence to reject the anxiety of the unknown and step into the incredible freedom of solo travel. The world is not as expensive as you think.
Frequently Asked Questions (FAQ)
How much money do I really need for a trip under $1000?
Excluding your main international flight, a budget of $1000 can comfortably last for 2-4 weeks in high-value regions like Southeast Asia or parts of Eastern Europe. For a one-week trip including flights from the US, you’ll need to target shoulder-season deals to nearby destinations like Mexico and Central America, or watch for flash sales to Europe.
Is it cheaper to stay in a hostel or an Airbnb when solo?
A hostel dorm bed will almost always be your cheapest nightly option. A private room in a hostel is often comparable in price to a basic room in an Airbnb. An entire Airbnb apartment only becomes cost-effective if you stay long enough and use the kitchen religiously to offset the higher upfront cost.
What are the best apps for budget solo travel?
Skyscanner/Google Flights: For finding the cheapest flight dates.
Hostelworld/Booking.com: For finding and booking affordable accommodation.
Rome2rio: For figuring out the cheapest way to get between cities.
Trail Wallet/TravelSpend: For tracking every penny of your expenses in real-time.
How do I handle currency conversion and ATM fees abroad?
First, get a debit card from a bank that charges zero foreign transaction fees and reimburses ATM fees (Charles Schwab Bank is excellent for this). Always decline the "dynamic currency conversion" offered by ATMs and card machines—it's a scam with a terrible exchange rate. Always choose to be charged in the local currency.
Don't Miss Out! Subscribe for Exclusive Content
SubscribeComments 0
No comments yet
Be the first to share your experience!
Dont Miss Out! Subscribe for Exclusive Content

Ultimate USA Holidays Guide: Top Picks

FTC Affiliate Disclosure Essentials: Stay Compliant as a Travel Creator

Essential Affiliate Tools: From Tracking to Full Optimization

Booking.com Affiliate Program Review: Pros, Cons, and Earnings Potential

Decoding Affiliate Commission Rates: Benchmarks for Travel Creators
