Decoding Affiliate Commission Rates: Benchmarks for Travel Creators
TrekGuider @trekguider
You’re a travel creator, and you’ve entered the world of affiliate marketing to turn your passion into a profession. But you’ve quickly run into a frustrating black box: the commission structure. You see a dizzying array of percentages, acronyms like CPA and EPC, and vague promises of earnings. You’re left wondering what good affiliate commission rates even look like. Are you earning your worth, or are you leaving a significant amount of money on the table?
This confusion isn't just academic; it's a direct threat to your bottom line. The reported average monthly income for affiliates in the travel niche is an impressive $13,847, a figure that proves this is a serious enterprise. But you can't build a sustainable business on guesswork. Partnering with a program offering a flashy 40% commission—only to discover it’s 40% of their tiny margin—is a rookie mistake that costs real money. This lack of clarity makes it impossible to forecast your income, negotiate better terms, or build a truly predictable business. You feel like you’re flying blind.
This guide is your decoder ring. We are pulling back the curtain to give you a comprehensive breakdown of how affiliate commissions actually work. We will deconstruct every major commission model, provide clear, data-backed industry benchmarks, and teach you how to analyze these rates like a seasoned professional. By the end of this deep dive, you will be able to spot high-value opportunities and architect a monetization strategy that truly rewards your influence. For a complete overview of the affiliate landscape, our definitive pillar page, Travel Affiliate Programs: The 2026 Ultimate Guide, is your essential command center.

The Anatomy of a Commission: Deconstructing the Core Models
Let's cut through the jargon. An affiliate commission is simply a reward for a job well done. A company—the merchant—pays you for successfully driving a specific, valuable action, which in the travel world almost always means a completed booking or sale.
But the way that reward is calculated can vary dramatically. Understanding the underlying structure of different affiliate commission rates is the first step toward becoming a high-earning creator.
1. Cost Per Sale (CPS) or Pay Per Sale (PPS): The Industry Workhorse
You'll encounter this model most often—it's the industry's workhorse for a reason. It’s simple and transparent: when a reader clicks your affiliate link and completes a purchase, you earn a percentage of the total sale value. If you recommend a $500 hotel stay and the program offers a 6% CPS commission, you earn $30. This model directly ties your earnings to the revenue you generate, making it the gold standard for most travel bookings and gear sales.
2. Cost Per Action (CPA): Rewarding a Specific Step
Recommended: The Solo Female Travel Safety Guide
Recommended: International Travel Checklist (Printable PDF)
CPA is a broader model where you’re compensated for a specific action a user takes. While that action is often a sale (making it identical to CPS), it can also be something else. For example, a travel credit card company might pay you a CPA commission for every user who completes an application, regardless of whether they are approved.
3. Cost Per Lead (CPL): Paying for High-Value Inquiries
With a CPL model, you earn a fixed fee for each qualified lead you generate. This is common in high-ticket travel sectors where the sales cycle is long. A luxury tour operator, for instance, might pay you $50 for every user who fills out a detailed inquiry form for a bespoke African safari. You get paid for delivering a potential customer; their sales team takes it from there.
4. Tiered & Multi-Tier Structures: Incentivizing Growth
This is where commission models get more sophisticated and rewarding.
Tiered Structures: Rewarding Your Growth These are designed to reward high-performing affiliates. Your commission rate increases as you drive more sales. A program might offer a base rate of 6%, which jumps to 8% after you generate $5,000 in sales in a month, and 10% after $10,000.
Multi-Tier Structures: Building a Network These allow you to earn commissions not only on your own sales but also on the sales generated by other affiliates you recruit into the program. This effectively turns you into a partner who helps grow the program itself, creating a secondary, more passive income stream.
5. Cost Per Click (CPC): The Rare Exception
In this model, you are paid a small fee for every click your affiliate link receives, regardless of a sale. Due to its high vulnerability to fraud, the CPC model is now extremely rare in modern affiliate marketing and almost never seen in the travel space.

Industry Benchmarks: What Good Affiliate Commission Rates Look Like
So, what should you actually expect to earn? While rates vary, the travel industry has established clear benchmarks across its major categories. Here’s your cheat sheet.
Hotels & Accommodations: 2% - 7% of Booking Value This is the bread and butter for many creators, but the details are everything. A program like Expedia Group offers up to 6% of the total booking value with a 7-day cookie. In contrast, Booking.com advertises a much higher "25-40%", but this is a percentage of their commission, not the customer's total payment. This opaque structure often results in a much lower effective rate, closer to 2-4% of the final booking value.
Tours, Activities & Experiences: 6% - 8%+ This is a high-margin category with strong potential. Market leaders like Viator and GetYourGuide set the standard with base commissions of 7-8%. Adventure-focused operators like G Adventures offer 6%, which is incredibly powerful when applied to their high-ticket tours that can cost thousands of dollars.
Travel Insurance: 10% or More Insurance is a consistently high-paying vertical. Top programs like SafetyWing and World Nomads both offer a standard 10% commission. SafetyWing takes this a step further with a recurring model, meaning you continue to earn 10% every time your referred customer renews their policy.
Gear & Apparel: 3% - 8% For physical products, rates depend heavily on the retailer. Amazon Associates is the baseline, offering 3-4% for most travel categories. However, partnering with specialty retailers is far more lucrative. A brand like REI, for example, offers a 5-8% commission on high-quality (and often high-priced) outdoor gear.
Pro-Tip: Don't be blinded by the highest percentage. A 6% commission on a $3,000 G Adventures tour is $180. An 8% commission on a $50 city walking tour is $4. Always consider the average order value of the products you are promoting when evaluating affiliate commission rates.

The Metrics That Matter More Than the Rate Itself
An experienced affiliate marketer knows the commission rate is just a starting point. To truly understand a program's profitability, you need to analyze the metrics that measure real-world performance.
Earnings Per Click (EPC): Your True North This is arguably the single most important metric. It’s calculated by dividing your total commission earnings by the total number of clicks you sent. If you sent 100 clicks and earned $50, your EPC is $0.50. This number tells you the average value of every single click. A program with a lower commission but a higher EPC is often the more profitable partner for your specific audience.
Conversion Rate (CR): The Sign of a Healthy Partner This is the percentage of users who take the desired action after clicking your link. A high conversion rate is a sign of a trusted brand with a well-optimized checkout process. A program with a 10% commission that converts at 1% is less profitable than a program with a 5% commission that converts at 5%.
Cookie Duration: The Travel Creator's Safety Net This is critical in the travel space. A longer cookie duration (30, 60, or 90 days) gives your audience the time they need to research a high-consideration purchase while ensuring you still get credit. A short cookie window is a major red flag and a sign that the program may not be structured in your favor.
Pro-Tip: Dive into your affiliate dashboards. Most networks like CJ Affiliate and Travelpayouts provide detailed reports on your EPC and conversion rates for each program. Use this data to identify your true top performers—the results will often surprise you.

The Travel Creator's Toolkit
Feeling overwhelmed by the data? You don't have to be. To help you organize your strategy and implement everything you've learned, we've created the ultimate resource bundle. It includes checklists, templates, and tools designed to accelerate your journey from beginner to pro.
Download Your Free Bundle: The Travel Creator's Toolkit
The High-Margin Alternative: Referral & Revenue Share Models
While traditional commission models are powerful, the most forward-thinking creators are diversifying into referral and revenue-sharing programs. Instead of a one-time payment for a single sale, these models allow you to build long-term, passive income streams by becoming a true platform partner.
This is the philosophy behind the TrekGuider Seller Platform. We believe in empowering creators to build complex businesses. Our platform is designed for you to sell your own digital products—like itineraries and guides—but our referral program adds another powerful layer to your income strategy.
Instead of a simple CPS commission, our model functions like a sophisticated multi-tier system. When you refer other creators to become sellers on TrekGuider, you earn an ongoing share of the revenue they generate, with tiered commissions that start at 4% for referred sellers. You’re not just earning from a single transaction; you’re building a network and earning from its collective success. It's a strategic way to move beyond chasing individual sales and start building a more resilient, high-margin business.
Frequently Asked Questions (FAQ)
1. Is a higher commission rate always better? Not at all. A high commission rate can be misleading if the program has a low conversion rate, a short cookie duration, or a low average order value. Always look at your Earnings Per Click (EPC) to determine the true profitability of a program for your audience.
2. How can I find the EPC for an affiliate program? Most reputable affiliate networks (like CJ Affiliate, ShareASale, or Travelpayouts) provide EPC data. It's often listed as a network-wide average for each merchant, which gives you a good baseline. Once you start sending traffic, you can track your own personal EPC in your performance reports.
3. Can I negotiate my affiliate commission rates? Yes, absolutely. Once you become a proven partner and consistently drive a significant volume of high-quality sales, you have leverage. Many brands are willing to negotiate a higher, private commission rate for their top-performing affiliates. Always track your performance and don't be afraid to ask.

From Confusion to Command
You are no longer in the dark. The world of affiliate commission rates is no longer a confusing black box. You now have the knowledge to deconstruct any program's payment structure, the industry benchmarks to know your worth, and the key metrics to identify what truly drives profit.
This knowledge is power. It empowers you to audit your existing partnerships, confidently seek out new ones, and even negotiate better terms. By focusing on programs with fair commissions, long cookie durations, and high conversion rates, you can ensure your hard work is properly rewarded. Building a profitable travel content business requires a strategic approach, and a deep understanding of affiliate commission rates is a non-negotiable part of that strategy.
Read the full guide: The Travel Blogger's Playbook to Affiliate Marketing Mastery
Don't Miss Out! Subscribe for Exclusive Content
Subscribe


Comments 0
No comments yet
Be the first to share your experience!
Dont Miss Out! Subscribe for Exclusive Content

Ultimate USA Holidays Guide: Top Picks

FTC Affiliate Disclosure: Stay Compliant as a Travel Creator

Essential Affiliate Tools: From Tracking to Full Optimization

Avoid These 5 Affiliate Landing Page Mistakes for Better Conversions

Affiliate Keyword Research Mastery for Travel Blogs

Booking.com Affiliate Review: Pros, Cons & Earnings
St. Patrick's: River Dyeing Secrets
TrekGuider @trekguider
You’ve seen the photos, and they look impossible: a major American river, flowing through a canyon of skyscrapers, glowing with the emerald-green hue of a shamrock. It’s a spectacle so surreal it feels like a clever digital edit. But it’s real, and the biggest problem for any traveler is that witnessing this world-famous tradition feels like a logistical nightmare. Where are the best spots? What time do you really need to arrive to beat the hundreds of thousands of spectators? And how do they even accomplish this magical feat without creating an environmental disaster?
Without a rock-solid plan, you risk being swallowed by a sea of green, craning your neck for a sliver of water between a thousand heads, only to miss the fleeting moment of transformation. You could spend hours shivering in the Windy City's notorious March air and leave with nothing but a blurry photo and the bitter taste of disappointment. This iconic event is the dazzling centerpiece of the city's festive calendar, a unique urban ritual that we place in the broader context of the city's year-round celebrations in our complete guide to Chicago Holidays: Windy City Thrills. Don't let poor planning rob you of the magic.
This is your definitive insider’s guide. Forget the guesswork. We are pulling back the curtain on the river dyeing secrets, from the history and science behind the tradition to a minute-by-minute game plan for a perfect day. You will learn the absolute best viewing locations, the parade navigation hacks locals swear by, and how to transform a potentially chaotic day into an unforgettable urban adventure.

The Legend of the Green River: An Accidental Tradition
While Chicago’s St. Patrick's Day Parade is one of the nation's oldest, with roots stretching back to 1843, the tradition that truly puts it on the global map is much younger. The practice of dyeing the Chicago River green was born in 1962 from a moment of pure, serendipitous observation. Stephen Bailey, then the business manager of the Chicago Journeymen Plumbers Local Union, noticed that a dye plumbers used to detect leaks and pollution sources in the river had stained a worker's white overalls a perfect, brilliant shade of Irish green.
A lightbulb went off. If that small amount of dye could stain fabric so vividly, what could a larger quantity do to the entire Chicago River? The Plumbers Union, a key sponsor of the parade, decided to find out. For the inaugural dyeing, they released 100 pounds of the chemical into the river, which, to their astonishment, kept the waterway a radiant green for nearly a week. The spectacle was an instant sensation, captivating the city and cementing a new, indelible tradition. Over the decades, the process has been perfected and the formula made environmentally safe, but the magic—and the stewardship of the event—remains firmly in the hands of the Plumbers Union, proof of a quirky idea that became a beloved civic institution.
The Science of the Spectacle: How Orange Powder Turns a River Green
The most closely guarded secret in Chicago isn't a political backroom deal; it's the precise formula for the dye that transforms the river. What we do know is that it’s a vegetable-based powder, making it completely safe for the river's ecosystem. The real visual trickery, however, lies in its color. When you see the crew on the boats scooping the substance from its container, you’ll notice it’s a bright, fiery orange.
The magic happens the moment the powder hits the water. Through an immediate chemical reaction, the orange powder blossoms into a brilliant emerald green. The process is a well-oiled machine. Two to three motorboats from the Plumbers Union perform the honors. One larger boat dumps between 40 and 60 pounds of the powder into the river just east of the DuSable Bridge (Michigan Avenue), creating a thick, concentrated streak of color. Smaller boats then zip back and forth through the dyed water, acting like giant egg beaters to churn the color and ensure it spreads evenly from bank to bank.
The initial streak of green is intense and almost fluorescent before it mellows into a rich, opaque emerald. The vibrant color holds for about five to six hours, allowing plenty of time for photos and for parade-goers to marvel at the sight before it naturally dissipates into Lake Michigan.
Pro-Tip: Many first-time visitors worry about the environmental impact. Rest assured, the original oil-based fluorescein dye was replaced with the current eco-friendly, vegetable-based powder decades ago. The Plumbers Union takes immense pride in the tradition being a safe spectacle that harms no wildlife.

Your Ultimate Viewing Guide for the St. Patrick's Day Chicago River Dyeing
Securing a good spot to watch the river dyeing is the single most important part of your plan. The event officially begins at 10:00 AM, but the crowds start forming hours earlier. Here are the best places to stake your claim, broken down by experience.
For the Iconic Postcard Shot: The Bridges
The East Side of the DuSable Bridge (Michigan Avenue): This is ground zero, the quintessential, postcard-perfect view. You get the iconic architecture, the Wrigley Building, the river, and the boats all in one frame. However, it is the most crowded spot on the planet for that hour. You must arrive by 7:00 AM, at the latest, to get a front-row spot against the railing.
The West Side of the Columbus Drive Bridge: Offering another fantastic, elevated vantage point, this bridge is slightly less famous than Michigan Avenue, so it can be marginally less packed. It’s also very close to the parade’s starting point, making for an easy transition.
For an Immersive, Water-Level View: The Riverwalk
The Chicago Riverwalk (Upper and Lower Levels): The stretch of the Riverwalk between Michigan Avenue and Columbus Drive puts you right at water level. It offers a unique and dramatic perspective as the green tide flows past. It’s fantastic for close-up photography and feeling completely immersed in the action. The lower level fills up extremely fast, and police will restrict access once it hits capacity, so get there early and be prepared to stay put.
For a More Relaxed, Crowd-Averse Experience
West of Michigan Avenue (Wabash, State, or Dearborn Street Bridges): The further west you go from the main dyeing area, the thinner the crowds become. You can still see the beautifully green river from these bridges without the intense crush of people. This is an excellent option for families with small children or anyone who prefers a bit more breathing room. You won't see the boats actively dumping the dye, but you'll see the stunning final product.
The St. Patrick's Day Chicago Game Plan: A Minute-by-Minute Timeline
To truly master the day, you need a strategy. Here is a timeline for Saturday, the Saturday before St. Patrick's Day, to ensure you see everything without the stress.
It’s a crucial distinction for planning: St. Patrick’s Day itself falls on Monday, March 17, 2026, but the city holds its main celebrations—the dyeing and the parade—on the preceding Saturday, March 15th. This allows for the largest possible turnout and a full day of festivities.
7:00 AM - 7:30 AM: The Early Bird Gets the View This is not an exaggeration. If you want a prime spot on the Michigan or Columbus bridges, you need to be there now. Grab a coffee and a pastry, dress in more warm layers than you think you need (the wind off the river is biting), and claim your territory. The city is still quiet, and the energy is just starting to build.
8:00 AM - 9:30 AM: The Green Tide Rises The crowds will begin to pour in. The bridges and the Riverwalk will fill up rapidly. This is the time to hold your ground and soak in the atmosphere. It’s a fantastic people-watching opportunity as the city transforms into a sea of green attire, from shamrock glasses to full-blown leprechaun suits.
10:00 AM: The Magic Moment The Plumbers Union boats will make their appearance. Watch as the crew begins dispersing the secret orange powder. You’ll see the first vibrant streaks of green appear in the boat’s wake, quickly spreading across the river’s surface as the crowd erupts in a collective cheer. This is the moment you came for.
10:30 AM - 11:30 AM: Soak It In and Reposition The river is now a stunning sheet of emerald. Take your photos and enjoy the incredible sight. Once the dyeing is complete, the crowds will begin to shift as people start moving toward the parade route. This is your window to either grab a quick bite or start making your way south to Columbus Drive.
Feeling inspired to document this incredible day? Capture every vibrant moment with our free The Travel Creator's Toolkit, packed with guides for stunning photography and videography to make your memories last a lifetime.
Navigating the Parade: From Columbus Drive to Victory
With the river successfully turned green, the city’s attention shifts to the grand St. Patrick's Day Parade. This is a massive celebration of Irish heritage featuring hundreds of groups, including traditional bagpipers, Irish dancers, elaborate floats, and local dignitaries.
Parade Start Time: 12:15 PM
Parade Route: The parade proceeds north along Columbus Drive, starting at Balbo Drive and ending at Monroe Drive. The main viewing stand is located in front of Buckingham Fountain.

Tips for a Great Parade Experience:
Best Viewing Spot: The area around Buckingham Fountain is the heart of the action, but it’s also the most crowded. For a more relaxed experience, find a spot further north along Columbus Drive toward Monroe.
Arrive with a Plan: The parade route is long. Pick a spot and stick to it. Trying to move through the dense crowds once the parade starts is nearly impossible.
Facilities: Portable restrooms are available along the route, but expect long lines. Plan accordingly. Food and drink vendors are also present, but it’s wise to bring your own water and snacks to avoid the high prices.
Pro-Tip: Public transportation is your best friend. The CTA 'L' trains will be packed, but they are far more efficient than trying to drive and park anywhere near Grant Park. Street closures are extensive. Exit at a stop in the Loop and walk the final few blocks to the river or parade route.
Beyond the River: Celebrating Like a Chicagoan
The river dyeing and parade are the main events, but the celebration extends throughout the city. To truly experience the day like a local, consider adding one of these activities to your itinerary.
Visit an Authentic Irish Pub: Chicago has a rich Irish heritage and the pubs to prove it. Head to neighborhoods like River North or Lincoln Park to find establishments like The Kerryman or Fado Irish Pub for a pint of Guinness, some traditional corned beef and cabbage, and live music.
Explore the Irish American Heritage Center: Located on the city's northwest side, this center often hosts a full-day festival with music, dance, food, and cultural exhibitions, offering a deeper connection to the holiday’s roots away from the downtown crowds.
Enjoy a Themed Cruise: Several boat tour companies offer special St. Patrick's Day cruises on the green river. This is a fantastic way to get an unparalleled view away from the crowded bridges, though tickets are pricey and must be booked months in advance.
Planning a bigger trip around this event? Our comprehensive Travel Guide has everything you need to explore Chicago's neighborhoods, find the best eats, and build the perfect itinerary for a multi-day adventure in the Windy City.
Your Mission, Should You Choose to Accept It
You are now armed with the secrets of the green river, a strategic timeline, and insider tips to navigate the festivities. You have the knowledge to bypass the chaos and witness one of the world's most unique and joyful celebrations like a seasoned pro. The magic of St Patrick's day Chicago is not just in the spectacle itself, but in the shared energy of a city coming together to create something beautiful and fleeting. So, dress in your finest green, brave the March chill, and go make memories that will last far longer than the color in the river.
Don't Miss Out! Subscribe for Exclusive Content
SubscribeComments 0
No comments yet
Be the first to share your experience!
Dont Miss Out! Subscribe for Exclusive Content

San Francisco Cherry Blossoms: A Local's Guide to the Blooms

Halloween SF: Haunts Without Horrors

SF Festivals: 7 Must-See Lineups

Christmas SF: Lights & Wharf Wonders

SF Pride: 6 Route & Party Hacks

Chinese New Year SF: Parade Essentials
Top 9 Adventure Travel Blogs to Follow Now
TrekGuider @trekguider
Let's be honest: the term "adventure travel" has been stretched to its breaking point. A search for genuine thrill-seeking inspiration often leads to a deluge of content about city walking tours and all-inclusive resorts. For someone planning a high-altitude trek or a remote jungle expedition, this isn't just frustrating—it's a waste of valuable time. Worse, relying on generic, unqualified advice for high-stakes travel can be impractical and even dangerous.
You need insights from people who have field-tested their gear in a downpour, navigated a remote border crossing, and know the difference between a challenging hike and a technical climb. That’s why we’ve gone deep, applying a rigorous, data-driven framework to identify the absolute best adventure travel blogs on the internet. This isn't just another list. We’ve categorized the top creators by their specific expertise—hiking, water sports, and extreme expeditions—so you can connect directly with the authorities who share your passion. For a complete map of every travel niche, start with our definitive pillar guide, The Best Travel Blogs to Follow in 2026.
Defining the "Adventure" in Adventure Travel Blogs
Before diving in, it’s crucial to understand a key industry distinction. The adventure travel sector is broadly split into two categories: "soft" and "hard" adventure. Knowing where a blog focuses its content is the first step to finding the right inspiration for your personal comfort level and skillset.
Soft Adventure: This category is all about accessible excitement. Characterized by low-to-moderate perceived risk, these activities don't require specialized training. Think guided wildlife safaris, kayaking on calm waters, or hiking on well-marked trails. The soft adventure market is experiencing significant growth, driven by families and active "baby boomers" seeking engaging yet safe experiences, making it a major focus for many top-tier blogs.
Hard Adventure: This is where the stakes get higher. Defined by a high level of real or perceived risk, these pursuits demand significant physical fitness, technical skill, and specialized gear. We're talking high-altitude mountaineering, whitewater kayaking in advanced rapids, and caving in remote environments. The creators behind these blogs are seasoned experts providing indispensable advice for high-consequence journeys.
Our list features the best of both worlds, ensuring a perfect match for every type of thrill-seeker.
The Best Adventure Travel Blogs for Hiking & Trekking
These creators are masters of the trail, providing invaluable advice for everything from day hikes in national parks to epic, multi-week treks in the world's most remote mountain ranges.
1. Nomadasaurus
Alesha and Jarryd of Nomadasaurus are the real deal. They’ve built an ironclad reputation for their incredible overland journeys and carefully detailed trekking guides. They seamlessly blend inspirational storytelling with the practical, nitty-gritty details you need to plan your own expedition, proving that a life of adventure can be a sustainable lifestyle.
Why They Made the List: They specialize in comprehensive, step-by-step guides for world-class, multi-day hikes.
Must-Read Post: ""
2. Expert Vagabond
Matthew Karsten has been a leading voice in adventure travel for over a decade, and for good reason. His blog is a treasure trove of stunning photography, riveting stories, and practical tips from his expeditions around the globe. He focuses on challenging, often-remote treks that push the boundaries of independent travel.
Why They Made the List: Unmatched experience in remote, hard-adventure trekking with a focus on skill-building.
Must-Read Post: ""
3. Earth Trekkers
While they often appear on lists of top family travel blogs, the core of Earth Trekkers' content is pure adventure. Julie, Tim, and their two kids have documented their journeys through dozens of countries, with a heavy emphasis on hiking and maximizing time in national parks. They are living proof that having a family can amplify a life of adventure, not end it.
Why They Made the List: They offer carefully detailed itineraries for challenging hikes that are still accessible for active families and couples.
Must-Read Post: " "
Your Next Great American Adventure Awaits
Planning an epic road trip to explore the stunning trails of America's national parks? Don't leave home without our essential checklist. This free, downloadable guide is packed with expert tips on everything from gear and vehicle prep to can't-miss hikes.
Download your free National Park Road Trip Checklist now!

Top Adventure Travel Blogs for Water Sports & Expeditions
From the crushing pressure of the deep sea to the wild spray of a whitewater river, these bloggers are experts in water-based adventure. They cover everything from scuba diving and kayaking to epic coastal explorations.
4. The Planet D
Dave and Deb of The Planet D live by the motto "Adventure is for Everyone." After participating in the world’s longest and hardest cycling race, they dedicated their lives to pushing the limits. Their content covers a massive range of activities, but they truly shine when it comes to expedition travel, especially in cold climates and on the water.
Why They Made the List: They are pioneers in expedition travel and excel at documenting epic, guided adventures like kayaking in Antarctica.
Must-Read Post: " "
5. Atlas & Boots
"Adventure with a dash of class" is the perfect tagline for this blog, run by professional writers Kia and Peter. Atlas & Boots is the go-to resource for travelers who want to explore the world's most remote environments without sacrificing smart planning. They cover everything from diving in treacherous waters to climbing the world's highest peaks.
Why They Made the List: Their content is exceptionally well-researched, often exploring the science and history behind the world's most extreme destinations.
Must-Read Post: ""
6. Shalee Wanders
Shalee is an adventure travel blogger with a passion for wildlife and conservation. Her blog documents incredible journeys with a special focus on African safaris and marine expeditions. She provides readers with a roadmap for planning their own ethical and unforgettable wildlife encounters, both on land and in the water.
Why They Made the List: She is a leading voice in combining adventure with ethical wildlife tourism, especially for safari and marine environments.
Must-Read Post: ""
Pro-Tip: When vetting an adventure blog for a high-risk activity, look for content that details failures and lessons learned, not just success stories. True expertise, as research on brand authenticity shows, is demonstrated in how a creator handles mistakes and mitigates risk.
Leading Adventure Travel Blogs for High-Altitude & Extreme Expeditions
This final category is for the true adrenaline junkies. These adventure travel blogs are run by creators who are experts in mountaineering, rock climbing, and other high-stakes pursuits that require immense skill, training, and courage.
7. Andrew Skurka
Recognized by National Geographic as "Adventurer of the Year," Andrew Skurka is in a league of his own. His blog is less a travelogue and more a technical library for serious backpackers and alpinists. He shares unparalleled expertise on gear, technique, and planning. If you are preparing for a truly demanding, self-supported trek, his site is a non-negotiable resource.
Why They Made the List: He is one of the most respected authorities on the planet for hard-adventure hiking and mountaineering.
Must-Read Content: His extensive library of technical and "how-to" guides.
8. The Broke Backpacker
Will Hatton is on a mission to prove that adventure is accessible to everyone, regardless of budget. While the blog covers budget travel, its soul is rooted in raw, off-the-beaten-path adventure. Will and his team travel to destinations few others dare to, from the mountains of Pakistan to the jungles of South America. If you want to know how to really get off the grid, this is your manual.
Why They Made the List: This blog is the undisputed champion of finding epic, hard adventures on a shoestring budget.
Must-Read Post: " "
9. GRRRLTRAVELER
Christine Kaaloa is a solo female traveler who tackles destinations and activities that many would find intimidating. She combines her adventures with intensely practical advice on safety, navigation, and street smarts. She empowers her readers—especially women—to confidently take on challenging solo adventures. That level of self-reliance is invaluable whether you're trekking in remote regions or navigating the diverse landscapes of the Yucatan, a journey we map out in our complete Mexico Travel Guide.
Why They Made the List: She is the leading expert on safe and practical solo adventure travel in challenging destinations.
Must-Read Post: " "
Pro-Tip: Pay close attention to the gear lists on these adventure travel blogs. The best creators don't just list what they use; they explain why they chose a specific item over its competitors. It is precisely this kind of deep expertise that creators leverage on platforms like TrekGuider to create and sell their own premium guides and itineraries.

Frequently Asked Questions About Adventure Travel Blogs
How do adventure travel blogs make money?
Top-tier blogs diversify their income. While some use display advertising, the most profitable methods, according to creator economy reports, are affiliate marketing (earning a commission for recommending gear or tours) and selling their own digital products. This can include anything from detailed itineraries and e-books to photography presets and online courses.
What's the difference between an adventure blogger and an Instagram influencer?
While there can be overlap, the key difference is depth. The blogs on this list are authoritative resources that provide detailed, practical advice that solves specific problems. Their business is built on expertise and trust, not just beautiful photos. An influencer's primary focus is often on aspirational content for a social media platform, while a professional blogger builds a long-term media asset.
Is it safe to follow advice from blogs for high-risk activities?
These expert-led blogs are excellent starting points for planning. However, for any activity with inherent risk, you must treat them as one of many resources. Always cross-reference their advice with official sources like government travel advisories, local guide services, and park authorities. Never attempt a high-risk activity without the proper training, gear, and understanding of current conditions.
Your Adventure Starts Here
The world is full of incredible challenges waiting for you, and the right guidance can mean the difference between a dream trip and a disaster. By focusing on the specific niche that ignites your passion—whether it's a peaceful mountain trail, a vibrant coral reef, or a towering summit—you can learn from a creator who has already forged the path. The nine adventure travel blogs listed here are more than just sources of inspiration; they are invaluable resources run by true experts in their fields. Use their hard-won knowledge to plan your next journey, push your limits, and start an adventure you’ll never forget.
Meta Data Suggestions:
SEO Meta Title (59 characters): Top 9 Adventure Travel Blogs to Follow for Real Expertise
URL Slug: /best-adventure-travel-blogs
SEO Meta Description (154 characters): Find your next thrill. We curated and categorized the 9 best adventure travel blogs for hiking, water sports, and extreme expeditions. Real expert advice.
Don't Miss Out! Subscribe for Exclusive Content
SubscribeComments 0
No comments yet
Be the first to share your experience!
Dont Miss Out! Subscribe for Exclusive Content
FTC Affiliate Disclosure: Stay Compliant as a Travel Creator
Essential Affiliate Tools: From Tracking to Full Optimization
Avoid These 5 Affiliate Landing Page Mistakes for Better Conversions
Affiliate Keyword Research Mastery for Travel Blogs
Booking.com Affiliate Review: Pros, Cons & Earnings

Decoding Affiliate Commission Rates: Benchmarks for Travel Creators
The Ultimate Solo Travel Packing List: A Modular Checklist
TrekGuider @trekguider
Staring at an empty suitcase can be overwhelming. This is not another generic article; this is your definitive, actionable solo travel packing list. It’s a methodical system designed to transform packing from a chore into an act of empowerment. We’ve built this checklist on a "Core + Modules" framework: a non-negotiable foundation of essentials, plus optional modules you can add for specific types of travel.
This tactical checklist is your "what." Before you dive into the specific items, we highly recommend reading our guide to to understand the minimalist systems and philosophy that make this list so powerful. Understanding the "why" will make packing the "what" intuitive and stress-free.
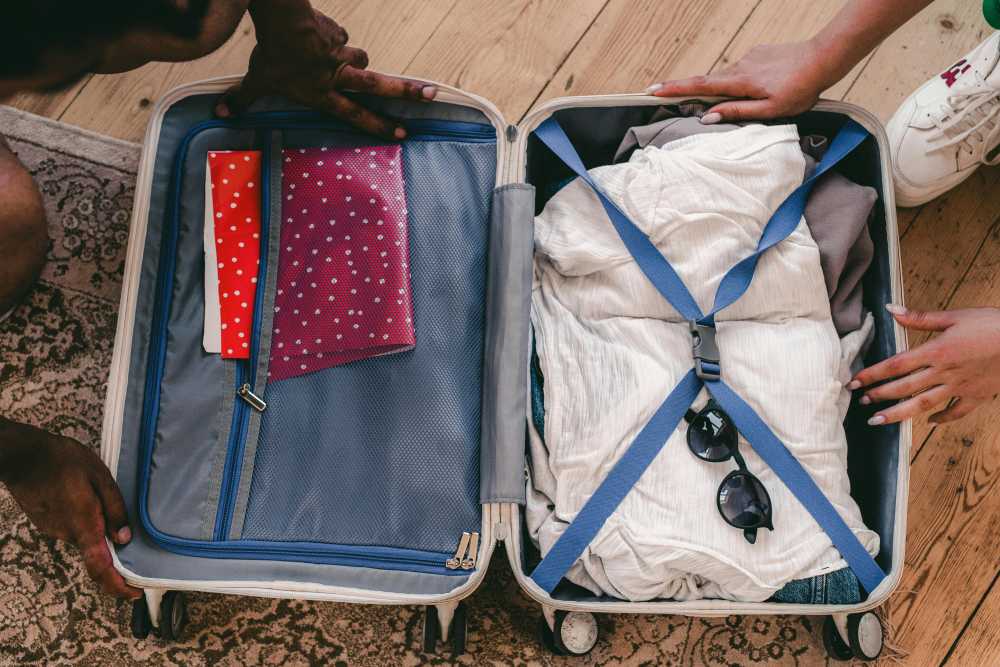
Your Core Essentials
Every trip, regardless of destination or duration, starts here. These are the non-negotiable items that form the base of any smart solo travel plan. Do not leave home without them.
Your Access to Everything
Your ability to move, transact, and prove your identity matters most. Build redundancy into your document strategy.
Passport/Visa: Check that your passport has at least six months of validity from your planned return date.
Digital & Physical Copies: Store a physical photocopy of your passport and driver's license in a separate bag from the originals. Keep high-quality photos of them in a secure cloud service (Google Drive, Dropbox) and in your email.
Travel Insurance Details: Carry a printed copy of your policy and save a PDF to your phone for offline access.
Multiple Bank Cards: Pack at least two different credit cards and one debit card. Store them in separate locations (e.g., one in your wallet, one in your daypack).
Emergency Cash: Hide $100-$200 USD deep within your main bag as a final safety net.
Bank Travel Notifications: Log into your banking apps and set a travel notice for your specific destinations and dates. This five-minute task prevents your accounts from being frozen for suspected fraud.
Your On-the-Go Wellness Kit
Recommended: The Solo Female Travel Safety Guide
Recommended: How to Pack Light: The Carry-On Guide
Stay healthy and comfortable on the road. The goal is a compact, leak-proof, and comprehensive kit.
Prescription Medications: Pack enough for your entire trip in their original, labeled containers. Bring a copy of the prescription itself.
Mini First-Aid Kit:
Pain relievers (Ibuprofen/Acetaminophen)
Assorted adhesive bandages
Antiseptic wipes
Blister treatment (e.g., Compeed)
Anti-diarrhea medication (e.g., Imodium)
Solid Toiletries: The ultimate packing hack. Eliminates liquid restrictions, prevents leaks, and lasts longer.
Solid shampoo bar
Solid conditioner bar
Solid soap bar
The Basics:
Toothbrush
Solid toothpaste tablets
Deodorant
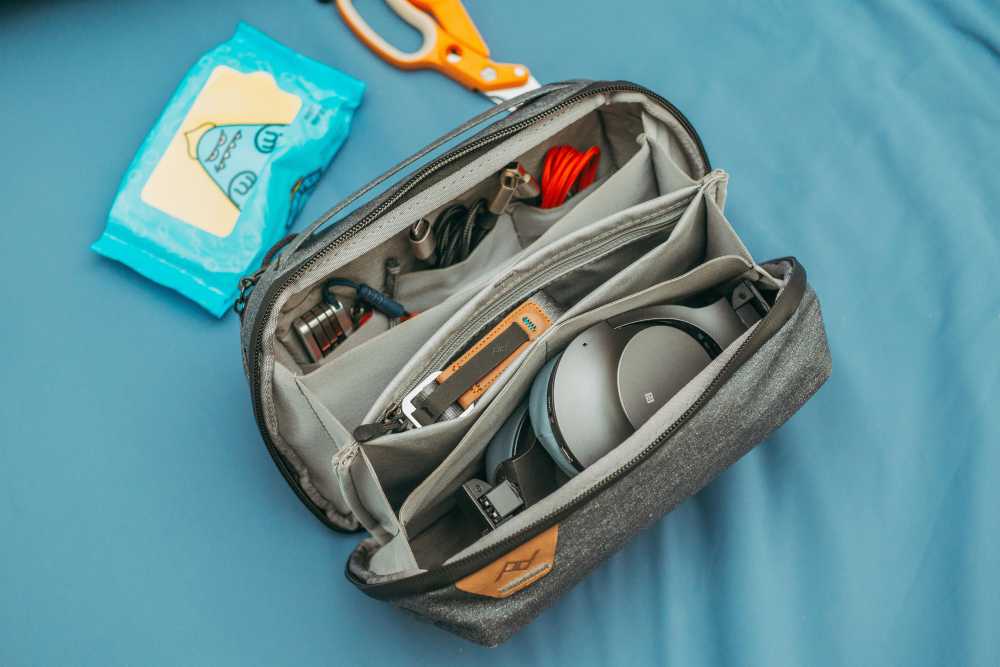
Your Digital Lifeline
Your smartphone is your navigator, translator, and connection to the world. Keeping it powered is mission-critical.
Smartphone: Your all-in-one command center. Download offline maps for your destination.
Portable Power Bank: A non-negotiable safety item. Choose a 10,000mAh+ model from a reliable brand like Anker to guarantee 2-3 full phone charges. Keep it charged.
Universal Power Adapter: Invest in one high-quality universal adapter with multiple USB ports. This allows you to charge all your devices from a single outlet.
Noise-Canceling Headphones: Essential for focus and peace on loud flights, trains, or in shared hostel rooms.

Essential Solo Travel Safety Gear
This module proactively addresses the "what-if" scenarios, allowing you to explore with confidence and sleep soundly. The gear here is your first line of defense, but true confidence comes from preparation. For a complete guide to situational awareness and navigating new environments securely, our comprehensive article, Anxious to Adventurous: Solo Travel Tips for Confidence, is required reading.
For Your Accommodation
Portable Door Lock (e.g., Addalock): A small, lightweight device that braces your door from the inside, making it impossible to open even with a key.
Door Stop Alarm: A wedge that slides under your door. If opened, it physically blocks the door while emitting a piercingly loud alarm.
For When You're Out & About
Anti-Theft Daypack (e.g., Pacsafe, Travelon): Choose a crossbody bag or backpack with slash-proof straps, lockable zippers, and RFID-blocking pockets.
Personal Safety Alarm: A keychain device that emits an ear-splitting siren and flashing strobe light to attract attention and disorient an attacker.
RFID-Blocking Wallet: Protects your passport and credit cards from electronic "skimming."
The 5-4-3-2-1 Formula
Pack less and wear more with a strategic, versatile wardrobe built on mix-and-match essentials. Choose a neutral color palette (black, gray, navy) for core items.
The 5-4-3-2-1 Formula (1-Week Framework)
5 Tops: Focus on wrinkle-resistant, odor-resistant fabrics. At least one should be merino wool—the ultimate travel fabric for temperature regulation and multi-day wear.
4 Bottoms: A typical mix includes one pair of comfortable travel pants, one pair of jeans or chinos, and one skirt or pair of shorts.
3 Accessories: A lightweight scarf or sarong is incredibly versatile (fashion, beach cover-up, towel, head covering).
2 Pairs of Shoes:
Pair 1: Supremely comfortable, broken-in walking shoes.
Pair 2: A versatile, slightly dressier option (flats, loafers, clean leather sneakers).
1 Jacket: A waterproof, windproof outer shell. Layer with a fleece or sweater for warmth as needed.
Climate Sub-Modules (Choose One)
Cold Climate Add-ons: One set of thermal base layers (top and bottom), a warm hat, gloves, and wool socks.
Tropical Climate Add-ons: A swimsuit, a quick-dry microfiber towel, a wide-brimmed sun hat, and sunglasses.
Digital Nomad's Checklist
This module is for anyone working on the road. It focuses on creating an efficient, ergonomic, and connected remote workstation.

Lightweight Laptop: An ultrabook (e.g., MacBook Air) offers the best balance of power and portability.
Portable Laptop Stand (e.g., Roost, Nexstand): The single best way to prevent neck and back pain.
Ergonomic Peripherals: A slim, portable keyboard (e.g., Logitech K380) and a portable mouse (e.g., Logitech MX Anywhere).
High-Quality Headphones with Mic: Essential for calls and focus in noisy environments.
eSIM: Use an app like Airalo to purchase and install a digital SIM card before you leave. Get connected the moment you land.
High-Capacity "PD" Power Bank: Ensure your power bank is "Power Delivery" rated and has enough capacity to charge your laptop, not just your phone.
What NOT to Pack
Knowing what to leave behind is as important as knowing what to bring.

Expensive or Sentimental Jewelry: Don't bring anything you would be devastated to lose.
Full-Sized Towel: Most accommodations provide them. If needed, a quick-dry travel towel is a superior option.
Multiple "Good" Outfits: Stick to versatile pieces that can be dressed up or down.
Physical Books: An e-reader provides an entire library at a fraction of the weight.
"Just in Case" Items: Unless you're traveling to a very remote location, you can buy most basic items at your destination.
Your Questions Answered
What should a solo female traveler add? Many add a versatile sarong (for modesty at religious sites), a silicone doorstop for extra security, and some opt for a fake wedding ring to deter unwanted attention.
How do I pack for a long-term trip in a carry-on? Commit to doing laundry. Pack one week's worth of clothing using the capsule method and plan to do laundry every 7-10 days.
What are the best shoes for solo travel? The ones you can walk in comfortably for 8+ hours. Never bring new, unbroken-in shoes on a trip.
By starting with the Core Essentials and adding modules tailored to your journey, you have now built the perfect solo travel packing list. This system eliminates guesswork, ensures you are prepared for your adventure, and empowers you to travel with the confidence of a pro.
Read the full guide: Anxious to Adventurous: The Ultimate Guide to Solo Travel Confidence
Don't Miss Out! Subscribe for Exclusive Content
SubscribeComments 0
No comments yet
Be the first to share your experience!
Dont Miss Out! Subscribe for Exclusive Content
Ultimate USA Holidays Guide: Top Picks
FTC Affiliate Disclosure: Stay Compliant as a Travel Creator
Essential Affiliate Tools: From Tracking to Full Optimization
Booking.com Affiliate Review: Pros, Cons & Earnings
Decoding Affiliate Commission Rates: Benchmarks for Travel Creators
