Decoding Affiliate Commission Rates: Benchmarks for Travel Creators
TrekGuider @trekguider
You’re a travel creator, and you’ve entered the world of affiliate marketing to turn your passion into a profession. But you’ve quickly run into a frustrating black box: the commission structure. You see a dizzying array of percentages, acronyms like CPA and EPC, and vague promises of earnings. You’re left wondering what good affiliate commission rates even look like. Are you earning your worth, or are you leaving a significant amount of money on the table?
This confusion isn't just academic; it's a direct threat to your bottom line. The reported average monthly income for affiliates in the travel niche is an impressive $13,847, a figure that proves this is a serious enterprise. But you can't build a sustainable business on guesswork. Partnering with a program offering a flashy 40% commission—only to discover it’s 40% of their tiny margin—is a rookie mistake that costs real money. This lack of clarity makes it impossible to forecast your income, negotiate better terms, or build a truly predictable business. You feel like you’re flying blind.
This guide is your decoder ring. We are pulling back the curtain to give you a comprehensive breakdown of how affiliate commissions actually work. We will deconstruct every major commission model, provide clear, data-backed industry benchmarks, and teach you how to analyze these rates like a seasoned professional. By the end of this deep dive, you will be able to spot high-value opportunities and architect a monetization strategy that truly rewards your influence. For a complete overview of the affiliate landscape, our definitive pillar page, Travel Affiliate Programs: The 2026 Ultimate Guide, is your essential command center.

The Anatomy of a Commission: Deconstructing the Core Models
Let's cut through the jargon. An affiliate commission is simply a reward for a job well done. A company—the merchant—pays you for successfully driving a specific, valuable action, which in the travel world almost always means a completed booking or sale.
But the way that reward is calculated can vary dramatically. Understanding the underlying structure of different affiliate commission rates is the first step toward becoming a high-earning creator.
1. Cost Per Sale (CPS) or Pay Per Sale (PPS): The Industry Workhorse
You'll encounter this model most often—it's the industry's workhorse for a reason. It’s simple and transparent: when a reader clicks your affiliate link and completes a purchase, you earn a percentage of the total sale value. If you recommend a $500 hotel stay and the program offers a 6% CPS commission, you earn $30. This model directly ties your earnings to the revenue you generate, making it the gold standard for most travel bookings and gear sales.
2. Cost Per Action (CPA): Rewarding a Specific Step
CPA is a broader model where you’re compensated for a specific action a user takes. While that action is often a sale (making it identical to CPS), it can also be something else. For example, a travel credit card company might pay you a CPA commission for every user who completes an application, regardless of whether they are approved.
3. Cost Per Lead (CPL): Paying for High-Value Inquiries
With a CPL model, you earn a fixed fee for each qualified lead you generate. This is common in high-ticket travel sectors where the sales cycle is long. A luxury tour operator, for instance, might pay you $50 for every user who fills out a detailed inquiry form for a bespoke African safari. You get paid for delivering a potential customer; their sales team takes it from there.
4. Tiered & Multi-Tier Structures: Incentivizing Growth
This is where commission models get more sophisticated and rewarding.
Tiered Structures: Rewarding Your Growth These are designed to reward high-performing affiliates. Your commission rate increases as you drive more sales. A program might offer a base rate of 6%, which jumps to 8% after you generate $5,000 in sales in a month, and 10% after $10,000.
Multi-Tier Structures: Building a Network These allow you to earn commissions not only on your own sales but also on the sales generated by other affiliates you recruit into the program. This effectively turns you into a partner who helps grow the program itself, creating a secondary, more passive income stream.
5. Cost Per Click (CPC): The Rare Exception
In this model, you are paid a small fee for every click your affiliate link receives, regardless of a sale. Due to its high vulnerability to fraud, the CPC model is now extremely rare in modern affiliate marketing and almost never seen in the travel space.

Industry Benchmarks: What Good Affiliate Commission Rates Look Like
So, what should you actually expect to earn? While rates vary, the travel industry has established clear benchmarks across its major categories. Here’s your cheat sheet.
Hotels & Accommodations: 2% - 7% of Booking Value This is the bread and butter for many creators, but the details are everything. A program like Expedia Group offers up to 6% of the total booking value with a 7-day cookie. In contrast, Booking.com advertises a much higher "25-40%", but this is a percentage of their commission, not the customer's total payment. This opaque structure often results in a much lower effective rate, closer to 2-4% of the final booking value.
Tours, Activities & Experiences: 6% - 8%+ This is a high-margin category with strong potential. Market leaders like Viator and GetYourGuide set the standard with base commissions of 7-8%. Adventure-focused operators like G Adventures offer 6%, which is incredibly powerful when applied to their high-ticket tours that can cost thousands of dollars.
Travel Insurance: 10% or More Insurance is a consistently high-paying vertical. Top programs like SafetyWing and World Nomads both offer a standard 10% commission. SafetyWing takes this a step further with a recurring model, meaning you continue to earn 10% every time your referred customer renews their policy.
Gear & Apparel: 3% - 8% For physical products, rates depend heavily on the retailer. Amazon Associates is the baseline, offering 3-4% for most travel categories. However, partnering with specialty retailers is far more lucrative. A brand like REI, for example, offers a 5-8% commission on high-quality (and often high-priced) outdoor gear.
Pro-Tip: Don't be blinded by the highest percentage. A 6% commission on a $3,000 G Adventures tour is $180. An 8% commission on a $50 city walking tour is $4. Always consider the average order value of the products you are promoting when evaluating affiliate commission rates.

The Metrics That Matter More Than the Rate Itself
An experienced affiliate marketer knows the commission rate is just a starting point. To truly understand a program's profitability, you need to analyze the metrics that measure real-world performance.
Earnings Per Click (EPC): Your True North This is arguably the single most important metric. It’s calculated by dividing your total commission earnings by the total number of clicks you sent. If you sent 100 clicks and earned $50, your EPC is $0.50. This number tells you the average value of every single click. A program with a lower commission but a higher EPC is often the more profitable partner for your specific audience.
Conversion Rate (CR): The Sign of a Healthy Partner This is the percentage of users who take the desired action after clicking your link. A high conversion rate is a sign of a trusted brand with a well-optimized checkout process. A program with a 10% commission that converts at 1% is less profitable than a program with a 5% commission that converts at 5%.
Cookie Duration: The Travel Creator's Safety Net This is critical in the travel space. A longer cookie duration (30, 60, or 90 days) gives your audience the time they need to research a high-consideration purchase while ensuring you still get credit. A short cookie window is a major red flag and a sign that the program may not be structured in your favor.
Pro-Tip: Dive into your affiliate dashboards. Most networks like CJ Affiliate and Travelpayouts provide detailed reports on your EPC and conversion rates for each program. Use this data to identify your true top performers—the results will often surprise you.

The Travel Creator's Toolkit
Feeling overwhelmed by the data? You don't have to be. To help you organize your strategy and implement everything you've learned, we've created the ultimate resource bundle. It includes checklists, templates, and tools designed to accelerate your journey from beginner to pro.
Download Your Free Bundle: The Travel Creator's Toolkit
The High-Margin Alternative: Referral & Revenue Share Models
While traditional commission models are powerful, the most forward-thinking creators are diversifying into referral and revenue-sharing programs. Instead of a one-time payment for a single sale, these models allow you to build long-term, passive income streams by becoming a true platform partner.
This is the philosophy behind the TrekGuider Seller Platform. We believe in empowering creators to build complex businesses. Our platform is designed for you to sell your own digital products—like itineraries and guides—but our referral program adds another powerful layer to your income strategy.
Instead of a simple CPS commission, our model functions like a sophisticated multi-tier system. When you refer other creators to become sellers on TrekGuider, you earn an ongoing share of the revenue they generate, with tiered commissions that start at 4% for referred sellers. You’re not just earning from a single transaction; you’re building a network and earning from its collective success. It's a strategic way to move beyond chasing individual sales and start building a more resilient, high-margin business.
Frequently Asked Questions (FAQ)
1. Is a higher commission rate always better? Not at all. A high commission rate can be misleading if the program has a low conversion rate, a short cookie duration, or a low average order value. Always look at your Earnings Per Click (EPC) to determine the true profitability of a program for your audience.
2. How can I find the EPC for an affiliate program? Most reputable affiliate networks (like CJ Affiliate, ShareASale, or Travelpayouts) provide EPC data. It's often listed as a network-wide average for each merchant, which gives you a good baseline. Once you start sending traffic, you can track your own personal EPC in your performance reports.
3. Can I negotiate my affiliate commission rates? Yes, absolutely. Once you become a proven partner and consistently drive a significant volume of high-quality sales, you have leverage. Many brands are willing to negotiate a higher, private commission rate for their top-performing affiliates. Always track your performance and don't be afraid to ask.

From Confusion to Command
You are no longer in the dark. The world of affiliate commission rates is no longer a confusing black box. You now have the knowledge to deconstruct any program's payment structure, the industry benchmarks to know your worth, and the key metrics to identify what truly drives profit.
This knowledge is power. It empowers you to audit your existing partnerships, confidently seek out new ones, and even negotiate better terms. By focusing on programs with fair commissions, long cookie durations, and high conversion rates, you can ensure your hard work is properly rewarded. Building a profitable travel content business requires a strategic approach, and a deep understanding of affiliate commission rates is a non-negotiable part of that strategy.
Read the full guide: The Travel Blogger's Playbook to Affiliate Marketing Mastery
Don't Miss Out! Subscribe for Exclusive Content
Subscribe


Comments 0
No comments yet
Be the first to share your experience!
Dont Miss Out! Subscribe for Exclusive Content

Ultimate USA Holidays Guide: Top Picks

FTC Affiliate Disclosure Essentials: Stay Compliant as a Travel Creator

Essential Affiliate Tools: From Tracking to Full Optimization

Avoid These 5 Affiliate Landing Page Mistakes for Better Conversions

Affiliate Keyword Research Mastery for Travel Blogs

Booking.com Affiliate Program Review: Pros, Cons, and Earnings Potential
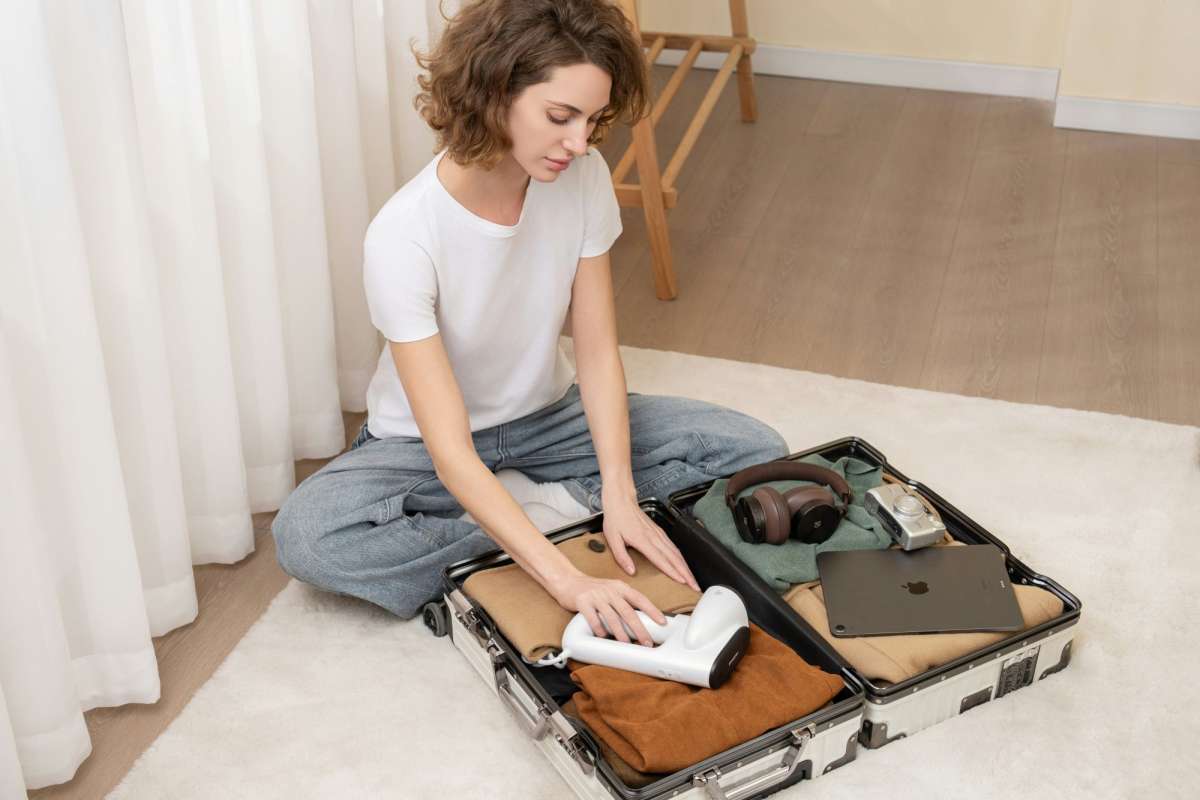
The Minimalist Solo Travel Packing List: A Complete Guide
TrekGuider @trekguider
You’ve seen the photo a hundred times: a solo traveler, backpack slung casually over one shoulder, gazing out at a breathtaking vista with a look of pure, unburdened freedom. That’s the dream. But then you look at your own open, empty suitcase, and a wave of anxiety hits. The "what ifs" start piling up. What if it rains? What if I get invited to a fancy dinner? What if I need more options? Before you know it, you’re wrestling with a monstrously heavy bag, convinced you need to pack for every conceivable scenario. This isn't just an inconvenience; for a solo traveler who has no one to help them, an overpacked bag is a physical burden, a financial drain in baggage fees, and a security risk that screams "tourist." It is the very anchor that weighs down the freedom you seek.

This guide is your liberation. It’s the tactical blueprint for adopting a minimalist mindset and the definitive solo female travel packing list you need to execute it with absolute confidence. We will systematically replace the anxiety of "what if" with the certainty of "I have what I need." By packing smarter, not fuller, you’ll unlock the mobility, savings, and peace of mind that define a truly life-changing solo adventure. This isn't just about what to pack; it's about reclaiming the freedom you deserve. For a complete overview of every stage of your journey, be sure to start with our comprehensive pillar guide, The Ultimate Guide to Solo Female Travel (15 Essential Tips).
The Freedom Philosophy: Why Less is Radically More for Solo Travelers
Adopting a minimalist packing ethos isn’t about deprivation; it’s a strategic choice that unlocks four key freedoms essential to the solo travel experience.
Freedom of Mobility: Navigating a bustling train station in Tokyo, climbing the winding cobblestone streets of Lisbon, or hopping on a last-minute ferry to a Greek island becomes effortless with a single, lightweight bag. You are nimble, agile, and free to say "yes" to spontaneous adventures without being weighed down.
Freedom from Fees: In an era where budget airlines charge for everything, checking a bag can add hundreds of dollars to your trip cost. Traveling carry-on only eliminates these fees entirely, putting that money back where it belongs: into your experience fund for things like a cooking class in Florence or a guided hike in Patagonia.
Freedom in Security: A large, checked bag is out of your control for hours, vulnerable to loss, damage, or theft. A carry-on stays with you, dramatically reducing your risk profile. Furthermore, a traveler with a single, manageable bag is less conspicuous and presents a less appealing target than someone struggling with multiple, bulky pieces of luggage.
Freedom of Mind: The fewer items you have, the fewer you have to track, manage, and worry about. A minimalist wardrobe simplifies your daily decisions, reduces clutter in your hotel room, and frees up mental energy to focus on what truly matters: being present and soaking in your surroundings.
The Core of Your Minimalist Solo Female Travel Packing List
The secret to a successful minimalist wardrobe is not about having less; it’s about making sure every single item does more. This means building a small, curated collection of high-quality, versatile pieces that can be mixed, matched, and layered to create multiple outfits for different occasions and climates. This is the art of the capsule wardrobe.
Clothing: The Art of the 10-Day Carry-On Capsule
This checklist is designed to fit into a standard 40-liter carry-on bag for a 10-day trip to a destination with a temperate climate (think European cities in spring or autumn). The core principle is to pack for one week and plan to do laundry once.
Tops (5):
2 neutral-colored t-shirts (merino wool or a high-quality blend is ideal)
2 versatile tank tops or blouses that can be dressed up or down
1 long-sleeve shirt for layering or sun protection
Layers (2):
1 comfortable sweater or cardigan in a neutral color
1 light, weather-resistant jacket (a packable rain shell or a classic denim jacket)
Bottoms (3):
1 pair of dark, comfortable travel pants or jeans (wear these on the plane to save space)
1 pair of versatile trousers, a skirt, or shorts (depending on the destination)
1 pair of leggings (perfect for sleeping, layering under pants for warmth, or lounging)
One-Piece Outfit (1):
1 simple, wrinkle-resistant dress or jumpsuit that can be worn casually with sneakers or dressed up with a scarf and flats.
Undergarments & Sleepwear:
5-7 pairs of underwear (quick-drying fabric is a game-changer)
3 pairs of socks (at least one pair of wool socks for warmth and comfort)
2 bras (one regular, one sports bra or bralette)
1 set of pajamas or comfortable sleepwear
Footwear (Maximum 3 pairs):
Comfortable Walking Shoes: A pair of stylish but supportive sneakers. This is your most important item. Wear them on the plane.
Versatile Flats or Sandals: A pair that can be dressed up for a nice dinner but are still comfortable enough to walk in.
Utility Shoes: A pair of flip-flops (essential for hostels and beaches) or waterproof boots, depending on your itinerary.
Pro-Tip: The combination of rolling your clothes tightly and using packing cubes is the single most effective space-saving technique. Packing cubes not only compress your clothing but also keep your bag impeccably organized, so you're not tearing everything apart to find one pair of socks.
The Champions of Versatility: 5 Items You Can't Live Without
Within your capsule wardrobe, a few key items will do the heaviest lifting. Investing in these five pieces will form the indestructible core of your minimalist packing list.
A Merino Wool T-Shirt: This isn't just a t-shirt; it's a piece of high-performance gear. Merino wool is a natural fiber that is thermo-regulating (keeps you cool when it's hot, warm when it's cold), moisture-wicking, and, most importantly, antimicrobial. This means it resists odor and can be worn multiple times between washes, allowing you to pack far fewer tops.
A Large, High-Quality Scarf or Sarong: This is the Swiss Army knife of a travel wardrobe. It can be a stylish accessory, a wrap for a chilly airplane, a head covering for entering religious sites, a makeshift picnic blanket, or even a privacy curtain in a hostel dorm.
A Simple Black Dress (in a wrinkle-resistant fabric): Choose a dress in a fabric like jersey or tencel. It can be paired with sneakers for a day of sightseeing and then instantly transformed for a nice dinner with the addition of flats and your versatile scarf. It’s a complete outfit in one lightweight piece.
Dark, Comfortable, Multi-Purpose Pants: A single pair of well-fitting, dark-colored pants can anchor your entire travel wardrobe. Whether they are high-tech travel pants, comfortable dark-wash jeans, or polished black trousers, they should be able to transition seamlessly from a day of exploring to a casual evening out.
A Lightweight Button-Down Shirt: A classic button-down in a breathable fabric like linen or tencel offers countless styling options. Wear it buttoned up, wear it open as a light jacket over a tank top or your black dress, or tie it at the waist. It’s a layering hero.
Beyond the Wardrobe: Your Solo Female Travel Packing List for Safety & Tech
While clothing makes up the bulk of your bag, a few key non-clothing items are indispensable for a safe, smooth, and convenient solo trip.
Your Personal Security Toolkit
Your awareness is your primary safety tool, but these devices provide a crucial layer of physical security and peace of mind.

Personal Safety Alarm: A small device that attaches to your keychain and emits an ear-piercing siren and flashing strobe light when activated. It’s designed to startle a potential attacker and attract immediate attention, giving you a window to escape.
Portable Door Lock or Door Stop Alarm: These inexpensive, lightweight devices give you absolute control over the security of your hotel or Airbnb room, making it nearly impossible for someone to enter, even with a key.
Anti-Theft Bag: With a 2024 report noting that 29% of solo female travelers had experienced a theft or attempted scam, a specialized bag is a wise investment. Look for features like slash-proof fabric and lockable zippers. A crossbody style worn in front of your body is the most secure option.
Small Padlock: A simple combination lock is a must-have for securing your belongings in a hostel locker or for locking the zippers of your backpack together in crowded areas.
Essential Tech and Convenience Items
Universal Travel Adapter with USB Ports: A modern essential. Choose a model that includes multiple USB-A and USB-C ports, allowing you to charge your phone, power bank, and other devices simultaneously from a single outlet.
High-Capacity Portable Power Bank: For a solo traveler, a dead phone is a safety issue. A reliable power bank (at least 10,000 mAh) ensures your lifeline for navigation, communication, and emergency help stays operational all day.
Solid Toiletry Kit: This is a game-changer for carry-on travel. Shampoo bars, conditioner bars, solid soap, and solid perfume sticks eliminate the need to worry about the TSA's liquids rule, prevent disastrous leaks, and are more environmentally friendly.
Pro-Tip: Before you leave, use your phone to download offline maps of your destination via Google Maps. This allows your phone's GPS to function perfectly even without a cell signal or Wi-Fi, making it nearly impossible to get truly lost. This makes a fully charged power bank your most important piece of tech.
Ready to Master the Art of Packing Light?
This guide gives you the "what," but to truly perfect the "how"—from advanced folding techniques to brand recommendations—you need the complete toolkit. Our free guide is the ultimate resource for step-by-step strategies, visual guides, and our ultimate pre-trip checklist.
Download the How to Pack Light Guide for free!
The "Do Not Pack" List: 5 Things to Leave at Home
Effective packing is as much about what you leave behind as what you bring. Ditching these common items will save you space, weight, and stress.

Expensive or Sentimental Jewelry: Wearing flashy jewelry can make you a target for theft. More importantly, the risk of losing a cherished or irreplaceable item is simply too high.
Multiple "Just-in-Case" Outfits: Resist the urge to pack for imaginary, unlikely scenarios. Pack for the trip you know you're taking. If an unexpected need arises, you can almost always buy what you need locally.
A Hair Dryer: This bulky item is provided by nearly every hotel and even most modern hostels. Leave yours at home.
Full-Sized Toiletries: There is no reason to carry large bottles of shampoo. Decant your essential liquids into reusable, travel-sized (under 100ml/3.4oz) containers or, better yet, switch to solids.
A Money Belt: While once a travel staple, money belts are often impractical for daily access and can be conspicuous. A more modern and secure approach is to use an anti-theft crossbody bag for daily essentials, while keeping deep storage items (like a backup credit card and passport) locked in your accommodation.
Frequently Asked Questions About Minimalist Packing
Are packing cubes really worth it?
Absolutely. They are the single most effective organizing tool for a carry-on. Not only do they compress clothing to save space, but they also function like dresser drawers inside your backpack, allowing you to find what you need without destroying your perfectly packed bag.
How do I pack for a trip with multiple climates?
The key is layering. Your capsule wardrobe (merino wool base layers, a fleece or sweater, and a waterproof/windproof shell) is designed for this. A merino t-shirt that keeps you cool in Rome can be layered under a sweater and jacket to keep you warm on a chilly evening in the Swiss Alps. Focus on adding or removing these versatile layers rather than packing entirely separate outfits.
What if I forget something important?
Unless it’s your passport or essential medication, you can almost certainly buy it at your destination. Forgetting a toothbrush or a pair of socks isn't a crisis; it’s an opportunity for a mini-adventure into a local pharmacy or shop.
Pro-Tip: Once you’ve mastered this universal list, you can find hyper-specific packing lists for destinations from Patagonia to Portugal—all shared by seasoned solo travelers on the TrekGuider platform.
Cleared for Takeoff: Navigating Airport Security with Your Carry-On
Knowing the rules is essential for a stress-free airport experience. For travelers departing from the US, the Transportation Security Administration (TSA) has two key guidelines for carry-on luggage.
The 3-1-1 Liquids Rule: All liquids, gels, creams, and pastes must be in containers of 3.4 ounces (100 milliliters) or smaller. All of these containers must fit into a single, clear, quart-sized bag. Each passenger gets one of these bags.
Electronics: All electronic devices larger than a cell phone (laptops, tablets, e-readers) must be removed from your bag and placed in a separate bin for X-ray screening.
Pack Light, Travel Far, Live Freely
Minimalist packing is not a restrictive set of rules; it's a liberating mindset. It’s a conscious decision to trade the burden of "stuff" for the freedom of experience. By focusing on versatility, quality, and intention, you transform your luggage from an anchor into a launchpad. You are now armed with more than just a checklist; you have a complete philosophy for navigating the world with ease and confidence. This solo female travel packing list is your blueprint for a lighter, smarter, and more enriching journey.

Once your minimalist kit is packed and ready, the only thing left to do is decide where to take it. Explore our collection of expert-written Travel Guide resources to find destination-specific advice and build the adventure of a lifetime.
Don't Miss Out! Subscribe for Exclusive Content
SubscribeComments 0
No comments yet
Be the first to share your experience!
Dont Miss Out! Subscribe for Exclusive Content
Ultimate USA Holidays Guide: Top Picks
FTC Affiliate Disclosure Essentials: Stay Compliant as a Travel Creator
Essential Affiliate Tools: From Tracking to Full Optimization
Booking.com Affiliate Program Review: Pros, Cons, and Earnings Potential

Decoding Affiliate Commission Rates: Benchmarks for Travel Creators

Amazon Associates for Travel: Strategies to Maximize Commissions
Crafting Travel Product Reviews That Drive Affiliate Sales
TrekGuider @trekguider
You’ve poured hours into it. The photos are stunning, the details are careful, and your personal story is woven throughout. You hit “publish” on your latest travel product review, certain that this is the one. But weeks later, the affiliate dashboard tells a familiar, frustrating story: plenty of clicks, but a whisper of commissions. You’re creating genuinely valuable content, but it feels like you’re leaving a fortune on the table, unable to bridge the chasm between your effort and your earnings.
This isn't just a feeling; it's a critical business problem. You see the industry reports—the affiliate marketing market soaring past $93 billion, with the average travel affiliate earning a reported $13,847 a month—and it feels like a world away. The issue isn't your passion or your expertise. The issue is that a travel product review that simply informs is a hobby; a review that is engineered to convert is a business. You're missing the formula, the psychological triggers, and the conversion-focused structure that turns a reader's trust into a reliable revenue stream.

Forget vague tips. This is a skill workshop—a definitive blueprint for how to write a product review that drives affiliate sales with the precision of a finely tuned engine. We will deconstruct the anatomy of a high-conversion review, from the headline that hooks to the call-to-action that closes. This is a masterclass in a single, vital skill, a topic we explore from every angle in our definitive command center for the entire affiliate ecosystem: Travel Affiliate Programs: The 2026 Ultimate Guide.
The Mindset Shift: From "Informing" to "Converting"
The first and most crucial step is a fundamental mindset shift. Most creators approach a product review as a report. They list the features, describe their experience, and hope the reader is inspired enough to click. This is a passive strategy that yields passive results.
A high-earning creator understands that a product review is their most valuable sales asset. Its primary purpose is not just to describe the product, but to guide the reader to a confident purchase decision. Every word, every image, and every design element must work in concert to achieve one goal: to solve the reader's problem so effectively that clicking your affiliate link becomes the most logical and desirable next step.
This isn't about being a pushy salesperson. It's about being a master problem-solver. Your reader has arrived on your page with a need: "Is this the right backpack for my trip to Europe?" or "Will this travel insurance actually cover me if I get sick in Thailand?" A review that converts answers these questions with such clarity, authority, and empathy that it eliminates all doubt and inspires action.

The Anatomy of a High-Conversion Review: A 7-Part Formula
A product review that consistently drives sales is not an accident of creative inspiration; it is a carefully constructed system. By following this seven-part formula, you create a user experience that caters to every type of reader—from the quick skimmer to the deep diver—and guides them seamlessly toward conversion.
Part 1: The Headline That Hooks and Qualifies
Your headline has one job: to make an undeniable promise of value to a specific audience. It must grab attention in a crowded search result and instantly signal that your review will solve their problem. Generic headlines like "My Review of the Osprey Backpack" are a death sentence.
Instead, use proven, high-impact formulas:
The "Real World Test" Formula: The Product Name Review: After Number Miles / Number Countries / Time Period
Example: The Osprey Farpoint 40 Review: After 6 Months & 15 Countries
The "Balanced Verdict" Formula: Product Name Review: Number Things I Loved & Number I Hated
Example: The Away Bigger Carry-On Review: 5 Things I Loved & 2 I Hated
The "Is It Worth It?" Formula: Is the Product Name Worth the Hype? An Honest 2026 Review
Example: Is the Nomatic Travel Pack Worth the Hype? An Honest 2026 Review
These headlines work because they promise authenticity, detail, and a balanced perspective—exactly what a user wants when researching a purchase.
Part 2: The Empathetic Introduction (The Hook)
Your introduction must accomplish three things in the first 100 words: connect with the reader's problem, establish your authority, and present the product as the potential solution. Use the PAS (Problem, Agitate, Solve) framework for maximum impact.
Problem: "Finding the perfect carry-on backpack is a nightmare. Most are either too bulky, too disorganized, or fall apart after one trip."
Agitate: "You end up repacking at the airport check-in counter, digging through a black hole of gear to find your passport, or worse, dealing with a broken zipper mid-adventure."
Solve: "For the past six months, I've been testing the Osprey Farpoint 40 across Southeast Asia to see if it's the ultimate solution for one-bag travel. In this review, I'll break down exactly who this bag is for, who should avoid it, and whether it lives up to its legendary reputation."
Part 3: The "At a Glance" Summary Box
Many of your readers are skimmers. They are busy and want a quick verdict. An "At a Glance" summary box at the top of your review is the single best way to serve this audience and capture an immediate conversion.
This box should be visually distinct (using a different background color or a border) and contain:
Product Image: A high-quality, authentic photo of the product in use.
A Quick Summary: A one-sentence verdict. (e.g., "The ultimate travel backpack for versatile adventurers who value comfort and organization.")
Key Specifications: A bulleted list of the most important specs (e.g., Capacity, Weight, Dimensions).
Overall Rating: A simple star rating (e.g., 4.5 / 5 Stars).
The Primary CTA: A bold, unmissable button with a clear call-to-action.
Part 4: The Deep Dive: Storytelling Over Specs
This is the heart of your review. This is where amateurs list features, but professionals tell stories. Your mission is to translate every specification into a tangible, real-world benefit, wrapped in the context of your personal experience.
Amateur: "The backpack has a 15-inch padded laptop sleeve."
Professional: "The Padded Laptop Compartment That Saved My MacBook: When my bus in Vietnam took a corner too fast, my bag went flying. My heart stopped, but the heavily padded, suspended laptop sleeve kept my MacBook safe without a scratch. For digital nomads, that peace of mind is priceless."
Structure this section with clear H3 subheadings for each key feature or benefit (e.g., "Comfort & Fit," "Organization & Pockets," "Durability & Materials"). This makes the content scannable and allows readers to jump to the sections that matter most to them.

Part 5: The Unbeatable Proof: Your Photos & Videos
Stock photos are a conversion killer. They scream "I've never actually used this product." Your review's credibility hinges on authentic, high-quality visual proof.
Show the Product in Action: Include photos of you wearing the backpack, packing the suitcase, or using the camera in a real travel environment.
Highlight Key Features: Take detailed close-up shots of the zippers, the materials, the specific pockets you're talking about.
Embrace Video: This isn't just a nice-to-have; it's a strategic imperative. With industry projections showing that video will account for a staggering 55% of all affiliate traffic by 2026, embedding a short, authentic video review is one of the most powerful trust signals in your arsenal.
Part 6: The Honest Verdict: Pros, Cons, and "Who It's For"
Radical transparency is the ultimate trust signal. No product is perfect, and acknowledging its flaws makes your praise exponentially more believable.
Create a simple, two-column list of Pros and Cons. Be specific and honest. Then, create a dedicated section that clearly defines who this product is perfect for and, just as importantly, who should look for something else.
This Product is Perfect For: "Digital nomads, weekend travelers, and anyone who prioritizes a comfortable carry and smart organization."
You Should Avoid This Product If: "You're a photographer who needs to carry multiple camera bodies or if you require a fully waterproof bag for extreme conditions."
Part 7: The Compelling Conclusion & Final CTA
Your conclusion should be short, powerful, and decisive. Summarize the product's single biggest benefit and give the reader one final, clear instruction. Reiterate your overall verdict and guide them to the click with a final, compelling call-to-action button.
The Psychology of Persuasion: Advanced Conversion Tactics
A great structure is the foundation, but layering in proven psychological triggers is how you maximize conversions.
Build Unshakable Trust: Your FTC disclosure must be clear and placed at the very top of your review. This isn't just a legal requirement; it's a badge of honor that signals transparency.
Leverage Social Proof: Weave in screenshots of other positive reviews or user ratings. Phrases like "With over 5,000 five-star reviews on Amazon..." validate the reader's potential decision.
Create Urgency (Ethically): For products with fluctuating prices, like flights or hotels, use CTAs that encourage immediate action. "Check Today's Prices on Booking.com" is both helpful and urgent.
Pro-Tip: One of the most effective ways to increase conversions is to use a comparison table. Pit the product you're reviewing against its main competitor. This not only helps the reader make a final decision but also gives you the opportunity to place two high-value affiliate links side-by-side.
The Ultimate Conversion Play: From Affiliate to Owner
A product review is the perfect place to introduce your audience to your own high-value offerings. After you've solved their immediate problem, you can guide them toward a deeper solution that you control completely. This is the natural evolution of your expertise.
For example, after the main body of your review for a travel backpack, you could add a section like:
"Now that you've found the perfect backpack, the next step is knowing what to put inside it. For my complete, field-tested packing system, check out my 'Ultimate Carry-On Packing List' available on the TrekGuider Platform. It's the exact checklist I use to pack for every trip."
This is a natural, value-driven upsell that transitions the reader from a potential affiliate commission to a direct customer, where you keep a much larger share of the revenue.

Pro-Tip: To supercharge your affiliate sales, offer a "bonus stack" for anyone who buys through your link. For example, "If you purchase the Osprey Farpoint 40 through my link, just forward me your receipt and I'll send you my personal 'Perfect Packing' video tutorial for free!" This small, value-added incentive can dramatically increase your conversion rate.
Ready to Build Your Own High-Margin Product? The most profitable product you can ever promote is your own. Affiliate marketing is the perfect training ground, but selling your own digital products—like guides, itineraries, or presets—offers unparalleled profit margins and brand authority. Our free Digital Product Ideas Guide is packed with dozens of proven, profitable ideas specifically for travel creators. Download it today to find the perfect product for your audience and start building your content empire.
Frequently Asked Questions (FAQ)
1. How long should a product review be? There's no magic number, but a high-converting review is typically comprehensive, often falling between 1,500 and 3,000 words. The goal is to be the most thorough and helpful resource on the internet for that specific product. Answer every possible question a reader might have.
2. Is it better to review a product I got for free or one I bought myself? A product you purchased with your own money will always carry more weight and authenticity with your audience. However, if you do receive a product for free, you can still write a credible review as long as you are radically transparent about it in your disclosure and maintain an honest, balanced perspective.
3. How many affiliate links are too many in one review? Focus on strategic placement over sheer quantity. A high-converting review might only have 5-10 well-placed links. Include them in your summary box, on your primary CTA buttons, and contextually on the product name throughout the text. The goal is to make it easy for the reader to click when they are ready, not to overwhelm them with links on every other word.
Your Blueprint for a Profitable Review Engine
You now have the complete formula for how to write a product review that doesn't just get traffic—it gets results. By shifting your mindset from informing to converting and carefully applying this seven-part framework, you transform your content from a simple article into a high-performance business asset.
This is a system you can replicate for every product you recommend, creating a reliable and scalable engine for affiliate income. Stop guessing and start engineering. The path to becoming a top-earning travel creator is paved with reviews that are strategic, persuasive, and relentlessly helpful. Now, go build your engine.
Read the full guide: The Travel Blogger's Playbook to Affiliate Marketing Mastery
Don't Miss Out! Subscribe for Exclusive Content
SubscribeComments 0
No comments yet
Be the first to share your experience!
Dont Miss Out! Subscribe for Exclusive Content
FTC Affiliate Disclosure Essentials: Stay Compliant as a Travel Creator
Essential Affiliate Tools: From Tracking to Full Optimization
Avoid These 5 Affiliate Landing Page Mistakes for Better Conversions
Affiliate Keyword Research Mastery for Travel Blogs
Booking.com Affiliate Program Review: Pros, Cons, and Earnings Potential
Decoding Affiliate Commission Rates: Benchmarks for Travel Creators
How to Travel Europe Alone: A 2026 First-Timer's Guide
TrekGuider @trekguider
You see the photos and you feel the pull. The ancient stones of the Colosseum bathed in golden light, the staggering peaks of the Swiss Alps, the charming canals of Amsterdam—a European adventure calls to you. But a shadow of apprehension quickly follows. The thought of navigating this vast, diverse continent entirely on your own feels overwhelming, even paralyzing. How do you even begin to compare a Eurail pass to a budget flight? How do you stay safe from the sophisticated tourist scams you’ve heard about in crowded piazzas? The logistical and safety concerns can feel like an insurmountable mountain, turning a lifelong dream into a source of anxiety.

This guide is your step-by-step plan to conquer that mountain. It is the definitive, practical blueprint for your first solo female travel Europe adventure, designed to replace abstract fear with concrete knowledge and confident action. This isn't just about seeing Europe; it's about discovering your own capability. For a complete overview of a solo traveler's journey, be sure to read our comprehensive pillar article, The Ultimate Guide to Solo Female Travel (15 Essential Tips).
Why Europe is the Perfect Stage for Your First Solo Trip
Before we dive into the logistics, let's establish why Europe is arguably the best destination on earth for a first-time solo traveler. Think about it: where else on Earth can you find such an unparalleled density of cultures, languages, and histories packed into a single, navigable continent? You can have breakfast with Belgian waffles in Brussels, lunch beneath the Eiffel Tower in Paris, and a late-night pasta in Lyon—all in a single day, if you’re ambitious.
More importantly, the tourist infrastructure is second to none. Reliable and extensive public transportation, a wide range of accommodation from social hostels to private hotels, and the widespread use of English in major hubs significantly lower the barrier to entry. Furthermore, numerous European countries consistently rank among the safest and most peaceful in the world. The 2026 Global Peace Index, for instance, lists countries like Iceland, Ireland, Portugal, and Slovenia in its top tiers, making them outstanding choices for building your solo travel confidence.

Conquering the Continent: A First-Timer's Guide to European Transport
Your biggest logistical decision will be how to move between cities and countries. Europe offers a fantastic array of options, each with a distinct balance of cost, speed, and experience. Your choice will define the rhythm of your trip.
Pro-Tip: Don't commit to a single mode of transport for your entire trip. The savviest travelers use a hybrid approach. Use budget airlines for long-haul jumps across the continent, scenic trains for shorter regional travel where the journey is the destination, and buses for budget-friendly hops between nearby cities.
Nailing your transportation strategy is the first step to unlocking the continent. Now, let’s talk about the fuel for your adventure: your budget. For a solo traveler, who bears the full cost of every room and ride, this is where savvy planning truly pays off.
Smart Budgeting for Solo Female Travel Europe: West vs. East
The single most important factor influencing your budget in Europe is geography. A week in Western Europe can easily cost double what you’d spend in the East, and understanding this allows you to craft an itinerary that matches your bank account.
The Paris vs. Prague Paradigm: A Tale of Two Budgets
To understand this disparity, let’s compare the approximate daily costs for a "Budget Soloist" in two iconic capitals, based on data synthesized from cost-of-living aggregator sites.
Accommodation: This is the biggest driver of cost. A bed in a well-rated hostel dorm in Prague might cost you €25. In Paris, a similar dorm will likely start at €50.
Food: A hearty, traditional sit-down dinner in Prague can be found for €10-€15. A comparable meal in a Parisian bistro could easily be €25-€35.
Daily Total: When you add in local transport and activities, a budget-conscious solo traveler could comfortably explore Prague on around €65 per day. To maintain a similar travel style in Paris, you would need to budget at least €115 per day.
This doesn't mean you should skip Western Europe. It means you should plan for it. You can balance your overall trip budget by spending more time in affordable countries like Poland, Hungary, and the Czech Republic, and shorter, more focused time in more expensive destinations like France, Switzerland, and the UK.
Your Pre-Departure Blueprint
Feeling organized is the first step to feeling confident. A detailed checklist ensures you don't miss a single crucial step, from visa applications to travel insurance. Download our free, comprehensive International Travel Checklist to start your planning process with total clarity.
Your Tactical Safety Guide to Europe

While Europe is generally very safe, its popular tourist hubs are magnets for petty crime and sophisticated scams. Your best defense is awareness. While a significant 66% of women who travel solo report worrying about their personal safety, data from recent surveys paints a more empowering picture. While 25% have found themselves in a situation they perceived as dangerous, a mere 1% were the victim of a crime. This shows that women are overwhelmingly successful at navigating the world safely. The key is trading abstract fear for concrete knowledge. This is the core of safe solo female travel Europe.
Recognizing and Dodging Common Tourist Scams
Scammers rely on distraction, confusion, and your natural inclination to be polite. By knowing their playbook, you can recognize the performance and walk away before you become a part of it.
The Friendship Bracelet/Rose Scam: Found near major landmarks, a person will approach, grab your wrist, and quickly weave a "friendship bracelet" onto it, or thrust a "free" rose into your hand. Once the item is attached or accepted, they aggressively demand payment. Defense: Keep your hands in your pockets in these areas. Do not stop walking. Use a firm, clear "No" and pull away if contact is made.
The Petition Scam: Common in cities like Paris and Berlin, a person shoves a clipboard at you for a signature. While you’re distracted, an accomplice pickpocket's you. Defense: Legitimate charities rarely operate this way. Never stop for street petitions. Ignore the person and keep moving.
The "Found Gold Ring" Scam: Someone "finds" a gold-colored ring on the ground in front of you and asks if you dropped it. They'll then offer to sell you the worthless brass ring for a "good price." Defense: Recognize it's a performance. Do not engage; simply shake your head and walk away.
The Spilled Drink/Fake Bird Poop Scam: Someone "accidentally" spills a substance on you. They will be profusely apologetic and immediately start "helping" you clean up, using the distraction to steal your wallet or phone. Defense: If a stranger spills something on you, your first move is to clutch your bag and secure your valuables. Create physical distance, firmly state, "I'm fine," and walk away to a safe place.
The Broken Taxi Meter Scam: A driver claims the meter is broken after the ride has started, then demands an exorbitant fare. Defense: Whenever possible, use reputable ride-sharing apps. With local taxis, use official stands and confirm they will use the meter before you get in.
The Secure Sanctuary: Your Hotel Room Safety Checklist
Your accommodation is your safe haven. Performing this consistent security check upon arrival provides critical peace of mind.
Prop the Door: Before entering, use your luggage to prop the main door open. This ensures an escape route if the room is unexpectedly occupied.
Sweep the Room: Do a quick but thorough search of the entire space—under the bed, in closets, behind the shower curtain.
Test All Locks: Once clear, close the door and immediately test the deadbolt, chain lock, and any other security latches. Check that all windows and balcony doors lock securely.
Deploy a Portable Lock: Use your own device, like a rubber doorstop alarm or a portable metal lock, to provide a layer of security that is entirely within your control.
Perform a Hidden Camera Scan: Use your phone's flashlight to scan for the glint of a tiny camera lens in unusual places like smoke detectors, clocks, and USB chargers. In the dark, your phone's front-facing camera is more sensitive to the small IR lights used by night-vision cameras.
Map Your Exits: Find the fire escape map on the back of the door and physically walk the route to the two nearest exits.
Pro-Tip: Your intuition is your most advanced piece of security gear. If a person, place, or situation feels "off," it probably is. Don't hesitate to leave a street or enter a different train car. You don’t need to justify this feeling; just honor it and act on it.
Crafting Your Perfect First-Time Itinerary

With your transport, budget, and safety strategies in place, the fun begins: deciding where to go! For a first-timer, the best destinations are those with excellent infrastructure, low crime rates, and an easy-to-navigate environment. Countries like Portugal, Ireland, and Slovenia are fantastic choices. They offer stunning scenery, friendly locals, and a well-trodden tourist path that makes independent travel feel seamless and secure.
For a destination that perfectly blends history, sunshine, and an incredible solo-friendly infrastructure, Spain is an incredible choice. From the energetic tapas bars of Madrid to the fantastical architecture of Barcelona, it's a country that feels made for independent exploration. Our comprehensive travel guides to Spain and Portugal contain detailed itineraries and local secrets that will make your trip unforgettable.
Frequently Asked Questions for a First-Time Solo Trip to Europe
Even with a plan, questions will pop up. Here are answers to the most common anxieties first-timers face.
Is it weird to eat alone in Europe?
Absolutely not. Dining solo is common across the continent. To feel more comfortable, choose a seat at the bar or a counter, which are natural spots for single diners. Bringing a book or a travel journal also gives you a purposeful focus.
How do I handle language barriers?
In most major tourist destinations, English is widely spoken in hotels, restaurants, and attractions. However, learning a few key phrases in the local language ("Hello," "Please," "Thank you," "Do you speak English?") is a sign of respect that goes a long way. Download the Google Translate app and pre-download the language pack for your destination for offline use.
What's the best way to meet other people?
Stay in a modern hostel (even in a private room) to access social common areas and events. Joining a free walking tour on your first day in a new city is a classic and effective strategy. Small group activities like a local cooking class or a day tour also create a natural environment for connection.
Do I really need travel insurance?
Yes. It is non-negotiable. For a solo traveler, it's your financial and logistical safety net for everything from a medical emergency to lost luggage or a canceled flight. Look for policies with strong emergency medical and evacuation coverage.

Your European Adventure Awaits
The dream of a European adventure doesn't have to remain a distant fantasy. It is an achievable, empowering, and profoundly rewarding journey that is more accessible to you now than ever before. By breaking down the process into manageable steps, you can conquer the logistics of transport and budgeting. By arming yourself with tactical safety knowledge, you can move through the world with confidence and awareness. This guide has given you the blueprint for your first solo female travel Europe adventure, transforming overwhelming questions into a clear, actionable plan.
The personal growth, resilience, and radical self-reliance you will discover on this journey will become a permanent part of who you are. The world is waiting.
Don't Miss Out! Subscribe for Exclusive Content
SubscribeComments 0
No comments yet
Be the first to share your experience!
Dont Miss Out! Subscribe for Exclusive Content

A Woman's Guide to Safe Travel: 10 Critical Tips

7 Hotel Safety & Security Tips for Peace of Mind

11 Essential Solo Travel Safety Tips You Need to Know

The Ultimate Guide to Travel Safety: A 2026 Playbook

How to Meet People While Traveling Solo (Without Being Awkward)
