Christmas SF: Lights & Wharf Wonders
TrekGuider @trekguider
Are you dreaming of a Christmas getaway filled with postcard-perfect lights and unique holiday cheer, but feel paralyzed by the options in a city as dynamic as San Francisco? You want to soak in the magic, but you’re haunted by the fear of missing the best spots, getting stuck in tourist traps, or wasting your precious vacation time navigating crowds instead of making memories. The anxiety of a poorly planned trip can extinguish the holiday spirit before it even has a chance to ignite.
Imagine the frustration: you’ve spent hours researching, only to end up with a mediocre view of a famous light display, shoulder-to-shoulder with a thousand other people. You risk missing out on the distinctly San Franciscan holiday traditions—the ones that fuse historic charm with stunning coastal beauty—and settling for a generic experience you could have had anywhere. Without a clear strategy, your festive adventure can devolve into a logistical nightmare.
This is your definitive guide to avoiding that fate. We’ve forged the ultimate itinerary, focusing laser-like on the city’s most dazzling illuminations and waterfront spectacles. This deep dive will ensure your Christmas in San Francisco is not just a trip, but a masterfully curated collection of magical moments. Think of this as your specialist mission. After getting the high-level overview of the city's entire festive calendar in our guide to San Francisco Holidays: Bay Area Buzz, you're now ready for the deep dive into the twinkling heart of a Bay Area Christmas.

Union Square: The Epicenter of Christmas in San Francisco
Forget what you think you know about a California Christmas. In San Francisco, the holiday season doesn't just arrive; it makes a grand entrance, and Union Square is its glittering, floodlit stage. The air here crackles with a unique energy, where the city’s high-fashion pulse is supercharged by a symphony of lights, music, and palpable joy. This is the undeniable starting point for any holiday tour, where the city’s most iconic traditions come to life.
The Macy's Great Tree: A Towering Beacon of Holiday Joy
Dominating the square like a festive titan, the Macy's Great Tree is the city's official holiday centerpiece. This colossal tree, soaring over 80 feet, is a spectacle of sustainability and sparkle, adorned with tens of thousands of energy-efficient LED lights and hundreds of shimmering ornaments. Its annual lighting ceremony in late November is a beloved ritual that officially flips the switch on the holiday season in San Francisco, drawing enormous crowds for an evening of live music and celebration.
Pro-Tip: For a truly breathtaking, crowd-free view, head inside the adjacent Macy's. The upper floors offer a panoramic perspective of the entire square. The best-kept secret is the view from the Cheesecake Factory on the 8th floor, where you can gaze down upon the tree and ice rink like a VIP.

Ice Skating Under the Lights: A Classic Winter Tradition
There's a certain magic in gliding across the ice under the watchful gaze of a giant Christmas tree, with the city's skyscrapers twinkling all around you. The Safeway Holiday Ice Rink in Union Square delivers this quintessential winter experience with a distinctly urban flair. Open from early November through mid-January, the rink offers 60-minute sessions that are pure, unadulterated holiday fun.
The atmosphere is electric, fueled by a soundtrack of holiday classics and the collective laughter of skaters. Whether you're executing perfect figure eights or clinging to the wall for dear life, lacing up your skates here is a non-negotiable part of the San Francisco Christmas experience. The evening sessions are especially enchanting, as the city lights create a dazzling, reflective canopy over the ice. Book your tickets online well in advance to secure your spot.
Window Shopping & Festive Displays: A Stroll Through Holiday Artistry
Union Square is San Francisco's luxury shopping heartland, and during Christmas, the storefronts become captivating galleries of festive art. Retailers like Saks Fifth Avenue, Neiman Marcus, and Tiffany & Co. engage in a friendly competition to create the most jaw-dropping holiday window displays. A simple stroll around the square becomes a visual feast of complex designs, whimsical animatronics, and brilliant lights.
The most heartwarming tradition, however, belongs to Macy's. For decades, their partnership with the SF SPCA has filled their windows with adorable, adoptable puppies and kittens playing in festive settings. It’s a guaranteed dose of holiday cheer that also helps countless animals find their forever homes.
Fisherman's Wharf & The Piers: Coastal Christmas Charm
If Union Square is the city's elegant holiday ballroom, Fisherman's Wharf is the lively waterfront party. Here, the festive spirit is infused with the salty air of the bay, offering a uniquely San Franciscan take on Christmas where twinkling lights meet maritime history.
PIER 39's Dazzling Christmas Tree & Sea Lion Spectacle
Giving the downtown tree a run for its money, PIER 39 erects its own majestic, 60-foot Christmas tree right at the entrance. This tree is the star of a nightly, synchronized light-and-music show that runs every half hour, bathing the pier in a dynamic kaleidoscope of color. It’s a fun, high-energy spectacle perfect for families.
What makes this experience uniquely San Franciscan is the audience: the famous sea lion colony barking from K-Dock, providing a chaotic, natural soundtrack. This quirky juxtaposition of organized holiday cheer and wild nature is pure San Francisco.
Ghirardelli Square: Chocolate, Lights, and Historic Splendor
A short, scenic walk from the main wharf leads you to the historic Ghirardelli Square, which offers a more refined and cozy holiday atmosphere. The beautiful brick architecture of the former chocolate factory is elegantly draped in lights, with a grand Christmas tree anchoring the main plaza. The iconic, glowing Ghirardelli sign serves as a beacon over the bay.
A visit here is an assault on the senses in the best possible way. The aroma of warm chocolate hangs in the air, drawing you into the Ghirardelli Chocolate Marketplace for a world-famous hot fudge sundae or a rich, soul-warming hot cocoa. It’s the perfect place to refuel and pick up beautifully packaged holiday gifts.

The Illuminated Boat Parade: A Floating Festival of Lights
For a truly unforgettable waterfront event, align your visit with the Fisherman's Wharf Lighted Boat Parade. As one of the oldest and largest in the country, this annual tradition is a spectacular display of maritime merriment. A fleet of fishing boats, sailboats, and private yachts, all decked out in elaborate holiday lights, parade along the waterfront from PIER 39 past the Marina Green. The sight of these floating light sculptures against the dark waters of the bay, with the Golden Gate Bridge in the distance, is pure magic. Prime viewing spots can be found at Aquatic Park, PIER 39, and anywhere along the Marina Green.
Beyond the Hubs: More Dazzling Christmas in San Francisco Lights
While the main hubs are essential, some of the city's most enchanting displays are found elsewhere. San Francisco is a city of neighborhoods, and venturing out reveals a more local and often more creative side of the holiday season.
Golden Gate Park's "Entwined": A Forest of Light
For a holiday experience that speaks to San Francisco's identity as a hub of art and technology, you must visit "Entwined" in Golden Gate Park. Each year, Peacock Meadow is transformed into an otherworldly forest of light by artist Charles Gadeken. This immersive, large-scale installation features towering, tree-like sculptures and geometric shapes illuminated by thousands of color-changing LEDs. Wandering through this dreamlike landscape as the lights shift through mesmerizing patterns is a captivating experience that feels a world away from the urban bustle.
The Fairmont Hotel's Giant Gingerbread House: A Sweet Spectacle
Ascend to the top of Nob Hill to witness one of the city's most beloved—and delicious—holiday traditions. The historic Fairmont San Francisco constructs a two-story, life-sized gingerbread house in its grand lobby. Made from thousands of real gingerbread bricks, gallons of royal icing, and a dizzying amount of candy, this edible marvel is a feast for the senses. You can even walk through it, breathing in the sweet, spicy aroma of gingerbread. The hotel's opulent lobby, with its own massive Christmas tree, completes the fairy-tale setting.
Neighborhood Lights: Discovering Local Gems
To truly capture the spirit of Christmas in San Francisco, take a tour of the residential neighborhoods where locals pour their hearts into decorating.
Tom and Jerry's House (3650 21st St.): A legendary, over-the-top display in the Castro featuring a giant tree, massive stockings, and a working ski lift for dolls.
45 Upper Terrace: Another famous private home known for its dazzling, multi-story cascade of lights and festive figures.
Sea Cliff: For a more elegant and professionally curated experience, a drive through this affluent neighborhood offers stunning views of stately homes adorned in sophisticated holiday decor.

Planning Your Perfect San Francisco Christmas Adventure
A little strategic planning will ensure your holiday trip is seamless and stress-free, allowing you to focus on the magic.
Getting Around: Mastering the City's Grid
San Francisco is famously compact, but its hills are no joke. Public transportation is your greatest asset.
Muni System: The city's network of buses and historic streetcars can get you almost anywhere. The F-line streetcar offers a wonderfully scenic route along the waterfront.
Cable Cars: While more of a moving landmark than practical transport, a ride on a festively decorated cable car is an iconic experience. Just be prepared for long lines.
Walking: The best way to soak in the details of Union Square and the Wharf. Wear your most comfortable shoes—you'll thank yourself later.
What to Pack: The Art of Layering
San Francisco's winter weather is a master of disguise. Mild sunshine can give way to bone-chilling wind and fog in an instant. The golden rule is to dress in layers. A base layer, a sweater or fleece, and a windproof/waterproof jacket will serve you well. A hat and gloves are essential for evenings by the bay.
Traveling with family adds another layer of complexity to packing and planning. The journey itself can be the most daunting part of a family vacation. To ensure your trip to the Bay Area starts smoothly, we’ve created the ultimate resource for parents. Make your travel day as joyful as your destination with our Stress-Free Flying with Kids Guide.
Your Unforgettable San Francisco Christmas Awaits
From the colossal, glittering tree in Union Square to the salty, sea-lion-serenaded festivities at Fisherman's Wharf, a Christmas in San Francisco is an experience that engages all the senses. You are now armed with the insider’s map to the city’s most brilliant lights, cherished traditions, and unique coastal wonders. You are empowered to craft a holiday itinerary filled with genuine magic and unforgettable memories, far from the generic tourist trail.
This deep dive into San Francisco's festive glow is just one chapter in the great American holiday story. The entire country is a mix of incredible celebrations, each with its own unique flavor. To continue your journey and plan your next great adventure, explore our comprehensive Travel Guide.
Don't Miss Out! Subscribe for Exclusive Content
Subscribe


Comments 0
No comments yet
Be the first to share your experience!
Dont Miss Out! Subscribe for Exclusive Content

San Francisco Cherry Blossoms: A Local's Guide to the Blooms

Halloween SF: Haunts Without Horrors

SF Festivals: 7 Must-See Lineups

SF Pride: 6 Route & Party Hacks

Chinese New Year SF: Parade Essentials

San Francisco Holidays: Bay Area Buzz
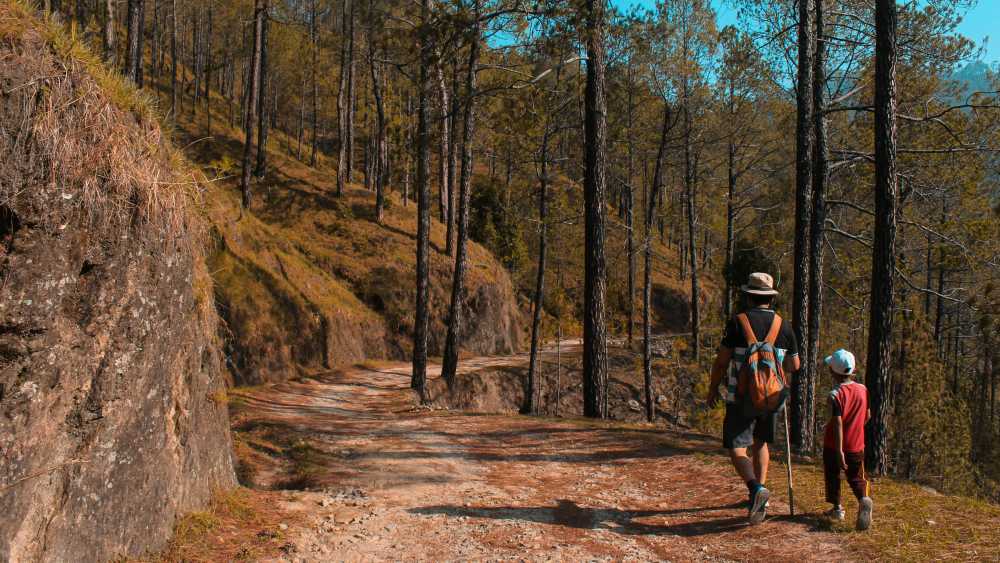
4 Unforgettable National Park Family Travel Ideas
TrekGuider @trekguider
Struggling to find a family vacation that pulls your kids away from screens and creates genuine memories, not just stress? You're not alone. The pressure to plan the perfect, budget-friendly trip often leads to analysis paralysis amid an overwhelming sea of options and the fear of getting it all wrong. This guide cuts through the noise.
This is where the timeless majesty of America’s national parks comes in. They are the ultimate solution—vast playgrounds of natural wonder that offer a powerful antidote to the digital saturation of modern life. Forget generic resort packages; this guide is a strategic playbook for crafting an unforgettable national park adventure. We’ll transform the daunting task of planning into an exciting journey.
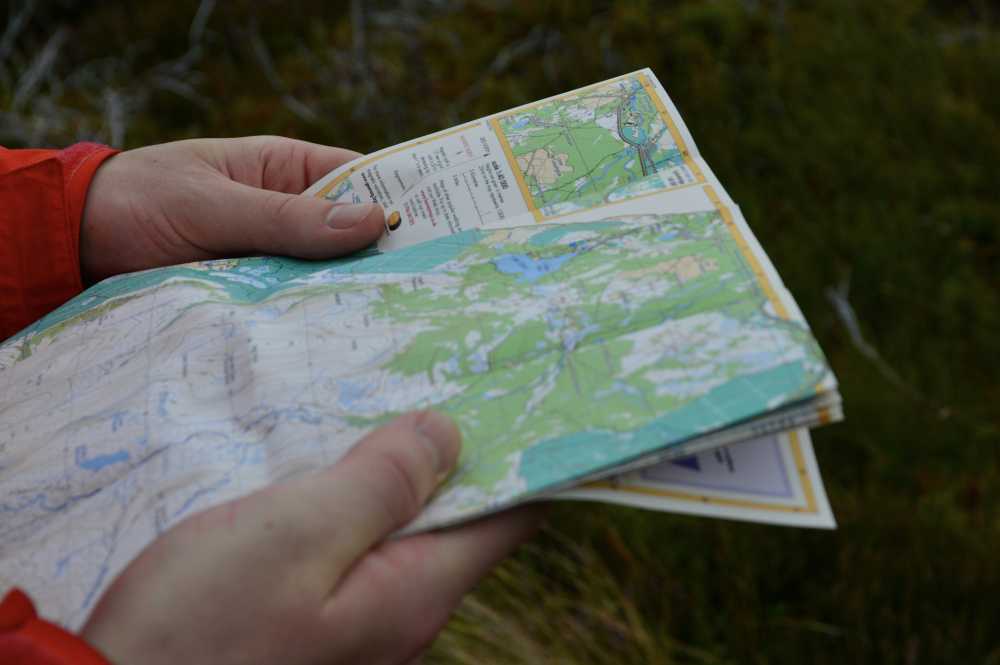
As we explore these specific parks, remember they represent just one path to an amazing trip. For a complete overview of destinations for every budget and travel style, our Family Travel Ideas: The 2026 Guide to Unforgettable Trips is your ultimate resource. This article is your specialized map to sun-drenched trails, awe-inspiring wildlife, and the kind of shared experiences that strengthen family bonds for years to come.
Why National Parks are the Ultimate Family Travel Ideas for Summer
In a world of manufactured entertainment, national parks offer something profoundly real. They are living classrooms, natural gymnasiums, and sanctuaries for the soul. For families, they present a unique opportunity to disconnect from daily routines and reconnect with each other in a meaningful way.
Unmatched Educational Value: Where else can your child see the geological forces that shaped our planet firsthand at the Grand Canyon, or watch a bison herd thunder across the plains of Yellowstone? These parks are immersive, multi-sensory learning environments that bring textbook concepts to vivid life.
Built-in Adventure: From gentle, toddler-friendly nature walks to more challenging hikes for teens, the parks are structured for adventure at every skill level. The thrill is in the discovery—spotting a bald eagle, identifying a new wildflower, or conquering a trail together.
Remarkable Affordability: Compared to theme parks or international travel, a national park vacation can be incredibly budget-friendly. An annual "America the Beautiful" pass grants access to all parks for just $80 per vehicle. With options for camping or lodging in nearby towns, you can tailor the trip to your exact financial comfort level.
A Cure for Nature Deficit Disorder: Experts increasingly recognize that time spent in nature is critical for a child's physical and mental development. It reduces stress, improves focus, and fosters creativity. A week in the woods can be the most effective reset button you’ll ever press for your family.
They are, quite simply, America's best idea, and they are waiting to be the backdrop for your family's next great story.
Your National Park Summer Adventure Playbook
Success in the wild begins with careful planning at home. The immense popularity of national parks during the summer means that spontaneity can lead to sold-out signs and disappointment. Following a proven framework is key to a smooth and memorable trip.
Step 1: The 6-12 Month Countdown - Booking Your Basecamp
Let’s start with a non-negotiable truth: if you only get one thing right in your planning, make it your lodging. In-park accommodations and popular campsites are often booked solid the day they become available, sometimes a full year in advance.
Define Your Lodging Style:
In-Park Lodges: Offer unparalleled convenience and historic charm (think the Old Faithful Inn). They are the most expensive option and require the earliest booking.
Campgrounds: Provide the most immersive nature experience. Services range from primitive sites to full RV hookups. Reservations are typically made through Recreation.gov.
Gateway Towns: Towns just outside park entrances (like West Yellowstone, MT, or Springdale, UT) offer a wide range of hotels, motels, and vacation rentals. They provide more flexibility and amenities but require daily travel into the park.
Set Your Alarms: Identify the exact date and time that reservations open for your target dates and lodging. Be online and ready to book the second they become available.
Have Backup Plans: Research and be ready to book your second and third choices immediately if your first is unavailable.
Pro-Tip: How to Actually Win the Campground Lottery
Booking a popular national park campsite on Recreation.gov is a competitive sport. Here’s how to win: a few days before your booking day, log into your account, find your desired campground, and add it to your cart to confirm the exact release time (usually 10 a.m. ET). On the day, log in 10 minutes early, sync your computer clock to the official U.S. time (time.gov), and have all your information ready. Refresh your screen precisely at the release time and complete the booking in seconds.
Step 2: The 2-3 Month Check-In - Crafting Your Itinerary
With your basecamp secured, you can now build your daily plan. The key is to balance iconic sights with downtime to avoid burnout. Our guide on How to Make Family Travel Planning Actually Easy dives even deeper into this process.
Cluster Your Activities: Parks are huge. Study the park map and group your desired activities by geographic area. Dedicate full days to specific regions, like the Yellowstone Lake area or the Tioga Road in Yosemite, to minimize driving time.
Prioritize the "Must-Sees": Identify the 2-3 iconic experiences your family absolutely cannot miss. Plan to visit these popular spots early in the morning (before 9 a.m.) or later in the afternoon (after 4 p.m.) to avoid the worst crowds and midday heat.
Involve the Kids: Give your children, especially older ones, a voice in the planning. Let them research and choose a specific trail they want to hike or a Ranger Program they want to attend. This ownership fosters excitement and cooperation.
Stay Organized from Start to Finish
A great road trip has a lot of moving parts. Our free checklist is designed to help you track everything from reservations to packing lists, ensuring nothing gets missed.
Download the free National Park Road Trip Checklist
Top National Parks for Summer Family Adventures (And What to Do There)
While every park is special, some are exceptionally well-suited for families during the summer months. Here are our top picks for incredible family travel ideas for summer in the national parks.
Yellowstone National Park: The Geothermal Wonderland
Best For: Ages 6+. The sheer scale and geothermal wonders are captivating for school-aged children and teens.
Can't-Miss Activities:
Watch Old Faithful Erupt: It’s iconic for a reason. Check the posted eruption times and find a spot on the boardwalk.
Explore the Grand Prismatic Spring: The vibrant colors of this massive hot spring are otherworldly. The best view is from the elevated overlook on the Fairy Falls Trail.
Wildlife Safari in Hayden Valley: Drive through this vast, open valley at dawn or dusk for the best chances of spotting bison, elk, grizzly bears, and even wolves.
Kid-Friendly Hike: The Storm Point Loop Trail is a relatively flat 2.3-mile loop that leads through forest to a scenic point on Yellowstone Lake.
Zion National Park: The Majestic Canyon Sanctuary
Best For: All ages, but especially families with active kids and teens.
Can't-Miss Activities:
Ride the Park Shuttle: During peak season, the mandatory shuttle is an experience in itself, offering narrated guidance and stunning views.
Walk The Narrows (Bottom-Up): Wading through the Virgin River in a 1,000-foot-deep canyon is the quintessential Zion experience. Rent proper water shoes from an outfitter in Springdale—it's a game-changer.
Hike to Emerald Pools: This series of trails leads to lush, spring-fed pools and waterfalls. The Lower Pool trail is paved and accessible for strollers.
Kid-Friendly Hike: The Pa'rus Trail is a 3.5-mile paved trail that follows the Virgin River. It's perfect for strollers, wheelchairs, and bikes.
Acadia National Park: The Coastal Gem of New England
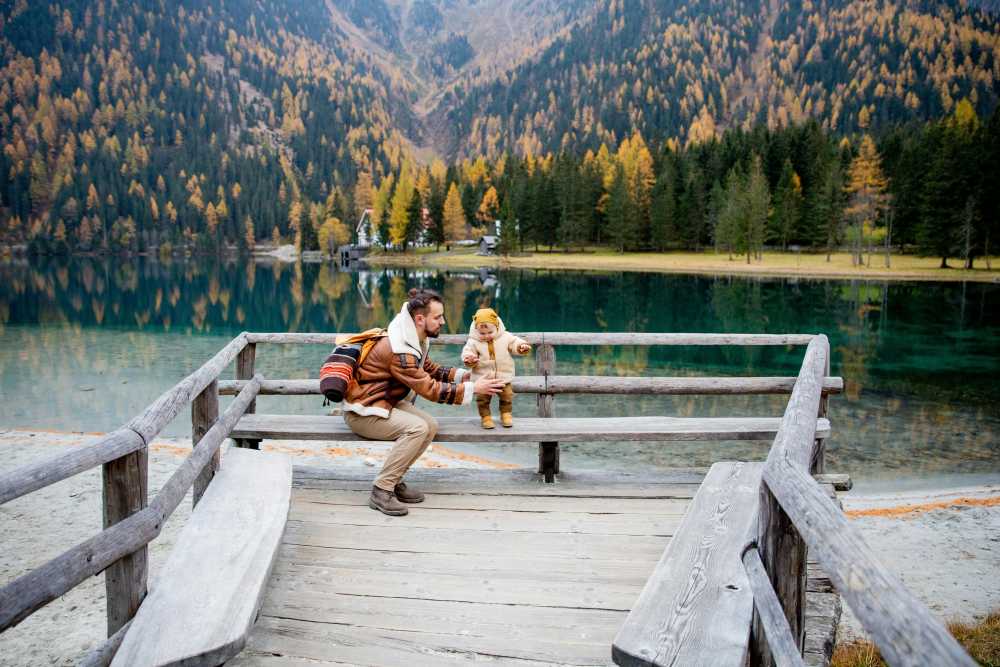
Best For: All ages. The diversity of landscapes makes it a perfect fit for multi-generational trips.
Can't-Miss Activities:
Drive the Park Loop Road: This 27-mile road hits many of the park's highlights, including Sand Beach, Thunder Hole, and Otter Cliff.
Watch the Sunrise from Cadillac Mountain: Be one of the first people in the United States to see the sunrise. Vehicle reservations are now required and must be booked in advance.
Explore the Tide Pools: At low tide, the rocky coastline near Wonderland Trail reveals a fascinating world of sea stars, crabs, and anemones.
Kid-Friendly Hike: The Jordan Pond Path is a 3.3-mile loop around a crystal-clear pond, best capped off with popovers at the Jordan Pond House.
Olympic National Park: A World of Ecosystems

Best For: Families who crave variety and have kids aged 7+. Olympic is like visiting three parks in one.
Can't-Miss Activities:
Explore the Hoh Rainforest: Walk the Hall of Mosses Trail (.8 miles), an easy loop that immerses you in a temperate rainforest dripping with green. It’s pure magic.
Discover Rialto Beach: This is the iconic Pacific Northwest coastline. Explore tide pools, admire giant driftwood, and hike to the Hole-in-the-Wall sea arch (check tide charts!).
Drive to Hurricane Ridge: Ascend nearly a mile in elevation for breathtaking panoramic views of the Olympic Mountains.
Kid-Friendly Hike: Sol Duc Falls Nature Trail is a 1.6-mile roundtrip hike through a stunning old-growth forest to a powerful, picturesque waterfall.
Common Pitfalls and How to Avoid Them
The "Too Much, Too Fast" Itinerary: Don't try to see an entire park in two days. You’ll end up with cranky kids and only see the park through a car window. Embrace a slower pace. For more on this, explore The Sanity-Saving System for Your Next Family Road Trip.
Ignoring the Junior Ranger Program: This is a mistake. The free activity booklets available at any visitor center are the single best way to engage kids aged 5-12. It transforms them from passive passengers into active explorers.
Underestimating Wildlife Safety: Seeing a bear or bison is a thrill, but these are powerful wild animals. Know and respect the rules: stay at least 100 yards from bears and wolves, and 25 yards from all other large animals. Never, ever feed wildlife.
Pro-Tip: Download the official NPS (National Park Service) app before your trip. You can save park maps and content for offline use, a lifesaver in areas with no cell service.
Packing and In-Trip Strategies
Your gear and daily approach can make or break the experience. Focus on comfort, preparedness, and flexibility.
The Essential Family Packing List:

Layered Clothing: Summer weather in the mountains is notoriously unpredictable. Pack lightweight layers—t-shirts, fleeces, and a waterproof rain jacket—for everyone.
Sturdy Footwear: Do not attempt hikes in flip-flops. Everyone needs comfortable, broken-in shoes with good traction.
Sun Protection: The sun is more intense at higher elevations. Bring wide-brimmed hats, sunglasses, and high-SPF sunscreen.
Reusable Water Bottles: Staying hydrated is critical. A large water bladder for each adult and a reusable bottle for each child is a must.
A "Go-Bag" for the Car: Keep a small backpack in the car with essentials: a first-aid kit, endless snacks, binoculars, a physical park map, and wet wipes.
Frequently Asked Questions
What is the best time of year for a national park family vacation?
While summer offers the most accessible weather and open facilities, it's also the most crowded. For fewer crowds and beautiful scenery, consider the "shoulder seasons" of late spring (May-June) and early fall (September-October). Always check specific park conditions, as weather varies greatly by region.
How far in advance should I book lodging for a national park trip?
For popular in-park lodges, you should book 12 months in advance—often the day reservations become available. For campsites, the booking window is typically 6 months in advance. Planning this far ahead is crucial for securing the best locations.
Are national parks a good vacation idea for families with toddlers?
Absolutely! Many parks feature paved, stroller-friendly trails like the Pa'rus Trail in Zion or accessible boardwalks around Yellowstone's geysers. The key is to choose the right activities, keep hikes short, and take advantage of the Junior Ranger programs, which have activities for younger children.
What's the most important thing to pack for a national park trip?
Beyond your camera, the most critical items are layered clothing and proper footwear. Mountain weather can change in an instant, so having layers ensures everyone stays comfortable. Sturdy, broken-in shoes are essential for preventing blisters and navigating uneven trails safely.
Conclusion
The beauty of a national park vacation lies in its simplicity and its power. By investing in careful planning, you are not just organizing a trip; you are building a framework for connection and creating a reservoir of shared memories that your family will draw upon for a lifetime. These family travel ideas for summer are more than just a vacation—they are an investment in your family's story.
So, use this guide to book with confidence, pack with purpose, and get ready to discover the incredible wonders waiting in your own backyard.

Read the full guide: Family Travel Ideas: The 2026 Guide to Unforgettable Trips
Don't Miss Out! Subscribe for Exclusive Content
SubscribeComments 0
No comments yet
Be the first to share your experience!
Dont Miss Out! Subscribe for Exclusive Content
San Francisco Cherry Blossoms: A Local's Guide to the Blooms
Halloween SF: Haunts Without Horrors
SF Festivals: 7 Must-See Lineups

Christmas SF: Lights & Wharf Wonders
SF Pride: 6 Route & Party Hacks
Chinese New Year SF: Parade Essentials
The Travel Blog Business Plan: How to Make Real Money in 2026
TrekGuider @trekguider
Stop collecting tactics. Start building a business. The internet is flooded with articles listing a dozen ways of how to make money travel blogging—affiliate links, display ads, sponsored posts—but they all miss the most critical question: in what order? Without a strategic plan, those tactics are just lottery tickets, a recipe for confusion and burnout.

This isn't another list. This is your comprehensive, step-by-step business plan, designed to take you from zero traffic and zero income to a profitable, scalable travel content business. We’re going to show you exactly what to focus on in your first 12 months (hint: it has nothing to do with making money) and provide the exact framework the top 1% of bloggers use to build seven-figure brands.
Forget the random tips and the vague "follow your passion" advice. It’s time to get serious. It's time to build a real asset.
Phase 1: Building Your Unfair Advantage (Months 1-12)
Welcome to the trenches. This is the most important—and by far the least glamorous—phase of your travel blogging career. The first 6 to 12 months are not about earning an income, chasing sponsored trips, or designing a beautiful logo. Let me be crystal clear: your goal in year one is not to make money.
Your goal is to build an asset.
Think of yourself as a real estate developer in a prime location. You wouldn't try to rent out a skyscraper while you're still pouring the concrete foundation. In the world of digital content, your asset is a high-quality website that attracts a dedicated audience through search engines. Your currency isn't dollars; it's traffic. Your foundation isn't concrete; it's trust.

During this foundational phase, every ounce of your energy—every late night and every weekend—will be dedicated to constructing a blog that is so genuinely helpful and authoritative that monetization becomes the natural, inevitable next step, not a desperate scramble. This is where you do the unsexy work that separates you from the 99% of travel blogs that are abandoned by month six. This is where you build your unfair advantage.
Step 1: Choose a Profitable Niche (Go Deep, Not Wide)
The single most fatal mistake a new travel blogger can make is trying to be everything to everyone. A blog about "my travels around the world" is a personal journal destined for an audience of three: you, your mom, and your most supportive friend.
A blog about "solo female travel in Southeast Asia on a budget" is a business. For those interested in this path, starting with can provide immense value to your future audience.
The fear of market saturation is valid, but the solution isn't to give up. The solution is to get laser-focused. Choosing a profitable niche is the most critical strategic decision you will make. It's not about limiting yourself; it's about making yourself the only logical choice for a specific person. A narrow focus is your primary weapon against a crowded market.

Here’s why this works:
It Builds Crushing Topical Authority for SEO: Google's algorithm is a machine built to find experts. When you write 30 in-depth articles exclusively about hiking in the Pacific Northwest, you are screaming to Google that you are the authority on that topic. This makes it exponentially easier to rank for valuable keywords than it is for a generalist who writes about Oregon one week and Paris the next. You're not just a voice in the crowd; you're the leading expert in a specific field.
It Attracts a High-Value Audience: A focused niche attracts a specific, passionate audience with a predictable set of problems, desires, and budgets. This clarity makes it far easier to create content that feels like it’s reading their mind, which in turn makes it easier to eventually sell products they are desperate to buy.
It Skyrockets Conversion Rates: Whether it's an affiliate link for a specific child-friendly hiking carrier or a brand deal with an Oregon-based tour company, a targeted audience converts at an astronomically higher rate. A general audience is just window shopping; a niche audience has their wallet out, ready to act on your expert recommendations.
Don't be afraid to get granular. Use this simple formula: [Who] does [What] in [Where].
From: "European travel" -> To: "Train travel for seniors in Western Europe."
From: "Family travel" -> To: "Accessible travel in Tuscany for multi-generational families."
From: "Adventure travel" -> To: "Scuba diving certification trips in the Caribbean for beginners."
A niche isn't a prison; it's your real advantage. It allows you to become a big fish in a small, profitable pond. For more ideas, explore our in-depth guide to 15 Profitable Travel Blog Niche Ideas for 2026.
Step 2: The Minimum Viable Setup (Spend Less Than $100)
Your perfectionism is your enemy here. The "Aspiring Travelpreneur" often falls into the trap of "pre-crastination"—spending months and thousands of dollars on custom design, expensive plugins, and countless online courses before they've even published a single, helpful article.
Resist this urge with every fiber of your being. In the beginning, your money is infinitely better spent on the experiences you can write about than on a fancy website.
Forget the custom logo and bespoke WordPress theme for now. In the beginning, your website needs to be a Toyota Corolla, not a Ferrari: utterly reliable, brutally efficient, and cheap to run. The goal isn't to win design awards; it's to build a platform that won't buckle when the traffic finally arrives.

Here are the absolute essentials:
A Domain Name: Choose a .com that is brandable, memorable, and hints at your niche. Don't overthink it. (Approx. $15/year)
Reliable Hosting: This is your one non-negotiable technical investment. Do not use free platforms like Wix or Blogger—you don't own your content, and your monetization options will be crippled. Shared hosting from a reputable provider like SiteGround, Bluehost, or Lyrical Host is the industry standard for your first year. (Approx. $5-$10/month)
A Clean WordPress Theme: Install the free, self-hosted version from WordPress.org (never .com). Then, choose a lightweight, fast-loading theme. A premium theme like Kadence or GeneratePress offers a free version that is more than powerful enough to get you started. In 2026, website speed is a critical ranking factor for SEO and essential for user experience. A slow site is a dead site.
Alternatively, for creators who want to bypass the technical setup of hosting and WordPress entirely, a marketplace platform like TrekGuider offers a powerful head start. By registering as a creator on TrekGuider, you can not only sell digital products but also publish your own blog directly on the platform. This approach allows you to focus 100% on creating great content while leveraging built-in tools to view statistics on your posts, directly track your audience engagement, and grow your business within an established travel ecosystem.
That's it. Your total initial investment can and should be under $100. Every dollar you save here is a dollar you can put toward the travel that will fuel your content—and your business—for the next year.
Step 3: Master "Helpful Content" SEO to Reach 50,000 Sessions
Traffic is the lifeblood of a profitable blog. It is the raw material from which all revenue is refined. Without a steady, predictable stream of readers, you have no one to show ads to, no one to click your affiliate links, and zero influence to leverage with brands. In this foundational phase, your single most important Key Performance Indicator (KPI) is monthly sessions.
And your singular, obsessive goal is to reach 50,000 monthly sessions.

Why that exact number? Because it's the golden ticket. It is the minimum traffic requirement to get accepted into premium advertising networks like Mediavine and Raptive (formerly AdThrive). The income difference isn't just big; it's staggering.
Google AdSense might earn you a paltry $1-$3 per 1,000 visitors (a metric called "RPM," or Revenue Per Mille).
A premium network like Mediavine can earn you $20, $30, or even $40+ RPM for the exact same traffic.
Hitting this threshold is the inflection point where your blog transforms from an expensive hobby into a legitimate source of income. It's the first taste of real profit.
The only sustainable, long-term way to get there is through Search Engine Optimization (SEO). This means creating content that methodically answers the specific questions your niche audience is typing into Google. Forget writing diary entries about your feelings. Your job now is to become a problem-solver. Your mantra is "helpful content."
This "nuts and bolts" content is the bedrock of every successful travel blog. Think about the practical, unglamorous questions a traveler actually needs answered:
"How much does a 3-day trip to Lisbon cost for a couple?" (Our is built on answering questions just like this.)
"Is it safe to drink tap water in Costa Rica in 2026?"
"What is the best travel insurance that covers trekking in Nepal?"
"A detailed, day-by-day itinerary for one week in Japan without a car." (This is the exact kind of detail you'll find in our .)
By focusing relentlessly on answering these practical questions with first-hand experience and exhaustive detail, you build immense trust with your audience and demonstrate your expertise to Google. This is a slow, methodical process of laying brick after brick. To learn the fundamentals, your first read should be our A Beginner's Guide to SEO for Travel Blogs.
Phase 2: The Monetization Ladder (Months 12-24)
You survived the gauntlet of year one. You've published 50+ articles of deeply helpful, SEO-optimized content. Your traffic is climbing steadily, and you're approaching or have just surpassed the magical 50,000 session mark. Now, and only now, is it time to flip the monetization switch. It's time to talk about how to make money travel blogging.

We call this phase the "Monetization Ladder" because it’s a sequential process. Trying to do everything at once—ads, affiliates, brand deals, products—is the fastest way to get overwhelmed and do everything poorly. Instead, you'll climb the ladder one rung at a time, introducing income streams in a logical order that aligns with your blog's growth and authority.
Rung 1: Affiliate Marketing
Affiliate marketing is the perfect first rung on the ladder for two simple, powerful reasons: it has zero traffic requirements, and it integrates perfectly with the helpful content you are already creating. Our guide on .
The concept is beautifully simple: you recommend products or services you genuinely use and love (hotels, tours, gear, travel insurance), and when a reader makes a purchase through your unique tracking link, you earn a commission at no extra cost to them.
This is the most reader-centric form of monetization possible. You're not just slapping a jarring banner ad on your site; you're providing a curated, value-added recommendation that solves a specific problem for your reader. For example, in an article about "The Best Carry-On Backpacks for a Two-Week Trip to Europe," you link to the specific Osprey backpack you've personally torture-tested for the past three years. It's a natural, helpful, and profitable service.

Your Action Plan:
Begin with Aggregators: In your early days, it's most efficient to join large affiliate networks that give you access to thousands of brands under one roof. For travel, your first stops should be platforms like TravelPayouts (for flights, hotels, tours), Stay22 (for embedding beautiful, interactive accommodation maps), and of course, Amazon Associates for all travel gear.
Perform a Content Audit: Go back through your top 10-15 highest-traffic articles. Where have you mentioned a hotel, a piece of gear, a tour, or a booking site? Add your affiliate links to these existing, proven posts first. This is the lowest-hanging fruit.
Prioritize Unshakeable Trust: This is the cardinal rule. Only recommend things you have used personally or would confidently recommend to your best friend. Your long-term credibility is worth infinitely more than a few quick commissions. The moment your readers suspect you're recommending something just for the money, you've lost.
Rung 2: Premium Display Advertising
This is your reward for a year of relentless, thankless work. The moment your Google Analytics shows you've crossed the 50,000-session threshold in the last 30 days, you should stop everything you're doing and apply to Mediavine.
Getting accepted is a rite of passage. It's the moment your traffic asset begins producing significant, life-changing passive income.
As we covered, the income potential is transformative. A blog earning a disappointing $50/month from AdSense could suddenly be earning $1,000-$2,000/month from Mediavine with the exact same audience. This provides a stable, predictable income floor. It's the money that pays your rent, allows you to reinvest in your business, and finally eases the financial pressure of this entrepreneurial journey.
The beauty of premium ads is their passive nature. Once you're approved, Mediavine's expert team works with you to install the ad code. They handle all the optimization, management, and advertiser relationships. Your only job is to keep doing what got you here: creating excellent content that attracts readers. This predictable income stream frees up your mental energy to focus on the more lucrative, and more complex, rungs of the ladder.
Rung 3: Sponsored Content & Brand Partnerships
Once you have established traffic, a clear niche, and a professional-looking website, brands will start to notice. You'll begin to get emails in your inbox with subject lines like "Collaboration Opportunity." This can be a very lucrative income stream, but it is a minefield if not approached with extreme strategic caution, as we outline in our guide to .

Many bloggers, desperate for validation and cash, fall into the trap of accepting any and every offer that comes their way. They turn their carefully crafted blog into a chaotic billboard of random, low-value sponsored posts for mattress companies and mobile games. This erodes reader trust and can be, in the words of veteran blogger Nomadic Matt, utterly "soul-sucking."
Position sponsored content as an opportunistic, supplementary income stream, not your primary goal.
You Are the Prize: Remember this always. You have done the hard work of building the asset—the targeted audience. Brands need access to your audience far more than you need their one-off payment. Do not accept free products in exchange for "exposure." Your rates should be based on the value you provide, and you should be comfortable starting at $500-$1,000 for a single sponsored post and rising quickly from there.
Create a Professional Media Kit: When you're ready to proactively pitch brands or respond to inquiries, you need a professional media kit. This is a 2-3 page PDF that acts as your blog's resume. Our free resource, , includes essential apps and resources that can help you showcase your traffic statistics, audience demographics, and past work, making the difference between being ignored and landing a four-figure deal.
Chase Partnerships, Not Posts: The most successful bloggers don't do one-off posts. They build long-term, multi-faceted partnerships. Instead of just pitching a single article, pitch a package that includes a dedicated blog post, a series of Instagram stories, a YouTube video, and inclusion in your email newsletter. This provides immense value to the brand and commands a price tag 5-10x higher than a single post.
Phase 3: Scaling to a Six-Figure Business (Year 2+)
If you've diligently climbed the monetization ladder, you'll have a profitable travel blog. You'll be earning a consistent, respectable income from ads, affiliates, and a few select brand deals. Congratulations—you've built yourself a great job.
But Phase 3 is about transcending that. It's about making the leap from content creator to business owner.

The objective here is to decouple your income from your time. It's about building systems and assets that generate revenue while you sleep, travel, or work on your next big project. This is where becomes a reality. You achieve this by creating and owning your own proprietary products.
The Ultimate Goal: Creating and Selling Your Own Digital Products
This is the endgame. This is the key to true financial independence and uncapped scaling. When you sell your own products, you control everything: the price, the profit margin (which is often 95% or higher), and the customer relationship. This is how the most successful bloggers build seven-figure brands, and we've compiled some top .
The best digital products are not born from a flash of genius. They are born directly from the problems you have been methodically solving for your audience all along. What questions do they ask you over and over again in your comments and DMs? What is their single biggest pain point?
Package the solution.

Examples of highly profitable digital products for travel bloggers include:
Hyper-Detailed Itineraries or Guides: Not a blog post, but a beautifully designed, downloadable PDF itinerary for a specific trip, complete with daily schedules, Google Map integrations, booking links, and insider tips they can't find anywhere else.
Niche E-books: A comprehensive guide to a topic you are an undisputed expert in, like "The Digital Nomad's Handbook to Visas and Taxes" or "The Complete Guide to Planning a Honeymoon in Greece," which you could model after our professional .
High-Value Templates: Notion or Google Sheets templates that help your readers organize their trip research, manage their budget, or track their credit card points. People will gladly pay a premium to save time and get organized.
Specialized Online Courses: High-ticket items ($200-$2,000+) that teach a specific, valuable skill, such as "Travel Photography for Beginners," "How to Land Your First Tourism Board Partnership," or "SEO for Travel Bloggers."
Once you've created your product, the next question is where to sell it. While you can set up your own storefront on your blog, a dedicated marketplace is often the fastest path to your first sale. By listing your products on the TrekGuider marketplace, you tap into a pre-existing audience of passionate travelers actively looking for resources. Our platform provides you with the tools to not only sell your digital guides and itineraries but also to publish your own blog content, view detailed statistics on views and engagement, and directly influence your sales through an integrated ecosystem designed for travelpreneurs.
Creating high-value products like detailed travel itineraries is a proven, winning model. To streamline this process, you can start with , which allows you to create professional, shareable plans your audience will love.
The potential here is limitless, and it is where you will build real, lasting, life-changing wealth.
Building an Email List: Your Most Valuable Asset
If your blog is your public storefront, your email list is your private VIP lounge. It is the single most valuable, durable, and critical asset in your entire business, for one simple reason: you own it. For a deep dive, explore our guide on .
Your Google rankings can fluctuate overnight. Instagram could shut down tomorrow. Facebook's algorithm is a black box. But your email list is a direct, unfiltered line of communication to your most loyal fans, and it is immune to the whims of algorithms.
It is the primary sales channel for launching your digital products and the ultimate tool for building a durable, long-term business.

Start building your list from day one—long before you have something to sell. Don't just put a "subscribe here" box in your footer. Offer a simple, valuable, and irresistible "lead magnet"—a freebie in exchange for an email address. This could be a one-page packing checklist like our , a 5-page PDF guide to the "Top 10 Mistakes to Avoid," or a simple spreadsheet template.
Nurture that list by sending regular, value-packed newsletters. Then, when it comes time to launch your e-book or course, you will have a warm, engaged audience of true fans who are ready and eager to buy from you. If you need help getting started, read our guide on How to Choose the Best Email Marketing Platform.
This three-phase plan is the exact blueprint for building a real business. But what does that business actually look like on a bank statement? Let’s pull back the curtain and talk about the numbers.
Financial Realities: A Data-Backed Look at Income & Timelines
It is absolutely crucial to have realistic expectations. Travel blogging is a marathon, not a sprint. The internet is littered with the ghosts of blogs started by people who expected to be earning thousands within a few months and quit when reality hit.
Profitability is a slow, steady climb built on relentless consistency. The numbers below are aggregated from dozens of public travel blog income reports to give you a realistic, no-fluff picture of what the journey often looks like when you follow this business plan.

These figures are not guarantees. They are a reflection of what is possible with a strategic, patient, and business-minded approach. Many bloggers never reach these numbers because they quit too soon, focus on the wrong things (like Instagram likes), or treat their blog like a diary instead of an asset. By following this plan, you put yourself on the path to joining the successful minority.
Frequently Asked Questions (FAQ Section)

How much do top travel bloggers make?
The most successful travel bloggers operate as full-blown media companies and can earn anywhere from $20,000 to over $100,000 per month. These figures are the result of 5-10+ years of work. Their income is highly diversified, coming from premium ads, a complex web of affiliate partnerships, a suite of their own digital products and courses, high-level brand ambassador deals, and sometimes even their own curated group tours. They have successfully transitioned from being "bloggers" to being brand CEOs.
Can you start a travel blog with no money?
While you can technically start on a free platform, it is a strategic dead end if your goal is to make serious money. As outlined in Phase 1, the minimum viable setup (domain and hosting) costs less than $100 for the entire first year. The question of how to become a travel blogger with no money is better framed as a lean startup. The most significant investment by far is your "sweat equity"—the hundreds of hours you will pour into creating exceptional content. If the initial $100 is a barrier, your first business goal should be to save that amount.
Is travel blogging dead or too saturated in 2026?
No, but the bar for entry is much higher. The era of the generalist "look at my cool life" travel diary is definitively over. The market is saturated with mediocrity, but there is more opportunity than ever for true experts who serve a specific niche. Readers and Google alike are rewarding authentic, deep, experience-based content over generic, AI-generated listicles. So, is travel blogging profitable in 2026? The answer is a resounding yes—for those who treat it like a business and commit to becoming the most helpful resource for a specific audience.
You have the business plan. Now it's time to get the tools to execute it.
The TrekGuider marketplace is built for this journey. Here, you can not only sell your digital products but also publish your own blog, track your stats, and grow your audience. To get started, download , a curated collection of 34 essential apps and resources designed to help you build your travel blog faster and smarter. For a complete A-to-Z resource on smarter travel, which will fuel your content for years, check out our .
Related Guides
- How to Make Money Blogging (From $0 to $10k/mo)
- How to Create a Digital Travel Guide People Will Buy
- 7 Digital Products That Sell Themselves for Travelers
- How to Make Money Online: A Creator's Guide for 2026
- Top 10 Travel Affiliate Programs for 2026
- 6 Proven Models to Make Money Online Blogging
- 5 Passive Income Ideas for Your Travel Blog
- Email Marketing for Bloggers: A Step-by-Step Playbook
- How to Start a Travel Blog (And Get Noticed)
- 15 Travel Blog Niche Ideas with Low Competition
Don't Miss Out! Subscribe for Exclusive Content
SubscribeComments 0
No comments yet
Be the first to share your experience!
Dont Miss Out! Subscribe for Exclusive Content

FTC Affiliate Disclosure Essentials: Stay Compliant as a Travel Creator

Essential Affiliate Tools: From Tracking to Full Optimization

Avoid These 5 Affiliate Landing Page Mistakes for Better Conversions

Affiliate Keyword Research Mastery for Travel Blogs

Booking.com Affiliate Program Review: Pros, Cons, and Earnings Potential

Decoding Affiliate Commission Rates: Benchmarks for Travel Creators
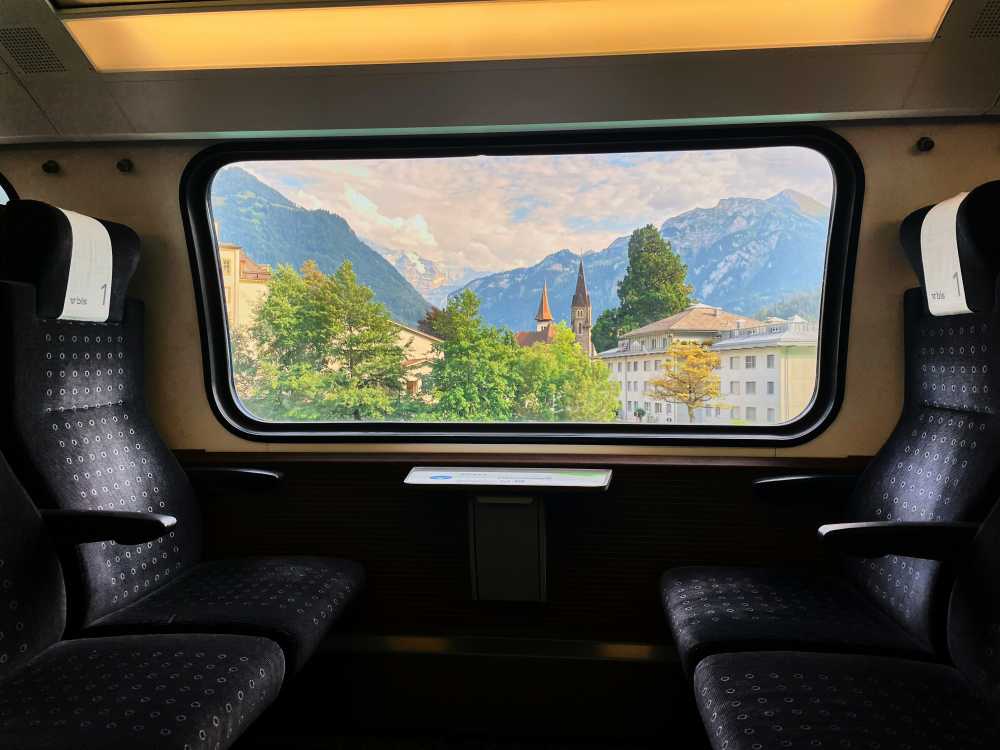
How to Solo Travel Europe: A Step-by-Step First-Timer's Plan
TrekGuider @trekguider
You have a dozen tabs open, a saved folder of dream destinations on Instagram, and that creeping sense of anxiety that it’s all just too complicated. The dream of wandering through Parisian streets or watching a sunset in Lisbon feels buried under an avalanche of questions about budgets, safety, and the fear of being utterly alone. You're stuck in analysis paralysis, and the excitement is slowly being replaced by dread.
You don't need another list of vague 'tips.' You need a plan.
This guide is that plan. This is your complete roadmap for solo travel in Europe. We will walk you through every single step, from your first budget spreadsheet to your first solo dinner abroad, turning your overwhelming 'what ifs' into a confident, resounding, 'I'm ready.'

From Jitters to Jet-Set: Your Four-Week Plan to Conquer Pre-Trip Anxiety
The single greatest weapon against travel anxiety is a competent, actionable plan. Every item you check off a list is a small victory, a piece of tangible proof that you are capable and in control. This guide will provide the specific, step-by-step strategy for your European adventure. But before we dive in, it's vital to build a strong foundation. For a complete overview of the core principles and mindset needed for any solo journey, is the perfect place to start.
Your 4-Week Countdown: A Week-by-Week Planning Checklist
Transform anxiety into action by breaking down the process into manageable weekly goals.
4 Weeks Out: Finalize your budget and book your round-trip flights. Purchase comprehensive travel insurance (this is non-negotiable). Ensure your passport is valid for at least six months beyond your planned return date.
3 Weeks Out: Book your accommodation for the first city on your itinerary. Begin booking major train routes between countries, as prices often increase closer to the date.
2 Weeks Out: Plan your packing list and purchase any necessary gear, like a universal adapter or packing cubes. Notify your bank and credit card companies of your travel dates.
1 Week Out: Download offline maps (Google Maps) and language packs (Google Translate). Confirm all bookings and share your detailed itinerary with a trusted contact back home. Pack your carry-on.
Identifying Your Travel Fears (and How to Systematically Crush Them)
Write down your top three fears. Are they about safety? Loneliness? Getting lost? Now, for each one, write down one concrete, actionable step you can take to mitigate it.
Fear of safety? Research and book a hotel in a neighborhood with a high GeoSure Women's Safety score.
Fear of loneliness? Pre-book a group walking tour for your first full day in a new city.
Fear of getting lost? Spend 30 minutes on Google Street View "walking" the route from your arrival airport/train station to your hotel. Familiarity breeds confidence.
How to Master Your Money in Europe
Financial stress can suffocate an otherwise amazing trip. A clear, realistic budget is an act of self-care that empowers you to enjoy your adventure without worry. Understanding the real costs of solo travel in Europe is the first step to financial freedom on the road.
How Much Does a Solo Trip to Europe Actually Cost?
Let's talk numbers. While your personal travel style is the biggest variable, here are some realistic daily budgets to anchor your planning (these exclude flights):
The Budget Backpacker: $50 - $75/day. This means staying in hostel dorms, cooking some of your own meals, focusing on free activities like walking tours, and using buses or pre-booked trains.
The Mid-Range Explorer: $100 - $175/day. This allows for private rooms in hostels or budget hotels, a mix of restaurant meals and street food, museum entries, and more comfortable train travel.
The Comfort Seeker: $200+/day. This budget accommodates boutique hotels, multi-course dinners, guided tours, and last-minute travel plans.

Destination Cost Tiers
Not all of Europe is priced equally. Stretch your budget further by focusing on these regions:
Budget-Friendly: Portugal, Spain, Czechia, Hungary, Poland, and the Balkan countries (Croatia, Albania, Bosnia and Herzegovina).
Mid-Range: Italy, Germany, France (outside of Paris), Ireland, Slovenia.
Splurge-Worthy: Switzerland, Iceland, Norway, Denmark, Sweden, and the United Kingdom (especially London).
Pro-Tip: The easiest way to save money on food is to make lunch your main meal. Many European restaurants offer a prix fixe lunch menu (menu of the day) which includes multiple courses for a fraction of the evening price.
Choosing Your Perfect First Solo Adventure
Your first destination should be a launching pad for success. Prioritize countries known for safety, excellent tourist infrastructure, and ease of navigation. This isn't about being unadventurous; it's about setting yourself up for a win.
For the Cautious Explorer: The 5 Safest & Easiest Countries for a First Trip
These countries consistently rank high on the Global Peace Index and are incredibly welcoming to solo travelers.
Portugal: Safe, affordable, fantastic public transport, and English is widely spoken in tourist areas. Lisbon is arguably the perfect first-time solo travel city.
Iceland: Staggeringly safe with otherworldly landscapes. Ideal for nature lovers. Easy to navigate with tours, though it is expensive.
Slovenia: A hidden gem. It has the beauty of Switzerland at a fraction of the cost, is incredibly safe, and is small enough to explore thoroughly.
Ireland: Famously friendly locals, easy to navigate, and a cozy pub culture that makes it easy to strike up a conversation.
Austria: Clean, efficient, and beautiful. Vienna is a solo traveler's dream with its cafe culture and walkable city center.

Understanding the Schengen Zone: How to Maximize Your 90 Days
For U.S. citizens, the Schengen Area is a collection of 27 European countries that have abolished internal border controls. You can travel freely between these countries for up to 90 days within any 180-day period without a visa. Be sure to track your days carefully if you're planning a longer trip. Countries like the UK and Ireland are not in the Schengen Zone and have their own entry rules.
Navigating Europe Like a Pro
Europe's transportation network is a marvel of efficiency. Mastering it is a core skill that transforms you from a tourist into a traveler.
Flights vs. Trains vs. Buses
Flights: Use budget airlines like Ryanair or EasyJet for long distances (e.g., Lisbon to Rome). Book well in advance and be ruthless about their baggage weight limits to avoid exorbitant fees.
Trains: The best option for distances under 5 hours. It’s scenic, comfortable, and delivers you directly to the city center. A Eurail pass can be cost-effective if you plan on frequent, long-distance train travel, but always compare the pass price to buying individual tickets in advance.
Buses: The cheapest, but slowest, option. Companies like FlixBus and BlaBlaCar Bus are great for budget-conscious travelers and for routes not well-served by trains.
A Beginner's Guide to Navigating Europe's Train Systems
Booking trains can feel intimidating. The key is using the right tools. Apps like Trainline or Omio are great for comparing options, but they sometimes add a small service fee. For the best price, go directly to the website of the country's national rail service (e.g., Deutsche Bahn in Germany, Trenitalia in Italy).
Pro-Tip: In some countries (like Italy and France), you must validate your paper ticket in a small machine on the platform before boarding. Forgetting this step can result in a steep fine. When in doubt, watch what the locals do!
Finding Your Home Away From Home
Where you sleep is your sanctuary. It’s your base of operations, your charging station, and your place to feel secure.
Hostels vs. Hotels vs. Airbnbs for Solo Travelers
Hostels: The best choice for budget and social connection. Modern hostels offer private rooms, female-only dorms, and organized social events. They are the easiest place to meet fellow travelers.
Hotels: The right choice when you prioritize privacy, comfort, and security. A hotel gives you a guaranteed quiet space to decompress after a long day of exploring.
Airbnbs: Can offer great value and a local feel, but can also be isolating. For a first-timer, a "private room" in a host's apartment is a good middle ground, offering a local connection with more privacy than a hostel.
How to Pick a Safe and Social Hostel (Even If You're Not 21)
Read recent reviews like a detective, specifically filtering for "solo traveler" or "solo female traveler." Prioritize properties with:
24-hour reception
Secure individual lockers (bring your own padlock)
A well-lit, central location
Organized events like walking tours or group dinners

Your Guide to Staying Safe and Savvy on a Solo Travel in Europe
Let’s be clear: safety isn't about paranoia; it's about preparation. It's the quiet confidence that comes from being aware and intentional, which makes you a less appealing target from the start.
Blending In and Walking with Purpose
Dress to blend: Observe what local women are wearing. Ditching the tourist "uniform" of athletic wear can help you stand out less.
Walk with confidence: Even when lost, walk like you know where you're going. Duck into a cafe or shop to consult your map rather than stopping in the middle of the sidewalk.
Avoid "distracted" behaviors: Keep your phone away when walking through crowded areas. Being present and aware of your surroundings is your number one deterrent.
Proven Tactics to Beat Pickpockets
Major European cities are notorious for pickpockets who target distracted tourists.
Use a crossbody bag worn in front of your body, always with the zipper closed.
Never put your phone or wallet in your back pocket.
At restaurants, don't hang your bag on the back of your chair or place your phone on the table. Keep your belongings in your lap.
The Art of Solo Socializing
One of the biggest anxieties about a solo travel Europe trip is loneliness. The beauty of it is that you are in complete control of your social meter. You can dial it up or down at will.
How to Confidently Eat Alone (and Actually Enjoy It)
Reframe this act. It's not a sign of loneliness; it's a moment of luxurious self-indulgence.
Sit at the bar: It's more casual and invites conversation with the bartender or neighbors.
Bring a prop: A book signals "I'm content," while a journal signals "I'm an interesting person reflecting on my day."
Engage with the experience: Focus on the food. Take notes. Be present. You'll forget to feel self-conscious.

5 Easy Ways to Meet Other Travelers
Free Walking Tours: The #1 hack. Instant group for a few hours.
Cooking Classes: A shared activity is a natural icebreaker.
Hostel Common Areas: Simply being present in these spaces makes you approachable.
Meetup.com: Find events for locals and expats interested in everything from hiking to language exchange.
Small Group Day Trips: Use platforms like GetYourGuide or Viator to join tours to nearby attractions.
Your Solo Travel Europe Questions, Answered
What is the best European country to visit for the first time alone?
For its unbeatable combination of safety, affordability, friendly locals, and excellent tourist infrastructure, Portugal is widely considered the best choice for a first-time solo trip in Europe.
Is Europe safe for a young solo female traveler?
Yes, overwhelmingly so. By choosing safe destinations, practicing situational awareness, and following standard safety protocols like those outlined in this guide, Europe is an incredibly safe and rewarding place for solo female travelers.
How do I handle language barriers when traveling alone?
In most major tourist destinations, English will be sufficient. However, learning a few key phrases in the local language ("Hello," "Please," "Thank you," "Excuse me") shows respect and will be greatly appreciated. Use the Google Translate app's offline and camera features for menus and signs.
The journey of solo travel in Europe is one of the most empowering experiences a person can have. It will challenge you, thrill you, and teach you more about your own resilience and capability than you thought possible. You've read the plan, you have the tools, and you understand the strategies. The fear you feel now will be a distant memory the moment you navigate a new city's metro system by yourself for the first time. That feeling of profound competence and freedom is what awaits. The adventure is yours to claim.
Read the full guide: Anxious to Adventurous: The Ultimate Guide to Solo Travel Confidence
Don't Miss Out! Subscribe for Exclusive Content
SubscribeComments 0
No comments yet
Be the first to share your experience!
Dont Miss Out! Subscribe for Exclusive Content

Ultimate USA Holidays Guide: Top Picks
FTC Affiliate Disclosure Essentials: Stay Compliant as a Travel Creator
Essential Affiliate Tools: From Tracking to Full Optimization
Booking.com Affiliate Program Review: Pros, Cons, and Earnings Potential
Decoding Affiliate Commission Rates: Benchmarks for Travel Creators
