Christmas SF: Lights & Wharf Wonders
TrekGuider @trekguider
Are you dreaming of a Christmas getaway filled with postcard-perfect lights and unique holiday cheer, but feel paralyzed by the options in a city as dynamic as San Francisco? You want to soak in the magic, but you’re haunted by the fear of missing the best spots, getting stuck in tourist traps, or wasting your precious vacation time navigating crowds instead of making memories. The anxiety of a poorly planned trip can extinguish the holiday spirit before it even has a chance to ignite.
Imagine the frustration: you’ve spent hours researching, only to end up with a mediocre view of a famous light display, shoulder-to-shoulder with a thousand other people. You risk missing out on the distinctly San Franciscan holiday traditions—the ones that fuse historic charm with stunning coastal beauty—and settling for a generic experience you could have had anywhere. Without a clear strategy, your festive adventure can devolve into a logistical nightmare.
This is your definitive guide to avoiding that fate. We’ve forged the ultimate itinerary, focusing laser-like on the city’s most dazzling illuminations and waterfront spectacles. This deep dive will ensure your Christmas in San Francisco is not just a trip, but a masterfully curated collection of magical moments. Think of this as your specialist mission. After getting the high-level overview of the city's entire festive calendar in our guide to San Francisco Holidays: Bay Area Buzz, you're now ready for the deep dive into the twinkling heart of a Bay Area Christmas.

Union Square: The Epicenter of Christmas in San Francisco
Forget what you think you know about a California Christmas. In San Francisco, the holiday season doesn't just arrive; it makes a grand entrance, and Union Square is its glittering, floodlit stage. The air here crackles with a unique energy, where the city’s high-fashion pulse is supercharged by a symphony of lights, music, and palpable joy. This is the undeniable starting point for any holiday tour, where the city’s most iconic traditions come to life.
The Macy's Great Tree: A Towering Beacon of Holiday Joy
Dominating the square like a festive titan, the Macy's Great Tree is the city's official holiday centerpiece. This colossal tree, soaring over 80 feet, is a spectacle of sustainability and sparkle, adorned with tens of thousands of energy-efficient LED lights and hundreds of shimmering ornaments. Its annual lighting ceremony in late November is a beloved ritual that officially flips the switch on the holiday season in San Francisco, drawing enormous crowds for an evening of live music and celebration.
Pro-Tip: For a truly breathtaking, crowd-free view, head inside the adjacent Macy's. The upper floors offer a panoramic perspective of the entire square. The best-kept secret is the view from the Cheesecake Factory on the 8th floor, where you can gaze down upon the tree and ice rink like a VIP.

Ice Skating Under the Lights: A Classic Winter Tradition
There's a certain magic in gliding across the ice under the watchful gaze of a giant Christmas tree, with the city's skyscrapers twinkling all around you. The Safeway Holiday Ice Rink in Union Square delivers this quintessential winter experience with a distinctly urban flair. Open from early November through mid-January, the rink offers 60-minute sessions that are pure, unadulterated holiday fun.
The atmosphere is electric, fueled by a soundtrack of holiday classics and the collective laughter of skaters. Whether you're executing perfect figure eights or clinging to the wall for dear life, lacing up your skates here is a non-negotiable part of the San Francisco Christmas experience. The evening sessions are especially enchanting, as the city lights create a dazzling, reflective canopy over the ice. Book your tickets online well in advance to secure your spot.
Window Shopping & Festive Displays: A Stroll Through Holiday Artistry
Union Square is San Francisco's luxury shopping heartland, and during Christmas, the storefronts become captivating galleries of festive art. Retailers like Saks Fifth Avenue, Neiman Marcus, and Tiffany & Co. engage in a friendly competition to create the most jaw-dropping holiday window displays. A simple stroll around the square becomes a visual feast of complex designs, whimsical animatronics, and brilliant lights.
The most heartwarming tradition, however, belongs to Macy's. For decades, their partnership with the SF SPCA has filled their windows with adorable, adoptable puppies and kittens playing in festive settings. It’s a guaranteed dose of holiday cheer that also helps countless animals find their forever homes.
Fisherman's Wharf & The Piers: Coastal Christmas Charm
If Union Square is the city's elegant holiday ballroom, Fisherman's Wharf is the lively waterfront party. Here, the festive spirit is infused with the salty air of the bay, offering a uniquely San Franciscan take on Christmas where twinkling lights meet maritime history.
PIER 39's Dazzling Christmas Tree & Sea Lion Spectacle
Giving the downtown tree a run for its money, PIER 39 erects its own majestic, 60-foot Christmas tree right at the entrance. This tree is the star of a nightly, synchronized light-and-music show that runs every half hour, bathing the pier in a dynamic kaleidoscope of color. It’s a fun, high-energy spectacle perfect for families.
What makes this experience uniquely San Franciscan is the audience: the famous sea lion colony barking from K-Dock, providing a chaotic, natural soundtrack. This quirky juxtaposition of organized holiday cheer and wild nature is pure San Francisco.
Ghirardelli Square: Chocolate, Lights, and Historic Splendor
A short, scenic walk from the main wharf leads you to the historic Ghirardelli Square, which offers a more refined and cozy holiday atmosphere. The beautiful brick architecture of the former chocolate factory is elegantly draped in lights, with a grand Christmas tree anchoring the main plaza. The iconic, glowing Ghirardelli sign serves as a beacon over the bay.
A visit here is an assault on the senses in the best possible way. The aroma of warm chocolate hangs in the air, drawing you into the Ghirardelli Chocolate Marketplace for a world-famous hot fudge sundae or a rich, soul-warming hot cocoa. It’s the perfect place to refuel and pick up beautifully packaged holiday gifts.

The Illuminated Boat Parade: A Floating Festival of Lights
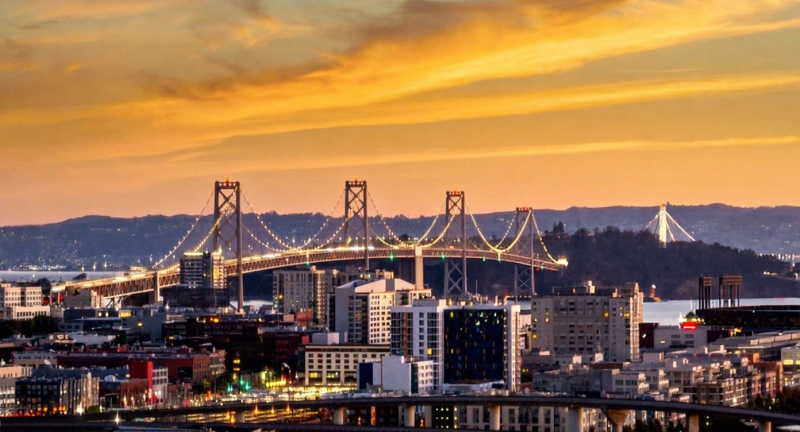
For a truly unforgettable waterfront event, align your visit with the Fisherman's Wharf Lighted Boat Parade. As one of the oldest and largest in the country, this annual tradition is a spectacular display of maritime merriment. A fleet of fishing boats, sailboats, and private yachts, all decked out in elaborate holiday lights, parade along the waterfront from PIER 39 past the Marina Green. The sight of these floating light sculptures against the dark waters of the bay, with the Golden Gate Bridge in the distance, is pure magic. Prime viewing spots can be found at Aquatic Park, PIER 39, and anywhere along the Marina Green.
Beyond the Hubs: More Dazzling Christmas in San Francisco Lights
While the main hubs are essential, some of the city's most enchanting displays are found elsewhere. San Francisco is a city of neighborhoods, and venturing out reveals a more local and often more creative side of the holiday season.
Golden Gate Park's "Entwined": A Forest of Light
For a holiday experience that speaks to San Francisco's identity as a hub of art and technology, you must visit "Entwined" in Golden Gate Park. Each year, Peacock Meadow is transformed into an otherworldly forest of light by artist Charles Gadeken. This immersive, large-scale installation features towering, tree-like sculptures and geometric shapes illuminated by thousands of color-changing LEDs. Wandering through this dreamlike landscape as the lights shift through mesmerizing patterns is a captivating experience that feels a world away from the urban bustle.
The Fairmont Hotel's Giant Gingerbread House: A Sweet Spectacle
Ascend to the top of Nob Hill to witness one of the city's most beloved—and delicious—holiday traditions. The historic Fairmont San Francisco constructs a two-story, life-sized gingerbread house in its grand lobby. Made from thousands of real gingerbread bricks, gallons of royal icing, and a dizzying amount of candy, this edible marvel is a feast for the senses. You can even walk through it, breathing in the sweet, spicy aroma of gingerbread. The hotel's opulent lobby, with its own massive Christmas tree, completes the fairy-tale setting.
Neighborhood Lights: Discovering Local Gems
To truly capture the spirit of Christmas in San Francisco, take a tour of the residential neighborhoods where locals pour their hearts into decorating.
Tom and Jerry's House (3650 21st St.): A legendary, over-the-top display in the Castro featuring a giant tree, massive stockings, and a working ski lift for dolls.
45 Upper Terrace: Another famous private home known for its dazzling, multi-story cascade of lights and festive figures.
Sea Cliff: For a more elegant and professionally curated experience, a drive through this affluent neighborhood offers stunning views of stately homes adorned in sophisticated holiday decor.

Planning Your Perfect San Francisco Christmas Adventure
A little strategic planning will ensure your holiday trip is seamless and stress-free, allowing you to focus on the magic.
Getting Around: Mastering the City's Grid
San Francisco is famously compact, but its hills are no joke. Public transportation is your greatest asset.
Muni System: The city's network of buses and historic streetcars can get you almost anywhere. The F-line streetcar offers a wonderfully scenic route along the waterfront.
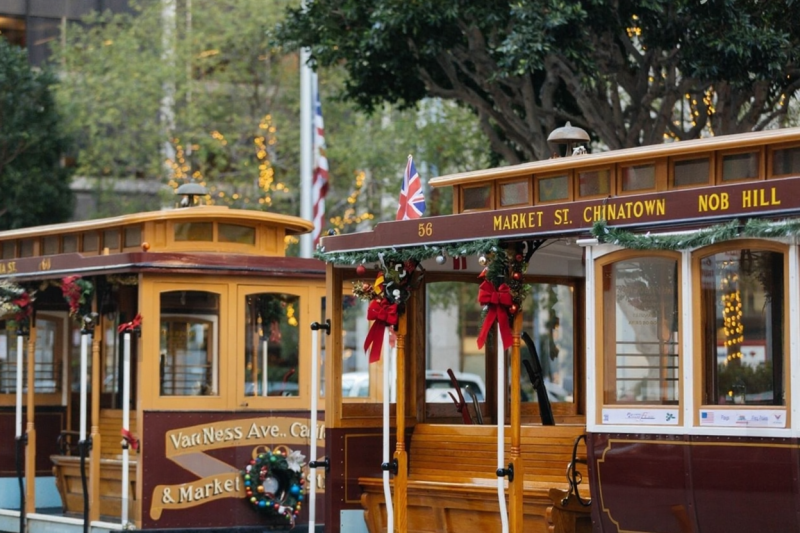
Cable Cars: While more of a moving landmark than practical transport, a ride on a festively decorated cable car is an iconic experience. Just be prepared for long lines.
Walking: The best way to soak in the details of Union Square and the Wharf. Wear your most comfortable shoes—you'll thank yourself later.
What to Pack: The Art of Layering
San Francisco's winter weather is a master of disguise. Mild sunshine can give way to bone-chilling wind and fog in an instant. The golden rule is to dress in layers. A base layer, a sweater or fleece, and a windproof/waterproof jacket will serve you well. A hat and gloves are essential for evenings by the bay.
Traveling with family adds another layer of complexity to packing and planning. The journey itself can be the most daunting part of a family vacation. To ensure your trip to the Bay Area starts smoothly, we’ve created the ultimate resource for parents. Make your travel day as joyful as your destination with our Stress-Free Flying with Kids Guide.
Your Unforgettable San Francisco Christmas Awaits
From the colossal, glittering tree in Union Square to the salty, sea-lion-serenaded festivities at Fisherman's Wharf, a Christmas in San Francisco is an experience that engages all the senses. You are now armed with the insider’s map to the city’s most brilliant lights, cherished traditions, and unique coastal wonders. You are empowered to craft a holiday itinerary filled with genuine magic and unforgettable memories, far from the generic tourist trail.
This deep dive into San Francisco's festive glow is just one chapter in the great American holiday story. The entire country is a mix of incredible celebrations, each with its own unique flavor. To continue your journey and plan your next great adventure, explore our comprehensive Travel Guide.
Don't Miss Out! Subscribe for Exclusive Content
Subscribe


Comments 0
No comments yet
Be the first to share your experience!
Dont Miss Out! Subscribe for Exclusive Content

San Francisco Cherry Blossoms: A Local's Guide to the Blooms

Halloween SF: Haunts Without Horrors

SF Festivals: 7 Must-See Lineups

SF Pride: 6 Route & Party Hacks

Chinese New Year SF: Parade Essentials

San Francisco Holidays: Bay Area Buzz
How to Start a Travel Blog (And Get Noticed)
TrekGuider @trekguider
You have a passion for travel that borders on obsession. Your camera roll is a treasure map of untold stories, and your notes app is filled with the kind of hard-won wisdom that could save a fellow traveler time, money, and stress. The idea of starting a travel blog feels like the perfect way to share it all—a potential path to a life with more freedom and adventure.
But there’s a problem. The moment you consider the "how," a wave of technical overwhelm washes over you. Domains, hosting, WordPress, plugins, SEO—it’s a foreign language, a dense fog of conflicting advice that makes the entire project feel intimidating and out of reach. You see other creators living the dream, and you're stuck in analysis paralysis, believing you need to be a web developer just to get started. Every day you wait, you feel the immense opportunity of the creator economy—a market projected to swell from $250 billion to nearly $500 billion by 2027—slipping through your fingers.
Forget the confusion. This is the guide that cuts through the noise. The old way of starting a travel blog is dead. You don't need to build a website from scratch. This is your chronological, step-by-step playbook that will show you how to start a travel blog presence on a powerful marketplace, letting you focus on what you do best: creating. We'll walk you through building a professional home for your brand in minutes, not months. This is your A-to-Z blueprint for building the foundational asset of your future business. Once this home base is built, you can begin the journey of transforming it into a real enterprise, a journey we map out in our ultimate guide to How to Make Money Online: A Creator's Guide for 2026.
Why a Marketplace? The Smarter Foundation for Your Creator Empire
Before we dive in, it's critical to understand why starting on a creator marketplace like TrekGuider is a fundamentally better strategy than building a self-hosted blog from scratch. While owning a website was once the only path, today it's a detour filled with technical headaches, maintenance costs, and the slow, grinding challenge of building traffic from zero.
The most resilient and profitable creators still operate on a "Hub-and-Spoke" model, but the "hub" has evolved.
The Old Hub: A self-hosted blog you have to build, manage, and secure yourself.
The New Hub: Your professional creator page on a marketplace like TrekGuider. This is the core business asset you control, supercharged with a built-in audience, e-commerce tools, and the collective SEO power of the entire platform.
The Spokes: Social media platforms remain your powerful distribution channels, used to capture attention and drive traffic back to your new, high-powered hub.
Starting on a marketplace isn't just about creating a profile; it's about plugging into a pre-built ecosystem designed for your success. You get to skip the entire technical setup and focus day-one on content and commerce.

The Strategic Blueprint – Nailing Your Niche
Even on a powerful platform, the single biggest real advantage you can give yourself is specificity. Trying to be a travel expert for "everyone" is a recipe for getting lost in the noise. Choosing a well-defined niche allows you to build authority faster, attract a dedicated audience, and stand out in a catalog of creators.
How to Find a Profitable Niche
A successful niche sits at the intersection of three circles: your genuine passion, your audience's pressing problems, and its potential for profitability. Before you commit, you must validate your idea.
Keyword & Platform Search: Use keyword research tools to check Google search volume, but also search within the marketplace itself. Are other creators successfully selling products in this niche? Is there a healthy amount of interest? This is your data-driven sign of audience demand.
Competitor & Market Analysis: The presence of a few successful creators in your niche is a good thing; it proves a market exists. Analyze their products, articles, and pricing. If others are generating revenue, it validates the niche's commercial potential.
5 Promising Travel Blog Niche Ideas to Spark Inspiration
To get your brainstorming started, here are five less-saturated niches with huge potential for 2026:
Eco-Friendly & Sustainable Travel: Focus on low-impact tourism, conservation-focused experiences, and green-certified brands. This niche attracts a passionate, value-driven audience.
Remote Work & "Workation" Travel: Become the go-to resource for digital nomads by creating guides on finding reliable WiFi, navigating visa requirements, and discovering the best long-term accommodations.
Culinary Tourism (Hyper-Niche): Don't just be a "food travel" blog. Go deeper. Focus on a specific cuisine (e.g., "Exploring the Regional Cuisines of Southern Italy") or a dietary need (e.g., "A Vegan's Guide to Japan").
Accessible Travel: A critically underserved and deeply important niche. Create practical guides and resources for travelers with disabilities, focusing on wheelchair-accessible hotels, attractions, and transportation.
Micro-Destination Blog: Instead of trying to cover the world, become the undisputed expert on a single city, region, or small country (e.g., "The Ultimate Guide to Visiting Malta"). You can dominate local affiliate partnerships and product sales for that area.
How to Start a Travel Blog on a Marketplace – Your 10-Minute Setup
This is where you leapfrog months of technical work. Instead of wrestling with hosting and code, you'll build a professional home for your brand in less time than it takes to drink a cup of coffee.

Step 1: Claim Your Professional Creator Page
Getting started is simple. Navigate to the TrekGuider marketplace and register. The platform is actively creating pages for established bloggers using public data, so your first step is to search the author catalog to see if a page already exists for you.
If you find your page, you can claim it and gain full control.
If not, you can create a new one from scratch in minutes.
Step 2: Customize Your Digital Home Base
Your creator page is your professional landing page. It's designed to be your central hub, consolidating your entire brand in one place. Fill out every section to build trust and showcase your expertise:
Basic Information: Add a high-quality photo and a compelling bio that tells your story and explains who you help.
Social & External Links: Integrate your social media profiles and link out to any other personal websites or online stores you may have.
Monetization Tools: Enable the donation feature to allow your most loyal fans to support you through one-time payments or recurring subscriptions.
Step 3: Build Your Product Showcase
This is your integrated storefront. You don't need to install any clunky e-commerce plugins. Simply start uploading the digital products you want to sell:
Guides and E-books
Custom Maps and Routes
Itinerary Templates
The platform handles secure payment processing (via Stripe) and instant digital delivery, so you can focus on creating, not logistics.
The Foundational Content – Publishing on the Platform
With your digital home base established, it's time to furnish it with value. On a marketplace, you don't need to worry about building a blog from zero. Your mission is to publish 5-10 high-quality, in-depth articles directly to the platform's article section. This is your primary strategy for getting discovered.

Why Publishing on the Marketplace is a Superpower
Instant Audience: You tap into the marketplace's existing audience of passionate travelers who are already there to read articles and buy products.
Shared SEO Authority: You benefit from the domain authority of the entire platform, giving your articles a better chance to rank on Google much faster than a brand-new website.
Direct Traffic to Your Products: Every article you publish is linked back to your creator page, acting as a powerful, built-in funnel that drives readers directly to your product showcase and donation buttons.
Writing Your First Authority-Building Articles
Your first articles should be "key elements"—long, in-depth, evergreen posts that solve a major problem for your niche audience. Examples include:
A definitive guide to your niche destination (e.g., "The Ultimate First-Timer's Guide to Visiting Bali").
An exhaustive packing list (e.g., "What to Pack for a 2-Week Trip to Italy").
A detailed "how-to" post (e.g., "How to Plan a Trip to Japan on a Budget").
Feeling Overwhelmed by Trip Planning?
Creating a detailed itinerary is one of the most time-consuming parts of travel planning. To help you streamline the process for your own adventures—and to give you an example of a high-value resource you can one day create for your own readers—we've built the ultimate tool. Our comprehensive, plug-and-play itinerary template takes the stress out of organizing your next trip.
Download Your Free Plug-and-Play Itinerary Template Now
This type of high-value resource is exactly what your audience is looking for. Once you've created a helpful freebie, the next step is to package your unique expertise into a premium Travel Guide, which you can sell directly on your TrekGuider creator page to a global audience of passionate travelers.
Getting Noticed – The Basics of Promotion
With your page set up and a foundation of great content published, you can finally shift your focus to promotion.

Master Marketplace SEO From Day One
SEO is still your most critical long-term strategy, but now you apply it to the articles you publish on TrekGuider. For every post you write, you should:
Target a Keyword: Choose a specific phrase your ideal reader would search for.
Use the Keyword: Place your keyword naturally in the article's title, the first paragraph, and at least one subheading.
Optimize Images: Use descriptive file names and add "alt text" to every image.
Use Social Media as Your Amplifier
Your social media channels are your "spokes." Their job is to drive traffic back to your TrekGuider "hub." Share your newly published articles and link directly to your creator page or specific products in your social profiles. This creates a powerful feedback loop, funneling your existing audience to the place where they can best support you and buy your products.
Pro-Tip: Your creator page bio is your elevator pitch. It's the first thing a potential customer will read. Use it to tell a compelling story, clearly state who you serve, and explain the unique value you provide. This builds an instant, human connection that turns a casual browser into a loyal follower.
Frequently Asked Questions About Starting a Travel Blog
1. Is it free to start a travel blog on TrekGuider?
Yes. Creating your personal author page, publishing articles, and listing products is free. The platform makes money by taking a small, transparent commission on the products you sell, so we only succeed when you succeed.
2. Do I need my own website to use the marketplace?
No, and that's the biggest advantage. TrekGuider provides you with your own professional landing page, so you can have a credible, feature-rich home for your brand without any of the costs or technical hassles of building and maintaining your own site.
3. How does the platform help me get discovered?
The marketplace helps in two key ways: First, your articles and products are showcased to the platform's entire audience of travelers. Second, by publishing on a high-authority domain, your content has a much better chance of ranking on search engines like Google, attracting new users to the platform and, ultimately, to your page.
Your Journey Starts Now
The path from a vague dream to a published, professional travel blog presence is no longer a fog. It's a clear, actionable checklist. You now have the complete blueprint that details how to start a travel blog the modern, smarter way—by leveraging the power of a creator marketplace.
The most challenging part of any great journey is taking the first step. You have the map to a faster, more direct route. The only thing left to do is to begin your adventure.
SEO Meta Data Suggestions:
SEO Meta Title (58 characters): How to Start a Travel Blog in 2026 (Beginner's Guide)
URL Slug: how-to-start-a-travel-blog
SEO Meta Description (154 characters): A step-by-step guide for beginners on how to start a travel blog. Learn how to choose a niche, set up your creator page, and publish content that gets noticed.
Read the full guide: The Travel Blog Business Plan: How to Make Real Money in 2026
Don't Miss Out! Subscribe for Exclusive Content
SubscribeComments 0
No comments yet
Be the first to share your experience!
Dont Miss Out! Subscribe for Exclusive Content

FTC Affiliate Disclosure Essentials: Stay Compliant as a Travel Creator

Essential Affiliate Tools: From Tracking to Full Optimization

Avoid These 5 Affiliate Landing Page Mistakes for Better Conversions

Affiliate Keyword Research Mastery for Travel Blogs

Booking.com Affiliate Program Review: Pros, Cons, and Earnings Potential

Decoding Affiliate Commission Rates: Benchmarks for Travel Creators
Lollapalooza: 7 Stage-Hopping Tips
TrekGuider @trekguider
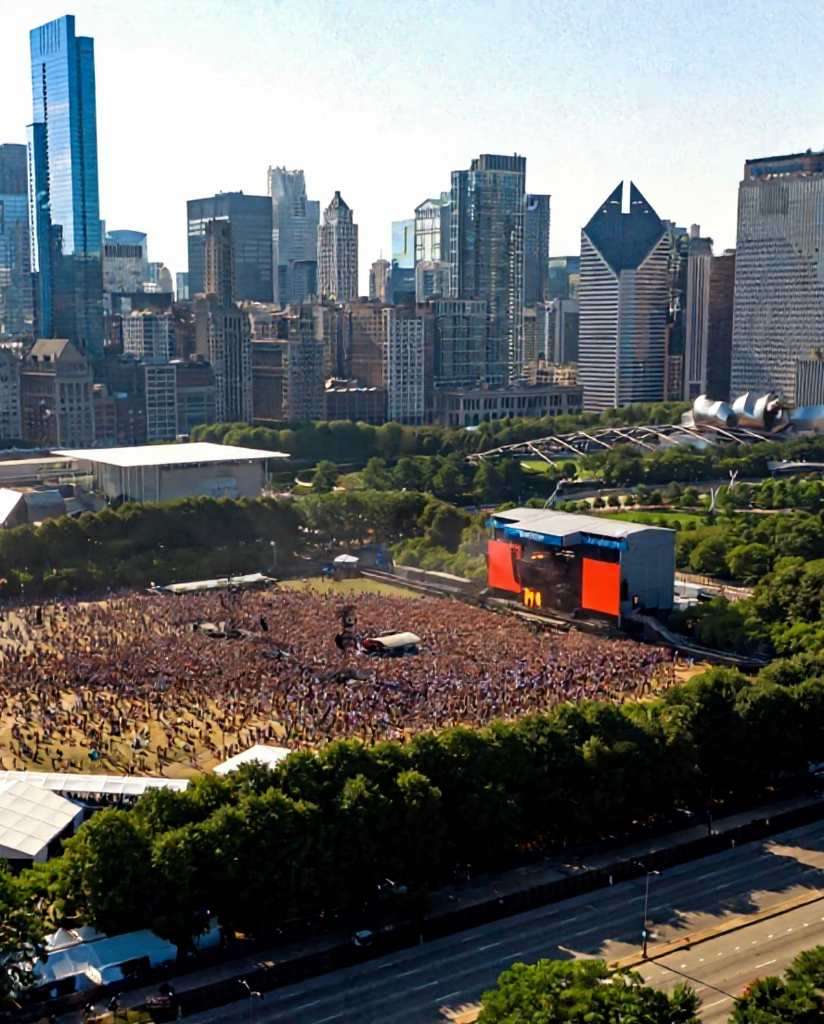
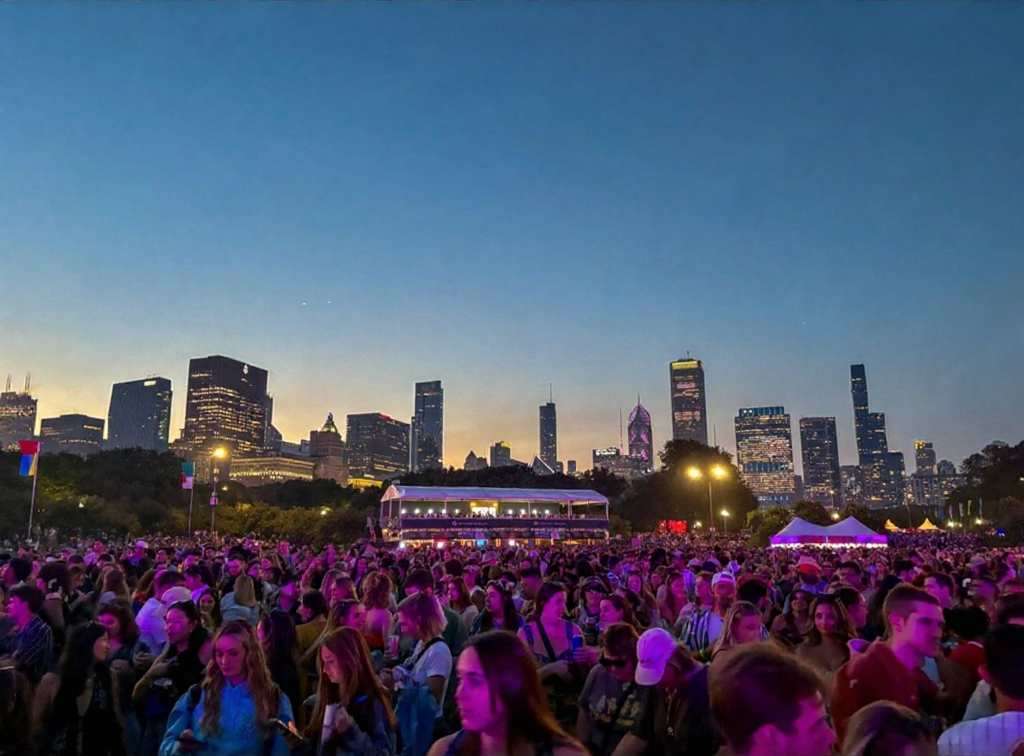
You’ve done it. You scored the golden ticket to Lollapalooza, the four-day musical marathon that transforms Chicago’s Grant Park into the center of the universe. But now, staring at a schedule that looks more like a complex circuit board than a concert lineup, the reality sets in. Dozens of artists you’re dying to see are scattered across a dozen stages, their set times overlapping in a cruel twist of fate. The sheer scale of the festival, with its massive crowds and sprawling grounds, suddenly feels less like a dream and more like a daunting logistical nightmare.
The anxiety begins to bubble. You picture yourself spending half the day trudging from the T-Mobile stage at the south end to the Bud Light stage at the north, only to arrive sweaty, exhausted, and just in time to hear the final chords of your favorite song. The fear of missing out becomes a palpable threat, turning the promise of unforgettable musical moments into a frantic race against the clock. Without a rock-solid plan, your festival experience could be defined by endless walks, missed opportunities, and the nagging feeling of being perpetually in the wrong place. This isn't just about seeing bands; it's about conquering one of the keystone events in a city known for its epic celebrations, a true highlight among the many experiences we cover in our definitive guide to Chicago Holidays: Windy City Thrills.
Forget the stress. This guide is your strategic playbook for navigating the glorious chaos of Lollapalooza Chicago. We’re breaking down the art of stage-hopping into seven actionable, pro-level tips that will transform you from a frantic fan into a festival veteran. From mastering the map before you even step foot in Grant Park to planning a seamless exit, these strategies will ensure you maximize your time, conserve your energy, and catch every single performance on your must-see list.
1. Become a Pre-Festival Master of the Map & Schedule
The biggest mistake a Lollapalooza rookie can make is showing up and trying to figure it all out on the fly. Grant Park is a massive urban oasis, and when it’s filled with stages, vendors, and hundreds of thousands of people, it becomes a complex, pulsating labyrinth. Your success begins long before you scan your wristband.
Download the Official App Immediately
Long before you even think about packing, your first move is to download the official Lollapalooza app. Consider it your digital command center for the entire weekend, running from July 31 to the final day of the festival. The app provides the most up-to-date schedule, a detailed festival map, and, most importantly, real-time push notifications. If a set time changes, a stage is delayed, or a surprise guest appears, the app will be the first to tell you. It also sends out crucial emergency alerts, making it an indispensable tool for staying safe and informed.
Create Your Artist Tiers
Once the full schedule drops, it’s time for strategy. Open the lineup—featuring titans like Olivia Rodrigo, Tyler the Creator, Sabrina Carpenter, and A$AP Rocky for the 2026 festival—and categorize every artist into two simple lists:
Tier 1 (Must-See): These are your non-negotiables. The artists you bought the ticket for. You will be at their set, no matter what.
Tier 2 (Nice-to-See): These are the artists you’d love to catch if the timing and location work out. They are your flexible options, the happy bonuses.
This simple act of prioritization is the bedrock of your stage-hopping plan. It allows you to build your day around your top-tier artists and fill the gaps with others, preventing the decision paralysis that comes from having too many choices.
Internalize the Grant Park Layout
Study the festival map like you’re planning a heist. The two main stages are typically located at the far north and south ends of Grant Park, a walk that can easily take 20-30 minutes through a thick crowd. Identify the locations of your Tier 1 artists and mentally map the routes between them. Note the locations of smaller stages, food courts (Chow Town), and, critically, the free water stations. Understanding the physical distances involved will help you make realistic calls about which back-to-back sets are doable and which are pure fantasy.

2. Master the "Perimeter Path" to Navigate Crowds
The center of any festival crowd is a slow-moving, densely packed sea of humanity. Trying to cut directly through the middle to get from one stage to another is a rookie move that wastes time and energy. The secret to swift movement is to think like a river, flowing where the resistance is lowest.
Stick to the Arteries
The most effective way to navigate Lollapalooza Chicago is by using the perimeter paths. Instead of plunging into the heart of the crowd, stick to the designated walkways along the sides. These paths, often lining the edges of the park or separating vendor areas, are the festival's arteries. While they may look like the longer route on a map, they are almost always faster than trying to push through a stationary audience. Make a mental note of these pathways when you first arrive.
Live by the 15-Minute Rule
If your next Tier 1 artist is on a stage across the park, you need to be ruthless with your timing. Implement the 15-Minute Rule: leave the current set 15 minutes before it ends. This gives you a critical head start, allowing you to exit the immediate crowd before the mass exodus begins when the music stops. It might sting to walk away from the end of a great performance, but that small sacrifice ensures you’re in a good position for the next one, rather than hearing it faintly from a quarter-mile away.
3. Hydrate and Fuel Like a Seasoned Athlete
Stage-hopping is a sport. You’ll be on your feet for 10 hours a day, walking several miles under the summer sun. You’re not just attending a concert; you’re entering a temporary city that generates a staggering economic impact—estimated at over $440 million. That scale demands respect and a bit of preparation.
Make Water Your First Priority
Lollapalooza provides free water refill stations throughout the grounds. When you first enter Grant Park, make it your mission to locate the station nearest the entrance and the stages you’ll be frequenting. Dehydration is the number one enemy of the festival-goer; it saps your energy, causes headaches, and can ruin your entire weekend. Make it a personal rule to refill your water bottle every single time you pass a station.
Pro-Tip: Bring a collapsible water bottle or an empty hydration pack. It's light, complies with security rules, and allows you to carry more water than a standard bottle. This means fewer trips to the refill station and more time enjoying the music.
4. Dress for a Four-Day Marathon, Not a Fashion Sprint
While Lollapalooza is a prime spot for people-watching and showing off your style, practicality should be your guiding principle. Your fashion choices can make or break your physical ability to enjoy the festival.
Your Shoes Are Your Most Important Gear
You will be walking and standing on concrete, grass, and uneven ground for hours on end. This is not the time for brand-new boots that need breaking in, flimsy sandals, or anything with a heel. Your number one priority should be comfortable, supportive, and already broken-in sneakers or walking shoes. Your feet are your foundation for the entire weekend; treat them well.
Prepare for All Four Chicago Seasons in One Day
Chicago weather is famously unpredictable. A day that starts hot and sunny can quickly turn cool and rainy. The key is to dress in layers. Start with a lightweight, breathable base layer and bring a flannel, hoodie, or light jacket that you can tie around your waist during the day and put on after the sun goes down. Most importantly, pack a poncho. It’s small, light, and will be an absolute lifesaver if a sudden downpour occurs.
5. Establish a "Home Base" for Your Crew
Navigating Lollapalooza Chicago with friends is a core part of the experience, but it’s incredibly easy to get separated. Cell service is notoriously unreliable when tens of thousands of people are trying to use it at once, so you can’t count on a text message or call to find your group.
Why a Meeting Point is Non-Negotiable
Before you even think about splitting up to see different artists, establish a clear, specific, and easy-to-find meeting point. This is your group’s "home base." If anyone gets lost, their phone dies, or you just need to regroup, everyone knows exactly where to go.
How to Choose a Good Spot
Don’t pick a generic spot like "the fountain" or "the food court." Choose a unique and unmistakable landmark. A good meeting point is something like, "the giant silver sculpture near the Buckingham Fountain" or "the corner of the 'Deep Dish' pizza stand in Chow Town." Pick a spot that is slightly away from the main walkways to avoid being constantly jostled. Check in at your home base at pre-determined times to ensure everyone is safe and accounted for.

6. Embrace the Journey Between the Stages
Stage-hopping isn’t just a commute; it’s an opportunity. The journey from one performance to another is part of the festival experience itself. Instead of seeing it as a chore, reframe it as a chance for discovery and inspiration.
Discover Your Next Favorite Band
As you walk the perimeter paths, you’ll pass smaller stages where artists you’ve never heard of are playing. Pause for a few minutes and listen. This is how you stumble upon incredible new music. Some of the most memorable Lollapalooza moments happen not at the massive headliner stages, but in the intimate settings of the BMI or Grove stages. Let your ears guide you.
Explore the Full Festival Experience
Lollapalooza is more than just a concert. It’s a massive cultural event filled with creativity. On your way from one stage to the next, take a detour through the art installations, check out the merch tents, or see what activations the sponsors have set up. This spirit of creative discovery is what fuels the best entrepreneurs. If you're feeling inspired by the artistry around you, channel that energy into your own project with our free Digital Product Ideas Guide. By exploring, you break up the monotony of walking and get a richer, more complete festival experience.

7. Plan Your Grand Escape in Advance
How you leave the festival is just as important as how you navigate it. At 10 PM, when the final headliner finishes, a massive wave of people will pour out of the Grant Park exits, creating a human traffic jam that can be overwhelming and slow.
Beat the Final Rush
Just as with the 15-Minute Rule for stage-hopping, consider leaving a few minutes before the absolute end of the night. Slipping out during the last song or just before the encore can save you up to an hour of being stuck in a slow-moving crowd. You’ll get to public transit or your rideshare pickup spot ahead of the main surge, which is a priceless advantage after a long day.
Know Your Public Transit Route Cold
The best way to get to and from Lollapalooza Chicago is by using the CTA rail system. Multiple downtown street closures make driving or using rideshares near the park a nightmare. Before the festival, identify the closest CTA station to your accommodation and memorize the route to and from the park exits. Having this plan locked in will prevent you from wandering aimlessly with a dead phone at the end of a long day.
Pro-Tip: If you must use a rideshare, set your pickup location several blocks away from the Grant Park exits. Walk away from the chaos and toward your pin. You'll escape the immediate surge pricing, and your driver will be able to find you much more easily than in the gridlock traffic near the festival grounds.
Your Blueprint for Lollapalooza Domination
The overwhelming scale of Lollapalooza can intimidate even the most enthusiastic music fan, but it doesn’t have to. With a strategic approach, the festival transforms from a logistical puzzle into the ultimate musical playground. By preparing in advance, navigating smartly, and taking care of your body, you shift from being a passive attendee to the master of your own experience. With these stage-hopping tips, you're now fully equipped with the knowledge of a seasoned pro, ready to conquer Lollapalooza Chicago and create a weekend of flawless, unforgettable memories.

Your Lollapalooza adventure is just one part of an incredible trip. To make the most of your time in the Windy City and beyond, check out our comprehensive Travel Guide. It’s packed with insider tips for exploring the best destinations across the USA.
Don't Miss Out! Subscribe for Exclusive Content
SubscribeComments 0
No comments yet
Be the first to share your experience!
Dont Miss Out! Subscribe for Exclusive Content
San Francisco Cherry Blossoms: A Local's Guide to the Blooms
Halloween SF: Haunts Without Horrors
SF Festivals: 7 Must-See Lineups

Christmas SF: Lights & Wharf Wonders
SF Pride: 6 Route & Party Hacks
Chinese New Year SF: Parade Essentials
Decoding Affiliate Commission Rates: Benchmarks for Travel Creators
TrekGuider @trekguider
You’re a travel creator, and you’ve entered the world of affiliate marketing to turn your passion into a profession. But you’ve quickly run into a frustrating black box: the commission structure. You see a dizzying array of percentages, acronyms like CPA and EPC, and vague promises of earnings. You’re left wondering what good affiliate commission rates even look like. Are you earning your worth, or are you leaving a significant amount of money on the table?
This confusion isn't just academic; it's a direct threat to your bottom line. The reported average monthly income for affiliates in the travel niche is an impressive $13,847, a figure that proves this is a serious enterprise. But you can't build a sustainable business on guesswork. Partnering with a program offering a flashy 40% commission—only to discover it’s 40% of their tiny margin—is a rookie mistake that costs real money. This lack of clarity makes it impossible to forecast your income, negotiate better terms, or build a truly predictable business. You feel like you’re flying blind.
This guide is your decoder ring. We are pulling back the curtain to give you a comprehensive breakdown of how affiliate commissions actually work. We will deconstruct every major commission model, provide clear, data-backed industry benchmarks, and teach you how to analyze these rates like a seasoned professional. By the end of this deep dive, you will be able to spot high-value opportunities and architect a monetization strategy that truly rewards your influence. For a complete overview of the affiliate landscape, our definitive pillar page, Travel Affiliate Programs: The 2026 Ultimate Guide, is your essential command center.

The Anatomy of a Commission: Deconstructing the Core Models
Let's cut through the jargon. An affiliate commission is simply a reward for a job well done. A company—the merchant—pays you for successfully driving a specific, valuable action, which in the travel world almost always means a completed booking or sale.
But the way that reward is calculated can vary dramatically. Understanding the underlying structure of different affiliate commission rates is the first step toward becoming a high-earning creator.
1. Cost Per Sale (CPS) or Pay Per Sale (PPS): The Industry Workhorse
You'll encounter this model most often—it's the industry's workhorse for a reason. It’s simple and transparent: when a reader clicks your affiliate link and completes a purchase, you earn a percentage of the total sale value. If you recommend a $500 hotel stay and the program offers a 6% CPS commission, you earn $30. This model directly ties your earnings to the revenue you generate, making it the gold standard for most travel bookings and gear sales.
2. Cost Per Action (CPA): Rewarding a Specific Step
CPA is a broader model where you’re compensated for a specific action a user takes. While that action is often a sale (making it identical to CPS), it can also be something else. For example, a travel credit card company might pay you a CPA commission for every user who completes an application, regardless of whether they are approved.
3. Cost Per Lead (CPL): Paying for High-Value Inquiries
With a CPL model, you earn a fixed fee for each qualified lead you generate. This is common in high-ticket travel sectors where the sales cycle is long. A luxury tour operator, for instance, might pay you $50 for every user who fills out a detailed inquiry form for a bespoke African safari. You get paid for delivering a potential customer; their sales team takes it from there.
4. Tiered & Multi-Tier Structures: Incentivizing Growth
This is where commission models get more sophisticated and rewarding.
Tiered Structures: Rewarding Your Growth These are designed to reward high-performing affiliates. Your commission rate increases as you drive more sales. A program might offer a base rate of 6%, which jumps to 8% after you generate $5,000 in sales in a month, and 10% after $10,000.
Multi-Tier Structures: Building a Network These allow you to earn commissions not only on your own sales but also on the sales generated by other affiliates you recruit into the program. This effectively turns you into a partner who helps grow the program itself, creating a secondary, more passive income stream.
5. Cost Per Click (CPC): The Rare Exception
In this model, you are paid a small fee for every click your affiliate link receives, regardless of a sale. Due to its high vulnerability to fraud, the CPC model is now extremely rare in modern affiliate marketing and almost never seen in the travel space.

Industry Benchmarks: What Good Affiliate Commission Rates Look Like
So, what should you actually expect to earn? While rates vary, the travel industry has established clear benchmarks across its major categories. Here’s your cheat sheet.
Hotels & Accommodations: 2% - 7% of Booking Value This is the bread and butter for many creators, but the details are everything. A program like Expedia Group offers up to 6% of the total booking value with a 7-day cookie. In contrast, Booking.com advertises a much higher "25-40%", but this is a percentage of their commission, not the customer's total payment. This opaque structure often results in a much lower effective rate, closer to 2-4% of the final booking value.
Tours, Activities & Experiences: 6% - 8%+ This is a high-margin category with strong potential. Market leaders like Viator and GetYourGuide set the standard with base commissions of 7-8%. Adventure-focused operators like G Adventures offer 6%, which is incredibly powerful when applied to their high-ticket tours that can cost thousands of dollars.
Travel Insurance: 10% or More Insurance is a consistently high-paying vertical. Top programs like SafetyWing and World Nomads both offer a standard 10% commission. SafetyWing takes this a step further with a recurring model, meaning you continue to earn 10% every time your referred customer renews their policy.
Gear & Apparel: 3% - 8% For physical products, rates depend heavily on the retailer. Amazon Associates is the baseline, offering 3-4% for most travel categories. However, partnering with specialty retailers is far more lucrative. A brand like REI, for example, offers a 5-8% commission on high-quality (and often high-priced) outdoor gear.
Pro-Tip: Don't be blinded by the highest percentage. A 6% commission on a $3,000 G Adventures tour is $180. An 8% commission on a $50 city walking tour is $4. Always consider the average order value of the products you are promoting when evaluating affiliate commission rates.

The Metrics That Matter More Than the Rate Itself
An experienced affiliate marketer knows the commission rate is just a starting point. To truly understand a program's profitability, you need to analyze the metrics that measure real-world performance.
Earnings Per Click (EPC): Your True North This is arguably the single most important metric. It’s calculated by dividing your total commission earnings by the total number of clicks you sent. If you sent 100 clicks and earned $50, your EPC is $0.50. This number tells you the average value of every single click. A program with a lower commission but a higher EPC is often the more profitable partner for your specific audience.
Conversion Rate (CR): The Sign of a Healthy Partner This is the percentage of users who take the desired action after clicking your link. A high conversion rate is a sign of a trusted brand with a well-optimized checkout process. A program with a 10% commission that converts at 1% is less profitable than a program with a 5% commission that converts at 5%.
Cookie Duration: The Travel Creator's Safety Net This is critical in the travel space. A longer cookie duration (30, 60, or 90 days) gives your audience the time they need to research a high-consideration purchase while ensuring you still get credit. A short cookie window is a major red flag and a sign that the program may not be structured in your favor.
Pro-Tip: Dive into your affiliate dashboards. Most networks like CJ Affiliate and Travelpayouts provide detailed reports on your EPC and conversion rates for each program. Use this data to identify your true top performers—the results will often surprise you.

The Travel Creator's Toolkit
Feeling overwhelmed by the data? You don't have to be. To help you organize your strategy and implement everything you've learned, we've created the ultimate resource bundle. It includes checklists, templates, and tools designed to accelerate your journey from beginner to pro.
Download Your Free Bundle: The Travel Creator's Toolkit
The High-Margin Alternative: Referral & Revenue Share Models
While traditional commission models are powerful, the most forward-thinking creators are diversifying into referral and revenue-sharing programs. Instead of a one-time payment for a single sale, these models allow you to build long-term, passive income streams by becoming a true platform partner.
This is the philosophy behind the TrekGuider Seller Platform. We believe in empowering creators to build complex businesses. Our platform is designed for you to sell your own digital products—like itineraries and guides—but our referral program adds another powerful layer to your income strategy.
Instead of a simple CPS commission, our model functions like a sophisticated multi-tier system. When you refer other creators to become sellers on TrekGuider, you earn an ongoing share of the revenue they generate, with tiered commissions that start at 4% for referred sellers. You’re not just earning from a single transaction; you’re building a network and earning from its collective success. It's a strategic way to move beyond chasing individual sales and start building a more resilient, high-margin business.
Frequently Asked Questions (FAQ)
1. Is a higher commission rate always better? Not at all. A high commission rate can be misleading if the program has a low conversion rate, a short cookie duration, or a low average order value. Always look at your Earnings Per Click (EPC) to determine the true profitability of a program for your audience.
2. How can I find the EPC for an affiliate program? Most reputable affiliate networks (like CJ Affiliate, ShareASale, or Travelpayouts) provide EPC data. It's often listed as a network-wide average for each merchant, which gives you a good baseline. Once you start sending traffic, you can track your own personal EPC in your performance reports.
3. Can I negotiate my affiliate commission rates? Yes, absolutely. Once you become a proven partner and consistently drive a significant volume of high-quality sales, you have leverage. Many brands are willing to negotiate a higher, private commission rate for their top-performing affiliates. Always track your performance and don't be afraid to ask.

From Confusion to Command
You are no longer in the dark. The world of affiliate commission rates is no longer a confusing black box. You now have the knowledge to deconstruct any program's payment structure, the industry benchmarks to know your worth, and the key metrics to identify what truly drives profit.
This knowledge is power. It empowers you to audit your existing partnerships, confidently seek out new ones, and even negotiate better terms. By focusing on programs with fair commissions, long cookie durations, and high conversion rates, you can ensure your hard work is properly rewarded. Building a profitable travel content business requires a strategic approach, and a deep understanding of affiliate commission rates is a non-negotiable part of that strategy.
Read the full guide: The Travel Blogger's Playbook to Affiliate Marketing Mastery
Don't Miss Out! Subscribe for Exclusive Content
SubscribeComments 0
No comments yet
Be the first to share your experience!
Dont Miss Out! Subscribe for Exclusive Content

Ultimate USA Holidays Guide: Top Picks
FTC Affiliate Disclosure Essentials: Stay Compliant as a Travel Creator
Essential Affiliate Tools: From Tracking to Full Optimization
Avoid These 5 Affiliate Landing Page Mistakes for Better Conversions
Affiliate Keyword Research Mastery for Travel Blogs