Chinese New Year SF: Parade Essentials
TrekGuider @trekguider
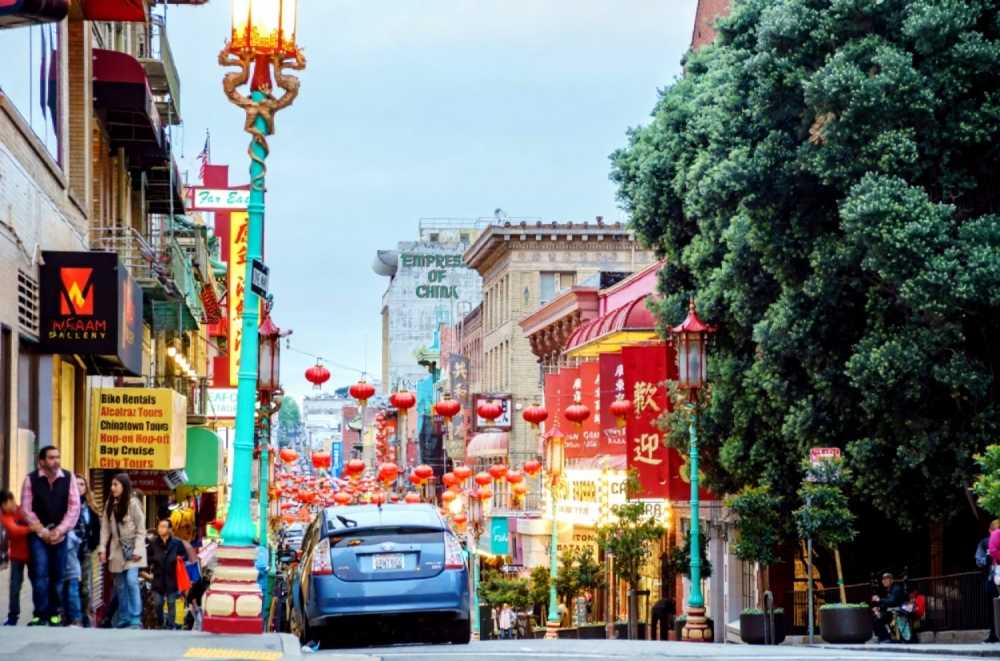
You can feel it before you see it. The low, resonant thump-thump-thump of the drums echoing off the buildings. The scent of roasted chestnuts and sizzling dumplings hanging in the cool February air. This is the magic of Chinese New Year in San Francisco, a tradition that has pulsed through the city’s veins since the Gold Rush. You’re here to witness the largest Lunar New Year celebration outside of Asia, but a thread of anxiety cuts through the excitement. How do you possibly navigate a crowd of half a million people? Where are the secret spots to actually see the famous 268-foot Golden Dragon?
The fear of missing out is real. You imagine being swallowed by the crowd, your view completely blocked, the vibrant floats and lion dancers reduced to a muffled soundtrack. A once-in-a-lifetime cultural immersion could easily devolve into a stressful, shoulder-to-shoulder shuffle. Without a game plan, you risk leaving with nothing but blurry photos and a sense of frustration.
This is your game plan. Forget the chaos and embrace the spectacle. This guide is your all-access pass, a step-by-step blueprint for conquering the parade like a seasoned local. We’ll give you the insider tips on securing the best viewing spots, a deep dive into the must-see moments, and the cultural context that brings it all to life. You’re about to experience the Chinese New Year San Francisco festival not as a tourist, but as an expert. This incredible event is at the heart of the city's cultural calendar, a vibrant highlight we proudly feature in our broader guide to San Francisco Holidays: Bay Area Buzz.

Understanding the Celebration: More Than Just a Parade
The Chinese New Year, also known as the Lunar New Year or Spring Festival, is the most important holiday in Chinese culture and for many other Asian communities worldwide. It marks the beginning of a new year on the traditional lunisolar calendar—a time for sweeping away the old, honoring ancestors, and gathering with family for lavish feasts.
Each year is associated with one of the twelve animals of the Chinese zodiac. The 2026 celebration, which officially begins on late January or February (the date follows the lunar calendar), will usher in the Year of the Snake—an animal symbolizing wisdom, intuition, and grace.
San Francisco’s celebration is steeped in history. First held in 1851, it has grown from a local community event into the oldest and largest festival of its kind outside of Asia, a powerful proof of the city’s deep-rooted Chinese-American heritage. While the parade is the dazzling finale, the festival is a multi-week affair with several key components you won't want to miss:
The Flower Market Fair: A bustling, fragrant market where families purchase fresh flowers and auspicious plants like orchids and peach blossoms to welcome good fortune into their homes.
The Community Street Fair: A vibrant, weekend-long street party that transforms Chinatown with traditional music, dance performances, artisan vendors, and an incredible array of festival foods.
The Grand Parade: The spectacular culmination of the festivities, featuring stunning floats, complex costumes, acrobatic lion dancers, and the legendary Golden Dragon.
The Main Event: Conquering the Chinese New Year San Francisco Parade
The Southwest Airlines Chinese New Year Parade is an unforgettable spectacle, renowned for being one of the few night-illuminated parades in North America. Its dazzling floats and vibrant performers don't just march; they light up the city streets, creating a truly magical atmosphere that has to be seen to be believed.
Mark Your Calendar: 2026 Parade Date and Time
To ensure you don’t miss a single moment of the magic, lock these details into your calendar now:
Date: Saturday, around mid-February (dates shift each year)
Start Time: 5:15 PM
The parade typically lasts for about two and a half hours, winding its way through the heart of the city as darkness falls, which allows the thousands of lights on the floats and costumes to shine their brightest.
The Parade Route: Where to Be and When
While the Chinese Chamber of Commerce confirms the final route closer to the date, it traditionally follows a path designed for maximum spectacle. The parade kicks off at the intersection of Second and Market Streets, proceeds up Market, turns onto Geary Street through Union Square, continues onto Powell Street, then Post Street, and finally enters Chinatown at Kearny Street before concluding near Columbus Avenue.
Choosing your spot is a strategic decision. Here’s the breakdown:
The Start (Market Street): This area is often slightly less congested than Union Square. It’s a great option if you want to see the performers and floats when they are fresh and full of energy.
The Middle (Union Square): This is the epicenter of the action, with massive crowds and an electric atmosphere. The wide streets provide good sightlines, but you must arrive exceptionally early to claim a spot.
The End (Chinatown & North Beach): As the parade passes through the iconic Dragon Gate on Grant Avenue (via Kearny), the energy is palpable. The narrower streets create an intimate, immersive experience, but this also makes it one of the most densely packed areas.
7 Essential Tips for Securing the Perfect Viewing Spot
Arrive Early. No, Earlier. This cannot be overstated. For a prime curbside spot along Geary or Powell, you need to be there hours in advance. Seasoned locals often lay down their blankets by 2:00 PM or even earlier.
Invest in Bleacher Seats. If you want a guaranteed, comfortable, and unobstructed view without a multi-hour wait, purchasing tickets for the bleacher seats is the smartest move you can make. Tickets are sold through the official parade website and are worth every penny for a stress-free experience, especially with family.
Scout the Corners. Intersections where the parade makes a turn—like from Geary onto Powell or Powell onto Post—are strategic goldmines. You get to see the floats approach from one direction and then watch them turn, effectively doubling your viewing time.
Pack for a Marathon, Not a Sprint. You’re in for the long haul. Bring a lightweight folding chair or a thick blanket. Pack snacks and water, but be courteous to your neighbors. This is a communal experience.
Think Vertically. Any slight elevation is an advantage. Look for spots on a small incline or the steps of a building. Some hotels and restaurants along the route host viewing parties, though these are premium, ticketed events.
The Post Street Gambit. The section along Post Street, between Powell and Kearny, is often slightly less chaotic than Union Square proper. It’s a solid choice for those arriving a little later but still hoping for a decent view before the parade plunges into the heart of Chinatown.
Public Transit is Your Only Friend. Do not even think about driving. Road closures begin in the afternoon, and parking is a nightmare of nonexistent spaces and astronomical fees. Use BART or MUNI to get downtown and walk the final blocks.
Pro-Tip: For a less overwhelming experience with kids, consider watching the parade formation near the starting point on Second Street. You'll see the floats and performers up close as they line up, offering a fascinating behind-the-scenes look before the main event's intensity kicks in.

What to Watch For: The Spectacle of the Night Parade
The parade is a rich mix of culture, artistry, and tradition. Knowing what to look for will transform your experience from passive viewing to active appreciation.
The Legendary Golden Dragon (Gum Lung)
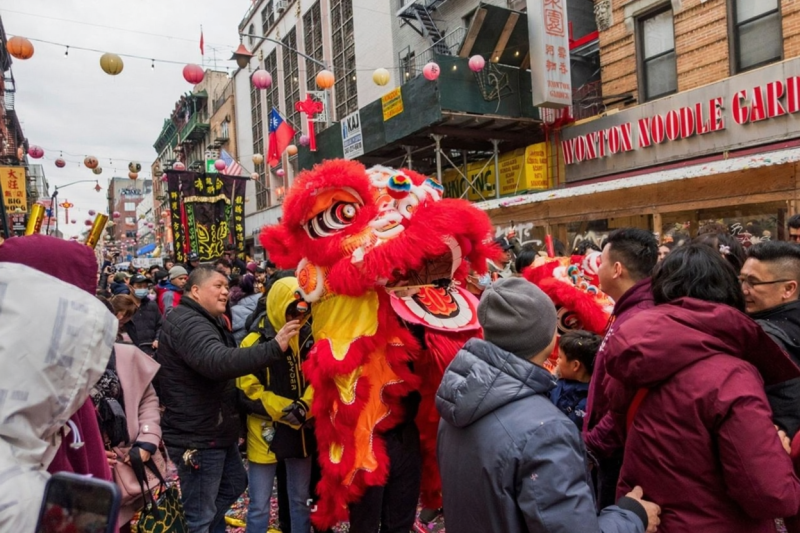
The grand finale and undisputed star of the show is the Golden Dragon, or "Gum Lung." This is no ordinary parade float. It's a magnificent, 268-foot-long masterpiece that requires a team of over 100 puppeteers from the Leung's White Crane martial arts association to carry it through the streets. In Chinese culture, the dragon is a benevolent symbol of power, good luck, and prosperity. Watching it weave and dance, illuminated against the night sky, is a core San Francisco memory in the making.

Dazzling Floats and Acrobatic Lion Dancers
This is where the "night-illuminated" aspect truly shines. The floats are breathtaking works of art, depicting scenes from Chinese folklore, the year's zodiac animal, and cultural landmarks, all glowing with thousands of lights. Interspersed between them are the high-energy lion dance troupes. Accompanied by the powerful rhythm of drums, gongs, and cymbals, the lion dancers perform acrobatic feats to scare away evil spirits and usher in a year of good fortune.
A Modern Twist: The Drone Light Show
In a perfect blend of ancient tradition and modern innovation, the parade has incorporated a stunning drone light show. Hundreds of synchronized drones ascend into the night sky, forming complex, glowing patterns—from zodiac animals to Chinese characters—in a display that is uniquely San Franciscan.
Beyond the Parade: Immersing Yourself in the Festivities
To truly capture the spirit of the holiday, you must venture beyond the parade route. The real cultural immersion happens in the days leading up to the main event.
The Chinatown Flower Market Fair
Held on the weekend before the parade, the Flower Market Fair is a sensory explosion. The streets of Chinatown are closed to traffic and filled with vendors selling beautiful flowers, lucky plants, and traditional New Year decorations. It’s a cultural tradition to decorate the home with fresh blooms to symbolize rebirth and new growth. Look for these auspicious items:
Orchids: Symbolizing fertility and abundance.
Tangerines with leaves intact: Representing secure relationships and wealth.
Peach blossoms: Considered sacred and symbolizing romance and prosperity.
The Chinatown Community Street Fair
Taking place on parade weekend, the Community Street Fair is a massive block party that showcases the best of Chinese culture. You’ll find everything from traditional calligraphy and lantern-making demonstrations to folk dance performances and Chinese opera. It’s a fantastic opportunity to shop for unique souvenirs and, most importantly, to sample authentic festival food.
The Symbolism of the Food
Food is the heart of the Lunar New Year celebration, with many dishes carrying symbolic meanings for a prosperous year. As you explore the street fair or local bakeries, be sure to try:
Long Noodles (Chángshòu Miàn): Eaten uncut, these noodles represent a long and happy life.
Dumplings (Jiǎozi): Shaped like ancient Chinese gold ingots, they symbolize wealth.
Rice Cakes (Niángāo): The name is a homophone for "higher year," signifying progress and improvement in the coming year.
Oranges and Tangerines: Their round shape and golden color symbolize fullness and wealth.

Practical Logistics for a Flawless Experience
A little bit of planning will make all the difference between a stressful outing and a cherished memory.
Getting There: Transportation and Parking
Let's be clear: public transportation is your only sane option.
BART (Bay Area Rapid Transit): The Powell Street and Montgomery Street stations will deposit you right on the Market Street parade route.
MUNI Metro & Buses: Numerous lines serve the downtown area. Check the SFMTA website for parade-day reroutes and schedule changes, which are inevitable.
Rideshare (Uber/Lyft): Expect heavy surge pricing and significant delays due to road closures. A better strategy is to be dropped off several blocks away and enjoy the walk in.
What to Wear and What to Pack
San Francisco weather is notoriously unpredictable. A beautiful sunny afternoon can become a bone-chillingly cold night in an instant.
Dress in Layers: A t-shirt, a fleece or hoodie, and a windproof jacket are your best friends. You’ll be grateful for the options as the temperature drops after sunset.
Comfortable Shoes: This is non-negotiable. You will be standing for hours and walking far more than you expect.
Essential Pack List:
A full water bottle.
Snacks to keep your energy levels high.
A portable phone charger (your battery will drain faster than you think).
A small, secure backpack.
For those traveling from abroad to witness this incredible event, ensuring your documents and plans are in order is crucial. Our International Travel Checklist is an indispensable resource for organizing your packing, paperwork, and preparations for a major cultural festival like this.
Safety and Crowd Management
With hundreds of thousands of spectators, situational awareness is key.
Stay Alert: Keep your valuables, like your phone and wallet, in a secure front pocket or a zipped bag worn on your front.
Use the Buddy System: Stick with your group. It is incredibly easy to get separated in the dense crowds.
Establish a Meeting Point: Before the parade starts, agree on a specific, easy-to-find meeting spot away from the main route in case you get separated. Cell service can be spotty in such large crowds.
Your Ultimate Chinese New Year Experience Awaits
You are now armed with the insider knowledge to experience the magic of the Chinese New Year San Francisco celebration to its absolute fullest. From understanding the cultural significance of the Year of the Snake to securing the perfect spot to watch the 268-foot Golden Dragon dance through the illuminated streets, you are ready to move beyond being a mere spectator. You are prepared to become an active participant in one of the world’s most vibrant and historic cultural traditions. Embrace the energy, savor the flavors, and welcome a year of prosperity and good fortune.
This deep dive into a single, spectacular event is just a glimpse of the expert planning we offer. To master your entire U.S. trip, from San Francisco's iconic festivals to the majestic national parks and bustling cityscapes across the country, our comprehensive Travel Guide provides the ultimate roadmap for your adventure.
Meta Data Suggestions:
SEO Meta Title: Chinese New Year San Francisco: Parade Guide & Tips (2026)
URL Slug: chinese-new-year-san-francisco-parade
SEO Meta Description: Your ultimate guide to the 2026 Chinese New Year San Francisco parade. Get expert tips on viewing spots, times, traditions, and how to navigate the crowds.
Don't Miss Out! Subscribe for Exclusive Content
Subscribe


Comments 0
No comments yet
Be the first to share your experience!
Dont Miss Out! Subscribe for Exclusive Content

San Francisco Cherry Blossoms: A Local's Guide to the Blooms

Halloween SF: Haunts Without Horrors

SF Festivals: 7 Must-See Lineups

Christmas SF: Lights & Wharf Wonders

SF Pride: 6 Route & Party Hacks

San Francisco Holidays: Bay Area Buzz
The Secret to a Solo Travel Blog People Actually Read
TrekGuider @trekguider
You’ve returned from a life-changing solo trip, your camera roll is full, and your head is buzzing with stories. You open up your laptop, ready to launch the blog you've been dreaming of, and... you freeze. Paralyzed by the thought that it's all been done before by influencers with perfect photos and unlimited budgets, you start to question everything. The pressure to present a flawless journey can feel immense, leaving you wondering if your own authentic, sometimes messy, experiences are even worth sharing.
What if the secret isn't to be perfect, but to be real? What if the moments of uncertainty, the budget-stretching decisions, and the quiet evenings spent alone are the very things that will make your readers connect with you on a deeper level? Your unique perspective is your single greatest asset. This is not just another list of generic topics. This is your playbook for turning your unique experiences—the good, the bad, and the beautifully mundane—into a solo travel blog that people will actually want to read.

First, Find Your Lane: Choosing a Powerful Solo Travel Niche
The travel blogging world is crowded, but most of it exists on a single, wide highway. The secret to standing out isn't to shout louder; it's to take a well-marked exit ramp into a specific niche.
"Niching down" isn't about limiting yourself; it's about becoming a big fish in a smaller, more passionate pond. Instead of being a generalist talking to everyone, you become the go-to expert for a specific type of solo traveler. This is how you build a loyal community that hangs on your every word.

For the Thrill-Seeker: The Adventurer
Your content revolves around the adrenaline of the journey, focusing on physically demanding, nature-based experiences.
"Training for the Inca Trail: My 3-Month Fitness Plan for Solo Hikers"
"My First Solo Scuba Dive: What to Expect in the Red Sea"
"Ranking the Best (and Safest) Destinations for Solo Rock Climbing"
"A Complete Gear Guide for a Multi-Day Solo Trek in Patagonia"
For the Knowledge-Seeker: The Culturalist
You travel for the stories, the art, and the history. Your blog is a treasure map to the world's most fascinating cultural experiences.
"How to Conquer the Uffizi Gallery in Florence as a Solo Traveler"
"Beyond the Temples: Finding Authentic Local Art in Kyoto"
"A Guide to Respectfully Visiting Historical Sites When You're Alone"
"The Ultimate 3-Day Historical Walking Tour of Rome for One"
For the Taste-Tester: The Foodie
Your itinerary is built around meals. You guide your readers on a culinary journey, helping them experience a destination one bite at a time.
"The Solo Foodie's Guide to the Best Street Food in Bangkok"
"How to Confidently Book a Table for One at a High-End Restaurant"
"I Took a Cooking Class in Tuscany Alone—Here’s What I Learned"
"Mapping Out the Perfect Solo Food Tour of Mexico City"
For the Quiet Observer: The Introvert
You prove solo travel isn't just for extroverts. Your blog focuses on mindful journeys, quiet retreats, and the profound joy of solitude.
"The Best Quiet Cafes in Paris for Reading and People-Watching"
"Why a Silent Retreat in a Japanese Monastery Was My Best Solo Trip Yet"
"A Guide to the Most Peaceful National Parks for Solo Exploration"
"How to Travel Solo Without Feeling Pressured to Socialize"
For the Savvy Saver: The Budget Backpacker
Your expertise lies in stretching every dollar. You provide actionable advice for long-term, sustainable travel on a shoestring.
"How I Traveled Through Southeast Asia for 3 Months on Under $3,000"
"An Honest Review of Hostel Life: The Good, The Bad, and The Smelly"
"The Ultimate Guide to Finding Cheap (But Amazing) Eats Anywhere"
"Workaway vs. Worldpackers: Which is Better for the Solo Traveler?"
Turn Problems into Your Best Posts
Every aspiring solo traveler has the same core fears: safety, loneliness, money, and logistics. When you address these fears head-on with honesty and practical advice, you don’t just get clicks—you build deep, lasting trust. Turning your fears into content is a powerful way to connect with readers. Of course, before you can write about overcoming these challenges, you need the right strategies to handle them in the first place. For a comprehensive breakdown of safety, budgeting, and planning, is your essential starting point. This is a crucial category of solo travel blog ideas because it provides immense value.

On Safety: Your Digital Bodyguard Content
"My Non-Negotiable Solo Female Safety Checklist for Southeast Asia"
"10 Things I Do to Feel Safer in a Hotel or Airbnb Alone"
"The Peace-of-Mind Apps on My Phone When I'm Traveling Solo"
"How to Handle Unwanted Attention: My Go-To Scripts"
On Loneliness: Writing About the Elephant in the Room
"What I Did When I Felt Crushing Loneliness in a Lisbon Crowd"
"A Guide to Making Friends on the Road (Even If You're an Introvert)"
"It's Okay to Be Sad: How I Deal with Homesickness During Long Trips"
"The Unexpected Joy of Dining Alone: A Mindset Shift"
On Money: From Budgeting Anxiety to Financial Freedom
"How I Saved $5,000 for My First Big Solo Trip (And You Can Too)"
"A Complete Breakdown of My Budget for One Month in Vietnam"
"The Worst Money Mistakes I've Made Traveling (And How to Avoid Them)"
"Credit Cards vs. Debit Cards vs. Cash: My Best Mix for Solo Travel"
On Photography: Nailing the Shot When You're the Whole Crew
"My No-Tripod Tricks for Amazing Solo Travel Photos"
"How to Ask Strangers to Take Your Photo (and Actually Get a Good One)"
"The Ultimate Guide to Using a GorillaPod and Your Phone's Self-Timer"
"The 'Video Screenshot' Hack That Changed My Solo Travel Photography"
Pro-Tip: When writing about challenges, use the "Problem-Solution-Transformation" framework. Start with the relatable problem ("I was terrified of eating alone"), explain your practical solution ("I started by sitting at the bar instead of a table"), and describe the transformation ("Now, it's one of my favorite parts of traveling and a great way to meet bartenders and other travelers").
The Unfiltered Guide: Reinventing the Destination Post
Forget the generic "Top 10 Things to Do" lists. Your readers crave authenticity. The best destination guides are filled with personal stories, honest opinions, and practical details that can't be found in a corporate guidebook. Share the mistakes and the magic.

The "First Impressions" Post
This is your raw, immediate reaction to a new place. It’s relatable and captures the feeling of arrival.
"24 Hours in Tokyo: The Honest Truth About Overwhelm and Wonder"
"My First Thoughts on Arriving in Cairo: A Sensory Overload"
"Landing in Iceland: What I Wish I'd Known Before Leaving the Airport"
The "Biggest Mistake" Post
Vulnerability builds trust. Sharing what went wrong is often more valuable than sharing what went right.
"The Tourist Trap I Fell For in Rome (And How You Can Avoid It)"
"Why I Hated My First Day in Paris (And How I Turned the Trip Around)"
"The Packing Mistake That Almost Ruined My Trip to the Andes"
The "A Day in the Life" Post
This format gives readers a true sense of your travel style. It’s less about a packed itinerary and more about the vibe.
"A Slow Travel Day in a Parisian Cafe: Journaling, Coffee, and Croissants"
"A Budget Backpacker's Day in Chiang Mai: Temples, Street Food, and Night Markets"
"My Digital Nomad Routine: A Work Day from a Beach in Portugal"
The "Hidden Gem" List
Go beyond the obvious landmarks. This is where you showcase your unique discoveries and provide immense value.
"5 Things to Do in Barcelona That Aren't in the Guidebooks"
"Forget the Main Square: Here Are the Best Neighborhoods to Explore in Prague"
"The Best Local Restaurant I Found in Florence (And How I Stumbled Upon It)"
Creative Formats to Keep Readers Hooked
Your blog doesn’t have to be an endless series of destination guides. Mixing up your content formats keeps your audience engaged and allows you to explore different facets of the solo travel experience, making your solo travel blog a dynamic resource.
Personal Essays: "How Solo Travel Forced Me to Face My Social Anxiety."
How-To Guides: "A Beginner's Guide to Using Public Transit in Europe."
Interviews: "I Interviewed a 70-Year-Old Solo Female Traveler: Here's Her Advice."
Gear Reviews: "The Only Backpack You Need for a Month-Long Trip: An In-Depth Review."
"A Week in My Wallet": A detailed, day-by-day spending diary from a specific city.
"What I Read on the Road": A list of books that shaped your journey.
Pro-Tip: Create templates for your most common post types. For example, have a "Day in the Life" template with sections for morning, afternoon, evening, what you ate, how much you spent, and a "vibe check." This streamlines your writing and creates consistency for readers.
Writing Blog Posts That Earn
From day one, you can be strategic about creating content that has the potential to earn an income. This isn't about selling out; it's about sustainably funding your work by providing genuinely valuable recommendations.

For Affiliate Income: The "Problem-Solver" Post
These posts recommend products or services you actually use and love. The key is to frame your recommendation as the hero of a story. Don't just list "My Favorite Power Bank." Write "The $30 Power Bank That Saved My Phone (and My Sanity) on a 14-Hour Train Ride."
"The 10 Travel Essentials I Never Leave Home Without"
"My Complete Solo Travel Tech Kit (Camera, Power Bank, and More)"
"Why Specific Travel Insurance is the Best for Solo Adventurers"
"The Most Comfortable Walking Shoes for Exploring Cities All Day"
For Building Your Email List: The "Lead Magnet" Post
Create content that naturally leads to a freebie (like a PDF checklist) that you offer in exchange for an email address. Your email list is one of your most valuable assets.
"My Ultimate Pre-Travel Planning Checklist (Get Your Free PDF!)"
"The 10 Most Important Phrases to Learn in Italian (Download the Cheatsheet)"
"How to Plan Your First Solo Trip in 10 Easy Steps (Free Workbook)"
For Selling Your Own Products: The "Appetizer" Post
Write a detailed, valuable free guide to a city, then offer a super-detailed, day-by-day downloadable itinerary for a small price for readers who want an expert plan without the work.
"The Perfect 3-Day Solo Solo Itinerary for Lisbon"
"How to Spend a Magical Week Alone in the Scottish Highlands"
"The Ultimate Solo Traveler's Guide to New York City"
Your Questions, Answered: A Solo Travel Blogger's FAQ
What should my first solo travel blog post be about?
Your first post should be your manifesto. Introduce yourself, share the story that sparked your love of solo travel, and most importantly, tell your readers why you're starting this blog and who it is for. Set the tone and make a promise about the authentic value you'll provide.
How do I make my travel blog stand out?
Find your unique niche and be ruthlessly authentic. Don't just share the postcard moments; share the challenges, the lessons learned, and your honest opinions. Your unique voice and real-world perspective are your biggest competitive advantages.
Do I need to be a great writer to start a travel blog?
You need to be a clear communicator. Write like you're talking to a friend. Use simple language, short paragraphs, and a conversational tone. Passion and honesty are far more important than a sophisticated vocabulary. You'll become a better writer simply by writing more.
Can I start a travel blog without traveling full-time?
Absolutely. Some of the most successful travel blogs are run by people with full-time jobs. You can blog about weekend trips, planning for a future big adventure, or exploring your own city like a tourist. Your audience will likely find this more relatable than the life of a full-time nomad.
Your Story Is Waiting
You’re standing at the trailhead of an incredible journey. That blinking cursor on a blank page isn't a barrier; it's a boarding pass. Every post you write, every story you share, and every fear you address is a step toward building something that is uniquely yours. This playbook of solo travel blog ideas is designed to give you the spark, but your experiences will provide the fire. Don't aim for perfection; aim for connection. Your story is waiting to be told.
Read the full guide: Anxious to Adventurous: The Ultimate Guide to Solo Travel Confidence
Don't Miss Out! Subscribe for Exclusive Content
SubscribeComments 0
No comments yet
Be the first to share your experience!
Dont Miss Out! Subscribe for Exclusive Content

FTC Affiliate Disclosure Essentials: Stay Compliant as a Travel Creator

Essential Affiliate Tools: From Tracking to Full Optimization

Avoid These 5 Affiliate Landing Page Mistakes for Better Conversions

Affiliate Keyword Research Mastery for Travel Blogs

Booking.com Affiliate Program Review: Pros, Cons, and Earnings Potential

Decoding Affiliate Commission Rates: Benchmarks for Travel Creators
9 Beach Safety Tips That Could Save Your Life
TrekGuider @trekguider
There’s a moment on every beach trip that feels like pure magic. It’s the feeling of warm sand between your toes, the hypnotic sound of waves crashing, and the endless blue horizon stretching out before you. It’s a picture of perfect relaxation. But beneath that tranquil surface, the ocean holds immense and impartial power. A beautiful day can turn dangerous in an instant from a hidden current, underestimated waves, or the relentless sun, transforming a dream vacation into a terrifying emergency. Every year, countless beachgoers find themselves in preventable peril simply because they misread the water or weren't prepared for the environment.
This isn't a guide to make you fear the ocean; it's a playbook to empower you to respect it. We’re here to give you the essential, expert-backed beach safety tips that can mean the difference between a blissful day and a life-altering one. These strategies, drawn from lifeguarding associations and national weather experts, are a critical component of the situational awareness we cover in our comprehensive guide, The Ultimate Guide to Travel Safety: A 2026 Playbook. By learning to see the beach not just as a playground, but as a dynamic natural environment, you can ensure your only takeaways are seashells and incredible memories. Let’s dive in.

Master the Water: Essential Ocean Safety Tips
The vast majority of beach-related dangers originate in the water itself. From powerful currents to unpredictable surf, understanding the ocean's behavior is the most critical skill any beachgoer can possess. These are the foundational beach safety tips for staying safe in the surf.
1. Become an Expert at Spotting Rip Currents
Rip currents are the number one danger at most surf beaches, responsible for the majority of ocean rescues performed by lifeguards. They are not undertows that pull you under the water; they are powerful, narrow channels of water that flow away from the shore at high speed. According to NOAA and the United States Lifesaving Association (USLA), knowing how to visually identify one from the shore is your first and best line of defense.
Here’s what to look for, especially from an elevated position like the dunes or a lifeguard tower:
A Channel of Churning, Choppy Water: Look for a specific area where the water seems agitated or rough, moving in a different direction than the surrounding waves.
A Break in the Incoming Wave Pattern: This is often the easiest sign to spot. You'll see a gap in the line of breaking waves—an area that looks deceptively calm. This flat spot is the rip current pulling water back out to sea, disrupting the incoming waves.
A Difference in Water Color: Because the current is carrying sand and sediment offshore, the water within a rip current often appears darker, murky, or sandy brown compared to the clearer, greener water on either side.
A Line of Foam or Debris Moving Seaward: This is a dead giveaway. If you see a line of foam, seaweed, or other floating debris moving steadily away from the beach, perpendicular to the shore, you are looking directly at a rip current.
Pro-Tip: Before you even set up your umbrella, take five minutes to stand back and observe the water. Actively look for these signs. Identifying potential rip currents before you get in the water is the single most important safety action you can take.
2. Know the "Flip, Float, Follow" Rule for Rip Current Survival
If you do get caught in a rip current, your instinctive reaction—to panic and swim directly against it back to shore—is the most dangerous thing you can do. Fighting a rip current will exhaust you to the point of drowning. The correct response is simple and could save your life.
Flip: Flip onto your back to stay afloat and conserve energy.
Float: The current will not pull you under; it will only pull you away from shore. Stay calm and float with it.
Follow: Once you are out of the main pull of the current, begin swimming parallel to the shoreline. Do not swim toward the beach. Once you have swum out of the current, you can then turn and swim back to shore, ideally at an angle away from where you were caught.
If you are unable to swim out of it, continue to float and wave your arms and yell for help to attract the attention of a lifeguard or other swimmers.

3. Understand and Obey the Beach Warning Flag System
While knowing how to escape an invisible current is a vital reactive skill, your most powerful proactive tool is the one flapping in the breeze. Beach warning flags are a simple, universal language used by lifeguards to communicate the current water conditions. This system, adopted by the International Lifesaving Federation, provides a quick, visual assessment of the hazard level. Ignoring these flags is a gamble you should never take.
Green Flag: Low Hazard. Conditions are calm, but you should still exercise caution.
Yellow Flag: Medium Hazard. Moderate surf and/or currents are present. Weak swimmers should stay out of the water, and everyone else should use extra care.
Red Flag: High Hazard. The surf is high, and/or strong currents make conditions dangerous. It is recommended that no one enters the water.
Double Red Flag: Water Closed to Public. Conditions are extremely dangerous. The water is closed to all swimming, and entering it is prohibited.
Purple Flag: Dangerous Marine Life. This flag indicates that potentially hazardous marine life, like jellyfish or sharks, has been spotted. It is always flown with another color flag that indicates the surf conditions.
Pro-Tip: The absence of flags does not automatically mean the water is safe. If there is no flag, it likely means there is no lifeguard on duty. In that case, you are swimming entirely at your own risk. Always try to swim at a beach protected by lifeguards.
Master the Environment: Sun and Shoreline Safety Tips
While the ocean poses the most immediate threats, the beach environment itself has its own set of risks. The sun, sand, and heat can cause serious health issues if not managed properly. These beach safety tips will keep you safe on the shore.
4. Know the Signs of Heat Exhaustion vs. Heatstroke
That perfect, sun-drenched beach day holds a hidden danger. When the temperature climbs, the line between bliss and a medical emergency can blur with alarming speed. According to the Red Cross, it's crucial to know the difference between heat exhaustion and the more severe, life-threatening heatstroke (sunstroke).
Heat Exhaustion Symptoms:
Headache, dizziness, and confusion
Excessive sweating with cool, moist, or pale skin
Nausea and muscle cramps
A rapid, weak pulse
First-Aid for Heat Exhaustion:
Move to a Cool Place: Immediately get the person out of the direct sun and into shade or air conditioning.
Cool Them Down: Loosen their clothing and apply cool, wet cloths or spray them with cool water.
Rehydrate: If they are conscious and able to swallow, have them sip small amounts of a sports drink or water.
If their condition doesn't improve or they start vomiting, call for emergency help immediately, as it can progress to heatstroke.
5. Recognize the Emergency of Heatstroke (Sunstroke)
Heatstroke is a full-blown medical emergency where the body's internal cooling system completely fails.
Heatstroke Symptoms:
Changes in mental status (confusion, agitation, loss of consciousness)
Hot, flushed, and often dry skin (sweating may have stopped)
A dangerously high body temperature (often above 104°F / 40°C)
A rapid, strong pulse, which may become weak later
First-Aid for Heatstroke:
Call 911 Immediately: This is a life-threatening emergency that requires professional medical intervention.
Begin Rapid Cooling: While waiting for help, do everything you can to cool the person's body. Immerse them in cool water if possible, or douse them with water and apply ice packs to the neck, groin, and armpits.

6. Practice Proactive Sun Protection
The best way to deal with a heat-related illness is to never let it start. Sun protection is a continuous strategy, not a one-time action.
Hydrate Constantly: Drink plenty of water throughout the day, even before you feel thirsty.
Use Broad-Spectrum Sunscreen: Apply a sunscreen with at least SPF 30 and reapply it every two hours, and always immediately after swimming or excessive sweating.
Seek Shade: Use an umbrella and take breaks from the sun, especially during the peak intensity hours of 10 a.m. to 4 p.m.
Wear Protective Clothing: A wide-brimmed hat and UV-blocking sunglasses are non-negotiable.
7. The "Stingray Shuffle" Rule
In many coastal areas, stingrays bury themselves in the sand in shallow water. Stepping directly on one can result in an excruciatingly painful sting from the barb on their tail. To avoid this, never walk normally through the shallows. Instead, shuffle your feet along the sand. The vibrations from the shuffle will alert any nearby stingrays to your presence, giving them a chance to swim away peacefully.
Master Your Preparation: Final Beach Safety Tips
A safe and relaxing beach day begins before you even leave home. Smart planning and having the right gear can make all the difference, especially when traveling with family.
8. Pack a Dedicated Beach First-Aid Kit
While your main travel medical kit should be comprehensive, your beach bag needs a few specific items to handle common coastal issues:
Waterproof Bandages: For minor cuts and scrapes from shells or rocks.
Aloe Vera Gel: For immediate relief from minor sunburn.
Antihistamine Cream: To soothe the itch from insect bites.
Tweezers: For removing splinters or shell fragments.
Vinegar: A small bottle of white vinegar is a secret weapon; it can help neutralize the sting from some types of jellyfish.
9. Always Designate a "Water Watcher"
When you're at the beach with a group, especially with children, it's easy to fall into the trap of "diffusion of responsibility," where everyone assumes someone else is watching the kids in the water. The solution is to formally designate one adult as the "Water Watcher" for a set period (e.g., 15-20 minutes). During their shift, that person's only job is to watch the water without distraction—no phones, no books, no conversations. Then, you switch. This simple system ensures there are always eyes on the swimmers.
Your Ultimate Guide to Family Beach Travel
Keeping kids safe and entertained at the beach is a unique challenge. From packing the right gear to navigating meltdowns and keeping them safe in the sun and surf, a little extra preparation goes a long way. Our specialized guide takes the stress out of the equation.
Download our free Stress-Free Flying with Kids Guide for expert tips on making every part of your family vacation, from the airport to the beach, a breeze!
Beach Safety FAQs
A prepared mind is a safe mind. Here are quick answers to other common beach safety questions.
1. What’s the right way to treat a jellyfish sting?
First, get out of the water. Rinse the affected area with vinegar (if available) for about 30 seconds to deactivate the stingers. Do not use fresh water, as it can make it worse. Carefully pluck out any visible tentacles with tweezers. Soaking the skin in hot water (as hot as can be tolerated without burning) for 20-45 minutes can also help relieve the pain.
2. Is it safe to dig deep holes in the sand?
Digging in the sand is a classic beach activity, but deep holes can be incredibly dangerous. They can collapse unexpectedly, burying a person in seconds. Never dig a hole deeper than the knees of the smallest person in your group, and always fill in any holes you dig before you leave the beach.
3. What should I do if I see someone in trouble in the water?
Do not attempt a swimming rescue yourself unless you are trained in water rescue. An untrained rescuer can quickly become a second victim. The best course of action is to call for help immediately. Yell to alert a lifeguard and call 911. If you can, throw the person something that floats, like a cooler or a boogie board.
By embracing these nine essential beach safety tips, you shift from being a passive visitor to an active, aware, and prepared participant in one of nature’s most magnificent environments. The goal isn't to diminish the fun but to ensure it. A healthy respect for the ocean and a solid plan for your day are the keys to unlocking a truly carefree and unforgettable experience by the sea.

Now that you've mastered the art of staying safe on the coast, you can focus on the rest of your adventure. For a complete, deep-dive into every facet of trip planning, from health and safety to budgeting and logistics, our comprehensive Travel Guide is the only resource you'll ever need.
Don't Miss Out! Subscribe for Exclusive Content
SubscribeComments 0
No comments yet
Be the first to share your experience!
Dont Miss Out! Subscribe for Exclusive Content

Ultimate USA Holidays Guide: Top Picks
FTC Affiliate Disclosure Essentials: Stay Compliant as a Travel Creator
Essential Affiliate Tools: From Tracking to Full Optimization
Booking.com Affiliate Program Review: Pros, Cons, and Earnings Potential
Decoding Affiliate Commission Rates: Benchmarks for Travel Creators

Amazon Associates for Travel: Strategies to Maximize Commissions
Lollapalooza: 7 Stage-Hopping Tips
TrekGuider @trekguider
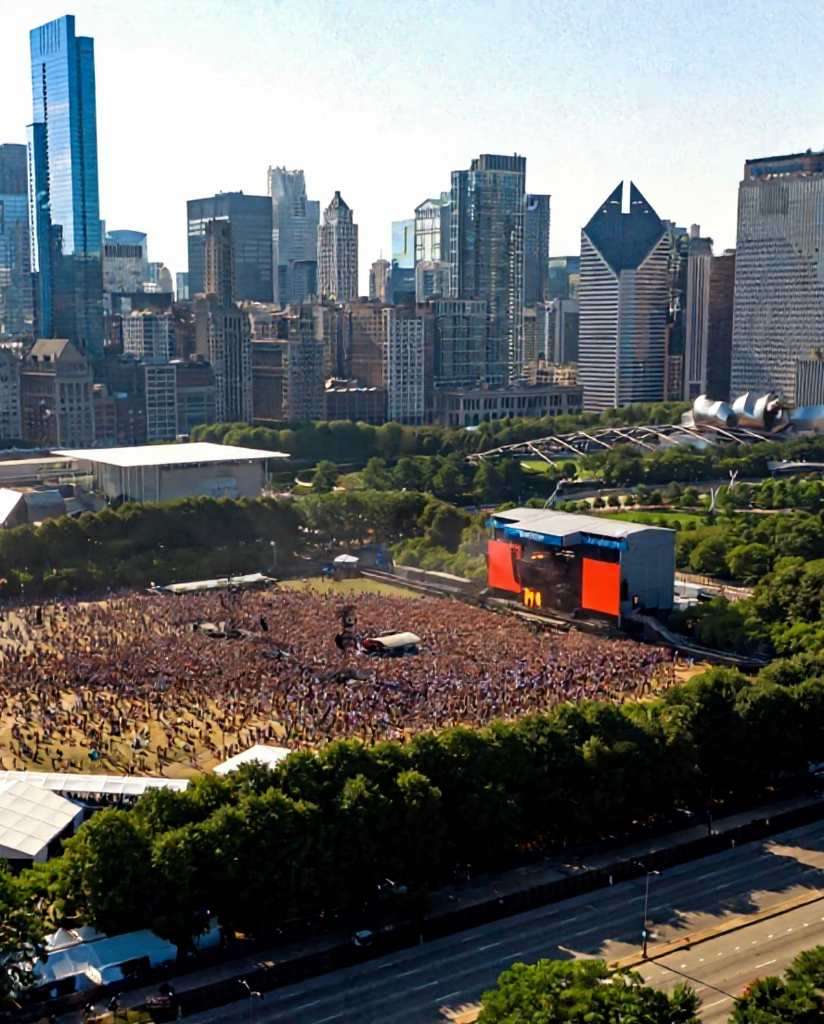
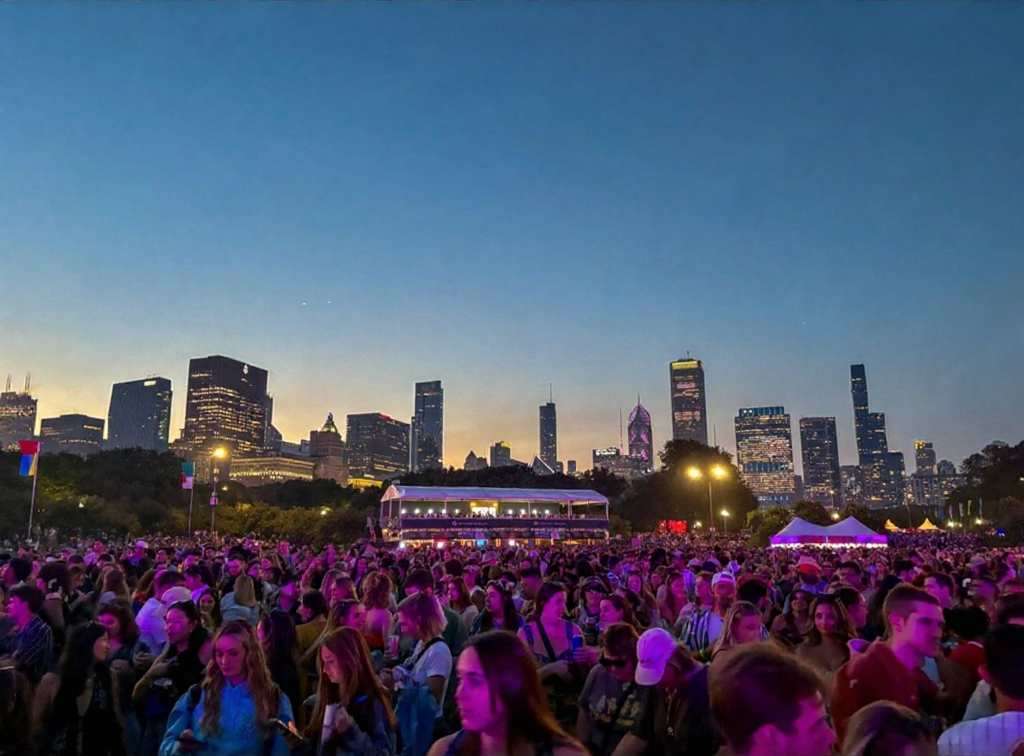
You’ve done it. You scored the golden ticket to Lollapalooza, the four-day musical marathon that transforms Chicago’s Grant Park into the center of the universe. But now, staring at a schedule that looks more like a complex circuit board than a concert lineup, the reality sets in. Dozens of artists you’re dying to see are scattered across a dozen stages, their set times overlapping in a cruel twist of fate. The sheer scale of the festival, with its massive crowds and sprawling grounds, suddenly feels less like a dream and more like a daunting logistical nightmare.
The anxiety begins to bubble. You picture yourself spending half the day trudging from the T-Mobile stage at the south end to the Bud Light stage at the north, only to arrive sweaty, exhausted, and just in time to hear the final chords of your favorite song. The fear of missing out becomes a palpable threat, turning the promise of unforgettable musical moments into a frantic race against the clock. Without a rock-solid plan, your festival experience could be defined by endless walks, missed opportunities, and the nagging feeling of being perpetually in the wrong place. This isn't just about seeing bands; it's about conquering one of the keystone events in a city known for its epic celebrations, a true highlight among the many experiences we cover in our definitive guide to Chicago Holidays: Windy City Thrills.
Forget the stress. This guide is your strategic playbook for navigating the glorious chaos of Lollapalooza Chicago. We’re breaking down the art of stage-hopping into seven actionable, pro-level tips that will transform you from a frantic fan into a festival veteran. From mastering the map before you even step foot in Grant Park to planning a seamless exit, these strategies will ensure you maximize your time, conserve your energy, and catch every single performance on your must-see list.
1. Become a Pre-Festival Master of the Map & Schedule
The biggest mistake a Lollapalooza rookie can make is showing up and trying to figure it all out on the fly. Grant Park is a massive urban oasis, and when it’s filled with stages, vendors, and hundreds of thousands of people, it becomes a complex, pulsating labyrinth. Your success begins long before you scan your wristband.
Download the Official App Immediately
Long before you even think about packing, your first move is to download the official Lollapalooza app. Consider it your digital command center for the entire weekend, running from July 31 to the final day of the festival. The app provides the most up-to-date schedule, a detailed festival map, and, most importantly, real-time push notifications. If a set time changes, a stage is delayed, or a surprise guest appears, the app will be the first to tell you. It also sends out crucial emergency alerts, making it an indispensable tool for staying safe and informed.
Create Your Artist Tiers
Once the full schedule drops, it’s time for strategy. Open the lineup—featuring titans like Olivia Rodrigo, Tyler the Creator, Sabrina Carpenter, and A$AP Rocky for the 2026 festival—and categorize every artist into two simple lists:
Tier 1 (Must-See): These are your non-negotiables. The artists you bought the ticket for. You will be at their set, no matter what.
Tier 2 (Nice-to-See): These are the artists you’d love to catch if the timing and location work out. They are your flexible options, the happy bonuses.
This simple act of prioritization is the bedrock of your stage-hopping plan. It allows you to build your day around your top-tier artists and fill the gaps with others, preventing the decision paralysis that comes from having too many choices.
Internalize the Grant Park Layout
Study the festival map like you’re planning a heist. The two main stages are typically located at the far north and south ends of Grant Park, a walk that can easily take 20-30 minutes through a thick crowd. Identify the locations of your Tier 1 artists and mentally map the routes between them. Note the locations of smaller stages, food courts (Chow Town), and, critically, the free water stations. Understanding the physical distances involved will help you make realistic calls about which back-to-back sets are doable and which are pure fantasy.

2. Master the "Perimeter Path" to Navigate Crowds
The center of any festival crowd is a slow-moving, densely packed sea of humanity. Trying to cut directly through the middle to get from one stage to another is a rookie move that wastes time and energy. The secret to swift movement is to think like a river, flowing where the resistance is lowest.
Stick to the Arteries
The most effective way to navigate Lollapalooza Chicago is by using the perimeter paths. Instead of plunging into the heart of the crowd, stick to the designated walkways along the sides. These paths, often lining the edges of the park or separating vendor areas, are the festival's arteries. While they may look like the longer route on a map, they are almost always faster than trying to push through a stationary audience. Make a mental note of these pathways when you first arrive.
Live by the 15-Minute Rule
If your next Tier 1 artist is on a stage across the park, you need to be ruthless with your timing. Implement the 15-Minute Rule: leave the current set 15 minutes before it ends. This gives you a critical head start, allowing you to exit the immediate crowd before the mass exodus begins when the music stops. It might sting to walk away from the end of a great performance, but that small sacrifice ensures you’re in a good position for the next one, rather than hearing it faintly from a quarter-mile away.
3. Hydrate and Fuel Like a Seasoned Athlete
Stage-hopping is a sport. You’ll be on your feet for 10 hours a day, walking several miles under the summer sun. You’re not just attending a concert; you’re entering a temporary city that generates a staggering economic impact—estimated at over $440 million. That scale demands respect and a bit of preparation.
Make Water Your First Priority
Lollapalooza provides free water refill stations throughout the grounds. When you first enter Grant Park, make it your mission to locate the station nearest the entrance and the stages you’ll be frequenting. Dehydration is the number one enemy of the festival-goer; it saps your energy, causes headaches, and can ruin your entire weekend. Make it a personal rule to refill your water bottle every single time you pass a station.
Pro-Tip: Bring a collapsible water bottle or an empty hydration pack. It's light, complies with security rules, and allows you to carry more water than a standard bottle. This means fewer trips to the refill station and more time enjoying the music.
4. Dress for a Four-Day Marathon, Not a Fashion Sprint
While Lollapalooza is a prime spot for people-watching and showing off your style, practicality should be your guiding principle. Your fashion choices can make or break your physical ability to enjoy the festival.
Your Shoes Are Your Most Important Gear
You will be walking and standing on concrete, grass, and uneven ground for hours on end. This is not the time for brand-new boots that need breaking in, flimsy sandals, or anything with a heel. Your number one priority should be comfortable, supportive, and already broken-in sneakers or walking shoes. Your feet are your foundation for the entire weekend; treat them well.
Prepare for All Four Chicago Seasons in One Day
Chicago weather is famously unpredictable. A day that starts hot and sunny can quickly turn cool and rainy. The key is to dress in layers. Start with a lightweight, breathable base layer and bring a flannel, hoodie, or light jacket that you can tie around your waist during the day and put on after the sun goes down. Most importantly, pack a poncho. It’s small, light, and will be an absolute lifesaver if a sudden downpour occurs.
5. Establish a "Home Base" for Your Crew
Navigating Lollapalooza Chicago with friends is a core part of the experience, but it’s incredibly easy to get separated. Cell service is notoriously unreliable when tens of thousands of people are trying to use it at once, so you can’t count on a text message or call to find your group.
Why a Meeting Point is Non-Negotiable
Before you even think about splitting up to see different artists, establish a clear, specific, and easy-to-find meeting point. This is your group’s "home base." If anyone gets lost, their phone dies, or you just need to regroup, everyone knows exactly where to go.
How to Choose a Good Spot
Don’t pick a generic spot like "the fountain" or "the food court." Choose a unique and unmistakable landmark. A good meeting point is something like, "the giant silver sculpture near the Buckingham Fountain" or "the corner of the 'Deep Dish' pizza stand in Chow Town." Pick a spot that is slightly away from the main walkways to avoid being constantly jostled. Check in at your home base at pre-determined times to ensure everyone is safe and accounted for.

6. Embrace the Journey Between the Stages
Stage-hopping isn’t just a commute; it’s an opportunity. The journey from one performance to another is part of the festival experience itself. Instead of seeing it as a chore, reframe it as a chance for discovery and inspiration.
Discover Your Next Favorite Band
As you walk the perimeter paths, you’ll pass smaller stages where artists you’ve never heard of are playing. Pause for a few minutes and listen. This is how you stumble upon incredible new music. Some of the most memorable Lollapalooza moments happen not at the massive headliner stages, but in the intimate settings of the BMI or Grove stages. Let your ears guide you.
Explore the Full Festival Experience
Lollapalooza is more than just a concert. It’s a massive cultural event filled with creativity. On your way from one stage to the next, take a detour through the art installations, check out the merch tents, or see what activations the sponsors have set up. This spirit of creative discovery is what fuels the best entrepreneurs. If you're feeling inspired by the artistry around you, channel that energy into your own project with our free Digital Product Ideas Guide. By exploring, you break up the monotony of walking and get a richer, more complete festival experience.

7. Plan Your Grand Escape in Advance
How you leave the festival is just as important as how you navigate it. At 10 PM, when the final headliner finishes, a massive wave of people will pour out of the Grant Park exits, creating a human traffic jam that can be overwhelming and slow.
Beat the Final Rush
Just as with the 15-Minute Rule for stage-hopping, consider leaving a few minutes before the absolute end of the night. Slipping out during the last song or just before the encore can save you up to an hour of being stuck in a slow-moving crowd. You’ll get to public transit or your rideshare pickup spot ahead of the main surge, which is a priceless advantage after a long day.
Know Your Public Transit Route Cold
The best way to get to and from Lollapalooza Chicago is by using the CTA rail system. Multiple downtown street closures make driving or using rideshares near the park a nightmare. Before the festival, identify the closest CTA station to your accommodation and memorize the route to and from the park exits. Having this plan locked in will prevent you from wandering aimlessly with a dead phone at the end of a long day.
Pro-Tip: If you must use a rideshare, set your pickup location several blocks away from the Grant Park exits. Walk away from the chaos and toward your pin. You'll escape the immediate surge pricing, and your driver will be able to find you much more easily than in the gridlock traffic near the festival grounds.
Your Blueprint for Lollapalooza Domination
The overwhelming scale of Lollapalooza can intimidate even the most enthusiastic music fan, but it doesn’t have to. With a strategic approach, the festival transforms from a logistical puzzle into the ultimate musical playground. By preparing in advance, navigating smartly, and taking care of your body, you shift from being a passive attendee to the master of your own experience. With these stage-hopping tips, you're now fully equipped with the knowledge of a seasoned pro, ready to conquer Lollapalooza Chicago and create a weekend of flawless, unforgettable memories.

Your Lollapalooza adventure is just one part of an incredible trip. To make the most of your time in the Windy City and beyond, check out our comprehensive Travel Guide. It’s packed with insider tips for exploring the best destinations across the USA.
Don't Miss Out! Subscribe for Exclusive Content
SubscribeComments 0
No comments yet
Be the first to share your experience!
Dont Miss Out! Subscribe for Exclusive Content
San Francisco Cherry Blossoms: A Local's Guide to the Blooms
Halloween SF: Haunts Without Horrors
SF Festivals: 7 Must-See Lineups
Christmas SF: Lights & Wharf Wonders
SF Pride: 6 Route & Party Hacks
