TrekGuider @trekguider
FTC Affiliate Disclosure: Stay Compliant as a Travel Creator

Let’s talk about the single most valuable asset in your travel content business: trust. It’s the bedrock of your brand, the reason your audience listens, and the currency that turns recommendations into revenue. Yet, there’s a legal landmine many creators unwittingly step on that can shatter that trust in an instant: the Federal Trade Commission (FTC).
In a creator economy where the affiliate marketing industry is a $93 billion juggernaut, operating with professional integrity isn't just good ethics—it's a brilliant business strategy. The creators hitting the reported average of $13,847 a month aren't just getting lucky; they're building resilient businesses on a foundation of transparency. But the rules around disclosure can feel like a confusing maze of legalese, leading many to either ignore them or implement them incorrectly. This isn't just a minor slip-up; it's a mistake that can get you kicked out of affiliate programs, alienate your audience, and attract unwanted legal attention.
This guide is your definitive, jargon-free map through that maze. We're breaking down the exact rules, providing copy-and-paste templates for every platform, and giving you the confidence to monetize ethically and legally. Mastering compliance is at the heart of a successful business, a topic we explore from every angle in our comprehensive pillar page on Travel Affiliate Programs: The 2026 Ultimate Guide.
What Exactly Is an FTC Affiliate Disclosure?
At its heart, an FTC affiliate disclosure is a simple, honest statement. It informs your audience that you have a "material connection" to a product or service you're recommending. In plain English, if you stand to earn a commission, get a free product, or receive any compensation when someone uses your link, you are legally required to tell them.
This isn't just red tape. It serves two purposes that are vital to your business:
It’s the Law: The FTC is America's consumer protection agency. Its job is to prevent deceptive advertising, and hiding a paid endorsement is considered deceptive. Compliance is non-negotiable.
It Forges Unbreakable Trust: In the creator world, transparency is a superpower. When you're upfront about your affiliate relationships, you prove you have nothing to hide. This makes your audience more likely to trust your recommendations, not less, because they see you as an honest broker.
Pro-Tip: Stop thinking of your FTC affiliate disclosure as a legal chore. Start seeing it as a badge of honor that signals your commitment to professionalism and respect for your audience.

The "Clear and Conspicuous" Standard: Your Four-Point Compliance Checklist
The FTC’s mandate boils down to two words: "clear and conspicuous." This isn’t just vague legalese; it’s an actionable standard built on four pillars. If your disclosure fails on even one, it’s not compliant.
1. Prominence: It Must Be Impossible to Miss
Recommended: Travel Creator Toolkit: 34 Essential Apps and Resources
Recommended: Digital Product Ideas: How to Make Money From Your Next Trip
Your disclosure can't be an afterthought. It needs to be presented in a font, color, and location that a typical user can't help but see. That means no tiny, light-gray text hidden in a crowded footer.
2. Presentation: It Must Be in Plain English
Ditch the corporate jargon. Your disclosure needs to be written in simple, straightforward language that anyone can understand instantly.
Excellent: "This post contains affiliate links. If you buy something through one of these links, I may earn a commission at no extra cost to you."
Poor: "This site is a participant in affiliate advertising programs designed to provide a means for sites to earn advertising fees."
3. Placement: It Must Appear Before Any Links
This is the rule creators break most often. The disclosure must be placed where your audience will see it before they scroll to your first affiliate link. Placing it at the bottom of your post is a clear violation.
4. Proximity: It Must Be Close to the Action
The disclosure should be as close to your recommendations as possible. For a blog post, a single, clear statement at the very top of the article is the gold standard and covers all the links that follow.

Your Platform-by-Platform Disclosure Playbook (with Templates)
The four pillars apply everywhere, but how you build them changes with the platform. Here’s your definitive guide.
For Your Travel Blog or Website
This is your home base, and the rules are clearest here. Your disclosure must be at the top of the article, before the main content begins.
Compliant Placement: At the very beginning of the post.
Non-Compliant Placement: In the sidebar, in the footer, or on a separate "Disclosures" page.
Template You Can Use:
(Heads up! This post contains affiliate links. If you book or buy something through one of my links, I may earn a small commission at no extra cost to you. This helps me keep the adventures coming. Thanks for your support!)
For Instagram (Posts, Stories, and Reels)
On social media, disclosures must be instantly visible without a user having to click "see more."
Compliant Placement: Within the first three lines of the caption.
Non-Compliant Placement: Buried in a long block of hashtags at the end.
Pro-Tip: For maximum clarity, the FTC recommends using simple, unambiguous terms.
Templates You Can Use:
For Captions: Start your caption with Ad: or Sponsored:.
Hashtags: Use clear, upfront hashtags like #ad or #sponsored. While #affiliate is used, it's less clear to the average consumer.
For Stories/Reels: The best method is using Instagram's built-in "Paid Partnership" label. If that's not an option, superimpose clear text like "Ad" or "Sponsored" on the screen and mention it verbally.

For YouTube Videos
A compliant YouTube video requires a two-pronged disclosure: one verbal, one written.
Compliant Placement: Stated verbally near the beginning of the video AND written in the description box above the "show more" fold.
Non-Compliant Placement: Only written in the description box where a user has to click to see it.
Templates You Can Use:
Verbal Script: "Just a quick heads-up before we get started—this video contains affiliate links. So if you decide to book that incredible tour I'm about to show you, I might earn a small commission, which is a huge help in supporting this channel!"
Description Box Text: DISCLOSURE: This video and description may contain affiliate links, which means that if you click on one of the product links, I’ll receive a small commission at no additional cost to you.
Don't Forget Referral Links
The rules for an FTC affiliate disclosure extend beyond traditional product sales. They cover any "material connection," and that absolutely includes referral programs. If you share a link that gives a friend a discount and earns you a credit or bonus, that relationship must be disclosed.
This is particularly relevant for modern creator platforms. For example, when you invite fellow creators to join the TrekGuider Seller Platform using your unique referral link, you must be transparent about the fact that you stand to benefit. The best disclosures frame this as a win-win.
Templates for Referral Links:
Simple & Direct: "This is my referral link. If you sign up, I may receive a bonus from TrekGuider."
Benefit-Focused: "Use my link to join the TrekGuider Seller Platform! You'll get mention the benefit, e.g., a 15% discount on your first purchase, and I'll get a small commission to help support my work."
The Travel Creator's Toolkit
Mastering compliance is a key part of building a professional content business. To help you organize your entire strategy—from legal checklists to content templates—we've created the ultimate resource bundle. It’s designed to help you operate like a pro from day one.
Download Your Free Bundle: The Travel Creator's Toolkit Today!
Frequently Asked Questions (FAQ)
1. Is it enough to have a "Disclosure Policy" page on my website? No. While having a dedicated policy page is a good practice, it does not satisfy the FTC's requirement for a disclosure that is proximate to the recommendation. The disclosure must be on the same page as the affiliate links themselves.
2. Do I need to disclose if I received a product for free, even if I'm not getting paid? Yes. Receiving a product or service for free (like a complimentary hotel stay or a free piece of luggage) is considered a "material connection" and must be disclosed just as you would a monetary commission.
3. Can I just use #affiliate in my social media posts? While it's better than nothing, the FTC has indicated that it prefers clearer, more universally understood terms like #ad or #sponsored. The term "affiliate" may not be clear to everyone in your audience.
Your Commitment to Transparency
The world of FTC affiliate disclosure is not designed to be a trap. It’s a framework for honest communication. By embracing these rules, you’re not just protecting yourself legally; you’re making a powerful statement to your audience that you value their trust above all else.
You now have the knowledge and the templates to implement compliant disclosures with confidence across every platform. See this not as a chore, but as a professional standard that elevates your brand. In the creator economy, transparency isn't just good policy—it's the ultimate currency.
Read the full guide: The Travel Blogger's Playbook to Affiliate Marketing Mastery
Travel News


Comments 0
No comments yet
Be the first to share your experience!
You May Also Like

Ultimate USA Holidays Guide: Top Picks

Essential Affiliate Tools: From Tracking to Full Optimization

Avoid These 5 Affiliate Landing Page Mistakes for Better Conversions

Affiliate Keyword Research Mastery for Travel Blogs

Booking.com Affiliate Review: Pros, Cons & Earnings

Decoding Affiliate Commission Rates: Benchmarks for Travel Creators
TrekGuider @trekguider
San Francisco Cherry Blossoms: A Local's Guide to the Blooms

The cherry blossom experience in San Francisco is not a grand, sweeping spectacle. It’s something more intimate, more soulful. It’s about turning a corner in a vibrant, historic neighborhood and finding yourself under a delicate canopy of blossoms, the scent of ramen broth mixing with the faint fragrance of spring. It’s a celebration rooted not in diplomacy, but in the fierce resilience of a community.
This is a concentrated jewel box of culture. But that intimacy comes with its own challenges. The Northern California Cherry Blossom Festival, the largest on the West Coast, packs over 220,000 people into the tight-knit blocks of Japantown. A poorly planned visit can quickly devolve into a frustrating battle with crowds, leaving you with more stress than serenity.
This isn’t just another guide. This is your strategic playbook for experiencing San Francisco’s cherry blossoms like a local. We’ll deconstruct the bloom’s tricky timing, reveal the best viewing spots both in and out of the festival’s epicenter, and provide the transportation hacks you need to navigate the city like a pro. By the end of this, you’ll have a plan to witness one of America’s most meaningful cultural celebrations in all its glory.
A Story of Resilience: The Soul of the Festival
To truly appreciate the blossoms here, you have to understand their story. San Francisco’s are proof of a community’s will to survive. Japantown, or Nihonmachi, is one of only three remaining in the United States, a neighborhood that has weathered unimaginable challenges.
After the forced internment of Japanese Americans during WWII, the community returned to find their homes and businesses lost. In the 1960s, city redevelopment projects displaced thousands more. The Northern California Cherry Blossom Festival was born from this turmoil. First held in 1968, it was a defiant celebration of culture and a powerful statement that the community was here to stay.
So when you stand in the Peace Plaza, you’re standing on historic ground. That iconic, five-tiered structure is the Peace Pagoda, a gift from San Francisco’s sister city of Osaka, designed by the renowned Japanese architect Yoshiro Taniguchi. It’s not just a landmark; it’s the spiritual anchor of the entire festival. Every blossom that blooms here feels more meaningful because of the history it represents.
Decoding the Bloom: Festival Dates vs. Nature’s Whim
The first mistake visitors make is confusing the festival schedule with the flowers’ schedule. They are two separate things.
For your planning purposes, here are the official festival dates, which traditionally span two weekends in April:
2026 Northern California Cherry Blossom Festival: April 12-13 & April 19-20, 2026
But here’s the critical distinction every visitor must understand: the festival dates are not the bloom dates. The festival is a fixed celebration of culture, while the blossoms themselves are a fleeting, unpredictable miracle of nature. Your goal is to find the magic window where the two overlap.

The Nuance of "Peak Bloom" in the Bay Area
In San Francisco, "peak bloom" is a rolling event, not a single moment. It depends on the tree variety and the city’s famously fickle microclimates.
The First Wave (Yoshino): The delicate, pale pink Yoshino cherry trees are typically the first to bloom, usually from late March into early April. These are the classic, ethereal blossoms you see in the Japanese Tea Garden.
The Second Wave (Kwanzan): Following the Yoshino are the Kwanzan cherry trees, which produce much fuller, fluffier, and deeper pink blossoms. These are hardier and their bloom often coincides perfectly with the festival’s second weekend and the Grand Parade, making for a spectacular show in Japantown.
Predicting the bloom is an art, not a science. A warm, dry winter can sometimes delay the bloom, as the trees need a certain number of "chill hours" to properly set their buds. Your best bet is to monitor social media. The official festival website and the Instagram accounts for the Japanese Tea Garden and SF Botanical Garden are invaluable resources for real-time updates.
Your Strategic Viewing Guide
You can experience the blossoms in three distinct ways: embracing the festival’s vibrant chaos, seeking tranquil beauty in a world-class garden, or discovering a hidden gem beloved by locals.
1. The Epicenter: Japantown & The Peace Plaza
During the festival weekends, the blocks around the Peace Plaza transform into a bustling hub of Japanese culture. You’ll find everything from traditional music and martial arts demonstrations to mouth-watering street food.
In Japantown, timing isn’t just important—it’s everything. It’s the difference between a serene morning stroll among the blossoms and being swept up in a shoulder-to-shoulder river of festival-goers.
Pro-Tip for Foodies: The food booths, known as yatai, are a massive draw. Don't miss the Takoyaki (octopus balls) from Kagura or the sweet, red-bean-filled Imagawayaki. To beat the lines, arrive right at 11 AM when the festival opens and eat first. The lines can be an hour long by 1 PM.
Pro-Tip for Photographers: The best shot of the Peace Pagoda framed by blossoms is from the Webster Street Bridge overlooking the plaza. For street scenes, a weekday morning before the festival begins offers beautiful, soft light and empty streets.
Go Deeper: For those who want to go even deeper, this is the perfect opportunity to connect with a local expert. The history of Japantown is complex and deeply moving, and a guided walk can reveal stories you’d never find on your own.
2. The Oasis: Golden Gate Park
If you need a break from the festival energy, a short bus ride will take you to the serene landscapes of Golden Gate Park, home to two premier blossom-viewing locations.
The Japanese Tea Garden: This is the oldest public Japanese garden in the United States, and it is an absolute masterpiece. The cherry trees here are artfully placed around the Drum Bridge, pagodas, and koi ponds. It’s a photographer’s dream. There is an entrance fee, but it’s worth every penny. To avoid crowds, purchase your ticket online in advance and go on a weekday morning.
The San Francisco Botanical Garden: Just a short walk from the Tea Garden, the SFBG offers a more sprawling, less crowded experience. Head to the Temperate Asia collection to find their grove of cherry trees. It’s a perfect spot for a quiet picnic under the petals.
3. The Secret Spot: The Palace of Fine Arts
For a truly local experience, head to the Marina district. Tucked away behind the iconic rotunda of the Palace of Fine Arts is a small, enchanting grove of cherry trees. The blossoms here often peak a bit later, sometimes into early May. The sight of the delicate pink flowers against the Greco-Roman architecture is breathtaking and feels like a hidden secret. It’s the perfect place to escape the crowds and enjoy a quiet moment.
Logistics Masterclass: Getting Around
Rule number one: Do not drive to Japantown during the festival. You will spend your entire day circling for non-existent parking. Here’s how to do it right:
Public Transit (Muni): This is your best friend. The 38-Geary and 38R-Geary Rapid buses run constantly along a major corridor and stop one block from the festival. The 2-Clement and 22-Fillmore are also excellent options. Use a Clipper card or the MuniMobile app to make things seamless.
Parking (If You Absolutely Must): The only sane option is the Japan Center Main Garage. The entrance is on Geary Blvd. On festival weekends, you must arrive before 10 AM, or you will find it full.
Ride-Sharing: A good option, but set your drop-off and pick-up points at least three blocks away from the festival’s core (e.g., at Geary & Laguna or Post & Franklin) to avoid getting stuck in gridlock.
Don't-Miss Festival Highlights
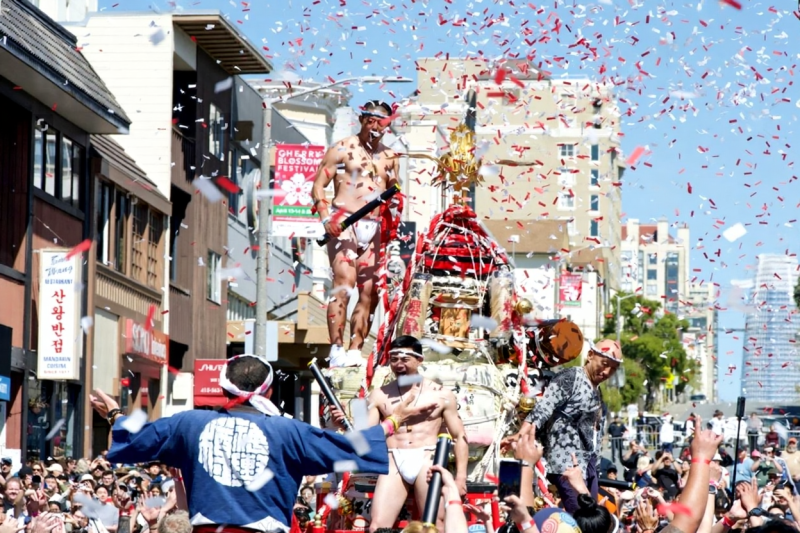
The festival’s crown jewel is the Grand Parade, which closes out the final Sunday of the event. This is a spectacular procession that starts near City Hall and travels up Post Street into the heart of Japantown. You’ll see everything from taiko drummers and dancers to the newly crowned Cherry Blossom Queen and her court—a leadership program for young Japanese American women.
The parade’s incredible finale is the TaruMikoshi. This is a massive, ornate portable shrine weighing over 1,000 pounds, carried on the shoulders of over 100 chanting participants. It’s a powerful, energetic display of community spirit and a must-see spectacle.
Your Pre-Trip Checklist
A little preparation goes a long way in San Francisco.
Dress in Layers: This is the golden rule of SF. A chilly, foggy morning can become a sunny, breezy afternoon in an instant. A fleece or mid-layer under a windbreaker is the standard local uniform for a reason.
Comfortable Shoes: You will be walking. A lot. The hills are no joke. This is not the time to break in new shoes.
Portable Power Bank: Between navigating, taking photos, and using transit apps, your phone battery won’t stand a chance. A power bank is essential.
Cash: While most vendors take cards, the lines for ATMs are long and the smaller food stalls are often cash-only.
The Cherry Blossom Festival is one of the city's signature spring events. For a complete look at what's happening year-round, our complete guide to San Francisco Holidays: Bay Area Buzz is the essential next read for planning a trip around the city's top seasonal events.
An Unforgettable Bloom
San Francisco’s cherry blossom celebration offers something truly special: a world-class cultural event with the heart of a neighborhood block party. It’s a chance to not only witness the stunning beauty of spring but to feel the powerful spirit of a community that has refused to be erased.
By timing your visit strategically, knowing where to find your own quiet corner, and embracing the city’s public transit, you can bypass the stress and create a truly unforgettable memory. You’re no longer just a tourist; you’re an insider, ready to experience this beautiful and meaningful spectacle to its fullest.
Capture the Perfect Bloom
You’re going to take hundreds of photos of the cherry blossoms—don’t let them get lost on your camera roll. Our free collection of Travel Lightroom Presets is designed to make your photos pop with just one click. Transform your shots of the delicate pink petals and vibrant festival scenes into professional-quality images you’ll be proud to share.
Frequently Asked Questions (FAQ)
When is the absolute best time to see the cherry blossoms in San Francisco? While the festival is in mid-to-late April, the "best" time depends on what you want to see. For the most ethereal, classic blossoms in a garden setting, aim for the first week of April at the Japanese Tea Garden. For the full, vibrant festival experience with the fluffy Kwanzan blossoms, the second weekend of the festival is your best bet.
Is the Northern California Cherry Blossom Festival free? Yes, attending the festival in Japantown, including all the stage performances and watching the parade, is completely free. You will need to pay for food, drinks, and any items from craft vendors. Note that visiting the Japanese Tea Garden in Golden Gate Park requires a separate admission fee.
How much time should I budget for the festival? If you plan to eat, watch a few performances, and browse the stalls, give yourself at least 3-4 hours in Japantown. If you want to see the parade, plan for that to take an additional 2 hours of your day.
Is the festival kid-friendly? Absolutely. Kids love the energy, the food, and the parade. There are also often hands-on cultural activities like origami folding. However, the crowds can be overwhelming for small children, so a weekday visit or arriving right at the opening on a weekend is recommended.
Can I see cherry blossoms in San Francisco outside of Japantown and Golden Gate Park? Yes! Besides our "secret spot" at the Palace of Fine Arts, you can often find beautiful blooming trees scattered in residential neighborhoods like the Richmond and Sunset districts. Keep your eyes peeled in late March and April—you’ll be surprised where they pop up.
Recommended: Free Travel Lightroom Presets: The TrekGuider Wanderlust Collection
Recommended: NYC Photo Map: 25 Iconic and Hidden Spots
Travel News
Comments 0
No comments yet
Be the first to share your experience!
You May Also Like

Halloween SF: Haunts Without Horrors

SF Festivals: 7 Must-See Lineups

Christmas SF: Lights & Wharf Wonders

SF Pride: 6 Route & Party Hacks

Chinese New Year SF: Parade Essentials

San Francisco Holidays: Bay Area Buzz
TrekGuider @trekguider
Solo Travel for Men: An Honest Guide to the Road Less Traveled

You feel that pull, don't you? It's the spark you get from a photo of a rugged coastline or a bustling foreign market—the call to adventure, to test your limits, and see the world on your own terms. But then the "what ifs" rush in. Are the logistics too complicated? Will it be lonely? Is it weird to travel by yourself? This guide is here to tell you those fears are normal, but they shouldn't be the reason you stay home. This is your definitive playbook for planning and executing your first incredible solo trip.
This hesitation is the silent thief of profound, life-altering experiences. It keeps you anchored in the familiar while a world of opportunity for growth, resilience, and radical self-discovery passes you by. Every year you put it off is a year you don't learn what you're truly made of when no one else is around to rely on. The comfort zone, once a safe harbor, slowly becomes a cage.
While the ultimate goal for many is creating unforgettable memories with loved ones, a journey of self-discovery through solo travel can be the most profound preparation. It builds the confidence and worldview that enriches every future trip, including those you'll find in Family Travel Ideas: The 2026 Guide to Unforgettable Trips.
Let's cut through the noise. This isn't another blog post filled with vague platitudes. This is an operational playbook, a mission briefing for one of the most rewarding journeys you'll ever undertake. We will dismantle every one of your concerns and equip you with the tools, tactics, and confidence to take that first monumental step. By the end of this guide, the idea of traveling alone won't be an intimidating fantasy; it will be your next actionable, exciting mission.
Why Going It Alone is a Modern Rite of Passage
In our day-to-day lives, men are often slotted into specific roles: the provider, the leader, the planner, the rock. These roles, while important, can also be limiting. Solo travel is a powerful antidote, a hard reset that strips away these external expectations and forces you to confront a more fundamental question: Who are you when no one is watching? The benefits aren't just about cool stories; they are tangible upgrades to your character.
Radical Self-Reliance: When you're alone in a new country and you miss the last train, there's no one to turn to for a solution. You have to figure it out. This isn't a hypothetical exercise; it's a real-time test of your problem-solving skills. You learn to trust your own judgment, navigate ambiguity, and find solutions under pressure. This builds a deep, unshakable confidence that permeates every other area of your life.
The Power of Decisive Action: At home, decisions can be made by committee. On the road, you are the committee. Where to eat, what to see, when to splurge, when to save—every choice is yours. This constant cycle of decision and consequence sharpens your instincts and teaches you to be decisive, cutting through the paralysis of overthinking.
A Hard Reset for the Mind: Routine is the enemy of growth. Solo travel is the ultimate pattern interrupt. It forces you out of your physical, mental, and social comfort zones, exposing you to new perspectives, cultures, and ways of thinking. This novelty stimulates your brain, fostering a level of creativity and open-mindedness that's difficult to achieve when you're stuck in a rut.
Forging Genuine Human Connection: Traveling with a partner or group can create a social bubble. When you travel alone, you are more approachable and more motivated to connect with others. These interactions—with fellow travelers in a hostel common room, a local shopkeeper, or a guide—are often more authentic and memorable. You learn to listen more and connect with people from vastly different backgrounds, building empathy and social skills.
A Step-by-Step Playbook for Launching Your Solo Journey
The biggest hurdle isn't the cost or the time off; it's inertia. Faced with a world of options, it's easy to get stuck in the planning phase forever. This playbook is designed to break that inertia and propel you from your couch to the boarding gate.
Step 1: Define Your Mission. What Kind of Solo Trip Are You After?
Recommended: Stress-Free Flying with Kids: Airport, TSA, and In-Flight Guide
Recommended: Travel Guide: Trip Planning, Flights, and Avoiding Tourist Traps
Before you look at a map, look in the mirror. Why are you doing this? Your motivation should define your destination.
The Recharge: Is the goal to decompress and escape the daily grind? You're looking for low-stress, high-comfort environments. Think a quiet coastal town in Portugal, a laid-back island in Thailand, or a cabin in a national park. The mission is relaxation, not a logistical marathon.
The Skill Acquisition: Do you want to learn something new? Pick a place that's a hub for that skill. Head to Costa Rica to learn to surf, to Chiang Mai for a Thai cooking course, or to the Alps for an introductory mountaineering class. This gives your trip a clear purpose and a built-in social structure.
The Frontier Test: Is this about pushing your limits and seeing what you're made of? This calls for a more adventurous destination. Consider trekking in Patagonia, motorbiking through Vietnam, or exploring the cultural depths of Colombia. These trips build maximum resilience.
Step 2: Choose Your Destination
Your first solo trip should be a win. It's about building confidence, not testing your absolute limits. Here are three archetypes for a successful first mission:
The Easy-Win (English-Speaking & High-Infrastructure): These are destinations where the learning curve is gentle. Think Ireland, Scotland, Australia, or New Zealand. The lack of a language barrier removes a major layer of stress, and the well-trodden tourist paths mean logistics are straightforward. You can focus on the experience of being alone without battling constant communication challenges.
The Adventure Hub (Activity-Focused): If your goal is to be active, choose a place known for it. The national parks of the Western USA for hiking, the mountains of British Columbia for biking, or Queenstown, New Zealand for adrenaline sports. These places are full of other active, often solo, travelers, making it easy to meet like-minded people.
The Backpacker's Trail (Social & Budget-Friendly): Southeast Asia (Thailand, Vietnam) or parts of South America (Peru, Colombia) are legendary for a reason. They offer an incredible value for money and a built-in social infrastructure of hostels, tours, and transportation that caters specifically to independent travelers. It's almost impossible not to meet people.

Step 3: The Budget
Your budget dictates your trip's style and duration. Be realistic and thorough. A well-structured plan, perhaps organized with a Travel Itinerary Template, is your best friend here.
Big Ticket Items: Start with the non-negotiables: flights and accommodation. Use tools like Google Flights and Skyscanner to track prices. For lodging, hostels are the most budget-friendly and social option, while private rooms on Airbnb or budget hotels offer more solitude.
Daily Expenses: Research the average daily cost in your chosen destination using sites like Numbeo. This includes food, local transport, and activities. A good rule of thumb is to estimate this and then add a 20% buffer.
Contingency Fund: This is non-negotiable. Have access to an extra $500-$1000 for emergencies—a missed flight, a medical issue, or a lost phone. This isn't for souvenirs; it's your get-out-of-jail-free card.
Pro-Tip: Always carry a portable power bank. A dead phone in an unfamiliar city isn't just an inconvenience; it's a safety risk. It’s your map, translator, and lifeline. Charge it religiously every night.
Step 4: Packing
Overpacking is a rookie mistake. Every item you bring is something you have to carry. The goal is to be prepared, not to bring your entire apartment.

The Right Bag: A travel backpack (40-50L) is far more versatile than a rolling suitcase. It forces you to be disciplined and can handle cobblestone streets, crowded trains, and hostel staircases with ease.
The Clothing Trinity: Pack items that are versatile, quick-drying, and layerable. Merino wool is the gold standard for travel clothing; it's temperature-regulating, odor-resistant, and comfortable. Aim for a week's worth of clothes and plan to do laundry.
3-4 merino wool t-shirts/henleys
1-2 pairs of versatile travel pants (not jeans)
1 pair of shorts (if climate appropriate)
1 packable rain jacket
1 mid-layer fleece or hoodie
4-5 pairs of wool socks and underwear
Essential Gear:
Packing cubes to organize everything.
A quick-dry travel towel.
A universal power adapter.
A basic first-aid kit with pain relievers, blister care, and any personal medications.
A padlock for hostel lockers.
Your Free Toolkit for Smarter Packing
Packing light is a skill. Our free How to Pack Light Guide is a masterclass in efficiency, showing you exactly how to fit everything you need into a single carry-on. Download it now and transform the way you prepare for any trip.
Tactics for Mastering the Solo Experience
Planning is only half the battle. Thriving on the road requires a specific mindset and a set of practical skills. This is where the real growth happens.
Neutralizing the "Big Three" Anxieties of Solo Travel for Men
Let’s address the elephants in the room head-on. These are the primary concerns that hold men back, and each one has a practical solution.
The Fear of Loneliness: This is the most common fear, but it's often misplaced. Being alone is not the same as being lonely.
Stay in Social Environments: Choose hostels with good common areas and organized events (like pub crawls or walking tours). This is the single easiest way to meet other travelers.
Embrace Day Tours: Joining a food tour, a hiking group, or a historical walking tour provides structured, low-pressure social interaction.
Learn a Few Key Phrases: Simply learning "Hello," "Please," and "Thank you" in the local language can break down barriers and make you seem more approachable.
Concerns About Safety: The world is generally safer than the news suggests, but being smart is non-negotiable.
Master Situational Awareness: This is your primary weapon. Constantly run a mental checklist: Where are the exits? Who seems out of place? Walk with purpose and confidence. Avoid flashing expensive electronics or large amounts of cash.
Secure Your Valuables: Keep your passport, extra cash, and credit cards locked in your accommodation. Carry only what you need for the day in a front pocket or a secure bag. Never put your wallet in your back pocket.
Inform Someone: Share your itinerary with a friend or family member back home and check in regularly.
Trust Your Gut: If a situation or a person feels off, it probably is. Remove yourself from the situation immediately. Don't worry about being polite; your safety is your only priority.
The Social Stigma (Is it "Weird"?): Let's be blunt: No one cares. The idea that it's strange for a man to travel alone is a self-imposed mental barrier. In the travel world, it's completely normal. You will see hundreds of other people doing the exact same thing.
How to Meet People Without Being Awkward
The Common Room is Your Stage: In a hostel, the common area is designed for interaction. Don't just sit in a corner on your phone. Sit at a communal table. A simple "Hey, where are you from?" is the universal icebreaker.
Ask for Advice: People love to be helpful. Asking another traveler for a restaurant recommendation is a low-stakes way to start a conversation that can easily lead to "Hey, I was about to head there now, want to join?"
Mastering the Art of Dining Alone: For many, this is surprisingly intimidating.
Sit at the Bar: It's more social and less formal than a table for one. You can chat with the bartender or the people next to you.
Bring a Prop: A book or a journal can make you feel less self-conscious, but try not to hide behind it. Make eye contact and be open to conversation.
Choose Casual Spots: Street food stalls, food halls, and casual eateries are much more comfortable for solo diners than formal restaurants.

Pro-Tip: The "Leading Question" technique is your best conversational tool. Instead of asking a closed question like "Are you having a good trip?" ask an open-ended one like, "What's been the most unexpected thing you've done in this city?" This invites a story, not a one-word answer.
Frequently Asked Questions
What's the best type of accommodation for a first-time solo male traveler?
For maximizing social opportunities and minimizing cost, hostels are unbeatable. Look for ones with highly-rated common areas and organized social events. If you need more privacy and have a larger budget, a private room in an Airbnb or a centrally-located hotel are also great options.
How do I handle eating alone in restaurants without feeling awkward?
Confidence is key. Sit at the bar whenever possible, as it's a more social and casual setting. Choosing less formal spots like food halls or bustling cafes can also feel more comfortable than a quiet, formal restaurant.
Is solo travel for men expensive?
It doesn't have to be. Your biggest expenses will be flights and accommodation. By choosing budget-friendly destinations (like Southeast Asia or Eastern Europe), staying in hostels, and eating like a local, you can travel for a fraction of what a typical resort vacation would cost.
What are some of the safest destinations for a first solo trip?
Countries with a strong tourism infrastructure and low crime rates are excellent starting points. Consider places like Portugal, Ireland, New Zealand, Japan, and South Korea. These destinations offer a great balance of adventure and security.
The Only Thing Left Is to Go
The journey of solo travel for men is far more than a simple vacation. It's a deliberate act of self-investment. It's an opportunity to strip away the noise of daily life, challenge your own preconceived limits, and build a more resilient, resourceful, and worldly version of yourself. The skills you learn are not just travel skills; they are life skills. You will return home not just with photos, but with a quiet confidence that can only be forged in the fires of experience.
The path is laid out. The excuses have been dismantled. The only thing left is to take the first step. Start the research, check the flights, and request the time off. Your adventure is waiting, but it demands that you go out and claim it.

Read the full guide: Family Travel Ideas: The 2026 Guide to Unforgettable Trips
Travel News
Comments 0
No comments yet
Be the first to share your experience!
You May Also Like
Ultimate USA Holidays Guide: Top Picks
Essential Affiliate Tools: From Tracking to Full Optimization
Booking.com Affiliate Review: Pros, Cons & Earnings
Decoding Affiliate Commission Rates: Benchmarks for Travel Creators

Amazon Associates for Travel: Strategies to Maximize Commissions
