Amazon Associates for Travel: Strategies to Maximize Commissions
TrekGuider @trekguider
Let’s be blunt: the Amazon Associates program feels like a paradox. On one hand, it’s the undisputed titan of e-commerce, a platform your audience uses weekly, if not daily. On the other, its core metrics—a paltry 3-4% commission for most travel gear and a 24-hour cookie—seem purpose-built to underwhelm.
This isn't just a feeling; it's a business problem that breeds frustration. You see the industry reports—the affiliate marketing market soaring past $93 billion, with travel creators hitting a reported average of $13,847 a month—and it feels like your Amazon efforts are a high-effort, low-reward distraction. You’re stuck in a cycle of creating content for a platform that seems designed to underpay you, leaving a fortune on the table.
This guide is your way out of that cycle. This is a hyper-focused masterclass on transforming Amazon Associates from a minor annoyance into a consistent and significant revenue stream. We’re moving beyond the basics to deliver advanced, actionable strategies tailored specifically for amazon associates for travel bloggers. You will learn to master high-conversion gear lists, use the SiteStripe tool for maximum efficiency, and navigate the treacherous waters of Amazon’s Terms of Service to build a bulletproof and profitable system, a topic we deconstruct from every angle in our definitive command center for the entire affiliate ecosystem: [Travel Affiliate Programs: The 2026 Ultimate Guide].

The Amazon Paradox: Why a Low-Commission Program is a Top Earner
At first glance, the program’s core metrics are discouraging. So why is Amazon Associates an essential, non-negotiable tool for virtually every top-earning travel creator?
The answer lies in two powerful forces: universal trust and the strategic magic of the 24-hour universal cookie.
First, you don’t have to sell your audience on the legitimacy of Amazon. They already have an account, their credit card is saved, and they trust the platform implicitly. This pre-existing brand equity dramatically reduces friction and leads to higher conversion rates than almost any other retailer.
Second, and most importantly, is the secret weapon: the 24-hour universal cookie. When a reader clicks your affiliate link for a travel adapter, a tracking cookie is placed on their browser. For the next 24 hours, you earn a commission on everything they add to their cart and purchase, not just the travel adapter.
Here’s how this plays out in the real world:
A reader clicks your link for a $15 travel adapter.
While on Amazon, they remember they also need a new $400 camera for their trip, a $150 suitcase, and $50 worth of toiletries.
They add it all to their cart and check out.
You don’t earn a commission on just the $15 adapter. You earn a commission on the entire $615 cart. This is the hidden engine that turns tiny clicks into substantial payouts. Your job isn’t just to sell a single product; it’s to open the 24-hour window.
Strategy 1: Master High-Conversion Content
Because the cookie window is so short, your content must be engineered to capture a user who is in the final stages of planning and ready to buy. Generic travelogues won’t cut it. Your focus must be on creating hyper-specific, product-focused content that solves an immediate purchasing need.

The Power of the Hyper-Specific Gear List
This is your bread and butter. But you must move beyond the generic "My Ultimate Packing List." The key to success is targeting long-tail keywords that attract a user with a very specific problem. Instead of competing with a million other packing lists, you become the definitive resource for a targeted niche.
Instead of: "My Packing List"
Target: "What to Pack for a Two-Week Safari in Tanzania"
Instead of: "Best Travel Cameras"
Target: "Best Vlogging Cameras and Mics for YouTube Travel Channels"
Instead of: "What to Wear in Europe"
Target: "What to Wear in Italy in October (That Isn't Jeans)"
These posts attract highly motivated buyers and are far less competitive to rank for in Google.
The "What's In My Bag?" Post
This is a classic for a reason: it works. This format allows you to showcase your gear in an authentic, personal context. The key is to use your own high-quality photos. Show the gear in use, show it laid out, and explain why each item has earned its place in your bag. This builds immense trust and makes your recommendations feel like they’re coming from a savvy friend, not a salesperson.
The Standalone Product Review
Reserve these for key, high-value, or truly exceptional pieces of gear that are central to your niche. If you are an adventure travel blogger, a deep-dive review of your favorite hiking boots or travel backpack can become an evergreen asset that earns commissions for years. Go into excruciating detail, share your real-world experiences, and include plenty of authentic photos and videos.
Strategy 2: The SiteStripe Workflow for Maximum Efficiency
One of the biggest hurdles to effectively monetizing with Amazon is the time it takes to generate links. Logging into your dashboard, searching for a product, and creating a custom link is a slow, clunky process. This is where mastering the Amazon SiteStripe is a game-changer.
SiteStripe is a free, official toolbar from Amazon that appears at the top of your browser whenever you’re logged into your Associates account and browsing Amazon.com. It allows you to generate a custom affiliate link for any product page with a single click.

Your High-Speed Workflow:
Find the Product: Navigate to the exact product page you want to recommend on Amazon.
Click to Generate: At the top of the page, use the SiteStripe toolbar to instantly get a link. You can choose:
Text: A clean, short amzn.to link.
Image: An image-based link with your tracking ID embedded.
Text + Image: A rich-text box with both the image and a text link.
Copy and Paste: Paste the link or code directly into your blog post.
What used to be a five-minute process now takes five seconds. This efficiency is critical. It allows you to quickly and easily add affiliate links to all relevant content, ensuring you never miss an opportunity to monetize.
Pro-Tip: Use SiteStripe to quickly grab image links. Product images hosted by Amazon are high-quality and load quickly. Using these official image links is often better than uploading your own product photos (for non-personal shots) and can help improve your page load speed.
Strategy 3: Build a Bulletproof System with TOS Mastery
Amazon is notoriously strict, and getting banned from the Associates program is a real risk. An accidental violation of their extensive Terms of Service (TOS) can result in the immediate termination of your account and the forfeiture of all your hard-earned commissions. Protecting your account matters most for any serious amazon associates for travel bloggers.

While you must read the full Associates Program Policies, here are the most common and critical violations that travel creators unwittingly commit:
Never Use Links in Emails: This is a cardinal sin. Amazon strictly forbids the use of affiliate links in any offline manner, including emails, newsletters, PDFs, or e-books. Always link from your email to a page on your blog, and place the Amazon links there.
Don't Cloak Your Links: While link cloaking is a best practice for most affiliate programs, Amazon has specific rules against it. They must be able to clearly identify that the link is coming from your site. Using a standard amzn.to short link generated by SiteStripe is always the safest bet.
Never Mention Specific Prices: Prices on Amazon fluctuate constantly. Stating a price in your article ("This backpack costs $199") is a violation because it can quickly become inaccurate. Instead, use a call-to-action like, "Check the latest price on Amazon."
Disclose, Disclose, Disclose: You must have a clear FTC disclosure on your site. Amazon also requires specific language: "As an Amazon Associate, I earn from qualifying purchases." This should be easily visible on your site.
Comply with Google's Rules: Beyond Amazon's rules, you must also comply with Google's. All paid links, including affiliate links, must use the rel="sponsored" HTML attribute. This signals to search engines that the link is commercial. Thankfully, most modern link management plugins can add this tag automatically, but it is your responsibility to ensure it’s there.
The Professional's Playbook: The Travel Creator's Toolkit
Mastering Amazon is a critical piece of the puzzle, but it's just one piece. To build a truly professional and profitable content business, you need a complete system. Our ultimate resource bundle, [The Travel Creator's Toolkit], is packed with the checklists, content templates, and guides you need to build a resilient and diversified affiliate income stream.
Strategy 4: The Pro-Level Play - Combine Amazon with High-Margin Digital Products
The ultimate strategy for top-earning creators is to use Amazon as a foundational layer in a more sophisticated, diversified income strategy. Amazon is perfect for recommending physical products, but its commissions will never match the profit margins of selling your own digital products.
This is where you combine the high-volume nature of Amazon with the high-margin nature of your own expertise. This is the evolution from affiliate to owner.

The Funnel in Action:
The Blog Post: You write your hyper-specific gear list, "The Ultimate Packing List for a 7-Day Trek in Patagonia."
The Amazon Links: You populate the post with your affiliate links for the perfect hiking boots, waterproof jacket, wool socks, and trekking poles available on Amazon. You solve your reader's immediate gear problem.
The High-Margin Upsell: At the end of the post, you offer the perfect next step. You add a call-to-action that says: "Now that you have the gear, get the complete plan. My premium 'Patagonia Self-Guided Trekking Itinerary' is a downloadable guide with detailed maps, daily schedules, and booking links for all the campsites. Get it now on the [TrekGuider Platform]."
This is the master strategy. You use Amazon to earn commissions on the "what" (the gear) and then sell your own high-margin product that provides the "how" (the plan). This allows you to fully monetize your expertise and build a business that you control completely.
Frequently Asked Questions (FAQ)
1. Can I use Amazon affiliate links on social media like Instagram or Pinterest? Yes, but with extreme caution. You must use the special links generated through the Amazon mobile app's "Mobile GetLink" feature or SiteStripe. You also must clearly identify yourself as an Amazon Associate on the social media profile where the links are shared. Most importantly, the link cannot be on a page that is "behind a gate" (like a private Facebook group).
2. What happens if a product I link to is out of stock? The link will still work and the 24-hour cookie will still be set. If the customer buys something else on Amazon during that window, you will still earn a commission. However, it creates a poor user experience. It's good practice to periodically check your top-performing links to ensure the products are still available.
3. How do I handle international traffic? My readers are from all over the world? This is a critical issue for travel creators. By default, a link to Amazon.com will only earn you a commission if the purchase is made on the US store. To monetize your global audience, you must use a link localization service. Amazon has its own called "OneLink," which can automatically redirect your international visitors to their local Amazon storefront. Third-party services like Geniuslink (Geni.us) offer more advanced features and are very popular with professional affiliates.
Your Blueprint for Amazon Mastery
Stop thinking of Amazon Associates as a low-paying chore. Start seeing it for what it is: a high-volume conversion machine that, when used strategically, can become a powerful and reliable pillar of your income. The key is not to focus on the low commission rate but to obsess over leveraging the 24-hour universal cookie.
By mastering the strategies for amazon associates for travel bloggers—creating hyper-specific content, working efficiently with SiteStripe, staying relentlessly compliant with the TOS, and layering it with your own high-margin products—you transform the program from a source of frustration into a predictable engine for revenue. This is a foundational skill for any serious travel creator looking to build a diversified and resilient business that can fund their adventures for years to come.
Don't Miss Out! Subscribe for Exclusive Content
Subscribe


Comments 0
No comments yet
Be the first to share your experience!
Dont Miss Out! Subscribe for Exclusive Content

Ultimate USA Holidays Guide: Top Picks

FTC Affiliate Disclosure Essentials: Stay Compliant as a Travel Creator

Essential Affiliate Tools: From Tracking to Full Optimization

Avoid These 5 Affiliate Landing Page Mistakes for Better Conversions

Affiliate Keyword Research Mastery for Travel Blogs

Booking.com Affiliate Program Review: Pros, Cons, and Earnings Potential
Lollapalooza: 7 Stage-Hopping Tips
TrekGuider @trekguider
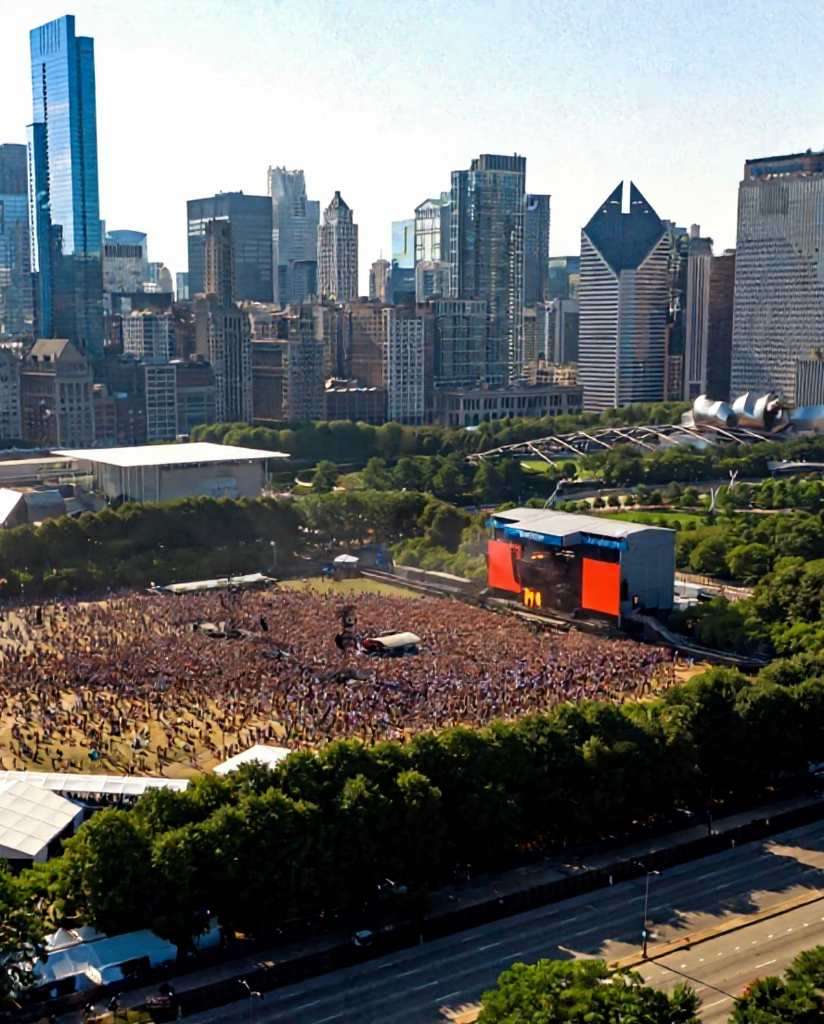
You’ve done it. You scored the golden ticket to Lollapalooza, the four-day musical marathon that transforms Chicago’s Grant Park into the center of the universe. But now, staring at a schedule that looks more like a complex circuit board than a concert lineup, the reality sets in. Dozens of artists you’re dying to see are scattered across a dozen stages, their set times overlapping in a cruel twist of fate. The sheer scale of the festival, with its massive crowds and sprawling grounds, suddenly feels less like a dream and more like a daunting logistical nightmare.
The anxiety begins to bubble. You picture yourself spending half the day trudging from the T-Mobile stage at the south end to the Bud Light stage at the north, only to arrive sweaty, exhausted, and just in time to hear the final chords of your favorite song. The fear of missing out becomes a palpable threat, turning the promise of unforgettable musical moments into a frantic race against the clock. Without a rock-solid plan, your festival experience could be defined by endless walks, missed opportunities, and the nagging feeling of being perpetually in the wrong place. This isn't just about seeing bands; it's about conquering one of the keystone events in a city known for its epic celebrations, a true highlight among the many experiences we cover in our definitive guide to [Chicago Holidays: Windy City Thrills].
Forget the stress. This guide is your strategic playbook for navigating the glorious chaos of Lollapalooza Chicago. We’re breaking down the art of stage-hopping into seven actionable, pro-level tips that will transform you from a frantic fan into a festival veteran. From mastering the map before you even step foot in Grant Park to planning a seamless exit, these strategies will ensure you maximize your time, conserve your energy, and catch every single performance on your must-see list.
1. Become a Pre-Festival Master of the Map & Schedule
The biggest mistake a Lollapalooza rookie can make is showing up and trying to figure it all out on the fly. Grant Park is a massive urban oasis, and when it’s filled with stages, vendors, and hundreds of thousands of people, it becomes a complex, pulsating labyrinth. Your success begins long before you scan your wristband.
Download the Official App Immediately
Long before you even think about packing, your first move is to download the official Lollapalooza app. Consider it your digital command center for the entire weekend, running from July 31 to the final day of the festival. The app provides the most up-to-date schedule, a detailed festival map, and, most importantly, real-time push notifications. If a set time changes, a stage is delayed, or a surprise guest appears, the app will be the first to tell you. It also sends out crucial emergency alerts, making it an indispensable tool for staying safe and informed.
Create Your Artist Tiers
Once the full schedule drops, it’s time for strategy. Open the lineup—featuring titans like Olivia Rodrigo, Tyler the Creator, Sabrina Carpenter, and A$AP Rocky for the 2026 festival—and categorize every artist into two simple lists:
Tier 1 (Must-See): These are your non-negotiables. The artists you bought the ticket for. You will be at their set, no matter what.
Tier 2 (Nice-to-See): These are the artists you’d love to catch if the timing and location work out. They are your flexible options, the happy bonuses.
This simple act of prioritization is the bedrock of your stage-hopping plan. It allows you to build your day around your top-tier artists and fill the gaps with others, preventing the decision paralysis that comes from having too many choices.
Internalize the Grant Park Layout
Study the festival map like you’re planning a heist. The two main stages are typically located at the far north and south ends of Grant Park, a walk that can easily take 20-30 minutes through a thick crowd. Identify the locations of your Tier 1 artists and mentally map the routes between them. Note the locations of smaller stages, food courts (Chow Town), and, critically, the free water stations. Understanding the physical distances involved will help you make realistic calls about which back-to-back sets are doable and which are pure fantasy.

2. Master the "Perimeter Path" to Navigate Crowds
The center of any festival crowd is a slow-moving, densely packed sea of humanity. Trying to cut directly through the middle to get from one stage to another is a rookie move that wastes time and energy. The secret to swift movement is to think like a river, flowing where the resistance is lowest.
Stick to the Arteries
The most effective way to navigate Lollapalooza Chicago is by using the perimeter paths. Instead of plunging into the heart of the crowd, stick to the designated walkways along the sides. These paths, often lining the edges of the park or separating vendor areas, are the festival's arteries. While they may look like the longer route on a map, they are almost always faster than trying to push through a stationary audience. Make a mental note of these pathways when you first arrive.
Live by the 15-Minute Rule
If your next Tier 1 artist is on a stage across the park, you need to be ruthless with your timing. Implement the 15-Minute Rule: leave the current set 15 minutes before it ends. This gives you a critical head start, allowing you to exit the immediate crowd before the mass exodus begins when the music stops. It might sting to walk away from the end of a great performance, but that small sacrifice ensures you’re in a good position for the next one, rather than hearing it faintly from a quarter-mile away.
3. Hydrate and Fuel Like a Seasoned Athlete
Stage-hopping is a sport. You’ll be on your feet for 10 hours a day, walking several miles under the summer sun. You’re not just attending a concert; you’re entering a temporary city that generates a staggering economic impact—estimated at over $440 million. That scale demands respect and a bit of preparation.
Make Water Your First Priority
Lollapalooza provides free water refill stations throughout the grounds. When you first enter Grant Park, make it your mission to locate the station nearest the entrance and the stages you’ll be frequenting. Dehydration is the number one enemy of the festival-goer; it saps your energy, causes headaches, and can ruin your entire weekend. Make it a personal rule to refill your water bottle every single time you pass a station.
Pro-Tip: Bring a collapsible water bottle or an empty hydration pack. It's light, complies with security rules, and allows you to carry more water than a standard bottle. This means fewer trips to the refill station and more time enjoying the music.

4. Dress for a Four-Day Marathon, Not a Fashion Sprint
While Lollapalooza is a prime spot for people-watching and showing off your style, practicality should be your guiding principle. Your fashion choices can make or break your physical ability to enjoy the festival.
Your Shoes Are Your Most Important Gear
You will be walking and standing on concrete, grass, and uneven ground for hours on end. This is not the time for brand-new boots that need breaking in, flimsy sandals, or anything with a heel. Your number one priority should be comfortable, supportive, and already broken-in sneakers or walking shoes. Your feet are your foundation for the entire weekend; treat them well.
Prepare for All Four Chicago Seasons in One Day
Chicago weather is famously unpredictable. A day that starts hot and sunny can quickly turn cool and rainy. The key is to dress in layers. Start with a lightweight, breathable base layer and bring a flannel, hoodie, or light jacket that you can tie around your waist during the day and put on after the sun goes down. Most importantly, pack a poncho. It’s small, light, and will be an absolute lifesaver if a sudden downpour occurs.
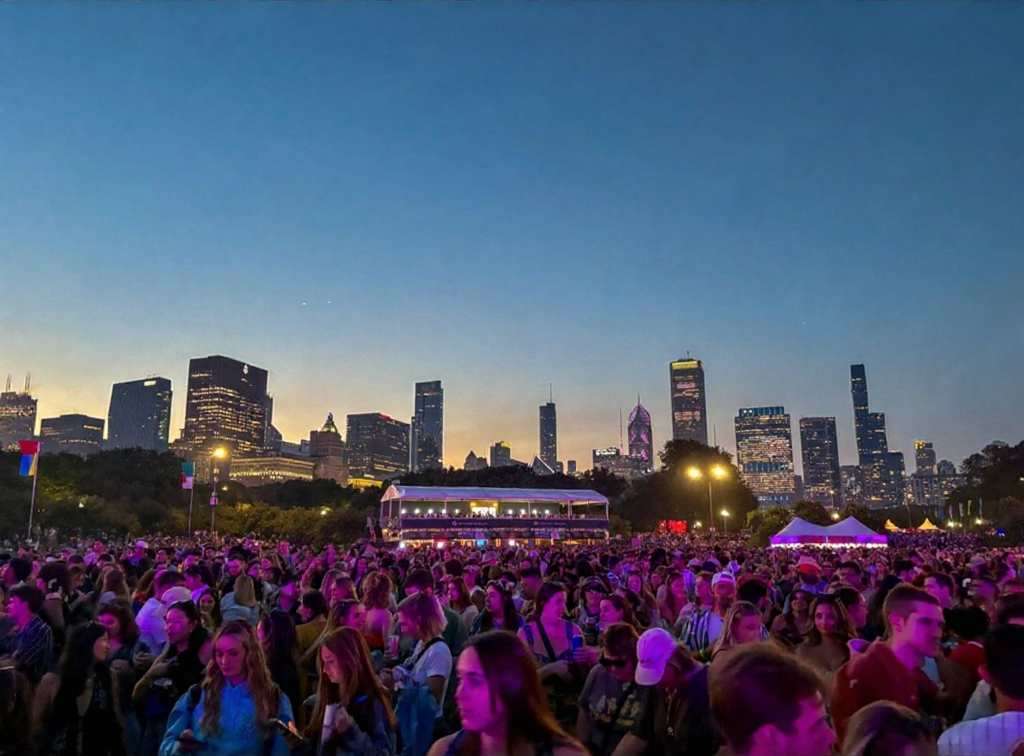
5. Establish a "Home Base" for Your Crew
Navigating Lollapalooza Chicago with friends is a core part of the experience, but it’s incredibly easy to get separated. Cell service is notoriously unreliable when tens of thousands of people are trying to use it at once, so you can’t count on a text message or call to find your group.
Why a Meeting Point is Non-Negotiable
Before you even think about splitting up to see different artists, establish a clear, specific, and easy-to-find meeting point. This is your group’s "home base." If anyone gets lost, their phone dies, or you just need to regroup, everyone knows exactly where to go.
How to Choose a Good Spot
Don’t pick a generic spot like "the fountain" or "the food court." Choose a unique and unmistakable landmark. A good meeting point is something like, "the giant silver sculpture near the Buckingham Fountain" or "the corner of the 'Deep Dish' pizza stand in Chow Town." Pick a spot that is slightly away from the main walkways to avoid being constantly jostled. Check in at your home base at pre-determined times to ensure everyone is safe and accounted for.

6. Embrace the Journey Between the Stages
Stage-hopping isn’t just a commute; it’s an opportunity. The journey from one performance to another is part of the festival experience itself. Instead of seeing it as a chore, reframe it as a chance for discovery and inspiration.
Discover Your Next Favorite Band
As you walk the perimeter paths, you’ll pass smaller stages where artists you’ve never heard of are playing. Pause for a few minutes and listen. This is how you stumble upon incredible new music. Some of the most memorable Lollapalooza moments happen not at the massive headliner stages, but in the intimate settings of the BMI or Grove stages. Let your ears guide you.
Explore the Full Festival Experience
Lollapalooza is more than just a concert. It’s a massive cultural event filled with creativity. On your way from one stage to the next, take a detour through the art installations, check out the merch tents, or see what activations the sponsors have set up. This spirit of creative discovery is what fuels the best entrepreneurs. If you're feeling inspired by the artistry around you, channel that energy into your own project with our free [Digital Product Ideas Guide]. By exploring, you break up the monotony of walking and get a richer, more complete festival experience.

7. Plan Your Grand Escape in Advance
How you leave the festival is just as important as how you navigate it. At 10 PM, when the final headliner finishes, a massive wave of people will pour out of the Grant Park exits, creating a human traffic jam that can be overwhelming and slow.
Beat the Final Rush
Just as with the 15-Minute Rule for stage-hopping, consider leaving a few minutes before the absolute end of the night. Slipping out during the last song or just before the encore can save you up to an hour of being stuck in a slow-moving crowd. You’ll get to public transit or your rideshare pickup spot ahead of the main surge, which is a priceless advantage after a long day.
Know Your Public Transit Route Cold
The best way to get to and from Lollapalooza Chicago is by using the CTA rail system. Multiple downtown street closures make driving or using rideshares near the park a nightmare. Before the festival, identify the closest CTA station to your accommodation and memorize the route to and from the park exits. Having this plan locked in will prevent you from wandering aimlessly with a dead phone at the end of a long day.
Pro-Tip: If you must use a rideshare, set your pickup location several blocks away from the Grant Park exits. Walk away from the chaos and toward your pin. You'll escape the immediate surge pricing, and your driver will be able to find you much more easily than in the gridlock traffic near the festival grounds.
Your Blueprint for Lollapalooza Domination
The overwhelming scale of Lollapalooza can intimidate even the most enthusiastic music fan, but it doesn’t have to. With a strategic approach, the festival transforms from a logistical puzzle into the ultimate musical playground. By preparing in advance, navigating smartly, and taking care of your body, you shift from being a passive attendee to the master of your own experience. With these stage-hopping tips, you're now fully equipped with the knowledge of a seasoned pro, ready to conquer Lollapalooza Chicago and create a weekend of flawless, unforgettable memories.

Your Lollapalooza adventure is just one part of an incredible trip. To make the most of your time in the Windy City and beyond, check out our comprehensive [Travel Guide]. It’s packed with insider tips for exploring the best destinations across the USA.
Don't Miss Out! Subscribe for Exclusive Content
SubscribeComments 0
No comments yet
Be the first to share your experience!
Dont Miss Out! Subscribe for Exclusive Content

San Francisco Cherry Blossoms: A Local's Guide to the Blooms

Halloween SF: Haunts Without Horrors

SF Festivals: 7 Must-See Lineups

Christmas SF: Lights & Wharf Wonders

SF Pride: 6 Route & Party Hacks

Chinese New Year SF: Parade Essentials
The Sanity-Saving System for Your Next Family Road Trip
TrekGuider @trekguider
Staring down a long family road trip and picturing more chaos than cherished memories? You're not alone. The line between an 'epic family adventure' and a 'mobile hostage situation' can be perilously thin, often hinging on a single forgotten charging cable or a rogue juice box.
The internet offers an avalanche of checklists, but this overload often creates more anxiety than it solves. What you really need isn't another random list—it's a bulletproof system designed to transform potential chaos into predictable calm.
This is that system. Forget frantic, last-minute packing. We're moving beyond what to pack and showing you how to orchestrate a seamless journey, from pre-trip vehicle checks to a sanity-saving in-car entertainment strategy.
While this guide focuses on the mechanics of a successful road trip, it’s a critical component of a larger travel philosophy. For a broader look at destinations and trip styles, be sure to explore our comprehensive guide to Family Travel Ideas: The 2026 Guide to Unforgettable Trips to find your next perfect adventure.

Your Pre-Launch Sequence: Mastering the 2-Week Countdown
A smooth trip begins long before you pull out of the driveway. This phase is about laying a foundation of safety and organization, giving you unshakable peace of mind before the wheels even start rolling.
The Essential Vehicle Safety Audit: Your First Step
Two weeks before your departure date, it’s time to give your vehicle a thorough check-up. While entrusting this to a certified mechanic is the gold standard, you can perform a solid initial inspection yourself.
Tires: Check the pressure on all four tires (and the spare!) to ensure it matches the recommended PSI on the driver’s side doorjamb. Inspect the tread for wear; a simple way to do this is with a penny. If you can see all of Lincoln's head, it’s time for new tires.
Fluids: Check and top off all essential fluids, including engine oil, coolant, brake fluid, and windshield washer fluid.
Brakes: Listen for any squeaking or grinding noises. If you notice any changes in performance or feel a vibration when braking, have them inspected by a professional immediately.
Lights & Wipers: Test all exterior and interior lights. Check your wiper blades for signs of cracking or wear and replace them if necessary. A sudden downpour is a terrible time to discover your wipers are shot.
Child Car Seat Safety
Vehicle safety extends to your most precious cargo. An improperly installed car seat can be a critical point of failure in an accident. Take these steps:
Check for Recalls: Visit the National Highway Traffic Safety Administration (NHTSA) website to ensure your car seat model has not been recalled.
Verify Fit: Ensure your child meets the height and weight requirements for their current seat.
Confirm Installation: A properly installed car seat should not move more than one inch in any direction at the belt path. Many local fire departments have certified technicians who will inspect your installation for free.
Assembling Your Complete Roadside Emergency Kit
Your vehicle should be equipped with more than just a jack and spare tire. A well-stocked roadside emergency kit is a non-negotiable part of your travel gear.
Jumper cables
Tire pressure gauge and portable air compressor
A well-stocked first-aid kit
Roadside flares or reflective triangles
A multi-tool and a small set of wrenches
Duct tape (because it fixes everything)
Flashlight with extra batteries
Portable phone charger or power bank
High-energy, non-perishable snacks and bottled water
Documentation & Digital Organization
Ensure your car's registration and insurance information are current and easily accessible. It's also wise to have digital copies saved to your phone. Use an app to plan your route, but to keep everything in one place—from reservations to daily plans—a dedicated Travel Itinerary Template is invaluable.
Your Ultimate Road Trip Blueprint
Planning a trip through America's greatest landscapes? Don't leave anything to chance. Our free, printable National Park Road Trip Checklist covers everything from vehicle prep to the one snack you can't forget. Download it now and guarantee a smoother adventure.
A System for Your Family Road Trip Essentials
Effective packing is about organization and accessibility, not just volume. This system ensures that everything you need is exactly where you need it, preventing roadside archaeology in your trunk.

The "Car Command Center": Organizing Your In-Reach Essentials
The front passenger seat area is your mission control. Use a seat-back organizer or a small bin to keep critical items within arm’s reach.
Phone mounts and charging cables
A roll of paper towels and a pack of wet wipes
Hand sanitizer
A small trash bag or designated car trash can
Lip balm, pain relievers, and personal medications
Sunglasses for the driver and co-pilot
The Comfort Kit: Blankets, Pillows, and Personal Items
A comfortable child is a happy child. For each kid, pack a small bag containing their comfort items like a travel pillow, a soft blanket, noise-canceling headphones, and a reusable water bottle.
The Kids' "Go-Bags": Empowering Young Travelers
Give each child a small backpack that is their responsibility. This fosters independence and dramatically reduces "Can you get my...?" requests. Let them help pack it with small toys, a coloring book, a reading book, and their tablet (if applicable).
The Overnight Bag: The Hotel Stop Lifesaver
If your trip includes an overnight hotel stay, this single tactic will save your sanity. Pack one duffel bag with everything the entire family needs for a single night: a change of clothes for everyone, pajamas, toiletries, medications, and charging cables. This prevents you from lugging every suitcase into the hotel.
Your In-Car Entertainment Playbook
Boredom is the mortal enemy of a peaceful road trip. Don’t leave entertainment to chance; deploy a structured strategy to keep spirits high and sibling squabbles low.
Your Secret Weapon Against Boredom
Instead of giving kids all their new activities at once, wrap a few small, inexpensive items and present one every hour or two. The anticipation and novelty work wonders to break up the monotony.
Pro-Tip: Use a hanging shoe organizer on the back of the front seat. Each pocket can hold a new activity, snack, or surprise. This visual countdown gives kids a clear answer to "how much longer?"
The Screen-Free Activity Arsenal
Engage their minds and prevent the glazed-over look of too much screen time with these proven winners:
Audiobooks: A captivating story can make hours fly by. Borrow digital audiobooks for free from your local library using the Libby app.
Podcasts for Kids: Shows like "Wow in the World" or "Story Pirates" are both entertaining and educational.
The License Plate Game: A classic for a reason. Find a printable checklist online to track which states you’ve found.
Travel Journals: Give each older child a blank notebook and encourage them to document the trip.
Travel Bingo: Create or print bingo cards with things to spot on the road (a red truck, a cow, a bridge, etc.).
Using Technology as a Tool, Not a Crutch
Screen time isn't the enemy, but mindless screen time can lead to crankiness. Use it strategically.
Download Everything: Do not rely on cellular service. Download movies, shows, and games onto tablets before you leave.
Set Clear Boundaries: Establish rules for screen time before you start the car.
Invest in Headphone Splitters: This cheap device allows two kids to watch the same movie on one device, preventing arguments.
Mastering Snacks and Drinks for the Road
Constant stops for overpriced gas station food can derail your budget and schedule. A well-planned mobile kitchen keeps everyone fed, hydrated, and happy.

How to Pack a Cooler for Freshness
Pre-chill: Bring your cooler inside the night before and pre-chill it with a "sacrificial" bag of ice.
Ice on the Bottom: Use solid blocks of ice or frozen water bottles on the bottom, as they melt slower than cubed ice.
Layer Strategically: Place drinks at the bottom and more delicate items like sandwiches on top.
Fill the Gaps: Air is the enemy of cold. Fill any empty space with extra ice cubes.
The "Low-Mess" Snack Box
Keep a separate, easily accessible box with snacks that don't require refrigeration and minimize mess. Think protein-packed (string cheese, nuts), clean fruits & veggies (grapes, baby carrots), and crunchy classics (pretzels, goldfish).
Pro-Tip: Use a craft organizer or a tackle box with small compartments to create a "snackle box." This turns snack time into a fun, self-serve activity.
Setting the Tone for a Great Trip
The final piece of your strategy involves managing expectations and the rhythm of the journey itself.
The 2-Hour Rule: Making Pit Stops Part of the Adventure
Plan to stop every two to three hours, even if nobody needs a bathroom break. Use your map app to find interesting parks, quirky roadside attractions, or local ice cream shops. Some of the 4 Unforgettable National Park Family Travel Ideas make for incredible, itinerary-worthy stops.
Embracing Spontaneity
No matter how well you plan, things will go wrong. You’ll hit traffic, or a child will have a meltdown. The most important thing you can pack is a flexible mindset. A relaxed attitude from the parents is contagious and sets the tone for the entire trip.
Frequently Asked Questions
How do you survive a 12-hour car ride with kids?
The key is breaking the trip into manageable chunks. Use the "Slow Reveal" method for new toys and activities, and plan to stop every 2-3 hours. Have one longer stop at a park or playground midday to burn off significant energy.
What are the best mess-free snacks for toddlers in the car?
Focus on dry, bite-sized items that won't cause a sticky disaster. Puffs, small crackers (like goldfish), dry cereal, and raisins are all excellent choices. Avoid anything juicy or crumbly like peaches or flaky pastries.
What should I check on my car before a long road trip?
At a minimum, you must check your tire pressure (including the spare), oil and other fluid levels, brakes, lights, and windshield wipers. For maximum peace of mind on a major trip, have a trusted mechanic perform a full inspection.
Your System for a Memorable Journey
You now have more than just a packing list; you have a complete, systems-based playbook for executing a smooth and memorable road trip. By investing time in this preparation, you’re not eliminating challenges—you're building the confidence and structure to handle them with grace.
You are transforming the drive from a stressful chore into a core part of the family adventure. Pack your bags, load up the car, and get ready to create memories that will last a lifetime.
Don't Miss Out! Subscribe for Exclusive Content
SubscribeComments 0
No comments yet
Be the first to share your experience!
Dont Miss Out! Subscribe for Exclusive Content
Ultimate USA Holidays Guide: Top Picks
FTC Affiliate Disclosure Essentials: Stay Compliant as a Travel Creator
Essential Affiliate Tools: From Tracking to Full Optimization
Booking.com Affiliate Program Review: Pros, Cons, and Earnings Potential

Decoding Affiliate Commission Rates: Benchmarks for Travel Creators
