Christmas Miami: Tropical Lights Tour
TrekGuider @trekguider
You’re dreaming of a classic Christmas—the kind with roaring fires, frosty windowpanes, and the scent of pine in the air. But you look outside, and the reality is 80 degrees, sun-drenched, with palm trees swaying in a gentle sea breeze. You crave that magical, festive spirit, but it’s hard to find when you’re swapping snow boots for sandals.
This disconnect can be jarring. The calendar says December, the stores are playing carols, but the subtropical warmth makes it feel like just another beautiful day in paradise. A nagging worry creeps in: will you miss out on the cozy, twinkling magic of the season? Will your holiday lack the festive punch you look forward to all year? How can you possibly capture the enchantment of Christmas in a place where snowflakes are replaced by sea spray?
The secret is to stop trying to replicate a winter wonderland and instead embrace the vibrant, utterly unique spectacle of a tropical holiday. Consider this your expert-led mission to unlock that magic. We’re going beyond the obvious to build your definitive tour of the dazzling tropical light displays and waterfront events that make a Christmas in Miami truly unforgettable. Forget the sleigh—here, we celebrate with glittering yachts and glowing shorelines. We’ll show you where to find enchanted parks and floating festivals of light, proving that a Miami Christmas doesn’t just rival the traditional version; it offers a brand of high-wattage magic all its own.
The Magic of Contrast: Why a Miami Christmas Shines Brighter
A Christmas in the Magic City is an exercise in brilliant contrasts. It’s where classic holiday traditions get a sun-kissed, subtropical makeover. Instead of pines and firs heavy with snow, you’ll find majestic Royal Palms wrapped from trunk to frond in thousands of shimmering lights, their silhouettes glowing against the warm twilight sky. The crisp, cold air of a northern winter is replaced by gentle, salty breezes carrying the faint sound of distant salsa music mixed with familiar holiday carols.
This fusion of high-energy festivity and laid-back beach culture creates an atmosphere you simply won’t find anywhere else. While our complete guide to [Miami Holidays: 8 Beach Fest Vibes] gives you the 30,000-foot view of the season, this deep dive is dedicated to the glittering, electric heart of a Miami Christmas: the lights. The city’s profound connection to the water is central to its identity, and this is never more apparent than during the holidays. The reflection of a million tiny lights dancing on the calm surface of Biscayne Bay is a sight that rivals any snow-covered landscape—a holiday experience that is both deeply festive and unapologetically Miami.
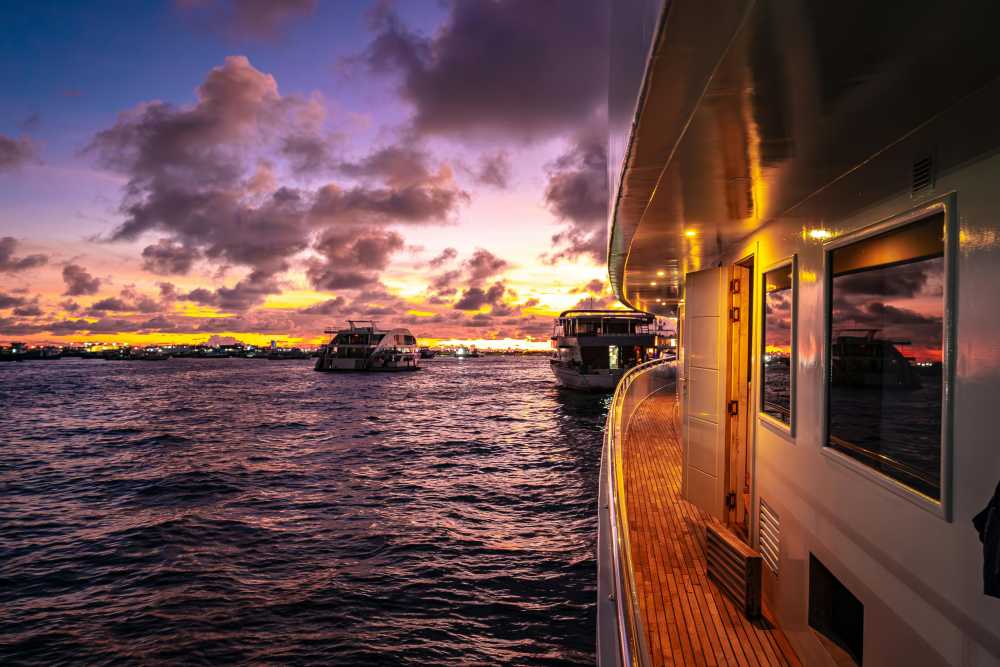
The Crown Jewel of a Christmas in Miami: The Holiday Boat Parades
While other cities have their tree-lighting ceremonies, Miami’s signature holiday tradition takes to the water. The holiday boat parades are the quintessential Christmas in Miami event, a dazzling display of nautical creativity and festive spirit that perfectly captures the city's coastal soul. Forget static neighborhood displays; this is a moving festival of light, a dynamic spectacle that draws thousands to the shores of Biscayne Bay.
What to Expect: A Floating Festival of Lights
Imagine a procession of vessels, from 100-foot luxury yachts and powerful sport-fishers to charming sailboats and even humble dinghies, all transformed into glowing works of art. Each boat is carefully decorated in thousands of colorful lights, often arranged into elaborate and animated designs. You’ll see everything from tropical Santas lounging on flamingo-drawn sleighs to shimmering nativity scenes and synchronized light shows pulsing to holiday music. Many participants add onboard carolers and costumed characters who wave to the cheering crowds, turning the parade into an interactive performance.
The atmosphere is electric and communal. Families and friends gather along the waterfront hours in advance, laying out blankets and setting up picnics as they wait for the show to begin. The air fills with palpable excitement as the first glowing vessel rounds the bend, its lights casting a long, shimmering trail on the dark water.
Pro-Level Viewing Guide: Where to Secure the Best Views
A good vantage point is the difference between a fleeting glimpse and a front-row seat to the magic. Since the parade routes typically traverse Biscayne Bay, any public space with an unobstructed view of the water is a prime candidate.

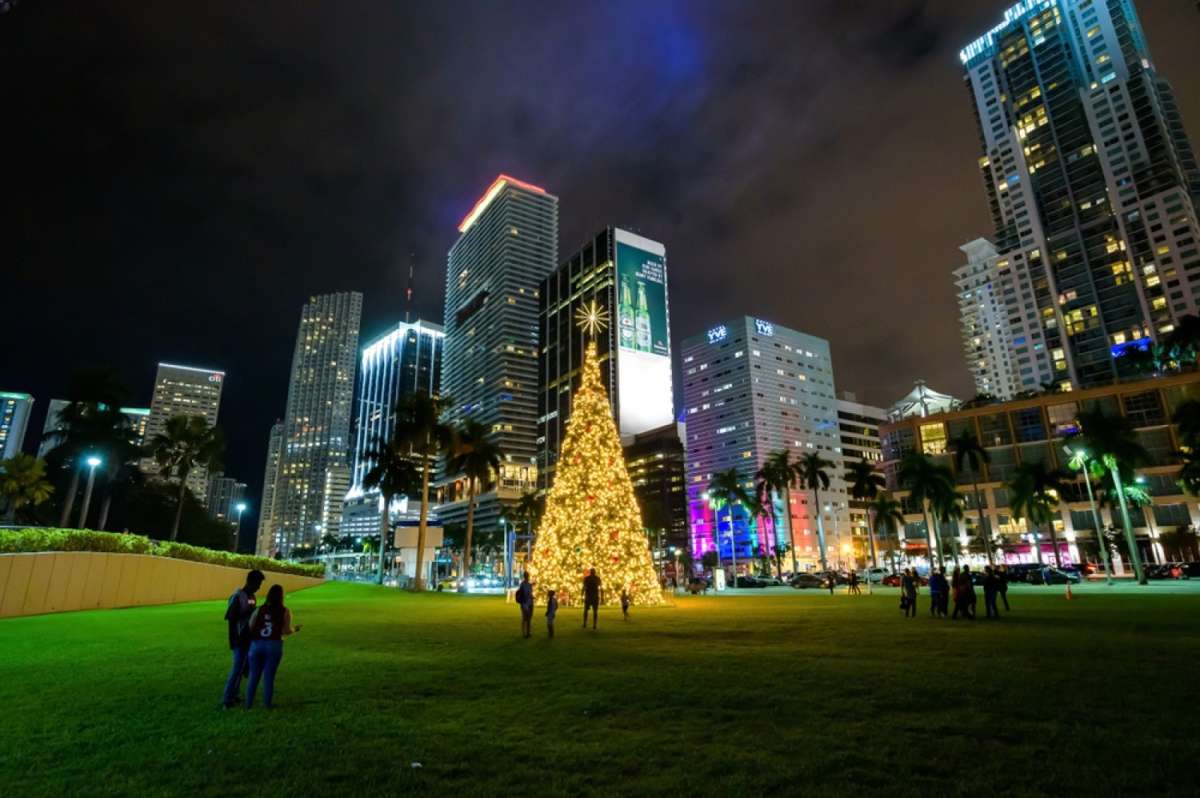
Bayfront Park: As the city's epicenter for major events, Bayfront Park is the most popular and accessible choice. Its sprawling lawns and waterfront promenades offer ample room, but they fill up fast. Arrive by late afternoon to claim a spot near the water's edge.
Venetian Causeway: For a slightly less congested experience, the sidewalks along the Venetian Causeway offer excellent, slightly elevated views of the parade as it moves through the central part of the bay.
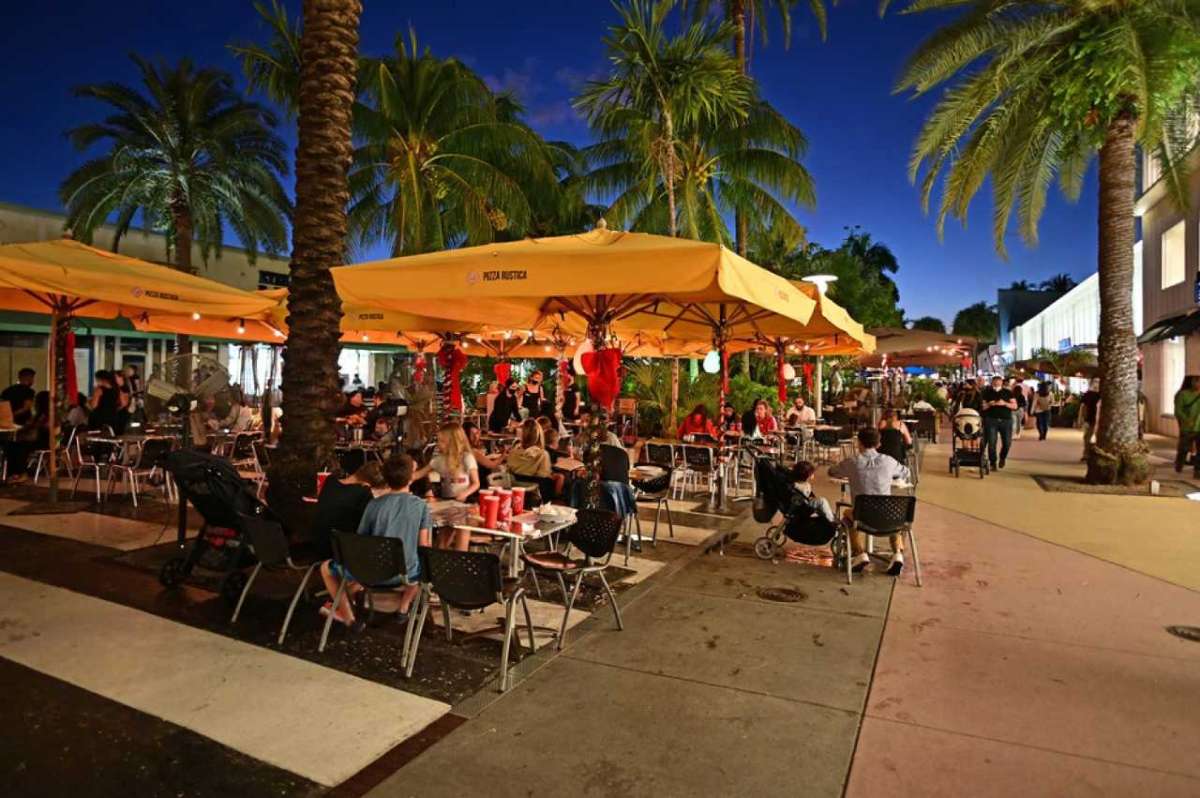
Restaurant Patios: Many waterfront restaurants in Downtown, Brickell, and Miami Beach offer fantastic (and comfortable) viewing spots. This requires planning and reservations weeks in advance, but it allows you to enjoy a festive meal with a world-class show.
Key Biscayne: The parks and beaches on the western side of Key Biscayne that face the bay, such as Hobie Island Beach Park, provide a more relaxed and family-friendly atmosphere away from the downtown hustle.
Pro-Tip: Treat it like a beach day. Arrive at your chosen spot at least 90 minutes before the parade's scheduled start. Pack a cooler with drinks and snacks, bring blankets or foldable chairs for comfort, and download a local radio app—some stations broadcast parade commentary and synchronized music.
Land-Based Spectacles: Immersive Worlds of Light
While the boat parades are a must-see, Miami’s land-based light displays offer weeks of festive enchantment. These attractions provide a more immersive experience, allowing you to walk through glowing landscapes and enjoy a full evening of holiday activities.
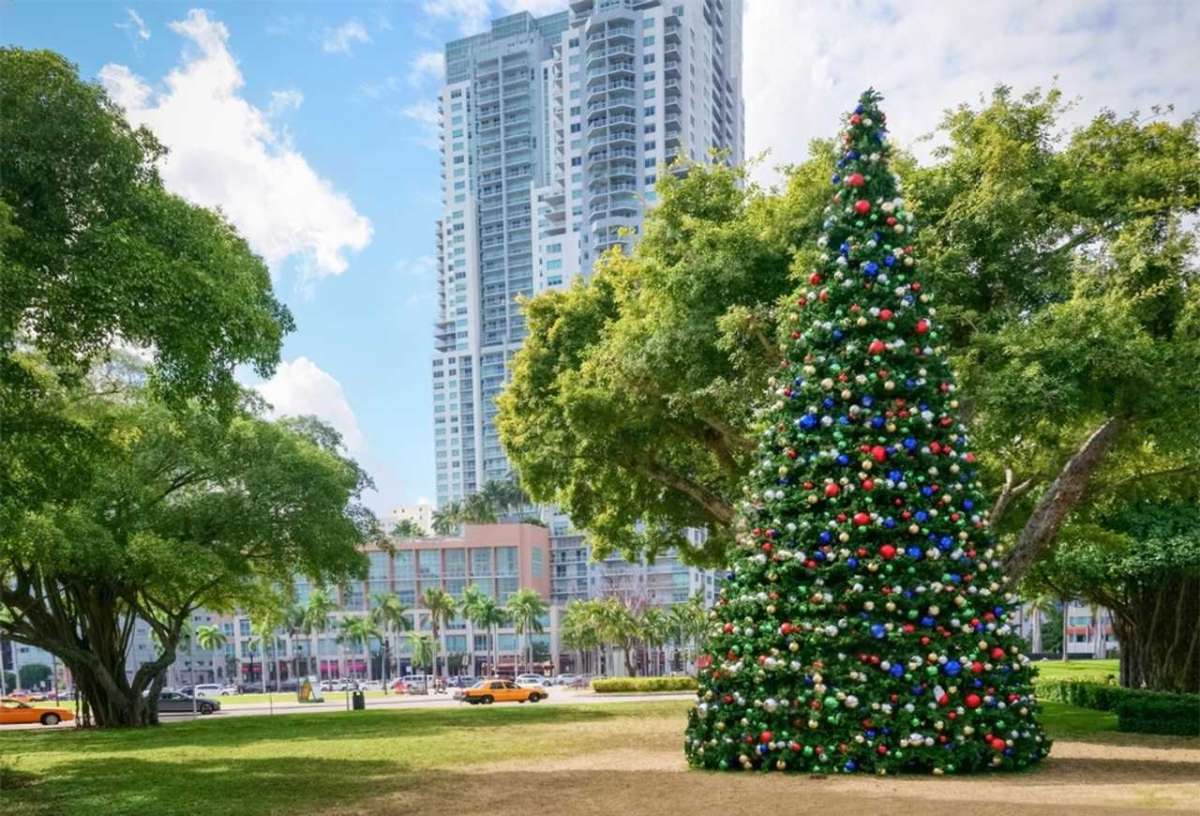
Christmas Wonderland at Tropical Park: A Festive Theme Park
For a one-stop holiday destination that caters to all ages, Christmas Wonderland at Tropical Park is an institution. This sprawling event transforms a beloved local park into a high-energy festive theme park. It’s an ideal outing for families, packed with everything from thrilling rides to gentle carousels, all set against a backdrop of millions of spectacular lights.
The park is designed as a walk-through experience with different themed areas. You can wander through illuminated tunnels synchronized to music, marvel at towering light sculptures of holiday characters, and take photos at countless Instagram-worthy spots. Beyond the lights and rides, Christmas Wonderland features live entertainment, holiday-themed food and drinks (think churros and hot cocoa), and artisan markets perfect for last-minute gift shopping.
The Enchanted Walk: Neighborhoods That Go All Out
One of the simple joys of Christmas in Miami is discovering the festive spirit in its residential neighborhoods. While Miami may not have a single, world-famous district for lights like Brooklyn's Dyker Heights, many of its affluent, waterfront communities embrace the season with gusto.
Take a slow evening drive through the neighborhoods along the Venetian Islands, Key Biscayne, or the Gables-by-the-Sea in Coral Gables. Here, you’ll see magnificent homes and gardens adorned with professional-grade light displays. The true Miami touch is seeing not just the houses, but also the towering palm trees, ancient banyan trees, and private docks lit up in festive colors, their lights reflecting beautifully in the canals and waterways.
Capturing the Glow: Photography Tips for Tropical Lights
Photographing holiday lights, especially moving ones on water, can be tricky. Here’s how to get shots worthy of the spectacle.
Use Night Mode: Modern smartphone cameras have incredible night mode capabilities. Use them. This feature keeps the shutter open longer to capture more light, resulting in brighter, clearer photos without harsh flash.
Find Stability: To avoid blurry shots, especially with longer exposures, brace your phone or camera against a solid object like a railing, a post, or a tripod.
Tap to Focus: Don't just point and shoot. Tap on the brightest part of the light display on your screen. This tells the camera where to focus and properly expose the shot, preventing the lights from becoming blown-out white blobs.
Capture Reflections: Miami's biggest advantage is water. Angle your shots to include the reflections of the lights on the bay or canals. This adds depth, color, and a sense of place to your photos.
Planning Your Tropical Lights Tour: A Step-by-Step Guide
A little strategic planning will elevate your lights tour from a casual outing to a seamless and memorable adventure.
Step 1: Choose Your Experience (Event vs. Exploration)
First, decide on your preferred vibe.
The Boat Parade: This is a high-energy, single-night event. It’s perfect if you love the excitement of a big crowd and a one-of-a-kind spectacle. The trade-off is that it’s a fixed date and can be very crowded.
Land-Based Displays: Attractions like Christmas Wonderland or self-guided neighborhood tours offer far more flexibility. They typically run for several weeks, allowing you to choose a less-crowded weeknight for your visit. This is often the better choice for families with young children.
Step 2: Lock In Your Itinerary
Once you’ve chosen your focus, confirm the details. For official events, check their websites for exact dates, times, and ticket information. Boat parades are weather-dependent, so always check social media channels on the day of the event for any last-minute changes. For a self-guided tour, map out a route in advance to maximize your viewing time.
Step 3: Pack for a Miami "Winter" Night
Packing for a Miami holiday can be deceptive. While days are warm, evenings on the water can get surprisingly cool and breezy. A light jacket, sweater, or pashmina is essential. Comfortable walking shoes are non-negotiable. If you're visiting from abroad and juggling different climates, our [International Travel Checklist] is an indispensable tool. It’s designed to help you remember everything from travel insurance to the perfect light layer for a breezy bayfront evening.
Step 4: Master Transportation and Logistics
Parking near major holiday attractions in Miami ranges from difficult to impossible.
Rideshares: Services like Uber and Lyft are your best friends. They eliminate the stress of finding and paying for parking.
Public Transit: For events centered around Bayfront Park, leave the car behind. Miami’s elevated Metromover is a free and surprisingly scenic way to get downtown, connecting directly to major Metrorail stations and parking garages further afield.
Book Parking: If you must drive, use an app like SpotHero to reserve a parking spot in a garage in advance. This is a pro move that can save you an hour of circling packed streets.
Pro-Tip: For ticketed light displays like Christmas Wonderland, always visit on a Tuesday or Wednesday evening if possible. Crowds are significantly smaller, traffic is lighter, and you’ll have a much more relaxed and enjoyable experience.
Beyond the Lights: Crafting Your Complete Holiday Itinerary
Your tropical lights tour is the perfect centerpiece for a festive Miami getaway, but it’s just the beginning. To build a truly immersive holiday experience, weave in some of the city’s other seasonal offerings. Pair an evening of light-viewing with a festive dinner at a restaurant in Brickell or Coconut Grove. Explore the luxury shops at the Design District or Bal Harbour, which feature stunning, museum-worthy holiday window displays.
A perfect lights tour is just one piece of an unforgettable holiday vacation. To build a complete itinerary—from finding the best seasonal Cuban coffee to planning day trips—our comprehensive [Travel Guide] provides the expert, local insights you need to experience the magic of a Christmas in Miami like a seasoned traveler. It’s your ultimate resource for crafting a holiday that is perfectly tailored to you.
Your Blueprint for a Brilliant Miami Christmas
You don’t need snow or a roaring fireplace to have a spectacular and magical holiday. A Christmas in Miami offers a vibrant, sun-kissed alternative, trading frosty landscapes for the dazzling reflection of a million lights on the water. From the unforgettable spectacle of a holiday boat parade on Biscayne Bay to the family-friendly enchantment of a park transformed into a winterless wonderland, the city is alive with a unique and powerful festive spirit.
You now have the ultimate blueprint to design your own tropical lights tour. You know the signature events to see, the best places to watch them from, and the pro-level tips to make your experience seamless and joyful. You are empowered to create holiday memories that are as warm, bright, and full of life as the city itself. So grab your sunglasses and a Santa hat, and get ready to experience a Christmas that shines brighter than any star on a frosty night.
Don't Miss Out! Subscribe for Exclusive Content
Subscribe


Comments 0
No comments yet
Be the first to share your experience!
Dont Miss Out! Subscribe for Exclusive Content

San Francisco Cherry Blossoms: A Local's Guide to the Blooms

Halloween SF: Haunts Without Horrors

SF Festivals: 7 Must-See Lineups

Christmas SF: Lights & Wharf Wonders

SF Pride: 6 Route & Party Hacks

Chinese New Year SF: Parade Essentials
How to Start a Travel Blog (And Get Noticed)
TrekGuider @trekguider
You have a passion for travel that borders on obsession. Your camera roll is a treasure map of untold stories, and your notes app is filled with the kind of hard-won wisdom that could save a fellow traveler time, money, and stress. The idea of starting a travel blog feels like the perfect way to share it all—a potential path to a life with more freedom and adventure.
But there’s a problem. The moment you consider the "how," a wave of technical overwhelm washes over you. Domains, hosting, WordPress, plugins, SEO—it’s a foreign language, a dense fog of conflicting advice that makes the entire project feel intimidating and out of reach. You see other creators living the dream, and you're stuck in analysis paralysis, believing you need to be a web developer just to get started. Every day you wait, you feel the immense opportunity of the creator economy—a market projected to swell from $250 billion to nearly $500 billion by 2027—slipping through your fingers.
Forget the confusion. This is the guide that cuts through the noise. The old way of starting a travel blog is dead. You don't need to build a website from scratch. This is your chronological, step-by-step playbook that will show you how to start a travel blog presence on a powerful marketplace, letting you focus on what you do best: creating. We'll walk you through building a professional home for your brand in minutes, not months. This is your A-to-Z blueprint for building the foundational asset of your future business. Once this home base is built, you can begin the journey of transforming it into a real enterprise, a journey we map out in our ultimate guide to [How to Make Money Online: A Creator's Guide for 2026].
Why a Marketplace? The Smarter Foundation for Your Creator Empire
Before we dive in, it's critical to understand why starting on a creator marketplace like TrekGuider is a fundamentally better strategy than building a self-hosted blog from scratch. While owning a website was once the only path, today it's a detour filled with technical headaches, maintenance costs, and the slow, grinding challenge of building traffic from zero.
The most resilient and profitable creators still operate on a "Hub-and-Spoke" model, but the "hub" has evolved.
The Old Hub: A self-hosted blog you have to build, manage, and secure yourself.
The New Hub: Your professional creator page on a marketplace like TrekGuider. This is the core business asset you control, supercharged with a built-in audience, e-commerce tools, and the collective SEO power of the entire platform.
The Spokes: Social media platforms remain your powerful distribution channels, used to capture attention and drive traffic back to your new, high-powered hub.
Starting on a marketplace isn't just about creating a profile; it's about plugging into a pre-built ecosystem designed for your success. You get to skip the entire technical setup and focus day-one on content and commerce.

The Strategic Blueprint – Nailing Your Niche
Even on a powerful platform, the single biggest real advantage you can give yourself is specificity. Trying to be a travel expert for "everyone" is a recipe for getting lost in the noise. Choosing a well-defined niche allows you to build authority faster, attract a dedicated audience, and stand out in a catalog of creators.
How to Find a Profitable Niche
A successful niche sits at the intersection of three circles: your genuine passion, your audience's pressing problems, and its potential for profitability. Before you commit, you must validate your idea.
Keyword & Platform Search: Use keyword research tools to check Google search volume, but also search within the marketplace itself. Are other creators successfully selling products in this niche? Is there a healthy amount of interest? This is your data-driven sign of audience demand.
Competitor & Market Analysis: The presence of a few successful creators in your niche is a good thing; it proves a market exists. Analyze their products, articles, and pricing. If others are generating revenue, it validates the niche's commercial potential.
5 Promising Travel Blog Niche Ideas to Spark Inspiration
To get your brainstorming started, here are five less-saturated niches with huge potential for 2026:
Eco-Friendly & Sustainable Travel: Focus on low-impact tourism, conservation-focused experiences, and green-certified brands. This niche attracts a passionate, value-driven audience.
Remote Work & "Workation" Travel: Become the go-to resource for digital nomads by creating guides on finding reliable WiFi, navigating visa requirements, and discovering the best long-term accommodations.
Culinary Tourism (Hyper-Niche): Don't just be a "food travel" blog. Go deeper. Focus on a specific cuisine (e.g., "Exploring the Regional Cuisines of Southern Italy") or a dietary need (e.g., "A Vegan's Guide to Japan").
Accessible Travel: A critically underserved and deeply important niche. Create practical guides and resources for travelers with disabilities, focusing on wheelchair-accessible hotels, attractions, and transportation.
Micro-Destination Blog: Instead of trying to cover the world, become the undisputed expert on a single city, region, or small country (e.g., "The Ultimate Guide to Visiting Malta"). You can dominate local affiliate partnerships and product sales for that area.
How to Start a Travel Blog on a Marketplace – Your 10-Minute Setup
This is where you leapfrog months of technical work. Instead of wrestling with hosting and code, you'll build a professional home for your brand in less time than it takes to drink a cup of coffee.

Step 1: Claim Your Professional Creator Page
Getting started is simple. Navigate to the TrekGuider marketplace and register. The platform is actively creating pages for established bloggers using public data, so your first step is to search the author catalog to see if a page already exists for you.
If you find your page, you can claim it and gain full control.
If not, you can create a new one from scratch in minutes.
Step 2: Customize Your Digital Home Base
Your creator page is your professional landing page. It's designed to be your central hub, consolidating your entire brand in one place. Fill out every section to build trust and showcase your expertise:
Basic Information: Add a high-quality photo and a compelling bio that tells your story and explains who you help.
Social & External Links: Integrate your social media profiles and link out to any other personal websites or online stores you may have.
Monetization Tools: Enable the donation feature to allow your most loyal fans to support you through one-time payments or recurring subscriptions.
Step 3: Build Your Product Showcase
This is your integrated storefront. You don't need to install any clunky e-commerce plugins. Simply start uploading the digital products you want to sell:
Guides and E-books
Custom Maps and Routes
Itinerary Templates
The platform handles secure payment processing (via Stripe) and instant digital delivery, so you can focus on creating, not logistics.
The Foundational Content – Publishing on the Platform
With your digital home base established, it's time to furnish it with value. On a marketplace, you don't need to worry about building a blog from zero. Your mission is to publish 5-10 high-quality, in-depth articles directly to the platform's article section. This is your primary strategy for getting discovered.

Why Publishing on the Marketplace is a Superpower
Instant Audience: You tap into the marketplace's existing audience of passionate travelers who are already there to read articles and buy products.
Shared SEO Authority: You benefit from the domain authority of the entire platform, giving your articles a better chance to rank on Google much faster than a brand-new website.
Direct Traffic to Your Products: Every article you publish is linked back to your creator page, acting as a powerful, built-in funnel that drives readers directly to your product showcase and donation buttons.
Writing Your First Authority-Building Articles
Your first articles should be "key elements"—long, in-depth, evergreen posts that solve a major problem for your niche audience. Examples include:
A definitive guide to your niche destination (e.g., "The Ultimate First-Timer's Guide to Visiting Bali").
An exhaustive packing list (e.g., "What to Pack for a 2-Week Trip to Italy").
A detailed "how-to" post (e.g., "How to Plan a Trip to Japan on a Budget").
Feeling Overwhelmed by Trip Planning?
Creating a detailed itinerary is one of the most time-consuming parts of travel planning. To help you streamline the process for your own adventures—and to give you an example of a high-value resource you can one day create for your own readers—we've built the ultimate tool. Our comprehensive, plug-and-play itinerary template takes the stress out of organizing your next trip.
[Download Your Free Plug-and-Play Itinerary Template Now]
This type of high-value resource is exactly what your audience is looking for. Once you've created a helpful freebie, the next step is to package your unique expertise into a premium [Travel Guide], which you can sell directly on your TrekGuider creator page to a global audience of passionate travelers.
Getting Noticed – The Basics of Promotion
With your page set up and a foundation of great content published, you can finally shift your focus to promotion.

Master Marketplace SEO From Day One
SEO is still your most critical long-term strategy, but now you apply it to the articles you publish on TrekGuider. For every post you write, you should:
Target a Keyword: Choose a specific phrase your ideal reader would search for.
Use the Keyword: Place your keyword naturally in the article's title, the first paragraph, and at least one subheading.
Optimize Images: Use descriptive file names and add "alt text" to every image.
Use Social Media as Your Amplifier
Your social media channels are your "spokes." Their job is to drive traffic back to your TrekGuider "hub." Share your newly published articles and link directly to your creator page or specific products in your social profiles. This creates a powerful feedback loop, funneling your existing audience to the place where they can best support you and buy your products.
Pro-Tip: Your creator page bio is your elevator pitch. It's the first thing a potential customer will read. Use it to tell a compelling story, clearly state who you serve, and explain the unique value you provide. This builds an instant, human connection that turns a casual browser into a loyal follower.
Frequently Asked Questions About Starting a Travel Blog
1. Is it free to start a travel blog on TrekGuider?
Yes. Creating your personal author page, publishing articles, and listing products is free. The platform makes money by taking a small, transparent commission on the products you sell, so we only succeed when you succeed.
2. Do I need my own website to use the marketplace?
No, and that's the biggest advantage. TrekGuider provides you with your own professional landing page, so you can have a credible, feature-rich home for your brand without any of the costs or technical hassles of building and maintaining your own site.
3. How does the platform help me get discovered?
The marketplace helps in two key ways: First, your articles and products are showcased to the platform's entire audience of travelers. Second, by publishing on a high-authority domain, your content has a much better chance of ranking on search engines like Google, attracting new users to the platform and, ultimately, to your page.
Your Journey Starts Now
The path from a vague dream to a published, professional travel blog presence is no longer a fog. It's a clear, actionable checklist. You now have the complete blueprint that details how to start a travel blog the modern, smarter way—by leveraging the power of a creator marketplace.
The most challenging part of any great journey is taking the first step. You have the map to a faster, more direct route. The only thing left to do is to begin your adventure.
SEO Meta Data Suggestions:
SEO Meta Title (58 characters): How to Start a Travel Blog in 2026 (Beginner's Guide)
URL Slug: how-to-start-a-travel-blog
SEO Meta Description (154 characters): A step-by-step guide for beginners on how to start a travel blog. Learn how to choose a niche, set up your creator page, and publish content that gets noticed.
Don't Miss Out! Subscribe for Exclusive Content
SubscribeComments 0
No comments yet
Be the first to share your experience!
Dont Miss Out! Subscribe for Exclusive Content

FTC Affiliate Disclosure Essentials: Stay Compliant as a Travel Creator

Essential Affiliate Tools: From Tracking to Full Optimization

Avoid These 5 Affiliate Landing Page Mistakes for Better Conversions

Affiliate Keyword Research Mastery for Travel Blogs

Booking.com Affiliate Program Review: Pros, Cons, and Earnings Potential

Decoding Affiliate Commission Rates: Benchmarks for Travel Creators
The Ultimate Travel First Aid Kit Checklist (2026)
TrekGuider @trekguider
But it doesn’t have to be that way. The single most powerful tool for ensuring a healthy, stress-free journey is one you create before you even leave home: a comprehensive travel first aid kit. This isn’t just a box of bandages; it’s a personalized arsenal of preparedness that empowers you to handle common health issues with confidence and ease. Building your own kit is at the heart of the proactive mindset we cover in our comprehensive [The Ultimate Guide to Travel Safety: A 2026 Playbook]. Think of this guide less as a simple shopping list and more as a masterclass in preparedness, backed by pharmacist-approved advice to help you build the ultimate defense against travel’s minor medical curveballs.

DIY vs. Pre-Made: Which Travel First Aid Kit is Right for You?
Before we dive into the specific items, it’s worth considering whether to build your kit from scratch or buy a pre-made one.
Pre-Made Kits: These offer undeniable convenience. They come in a compact case and provide a decent baseline of supplies. However, they are often filled with low-quantity, generic items and may lack the specific medications you need for your trip.
DIY Kits: Building your own kit requires a bit more effort upfront but is superior in every other way. It allows you to choose high-quality brands, pack sufficient quantities, and tailor the contents specifically to your destination, your planned activities, and your personal health needs.
Our recommendation? Start with a high-quality pre-made kit as your base and then use this checklist to supercharge it, swapping out generic items and adding the crucial medications and tools it’s missing. This hybrid approach gives you the best of both worlds.
The Core Components of Your Ultimate Travel First Aid Kit
A truly effective travel first aid kit is organized like a mobile clinic, with specific supplies to treat the most common categories of travel-related ailments. Here is the definitive breakdown of what you need.
Wound & Burn Care: For Life's Little Scrapes
From a papercut to a scraped knee on a cobblestone street, any break in the skin is an open invitation for infection, especially in new environments. Here’s how you shut that door, fast.
Antiseptic Wipes (BZK or alcohol-based): For cleaning wounds, scrapes, and your hands before providing treatment. Individual packets are perfect for travel.
Antibiotic Ointment (e.g., bacitracin): A crucial step to prevent infection in minor cuts, scrapes, and burns after cleaning.
Assorted Adhesive Bandages: Pack a variety of sizes. Fabric bandages are generally more durable and flexible than plastic ones.
Butterfly Bandages / Wound-Closure Strips: Essential for taping the edges of a minor cut together to help it heal cleanly.
Sterile Gauze Pads and a Roll of Gauze: For dressing larger wounds or as a compress to control bleeding. Pack a few different sizes.
Medical Adhesive Tape: To secure gauze and bandages in place.
Moleskin or Blister Treatment Pads: An absolute lifesaver for any trip involving significant walking or hiking. Apply it as soon as you feel a "hot spot" to prevent a blister from forming.
Aloe Vera Gel: Provides soothing relief for minor sunburns.
Pain, Fever & Sprains: Managing Aches and Injuries
Long days of sightseeing, sleeping in unfamiliar beds, and carrying luggage can lead to aches and pains. Be prepared to manage them effectively so they don't slow you down.
Pain Relievers/Fever Reducers: Pack both an ibuprofen-based and an acetaminophen-based option. Pharmacists consistently recommend trusted brands like Advil/Motrin (Ibuprofen) for inflammation and pain, and Tylenol (Acetaminophen) for general pain and fever.
Aspirin: While not for general pain relief for everyone, a dose of aspirin can be life-saving for an adult experiencing symptoms of a heart attack.
Elastic Wrap Bandage: Invaluable for providing support and compression to a sprained ankle, wrist, or knee.
Instant Cold Packs: These single-use packs are activated by squeezing them and are excellent for reducing swelling from sprains, strains, and other minor injuries in the first 24-48 hours.
Pro-Tip: Decant pills into small, clearly labeled travel containers to save space, but take a photo of the original packaging first. This helps you remember dosages and provides information for pharmacists or doctors abroad if needed.

Digestive Issues: Your Defense Against Traveler's Diarrhea
Let’s be direct: traveler’s diarrhea is the single most common illness to strike travelers, affecting up to 80% of visitors in some destinations. Having a dedicated section in your kit to manage digestive distress is absolutely critical.
Anti-diarrhea Medication: To manage symptoms when you need to travel or get through a planned activity. The top pharmacist-recommended brand is Imodium (Loperamide).
Antacids: For relief from indigestion, heartburn, and general upset stomach. Pepto-Bismol is another pharmacist-favorite that can also help with mild diarrhea.
Oral Rehydration Salts: This is arguably the most important item in this section. Dehydration is the primary risk of diarrhea and vomiting. These pre-measured packets mix with safe, bottled water to replenish the essential fluids and electrolytes your body has lost.
Anti-nausea or Motion Sickness Medication: Essential if you’re prone to motion sickness on planes, boats, or winding bus rides.
Allergies, Bites & Skin: Soothing Irritations
New environments mean new pollens, unfamiliar insects, and different plants. Be ready to tackle itches, rashes, and allergic reactions before they become a major annoyance.
Antihistamine (e.g., diphenhydramine): For treating allergic reactions, hives, and severe itching. Note that some antihistamines can cause drowsiness.
Hydrocortisone Cream (1%): A topical steroid cream that provides fast relief from the irritation and itching of rashes and insect bites.
Insect Repellent: In any region with mosquito-borne illnesses like Dengue or Malaria, this is as important as your passport. Choose a repellent with an effective active ingredient like DEET or Picaridin.
Epinephrine Auto-Injector (e.g., EpiPen): This requires a prescription and is absolutely essential for travelers with a history of severe allergic reactions (anaphylaxis).
Ready to Pack Like a Pro?
Your travel first aid kit is a critical piece of your travel puzzle, but it's not the only one. To ensure you don't overlook a single essential item—from documents and finances to clothing and gear—you need a master list. Our comprehensive, free checklist has you covered.
Download Your Free [International Travel Checklist] Now!
Essential Tools & Personal Medications
The final layer of your kit includes the tools to use your supplies effectively and your own personal health necessities.
Fine-Point Tweezers: For removing splinters, ticks, or other foreign objects from the skin.
Small, Rounded-Tip Scissors: For cutting medical tape, gauze, or moleskin. (Ensure they meet TSA guidelines if packing in a carry-on).
Disposable Non-Latex Gloves: To protect your hands and prevent infection when treating a wound on yourself or someone else.
Digital Thermometer: For accurately checking for fever.
Personal Medications: This is the most critical category. Pack a sufficient supply for your entire trip, plus at least a few extra days' worth in case of delays. Always keep your personal medications in your carry-on luggage in their original, labeled containers.
Pro-Tip: Before you leave, ask your doctor for a letter describing your condition and the medications you take, including their generic names. Keep a digital copy of this and your prescriptions on your phone. This can be invaluable if your medication is lost or you need to see a doctor abroad.

Beyond the Basics: Customizing Your Kit
The ultimate travel first aid kit is not one-size-fits-all. Once you have the core components, elevate your preparedness by customizing it for your specific journey.
By Destination:
Tropical/Developing Countries: Add anti-fungal cream, more insect repellent, and potentially a prescription for a standby antibiotic for severe traveler's diarrhea (consult your doctor).
High-Altitude Destinations: Speak with your doctor about medication to prevent altitude sickness.
By Activity:
Hiking/Trekking: Double down on blister care (moleskin, gel pads), pack an elastic wrap for sprains, and add pain-relieving gel.
Beach Vacation: Add extra aloe vera gel, sting-relief spray, and waterproof bandages.
By Traveler:
With Children: Include children’s formulations and dosages of pain/fever reducers, kid-friendly bandages, and any specific allergy medications they need.
Travel First Aid Kit FAQs
A great kit anticipates problems. Here are answers to common questions that take your preparedness to the next level.
1. What’s the first thing I should do if I get traveler’s diarrhea?
According to the CDC and travel medicine doctors, the first and most important step is oral rehydration. Dehydration is the biggest risk. Start sipping an Oral Rehydration Solution (ORS), sports drinks, or clear broths immediately. For mild to moderate cases that don't have a high fever or blood, an antimotility drug like Loperamide (Imodium) can help manage the symptoms. If symptoms are severe, incapacitating, or include a high fever or blood, it's time to consider a prescribed standby antibiotic and seek medical advice.
2. Should I pack a standby antibiotic in my kit?
This is a question for your doctor or a travel medicine clinic. For travelers heading to high-risk destinations where severe traveler's diarrhea is common, many doctors will provide a prescription for a standby antibiotic like Azithromycin. It’s not for mild cases but can significantly shorten the duration of a severe bout of illness. Discuss your itinerary with your doctor to see if this is right for you.
3. Is it okay to pack medications outside their original bottles to save space?
While it's tempting, it's safest to keep prescription medications in their original, clearly labeled containers. This avoids any confusion or legal issues with customs officials. For over-the-counter pills, you have more flexibility. If you use a travel pill organizer, consider taking a photo of the original packaging so you have the dosage information and ingredients handy.

Pack Confidence for Every Journey
A carefully assembled travel first aid kit does more than just prepare you for minor medical issues; it provides profound peace of mind. It transforms you from a worried passenger into a self-sufficient, empowered traveler, ready to handle the small bumps in the road so you can stay focused on the incredible experiences ahead. By following this checklist, you’re not just packing supplies—you’re packing the confidence to explore the world freely and fully.
Now that your health and safety are covered, you can focus on the other details that make a trip unforgettable. For a complete, deep-dive into every facet of trip planning, from health and safety to budgeting and logistics, our comprehensive [Travel Guide] is the only resource you'll ever need.
Meta Data Suggestions:
SEO Meta Title (55 characters): The Ultimate Travel First Aid Kit Checklist (2026)
URL Slug: travel-first-aid-kit-checklist
SEO Meta Description (154 characters): Build the perfect travel first aid kit. Our 2026 checklist, with pharmacist-approved tips, covers everything from wound care to stomach issues. Be prepared.
Don't Miss Out! Subscribe for Exclusive Content
SubscribeComments 0
No comments yet
Be the first to share your experience!
Dont Miss Out! Subscribe for Exclusive Content

Ultimate USA Holidays Guide: Top Picks
FTC Affiliate Disclosure Essentials: Stay Compliant as a Travel Creator
Essential Affiliate Tools: From Tracking to Full Optimization
Booking.com Affiliate Program Review: Pros, Cons, and Earnings Potential
Decoding Affiliate Commission Rates: Benchmarks for Travel Creators
