How to Create a Digital Travel Guide People Will Buy
TrekGuider @trekguider
You’re a travel expert. Your notes are filled with hidden gems, your camera roll is a treasure trove of untold stories, and your advice could save fellow travelers hundreds of dollars and hours of stress. You know your expertise has value, but packaging it into a real, scalable income stream feels like a monumental task. Relying on the slow trickle of ad revenue or the unpredictability of affiliate sales is a frustrating grind, keeping your dream of a truly independent business just out of reach.
This uncertainty keeps you on the content treadmill, trading your valuable time for pennies. You see other creators launching their own products and achieving a level of financial freedom that feels like a distant fantasy. The path forward is a confusing fog of questions about design, content, pricing, and technology, leaving you stuck in analysis paralysis while the immense opportunity of the creator economy—a market projected to nearly double from $250 billion to almost $500 billion by 2027—passes you by.
It’s time to stop trading hours for dollars and start building assets. This is your chronological, step-by-step playbook. We will demystify the entire process and show you exactly how to create a digital travel guide that people will not only buy but will also love and recommend. This is your complete workflow for transforming your hard-won expertise into a polished, professional product that generates passive income for years to come. Think of this as a critical chapter in your business plan; for the complete blueprint on building a modern creator enterprise, be sure to read our ultimate guide to How to Make Money Online: A Creator's Guide for 2026.

Why a Digital Guide is Your Ultimate Scalable Asset
Before diving into the "how," it's critical to understand the "why." Transitioning from promoting others' products to creating and selling your own is the single most powerful step you can take toward building a profitable, independent business. While ads and affiliate links have their place, digital products offer a level of control and scalability that other models simply can't match.
The advantages are transformative:
Infinite Scalability: Digital products operate on a "create once, sell forever" model. Whether you sell 10 copies or 10,000, your workload remains the same. There is no inventory to manage and no shipping to worry about.
Exceptionally High Profit Margins: With no manufacturing or distribution costs, the profit margins are extraordinary. Once you recoup your initial time investment, nearly every sale is pure profit.
Full Ownership and Control: When you sell your own guide, you own the entire process. You control the product, the pricing, the marketing, and the customer relationship. You are no longer dependent on an affiliate partner’s commission rates or an ad network's traffic requirements.
Solidifies Your Authority: Creating and selling a high-quality product instantly positions you as an expert. It builds deep trust with your audience, as you are no longer just recommending other people's stuff—you are standing behind your own valuable creation.
The market reflects this opportunity. The e-learning sector alone, a huge component of the digital product world, is projected to surge to an incredible $848 billion by 2030. This isn't a fleeting trend; it's a fundamental shift in how creators build resilient businesses.
The Blueprint – Research and Validation
The costliest mistake a creator can make is to spend months building a product nobody asked for. Thorough research and validation aren't optional; they are the foundation upon which a profitable product is built.
Identify Audience Needs and Define a Specific Niche
Your first job isn't to be a brilliant inventor; it's to be a sharp detective, uncovering the real, recurring problems your audience is desperate to solve.
Listen to Your Audience: The best ideas are hidden in plain sight. Dive into your blog comments, email replies, and social media DMs. What destinations are people constantly asking about? What part of the travel planning process do they find most challenging or stressful? Their recurring questions are your product ideas.
Define a Hyper-Specific Niche: Avoid creating a generic guide. A broad guide to "Mexico" will get lost in a sea of competition. A highly specific product like "A First-Timer's Foodie Guide to Mexico City's Roma Norte Neighborhood" is more valuable, easier to market, and instantly positions you as a niche expert.
Conduct Keyword and Market Research to Validate Demand
Once you have an idea, you must validate it with data.
Analyze Search Volume: Use an SEO tool to check the search volume for terms related to your guide idea. High search volume for long-tail keywords like "7-day Japan itinerary for foodies" or "what to do in Lisbon with kids" is a strong data signal that a ready market exists for a guide on that topic.
Conduct Competitor Analysis: Find 3-5 comparable digital travel guides in your niche. Your goal isn’t to copy them, but to identify a gap in the market. Analyze their price points, what they include, and, most importantly, read their reviews. What are customers praising? What are they complaining about? This will show you exactly how to create a superior product.
Pro-Tip: True validation comes from the intersection of qualitative and quantitative data. A great product idea is one that your audience is asking for (qualitative) and that a significant number of people are searching for online (quantitative).

The Core – Outlining and Content Creation
With a validated idea, it’s time to build the heart of your product: the content. This is where your unique expertise, voice, and experience shine.
Develop a Logical Structure
A good guide flows intuitively and is easy to navigate. Before you write a single word, create a detailed table of contents. This will be your roadmap and ensure you don't miss any crucial information. A typical structure includes:
Introduction: A brief overview of the destination, essential facts (currency, language), and why your guide is the ultimate resource.
Logistics: The practical nuts and bolts—getting there, getting around, visa requirements, and curated recommendations on where to stay for different budgets.
Experiences: The core of your guide. This includes top attractions, detailed daily itineraries, and deep dives into your niche (e.g., food and drink recommendations, hiking trails, photo spots).
Practicalities: The crucial final details like safety tips, packing lists, a budget breakdown, and useful local phrases.
Write Compelling and Useful Content
This is where you go beyond the generic advice found on a thousand other blogs.
Gather Your Assets: Compile all of your personal notes, journal entries, and high-quality photographs from your travels to the destination. Your first-hand experience and unique visuals are your primary competitive advantage.
Be Both Inspirational and Intensely Practical: Write in an engaging, personal tone. Share anecdotes and insider tips that bring the destination to life. Go beyond simply listing facts; tell your readers why a place is special. Share the hard-won wisdom that can't be found elsewhere, like "skip the line at the Colosseum by booking this specific tour" or "the best gelato is actually found two blocks away from the main square at this tiny shop."
With your raw content compiled, the next step is to give it a professional polish that signals its immense value.

The Polish – Professional Design for Non-Designers
Your guide's content may be brilliant, but in the digital world, packaging matters. A professional, user-friendly design signals quality and dramatically improves the customer experience.
Select a User-Friendly Design Tool
You don't need to be a graphic designer to create a stunning product. For a travel blogger whose primary goal is to efficiently create a static PDF travel guide, a template-based tool like Canva is the strategically superior choice. While powerful professional software like Figma or Adobe Illustrator has a steep learning curve that can delay your launch by weeks, Canva is built specifically for this type of project. Its intuitive, drag-and-drop interface is designed to help non-designers produce high-quality visuals quickly.
Feeling inspired to build your own assets but not sure where to begin? Creating high-value products is the core of a modern creator business. To accelerate your journey, we've bundled together some of our most powerful resources. The Travel Creator's Toolkit is a free collection of checklists, templates, and guides designed to help you streamline your workflow and build your business faster.
5 Essential Mobile-First Design Principles for a User-Friendly Guide
Your guide will almost certainly be used on a mobile phone while your customer is in-destination. Designing with a mobile-first user experience (UX) is not an option; it is essential for your product to be functional and valuable.
Prioritize Legibility and High Contrast: The content must be effortlessly readable on a small screen, often in bright sunlight. Use a clean, simple font of at least 11 points so users don't need to pinch-and-zoom. Crucially, ensure a high contrast ratio between the text and background—at least 4.5:1 as recommended by Web Content Accessibility Guidelines (WCAG)—to maintain readability.
Implement Simplified Navigation: The single most important navigation element is a hyperlinked Table of Contents at the beginning of the document. This allows users to jump directly to the section they need with a single tap, which is crucial when they're trying to find information quickly on a busy street.
Design for Touch with Finger-Friendly Targets: Any included hyperlinks (e.g., a link to a restaurant's website or a Google Maps location) must have a clickable area large enough to be easily tapped with a finger—the industry standard is a minimum touch target size of 44x44 points (approximately 7-10mm).
Minimize Cognitive Load by Eliminating Clutter: Mobile users are often distracted. Their interaction with a guide is typically in short bursts or "micro-tasks". To accommodate this, use short paragraphs, bulleted lists, bolded text for key information, and generous white space. A clean, uncluttered interface helps users find what they need with minimum effort.
Optimize for Performance and Portrait Orientation: The vast majority (94%) of mobile users hold their phones vertically. Your guide must be designed with a portrait layout (e.g., A4 or US Letter size). Crucially, keep the final PDF file size as small as possible by compressing all images before inserting them into your document. A large file will download slowly on a weak cellular connection, creating a poor user experience.

The Launchpad – How to Create a Digital Travel Guide for Sale
You've created a valuable, beautifully designed resource. The final phase is to package it, price it for profit, and get it into the hands of your customers.
How to Price Your First Digital Product
Pricing is one of the most challenging decisions. The most effective strategy for a knowledge-based product is value-based pricing. Instead of focusing on your production costs, price your product based on the transformation it provides to the customer. If your guide saves a user 20 hours of stressful research and helps them discover priceless experiences they would have otherwise missed, its value is immense.
A practical process for setting your price:
Step 1: Research the Market: Identify 3-5 comparable digital travel guides in your niche to establish a realistic market range.
Step 2: Articulate the Value: Make a specific list of the tangible outcomes your guide provides (e.g., "Saves over 15 hours of planning," "Includes a pre-planned 7-day itinerary worth over $100 in planning fees").
Step 3: Set an Initial Price and Test: For a high-quality, first-time travel guide, a price point between $19 and $49 is a strong starting position. It communicates significant value without creating sticker shock for the buyer.
Choose a Sales Platform That Works for You
You need a platform to handle the sale and secure digital delivery of your product. While you can use e-commerce plugins on your own blog, the smartest strategy is to leverage a platform that puts you in front of a built-in audience of motivated buyers.
Pro-Tip: Don't just build a product; build your business inside an ecosystem. A specialized marketplace like TrekGuider is the ideal place to sell your high-quality Travel Guide. It provides a professional, ready-made storefront and connects you with a global audience of passionate travelers who are actively searching for expert resources. You can publish articles to attract new customers directly on the platform, creating a powerful marketing funnel that leads right back to your product page.
Frequently Asked Questions (FAQ)
1. How long should my digital travel guide be?
Value is not measured in page count. A concise, 50-page guide packed with unique, actionable advice is far more valuable than a rambling 200-page guide filled with generic information. Focus on comprehensively solving the specific problem your niche audience has.
2. Do I need to have visited the destination very recently?
While recent, first-hand experience is ideal, an "evergreen" guide focused on core attractions, culture, and logistics can have a long shelf life. The key is transparency. Be clear about when you last visited and focus on information that doesn't change rapidly. You can always update your guide with new editions.
3. What if I'm not a professional writer or photographer?
You don't need to be. Your audience values authenticity and expertise over perfect prose. Write in your natural, conversational voice, as if you were giving advice to a friend. For photos, a modern smartphone can capture high-quality images. The goal is to be clear, helpful, and genuine.
Your Journey from Expert to Entrepreneur Starts Now
You now have the complete, A-to-Z workflow. You've moved from the vague idea of a product to a concrete, actionable blueprint that covers research, content creation, professional design, and a smart launch strategy. The path from being a passionate travel expert to a successful digital entrepreneur is no longer a fog of confusion.
You have the definitive answer to the question of how to create a digital travel guide that provides immense value and generates a sustainable income. The only thing left to do is take the first step. Start the research, outline your expertise, and begin building the asset that will power your business and fund your adventures for years to come.
SEO Meta Data Suggestions:
SEO Meta Title (58 characters): How to Create a Digital Travel Guide People Will Actually Buy
URL Slug: how-to-create-digital-travel-guide
SEO Meta Description (154 characters): A step-by-step playbook for travel creators on how to create a digital travel guide, from research and writing to design, pricing, and selling your product.
Read the full guide: The Travel Blog Business Plan: How to Make Real Money in 2026
Don't Miss Out! Subscribe for Exclusive Content
Subscribe


Comments 0
No comments yet
Be the first to share your experience!
Dont Miss Out! Subscribe for Exclusive Content

FTC Affiliate Disclosure Essentials: Stay Compliant as a Travel Creator

Essential Affiliate Tools: From Tracking to Full Optimization

Avoid These 5 Affiliate Landing Page Mistakes for Better Conversions

Affiliate Keyword Research Mastery for Travel Blogs

Booking.com Affiliate Program Review: Pros, Cons, and Earnings Potential

Decoding Affiliate Commission Rates: Benchmarks for Travel Creators
Lollapalooza: 7 Stage-Hopping Tips
TrekGuider @trekguider
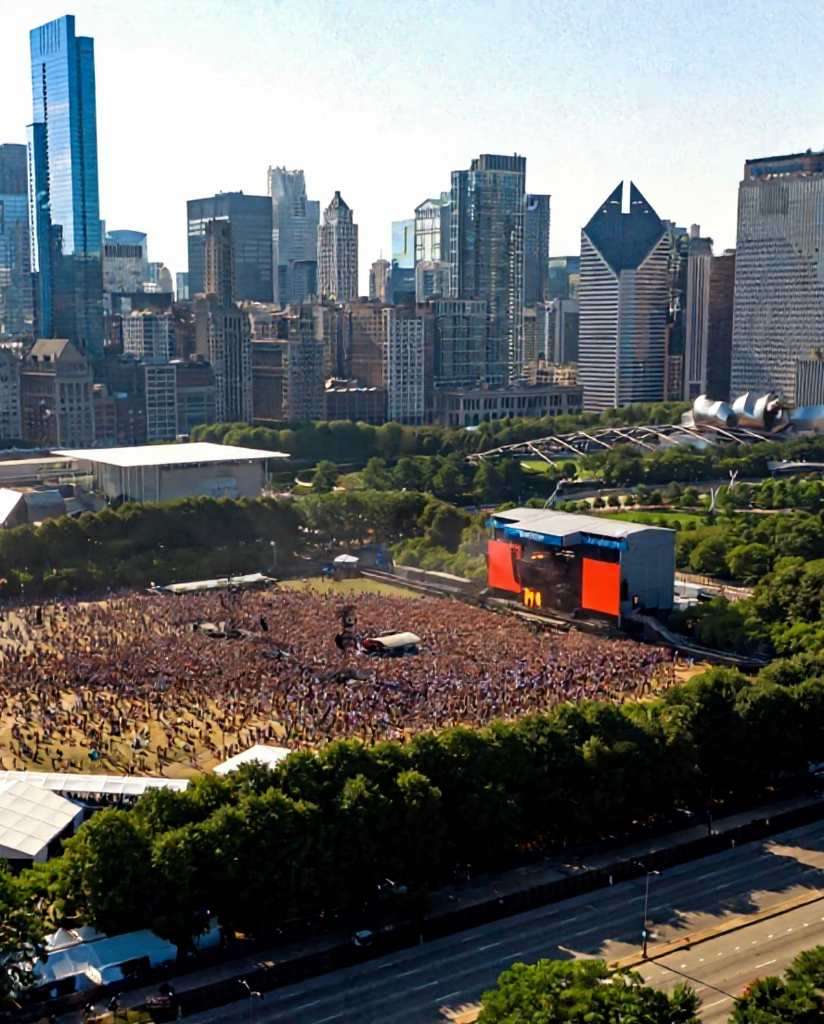
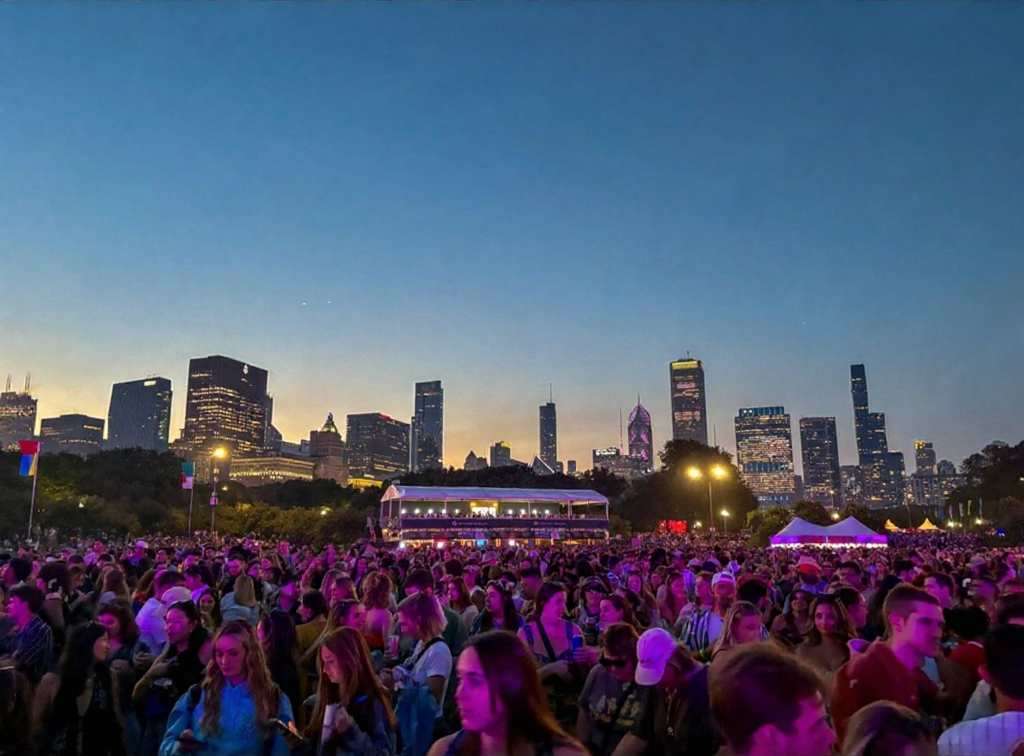
You’ve done it. You scored the golden ticket to Lollapalooza, the four-day musical marathon that transforms Chicago’s Grant Park into the center of the universe. But now, staring at a schedule that looks more like a complex circuit board than a concert lineup, the reality sets in. Dozens of artists you’re dying to see are scattered across a dozen stages, their set times overlapping in a cruel twist of fate. The sheer scale of the festival, with its massive crowds and sprawling grounds, suddenly feels less like a dream and more like a daunting logistical nightmare.
The anxiety begins to bubble. You picture yourself spending half the day trudging from the T-Mobile stage at the south end to the Bud Light stage at the north, only to arrive sweaty, exhausted, and just in time to hear the final chords of your favorite song. The fear of missing out becomes a palpable threat, turning the promise of unforgettable musical moments into a frantic race against the clock. Without a rock-solid plan, your festival experience could be defined by endless walks, missed opportunities, and the nagging feeling of being perpetually in the wrong place. This isn't just about seeing bands; it's about conquering one of the keystone events in a city known for its epic celebrations, a true highlight among the many experiences we cover in our definitive guide to Chicago Holidays: Windy City Thrills.
Forget the stress. This guide is your strategic playbook for navigating the glorious chaos of Lollapalooza Chicago. We’re breaking down the art of stage-hopping into seven actionable, pro-level tips that will transform you from a frantic fan into a festival veteran. From mastering the map before you even step foot in Grant Park to planning a seamless exit, these strategies will ensure you maximize your time, conserve your energy, and catch every single performance on your must-see list.
1. Become a Pre-Festival Master of the Map & Schedule
The biggest mistake a Lollapalooza rookie can make is showing up and trying to figure it all out on the fly. Grant Park is a massive urban oasis, and when it’s filled with stages, vendors, and hundreds of thousands of people, it becomes a complex, pulsating labyrinth. Your success begins long before you scan your wristband.
Download the Official App Immediately
Long before you even think about packing, your first move is to download the official Lollapalooza app. Consider it your digital command center for the entire weekend, running from July 31 to the final day of the festival. The app provides the most up-to-date schedule, a detailed festival map, and, most importantly, real-time push notifications. If a set time changes, a stage is delayed, or a surprise guest appears, the app will be the first to tell you. It also sends out crucial emergency alerts, making it an indispensable tool for staying safe and informed.
Create Your Artist Tiers
Once the full schedule drops, it’s time for strategy. Open the lineup—featuring titans like Olivia Rodrigo, Tyler the Creator, Sabrina Carpenter, and A$AP Rocky for the 2026 festival—and categorize every artist into two simple lists:
Tier 1 (Must-See): These are your non-negotiables. The artists you bought the ticket for. You will be at their set, no matter what.
Tier 2 (Nice-to-See): These are the artists you’d love to catch if the timing and location work out. They are your flexible options, the happy bonuses.
This simple act of prioritization is the bedrock of your stage-hopping plan. It allows you to build your day around your top-tier artists and fill the gaps with others, preventing the decision paralysis that comes from having too many choices.
Internalize the Grant Park Layout
Study the festival map like you’re planning a heist. The two main stages are typically located at the far north and south ends of Grant Park, a walk that can easily take 20-30 minutes through a thick crowd. Identify the locations of your Tier 1 artists and mentally map the routes between them. Note the locations of smaller stages, food courts (Chow Town), and, critically, the free water stations. Understanding the physical distances involved will help you make realistic calls about which back-to-back sets are doable and which are pure fantasy.

2. Master the "Perimeter Path" to Navigate Crowds
The center of any festival crowd is a slow-moving, densely packed sea of humanity. Trying to cut directly through the middle to get from one stage to another is a rookie move that wastes time and energy. The secret to swift movement is to think like a river, flowing where the resistance is lowest.
Stick to the Arteries
The most effective way to navigate Lollapalooza Chicago is by using the perimeter paths. Instead of plunging into the heart of the crowd, stick to the designated walkways along the sides. These paths, often lining the edges of the park or separating vendor areas, are the festival's arteries. While they may look like the longer route on a map, they are almost always faster than trying to push through a stationary audience. Make a mental note of these pathways when you first arrive.
Live by the 15-Minute Rule
If your next Tier 1 artist is on a stage across the park, you need to be ruthless with your timing. Implement the 15-Minute Rule: leave the current set 15 minutes before it ends. This gives you a critical head start, allowing you to exit the immediate crowd before the mass exodus begins when the music stops. It might sting to walk away from the end of a great performance, but that small sacrifice ensures you’re in a good position for the next one, rather than hearing it faintly from a quarter-mile away.
3. Hydrate and Fuel Like a Seasoned Athlete
Stage-hopping is a sport. You’ll be on your feet for 10 hours a day, walking several miles under the summer sun. You’re not just attending a concert; you’re entering a temporary city that generates a staggering economic impact—estimated at over $440 million. That scale demands respect and a bit of preparation.
Make Water Your First Priority
Lollapalooza provides free water refill stations throughout the grounds. When you first enter Grant Park, make it your mission to locate the station nearest the entrance and the stages you’ll be frequenting. Dehydration is the number one enemy of the festival-goer; it saps your energy, causes headaches, and can ruin your entire weekend. Make it a personal rule to refill your water bottle every single time you pass a station.
Pro-Tip: Bring a collapsible water bottle or an empty hydration pack. It's light, complies with security rules, and allows you to carry more water than a standard bottle. This means fewer trips to the refill station and more time enjoying the music.

4. Dress for a Four-Day Marathon, Not a Fashion Sprint
While Lollapalooza is a prime spot for people-watching and showing off your style, practicality should be your guiding principle. Your fashion choices can make or break your physical ability to enjoy the festival.
Your Shoes Are Your Most Important Gear
You will be walking and standing on concrete, grass, and uneven ground for hours on end. This is not the time for brand-new boots that need breaking in, flimsy sandals, or anything with a heel. Your number one priority should be comfortable, supportive, and already broken-in sneakers or walking shoes. Your feet are your foundation for the entire weekend; treat them well.
Prepare for All Four Chicago Seasons in One Day
Chicago weather is famously unpredictable. A day that starts hot and sunny can quickly turn cool and rainy. The key is to dress in layers. Start with a lightweight, breathable base layer and bring a flannel, hoodie, or light jacket that you can tie around your waist during the day and put on after the sun goes down. Most importantly, pack a poncho. It’s small, light, and will be an absolute lifesaver if a sudden downpour occurs.
5. Establish a "Home Base" for Your Crew
Navigating Lollapalooza Chicago with friends is a core part of the experience, but it’s incredibly easy to get separated. Cell service is notoriously unreliable when tens of thousands of people are trying to use it at once, so you can’t count on a text message or call to find your group.
Why a Meeting Point is Non-Negotiable
Before you even think about splitting up to see different artists, establish a clear, specific, and easy-to-find meeting point. This is your group’s "home base." If anyone gets lost, their phone dies, or you just need to regroup, everyone knows exactly where to go.
How to Choose a Good Spot
Don’t pick a generic spot like "the fountain" or "the food court." Choose a unique and unmistakable landmark. A good meeting point is something like, "the giant silver sculpture near the Buckingham Fountain" or "the corner of the 'Deep Dish' pizza stand in Chow Town." Pick a spot that is slightly away from the main walkways to avoid being constantly jostled. Check in at your home base at pre-determined times to ensure everyone is safe and accounted for.

6. Embrace the Journey Between the Stages
Stage-hopping isn’t just a commute; it’s an opportunity. The journey from one performance to another is part of the festival experience itself. Instead of seeing it as a chore, reframe it as a chance for discovery and inspiration.
Discover Your Next Favorite Band
As you walk the perimeter paths, you’ll pass smaller stages where artists you’ve never heard of are playing. Pause for a few minutes and listen. This is how you stumble upon incredible new music. Some of the most memorable Lollapalooza moments happen not at the massive headliner stages, but in the intimate settings of the BMI or Grove stages. Let your ears guide you.
Explore the Full Festival Experience
Lollapalooza is more than just a concert. It’s a massive cultural event filled with creativity. On your way from one stage to the next, take a detour through the art installations, check out the merch tents, or see what activations the sponsors have set up. This spirit of creative discovery is what fuels the best entrepreneurs. If you're feeling inspired by the artistry around you, channel that energy into your own project with our free Digital Product Ideas Guide. By exploring, you break up the monotony of walking and get a richer, more complete festival experience.

7. Plan Your Grand Escape in Advance
How you leave the festival is just as important as how you navigate it. At 10 PM, when the final headliner finishes, a massive wave of people will pour out of the Grant Park exits, creating a human traffic jam that can be overwhelming and slow.
Beat the Final Rush
Just as with the 15-Minute Rule for stage-hopping, consider leaving a few minutes before the absolute end of the night. Slipping out during the last song or just before the encore can save you up to an hour of being stuck in a slow-moving crowd. You’ll get to public transit or your rideshare pickup spot ahead of the main surge, which is a priceless advantage after a long day.
Know Your Public Transit Route Cold
The best way to get to and from Lollapalooza Chicago is by using the CTA rail system. Multiple downtown street closures make driving or using rideshares near the park a nightmare. Before the festival, identify the closest CTA station to your accommodation and memorize the route to and from the park exits. Having this plan locked in will prevent you from wandering aimlessly with a dead phone at the end of a long day.
Pro-Tip: If you must use a rideshare, set your pickup location several blocks away from the Grant Park exits. Walk away from the chaos and toward your pin. You'll escape the immediate surge pricing, and your driver will be able to find you much more easily than in the gridlock traffic near the festival grounds.
Your Blueprint for Lollapalooza Domination
The overwhelming scale of Lollapalooza can intimidate even the most enthusiastic music fan, but it doesn’t have to. With a strategic approach, the festival transforms from a logistical puzzle into the ultimate musical playground. By preparing in advance, navigating smartly, and taking care of your body, you shift from being a passive attendee to the master of your own experience. With these stage-hopping tips, you're now fully equipped with the knowledge of a seasoned pro, ready to conquer Lollapalooza Chicago and create a weekend of flawless, unforgettable memories.

Your Lollapalooza adventure is just one part of an incredible trip. To make the most of your time in the Windy City and beyond, check out our comprehensive Travel Guide. It’s packed with insider tips for exploring the best destinations across the USA.
Don't Miss Out! Subscribe for Exclusive Content
SubscribeComments 0
No comments yet
Be the first to share your experience!
Dont Miss Out! Subscribe for Exclusive Content

San Francisco Cherry Blossoms: A Local's Guide to the Blooms

Halloween SF: Haunts Without Horrors

SF Festivals: 7 Must-See Lineups

Christmas SF: Lights & Wharf Wonders

SF Pride: 6 Route & Party Hacks

Chinese New Year SF: Parade Essentials
Is Solo Travel Safe? A Data-Driven Look at the Real Risks & How to Mitigate Them
TrekGuider @trekguider
You've pictured it a thousand times: a journey planned entirely for you, by you. The pure, unadulterated freedom of the open road. But then the doubt creeps in, fueled by worried questions and sensational headlines. Is it actually safe to venture out alone? That single question can be paralyzing, trapping you between a deep desire for adventure and a genuine concern for your well-being.
This constant drumbeat of fear can be deafening, causing you to second-guess your ambitions and question whether your dream of independent exploration is just a reckless fantasy.
This guide is your way through that noise. We believe that safe solo travel is not only possible but is one of the most profoundly empowering experiences a person can have. While we offer deep resources on all kinds of journeys, from group adventures detailed in our Family Travel Ideas: The 2026 Guide to Unforgettable Trips to individual quests, this article is dedicated to you, the solo explorer. It’s about replacing vague fears with a clear, data-driven assessment of the real risks and arming yourself with practical, proven strategies to manage them.

The Statistical Truth: Is Solo Travel Safe from a Data Perspective?
First, let's ground ourselves in reality, not headlines. The perception of danger, often amplified by a 24-hour news cycle, is frequently magnified far beyond the statistical truth. While any travel carries inherent risks, data shows that the world is not the uniformly dangerous place it's often made out to be.
Violent crime rates, for instance, have been on a global decline for decades. According to the United Nations Office on Drugs and Crime (UNODC), the global homicide rate has been steadily decreasing. Furthermore, areas popular with tourists are often more heavily policed and protected, simply because tourism is a vital economic engine for many countries.
The most common crimes affecting travelers are not violent assaults, but rather crimes of opportunity—preventable incidents that prey on distraction. These fall into three main categories:
Petty Theft: This is the undisputed champion of tourist troubles. It includes pickpocketing in crowded squares, snatching a phone left on a cafe table, and swiping an unattended bag. Data from cities like Barcelona and Rome consistently shows that this is, by a huge margin, the most reported crime against visitors.
Scams: From the aggressive "friendship bracelet" weavers in Paris to the notoriously creative taxi drivers in Bangkok, scams are designed to trick you out of your money through clever, non-violent deception.
Credit Card Fraud: Sophisticated skimming devices at ATMs or dishonest vendors can capture your card information, leading to fraudulent charges days or weeks later.

Understanding this allows for a critical mindset shift. The goal is not to build a fortress around yourself. It’s to develop smart, consistent habits that make you a "hard target" for these common, low-level threats. The answer to "is solo travel safe?" is overwhelmingly yes, provided you are prepared, aware, and informed.
Building Your Safety Foundation Before You Go
True travel safety isn't something you find; it's something you build. The foundation for a secure and confident solo trip is laid long before you ever start packing a bag. This pre-trip protocol is your blueprint for mitigating risk from the comfort of your own home.
1. Master Your Destination Before You Arrive

Every location has its own unique rhythm and set of unwritten rules. Conducting a deep analysis of your destination with safety as the primary lens is the first and most crucial step.
Consult Official Channels: Start with the U.S. Department of State's travel advisories. They provide detailed, country-specific information on everything from political unrest and health concerns to targeted advice for female or LGBTQ+ travelers. Pay attention to the overall country level, but also look for specific regional warnings.
Dig for Local Nuances: Go beyond official reports. Use travel blogs and forums to understand neighborhood dynamics. Instead of a generic search, use specific, targeted queries like "(City Name) solo female safety" or "scams to watch for in (Country)" on Reddit (r/solotravel) or Facebook groups. This uncovers the subtle, on-the-ground intelligence that guidebooks often miss.
Understand the Cultural Context: Research local customs, dress codes, and social norms. In some countries, what's considered a friendly gesture at home might be interpreted differently. Understanding and respecting the local culture not only enriches your experience but is also a powerful tool for blending in and avoiding unwanted attention.
2. Fortify Your Finances and Documents
The goal here is redundancy. You want to ensure that the loss of a single item—like your wallet or phone—is merely an inconvenience, not a trip-ending catastrophe.
Build a Digital Vault: Scan your passport, driver's license, visa, and the front and back of your credit cards. Save these as encrypted files in a secure cloud service (like Google Drive or Dropbox) and email a copy to yourself and a trusted contact. To ensure you don't miss any critical documents, our International Travel Checklist is an indispensable tool.
Distribute Your Itinerary: Leave a detailed copy of your itinerary—including flight numbers, accommodation names and addresses, and a general daily plan—with a family member or friend back home.
Diversify Your Money: Never depend on a single source of funds. Travel with at least two different credit cards and one debit card, and store them in separate locations. Keep one card in your wallet, one in a hidden pocket of your daypack, and perhaps a third in the safe back at your hotel.
Alert Your Banks: A simple but critical step. Inform your bank and credit card companies of your travel dates and destinations. This prevents their fraud detection systems from freezing your accounts when they see a transaction from a foreign country.
3. Travel Insurance
Think of travel insurance as your ultimate safety net. For a solo traveler, it's not a luxury; it's an absolute necessity. A comprehensive policy is your financial backstop for the unexpected. Look for coverage that includes:
Emergency medical and dental expenses
Emergency medical evacuation (this is critical and can cost tens of thousands of dollars without insurance)
Trip cancellation, delay, or interruption
Lost or stolen luggage and personal effects
A 24/7 emergency assistance hotline
Your On-the-Ground Toolkit for Staying Safe Solo
Once you arrive, your most powerful safety tool is situational awareness. This isn't about being paranoid; it's about being present, perceptive, and engaged with your surroundings.
Mastering the Art of Situational Awareness

This is the skill of observing your environment and making smart, proactive decisions based on what you see.
Walk with Purpose and Confidence: Even when you’re utterly lost, walk like you know exactly where you're going. Keep your head up, your shoulders back, and your pace steady. A confident posture is a natural deterrent.
Minimize Distractions, Maximize Perception: Avoid walking while staring down at your phone or wearing headphones in both ears. These actions scream "distracted tourist" and make you a prime target for pickpockets. Keep your phone in your pocket and one earbud out so you can hear your surroundings.
Blend In, Don't Stand Out: The goal is to look like a savvy local, not a bewildered tourist. Dress in a way that aligns with local styles—if locals don't wear shorts, maybe you shouldn't either. Avoid flashing expensive jewelry, wads of cash, or a high-end camera slung around your neck.
Trust Your Gut Instinct: Your intuition is a highly advanced, subconscious pattern-recognition machine. If a person, a dark alley, or a situation feels "off," it probably is. Don't hesitate or worry about being polite—remove yourself from the situation immediately.
Pro-Tip: Carry a "decoy" wallet. Get a cheap, old wallet and stock it with a small amount of local currency and some expired credit cards or old loyalty cards. Keep this in your pocket or an easily accessible part of your bag. In the unlikely event of a robbery, you can hand this over without losing your primary financial resources.
How to Guarantee Your Accommodation Is Safe for Solo Travel
Your hotel, hostel, or rental is your sanctuary. A few simple checks can ensure it stays that way.
Vet the Location: Before booking, use Google Street View to take a virtual walk around the block. Is it a deserted industrial area or a lively street with open cafes? Read recent reviews, specifically searching for keywords like "safe," "location," and "solo."
Secure Your Room: The moment you check in, test the locks on the door and windows. Always use the deadbolt and security chain when you're inside. For an incredibly effective and cheap extra layer of security, pack a simple rubber doorstop and wedge it under your door at night.
Use the Safe (That's What It's For): Don't leave your passport, extra cash, or spare credit cards lying around. Use the in-room safe. If you're in a hostel, choose one that offers secure individual lockers and bring your own padlock.
Digital Defense: Ensuring Your Solo Travel is Safe Online
In the 21st century, physical safety is only half the battle. Public Wi-Fi networks are notoriously insecure, making them prime hunting grounds for data thieves.
A VPN is Non-Negotiable: A Virtual Private Network (VPN) is an essential tool for any traveler. It encrypts your internet connection, creating a secure, private tunnel for your data that is unreadable to anyone snooping on the network.
Embrace Two-Factor Authentication (2FA): Activate 2FA on all your important accounts (email, banking, social media). This means that even if a thief manages to get your password, they can't access your accounts without a second, time-sensitive code sent to your device.
Be Wary of Public Computers: Avoid logging into sensitive accounts on public computers, like those in an internet cafe or hotel business center. If you absolutely must, use a private/incognito browsing window and be certain to log out of all accounts and clear the browser history before you leave.
Pro-Tip: Adapt the "Morning Photo" protocol for solo use. Each morning, send a quick photo of yourself (showing your outfit) and a brief text outlining your general plans for the day to a trusted contact back home. This creates a simple, timestamped visual record of your appearance and intended whereabouts.
A Crucial Guide for Solo Female Travelers
While the vast majority of safety advice is universal, it's a reality that women traveling alone can face a unique set of concerns and scrutiny. Adhering to the core principles of solo travel safety is therefore doubly important.
Confidence is Your Cloak: Your body language is your first line of defense. Walk tall, be assertive in your interactions, and don't be afraid to be firm or even loud if someone is making you uncomfortable. A simple, sharp "No" is a complete sentence in every language.
Be Mindful of Local Gender Dynamics: Research how men and women typically interact in your destination. In some conservative cultures, direct eye contact or an unsolicited smile from a woman can be misinterpreted as an invitation. Adapting your behavior isn't about submission; it's a sign of cultural respect and a smart safety tactic.
Strategically Handle Unwanted Attention: If you feel you are being followed or persistently harassed, walk directly into a busy shop, restaurant, or hotel lobby. Approach a staff member (especially another woman) and calmly explain the situation. A simple "that person is bothering me" is universally understood.
Use the "Ring" Trick: Many experienced solo female travelers wear a simple, plain band on their left ring finger, regardless of their actual marital status. It can be a simple, non-confrontational way to deter unwanted advances or questions about why you're alone.
Your Essential Toolkit for Confident Exploration
The advice in this section is just the beginning. For a deeper dive into female-specific safety strategies, real-world scenarios, and expert-level preparation, download our free Solo Female Travel Safety Guide. It's the definitive resource for every woman who's ready to see the world on her own terms.
Frequently Asked Questions
What is the most common crime against solo travelers?
The most common risks are crimes of opportunity, not violence. Petty theft, like pickpocketing and bag snatching in crowded tourist areas, is by far the most frequent issue. Being aware and keeping your valuables secure are your best defenses.
Is it safe for a woman to travel alone for the first time?
Absolutely. Thousands of women travel solo safely every day. The key is thorough preparation: choose a destination with a good safety record for solo women, research local customs, and follow the universal safety protocols outlined in this guide.
Should I carry my passport with me while I'm out exploring?
In most cases, it's safer to leave your passport secured in your hotel safe. Carry a photocopy or a digital image on your phone for identification purposes. Some countries legally require you to carry the original, so always verify the local law for your destination.
What is the single most important safety tip for a solo traveler?
Trust your intuition. More than any single gadget or tactic, your gut feeling is your best defense. If a situation or person feels wrong, remove yourself from it immediately without hesitation or apology.
Safety Is the Freedom to Explore
So, after all this, is solo travel safe? The answer is a resounding, confident yes. True safety on the road is not a matter of luck; it is the direct and empowering result of thoughtful preparation, heightened awareness, and a proactive mindset.

By shifting your perspective from a fear of the unknown to a healthy respect for the variables, you transform yourself from a potential target into a capable, worldly explorer. The strategies outlined here are not meant to make you fearful, but to make you free—free from the anxiety that holds you back, and free to embrace the incredible growth, perspective, and pure joy that only solo travel can provide. Armed with this knowledge and a commitment to smart travel practices, you can ensure your journey is not just memorable, but also profoundly safe.
Read the full guide: Family Travel Ideas: The 2026 Guide to Unforgettable Trips
Don't Miss Out! Subscribe for Exclusive Content
SubscribeComments 0
No comments yet
Be the first to share your experience!
Dont Miss Out! Subscribe for Exclusive Content

Ultimate USA Holidays Guide: Top Picks
FTC Affiliate Disclosure Essentials: Stay Compliant as a Travel Creator
Essential Affiliate Tools: From Tracking to Full Optimization
Booking.com Affiliate Program Review: Pros, Cons, and Earnings Potential
Decoding Affiliate Commission Rates: Benchmarks for Travel Creators
