High-Paying Affiliate Opportunities for Individual Travel Affiliates
TrekGuider @trekguider
High-Paying Affiliate Opportunities for Individual Travel Affiliates
You’re a talented travel creator, but your affiliate dashboard tells a frustrating story. You spend hours crafting the perfect packing list, linking to dozens of small-ticket items, only to see a few dollars trickle in. It feels like you’re running on a hamster wheel, putting in immense effort for pennies on the dollar—a far cry from the sustainable business you dream of building.
This isn't just a feeling; it's a strategic dead end. You see the industry reports and know the potential is there. You're operating at the intersection of two economic juggernauts: a creator economy forecasted to exceed $1.3 trillion by 2033 and a global affiliate market projected to hit $93 billion. The money is there, but it doesn't flow to those who work the hardest; it flows to those who work the smartest. The reported average of $13,847 a month for travel affiliates isn't a myth, but it’s inaccessible to those stuck in the volume game.

This isn't another sprawling listicle of 50 programs. This is a strategic playbook. We're going to deconstruct the three pillars of a high-income affiliate strategy perfectly suited for the solo creator: high-ticket products, recurring revenue, and the game-changing power of referral affiliate models. This is how you stop thinking like a hobbyist and start getting paid like the professional you are. It’s a critical piece of the puzzle we cover from every angle in our definitive pillar guide, Travel Affiliate Programs: The 2026 Ultimate Guide—your command center for the entire ecosystem.
The Mindset Shift: From Chasing Volume to Creating Value
But before we dive into the specific opportunities, we need to address the single most important factor: your mindset. Most new creators are obsessed with traffic and commission percentages, believing the path to wealth is paved with millions of pageviews. This leads them directly into the low-margin trap.
Professional affiliates, however, focus on a much more powerful metric: Earnings Per Click (EPC). This number tells you the average amount of money you make every single time someone clicks one of your links. It’s the ultimate measure of your influence.
Consider the simple math:
Scenario A (The Volume Trap): You promote a $50 travel gadget with a 4% commission. You earn $2 per sale. To make $200, you need to drive 100 sales.
Scenario B (The Value Strategy): You promote a $3,000 adventure tour with a 6% commission. You earn $180 per sale. To make more than $200, you only need to drive two sales.
Which business would you rather run? By focusing on value over volume, you can build a more profitable and sustainable business with the same—or even less—traffic.

The High-Ticket Strategy—Earn More from a Single Click
The most direct path to a higher income is to promote products and services with a high price tag. A single conversion can generate a commission that would otherwise take hundreds of smaller sales to match. This is the core of a strategy focused on high paying affiliates.
Adventure Tour Operators
Selling a multi-thousand-dollar tour is one of the most effective ways to generate a substantial commission. You aren't just selling a trip; you're selling a life-changing experience.
Prime Example: G Adventures: This adventure travel company specializes in small-group tours that often cost thousands of dollars. With a 6% commission, a single booking for a $4,000 trip to Antarctica nets you a $240 commission. Crucially, they offer a generous 90-day cookie duration, which is perfectly suited for a high-consideration purchase that requires weeks of planning.
Luxury Travel & Premium Accommodations
For creators in the luxury niche, the earning potential is immense. Promoting five-star hotels, premium villas, or business-class flight deals can yield significant returns. While a program like Booking.com has its flaws, partnering directly with luxury hotel groups or high-end booking platforms can be incredibly lucrative.

Premium Travel Gear
While Amazon is the default for many, it's often the least profitable option for expensive gear. Specialty retailers offer higher commission rates on the premium products your audience is looking for.
Prime Example: REI: For creators in the outdoor and adventure space, REI is a premier partner. They offer a 5-8% commission on high-quality gear. Selling a $700 tent or a $400 backpack through REI will yield a much higher commission than the 3-4% offered by Amazon, and you're connecting your audience with a trusted, specialist brand.
Pro-Tip: When promoting high-ticket items, your content must match the price tag. A brief mention won't cut it. You need to create in-depth, comprehensive reviews, case studies, and guides that give your audience the confidence to make a major purchase decision.
The Recurring Revenue Model—Get Paid Month After Month
What’s better than a big commission? A commission that pays you every single month. Recurring revenue is the holy grail for creators seeking stable, predictable income. With this model, you make a sale once, and you continue to earn a commission for as long as that customer remains subscribed.

Travel Insurance Subscriptions
This is the most powerful recurring revenue stream for travel creators. Every long-term traveler and digital nomad needs insurance, and many use subscription-based services.
Prime Example: SafetyWing: A favorite among digital nomads, SafetyWing offers travel medical insurance on a monthly subscription. Their affiliate program is one of the best in the industry, offering a 10% recurring commission for up to 364 days. A single referral can turn into a year-long passive income stream that builds on itself with every new sign-up.
Travel-Tech & Software
Think about the digital tools your audience uses to plan and execute their travels. Many of these are subscription-based and have fantastic affiliate programs. This could include:
VPN Services: Essential for digital nomads and security-conscious travelers.
Photo Editing Software: Like Adobe Lightroom or preset subscriptions.
Booking & Planning Apps: Niche apps that help travelers organize their trips.
Pro-Tip: The key to succeeding with recurring models is to promote products that become an indispensable part of your audience's travel lifestyle. When the product is essential, the customer rarely cancels, and your passive income stream remains stable and grows over time.
The Ultimate High-Paying Opportunity: The Referral Affiliate Model
We've saved the most powerful model for last. This is the strategy that the world's top creators use to build diversified, high-margin businesses. It represents a big change from being a simple affiliate to becoming a true platform partner.
What’s the difference?
Traditional Affiliates earn a one-time commission for selling someone else's product.
Referral Affiliates build a network and earn a long-term, passive income stream from that network's success.
This model is about empowerment. Instead of just selling a product to your audience, you introduce them to a platform or tool that helps them achieve their own goals. It creates a powerful win-win scenario that feels more like a collaboration than a transaction.

The Ultimate Evolution: The TrekGuider Referral Model
This is precisely the model we’ve built to empower creators at TrekGuider. We believe the most valuable product you can ever promote is your own. The TrekGuider Platform is designed for travel creators to sell their own digital products—like itineraries, guides, maps, and presets.
Our referral program is the ultimate high-paying affiliate opportunity because it transforms you into a business builder. When you introduce fellow creators to the platform using your unique referral link, you unlock a powerful, ongoing revenue share.
Here’s how it works:
You Empower Your Peers: You share a platform that can help your fellow creators build their own sustainable businesses and monetize their expertise.
You Earn Passively: When a new seller joins through your link, you receive an ongoing revenue share from the platform's earnings on their sales—a powerful 25% for their first 30 days, and 12.5% for the next 11 months.
You Build a Compounding Asset: This isn't a one-time payment. It's a long-term passive income stream that grows as the creators you refer become more successful. You are building a network and earning from its collective success.
This is the pinnacle of value-based marketing. You succeed by helping others succeed, creating a powerful and ethical engine for high-margin, passive income.
Build Your Own High-Margin Product
The most successful creators know that affiliate income is just one piece of the puzzle. The ultimate strategy for diversifying your income and taking full control of your earnings is to sell your own digital products. But where do you start?
Our free Digital Product Ideas Guide is packed with dozens of proven, profitable ideas specifically for travel creators. Download it today to find the perfect product for your audience and start building your content empire.
Frequently Asked Questions (FAQ)
1. Are high-ticket programs harder to convert? Yes, they can be. A customer will spend more time researching a $3,000 tour than a $30 gadget. This is why your content must be exceptionally thorough and trustworthy. It's a trade-off: more effort per piece of content for a much higher reward per conversion.
2. Is this too complicated for a solo creator to manage? Not at all. The beauty of this strategy is its focus. Instead of managing links for a hundred cheap products, you're focusing on building deep, valuable content around a handful of high-performing partners. It's about working smarter, not harder.
3. How do I find these types of high-paying affiliate opportunities? Start by looking at the premium products and services you already use and love. Visit their websites and look for an "Affiliates" or "Partners" link, usually in the footer. You can also explore major affiliate networks like CJ Affiliate or ShareASale and filter for partners with high average order values or recurring commission structures.
Your Path to a Professional Income
The world of high paying affiliates is not a secret club reserved for the elite. It is accessible to any individual creator who is willing to be strategic. By shifting your focus from volume to value, you can fundamentally transform your earning potential.
Stop chasing pennies. Start building a professional, resilient business by incorporating these three pillars into your strategy:
Promote High-Ticket Products to earn substantial commissions from a single sale.
Leverage Recurring Revenue Models to build a stable, predictable passive income stream.
Embrace Referral Programs like the TrekGuider Platform to become a true partner and build a business asset that pays you for years to come.
As an individual travel affiliate, your expertise and the trust you've built with your audience are your most valuable assets. By aligning your monetization strategy with high-value opportunities, you can ensure you are finally compensated for the immense value you provide.

Meta Data Suggestions:
SEO Meta Title: 5 High-Paying Affiliate Opportunities for Travel Creators
URL Slug: /high-paying-affiliate-opportunities
SEO Meta Description: Stop earning pennies. Discover 5 high-paying affiliate opportunities for travel creators, focusing on high-ticket sales, recurring revenue, and referral programs.
Read the full guide: The Travel Blogger's Playbook to Affiliate Marketing Mastery
Don't Miss Out! Subscribe for Exclusive Content
Subscribe


Comments 0
No comments yet
Be the first to share your experience!
Dont Miss Out! Subscribe for Exclusive Content

FTC Affiliate Disclosure Essentials: Stay Compliant as a Travel Creator

Essential Affiliate Tools: From Tracking to Full Optimization

Avoid These 5 Affiliate Landing Page Mistakes for Better Conversions

Affiliate Keyword Research Mastery for Travel Blogs

Booking.com Affiliate Program Review: Pros, Cons, and Earnings Potential

Decoding Affiliate Commission Rates: Benchmarks for Travel Creators
Ultra Festival: Beat the Heat Guide
TrekGuider @trekguider
You’ve done it. You scored the golden ticket to Ultra Music Festival, a three-day sonic pilgrimage in the heart of Miami where the world’s greatest DJs command colossal stages and the energy is nothing short of electric. But as the bass drops, so does the relentless Florida sun. The real problem isn't just the heat; it's the brutal combination of scorching temperatures, suffocating humidity, and tens of thousands of dancing bodies that can quickly turn your dream festival into a dehydrated, sun-stroked nightmare.
Imagine the agony of missing Skrillex’s closing set because you’re dizzy and nauseous, huddled in a medical tent. Picture the sheer frustration of tapping out before sunset on day one, your energy completely drained, while your friends rave on into the night. This isn't a scare tactic; it's a common reality for unprepared attendees who fatally underestimate the physical toll of partying under the Miami sun for three straight days. The line between an unforgettable weekend and a miserable, potentially dangerous one is drawn by a single thing: a bulletproof strategy.
This is that strategy. Forget the generic "drink water" advice you’ve heard a thousand times. This is your new bible for not just surviving, but truly conquering the heat at Ultra. We’re providing a pro-level, comprehensive blueprint covering everything from tactical gear selection and advanced hydration science to strategic stage navigation and leveraging festival tech for your safety. Follow these steps, and you won't just beat the heat—you'll own the entire experience, from the opening beat on Friday to the final fireworks on Sunday.

Understanding the Ultra Music Festival Environment: Sun, Crowds, and Sound
Before you can build a plan, you must understand the battlefield. Ultra Music Festival unfolds in late March at Bayfront Park, a beautiful but notoriously exposed venue. For 2026, the festival runs from March 28-30 (and for you long-term planners, March 27-29 in 2026), a time when Miami’s weather is deceptively intense. While the festival is at the heart of the city's vibrant event calendar—a scene we detail in our complete guide to Miami Holidays: 8 Beach Fest Vibes—its unique environment presents a specific set of challenges you must be prepared for.
The festival operates on a strict "rain or shine" policy, meaning you need to be ready for anything. The schedule itself is a marathon, not a sprint:
Friday, March 28: 4:00 PM – 12:00 AM
Saturday, March 29: 12:00 PM – 12:00 AM
Sunday, March 30: 12:00 PM – 10:00 PM
Notice that Saturday and Sunday demand ten to twelve hours of exposure. The primary obstacles you will face are:
Intense Solar Radiation: The Florida sun is powerful. Without adequate shade, direct exposure can lead to severe sunburn and rapidly increase your core body temperature.
Oppressive Humidity: Miami's humidity cripples your body's natural cooling system. It prevents sweat from evaporating effectively, making 85°F feel like a suffocating 95°F.
Massive Crowds: Dense crowds trap body heat, creating microclimates that are significantly hotter than the ambient air. Navigating these human seas requires immense physical energy.
Constant Movement: You’ll be walking, standing, and dancing for hours on end, burning calories and losing fluids at a dangerously accelerated rate.
The first and most critical mindset shift is to treat Ultra like an athletic event. Your preparation starts long before you ever step foot in Bayfront Park.

Pre-Festival Prep: Your Foundation for Success
Victory is won in the preparation. What you do in the days leading up to the festival and what you pack in your bag will absolutely dictate your endurance and enjoyment.
The Ultimate Packing List: Beyond the Basics
Your packing list is your first line of defense. Every single item should serve a purpose, primarily focused on cooling, hydration, and comfort.
Clothing (The Three B’s: Breathable, Bright, and Barely-There):
Fabrics: Choose lightweight, moisture-wicking materials like polyester, nylon, or bamboo blends. These technical fabrics pull sweat away from your skin, allowing it to evaporate and cool you down. Avoid cotton at all costs; it absorbs moisture, becoming a heavy, suffocating trap for heat.
Colors: Opt for light-colored clothing. White, beige, and pastels reflect sunlight rather than absorbing it like dark colors do.
Fit: Loose-fitting garments are your best friend. They allow for crucial airflow against your skin, preventing heat from getting trapped.
Footwear (Your Most Important Gear): You will be on your feet for 30+ hours over the weekend. Comfortable, well-worn sneakers are non-negotiable. Do not, under any circumstances, wear brand-new shoes, flimsy sandals, or heavy boots. Running or athletic shoes with proven arch support are ideal.
Hydration Hardware:
Hydration Pack: This is the single most important piece of gear you can bring. A CamelBak or a similar backpack with a water bladder allows you to carry 2-3 liters of water and sip continuously without fumbling with a bottle. Ensure it complies with the latest festival size and pocket regulations before you go.
Electrolyte Packets: Pack single-serving powders or tablets (like Liquid I.V., Nuun, or Pedialyte packets). They are small, light, and absolutely essential for true hydration.

Sun & Heat Protection Arsenal:
Sweatproof Sunscreen: A broad-spectrum, water-resistant sunscreen with an SPF of 50 or higher is mandatory. Apply it generously 30 minutes before you enter and reapply every two hours, no exceptions.
Wide-Brimmed Hat: A bucket hat or other wide-brimmed hat provides a portable oasis of shade for your face, neck, and ears, significantly reducing your perceived temperature.
UV-Protective Sunglasses: Protect your eyes from the relentless glare and long-term sun damage.
Cooling Towel: These hyper-evaporative towels, when soaked in water, provide incredible cooling relief when worn around your neck.
Handheld Fan/Mister: A small, battery-operated fan can be a godsend in a stagnant, dense crowd, creating a personal breeze when you need it most.
Physical Conditioning: Don't Underestimate the Marathon
You wouldn't run a 10k without training, and you shouldn't tackle Ultra without some physical prep.
Pre-Hydrate Aggressively: Begin increasing your water intake 2-3 days before the festival. Your goal is to start Day 1 with your body in a state of optimal hydration, not playing a desperate game of catch-up.
Build Endurance: In the weeks leading up, incorporate some light cardio into your routine. Even 30 minutes of brisk walking or jogging a few times a week will dramatically improve your stamina.
Prioritize Sleep: Get a full 8 hours of sleep each night in the week before the festival. A sleep deficit severely impairs your body's ability to regulate temperature and recover.
Just as detailed planning is key for a scenic road trip, like the one we map out in our Big Sur Map & Itinerary, careful preparation is essential for a massive festival. Don't leave your experience to chance.
Mastering Hydration: The Core of Your Ultra Music Festival Strategy
This is the most critical section of this guide. Proper hydration at Ultra is a science. Simply drinking water when you feel thirsty is a recipe for disaster; by the time you feel thirst, you are already significantly dehydrated.

Water Isn't Enough: The Critical Role of Electrolytes
When you sweat, you don't just lose water; you lose vital minerals called electrolytes—primarily sodium, potassium, and magnesium. These minerals are the spark plugs of your body, responsible for regulating nerve and muscle function, hydrating your cells, and balancing blood pressure. Replenishing them is just as important as replenishing water.
Why It Matters: Drinking excessive amounts of plain water without replacing electrolytes can lead to a dangerous condition called hyponatremia, where the sodium levels in your blood become dangerously diluted. Symptoms can mimic dehydration (nausea, headache, confusion) but can be far more severe.
Your Game Plan: For every two refills of your hydration pack with plain water, make the third refill an electrolyte mix. This simple rule ensures you are constantly replenishing what you're sweating out. Avoid relying on sugary energy drinks or sodas for hydration; they can often make dehydration worse.
Your Hydration Schedule: A Sip-by-Sip Plan
Discipline is everything. You need a proactive hydration schedule, not a reactive one.
The Morning Load-Up: Drink at least 16-20 ounces (about half a liter) of water with an electrolyte packet before you even leave for the festival.
The Immediate Refill: The very first thing you do upon entering Bayfront Park is locate a water station and fill your hydration pack to its maximum capacity.
The 15-Minute Rule: Take a few big sips of water from your pack every 15 minutes. Set a recurring alarm on your phone or watch if you have to. Do not wait until you feel thirsty.
The Proactive Refill: Never wait until your pack is empty to refill it. When it's about one-third full, make your way to a water station. The lines are shortest during non-peak times (e.g., during a headliner's set when everyone is at one stage, or early in the day).
The End-of-Night Recovery: Drink another 16-20 ounces of electrolyte-infused water before you go to sleep. This will supercharge your body's recovery overnight and prepare you for the next day.
Pro-Tip: As soon as you get inside, open the festival map on the official app and screenshot the locations of all free water refill stations. The stations located near smaller stages or along the perimeter of the park often have significantly shorter lines than the ones near the main stage.
Strategic Navigation and Lineup Planning
How you move through the festival and plan your day is just as important as what you pack. Wasting energy is a luxury you simply cannot afford.

Decoding the Festival Map for Heat Evasion
The festival grounds are a maze of stages, vendors, and people. Use the map to your real advantage.
Identify Cool Zones: Before you even start thinking about artists, scan the map for any designated shade structures, indoor stages (like the iconic Megastructure), or air-conditioned brand activations. These are your recovery oases.
Plan Efficient Routes: When moving from the Main Stage to the Resistance stage, don't just try to cut through the thickest part of the crowd. Use the perimeter walkways. It might be a slightly longer distance, but it will be faster and require far less energy than pushing through a human traffic jam.
Building a Smart Schedule: Pacing is Everything
With a 2026 lineup featuring titans like John Summit & Dom Dolla, Armin van Buuren, Tiësto, Chase & Status, and Deadmau5, the temptation is to sprint from stage to stage. This is a rookie mistake that will burn you out by 9 PM on Friday.
Prioritize Ruthlessly: Accept that you cannot see every artist. Pick your top 3-4 "can't-miss" sets for each day and build your schedule around them as anchors.
Schedule Deliberate Downtime: The hottest part of the day is typically between 2 PM and 5 PM. This is the perfect time to schedule a tactical break. Find a shady spot, sit down, focus on hydrating, and eat a proper meal. This planned rest will give you the energy you need for the headlining acts at night.
Embrace Discovery: Use the time between your must-see sets to explore smaller stages. They are often less crowded, providing more space to dance, breathe, and discover your new favorite artist.
Pro-Tip: When moving through a dense crowd to get closer to a stage, conserve energy by following directly behind a larger, determined person or group. Let them carve a path for you. It's a simple "drafting" trick that saves a surprising amount of physical effort.
Leveraging Technology and Safety Resources at Ultra Music Festival
In the modern festival era, your phone is an essential survival tool. Ultra has integrated technology to enhance attendee safety, and you should take full advantage of every resource.
Your Phone is Your Lifeline
The Official Ultra App: Download it well in advance. It contains the most up-to-date festival map, set times, and, most importantly, will send push notifications for any emergency alerts or important announcements.
The SaferWatch App: Ultra has partnered with the SaferWatch app, which allows you to report any safety or security concerns (medical emergencies, suspicious activity) directly and anonymously to festival staff in real-time. Have it downloaded and set up before you arrive.
Portable Charger: Your phone is useless with a dead battery. A fully charged portable power bank is not optional; it's mandatory.
Knowing Where to Go for Help
Even with perfect preparation, things can go wrong. Knowing how to recognize a problem and where to get help is crucial.
Locate Medical Tents: Just like the water stations, the first thing you should do is identify the location of all medical tents on your map. They are staffed with professionals who are there to help you, no questions asked. There is no shame in seeking help.
Recognize the Signs of Heat Exhaustion: Be aware of these symptoms in yourself and your friends:
Heavy sweating
Dizziness or lightheadedness
Nausea or vomiting
A throbbing headache
Cool, pale, clammy skin
If you or a friend experience these, get to a medical tent immediately. Do not try to "tough it out."
Be a Good Raver: The Ultra community is known for looking out for one another. If you see someone who looks unwell or is in distress, ask if they need help and guide them toward a medical tent or alert festival staff.

You're Ready to Conquer Ultra
The roar of the crowd, the earth-shaking bass, the Miami skyline lit up against the night sky—these are the moments that define the Ultra Music Festival experience. By approaching the weekend with the mindset of an endurance athlete, you are no longer at the mercy of the elements. You are in control. Preparation is your armor, hydration is your fuel, and a smart strategy is your map to victory. You now have the expert knowledge to stay cool, energized, and safe from the first set to the final encore.
You are now equipped to handle the heat, navigate the crowds, and fully immerse yourself in the magic of one of the world's greatest music festivals. This level of detailed planning is what transforms a good trip into an unforgettable one. For comprehensive strategies on navigating destinations and events worldwide, our master Travel Guide is the ultimate resource for the serious traveler. Now go, stay hydrated, and have the time of your life.
Don't Miss Out! Subscribe for Exclusive Content
SubscribeComments 0
No comments yet
Be the first to share your experience!
Dont Miss Out! Subscribe for Exclusive Content

San Francisco Cherry Blossoms: A Local's Guide to the Blooms

Halloween SF: Haunts Without Horrors

SF Festivals: 7 Must-See Lineups

Christmas SF: Lights & Wharf Wonders

SF Pride: 6 Route & Party Hacks

Chinese New Year SF: Parade Essentials
The Minimalist Solo Travel Packing List: A Complete Guide
TrekGuider @trekguider
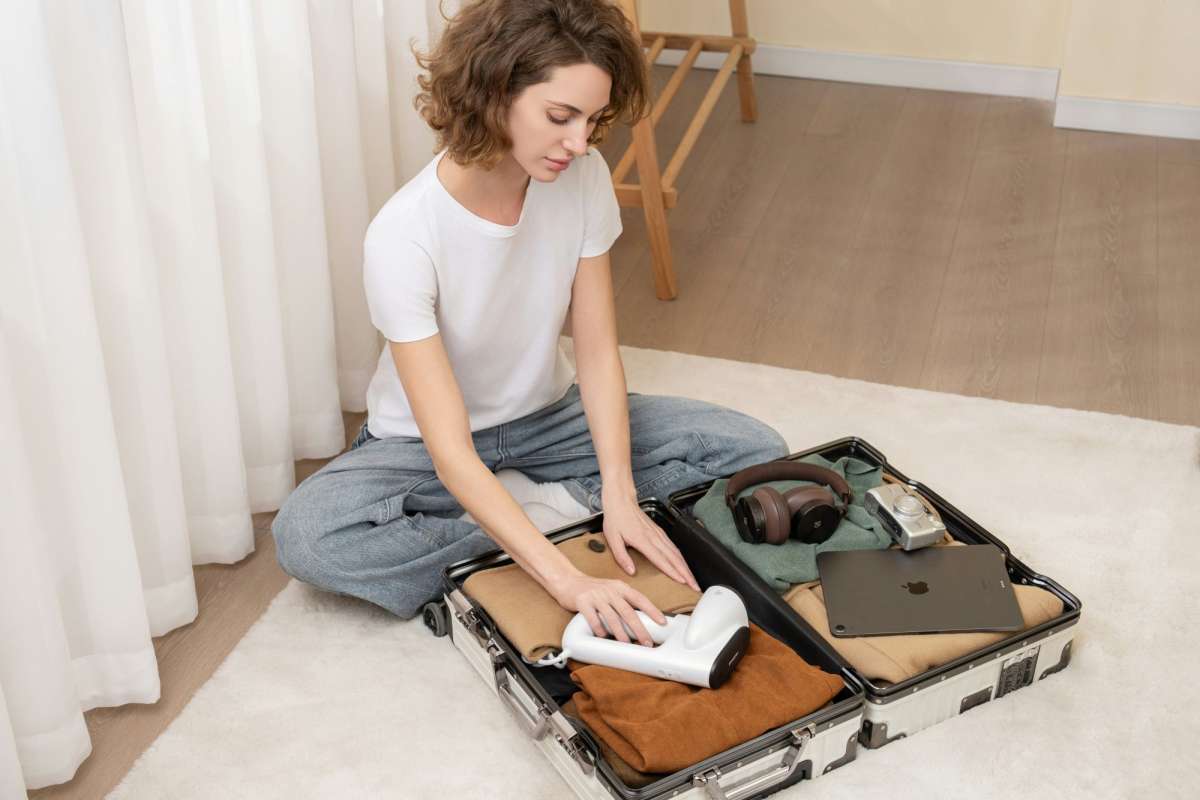
You’ve seen the photo a hundred times: a solo traveler, backpack slung casually over one shoulder, gazing out at a breathtaking vista with a look of pure, unburdened freedom. That’s the dream. But then you look at your own open, empty suitcase, and a wave of anxiety hits. The "what ifs" start piling up. What if it rains? What if I get invited to a fancy dinner? What if I need more options? Before you know it, you’re wrestling with a monstrously heavy bag, convinced you need to pack for every conceivable scenario. This isn't just an inconvenience; for a solo traveler who has no one to help them, an overpacked bag is a physical burden, a financial drain in baggage fees, and a security risk that screams "tourist." It is the very anchor that weighs down the freedom you seek.

This guide is your liberation. It’s the tactical blueprint for adopting a minimalist mindset and the definitive solo female travel packing list you need to execute it with absolute confidence. We will systematically replace the anxiety of "what if" with the certainty of "I have what I need." By packing smarter, not fuller, you’ll unlock the mobility, savings, and peace of mind that define a truly life-changing solo adventure. This isn't just about what to pack; it's about reclaiming the freedom you deserve. For a complete overview of every stage of your journey, be sure to start with our comprehensive pillar guide, The Ultimate Guide to Solo Female Travel (15 Essential Tips).
The Freedom Philosophy: Why Less is Radically More for Solo Travelers
Adopting a minimalist packing ethos isn’t about deprivation; it’s a strategic choice that unlocks four key freedoms essential to the solo travel experience.
Freedom of Mobility: Navigating a bustling train station in Tokyo, climbing the winding cobblestone streets of Lisbon, or hopping on a last-minute ferry to a Greek island becomes effortless with a single, lightweight bag. You are nimble, agile, and free to say "yes" to spontaneous adventures without being weighed down.
Freedom from Fees: In an era where budget airlines charge for everything, checking a bag can add hundreds of dollars to your trip cost. Traveling carry-on only eliminates these fees entirely, putting that money back where it belongs: into your experience fund for things like a cooking class in Florence or a guided hike in Patagonia.
Freedom in Security: A large, checked bag is out of your control for hours, vulnerable to loss, damage, or theft. A carry-on stays with you, dramatically reducing your risk profile. Furthermore, a traveler with a single, manageable bag is less conspicuous and presents a less appealing target than someone struggling with multiple, bulky pieces of luggage.
Freedom of Mind: The fewer items you have, the fewer you have to track, manage, and worry about. A minimalist wardrobe simplifies your daily decisions, reduces clutter in your hotel room, and frees up mental energy to focus on what truly matters: being present and soaking in your surroundings.
The Core of Your Minimalist Solo Female Travel Packing List
The secret to a successful minimalist wardrobe is not about having less; it’s about making sure every single item does more. This means building a small, curated collection of high-quality, versatile pieces that can be mixed, matched, and layered to create multiple outfits for different occasions and climates. This is the art of the capsule wardrobe.
Clothing: The Art of the 10-Day Carry-On Capsule
This checklist is designed to fit into a standard 40-liter carry-on bag for a 10-day trip to a destination with a temperate climate (think European cities in spring or autumn). The core principle is to pack for one week and plan to do laundry once.
Tops (5):
2 neutral-colored t-shirts (merino wool or a high-quality blend is ideal)
2 versatile tank tops or blouses that can be dressed up or down
1 long-sleeve shirt for layering or sun protection
Layers (2):
1 comfortable sweater or cardigan in a neutral color
1 light, weather-resistant jacket (a packable rain shell or a classic denim jacket)
Bottoms (3):
1 pair of dark, comfortable travel pants or jeans (wear these on the plane to save space)
1 pair of versatile trousers, a skirt, or shorts (depending on the destination)
1 pair of leggings (perfect for sleeping, layering under pants for warmth, or lounging)
One-Piece Outfit (1):
1 simple, wrinkle-resistant dress or jumpsuit that can be worn casually with sneakers or dressed up with a scarf and flats.
Undergarments & Sleepwear:
5-7 pairs of underwear (quick-drying fabric is a game-changer)
3 pairs of socks (at least one pair of wool socks for warmth and comfort)
2 bras (one regular, one sports bra or bralette)
1 set of pajamas or comfortable sleepwear
Footwear (Maximum 3 pairs):
Comfortable Walking Shoes: A pair of stylish but supportive sneakers. This is your most important item. Wear them on the plane.
Versatile Flats or Sandals: A pair that can be dressed up for a nice dinner but are still comfortable enough to walk in.
Utility Shoes: A pair of flip-flops (essential for hostels and beaches) or waterproof boots, depending on your itinerary.
Pro-Tip: The combination of rolling your clothes tightly and using packing cubes is the single most effective space-saving technique. Packing cubes not only compress your clothing but also keep your bag impeccably organized, so you're not tearing everything apart to find one pair of socks.
The Champions of Versatility: 5 Items You Can't Live Without
Within your capsule wardrobe, a few key items will do the heaviest lifting. Investing in these five pieces will form the indestructible core of your minimalist packing list.
A Merino Wool T-Shirt: This isn't just a t-shirt; it's a piece of high-performance gear. Merino wool is a natural fiber that is thermo-regulating (keeps you cool when it's hot, warm when it's cold), moisture-wicking, and, most importantly, antimicrobial. This means it resists odor and can be worn multiple times between washes, allowing you to pack far fewer tops.
A Large, High-Quality Scarf or Sarong: This is the Swiss Army knife of a travel wardrobe. It can be a stylish accessory, a wrap for a chilly airplane, a head covering for entering religious sites, a makeshift picnic blanket, or even a privacy curtain in a hostel dorm.
A Simple Black Dress (in a wrinkle-resistant fabric): Choose a dress in a fabric like jersey or tencel. It can be paired with sneakers for a day of sightseeing and then instantly transformed for a nice dinner with the addition of flats and your versatile scarf. It’s a complete outfit in one lightweight piece.
Dark, Comfortable, Multi-Purpose Pants: A single pair of well-fitting, dark-colored pants can anchor your entire travel wardrobe. Whether they are high-tech travel pants, comfortable dark-wash jeans, or polished black trousers, they should be able to transition seamlessly from a day of exploring to a casual evening out.
A Lightweight Button-Down Shirt: A classic button-down in a breathable fabric like linen or tencel offers countless styling options. Wear it buttoned up, wear it open as a light jacket over a tank top or your black dress, or tie it at the waist. It’s a layering hero.
Beyond the Wardrobe: Your Solo Female Travel Packing List for Safety & Tech
While clothing makes up the bulk of your bag, a few key non-clothing items are indispensable for a safe, smooth, and convenient solo trip.
Your Personal Security Toolkit
Your awareness is your primary safety tool, but these devices provide a crucial layer of physical security and peace of mind.

Personal Safety Alarm: A small device that attaches to your keychain and emits an ear-piercing siren and flashing strobe light when activated. It’s designed to startle a potential attacker and attract immediate attention, giving you a window to escape.
Portable Door Lock or Door Stop Alarm: These inexpensive, lightweight devices give you absolute control over the security of your hotel or Airbnb room, making it nearly impossible for someone to enter, even with a key.
Anti-Theft Bag: With a 2024 report noting that 29% of solo female travelers had experienced a theft or attempted scam, a specialized bag is a wise investment. Look for features like slash-proof fabric and lockable zippers. A crossbody style worn in front of your body is the most secure option.
Small Padlock: A simple combination lock is a must-have for securing your belongings in a hostel locker or for locking the zippers of your backpack together in crowded areas.
Essential Tech and Convenience Items
Universal Travel Adapter with USB Ports: A modern essential. Choose a model that includes multiple USB-A and USB-C ports, allowing you to charge your phone, power bank, and other devices simultaneously from a single outlet.
High-Capacity Portable Power Bank: For a solo traveler, a dead phone is a safety issue. A reliable power bank (at least 10,000 mAh) ensures your lifeline for navigation, communication, and emergency help stays operational all day.
Solid Toiletry Kit: This is a game-changer for carry-on travel. Shampoo bars, conditioner bars, solid soap, and solid perfume sticks eliminate the need to worry about the TSA's liquids rule, prevent disastrous leaks, and are more environmentally friendly.
Pro-Tip: Before you leave, use your phone to download offline maps of your destination via Google Maps. This allows your phone's GPS to function perfectly even without a cell signal or Wi-Fi, making it nearly impossible to get truly lost. This makes a fully charged power bank your most important piece of tech.
Ready to Master the Art of Packing Light?
This guide gives you the "what," but to truly perfect the "how"—from advanced folding techniques to brand recommendations—you need the complete toolkit. Our free guide is the ultimate resource for step-by-step strategies, visual guides, and our ultimate pre-trip checklist.
Download the How to Pack Light Guide for free!
The "Do Not Pack" List: 5 Things to Leave at Home
Effective packing is as much about what you leave behind as what you bring. Ditching these common items will save you space, weight, and stress.

Expensive or Sentimental Jewelry: Wearing flashy jewelry can make you a target for theft. More importantly, the risk of losing a cherished or irreplaceable item is simply too high.
Multiple "Just-in-Case" Outfits: Resist the urge to pack for imaginary, unlikely scenarios. Pack for the trip you know you're taking. If an unexpected need arises, you can almost always buy what you need locally.
A Hair Dryer: This bulky item is provided by nearly every hotel and even most modern hostels. Leave yours at home.
Full-Sized Toiletries: There is no reason to carry large bottles of shampoo. Decant your essential liquids into reusable, travel-sized (under 100ml/3.4oz) containers or, better yet, switch to solids.
A Money Belt: While once a travel staple, money belts are often impractical for daily access and can be conspicuous. A more modern and secure approach is to use an anti-theft crossbody bag for daily essentials, while keeping deep storage items (like a backup credit card and passport) locked in your accommodation.
Frequently Asked Questions About Minimalist Packing
Are packing cubes really worth it?
Absolutely. They are the single most effective organizing tool for a carry-on. Not only do they compress clothing to save space, but they also function like dresser drawers inside your backpack, allowing you to find what you need without destroying your perfectly packed bag.
How do I pack for a trip with multiple climates?
The key is layering. Your capsule wardrobe (merino wool base layers, a fleece or sweater, and a waterproof/windproof shell) is designed for this. A merino t-shirt that keeps you cool in Rome can be layered under a sweater and jacket to keep you warm on a chilly evening in the Swiss Alps. Focus on adding or removing these versatile layers rather than packing entirely separate outfits.
What if I forget something important?
Unless it’s your passport or essential medication, you can almost certainly buy it at your destination. Forgetting a toothbrush or a pair of socks isn't a crisis; it’s an opportunity for a mini-adventure into a local pharmacy or shop.
Pro-Tip: Once you’ve mastered this universal list, you can find hyper-specific packing lists for destinations from Patagonia to Portugal—all shared by seasoned solo travelers on the TrekGuider platform.
Cleared for Takeoff: Navigating Airport Security with Your Carry-On
Knowing the rules is essential for a stress-free airport experience. For travelers departing from the US, the Transportation Security Administration (TSA) has two key guidelines for carry-on luggage.
The 3-1-1 Liquids Rule: All liquids, gels, creams, and pastes must be in containers of 3.4 ounces (100 milliliters) or smaller. All of these containers must fit into a single, clear, quart-sized bag. Each passenger gets one of these bags.
Electronics: All electronic devices larger than a cell phone (laptops, tablets, e-readers) must be removed from your bag and placed in a separate bin for X-ray screening.
Pack Light, Travel Far, Live Freely
Minimalist packing is not a restrictive set of rules; it's a liberating mindset. It’s a conscious decision to trade the burden of "stuff" for the freedom of experience. By focusing on versatility, quality, and intention, you transform your luggage from an anchor into a launchpad. You are now armed with more than just a checklist; you have a complete philosophy for navigating the world with ease and confidence. This solo female travel packing list is your blueprint for a lighter, smarter, and more enriching journey.
Once your minimalist kit is packed and ready, the only thing left to do is decide where to take it. Explore our collection of expert-written Travel Guide resources to find destination-specific advice and build the adventure of a lifetime.
Don't Miss Out! Subscribe for Exclusive Content
SubscribeComments 0
No comments yet
Be the first to share your experience!
Dont Miss Out! Subscribe for Exclusive Content

Ultimate USA Holidays Guide: Top Picks
FTC Affiliate Disclosure Essentials: Stay Compliant as a Travel Creator
Essential Affiliate Tools: From Tracking to Full Optimization
Booking.com Affiliate Program Review: Pros, Cons, and Earnings Potential
Decoding Affiliate Commission Rates: Benchmarks for Travel Creators
