The Ultimate Solo Travel Packing List: A Modular Checklist
TrekGuider @trekguider
Staring at an empty suitcase can be overwhelming. This is not another generic article; this is your definitive, actionable solo travel packing list. It’s a methodical system designed to transform packing from a chore into an act of empowerment. We’ve built this checklist on a "Core + Modules" framework: a non-negotiable foundation of essentials, plus optional modules you can add for specific types of travel.
This tactical checklist is your "what." Before you dive into the specific items, we highly recommend reading our guide to to understand the minimalist systems and philosophy that make this list so powerful. Understanding the "why" will make packing the "what" intuitive and stress-free.

Your Core Essentials
Every trip, regardless of destination or duration, starts here. These are the non-negotiable items that form the base of any smart solo travel plan. Do not leave home without them.
Your Access to Everything
Your ability to move, transact, and prove your identity matters most. Build redundancy into your document strategy.
Passport/Visa: Check that your passport has at least six months of validity from your planned return date.
Digital & Physical Copies: Store a physical photocopy of your passport and driver's license in a separate bag from the originals. Keep high-quality photos of them in a secure cloud service (Google Drive, Dropbox) and in your email.
Travel Insurance Details: Carry a printed copy of your policy and save a PDF to your phone for offline access.
Multiple Bank Cards: Pack at least two different credit cards and one debit card. Store them in separate locations (e.g., one in your wallet, one in your daypack).
Emergency Cash: Hide $100-$200 USD deep within your main bag as a final safety net.
Bank Travel Notifications: Log into your banking apps and set a travel notice for your specific destinations and dates. This five-minute task prevents your accounts from being frozen for suspected fraud.
Your On-the-Go Wellness Kit
Stay healthy and comfortable on the road. The goal is a compact, leak-proof, and comprehensive kit.
Prescription Medications: Pack enough for your entire trip in their original, labeled containers. Bring a copy of the prescription itself.
Mini First-Aid Kit:
Pain relievers (Ibuprofen/Acetaminophen)
Assorted adhesive bandages
Antiseptic wipes
Blister treatment (e.g., Compeed)
Anti-diarrhea medication (e.g., Imodium)
Solid Toiletries: The ultimate packing hack. Eliminates liquid restrictions, prevents leaks, and lasts longer.
Solid shampoo bar
Solid conditioner bar
Solid soap bar
The Basics:
Toothbrush
Solid toothpaste tablets
Deodorant
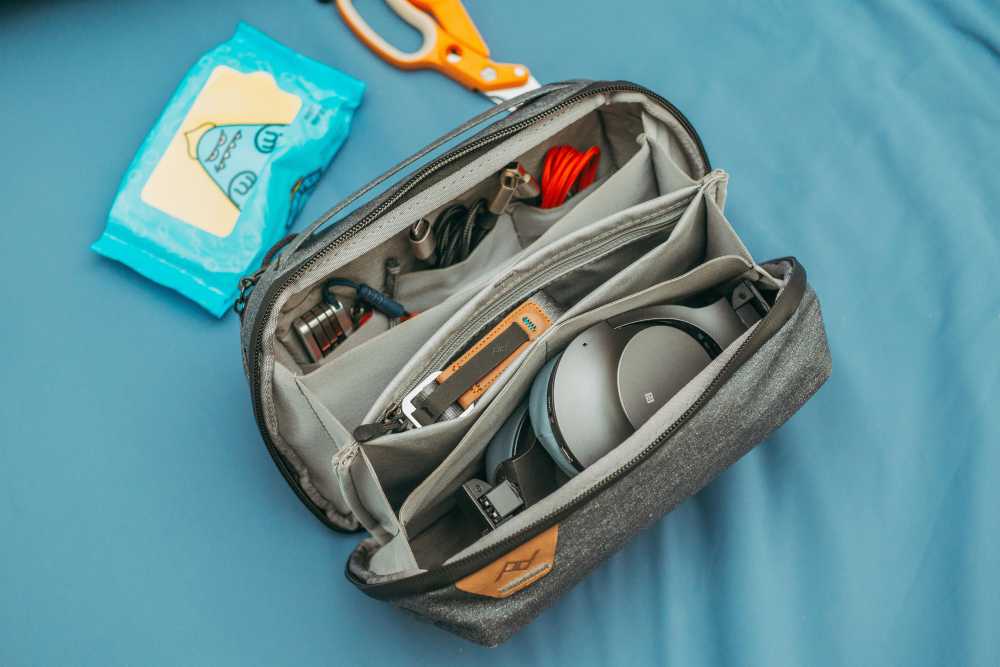
Your Digital Lifeline
Your smartphone is your navigator, translator, and connection to the world. Keeping it powered is mission-critical.
Smartphone: Your all-in-one command center. Download offline maps for your destination.
Portable Power Bank: A non-negotiable safety item. Choose a 10,000mAh+ model from a reliable brand like Anker to guarantee 2-3 full phone charges. Keep it charged.
Universal Power Adapter: Invest in one high-quality universal adapter with multiple USB ports. This allows you to charge all your devices from a single outlet.
Noise-Canceling Headphones: Essential for focus and peace on loud flights, trains, or in shared hostel rooms.

Essential Solo Travel Safety Gear
This module proactively addresses the "what-if" scenarios, allowing you to explore with confidence and sleep soundly. The gear here is your first line of defense, but true confidence comes from preparation. For a complete guide to situational awareness and navigating new environments securely, our comprehensive article, Anxious to Adventurous: Solo Travel Tips for Confidence, is required reading.

For Your Accommodation
Portable Door Lock (e.g., Addalock): A small, lightweight device that braces your door from the inside, making it impossible to open even with a key.
Door Stop Alarm: A wedge that slides under your door. If opened, it physically blocks the door while emitting a piercingly loud alarm.
For When You're Out & About
Anti-Theft Daypack (e.g., Pacsafe, Travelon): Choose a crossbody bag or backpack with slash-proof straps, lockable zippers, and RFID-blocking pockets.
Personal Safety Alarm: A keychain device that emits an ear-splitting siren and flashing strobe light to attract attention and disorient an attacker.
RFID-Blocking Wallet: Protects your passport and credit cards from electronic "skimming."
The 5-4-3-2-1 Formula
Pack less and wear more with a strategic, versatile wardrobe built on mix-and-match essentials. Choose a neutral color palette (black, gray, navy) for core items.
The 5-4-3-2-1 Formula (1-Week Framework)
5 Tops: Focus on wrinkle-resistant, odor-resistant fabrics. At least one should be merino wool—the ultimate travel fabric for temperature regulation and multi-day wear.
4 Bottoms: A typical mix includes one pair of comfortable travel pants, one pair of jeans or chinos, and one skirt or pair of shorts.
3 Accessories: A lightweight scarf or sarong is incredibly versatile (fashion, beach cover-up, towel, head covering).
2 Pairs of Shoes:
Pair 1: Supremely comfortable, broken-in walking shoes.
Pair 2: A versatile, slightly dressier option (flats, loafers, clean leather sneakers).
1 Jacket: A waterproof, windproof outer shell. Layer with a fleece or sweater for warmth as needed.
Climate Sub-Modules (Choose One)
Cold Climate Add-ons: One set of thermal base layers (top and bottom), a warm hat, gloves, and wool socks.
Tropical Climate Add-ons: A swimsuit, a quick-dry microfiber towel, a wide-brimmed sun hat, and sunglasses.
Digital Nomad's Checklist
This module is for anyone working on the road. It focuses on creating an efficient, ergonomic, and connected remote workstation.

Lightweight Laptop: An ultrabook (e.g., MacBook Air) offers the best balance of power and portability.
Portable Laptop Stand (e.g., Roost, Nexstand): The single best way to prevent neck and back pain.
Ergonomic Peripherals: A slim, portable keyboard (e.g., Logitech K380) and a portable mouse (e.g., Logitech MX Anywhere).
High-Quality Headphones with Mic: Essential for calls and focus in noisy environments.
eSIM: Use an app like Airalo to purchase and install a digital SIM card before you leave. Get connected the moment you land.
High-Capacity "PD" Power Bank: Ensure your power bank is "Power Delivery" rated and has enough capacity to charge your laptop, not just your phone.
What NOT to Pack
Knowing what to leave behind is as important as knowing what to bring.

Expensive or Sentimental Jewelry: Don't bring anything you would be devastated to lose.
Full-Sized Towel: Most accommodations provide them. If needed, a quick-dry travel towel is a superior option.
Multiple "Good" Outfits: Stick to versatile pieces that can be dressed up or down.
Physical Books: An e-reader provides an entire library at a fraction of the weight.
"Just in Case" Items: Unless you're traveling to a very remote location, you can buy most basic items at your destination.
Your Questions Answered
What should a solo female traveler add? Many add a versatile sarong (for modesty at religious sites), a silicone doorstop for extra security, and some opt for a fake wedding ring to deter unwanted attention.
How do I pack for a long-term trip in a carry-on? Commit to doing laundry. Pack one week's worth of clothing using the capsule method and plan to do laundry every 7-10 days.
What are the best shoes for solo travel? The ones you can walk in comfortably for 8+ hours. Never bring new, unbroken-in shoes on a trip.

By starting with the Core Essentials and adding modules tailored to your journey, you have now built the perfect solo travel packing list. This system eliminates guesswork, ensures you are prepared for your adventure, and empowers you to travel with the confidence of a pro.
Read the full guide: Anxious to Adventurous: The Ultimate Guide to Solo Travel Confidence
Don't Miss Out! Subscribe for Exclusive Content
Subscribe


Comments 0
No comments yet
Be the first to share your experience!
Dont Miss Out! Subscribe for Exclusive Content

Ultimate USA Holidays Guide: Top Picks

FTC Affiliate Disclosure Essentials: Stay Compliant as a Travel Creator

Essential Affiliate Tools: From Tracking to Full Optimization

Booking.com Affiliate Program Review: Pros, Cons, and Earnings Potential

Decoding Affiliate Commission Rates: Benchmarks for Travel Creators

Amazon Associates for Travel: Strategies to Maximize Commissions
FTC Affiliate Disclosure Essentials: Stay Compliant as a Travel Creator
TrekGuider @trekguider
Let’s talk about the single most valuable asset in your travel content business: trust. It’s the bedrock of your brand, the reason your audience listens, and the currency that turns recommendations into revenue. Yet, there’s a legal landmine many creators unwittingly step on that can shatter that trust in an instant: the Federal Trade Commission (FTC).

In a creator economy where the affiliate marketing industry is a $93 billion juggernaut, operating with professional integrity isn't just good ethics—it's a brilliant business strategy. The creators hitting the reported average of $13,847 a month aren't just getting lucky; they're building resilient businesses on a foundation of transparency. But the rules around disclosure can feel like a confusing maze of legalese, leading many to either ignore them or implement them incorrectly. This isn't just a minor slip-up; it's a mistake that can get you kicked out of affiliate programs, alienate your audience, and attract unwanted legal attention.
This guide is your definitive, jargon-free map through that maze. We're breaking down the exact rules, providing copy-and-paste templates for every platform, and giving you the confidence to monetize ethically and legally. Mastering compliance is at the heart of a successful business, a topic we explore from every angle in our comprehensive pillar page on Travel Affiliate Programs: The 2026 Ultimate Guide.
What Exactly Is an FTC Affiliate Disclosure?
At its heart, an FTC affiliate disclosure is a simple, honest statement. It informs your audience that you have a "material connection" to a product or service you're recommending. In plain English, if you stand to earn a commission, get a free product, or receive any compensation when someone uses your link, you are legally required to tell them.
This isn't just red tape. It serves two purposes that are vital to your business:
It’s the Law: The FTC is America's consumer protection agency. Its job is to prevent deceptive advertising, and hiding a paid endorsement is considered deceptive. Compliance is non-negotiable.
It Forges Unbreakable Trust: In the creator world, transparency is a superpower. When you're upfront about your affiliate relationships, you prove you have nothing to hide. This makes your audience more likely to trust your recommendations, not less, because they see you as an honest broker.
Pro-Tip: Stop thinking of your FTC affiliate disclosure as a legal chore. Start seeing it as a badge of honor that signals your commitment to professionalism and respect for your audience.

The "Clear and Conspicuous" Standard: Your Four-Point Compliance Checklist
The FTC’s mandate boils down to two words: "clear and conspicuous." This isn’t just vague legalese; it’s an actionable standard built on four pillars. If your disclosure fails on even one, it’s not compliant.
1. Prominence: It Must Be Impossible to Miss
Your disclosure can't be an afterthought. It needs to be presented in a font, color, and location that a typical user can't help but see. That means no tiny, light-gray text hidden in a crowded footer.
2. Presentation: It Must Be in Plain English
Ditch the corporate jargon. Your disclosure needs to be written in simple, straightforward language that anyone can understand instantly.
Excellent: "This post contains affiliate links. If you buy something through one of these links, I may earn a commission at no extra cost to you."
Poor: "This site is a participant in affiliate advertising programs designed to provide a means for sites to earn advertising fees."
3. Placement: It Must Appear Before Any Links
This is the rule creators break most often. The disclosure must be placed where your audience will see it before they scroll to your first affiliate link. Placing it at the bottom of your post is a clear violation.
4. Proximity: It Must Be Close to the Action
The disclosure should be as close to your recommendations as possible. For a blog post, a single, clear statement at the very top of the article is the gold standard and covers all the links that follow.

Your Platform-by-Platform Disclosure Playbook (with Templates)
The four pillars apply everywhere, but how you build them changes with the platform. Here’s your definitive guide.
For Your Travel Blog or Website
This is your home base, and the rules are clearest here. Your disclosure must be at the top of the article, before the main content begins.
Compliant Placement: At the very beginning of the post.
Non-Compliant Placement: In the sidebar, in the footer, or on a separate "Disclosures" page.
Template You Can Use:
(Heads up! This post contains affiliate links. If you book or buy something through one of my links, I may earn a small commission at no extra cost to you. This helps me keep the adventures coming. Thanks for your support!)
For Instagram (Posts, Stories, and Reels)
On social media, disclosures must be instantly visible without a user having to click "see more."
Compliant Placement: Within the first three lines of the caption.
Non-Compliant Placement: Buried in a long block of hashtags at the end.
Pro-Tip: For maximum clarity, the FTC recommends using simple, unambiguous terms.
Templates You Can Use:
For Captions: Start your caption with Ad: or Sponsored:.
Hashtags: Use clear, upfront hashtags like #ad or #sponsored. While #affiliate is used, it's less clear to the average consumer.
For Stories/Reels: The best method is using Instagram's built-in "Paid Partnership" label. If that's not an option, superimpose clear text like "Ad" or "Sponsored" on the screen and mention it verbally.

For YouTube Videos
A compliant YouTube video requires a two-pronged disclosure: one verbal, one written.
Compliant Placement: Stated verbally near the beginning of the video AND written in the description box above the "show more" fold.
Non-Compliant Placement: Only written in the description box where a user has to click to see it.
Templates You Can Use:
Verbal Script: "Just a quick heads-up before we get started—this video contains affiliate links. So if you decide to book that incredible tour I'm about to show you, I might earn a small commission, which is a huge help in supporting this channel!"
Description Box Text: DISCLOSURE: This video and description may contain affiliate links, which means that if you click on one of the product links, I’ll receive a small commission at no additional cost to you.
Don't Forget Referral Links
The rules for an FTC affiliate disclosure extend beyond traditional product sales. They cover any "material connection," and that absolutely includes referral programs. If you share a link that gives a friend a discount and earns you a credit or bonus, that relationship must be disclosed.
This is particularly relevant for modern creator platforms. For example, when you invite fellow creators to join the TrekGuider Seller Platform using your unique referral link, you must be transparent about the fact that you stand to benefit. The best disclosures frame this as a win-win.
Templates for Referral Links:
Simple & Direct: "This is my referral link. If you sign up, I may receive a bonus from TrekGuider."
Benefit-Focused: "Use my link to join the TrekGuider Seller Platform! You'll get mention the benefit, e.g., a 15% discount on your first purchase, and I'll get a small commission to help support my work."
The Travel Creator's Toolkit
Mastering compliance is a key part of building a professional content business. To help you organize your entire strategy—from legal checklists to content templates—we've created the ultimate resource bundle. It’s designed to help you operate like a pro from day one.
Download Your Free Bundle: The Travel Creator's Toolkit Today!
Frequently Asked Questions (FAQ)
1. Is it enough to have a "Disclosure Policy" page on my website? No. While having a dedicated policy page is a good practice, it does not satisfy the FTC's requirement for a disclosure that is proximate to the recommendation. The disclosure must be on the same page as the affiliate links themselves.
2. Do I need to disclose if I received a product for free, even if I'm not getting paid? Yes. Receiving a product or service for free (like a complimentary hotel stay or a free piece of luggage) is considered a "material connection" and must be disclosed just as you would a monetary commission.
3. Can I just use #affiliate in my social media posts? While it's better than nothing, the FTC has indicated that it prefers clearer, more universally understood terms like #ad or #sponsored. The term "affiliate" may not be clear to everyone in your audience.
Your Commitment to Transparency
The world of FTC affiliate disclosure is not designed to be a trap. It’s a framework for honest communication. By embracing these rules, you’re not just protecting yourself legally; you’re making a powerful statement to your audience that you value their trust above all else.
You now have the knowledge and the templates to implement compliant disclosures with confidence across every platform. See this not as a chore, but as a professional standard that elevates your brand. In the creator economy, transparency isn't just good policy—it's the ultimate currency.
Read the full guide: The Travel Blogger's Playbook to Affiliate Marketing Mastery
Don't Miss Out! Subscribe for Exclusive Content
SubscribeComments 0
No comments yet
Be the first to share your experience!
Dont Miss Out! Subscribe for Exclusive Content
Ultimate USA Holidays Guide: Top Picks
Essential Affiliate Tools: From Tracking to Full Optimization

Avoid These 5 Affiliate Landing Page Mistakes for Better Conversions

Affiliate Keyword Research Mastery for Travel Blogs
Booking.com Affiliate Program Review: Pros, Cons, and Earnings Potential
Decoding Affiliate Commission Rates: Benchmarks for Travel Creators
Crafting Travel Product Reviews That Drive Affiliate Sales
TrekGuider @trekguider
You’ve poured hours into it. The photos are stunning, the details are careful, and your personal story is woven throughout. You hit “publish” on your latest travel product review, certain that this is the one. But weeks later, the affiliate dashboard tells a familiar, frustrating story: plenty of clicks, but a whisper of commissions. You’re creating genuinely valuable content, but it feels like you’re leaving a fortune on the table, unable to bridge the chasm between your effort and your earnings.
This isn't just a feeling; it's a critical business problem. You see the industry reports—the affiliate marketing market soaring past $93 billion, with the average travel affiliate earning a reported $13,847 a month—and it feels like a world away. The issue isn't your passion or your expertise. The issue is that a travel product review that simply informs is a hobby; a review that is engineered to convert is a business. You're missing the formula, the psychological triggers, and the conversion-focused structure that turns a reader's trust into a reliable revenue stream.

Forget vague tips. This is a skill workshop—a definitive blueprint for how to write a product review that drives affiliate sales with the precision of a finely tuned engine. We will deconstruct the anatomy of a high-conversion review, from the headline that hooks to the call-to-action that closes. This is a masterclass in a single, vital skill, a topic we explore from every angle in our definitive command center for the entire affiliate ecosystem: Travel Affiliate Programs: The 2026 Ultimate Guide.
The Mindset Shift: From "Informing" to "Converting"
The first and most crucial step is a fundamental mindset shift. Most creators approach a product review as a report. They list the features, describe their experience, and hope the reader is inspired enough to click. This is a passive strategy that yields passive results.
A high-earning creator understands that a product review is their most valuable sales asset. Its primary purpose is not just to describe the product, but to guide the reader to a confident purchase decision. Every word, every image, and every design element must work in concert to achieve one goal: to solve the reader's problem so effectively that clicking your affiliate link becomes the most logical and desirable next step.
This isn't about being a pushy salesperson. It's about being a master problem-solver. Your reader has arrived on your page with a need: "Is this the right backpack for my trip to Europe?" or "Will this travel insurance actually cover me if I get sick in Thailand?" A review that converts answers these questions with such clarity, authority, and empathy that it eliminates all doubt and inspires action.

The Anatomy of a High-Conversion Review: A 7-Part Formula
A product review that consistently drives sales is not an accident of creative inspiration; it is a carefully constructed system. By following this seven-part formula, you create a user experience that caters to every type of reader—from the quick skimmer to the deep diver—and guides them seamlessly toward conversion.
Part 1: The Headline That Hooks and Qualifies
Your headline has one job: to make an undeniable promise of value to a specific audience. It must grab attention in a crowded search result and instantly signal that your review will solve their problem. Generic headlines like "My Review of the Osprey Backpack" are a death sentence.
Instead, use proven, high-impact formulas:
The "Real World Test" Formula: The Product Name Review: After Number Miles / Number Countries / Time Period
Example: The Osprey Farpoint 40 Review: After 6 Months & 15 Countries
The "Balanced Verdict" Formula: Product Name Review: Number Things I Loved & Number I Hated
Example: The Away Bigger Carry-On Review: 5 Things I Loved & 2 I Hated
The "Is It Worth It?" Formula: Is the Product Name Worth the Hype? An Honest 2026 Review
Example: Is the Nomatic Travel Pack Worth the Hype? An Honest 2026 Review
These headlines work because they promise authenticity, detail, and a balanced perspective—exactly what a user wants when researching a purchase.
Part 2: The Empathetic Introduction (The Hook)
Your introduction must accomplish three things in the first 100 words: connect with the reader's problem, establish your authority, and present the product as the potential solution. Use the PAS (Problem, Agitate, Solve) framework for maximum impact.
Problem: "Finding the perfect carry-on backpack is a nightmare. Most are either too bulky, too disorganized, or fall apart after one trip."
Agitate: "You end up repacking at the airport check-in counter, digging through a black hole of gear to find your passport, or worse, dealing with a broken zipper mid-adventure."
Solve: "For the past six months, I've been testing the Osprey Farpoint 40 across Southeast Asia to see if it's the ultimate solution for one-bag travel. In this review, I'll break down exactly who this bag is for, who should avoid it, and whether it lives up to its legendary reputation."
Part 3: The "At a Glance" Summary Box
Many of your readers are skimmers. They are busy and want a quick verdict. An "At a Glance" summary box at the top of your review is the single best way to serve this audience and capture an immediate conversion.
This box should be visually distinct (using a different background color or a border) and contain:
Product Image: A high-quality, authentic photo of the product in use.
A Quick Summary: A one-sentence verdict. (e.g., "The ultimate travel backpack for versatile adventurers who value comfort and organization.")
Key Specifications: A bulleted list of the most important specs (e.g., Capacity, Weight, Dimensions).
Overall Rating: A simple star rating (e.g., 4.5 / 5 Stars).
The Primary CTA: A bold, unmissable button with a clear call-to-action.
Part 4: The Deep Dive: Storytelling Over Specs
This is the heart of your review. This is where amateurs list features, but professionals tell stories. Your mission is to translate every specification into a tangible, real-world benefit, wrapped in the context of your personal experience.
Amateur: "The backpack has a 15-inch padded laptop sleeve."
Professional: "The Padded Laptop Compartment That Saved My MacBook: When my bus in Vietnam took a corner too fast, my bag went flying. My heart stopped, but the heavily padded, suspended laptop sleeve kept my MacBook safe without a scratch. For digital nomads, that peace of mind is priceless."
Structure this section with clear H3 subheadings for each key feature or benefit (e.g., "Comfort & Fit," "Organization & Pockets," "Durability & Materials"). This makes the content scannable and allows readers to jump to the sections that matter most to them.

Part 5: The Unbeatable Proof: Your Photos & Videos
Stock photos are a conversion killer. They scream "I've never actually used this product." Your review's credibility hinges on authentic, high-quality visual proof.
Show the Product in Action: Include photos of you wearing the backpack, packing the suitcase, or using the camera in a real travel environment.
Highlight Key Features: Take detailed close-up shots of the zippers, the materials, the specific pockets you're talking about.
Embrace Video: This isn't just a nice-to-have; it's a strategic imperative. With industry projections showing that video will account for a staggering 55% of all affiliate traffic by 2026, embedding a short, authentic video review is one of the most powerful trust signals in your arsenal.
Part 6: The Honest Verdict: Pros, Cons, and "Who It's For"
Radical transparency is the ultimate trust signal. No product is perfect, and acknowledging its flaws makes your praise exponentially more believable.
Create a simple, two-column list of Pros and Cons. Be specific and honest. Then, create a dedicated section that clearly defines who this product is perfect for and, just as importantly, who should look for something else.
This Product is Perfect For: "Digital nomads, weekend travelers, and anyone who prioritizes a comfortable carry and smart organization."
You Should Avoid This Product If: "You're a photographer who needs to carry multiple camera bodies or if you require a fully waterproof bag for extreme conditions."
Part 7: The Compelling Conclusion & Final CTA
Your conclusion should be short, powerful, and decisive. Summarize the product's single biggest benefit and give the reader one final, clear instruction. Reiterate your overall verdict and guide them to the click with a final, compelling call-to-action button.

The Psychology of Persuasion: Advanced Conversion Tactics
A great structure is the foundation, but layering in proven psychological triggers is how you maximize conversions.
Build Unshakable Trust: Your FTC disclosure must be clear and placed at the very top of your review. This isn't just a legal requirement; it's a badge of honor that signals transparency.
Leverage Social Proof: Weave in screenshots of other positive reviews or user ratings. Phrases like "With over 5,000 five-star reviews on Amazon..." validate the reader's potential decision.
Create Urgency (Ethically): For products with fluctuating prices, like flights or hotels, use CTAs that encourage immediate action. "Check Today's Prices on Booking.com" is both helpful and urgent.
Pro-Tip: One of the most effective ways to increase conversions is to use a comparison table. Pit the product you're reviewing against its main competitor. This not only helps the reader make a final decision but also gives you the opportunity to place two high-value affiliate links side-by-side.
The Ultimate Conversion Play: From Affiliate to Owner
A product review is the perfect place to introduce your audience to your own high-value offerings. After you've solved their immediate problem, you can guide them toward a deeper solution that you control completely. This is the natural evolution of your expertise.
For example, after the main body of your review for a travel backpack, you could add a section like:
"Now that you've found the perfect backpack, the next step is knowing what to put inside it. For my complete, field-tested packing system, check out my 'Ultimate Carry-On Packing List' available on the TrekGuider Platform. It's the exact checklist I use to pack for every trip."
This is a natural, value-driven upsell that transitions the reader from a potential affiliate commission to a direct customer, where you keep a much larger share of the revenue.

Pro-Tip: To supercharge your affiliate sales, offer a "bonus stack" for anyone who buys through your link. For example, "If you purchase the Osprey Farpoint 40 through my link, just forward me your receipt and I'll send you my personal 'Perfect Packing' video tutorial for free!" This small, value-added incentive can dramatically increase your conversion rate.
Ready to Build Your Own High-Margin Product? The most profitable product you can ever promote is your own. Affiliate marketing is the perfect training ground, but selling your own digital products—like guides, itineraries, or presets—offers unparalleled profit margins and brand authority. Our free Digital Product Ideas Guide is packed with dozens of proven, profitable ideas specifically for travel creators. Download it today to find the perfect product for your audience and start building your content empire.
Frequently Asked Questions (FAQ)
1. How long should a product review be? There's no magic number, but a high-converting review is typically comprehensive, often falling between 1,500 and 3,000 words. The goal is to be the most thorough and helpful resource on the internet for that specific product. Answer every possible question a reader might have.
2. Is it better to review a product I got for free or one I bought myself? A product you purchased with your own money will always carry more weight and authenticity with your audience. However, if you do receive a product for free, you can still write a credible review as long as you are radically transparent about it in your disclosure and maintain an honest, balanced perspective.
3. How many affiliate links are too many in one review? Focus on strategic placement over sheer quantity. A high-converting review might only have 5-10 well-placed links. Include them in your summary box, on your primary CTA buttons, and contextually on the product name throughout the text. The goal is to make it easy for the reader to click when they are ready, not to overwhelm them with links on every other word.
Your Blueprint for a Profitable Review Engine
You now have the complete formula for how to write a product review that doesn't just get traffic—it gets results. By shifting your mindset from informing to converting and carefully applying this seven-part framework, you transform your content from a simple article into a high-performance business asset.
This is a system you can replicate for every product you recommend, creating a reliable and scalable engine for affiliate income. Stop guessing and start engineering. The path to becoming a top-earning travel creator is paved with reviews that are strategic, persuasive, and relentlessly helpful. Now, go build your engine.
Read the full guide: The Travel Blogger's Playbook to Affiliate Marketing Mastery
Don't Miss Out! Subscribe for Exclusive Content
SubscribeComments 0
No comments yet
Be the first to share your experience!
Dont Miss Out! Subscribe for Exclusive Content
FTC Affiliate Disclosure Essentials: Stay Compliant as a Travel Creator
Essential Affiliate Tools: From Tracking to Full Optimization
Avoid These 5 Affiliate Landing Page Mistakes for Better Conversions
Affiliate Keyword Research Mastery for Travel Blogs
Booking.com Affiliate Program Review: Pros, Cons, and Earnings Potential