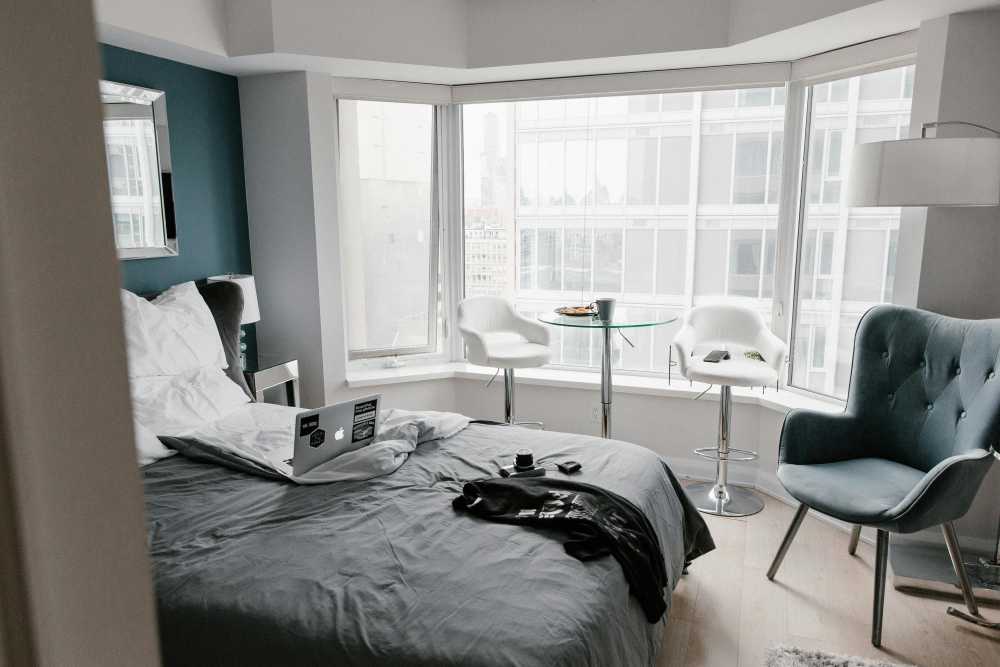
7 Hotel Safety & Security Tips for Peace of Mind
TrekGuider @trekguider
You’ve finally made it. After a long day of navigating airports, taxis, and unfamiliar streets, you slide the key card into your hotel room door and a wave of relief washes over you. This is your sanctuary, your home base for the adventures ahead. But as you drop your bags, another feeling can creep in, spoiling the moment. Let’s be honest: that sterile, anonymous hotel room doesn't feel as secure as your own home. It’s a vulnerability that can cast a shadow over an entire trip, a persistent whisper of "what if" that prevents you from ever truly relaxing.

The good news is that safety isn't a matter of luck; it's a repeatable skill. This guide is your new ritual, a systematic playbook for transforming any hotel room into a personal fortress. We’ve synthesized advice from former hotel security personnel and fire safety experts to bring you seven essential hotel safety tips. This isn’t about paranoia; it's about empowerment. By making these simple checks a habit, you can ensure your peace of mind is the most valuable thing you pack. These strategies are a critical part of the accommodation-specific awareness we cover in our comprehensive guide to [The Ultimate Guide to Travel Safety: A 2026 Playbook].
The 60-Second Security Sweep: Your First Check-In Ritual
Your first minute inside a new hotel room is the most important. This is your window to verify, secure, and orient yourself before you get distracted by unpacking or collapsing on the bed. By turning the following steps into an unbreakable habit, you proactively eliminate the most common security and safety risks. Think of it as a professional-grade inspection that takes less time than it does to check your email.
Tip 1: Secure the Door and Verify the Room is Empty
Before you do anything else, take control of your entry point. A common mistake is to walk in, close the door, and immediately turn your back to it while dealing with luggage. This makes you vulnerable. Instead, follow this security-conscious procedure.
Prop the Door: As you enter, use your luggage to prop the door open so it can't be closed behind you.
Conduct a Visual Clear: From the doorway, quickly scan the room to ensure it is empty. This includes a glance behind the curtains, in the closet, under the bed, and inside the shower.
Close and Lock: Once you've confirmed the room is unoccupied, remove your luggage from the entryway, close the door, and immediately test every single locking mechanism. This includes the primary deadbolt and any secondary security devices like a security chain or a flip latch. Ensure they are all functional and engage smoothly. Don't assume they work; physically test them.
Tip 2: Check Your Communication and Safety Gear
Now that the room is secure, your next step is to verify your lifelines. You need to know that the room’s built-in safety equipment is present and functional.
Test the Phone: Pick up the in-room phone and confirm there’s a dial tone or call the front desk for a quick "hello." This ensures you have a reliable way to call for help if your cell phone has no service or the battery dies.
Locate Safety Devices: Visually identify the smoke detector and fire alarm sprinkler heads. It’s also wise to check for a carbon monoxide detector, especially in hotels with in-room fireplaces or those attached to large parking garages. If one isn't present and you have concerns, report it to the front desk.
Tip 3: Create a Mental Fire Escape Map
This is one of the most critical hotel safety tips, yet it's the one most often ignored. In the event of a fire, heavy smoke can reduce visibility to absolute zero. The evacuation map on the back of your door is not decoration; it's your key to survival.
According to fire safety experts, you must identify three key things:
Your Primary and Secondary Exits: The map will show the nearest emergency exit stairwell. Crucially, you must also identify an alternative, secondary exit in case your primary route is blocked by fire or smoke. Remember, elevators must never be used in a fire.
The Door Count: This is the most important part. Physically walk out into the hallway and count the number of doors between your room and the nearest emergency exit. Memorize this number. In a dark, smoke-filled hallway, this knowledge will allow you to feel your way along the wall to safety, counting the doors as you go.
Location of Safety Equipment: As you identify your route, note the location of fire alarm pull stations and fire extinguishers in the hallway.
Tip 4: Fortify Your Privacy
Your final step in the initial sweep is to ensure your room is a truly private space.
Check Windows and Connecting Doors: Go to every window and make sure it is locked securely. If your room has a connecting door to an adjacent room, verify that it is locked from your side. A good practice is to slide a chair or your luggage in front of a connecting door as an extra physical and audible barrier.
Close the Curtains: Fully close the curtains to ensure privacy from the outside, especially in ground-floor rooms or those that face other buildings.
Scan for Oddities: While rare, hidden cameras are a modern concern. Conduct a quick visual scan for any electronics or objects that seem out of place. Pay attention to smoke detectors, alarm clocks, and USB wall outlets, looking for unusual pinholes or lenses.
Beyond the Locks: Advanced Hotel Safety Tips
Okay, the room is secure. But a locked door is just the first line of defense. Now it’s time to think like a pro and protect your belongings with the kind of savvy that separates seasoned travelers from the rest.
Tip 5: Outsmart a Thief: How to Hide Your Valuables
The in-room safe should always be your first choice for storing passports, extra cash, and small electronics. However, if a safe is unavailable, broken, or you simply don't trust it, you need a smart hiding strategy. The key is to avoid the first places a thief would look: in drawers, under the mattress, and inside your suitcase.

Security consultants recommend using non-obvious, "high-friction" hiding spots that take time and effort to find.
Taped in an Inconspicuous Location: Use a small amount of duct tape to secure an envelope containing cash or cards to a surface that is out of sight. Think creatively: the underside of a heavy desk, the back panel of a chest of drawers, or high up on a closet shelf.
Inside a Common, Uninteresting Object: Hide valuables in plain sight by placing them inside items a thief would ignore. A popular tactic is to place cash inside a bag of dirty laundry, as it's highly unlikely to be searched. You can also slip flat items like cash or cards inside the hotel room's bible or another book on a shelf.
Within the Room's Fixtures: Some parts of a hotel room offer clever nooks. For a laptop, a surprisingly effective tactic is to hide it inside a pillowcase on the bed, then pile the other pillows on top to disguise its shape.
Pro-Tip: When hiding cash or cards in an envelope, tape it flat against a surface and choose a dark color for the envelope (e.g., black or brown) to prevent it from being seen through any gaps.
Tip 6: Bring Your Own Security: Portable Safety Devices
For the ultimate peace of mind, especially when staying in older hotels, budget accommodations, or short-term rentals, consider investing in a portable security device. These lightweight gadgets are designed to provide an extra layer of defense against unauthorized entry.
Portable Door Locks: These devices brace against the door frame from the inside, making it physically impossible for the door to be opened from the outside, even with a key.
Door Stop Alarms: These are simple, wedge-shaped door stops that you place under your door from the inside. If the door is pushed open, it triggers a piercingly loud alarm, startling the intruder and alerting you and others to the breach.
The Final Layer of Protection: Personal Habits
Your physical security measures are only half the battle. The other half is cultivating smart habits and maintaining a high level of situational awareness throughout your stay.
Tip 7: Practice Smart "Hotel Habits"
Small, consistent habits can significantly reduce your risk profile.
Sanitize High-Touch Surfaces: Upon arrival, use a disinfectant wipe to clean the objects that are most frequently handled but often overlooked by cleaning staff: the TV remote, light switches, doorknobs, and the phone.
Be Discreet with Your Room Number: When checking in, if the front desk clerk announces your room number out loud, politely ask for a different room and for them to write it down for you instead. Never leave your key card sleeve, which often has the room number written on it, lying around in public areas.
Use the "Do Not Disturb" Sign: When you are in your room, hang the "Do Not Disturb" sign on the outside of your door. This is a clear signal that the room is occupied and can deter someone from trying to enter, whether by mistake or with ill intent.
Verify All Visitors: Never blindly open your door. If someone knocks claiming to be hotel staff, call the front desk to verify that they sent someone to your room before opening the door.
Pro-Tip: If you order room service or have hotel staff coming to your room, call the front desk to verify the person's identity before opening the door. It's a simple step that confirms the visitor is legitimate.
A secure hotel stay is a cornerstone of a well-planned trip. To ensure every other aspect of your journey is just as prepared, from packing lists to financial planning, a comprehensive resource is essential. The right [Travel Guide] can be the difference between a good trip and a flawless one.
Your Pre-Trip Master Plan
A secure hotel room is just one piece of your travel safety puzzle. To ensure you don't overlook a single essential item—from documents and finances to clothing and gear—a master checklist is your most powerful tool. Our comprehensive, free checklist has you covered for every stage of your trip.

Download Your Free [International Travel Checklist] Now!
Hotel Safety FAQs
A prepared mind anticipates questions. Here are expert answers to common concerns.
1. Is an in-room safe really the most secure option?
For the vast majority of travelers, yes. Modern electronic safes are quite secure against opportunistic theft. However, hotel management does have a master key or code for emergencies. The greatest risk often comes from user error (choosing an obvious code like 1234) or a dishonest staff member (which is rare in reputable hotels). For irreplaceable items, using a smart hiding spot in addition to the safe, or keeping them on your person, can provide an extra layer of security.
2. Are short-term rentals (like an Airbnb) more or less secure than hotels?
It varies dramatically. A professionally managed rental in a secure building can be safer than a budget motel. However, rentals lack the 24/7 staff, multiple security cameras, and controlled access points of a hotel. When booking a rental, read reviews carefully for any mention of safety concerns, check the lock quality upon arrival, and consider bringing your own portable door lock.
3. What should I do if hotel staff need to enter my room while I'm out?
If you have requested maintenance or housekeeping, you have a reasonable expectation they will enter. Secure all valuables in the safe or hide them before you leave. If you are concerned, you can request that these services only be performed while you are present in the room. Always leave the "Do Not Disturb" sign on your door when you leave if you do not want anyone entering.
Travel with True Peace of Mind
Your hotel room should be a sanctuary—a place where you can recharge after a day of exploration and sleep soundly through the night. It shouldn't be a source of anxiety. By incorporating these seven hotel safety tips into your check-in routine, you are taking active control of your environment. You are replacing uncertainty with a plan and vulnerability with empowerment. This simple, 60-second ritual does more than just secure a room; it secures your peace of mind, freeing you to focus on the real purpose of your journey: the adventure that awaits outside your door.

Meta Data Suggestions:
SEO Meta Title (Under 60 characters):
7 Essential Hotel Safety Tips for Travelers
URL Slug:
hotel-safety-security-tips
SEO Meta Description (Under 155 characters):
Sleep soundly on your next trip. Our expert-backed hotel safety tips cover room security, hiding valuables, fire safety, and more for total peace of mind.
Don't Miss Out! Subscribe for Exclusive Content
Subscribe


Comments 0
No comments yet
Be the first to share your experience!
Dont Miss Out! Subscribe for Exclusive Content

Ultimate USA Holidays Guide: Top Picks

FTC Affiliate Disclosure Essentials: Stay Compliant as a Travel Creator

Essential Affiliate Tools: From Tracking to Full Optimization

Booking.com Affiliate Program Review: Pros, Cons, and Earnings Potential

Decoding Affiliate Commission Rates: Benchmarks for Travel Creators

Amazon Associates for Travel: Strategies to Maximize Commissions
Crafting Travel Product Reviews That Drive Affiliate Sales
TrekGuider @trekguider
You’ve poured hours into it. The photos are stunning, the details are meticulous, and your personal story is woven throughout. You hit “publish” on your latest travel product review, certain that this is the one. But weeks later, the affiliate dashboard tells a familiar, frustrating story: plenty of clicks, but a whisper of commissions. You’re creating genuinely valuable content, but it feels like you’re leaving a fortune on the table, unable to bridge the chasm between your effort and your earnings.
This isn't just a feeling; it's a critical business problem. You see the industry reports—the affiliate marketing market soaring past $93 billion, with the average travel affiliate earning a reported $13,847 a month—and it feels like a world away. The issue isn't your passion or your expertise. The issue is that a travel product review that simply informs is a hobby; a review that is engineered to convert is a business. You're missing the formula, the psychological triggers, and the conversion-focused structure that turns a reader's trust into a reliable revenue stream.

Forget vague tips. This is a skill workshop—a definitive blueprint for how to write a product review that drives affiliate sales with the precision of a finely tuned engine. We will deconstruct the anatomy of a high-conversion review, from the headline that hooks to the call-to-action that closes. This is a masterclass in a single, vital skill, a topic we explore from every angle in our definitive command center for the entire affiliate ecosystem: [Travel Affiliate Programs: The 2026 Ultimate Guide].
The Mindset Shift: From "Informing" to "Converting"
The first and most crucial step is a fundamental mindset shift. Most creators approach a product review as a report. They list the features, describe their experience, and hope the reader is inspired enough to click. This is a passive strategy that yields passive results.
A high-earning creator understands that a product review is their most valuable sales asset. Its primary purpose is not just to describe the product, but to guide the reader to a confident purchase decision. Every word, every image, and every design element must work in concert to achieve one goal: to solve the reader's problem so effectively that clicking your affiliate link becomes the most logical and desirable next step.
This isn't about being a pushy salesperson. It's about being a master problem-solver. Your reader has arrived on your page with a need: "Is this the right backpack for my trip to Europe?" or "Will this travel insurance actually cover me if I get sick in Thailand?" A review that converts answers these questions with such clarity, authority, and empathy that it eliminates all doubt and inspires action.

The Anatomy of a High-Conversion Review: A 7-Part Formula
A product review that consistently drives sales is not an accident of creative inspiration; it is a carefully constructed system. By following this seven-part formula, you create a user experience that caters to every type of reader—from the quick skimmer to the deep diver—and guides them seamlessly toward conversion.
Part 1: The Headline That Hooks and Qualifies
Your headline has one job: to make an undeniable promise of value to a specific audience. It must grab attention in a crowded search result and instantly signal that your review will solve their problem. Generic headlines like "My Review of the Osprey Backpack" are a death sentence.
Instead, use proven, high-impact formulas:
The "Real World Test" Formula: The [Product Name] Review: After [Number] Miles / [Number] Countries / [Time Period]
Example: The Osprey Farpoint 40 Review: After 6 Months & 15 Countries
The "Balanced Verdict" Formula: [Product Name] Review: [Number] Things I Loved & [Number] I Hated
Example: The Away Bigger Carry-On Review: 5 Things I Loved & 2 I Hated
The "Is It Worth It?" Formula: Is the [Product Name] Worth the Hype? An Honest 2026 Review
Example: Is the Nomatic Travel Pack Worth the Hype? An Honest 2026 Review
These headlines work because they promise authenticity, detail, and a balanced perspective—exactly what a user wants when researching a purchase.
Part 2: The Empathetic Introduction (The Hook)
Your introduction must accomplish three things in the first 100 words: connect with the reader's problem, establish your authority, and present the product as the potential solution. Use the PAS (Problem, Agitate, Solve) framework for maximum impact.
Problem: "Finding the perfect carry-on backpack is a nightmare. Most are either too bulky, too disorganized, or fall apart after one trip."
Agitate: "You end up repacking at the airport check-in counter, digging through a black hole of gear to find your passport, or worse, dealing with a broken zipper mid-adventure."
Solve: "For the past six months, I've been testing the Osprey Farpoint 40 across Southeast Asia to see if it's the ultimate solution for one-bag travel. In this review, I'll break down exactly who this bag is for, who should avoid it, and whether it lives up to its legendary reputation."
Part 3: The "At a Glance" Summary Box
Many of your readers are skimmers. They are busy and want a quick verdict. An "At a Glance" summary box at the top of your review is the single best way to serve this audience and capture an immediate conversion.
This box should be visually distinct (using a different background color or a border) and contain:
Product Image: A high-quality, authentic photo of the product in use.
A Quick Summary: A one-sentence verdict. (e.g., "The ultimate travel backpack for versatile adventurers who value comfort and organization.")
Key Specifications: A bulleted list of the most important specs (e.g., Capacity, Weight, Dimensions).
Overall Rating: A simple star rating (e.g., 4.5 / 5 Stars).
The Primary CTA: A bold, unmissable button with a clear call-to-action.
Part 4: The Deep Dive: Storytelling Over Specs
This is the heart of your review. This is where amateurs list features, but professionals tell stories. Your mission is to translate every specification into a tangible, real-world benefit, wrapped in the context of your personal experience.
Amateur: "The backpack has a 15-inch padded laptop sleeve."
Professional: "The Padded Laptop Compartment That Saved My MacBook: When my bus in Vietnam took a corner too fast, my bag went flying. My heart stopped, but the heavily padded, suspended laptop sleeve kept my MacBook safe without a scratch. For digital nomads, that peace of mind is priceless."
Structure this section with clear H3 subheadings for each key feature or benefit (e.g., "Comfort & Fit," "Organization & Pockets," "Durability & Materials"). This makes the content scannable and allows readers to jump to the sections that matter most to them.

Part 5: The Unbeatable Proof: Your Photos & Videos
Stock photos are a conversion killer. They scream "I've never actually used this product." Your review's credibility hinges on authentic, high-quality visual proof.
Show the Product in Action: Include photos of you wearing the backpack, packing the suitcase, or using the camera in a real travel environment.
Highlight Key Features: Take detailed close-up shots of the zippers, the materials, the specific pockets you're talking about.
Embrace Video: This isn't just a nice-to-have; it's a strategic imperative. With industry projections showing that video will account for a staggering 55% of all affiliate traffic by 2025, embedding a short, authentic video review is one of the most powerful trust signals in your arsenal.
Part 6: The Honest Verdict: Pros, Cons, and "Who It's For"
Radical transparency is the ultimate trust signal. No product is perfect, and acknowledging its flaws makes your praise exponentially more believable.
Create a simple, two-column list of Pros and Cons. Be specific and honest. Then, create a dedicated section that clearly defines who this product is perfect for and, just as importantly, who should look for something else.
This Product is Perfect For: "Digital nomads, weekend travelers, and anyone who prioritizes a comfortable carry and smart organization."
You Should Avoid This Product If: "You're a photographer who needs to carry multiple camera bodies or if you require a fully waterproof bag for extreme conditions."
Part 7: The Compelling Conclusion & Final CTA
Your conclusion should be short, powerful, and decisive. Summarize the product's single biggest benefit and give the reader one final, clear instruction. Reiterate your overall verdict and guide them to the click with a final, compelling call-to-action button.

The Psychology of Persuasion: Advanced Conversion Tactics
A great structure is the foundation, but layering in proven psychological triggers is how you maximize conversions.
Build Unshakable Trust: Your FTC disclosure must be clear and placed at the very top of your review. This isn't just a legal requirement; it's a badge of honor that signals transparency.
Leverage Social Proof: Weave in screenshots of other positive reviews or user ratings. Phrases like "With over 5,000 five-star reviews on Amazon..." validate the reader's potential decision.
Create Urgency (Ethically): For products with fluctuating prices, like flights or hotels, use CTAs that encourage immediate action. "Check Today's Prices on Booking.com" is both helpful and urgent.
Pro-Tip: One of the most effective ways to increase conversions is to use a comparison table. Pit the product you're reviewing against its main competitor. This not only helps the reader make a final decision but also gives you the opportunity to place two high-value affiliate links side-by-side.
The Ultimate Conversion Play: From Affiliate to Owner
A product review is the perfect place to introduce your audience to your own high-value offerings. After you've solved their immediate problem, you can guide them toward a deeper solution that you control completely. This is the natural evolution of your expertise.
For example, after the main body of your review for a travel backpack, you could add a section like:
"Now that you've found the perfect backpack, the next step is knowing what to put inside it. For my complete, field-tested packing system, check out my 'Ultimate Carry-On Packing List' available on the [TrekGuider Platform]. It's the exact checklist I use to pack for every trip."
This is a natural, value-driven upsell that transitions the reader from a potential affiliate commission to a direct customer, where you keep a much larger share of the revenue.

Pro-Tip: To supercharge your affiliate sales, offer a "bonus stack" for anyone who buys through your link. For example, "If you purchase the Osprey Farpoint 40 through my link, just forward me your receipt and I'll send you my personal 'Perfect Packing' video tutorial for free!" This small, value-added incentive can dramatically increase your conversion rate.
Ready to Build Your Own High-Margin Product? The most profitable product you can ever promote is your own. Affiliate marketing is the perfect training ground, but selling your own digital products—like guides, itineraries, or presets—offers unparalleled profit margins and brand authority. Our free [Digital Product Ideas Guide] is packed with dozens of proven, profitable ideas specifically for travel creators. Download it today to find the perfect product for your audience and start building your content empire.
Frequently Asked Questions (FAQ)
1. How long should a product review be? There's no magic number, but a high-converting review is typically comprehensive, often falling between 1,500 and 3,000 words. The goal is to be the most thorough and helpful resource on the internet for that specific product. Answer every possible question a reader might have.
2. Is it better to review a product I got for free or one I bought myself? A product you purchased with your own money will always carry more weight and authenticity with your audience. However, if you do receive a product for free, you can still write a credible review as long as you are radically transparent about it in your disclosure and maintain an honest, balanced perspective.
3. How many affiliate links are too many in one review? Focus on strategic placement over sheer quantity. A high-converting review might only have 5-10 well-placed links. Include them in your summary box, on your primary CTA buttons, and contextually on the product name throughout the text. The goal is to make it easy for the reader to click when they are ready, not to overwhelm them with links on every other word.
Your Blueprint for a Profitable Review Engine
You now have the complete formula for how to write a product review that doesn't just get traffic—it gets results. By shifting your mindset from informing to converting and meticulously applying this seven-part framework, you transform your content from a simple article into a high-performance business asset.
This is a system you can replicate for every product you recommend, creating a reliable and scalable engine for affiliate income. Stop guessing and start engineering. The path to becoming a top-earning travel creator is paved with reviews that are strategic, persuasive, and relentlessly helpful. Now, go build your engine.
Don't Miss Out! Subscribe for Exclusive Content
SubscribeComments 0
No comments yet
Be the first to share your experience!
Dont Miss Out! Subscribe for Exclusive Content
FTC Affiliate Disclosure Essentials: Stay Compliant as a Travel Creator
Essential Affiliate Tools: From Tracking to Full Optimization

Avoid These 5 Affiliate Landing Page Mistakes for Better Conversions

Affiliate Keyword Research Mastery for Travel Blogs
Booking.com Affiliate Program Review: Pros, Cons, and Earnings Potential
Decoding Affiliate Commission Rates: Benchmarks for Travel Creators
Best Solo Destinations for Foodies: Culinary Solo Adventures
TrekGuider @trekguider
There's a delicious, unparalleled freedom that comes with traveling for food by yourself. It’s the liberty to chase a craving for the perfect taco across three neighborhoods, to build an entire day around a single reservation, or to linger over a coffee without compromise. But for many, this thrilling prospect is shadowed by a single, persistent question: "Will it be weird eating by myself?" This worry can stop a culinary adventure in its tracks, agitating the traveler's mind until a dream trip becomes a hesitant daydream.
The truth is, some of the world's greatest travel moments happen at a table for one. But the anxiety is real, and it stems from a critical lack of information. Most travel guides list great food cities but completely ignore the person who matters most: you, the solo traveler. They don't tell you where dining alone is not just accepted, but celebrated. They don't point you to the vibrant food halls, the welcoming chef's counters, or the social cooking classes that solve this problem by making a solo trip a feast for the senses and the soul. We've explored the foundational principles in , and now we're diving deeper into the delicious specifics.
This isn't just another list of cities with good restaurants. This is your definitive guide to the best solo destinations for foodies in the United States. Each city has been meticulously selected and ranked based on two critical factors: its world-class, undeniable culinary prowess and, just as importantly, its exceptional environment for the individual adventurer. Get ready to pack your bags and your appetite.
A Food Lover's Hit List: The Top 8 US Cities for a Solo Culinary Trip
1. New Orleans, Louisiana

New Orleans isn't a city that simply has good food; it is a city where food is the culture. It's the vibrant, soulful expression of its unique Creole and Cajun heritage, a story told through flavor that you simply cannot find anywhere else on earth. To visit New Orleans is to participate in a city-wide, centuries-old celebration of eating.
Why Your Taste Buds Will Thank You
A Roster of Icons: This is the hallowed ground of Gumbo, Jambalaya, Étouffée, Po' boys, and Beignets. These aren't just dishes; they are cultural institutions you must experience at their source.
A Spectrum of Dining: From historic, white-tablecloth Creole establishments to raucous neighborhood seafood boils, the city offers a dining experience for every mood and budget.
Birthplace of the Cocktail: The city's bar scene is as serious and storied as its restaurant scene, giving us legendary cocktails like the Sazerac and the Vieux Carré.
The Solo Traveler Advantage
The energy of New Orleans is communal and infectious, making it surprisingly easy to navigate as an individual. The city’s dining infrastructure is built for solo exploration. Countless classic restaurants feature long, inviting bars where ordering a three-course meal is as common as ordering a drink. Casual po' boy shops and oyster bars are designed for quick, delicious, and solo-friendly meals. The constant hum of music and street life means you're never truly alone; you're part of the city's living, breathing festival. Joining a walking food tour of the French Quarter is one of the best ways to get your bearings, sample the classics, and connect with fellow travelers.
The Solo Foodie Scorecard
Your "Must-Eat" List
Charbroiled Oysters: Find a classic oyster bar with a seat at the counter and watch the magic happen.
A Fried Shrimp Po' boy "Dressed": Grab one from a casual, no-frills neighborhood joint for an authentic taste.
Gumbo: Sample it everywhere, from an upscale Creole restaurant to a laid-back Cajun cafe, to appreciate its rich diversity.
Insider Solo Tip: Many of the most famous restaurants, like Commander's Palace, offer fantastic weekday lunch specials that provide a taste of their legendary cuisine for a fraction of the dinner price.
2. New York City, New York

New York isn't just a city; it's a global culinary encyclopedia. It's a place where you can eat your way across continents without ever leaving a single borough. The city's food scene is a direct reflection of its identity: a dynamic, endlessly diverse melting pot of cultures, flavors, and experiences.
Why Your Taste Buds Will Thank You
Unmatched Diversity: From Michelin-starred tasting menus in Manhattan to authentic soup dumplings in Queens, NYC offers a world of culinary options.
An Iconic Menu: It’s the definitive home of the classic pizza slice, the overstuffed deli sandwich, and the perfect bagel with lox.
The Trendsetter: NYC is a culinary incubator where new food trends are born, making it a thrilling destination for anyone who wants to taste the future.
The Solo Traveler Advantage
Let’s state this plainly: New York City isn't just one of the best solo destinations for foodies; it's arguably the template. Why? Because dining alone here isn't an exception or a novelty—it’s a fundamental part of the city’s rhythm. The infrastructure is built for one. The sheer number of diners, ramen shops with counter seating, gourmet food halls (like Chelsea Market and Dekalb Market), and slice shops makes solo dining effortless. You will never feel out of place grabbing a seat at a bar for dinner or a stool at a coffee counter. The world-class public transportation system means you can affordably explore the culinary landscapes of all five boroughs with just the swipe of a MetroCard.
The Solo Foodie Scorecard
Your "Must-Eat" List
A Classic Slice: Grab a foldable, perfect slice from a legendary, no-frills joint like Joe's Pizza.
A Pastrami on Rye: Experience a true New York deli sandwich from an institution like Katz's Delicatessen.
Soup Dumplings (Xiao Long Bao): Head to a specialty spot in Chinatown or Flushing for these delicate, broth-filled wonders.
Insider Solo Tip: To experience some of the city's best food without the hassle of reservations, focus on the incredible food halls where you can sample from multiple high-end vendors in a casual, communal setting.
3. Portland, Oregon

Portland's food scene is a delicious reflection of its independent, creative, and slightly quirky spirit. It's a city that champions the local, the artisanal, and the unconventional, from its world-class coffee roasters to its pioneering food truck culture. This is a place for the foodie who values craft and community.
Why Your Taste Buds Will Thank You
Food Cart Culture: Portland is the undisputed king of food trucks (called "food carts" here). Clusters of these carts, known as "pods," offer a staggering variety of high-quality, affordable global cuisine.
Farm-to-Table Ethos: The city is surrounded by the fertile Willamette Valley, giving chefs direct access to incredible local produce, which is a cornerstone of the dining scene.
Coffee and Doughnuts: Portland takes its coffee and doughnuts very seriously, with legendary spots like Voodoo Doughnut and the more artisanal Blue Star, plus a world-class coffee scene.
The Solo Traveler Advantage
Portland is a paradise for the solo diner, primarily because of its food cart culture. The pods are designed for individual ordering and casual outdoor seating, completely removing the formality of a traditional restaurant. You can create your own progressive meal, grabbing an appetizer from one cart, a main from another, and dessert from a third. It's a low-pressure, high-reward dining experience that feels custom-made for one. The city is also incredibly walkable and bike-friendly, with excellent public transit, making it easy to explore.
The Solo Foodie Scorecard
Your "Must-Eat" List
Anything from a Food Cart: Explore a large pod and pick whatever tempts you most.
An Artisanal Doughnut: Try a unique flavor from a spot like Blue Star Donuts to taste Portland's creative side.
A Specialty Coffee: Visit one of the city's renowned roasters, like Stumptown Coffee, for a perfectly crafted pour-over.
Insider Solo Tip: Build your own food tour by using the city's bike-share program, Biketown, to pedal between different food cart pods in various neighborhoods.
4. San Francisco, California

San Francisco is a culinary heavyweight with a rich history, from Gold Rush-era sourdough starters to the birth of the modern farm-to-table movement. Its food scene is a vibrant tapestry of historic neighborhoods, fresh California ingredients, and a deep connection to the Pacific.
Why Your Taste Buds Will Thank You
Neighborhood Specialties: This is a city of distinct culinary zones: authentic Italian in North Beach, incredible dim sum in the country's oldest Chinatown, and world-class Mexican food in the Mission District.
Ingredient Mecca: Situated between the Pacific Ocean and California's agricultural heartland, chefs here have access to some of the best seafood, produce, and wine in the world.
The Ferry Building Marketplace: This iconic food hall is a one-stop shop for the best of Northern California's artisanal products, from local cheeses to fresh oysters.
The Solo Traveler Advantage
San Francisco's neighborhood-centric nature makes it a fantastic city for solo exploration on foot. A solo traveler can easily spend a day walking from the taquerias of the Mission to the cafes of North Beach, tasting the city's history along the way. The Ferry Building Marketplace is a must-visit, offering a bustling, low-pressure environment perfect for grabbing a gourmet lunch, sampling local products, and enjoying stunning views of the bay.
The Solo Foodie Scorecard
Your "Must-Eat" List
A Mission Burrito: Get an authentic, foil-wrapped masterpiece from a beloved taqueria in the Mission District.
Dim Sum in Chinatown: Wander the streets of the nation's oldest Chinatown and find a bustling spot for a dim sum brunch.
Sourdough Bread Bowl with Clam Chowder: A quintessential San Francisco experience, best enjoyed with a view of the water.
Insider Solo Tip: For an amazing and affordable solo lunch, head to a market in Chinatown, grab some roast duck or pork to go, and enjoy it at a park with a view.
5. Chicago, Illinois

Chicago is a city of bold flavors and hearty appetites. While famous for its deep-dish pizza, its culinary scene is also incredibly sophisticated, boasting a high concentration of Michelin-starred restaurants. It's a city that perfects both high-end and low-brow cuisine with equal passion.
Why Your Taste Buds Will Thank You
A Trio of Icons: Chicago is the undisputed home of deep-dish pizza, the Chicago-style hot dog (dragged through the garden), and the Italian beef sandwich.
Fine Dining Powerhouse: The city is a destination for serious gourmands, with a thriving fine-dining scene that consistently earns international acclaim.
Diverse Culinary Neighborhoods: From the foodie hub of the West Loop to the Mexican flavors of Pilsen, Chicago's neighborhoods offer a world of exploration.
The Solo Traveler Advantage
Chicago's Midwestern friendliness extends to its dining scene. The city is full of classic taverns and restaurants with welcoming bars where a solo diner can comfortably enjoy a full meal. The rise of food halls, like Time Out Market in the West Loop, has added even more excellent solo-friendly options. The city's grid system and robust 'L' train network make it straightforward to navigate and explore different culinary neighborhoods on your own.
The Solo Foodie Scorecard
Your "Must-Eat" List
Deep-Dish Pizza: You have to try it. Find a classic pizzeria and settle in for a gloriously cheesy experience.
A Chicago-Style Hot Dog: Get one from a classic hot dog stand with all seven traditional toppings.
An Italian Beef Sandwich: Order it "dipped" for the full, messy, and delicious experience.
Insider Solo Tip: To tackle a deep-dish pizza without taking up a large table, aim for a weekday lunch special or find a classic pizzeria with bar seating where you can often order by the slice.
6. San Diego, California
San Diego offers a sun-drenched culinary scene defined by its proximity to the ocean and the border. The vibe is casual and fresh, with a focus on high-quality local ingredients and a vibrant fusion of American and Mexican flavors that created the city's signature dish: the fish taco.
Why Your Taste Buds Will Thank You
Cali-Baja Cuisine: San Diego is the birthplace of this exciting culinary movement, blending the fresh, local ingredients of California with the bold flavors and techniques of Baja California, Mexico.
The Fish Taco Capital: The city is the undisputed fish taco capital, offering everything from simple fried fish stands to gourmet grilled mahi-mahi versions.
A Premier Craft Beer Scene: San Diego is one of America's best craft beer cities, with dozens of innovative breweries perfect for a solo afternoon of tasting.
The Solo Traveler Advantage
The casual, outdoor-oriented culture of San Diego makes it an incredibly welcoming place for a solo traveler. The dining scene is dominated by taco shops, breweries with food trucks, and open-air cafes where dining alone is completely normal. You can grab a few fish tacos from a casual stand in La Jolla and eat them on the beach, or settle in at a brewery tasting room and chat with the locals.
The Solo Foodie Scorecard
Your "Must-Eat" List
Fish Tacos: Eat them from a casual, open-air stand in a beach neighborhood like Pacific Beach.
Carne Asada Fries: A decadent and delicious local specialty you'll find at taco shops across the city.
A Local Craft Beer: Visit a brewery in the North Park neighborhood, the heart of the city's craft beer scene.
Insider Solo Tip: Many of San Diego's best taco shops are cash-only, so be sure to have some on hand to avoid missing out on the most authentic spots.
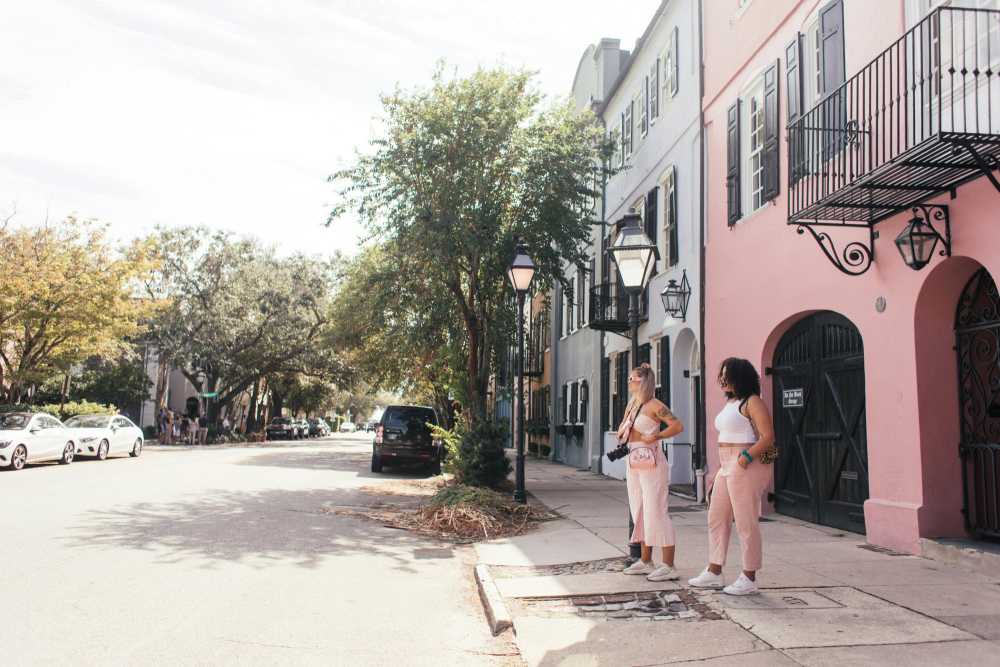
7. Charleston, South Carolina

Charleston is a city where history and culinary innovation gracefully intertwine. It’s a jewel box of a city, with a sophisticated food scene that honors its Lowcountry roots while constantly pushing the boundaries of Southern cuisine.
Why Your Taste Buds Will Thank You
The Heart of Lowcountry Cuisine: Charleston is the epicenter of Lowcountry cooking, featuring regional staples like shrimp and grits, she-crab soup, and fresh oysters.
James Beard Acclaim: The city has an incredibly high concentration of James Beard Award-winning chefs and restaurants, making it a destination for high-end dining.
Historic Ambiance: Dining in Charleston often means eating in beautifully preserved historic buildings, adding a unique sense of place to every meal.
The Solo Traveler Advantage
The solo traveler's skeleton key to Charleston's exclusive dining scene? The bar seat. At celebrated spots like Husk or FIG, where reservations are booked months out, the bar is often held for walk-ins. Arrive 15 minutes before they open for dinner, be the first in line, and you can often snag a front-row seat to a world-class meal without a reservation. The city's compact, historic downtown is exceptionally walkable and safe, making it a joy to explore on foot.
The Solo Foodie Scorecard
Your "Must-Eat" List
Shrimp and Grits: Try a classic version at a respected Lowcountry restaurant.
She-Crab Soup: A rich, creamy Charleston specialty you won't find anywhere else.
Fresh Oysters: Enjoy them raw on the half shell from the nearby waters.
Insider Solo Tip: Beyond the bar trick, look for the city's many "hidden gem" casual lunch counters tucked away on side streets, which serve incredible Lowcountry food without the pomp or price.
8. Austin, Texas

Austin runs on a fuel of barbecue smoke, breakfast tacos, and live music. It's a city with a rebellious, fun-loving spirit, and its food scene is just as bold and creative. It's a place where tradition (Texas barbecue) and innovation (gourmet food trucks) exist side-by-side.
Why Your Taste Buds Will Thank You
A Barbecue Pilgrimage: Austin is a global destination for barbecue lovers, home to legendary smokehouses where people wait in line for hours for perfectly smoked brisket.
The Breakfast Taco: The breakfast taco is a local obsession and the city's quintessential morning meal.
Innovative Food Trucks: Like Portland, Austin has a thriving food truck scene, offering everything from gourmet donuts to fusion tacos in parks across the city.
The Solo Traveler Advantage
Austin’s casual, social culture makes it one of the best US cities for solo food travel. The barbecue experience, where waiting in line is a communal ritual, is inherently social and a great way to meet people. The food truck parks are designed for casual, individual dining, and grabbing a breakfast taco from a walk-up window is a perfect solo start to the day. The live music scene provides endless evening entertainment that's easy to enjoy alone.
The Solo Foodie Scorecard
Your "Must-Eat" List
Brisket from a Legendary Smokehouse: It's worth the wait. Go early and make an experience out of it.
Breakfast Tacos: Try a few different kinds from a beloved local taco stand.
Queso: Sample this molten cheese dip, a Tex-Mex staple, at a lively restaurant with a patio.
Insider Solo Tip: To skip the legendary lines at places like Franklin Barbecue, consider their pre-order service for pickup or aim for a weekday visit right when they open.
Your Field Guide to Dining Solo—And Loving It

Having a list of destinations is the first step—now it's time to master the craft. Because knowing where to go is only half the battle; knowing how to approach it with confidence is what turns a good trip into an unforgettable one.
Four Ways to Conquer the Table for One
Embrace the Bar: The bar is the best seat in the house for a solo diner. It's socially designated for individuals, eliminates the "empty chair" feeling, and often provides a chance to chat with the bartender or other patrons.
Come with a Prop: A book, a journal, or a city map can be a great prop. It gives you something to engage with during lulls and signals that you're a traveler contentedly soaking in the experience.
Start Casual: Your first few solo meals don't need to be at a fancy restaurant. Start with more casual environments. Cafés, bustling food halls, and counter-service restaurants are excellent, low-pressure venues.
Dine Early: Dining during off-peak hours (e.g., an early dinner at 5:30 PM) can feel less intimidating than walking into a packed restaurant at the height of the dinner rush.
Pro-Tip: Download the Resy or OpenTable app and look for restaurants that have a "Bar Seating" option when you book. This guarantees you a designated solo spot and takes the guesswork out of your arrival.
Think Beyond the Restaurant: How to Find Your Food Tribe
Take a Food Tour: These are the ultimate solo traveler hack. They offer a curated tasting menu of a city's best bites, eliminate decision fatigue, and provide an instant group of like-minded dining companions for an afternoon.
Sign Up for a Cooking Class: This is a hands-on, immersive way to learn about local ingredients and culinary techniques. The small-group setting naturally fosters conversation and connection over a shared task.
Explore a Farmers' Market: Places like San Francisco's Ferry Building are vibrant, low-pressure environments perfect for observing local life, sampling artisanal products, and assembling a gourmet picnic to enjoy in a nearby park.
The Table is Set for Your Solo Adventure
The best solo destinations for foodies offer a perfect marriage of exceptional cuisine and a welcoming, accessible environment for the individual traveler. From the Creole kitchens of New Orleans to the food trucks of Austin, these cities prove that you don't need a companion to have a rich and delicious travel experience. Armed with this knowledge, you can confidently navigate the country's best food scenes. The world is your oyster (or taco, or slice of pizza). Go taste it.
Your Questions, Answered: The Solo Foodie FAQ
What is the best US city for a first-time solo foodie trip?
New York City is often the top choice for first-timers. The sheer variety of food, the prevalence of solo-friendly dining spots like food halls and diners, and the fact that eating alone is completely normal make it a very comfortable and exciting experience.
How can I find good restaurants for dining alone?
Look for places with bar or counter seating, as this is a natural spot for solo diners. Food halls and markets are also fantastic options for variety and a casual atmosphere. Reading online reviews and searching for terms like "counter seating" or "good for solo dining" can also help you find the perfect spot.
Are food tours a good idea for solo travelers?
Absolutely! Food tours are one of the best ways to experience a city's culinary scene when traveling alone. They provide a structured itinerary, allow you to sample many different things without ordering full meals, and offer a great opportunity to meet other travelers in a relaxed, social setting.
Is it safe to explore food scenes alone at night?
Safety varies by city and neighborhood, so it is crucial to research your specific destination. Always stick to well-lit, busy areas, be aware of your surroundings, and let someone know your plans. Using a taxi or rideshare service for late-night travel back to your accommodation is a wise precaution.
Don't Miss Out! Subscribe for Exclusive Content
SubscribeComments 0
No comments yet
Be the first to share your experience!
Dont Miss Out! Subscribe for Exclusive Content

Chicago Beer Fests: Top 6 Tastings

A Woman's Guide to Safe Travel: 10 Critical Tips

7 Hotel Safety & Security Tips for Peace of Mind

9 Beach Safety Tips That Could Save Your Life

How to Stay Safe While Hiking: A Hiker's Safety Guide