Christmas Miami: Tropical Lights Tour
TrekGuider @trekguider
You’re dreaming of a classic Christmas—the kind with roaring fires, frosty windowpanes, and the scent of pine in the air. But you look outside, and the reality is 80 degrees, sun-drenched, with palm trees swaying in a gentle sea breeze. You crave that magical, festive spirit, but it’s hard to find when you’re swapping snow boots for sandals.
This disconnect can be jarring. The calendar says December, the stores are playing carols, but the subtropical warmth makes it feel like just another beautiful day in paradise. A nagging worry creeps in: will you miss out on the cozy, twinkling magic of the season? Will your holiday lack the festive punch you look forward to all year? How can you possibly capture the enchantment of Christmas in a place where snowflakes are replaced by sea spray?
The secret is to stop trying to replicate a winter wonderland and instead embrace the vibrant, utterly unique spectacle of a tropical holiday. Consider this your expert-led mission to unlock that magic. We’re going beyond the obvious to build your definitive tour of the dazzling tropical light displays and waterfront events that make a Christmas in Miami truly unforgettable. Forget the sleigh—here, we celebrate with glittering yachts and glowing shorelines. We’ll show you where to find enchanted parks and floating festivals of light, proving that a Miami Christmas doesn’t just rival the traditional version; it offers a brand of high-wattage magic all its own.

The Magic of Contrast: Why a Miami Christmas Shines Brighter
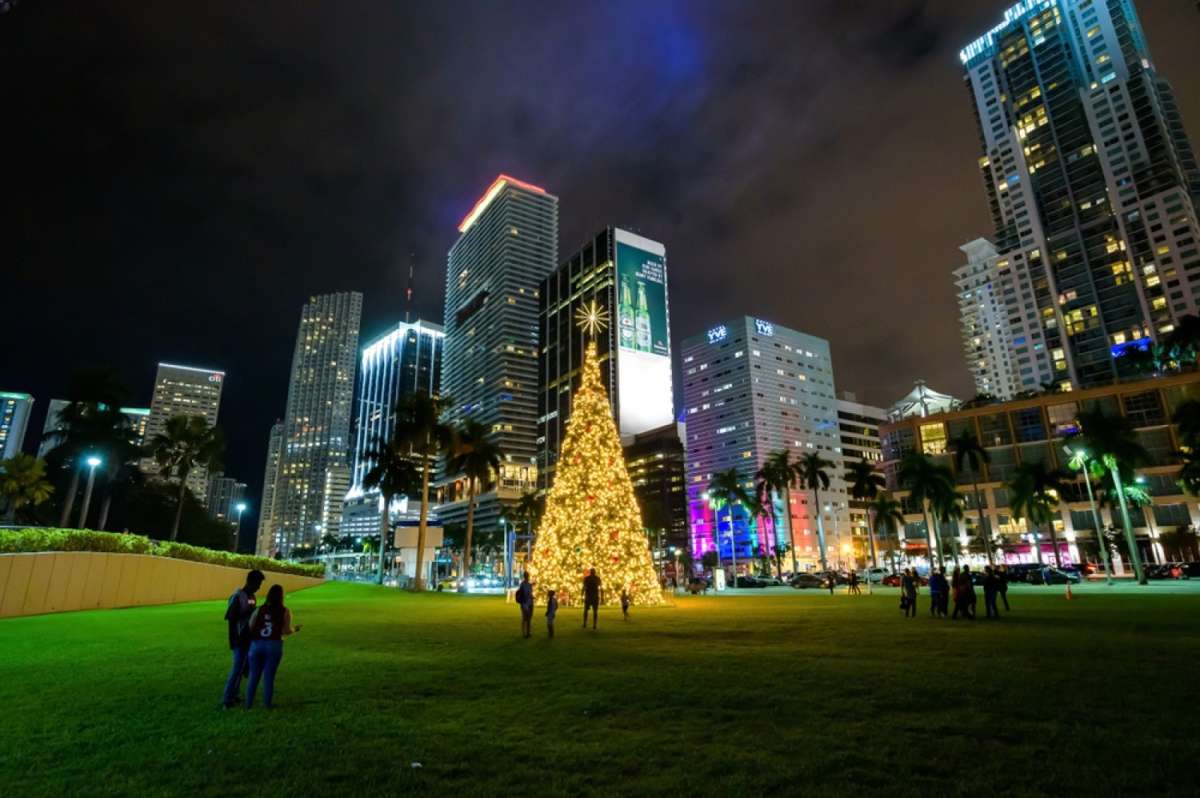
A Christmas in the Magic City is an exercise in brilliant contrasts. It’s where classic holiday traditions get a sun-kissed, subtropical makeover. Instead of pines and firs heavy with snow, you’ll find majestic Royal Palms wrapped from trunk to frond in thousands of shimmering lights, their silhouettes glowing against the warm twilight sky. The crisp, cold air of a northern winter is replaced by gentle, salty breezes carrying the faint sound of distant salsa music mixed with familiar holiday carols.
This fusion of high-energy festivity and laid-back beach culture creates an atmosphere you simply won’t find anywhere else. While our complete guide to Miami Holidays: 8 Beach Fest Vibes gives you the 30,000-foot view of the season, this deep dive is dedicated to the glittering, electric heart of a Miami Christmas: the lights. The city’s profound connection to the water is central to its identity, and this is never more apparent than during the holidays. The reflection of a million tiny lights dancing on the calm surface of Biscayne Bay is a sight that rivals any snow-covered landscape—a holiday experience that is both deeply festive and unapologetically Miami.
The Crown Jewel of a Christmas in Miami: The Holiday Boat Parades
While other cities have their tree-lighting ceremonies, Miami’s signature holiday tradition takes to the water. The holiday boat parades are the quintessential Christmas in Miami event, a dazzling display of nautical creativity and festive spirit that perfectly captures the city's coastal soul. Forget static neighborhood displays; this is a moving festival of light, a dynamic spectacle that draws thousands to the shores of Biscayne Bay.
What to Expect: A Floating Festival of Lights
Imagine a procession of vessels, from 100-foot luxury yachts and powerful sport-fishers to charming sailboats and even humble dinghies, all transformed into glowing works of art. Each boat is carefully decorated in thousands of colorful lights, often arranged into elaborate and animated designs. You’ll see everything from tropical Santas lounging on flamingo-drawn sleighs to shimmering nativity scenes and synchronized light shows pulsing to holiday music. Many participants add onboard carolers and costumed characters who wave to the cheering crowds, turning the parade into an interactive performance.

The atmosphere is electric and communal. Families and friends gather along the waterfront hours in advance, laying out blankets and setting up picnics as they wait for the show to begin. The air fills with palpable excitement as the first glowing vessel rounds the bend, its lights casting a long, shimmering trail on the dark water.
Pro-Level Viewing Guide: Where to Secure the Best Views
A good vantage point is the difference between a fleeting glimpse and a front-row seat to the magic. Since the parade routes typically traverse Biscayne Bay, any public space with an unobstructed view of the water is a prime candidate.

Bayfront Park: As the city's epicenter for major events, Bayfront Park is the most popular and accessible choice. Its sprawling lawns and waterfront promenades offer ample room, but they fill up fast. Arrive by late afternoon to claim a spot near the water's edge.
Venetian Causeway: For a slightly less congested experience, the sidewalks along the Venetian Causeway offer excellent, slightly elevated views of the parade as it moves through the central part of the bay.
Restaurant Patios: Many waterfront restaurants in Downtown, Brickell, and Miami Beach offer fantastic (and comfortable) viewing spots. This requires planning and reservations weeks in advance, but it allows you to enjoy a festive meal with a world-class show.
Key Biscayne: The parks and beaches on the western side of Key Biscayne that face the bay, such as Hobie Island Beach Park, provide a more relaxed and family-friendly atmosphere away from the downtown hustle.
Pro-Tip: Treat it like a beach day. Arrive at your chosen spot at least 90 minutes before the parade's scheduled start. Pack a cooler with drinks and snacks, bring blankets or foldable chairs for comfort, and download a local radio app—some stations broadcast parade commentary and synchronized music.
Land-Based Spectacles: Immersive Worlds of Light
While the boat parades are a must-see, Miami’s land-based light displays offer weeks of festive enchantment. These attractions provide a more immersive experience, allowing you to walk through glowing landscapes and enjoy a full evening of holiday activities.
Christmas Wonderland at Tropical Park: A Festive Theme Park
For a one-stop holiday destination that caters to all ages, Christmas Wonderland at Tropical Park is an institution. This sprawling event transforms a beloved local park into a high-energy festive theme park. It’s an ideal outing for families, packed with everything from thrilling rides to gentle carousels, all set against a backdrop of millions of spectacular lights.
The park is designed as a walk-through experience with different themed areas. You can wander through illuminated tunnels synchronized to music, marvel at towering light sculptures of holiday characters, and take photos at countless Instagram-worthy spots. Beyond the lights and rides, Christmas Wonderland features live entertainment, holiday-themed food and drinks (think churros and hot cocoa), and artisan markets perfect for last-minute gift shopping.
The Enchanted Walk: Neighborhoods That Go All Out
One of the simple joys of Christmas in Miami is discovering the festive spirit in its residential neighborhoods. While Miami may not have a single, world-famous district for lights like Brooklyn's Dyker Heights, many of its affluent, waterfront communities embrace the season with gusto.
Take a slow evening drive through the neighborhoods along the Venetian Islands, Key Biscayne, or the Gables-by-the-Sea in Coral Gables. Here, you’ll see magnificent homes and gardens adorned with professional-grade light displays. The true Miami touch is seeing not just the houses, but also the towering palm trees, ancient banyan trees, and private docks lit up in festive colors, their lights reflecting beautifully in the canals and waterways.
Capturing the Glow: Photography Tips for Tropical Lights
Photographing holiday lights, especially moving ones on water, can be tricky. Here’s how to get shots worthy of the spectacle.

Use Night Mode: Modern smartphone cameras have incredible night mode capabilities. Use them. This feature keeps the shutter open longer to capture more light, resulting in brighter, clearer photos without harsh flash.
Find Stability: To avoid blurry shots, especially with longer exposures, brace your phone or camera against a solid object like a railing, a post, or a tripod.
Tap to Focus: Don't just point and shoot. Tap on the brightest part of the light display on your screen. This tells the camera where to focus and properly expose the shot, preventing the lights from becoming blown-out white blobs.
Capture Reflections: Miami's biggest advantage is water. Angle your shots to include the reflections of the lights on the bay or canals. This adds depth, color, and a sense of place to your photos.
Planning Your Tropical Lights Tour: A Step-by-Step Guide
A little strategic planning will elevate your lights tour from a casual outing to a seamless and memorable adventure.
Step 1: Choose Your Experience (Event vs. Exploration)
First, decide on your preferred vibe.
The Boat Parade: This is a high-energy, single-night event. It’s perfect if you love the excitement of a big crowd and a one-of-a-kind spectacle. The trade-off is that it’s a fixed date and can be very crowded.
Land-Based Displays: Attractions like Christmas Wonderland or self-guided neighborhood tours offer far more flexibility. They typically run for several weeks, allowing you to choose a less-crowded weeknight for your visit. This is often the better choice for families with young children.
Step 2: Lock In Your Itinerary
Once you’ve chosen your focus, confirm the details. For official events, check their websites for exact dates, times, and ticket information. Boat parades are weather-dependent, so always check social media channels on the day of the event for any last-minute changes. For a self-guided tour, map out a route in advance to maximize your viewing time.
Step 3: Pack for a Miami "Winter" Night
Packing for a Miami holiday can be deceptive. While days are warm, evenings on the water can get surprisingly cool and breezy. A light jacket, sweater, or pashmina is essential. Comfortable walking shoes are non-negotiable. If you're visiting from abroad and juggling different climates, our International Travel Checklist is an indispensable tool. It’s designed to help you remember everything from travel insurance to the perfect light layer for a breezy bayfront evening.
Step 4: Master Transportation and Logistics
Parking near major holiday attractions in Miami ranges from difficult to impossible.
Rideshares: Services like Uber and Lyft are your best friends. They eliminate the stress of finding and paying for parking.
Public Transit: For events centered around Bayfront Park, leave the car behind. Miami’s elevated Metromover is a free and surprisingly scenic way to get downtown, connecting directly to major Metrorail stations and parking garages further afield.
Book Parking: If you must drive, use an app like SpotHero to reserve a parking spot in a garage in advance. This is a pro move that can save you an hour of circling packed streets.
Pro-Tip: For ticketed light displays like Christmas Wonderland, always visit on a Tuesday or Wednesday evening if possible. Crowds are significantly smaller, traffic is lighter, and you’ll have a much more relaxed and enjoyable experience.
Beyond the Lights: Crafting Your Complete Holiday Itinerary
Your tropical lights tour is the perfect centerpiece for a festive Miami getaway, but it’s just the beginning. To build a truly immersive holiday experience, weave in some of the city’s other seasonal offerings. Pair an evening of light-viewing with a festive dinner at a restaurant in Brickell or Coconut Grove. Explore the luxury shops at the Design District or Bal Harbour, which feature stunning, museum-worthy holiday window displays.
A perfect lights tour is just one piece of an unforgettable holiday vacation. To build a complete itinerary—from finding the best seasonal Cuban coffee to planning day trips—our comprehensive Travel Guide provides the expert, local insights you need to experience the magic of a Christmas in Miami like a seasoned traveler. It’s your ultimate resource for crafting a holiday that is perfectly tailored to you.
Your Blueprint for a Brilliant Miami Christmas
You don’t need snow or a roaring fireplace to have a spectacular and magical holiday. A Christmas in Miami offers a vibrant, sun-kissed alternative, trading frosty landscapes for the dazzling reflection of a million lights on the water. From the unforgettable spectacle of a holiday boat parade on Biscayne Bay to the family-friendly enchantment of a park transformed into a winterless wonderland, the city is alive with a unique and powerful festive spirit.
You now have the ultimate blueprint to design your own tropical lights tour. You know the signature events to see, the best places to watch them from, and the pro-level tips to make your experience seamless and joyful. You are empowered to create holiday memories that are as warm, bright, and full of life as the city itself. So grab your sunglasses and a Santa hat, and get ready to experience a Christmas that shines brighter than any star on a frosty night.
Don't Miss Out! Subscribe for Exclusive Content
Subscribe


Comments 0
No comments yet
Be the first to share your experience!
Dont Miss Out! Subscribe for Exclusive Content

San Francisco Cherry Blossoms: A Local's Guide to the Blooms

Halloween SF: Haunts Without Horrors

SF Festivals: 7 Must-See Lineups

Christmas SF: Lights & Wharf Wonders

SF Pride: 6 Route & Party Hacks

Chinese New Year SF: Parade Essentials
Solo Travel in Asia: Afford Your Dream Trip (No More Guessing)
TrekGuider @trekguider
You see the photos in your feed: the vibrant street food stalls of Hanoi, the serene, golden temples of Chiang Mai, the almost impossibly turquoise waters of the Philippines. You want that. But a cloud of anxiety hangs over the dream: the budget. You’ve seen the blogs promising epic adventures for "$30 a day," but a nagging voice in your head questions the reality. How can that possibly be the whole story? It feels like you're missing a huge piece of the financial puzzle, making it impossible to know if your hard-earned savings are really enough.
Let's be clear: you're right to be skeptical. The internet is a minefield of incomplete advice that conveniently ignores the thousands of dollars you'll spend on flights, comprehensive travel insurance, visas, and pre-trip vaccinations before your boots even touch the ground. This "per-day" myth is a dangerous fantasy that leads to stress and budget blowouts. You don't need a fantasy; you need a plan based on reality.

This is that guide. We're cutting through the noise to give you a reality-based playbook for budget solo travel in Asia, built on hard data and real-world experience. We will tackle the Total Trip Cost head-on, giving you a complete financial blueprint that empowers you to plan with unshakable confidence. While this guide is your financial strategy, mastering the art of traveling alone is equally crucial. For a complete playbook on mindset, safety, and logistics, be sure to read our comprehensive guide on .
Asia: The Undisputed Epicenter for Budget Solo Travel
For decades, Asia has been the champion for independent travelers seeking the ultimate trifecta: unparalleled diversity, profound cultural experiences, and an astonishingly low cost of living. The continent offers a sensory feast, from the futuristic skyline of Tokyo to the ancient, jungle-claimed ruins of Angkor Wat and the snow-capped Himalayan peaks of Nepal.
What makes it uniquely perfect for budget solo travel is the well-trodden "Banana Pancake Trail"—the unofficial network of routes across Southeast Asia that has created a strong and welcoming infrastructure for backpackers. This translates to an abundance of affordable hostels, cheap and mind-blowingly delicious street food on every corner, accessible transportation, and a built-in community of fellow travelers. It’s an environment practically engineered for exploration, where your dollar stretches further than almost anywhere else on Earth, allowing for longer, more immersive journeys without bankrupting you.

The World's Best Bargains: A Data-Driven Ranking of Asia's Top 10 Budget Nations
The sheer number of options in Asia can be overwhelming. To cut through the noise, we've created a composite ranking based on average daily cost, safety (using data from the Global Peace Index), ease of solo travel, and overall experience value. This is your starting point for planning an incredible budget solo travel in Asia itinerary.
The "Big 4" for Ultimate Value: Vietnam, Cambodia, Nepal, Thailand
These four nations are the undisputed kings of the classic backpacker circuit, and for good reason. This is where your travel fund has superpowers. Here, a daily budget of $25-35 isn't about survival; it's about thriving. We're talking $8 for a clean hostel dorm bed, $2 for a world-class bowl of Phở or Pad Thai from a street vendor, and less than $1 for a local beer. The value proposition is simply unbeatable for anyone planning budget solo travel in Asia.
The Best of the Rest: Indonesia, The Philippines, Laos, Malaysia
This next tier offers world-class experiences with a slight step up in daily cost. The Philippines is an archipelago of some of the planet's most beautiful beaches, a paradise for island hopping and diving. Laos offers a more tranquil, less-trodden path with breathtaking mountain scenery and a deeply relaxed atmosphere. And Malaysia, particularly the island of Penang, is a food lover's dream, blending Malay, Chinese, and Indian culinary traditions into a spectacular and affordable street food scene.
The Rising Star: Uzbekistan
Largely absent from mainstream guides, Uzbekistan is a hidden gem for the budget-conscious history buff. As a central hub of the ancient Silk Road, its cities—Samarkand, Bukhara, and Khiva—are architectural masterpieces of complex tilework and soaring minarets. With a high degree of safety, incredibly friendly locals, and rock-bottom prices, it offers a unique cultural experience far from the tourist crowds.
The Great Debate: How to Conquer Japan on a Backpacker's Budget
Japan has a reputation for being prohibitively expensive, but here's the inside scoop: thanks to a favorable currency exchange rate and a unique social infrastructure, it has become surprisingly accessible. The key is to travel like a local, not a tourist.
Sleep in capsule hotels: These futuristic pods offer a clean, private, and safe place to sleep for a fraction of the price of a standard hotel.
Embrace the conbini: Japanese convenience stores (7-Eleven, FamilyMart) are a culinary marvel. You can get delicious and healthy meals like onigiri (rice balls), sandwiches, and bento boxes for just a few dollars.
Focus on free attractions: Many of Japan's most beautiful sights, from serene Shinto shrines and sprawling city parks to vibrant neighborhoods like Harajuku, are completely free to explore.
By adopting these strategies, you can experience one of the world's most fascinating cultures on a budget of around $50-70 a day.
Your No-Nonsense Guide to a Realistic Budget for Solo Travel in Asia
Let's build your real-world budget. While daily spending is the fun part, a successful trip requires a holistic financial plan that starts long before you book your flight.
The Daily Budget Benchmark: What $30, $50, and $75 a Day Really Buys You

$30/Day (The Shoestring Backpacker): This is tight but achievable in the "Big 4." It covers a bed in a dorm hostel, exclusively eating street food, walking as your primary transport, and sticking to mostly free activities.
$50/Day (The Flashpacker): This is the sweet spot for a comfortable budget solo travel in Asia experience. It allows for a private room in a hostel or a budget guesthouse, a mix of street food and restaurant meals, the occasional Grab ride, and entry fees for major attractions.
$75/Day (The Comfort Seeker): At this level, you can afford budget hotels, enjoy meals in nice restaurants, take domestic flights to save time, and participate in more expensive activities like scuba diving courses without constantly checking your bank account.
Deconstructing Your On-the-Ground Costs: A Percentage-Based Breakdown
Once you land, a good rule of thumb for allocating your daily funds is:
Accommodation: 35%
Food & Drink: 25%
Activities & Attractions: 15%
In-Country Transport: 15%
Miscellaneous (laundry, SIM card, etc.): 10%
The Hidden Costs: Budgeting for the "Big 4"
This is the most important part of your budget—the major expenses you'll pay before you leave. Ignoring these is the #1 mistake aspiring travelers make.

International Flights: This will likely be your single largest expense, ranging from $700 to $1,500+ for a round-trip ticket from the U.S. Use tools like Google Flights and Skyscanner, be flexible with your dates, and consider flying during the shoulder seasons (e.g., April-May, September-October) for huge savings.
Travel Insurance: A serious medical emergency or trip cancellation can be financially catastrophic without it. A comprehensive policy from a reputable provider like SafetyWing or World Nomads for a multi-month trip can cost between $300 and $700. It is the single most important investment you will make in your safety.
Visas: Costs and requirements vary wildly. Some countries offer free entry for U.S. citizens, while others require visas costing $30 to $100+. Research the official embassy websites for every country on your itinerary and budget accordingly.
Vaccinations & Meds: A pre-trip consultation with a travel doctor is essential. The cost of recommended vaccinations (like Typhoid, Hepatitis A, and Japanese Encephalitis) can easily add up to several hundred dollars.
Pro-Tip: Use Google Flights' 'Explore' map feature with flexible dates to visually find the cheapest entry point into Asia. Often, flying into a major hub like Bangkok (BKK) or Kuala Lumpur (KUL) and then taking a budget flight with AirAsia is significantly cheaper than a direct flight to your final destination.
Field Notes on Safety for Budget Solo Travel in Asia
Your safety matters most. Being prepared and aware isn't about being paranoid; it's about traveling with the quiet confidence of a pro.

Pre-Trip Protocol: Before you leave, make two photocopies of your passport, visa, and credit cards. Leave one set at home and keep the other in a separate bag from the originals. Save encrypted digital copies in a secure cloud service.
On-the-Ground Awareness: Petty theft is the most common crime. Be vigilant in crowded markets and on public transport. Never flash expensive electronics. Be politely skeptical of overly friendly strangers offering unsolicited help—these are often the lead-in to common tourist scams.
Accommodation Strategy: Read recent reviews from other solo travelers, especially solo women. Choose hostels or hotels in central, well-lit areas. Your accommodation is your safe haven; it's worth paying a few extra dollars for a better location and peace of mind.
A Note for Solo Female Travelers: While most of Asia is very safe, it’s smart to be mindful of cultural norms. In more conservative regions or when visiting temples, carry a scarf or sarong to cover your shoulders and knees. Trust your gut instinct—it is your most reliable safety tool. If a situation feels wrong, it is. Leave immediately.
Hacks to Stretch Your Travel Fund Further
Mastering a few key strategies can save you thousands over the course of a long trip.
Accommodation Hacks
Go analog for long stays. If you plan to stay a week or more, email or call the hostel directly to ask for a weekly rate. You can often get a 15-20% discount.
Master the art of the overnight journey. An overnight bus or train isn't just transport; it's a mobile hotel room that saves you one night's accommodation cost. In countries like Vietnam and Thailand, look for 'VIP' or 'sleeper' options, which often cost only a few dollars more for a fully reclining seat or bunk—an unbeatable value.
Food & Drink Hacks
Eat where the locals eat. Street food stalls and hole-in-the-wall restaurants with plastic stools and long lines of locals are where you'll find the most authentic and delicious food for the lowest prices.
Carry a reusable water bottle with a built-in filter (like a Lifestraw or Grayl). This saves you money on bottled water and dramatically reduces your plastic waste.
Transportation Hacks
Download Grab or Go-Jek. These ride-sharing apps are ubiquitous in Southeast Asia and offer fair, fixed pricing, eliminating the need to haggle with tuk-tuk or taxi drivers.
For long-haul bus and train travel, use a portal like 12Go Asia to compare prices and book tickets in advance, especially on popular routes.
Financial & Tech Hacks
Get a Wise (formerly TransferWise) card. This multi-currency account allows you to hold different currencies and withdraw money from ATMs with minimal fees, saving you a fortune on bank charges compared to your home debit card.
Buy an eSIM from a provider like Airalo before you leave home. This gives you affordable data the second you land, a massive convenience and safety advantage for navigating to your hostel.
Extending Your Trip: The Work-Exchange Secret
Platforms like Workaway and Worldpackers are game-changers for long-term budget solo travel in Asia. They connect you with hosts (often hostels, farms, or families) who offer free accommodation and sometimes food in exchange for a few hours of work per day. This is a phenomenal way to stretch your budget for months.
Pro-Tip: When withdrawing cash, always decline the ATM's "dynamic currency conversion." This is a fancy term for a terrible exchange rate. By choosing to be charged in the local currency (e.g., Thai Baht), you let your own bank handle the conversion at a much fairer rate, saving you 5-10% on every withdrawal.
Your Essential Asia Solo Travel Toolkit
Leverage technology to make your trip smoother, safer, and cheaper.

Financial: Wise, Revolut
Connectivity: Airalo, Holafly
Navigation: Google Maps (with offline maps downloaded!), Maps.me
Transportation: Grab, Go-Jek, 12Go Asia, Skyscanner
Accommodation: Booking.com, Hostelworld, Agoda
The Only Thing Left is to Go
The dream of an extended trip through Asia is not a fantasy reserved for the wealthy; it is an achievable goal for anyone armed with a solid, reality-based plan. By moving past the incomplete "per-day" myth and embracing a Total Trip Cost approach, you give yourself the financial clarity needed to travel with confidence, not anxiety. The strategies and tips in this guide are your blueprint. The path to a successful budget solo travel in Asia adventure is clear. The world is waiting for you.
Read the full guide: Anxious to Adventurous: The Ultimate Guide to Solo Travel Confidence
Don't Miss Out! Subscribe for Exclusive Content
SubscribeComments 0
No comments yet
Be the first to share your experience!
Dont Miss Out! Subscribe for Exclusive Content

Top 11 High-Paying Affiliate Programs for Travel Bloggers

High-Paying Affiliate Opportunities for Individual Travel Affiliates

Amazon Associates for Travel: Strategies to Maximize Commissions

How to Avoid Travel Scams: A Global Guide

A Woman's Guide to Safe Travel: 10 Critical Tips

7 Hotel Safety & Security Tips for Peace of Mind
FTC Affiliate Disclosure Essentials: Stay Compliant as a Travel Creator
TrekGuider @trekguider
Let’s talk about the single most valuable asset in your travel content business: trust. It’s the bedrock of your brand, the reason your audience listens, and the currency that turns recommendations into revenue. Yet, there’s a legal landmine many creators unwittingly step on that can shatter that trust in an instant: the Federal Trade Commission (FTC).

In a creator economy where the affiliate marketing industry is a $93 billion juggernaut, operating with professional integrity isn't just good ethics—it's a brilliant business strategy. The creators hitting the reported average of $13,847 a month aren't just getting lucky; they're building resilient businesses on a foundation of transparency. But the rules around disclosure can feel like a confusing maze of legalese, leading many to either ignore them or implement them incorrectly. This isn't just a minor slip-up; it's a mistake that can get you kicked out of affiliate programs, alienate your audience, and attract unwanted legal attention.
This guide is your definitive, jargon-free map through that maze. We're breaking down the exact rules, providing copy-and-paste templates for every platform, and giving you the confidence to monetize ethically and legally. Mastering compliance is at the heart of a successful business, a topic we explore from every angle in our comprehensive pillar page on Travel Affiliate Programs: The 2026 Ultimate Guide.
What Exactly Is an FTC Affiliate Disclosure?
At its heart, an FTC affiliate disclosure is a simple, honest statement. It informs your audience that you have a "material connection" to a product or service you're recommending. In plain English, if you stand to earn a commission, get a free product, or receive any compensation when someone uses your link, you are legally required to tell them.
This isn't just red tape. It serves two purposes that are vital to your business:
It’s the Law: The FTC is America's consumer protection agency. Its job is to prevent deceptive advertising, and hiding a paid endorsement is considered deceptive. Compliance is non-negotiable.
It Forges Unbreakable Trust: In the creator world, transparency is a superpower. When you're upfront about your affiliate relationships, you prove you have nothing to hide. This makes your audience more likely to trust your recommendations, not less, because they see you as an honest broker.
Pro-Tip: Stop thinking of your FTC affiliate disclosure as a legal chore. Start seeing it as a badge of honor that signals your commitment to professionalism and respect for your audience.

The "Clear and Conspicuous" Standard: Your Four-Point Compliance Checklist
The FTC’s mandate boils down to two words: "clear and conspicuous." This isn’t just vague legalese; it’s an actionable standard built on four pillars. If your disclosure fails on even one, it’s not compliant.
1. Prominence: It Must Be Impossible to Miss
Your disclosure can't be an afterthought. It needs to be presented in a font, color, and location that a typical user can't help but see. That means no tiny, light-gray text hidden in a crowded footer.
2. Presentation: It Must Be in Plain English
Ditch the corporate jargon. Your disclosure needs to be written in simple, straightforward language that anyone can understand instantly.
Excellent: "This post contains affiliate links. If you buy something through one of these links, I may earn a commission at no extra cost to you."
Poor: "This site is a participant in affiliate advertising programs designed to provide a means for sites to earn advertising fees."
3. Placement: It Must Appear Before Any Links
This is the rule creators break most often. The disclosure must be placed where your audience will see it before they scroll to your first affiliate link. Placing it at the bottom of your post is a clear violation.
4. Proximity: It Must Be Close to the Action
The disclosure should be as close to your recommendations as possible. For a blog post, a single, clear statement at the very top of the article is the gold standard and covers all the links that follow.

Your Platform-by-Platform Disclosure Playbook (with Templates)
The four pillars apply everywhere, but how you build them changes with the platform. Here’s your definitive guide.
For Your Travel Blog or Website
This is your home base, and the rules are clearest here. Your disclosure must be at the top of the article, before the main content begins.
Compliant Placement: At the very beginning of the post.
Non-Compliant Placement: In the sidebar, in the footer, or on a separate "Disclosures" page.
Template You Can Use:
(Heads up! This post contains affiliate links. If you book or buy something through one of my links, I may earn a small commission at no extra cost to you. This helps me keep the adventures coming. Thanks for your support!)
For Instagram (Posts, Stories, and Reels)
On social media, disclosures must be instantly visible without a user having to click "see more."
Compliant Placement: Within the first three lines of the caption.
Non-Compliant Placement: Buried in a long block of hashtags at the end.
Pro-Tip: For maximum clarity, the FTC recommends using simple, unambiguous terms.
Templates You Can Use:
For Captions: Start your caption with Ad: or Sponsored:.
Hashtags: Use clear, upfront hashtags like #ad or #sponsored. While #affiliate is used, it's less clear to the average consumer.
For Stories/Reels: The best method is using Instagram's built-in "Paid Partnership" label. If that's not an option, superimpose clear text like "Ad" or "Sponsored" on the screen and mention it verbally.

For YouTube Videos
A compliant YouTube video requires a two-pronged disclosure: one verbal, one written.
Compliant Placement: Stated verbally near the beginning of the video AND written in the description box above the "show more" fold.
Non-Compliant Placement: Only written in the description box where a user has to click to see it.
Templates You Can Use:
Verbal Script: "Just a quick heads-up before we get started—this video contains affiliate links. So if you decide to book that incredible tour I'm about to show you, I might earn a small commission, which is a huge help in supporting this channel!"
Description Box Text: DISCLOSURE: This video and description may contain affiliate links, which means that if you click on one of the product links, I’ll receive a small commission at no additional cost to you.
Don't Forget Referral Links
The rules for an FTC affiliate disclosure extend beyond traditional product sales. They cover any "material connection," and that absolutely includes referral programs. If you share a link that gives a friend a discount and earns you a credit or bonus, that relationship must be disclosed.
This is particularly relevant for modern creator platforms. For example, when you invite fellow creators to join the TrekGuider Seller Platform using your unique referral link, you must be transparent about the fact that you stand to benefit. The best disclosures frame this as a win-win.
Templates for Referral Links:
Simple & Direct: "This is my referral link. If you sign up, I may receive a bonus from TrekGuider."
Benefit-Focused: "Use my link to join the TrekGuider Seller Platform! You'll get mention the benefit, e.g., a 15% discount on your first purchase, and I'll get a small commission to help support my work."
The Travel Creator's Toolkit
Mastering compliance is a key part of building a professional content business. To help you organize your entire strategy—from legal checklists to content templates—we've created the ultimate resource bundle. It’s designed to help you operate like a pro from day one.
Download Your Free Bundle: The Travel Creator's Toolkit Today!
Frequently Asked Questions (FAQ)
1. Is it enough to have a "Disclosure Policy" page on my website? No. While having a dedicated policy page is a good practice, it does not satisfy the FTC's requirement for a disclosure that is proximate to the recommendation. The disclosure must be on the same page as the affiliate links themselves.
2. Do I need to disclose if I received a product for free, even if I'm not getting paid? Yes. Receiving a product or service for free (like a complimentary hotel stay or a free piece of luggage) is considered a "material connection" and must be disclosed just as you would a monetary commission.
3. Can I just use #affiliate in my social media posts? While it's better than nothing, the FTC has indicated that it prefers clearer, more universally understood terms like #ad or #sponsored. The term "affiliate" may not be clear to everyone in your audience.
Your Commitment to Transparency
The world of FTC affiliate disclosure is not designed to be a trap. It’s a framework for honest communication. By embracing these rules, you’re not just protecting yourself legally; you’re making a powerful statement to your audience that you value their trust above all else.
You now have the knowledge and the templates to implement compliant disclosures with confidence across every platform. See this not as a chore, but as a professional standard that elevates your brand. In the creator economy, transparency isn't just good policy—it's the ultimate currency.
Read the full guide: The Travel Blogger's Playbook to Affiliate Marketing Mastery
Don't Miss Out! Subscribe for Exclusive Content
SubscribeComments 0
No comments yet
Be the first to share your experience!
Dont Miss Out! Subscribe for Exclusive Content

Ultimate USA Holidays Guide: Top Picks

Essential Affiliate Tools: From Tracking to Full Optimization

Avoid These 5 Affiliate Landing Page Mistakes for Better Conversions

Affiliate Keyword Research Mastery for Travel Blogs

Booking.com Affiliate Program Review: Pros, Cons, and Earnings Potential
