July 4th NYC: Best Fireworks Views
TrekGuider @trekguider
Trying to see the Macy's 4th of July fireworks in New York City can feel like plotting a military campaign. You know it’s one of the most spectacular patriotic displays on the planet, a dazzling barrage of color and sound against the world’s most famous skyline. But the thought of navigating the colossal crowds, deciphering the cryptic official viewing spots, and battling for a sliver of sidewalk with a view of a brick wall is enough to trigger a full-blown anxiety attack.
You’re haunted by visions of being pinned for hours in a human gridlock, craning your neck to see absolutely nothing, with no access to a restroom or a bottle of water. What if you spend all day planning, only to find your chosen spot has been unceremoniously cordoned off by the NYPD? The dream of a magical Independence Day quickly sours into a logistical nightmare, leaving you sweating on a crowded street corner wondering why you didn't just stay home and watch it on TV.
Forget the chaos. This is your definitive battle plan for conquering the crowds and securing a breathtaking view. We’ve distilled the official intel and insider secrets into a foolproof strategy. Whether you want a free patch of grass with a picnic or a more civilized vantage point, this guide will equip you for an unforgettable Fourth of July in New York.

Understanding the Main Event: The Macy's Fireworks Spectacular
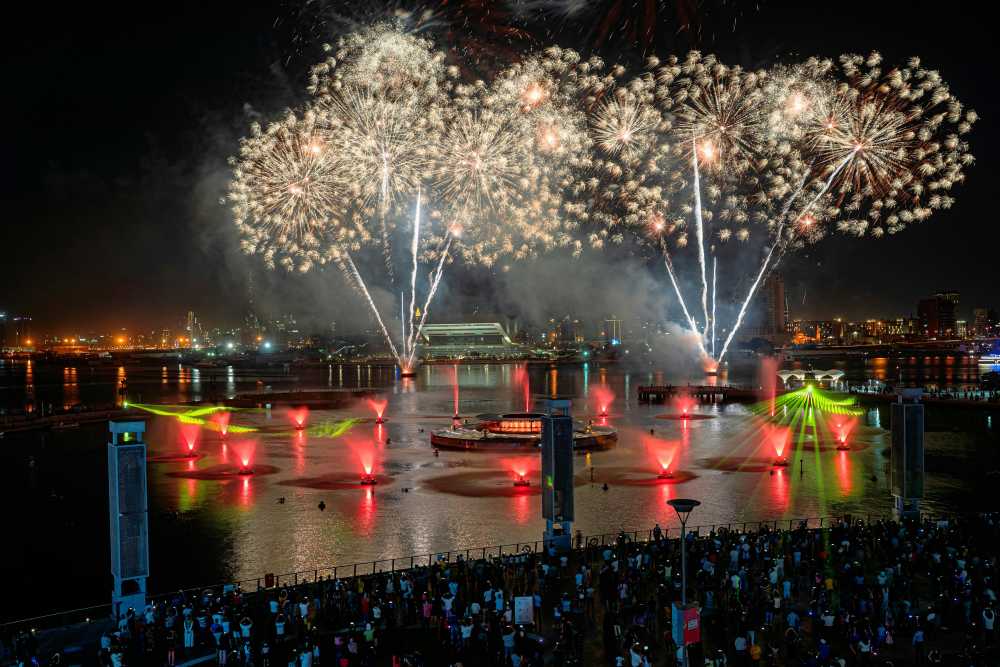
Let’s be clear about the sheer scale of this operation. The Macy's 4th of July Fireworks isn't just a show; it's the nation's largest pyrotechnic spectacle, a city-shaking tradition that paints the skyline with thousands of carefully choreographed shells launched from barges on the water. For Friday, July 4, 2026, the show continues its reign on the East River, meaning the most coveted views will be found along the waterfronts of Brooklyn, Queens, and Manhattan.
This isn't a casual affair where you can wander up a few minutes before showtime. It's a massive, city-wide celebration that demands a solid game plan. While the fireworks are an undisputed summer highlight, they're just one piece of the city's vibrant celebratory calendar, which we cover in our definitive guide to New York Holidays: 10 Must-Do Events. Thinking about your trip through this lens—as one epic event among many—is the key to unlocking a truly memorable visit.
The Best Free Viewing Spots for the Fourth of July in New York
Securing a great free spot is the holy grail for most spectators. It requires a healthy dose of patience and impeccable timing, but the reward is a front-row seat to history without spending a dime. The secret is knowing precisely where to go and, just as critically, which tourist traps to avoid.
Brooklyn's Cinematic Waterfront Views
For years, the Brooklyn waterfront has offered the most cinematic views of the fireworks, framing the pyrotechnics against the iconic Manhattan skyline. This is where you go for the postcard shot.
Transmitter Park (Greenpoint): Consistently hailed as a top-tier viewing location, this park offers a direct, jaw-droppingly clear sightline across the East River. Its open, grassy layout is a godsend, providing more room to spread out a blanket than the narrow promenades elsewhere. But its reputation precedes it. To claim a decent piece of turf, you must arrive by 6 PM at the absolute latest.
Domino Park (Williamsburg): With its clever multi-level design, reclaimed factory artifacts, and ample seating, Domino Park is a phenomenal—and popular—option. The elevated walkway provides a unique perspective, and the park's modern amenities (hello, clean restrooms!) make the long wait far more civilized.
East River State Park (Williamsburg): Just a short walk from Domino Park, this location offers a more traditional park experience with a sprawling grassy lawn. It’s a magnet for families and larger groups looking to set up a proper picnic and make a full day of it.
Manhattan's Official Front Lines (and What to Expect)
Manhattan offers official, NYPD-managed viewing points that get you incredibly close to the action. However, this proximity comes at the cost of the highest crowd density and the tightest security.
Official Access Points: The city announces these designated entry points a few days before the event, typically along the FDR Drive in the East Village, Murray Hill, and Midtown East. Check the official Macy's or NYC websites on the day of the event for the exact cross-streets.
The No-Go Zones: Heed the official warnings. The city explicitly advises spectators to avoid FDR Drive in Midtown, Battery Park, and the Brooklyn Heights Promenade. These areas will either be completely closed to the public or offer severely obstructed views. Don't be the tourist who wastes hours trekking to a dead end.
Queens: The Savvy Spectator's Choice
Often overlooked by the masses flocking to Brooklyn, the Queens waterfront in Long Island City provides views that are every bit as stunning, but often with slightly more breathing room.
Gantry Plaza State Park: This park is a true gem, famous for its iconic Pepsi-Cola sign and beautifully restored waterfront gantries. It offers a sweeping panorama of the Midtown skyline, which serves as the ultimate canvas for the fireworks display.
Hunter's Point South Park: Located just south of Gantry Plaza, this park boasts a vast, open green space perfect for laying down a blanket. It’s an excellent alternative for those looking to escape the most intense choke points in Manhattan and Brooklyn.

Pro-Level Strategy: Navigating Security and Human Gridlock
Experiencing the Fourth of July in New York is as much about logistical prowess as it is about patriotic fervor. This is not a casual security checkpoint. The NYPD's presence is comprehensive, involving everything from drones providing aerial surveillance and metal detectors at entry points to NYPD scuba divers patrolling the river itself. This isn't to intimidate, but to ensure a safe event for millions.
Your Arrival and Entry Checklist
Embrace the Early Bird Ethos: We cannot overstate this. For prime real estate like Transmitter Park, a 6 PM arrival is the bare minimum. For the official Manhattan zones, dedicated viewers begin lining up in the early afternoon. The later you arrive, the more likely you are to be watching the back of someone's head.
Pack Like a Pro: You will be on your feet or sitting on the ground for hours. Comfort matters most, but you also need to breeze through security. Large backpacks, coolers, alcohol, and lawn chairs are almost always prohibited. Knowing what to bring—and what to leave behind—is crucial. Our How to Pack Light Guide offers brilliant strategies for carrying just the essentials, a skill that's just as valuable for a day in the city as it is for a week-long trip.
Trust but Verify (Your Sources): On July 4th, follow the NYPD and Macy's on social media or refresh their websites. Viewing points can and do change or close without notice based on crowd capacity. A quick check before you head out can save you from a massive, frustrating detour.
The Buddy System is Non-Negotiable: In crowds of this magnitude, getting separated is incredibly easy. Establish a clear, unambiguous meeting point in advance (e.g., "the corner of X and Y," not "by the hot dog stand"). Keep your phones fully charged, and consider sharing your location with your group via a mapping app.
Pro-Tip: Public transportation is your only sane option. Do not even entertain the idea of driving. Street closures begin in the early afternoon, and parking is a fantasy. The subway is the most efficient way to get close to the action, but expect platforms and train cars to be packed to capacity. Plan your route, buy your MetroCard in advance, and budget at least double the normal travel time.

Beyond the Fireworks: Mastering the All-American Picnic
The fireworks are the grand finale, but Independence Day is an all-day affair. A classic American picnic is the perfect way to spend the afternoon, soaking in the city's festive energy in a more relaxed setting before diving into the waterfront fray.
Prime Picnic Parks (Well Away from the Fireworks Chaos)
Central Park: It’s the quintessential NYC experience for a reason. Head to the vast Sheep Meadow or the Great Lawn, find a spot under a tree, and enjoy the people-watching. You won't see the main fireworks from here, but it’s the perfect stage for your pre-show festivities.
Prospect Park, Brooklyn: Often called Brooklyn's answer to Central Park, the Long Meadow in Prospect Park offers a similarly idyllic and expansive setting. It’s a favorite among locals and provides a more laid-back, community-focused vibe.
Governors Island: A quick and scenic ferry ride away, Governors Island is a true urban oasis. With its sprawling lawns, hammocks, and unparalleled views of the Statue of Liberty, it’s an ideal place to decompress for the day before heading back for the evening's main event.
Your Picnic Pack-Out List
The Spread: Stick to classics that travel well: gourmet sandwiches, cold fried chicken, pasta salads, and fresh fruit. Most importantly, bring more water than you think you'll need. Remember that alcohol is prohibited in public parks.
The Comfort Kit: A large, durable blanket is your foundation. Sunscreen, hats, and sunglasses are absolutely essential for a long day outdoors.
The Clean-Up Crew: Pack a dedicated trash bag and commit to the golden rule of picnicking: leave your spot cleaner than you found it.
Paid Options for a Crowd-Free Fourth of July in New York
If the idea of battling the masses for a patch of grass makes you want to run for the hills, several paid alternatives offer a more comfortable and exclusive experience. These options require booking far in advance and come at a premium, but for many, the guaranteed view and amenities are worth every penny.
Rooftop Bars and Viewing Parties
Many hotels and restaurants with prime real estate in Midtown East, Williamsburg, and Long Island City host ticketed fireworks viewing parties. These events typically include an open bar, food, and live music, all with an elevated, unobstructed view high above the street-level chaos. Expect tickets to start in the low hundreds and sell out weeks, if not months, ahead of time.
Fireworks Cruises on the East River
For a truly cinematic experience, watch the fireworks from the water itself. Numerous companies offer July 4th dinner cruises that place you directly on the East River, offering an unparalleled, up-close perspective of the show.
The Perks: You get a completely unobstructed view, dinner and drinks are often included, and you have access to clean, private restrooms—a luxury that cannot be overstated.
The Price: This is the most expensive option, with prices frequently ranging from $150 to over $500 per person. They are incredibly popular and must be booked months in advance.
Pro-Tip: When booking any ticketed event, do your due diligence. Scrutinize the venue's location on a map to confirm its viewing position relative to the fireworks barges. Search for reviews and photos from previous years' events to ensure the view is as spectacular as advertised. Not all "river views" are created equal.

Your Mission: An Unforgettable Independence Day
You are now armed with the strategy and insider intelligence to make your Fourth of July in New York a resounding success. The key is to decide on your desired experience—a free-for-all on the grass, a civilized seat at a rooftop bar, or a luxurious view from the water—and plan with precision. Arrive early, pack smart, and stay informed.
This is about more than just watching fireworks; it's about taking part in a quintessential American tradition in the most dynamic city on Earth. You're no longer a tourist hoping for a lucky break; you're an insider with a plan. Go forth, claim your spot, and create some dazzling memories. And when you're ready to plan your next great urban adventure, our comprehensive Travel Guide is packed with the expert resources you need to make every trip a masterpiece.
Don't Miss Out! Subscribe for Exclusive Content
Subscribe


Comments 0
No comments yet
Be the first to share your experience!
Dont Miss Out! Subscribe for Exclusive Content

San Francisco Cherry Blossoms: A Local's Guide to the Blooms

Halloween SF: Haunts Without Horrors

SF Festivals: 7 Must-See Lineups

Christmas SF: Lights & Wharf Wonders

SF Pride: 6 Route & Party Hacks

Chinese New Year SF: Parade Essentials
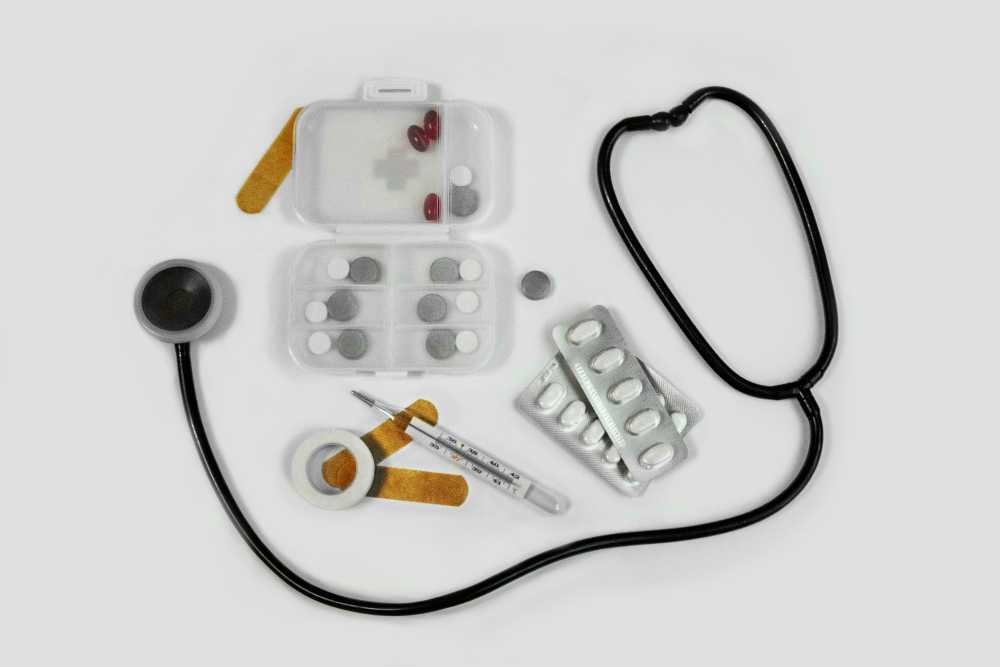
The Ultimate Travel First Aid Kit Checklist (2026)
TrekGuider @trekguider
But it doesn’t have to be that way. The single most powerful tool for ensuring a healthy, stress-free journey is one you create before you even leave home: a comprehensive travel first aid kit. This isn’t just a box of bandages; it’s a personalized arsenal of preparedness that empowers you to handle common health issues with confidence and ease. Building your own kit is at the heart of the proactive mindset we cover in our comprehensive The Ultimate Guide to Travel Safety: A 2026 Playbook. Think of this guide less as a simple shopping list and more as a masterclass in preparedness, backed by pharmacist-approved advice to help you build the ultimate defense against travel’s minor medical curveballs.
DIY vs. Pre-Made: Which Travel First Aid Kit is Right for You?
Before we dive into the specific items, it’s worth considering whether to build your kit from scratch or buy a pre-made one.
Pre-Made Kits: These offer undeniable convenience. They come in a compact case and provide a decent baseline of supplies. However, they are often filled with low-quantity, generic items and may lack the specific medications you need for your trip.
DIY Kits: Building your own kit requires a bit more effort upfront but is superior in every other way. It allows you to choose high-quality brands, pack sufficient quantities, and tailor the contents specifically to your destination, your planned activities, and your personal health needs.
Our recommendation? Start with a high-quality pre-made kit as your base and then use this checklist to supercharge it, swapping out generic items and adding the crucial medications and tools it’s missing. This hybrid approach gives you the best of both worlds.
The Core Components of Your Ultimate Travel First Aid Kit
A truly effective travel first aid kit is organized like a mobile clinic, with specific supplies to treat the most common categories of travel-related ailments. Here is the definitive breakdown of what you need.
Wound & Burn Care: For Life's Little Scrapes
From a papercut to a scraped knee on a cobblestone street, any break in the skin is an open invitation for infection, especially in new environments. Here’s how you shut that door, fast.
Antiseptic Wipes (BZK or alcohol-based): For cleaning wounds, scrapes, and your hands before providing treatment. Individual packets are perfect for travel.
Antibiotic Ointment (e.g., bacitracin): A crucial step to prevent infection in minor cuts, scrapes, and burns after cleaning.
Assorted Adhesive Bandages: Pack a variety of sizes. Fabric bandages are generally more durable and flexible than plastic ones.
Butterfly Bandages / Wound-Closure Strips: Essential for taping the edges of a minor cut together to help it heal cleanly.
Sterile Gauze Pads and a Roll of Gauze: For dressing larger wounds or as a compress to control bleeding. Pack a few different sizes.
Medical Adhesive Tape: To secure gauze and bandages in place.
Moleskin or Blister Treatment Pads: An absolute lifesaver for any trip involving significant walking or hiking. Apply it as soon as you feel a "hot spot" to prevent a blister from forming.
Aloe Vera Gel: Provides soothing relief for minor sunburns.
Pain, Fever & Sprains: Managing Aches and Injuries
Long days of sightseeing, sleeping in unfamiliar beds, and carrying luggage can lead to aches and pains. Be prepared to manage them effectively so they don't slow you down.
Pain Relievers/Fever Reducers: Pack both an ibuprofen-based and an acetaminophen-based option. Pharmacists consistently recommend trusted brands like Advil/Motrin (Ibuprofen) for inflammation and pain, and Tylenol (Acetaminophen) for general pain and fever.
Aspirin: While not for general pain relief for everyone, a dose of aspirin can be life-saving for an adult experiencing symptoms of a heart attack.
Elastic Wrap Bandage: Invaluable for providing support and compression to a sprained ankle, wrist, or knee.
Instant Cold Packs: These single-use packs are activated by squeezing them and are excellent for reducing swelling from sprains, strains, and other minor injuries in the first 24-48 hours.
Pro-Tip: Decant pills into small, clearly labeled travel containers to save space, but take a photo of the original packaging first. This helps you remember dosages and provides information for pharmacists or doctors abroad if needed.

Digestive Issues: Your Defense Against Traveler's Diarrhea
Let’s be direct: traveler’s diarrhea is the single most common illness to strike travelers, affecting up to 80% of visitors in some destinations. Having a dedicated section in your kit to manage digestive distress is absolutely critical.
Anti-diarrhea Medication: To manage symptoms when you need to travel or get through a planned activity. The top pharmacist-recommended brand is Imodium (Loperamide).
Antacids: For relief from indigestion, heartburn, and general upset stomach. Pepto-Bismol is another pharmacist-favorite that can also help with mild diarrhea.
Oral Rehydration Salts: This is arguably the most important item in this section. Dehydration is the primary risk of diarrhea and vomiting. These pre-measured packets mix with safe, bottled water to replenish the essential fluids and electrolytes your body has lost.
Anti-nausea or Motion Sickness Medication: Essential if you’re prone to motion sickness on planes, boats, or winding bus rides.
Allergies, Bites & Skin: Soothing Irritations
New environments mean new pollens, unfamiliar insects, and different plants. Be ready to tackle itches, rashes, and allergic reactions before they become a major annoyance.
Antihistamine (e.g., diphenhydramine): For treating allergic reactions, hives, and severe itching. Note that some antihistamines can cause drowsiness.
Hydrocortisone Cream (1%): A topical steroid cream that provides fast relief from the irritation and itching of rashes and insect bites.
Insect Repellent: In any region with mosquito-borne illnesses like Dengue or Malaria, this is as important as your passport. Choose a repellent with an effective active ingredient like DEET or Picaridin.
Epinephrine Auto-Injector (e.g., EpiPen): This requires a prescription and is absolutely essential for travelers with a history of severe allergic reactions (anaphylaxis).
Ready to Pack Like a Pro?
Your travel first aid kit is a critical piece of your travel puzzle, but it's not the only one. To ensure you don't overlook a single essential item—from documents and finances to clothing and gear—you need a master list. Our comprehensive, free checklist has you covered.
Download Your Free International Travel Checklist Now!
Essential Tools & Personal Medications
The final layer of your kit includes the tools to use your supplies effectively and your own personal health necessities.
Fine-Point Tweezers: For removing splinters, ticks, or other foreign objects from the skin.
Small, Rounded-Tip Scissors: For cutting medical tape, gauze, or moleskin. (Ensure they meet TSA guidelines if packing in a carry-on).
Disposable Non-Latex Gloves: To protect your hands and prevent infection when treating a wound on yourself or someone else.
Digital Thermometer: For accurately checking for fever.
Personal Medications: This is the most critical category. Pack a sufficient supply for your entire trip, plus at least a few extra days' worth in case of delays. Always keep your personal medications in your carry-on luggage in their original, labeled containers.
Pro-Tip: Before you leave, ask your doctor for a letter describing your condition and the medications you take, including their generic names. Keep a digital copy of this and your prescriptions on your phone. This can be invaluable if your medication is lost or you need to see a doctor abroad.

Beyond the Basics: Customizing Your Kit
The ultimate travel first aid kit is not one-size-fits-all. Once you have the core components, elevate your preparedness by customizing it for your specific journey.
By Destination:
Tropical/Developing Countries: Add anti-fungal cream, more insect repellent, and potentially a prescription for a standby antibiotic for severe traveler's diarrhea (consult your doctor).
High-Altitude Destinations: Speak with your doctor about medication to prevent altitude sickness.
By Activity:
Hiking/Trekking: Double down on blister care (moleskin, gel pads), pack an elastic wrap for sprains, and add pain-relieving gel.
Beach Vacation: Add extra aloe vera gel, sting-relief spray, and waterproof bandages.
By Traveler:
With Children: Include children’s formulations and dosages of pain/fever reducers, kid-friendly bandages, and any specific allergy medications they need.
Travel First Aid Kit FAQs
A great kit anticipates problems. Here are answers to common questions that take your preparedness to the next level.
1. What’s the first thing I should do if I get traveler’s diarrhea?
According to the CDC and travel medicine doctors, the first and most important step is oral rehydration. Dehydration is the biggest risk. Start sipping an Oral Rehydration Solution (ORS), sports drinks, or clear broths immediately. For mild to moderate cases that don't have a high fever or blood, an antimotility drug like Loperamide (Imodium) can help manage the symptoms. If symptoms are severe, incapacitating, or include a high fever or blood, it's time to consider a prescribed standby antibiotic and seek medical advice.
2. Should I pack a standby antibiotic in my kit?
This is a question for your doctor or a travel medicine clinic. For travelers heading to high-risk destinations where severe traveler's diarrhea is common, many doctors will provide a prescription for a standby antibiotic like Azithromycin. It’s not for mild cases but can significantly shorten the duration of a severe bout of illness. Discuss your itinerary with your doctor to see if this is right for you.
3. Is it okay to pack medications outside their original bottles to save space?
While it's tempting, it's safest to keep prescription medications in their original, clearly labeled containers. This avoids any confusion or legal issues with customs officials. For over-the-counter pills, you have more flexibility. If you use a travel pill organizer, consider taking a photo of the original packaging so you have the dosage information and ingredients handy.

Pack Confidence for Every Journey
A carefully assembled travel first aid kit does more than just prepare you for minor medical issues; it provides profound peace of mind. It transforms you from a worried passenger into a self-sufficient, empowered traveler, ready to handle the small bumps in the road so you can stay focused on the incredible experiences ahead. By following this checklist, you’re not just packing supplies—you’re packing the confidence to explore the world freely and fully.
Now that your health and safety are covered, you can focus on the other details that make a trip unforgettable. For a complete, deep-dive into every facet of trip planning, from health and safety to budgeting and logistics, our comprehensive Travel Guide is the only resource you'll ever need.
Meta Data Suggestions:
SEO Meta Title (55 characters): The Ultimate Travel First Aid Kit Checklist (2026)
URL Slug: travel-first-aid-kit-checklist
SEO Meta Description (154 characters): Build the perfect travel first aid kit. Our 2026 checklist, with pharmacist-approved tips, covers everything from wound care to stomach issues. Be prepared.
Don't Miss Out! Subscribe for Exclusive Content
SubscribeComments 0
No comments yet
Be the first to share your experience!
Dont Miss Out! Subscribe for Exclusive Content

Ultimate USA Holidays Guide: Top Picks

FTC Affiliate Disclosure Essentials: Stay Compliant as a Travel Creator

Essential Affiliate Tools: From Tracking to Full Optimization

Booking.com Affiliate Program Review: Pros, Cons, and Earnings Potential

Decoding Affiliate Commission Rates: Benchmarks for Travel Creators

Amazon Associates for Travel: Strategies to Maximize Commissions
The Secret to a Solo Travel Blog People Actually Read
TrekGuider @trekguider
You’ve returned from a life-changing solo trip, your camera roll is full, and your head is buzzing with stories. You open up your laptop, ready to launch the blog you've been dreaming of, and... you freeze. Paralyzed by the thought that it's all been done before by influencers with perfect photos and unlimited budgets, you start to question everything. The pressure to present a flawless journey can feel immense, leaving you wondering if your own authentic, sometimes messy, experiences are even worth sharing.
What if the secret isn't to be perfect, but to be real? What if the moments of uncertainty, the budget-stretching decisions, and the quiet evenings spent alone are the very things that will make your readers connect with you on a deeper level? Your unique perspective is your single greatest asset. This is not just another list of generic topics. This is your playbook for turning your unique experiences—the good, the bad, and the beautifully mundane—into a solo travel blog that people will actually want to read.

First, Find Your Lane: Choosing a Powerful Solo Travel Niche
The travel blogging world is crowded, but most of it exists on a single, wide highway. The secret to standing out isn't to shout louder; it's to take a well-marked exit ramp into a specific niche.
"Niching down" isn't about limiting yourself; it's about becoming a big fish in a smaller, more passionate pond. Instead of being a generalist talking to everyone, you become the go-to expert for a specific type of solo traveler. This is how you build a loyal community that hangs on your every word.

For the Thrill-Seeker: The Adventurer
Your content revolves around the adrenaline of the journey, focusing on physically demanding, nature-based experiences.
"Training for the Inca Trail: My 3-Month Fitness Plan for Solo Hikers"
"My First Solo Scuba Dive: What to Expect in the Red Sea"
"Ranking the Best (and Safest) Destinations for Solo Rock Climbing"
"A Complete Gear Guide for a Multi-Day Solo Trek in Patagonia"
For the Knowledge-Seeker: The Culturalist
You travel for the stories, the art, and the history. Your blog is a treasure map to the world's most fascinating cultural experiences.
"How to Conquer the Uffizi Gallery in Florence as a Solo Traveler"
"Beyond the Temples: Finding Authentic Local Art in Kyoto"
"A Guide to Respectfully Visiting Historical Sites When You're Alone"
"The Ultimate 3-Day Historical Walking Tour of Rome for One"
For the Taste-Tester: The Foodie
Your itinerary is built around meals. You guide your readers on a culinary journey, helping them experience a destination one bite at a time.
"The Solo Foodie's Guide to the Best Street Food in Bangkok"
"How to Confidently Book a Table for One at a High-End Restaurant"
"I Took a Cooking Class in Tuscany Alone—Here’s What I Learned"
"Mapping Out the Perfect Solo Food Tour of Mexico City"
For the Quiet Observer: The Introvert
You prove solo travel isn't just for extroverts. Your blog focuses on mindful journeys, quiet retreats, and the profound joy of solitude.
"The Best Quiet Cafes in Paris for Reading and People-Watching"
"Why a Silent Retreat in a Japanese Monastery Was My Best Solo Trip Yet"
"A Guide to the Most Peaceful National Parks for Solo Exploration"
"How to Travel Solo Without Feeling Pressured to Socialize"
For the Savvy Saver: The Budget Backpacker
Your expertise lies in stretching every dollar. You provide actionable advice for long-term, sustainable travel on a shoestring.
"How I Traveled Through Southeast Asia for 3 Months on Under $3,000"
"An Honest Review of Hostel Life: The Good, The Bad, and The Smelly"
"The Ultimate Guide to Finding Cheap (But Amazing) Eats Anywhere"
"Workaway vs. Worldpackers: Which is Better for the Solo Traveler?"
Turn Problems into Your Best Posts
Every aspiring solo traveler has the same core fears: safety, loneliness, money, and logistics. When you address these fears head-on with honesty and practical advice, you don’t just get clicks—you build deep, lasting trust. Turning your fears into content is a powerful way to connect with readers. Of course, before you can write about overcoming these challenges, you need the right strategies to handle them in the first place. For a comprehensive breakdown of safety, budgeting, and planning, is your essential starting point. This is a crucial category of solo travel blog ideas because it provides immense value.

On Safety: Your Digital Bodyguard Content
"My Non-Negotiable Solo Female Safety Checklist for Southeast Asia"
"10 Things I Do to Feel Safer in a Hotel or Airbnb Alone"
"The Peace-of-Mind Apps on My Phone When I'm Traveling Solo"
"How to Handle Unwanted Attention: My Go-To Scripts"
On Loneliness: Writing About the Elephant in the Room
"What I Did When I Felt Crushing Loneliness in a Lisbon Crowd"
"A Guide to Making Friends on the Road (Even If You're an Introvert)"
"It's Okay to Be Sad: How I Deal with Homesickness During Long Trips"
"The Unexpected Joy of Dining Alone: A Mindset Shift"
On Money: From Budgeting Anxiety to Financial Freedom
"How I Saved $5,000 for My First Big Solo Trip (And You Can Too)"
"A Complete Breakdown of My Budget for One Month in Vietnam"
"The Worst Money Mistakes I've Made Traveling (And How to Avoid Them)"
"Credit Cards vs. Debit Cards vs. Cash: My Best Mix for Solo Travel"
On Photography: Nailing the Shot When You're the Whole Crew
"My No-Tripod Tricks for Amazing Solo Travel Photos"
"How to Ask Strangers to Take Your Photo (and Actually Get a Good One)"
"The Ultimate Guide to Using a GorillaPod and Your Phone's Self-Timer"
"The 'Video Screenshot' Hack That Changed My Solo Travel Photography"
Pro-Tip: When writing about challenges, use the "Problem-Solution-Transformation" framework. Start with the relatable problem ("I was terrified of eating alone"), explain your practical solution ("I started by sitting at the bar instead of a table"), and describe the transformation ("Now, it's one of my favorite parts of traveling and a great way to meet bartenders and other travelers").
The Unfiltered Guide: Reinventing the Destination Post
Forget the generic "Top 10 Things to Do" lists. Your readers crave authenticity. The best destination guides are filled with personal stories, honest opinions, and practical details that can't be found in a corporate guidebook. Share the mistakes and the magic.

The "First Impressions" Post
This is your raw, immediate reaction to a new place. It’s relatable and captures the feeling of arrival.
"24 Hours in Tokyo: The Honest Truth About Overwhelm and Wonder"
"My First Thoughts on Arriving in Cairo: A Sensory Overload"
"Landing in Iceland: What I Wish I'd Known Before Leaving the Airport"
The "Biggest Mistake" Post
Vulnerability builds trust. Sharing what went wrong is often more valuable than sharing what went right.
"The Tourist Trap I Fell For in Rome (And How You Can Avoid It)"
"Why I Hated My First Day in Paris (And How I Turned the Trip Around)"
"The Packing Mistake That Almost Ruined My Trip to the Andes"
The "A Day in the Life" Post
This format gives readers a true sense of your travel style. It’s less about a packed itinerary and more about the vibe.
"A Slow Travel Day in a Parisian Cafe: Journaling, Coffee, and Croissants"
"A Budget Backpacker's Day in Chiang Mai: Temples, Street Food, and Night Markets"
"My Digital Nomad Routine: A Work Day from a Beach in Portugal"
The "Hidden Gem" List
Go beyond the obvious landmarks. This is where you showcase your unique discoveries and provide immense value.
"5 Things to Do in Barcelona That Aren't in the Guidebooks"
"Forget the Main Square: Here Are the Best Neighborhoods to Explore in Prague"
"The Best Local Restaurant I Found in Florence (And How I Stumbled Upon It)"
Creative Formats to Keep Readers Hooked
Your blog doesn’t have to be an endless series of destination guides. Mixing up your content formats keeps your audience engaged and allows you to explore different facets of the solo travel experience, making your solo travel blog a dynamic resource.
Personal Essays: "How Solo Travel Forced Me to Face My Social Anxiety."
How-To Guides: "A Beginner's Guide to Using Public Transit in Europe."
Interviews: "I Interviewed a 70-Year-Old Solo Female Traveler: Here's Her Advice."
Gear Reviews: "The Only Backpack You Need for a Month-Long Trip: An In-Depth Review."
"A Week in My Wallet": A detailed, day-by-day spending diary from a specific city.
"What I Read on the Road": A list of books that shaped your journey.
Pro-Tip: Create templates for your most common post types. For example, have a "Day in the Life" template with sections for morning, afternoon, evening, what you ate, how much you spent, and a "vibe check." This streamlines your writing and creates consistency for readers.
Writing Blog Posts That Earn
From day one, you can be strategic about creating content that has the potential to earn an income. This isn't about selling out; it's about sustainably funding your work by providing genuinely valuable recommendations.

For Affiliate Income: The "Problem-Solver" Post
These posts recommend products or services you actually use and love. The key is to frame your recommendation as the hero of a story. Don't just list "My Favorite Power Bank." Write "The $30 Power Bank That Saved My Phone (and My Sanity) on a 14-Hour Train Ride."
"The 10 Travel Essentials I Never Leave Home Without"
"My Complete Solo Travel Tech Kit (Camera, Power Bank, and More)"
"Why Specific Travel Insurance is the Best for Solo Adventurers"
"The Most Comfortable Walking Shoes for Exploring Cities All Day"
For Building Your Email List: The "Lead Magnet" Post
Create content that naturally leads to a freebie (like a PDF checklist) that you offer in exchange for an email address. Your email list is one of your most valuable assets.
"My Ultimate Pre-Travel Planning Checklist (Get Your Free PDF!)"
"The 10 Most Important Phrases to Learn in Italian (Download the Cheatsheet)"
"How to Plan Your First Solo Trip in 10 Easy Steps (Free Workbook)"
For Selling Your Own Products: The "Appetizer" Post
Write a detailed, valuable free guide to a city, then offer a super-detailed, day-by-day downloadable itinerary for a small price for readers who want an expert plan without the work.
"The Perfect 3-Day Solo Solo Itinerary for Lisbon"
"How to Spend a Magical Week Alone in the Scottish Highlands"
"The Ultimate Solo Traveler's Guide to New York City"
Your Questions, Answered: A Solo Travel Blogger's FAQ
What should my first solo travel blog post be about?
Your first post should be your manifesto. Introduce yourself, share the story that sparked your love of solo travel, and most importantly, tell your readers why you're starting this blog and who it is for. Set the tone and make a promise about the authentic value you'll provide.
How do I make my travel blog stand out?
Find your unique niche and be ruthlessly authentic. Don't just share the postcard moments; share the challenges, the lessons learned, and your honest opinions. Your unique voice and real-world perspective are your biggest competitive advantages.
Do I need to be a great writer to start a travel blog?
You need to be a clear communicator. Write like you're talking to a friend. Use simple language, short paragraphs, and a conversational tone. Passion and honesty are far more important than a sophisticated vocabulary. You'll become a better writer simply by writing more.
Can I start a travel blog without traveling full-time?
Absolutely. Some of the most successful travel blogs are run by people with full-time jobs. You can blog about weekend trips, planning for a future big adventure, or exploring your own city like a tourist. Your audience will likely find this more relatable than the life of a full-time nomad.
Your Story Is Waiting
You’re standing at the trailhead of an incredible journey. That blinking cursor on a blank page isn't a barrier; it's a boarding pass. Every post you write, every story you share, and every fear you address is a step toward building something that is uniquely yours. This playbook of solo travel blog ideas is designed to give you the spark, but your experiences will provide the fire. Don't aim for perfection; aim for connection. Your story is waiting to be told.
Read the full guide: Anxious to Adventurous: The Ultimate Guide to Solo Travel Confidence
Don't Miss Out! Subscribe for Exclusive Content
SubscribeComments 0
No comments yet
Be the first to share your experience!
Dont Miss Out! Subscribe for Exclusive Content
FTC Affiliate Disclosure Essentials: Stay Compliant as a Travel Creator
Essential Affiliate Tools: From Tracking to Full Optimization

Avoid These 5 Affiliate Landing Page Mistakes for Better Conversions

Affiliate Keyword Research Mastery for Travel Blogs
Booking.com Affiliate Program Review: Pros, Cons, and Earnings Potential